Yoga isn’t simply stretching. Researchers found it can strengthen the muscles around the knee, improve balance, and change how the joint handles everyday loads.
The first instinct when a knee starts hurting is to protect it. Stop loading it. Sit out the walk, skip the stairs, rest until it gets better. That instinct feels sensible. The research, accumulated across decades of exercise science, largely disagrees.
If you know what it’s like to negotiate with a staircase in the morning, leading with the good leg, testing each step, you already understand the instinct being described here.
Joints don’t heal well in isolation. The knee specifically depends on the muscles surrounding it to absorb load. When those muscles weaken from disuse, the joint itself takes the mechanical stress that those muscles should be sharing. Pain that was originally modest gets worse, not better, because the structural support that the knee needs has quietly eroded.
Yoga targets that support system directly, building the quadriceps, hamstrings, and glutes that take load off the joint. It also improves proprioception, the body’s sense of where the knee is in space, which shapes how the joint tracks during ordinary movement. That combination is what puts yoga in a different category from simple rest or from passive treatments alone.
The evidence for pain and stiffness relief is real and consistent across multiple trials. But the same research yields a finding that rarely gets mentioned: shorter yoga programs don’t always move quality-of-life scores or daily-activity measures by a clinically significant amount, at least not within the first eight to twelve weeks. That distinction matters for setting realistic expectations. More on it below.
Is Yoga Right for Your Knee Pain? Take This 2-Minute Assessment
Work through these 12 questions honestly. Your answers will tell you whether yoga is appropriate for you right now, or whether a conversation with your doctor should come first.
Your Action Plan: The 4-to-8-Week Blueprint
What the Research Shows
Across eight randomized controlled trials involving 756 people with knee osteoarthritis, yoga produced consistent reductions in pain, stiffness, and physical function. That’s the core finding of a 2024 meta-analysis in PLOS ONE, and the result held across different countries, different patient populations, and different yoga styles.
For pain specifically, the standardized mean difference of -0.92 indicates an effect size that researchers classify as large. One honest caveat: the individual trials showed high heterogeneity in the pain data (I²=94%), which means results varied considerably between studies, most likely because of differences in supervision levels and session frequency.
The same meta-analysis found no significant improvement in activities of daily living or quality-of-life scores in the short term. That finding didn’t make it into most yoga-for-knee-pain articles. Naming it plainly matters, because it clarifies something real about the timeline: pain and stiffness respond within weeks, while the larger functional improvements take longer to appear.
Researchers speculate that short intervention windows and low supervised session frequency are part of the explanation.
Two trials tested specific questions that matter practically. A 2022 randomized trial published in Annals of Internal Medicine enrolled 212 adults with symptomatic knee osteoarthritis in a 12-week unsupervised online yoga program, three sessions per week, compared against an education-only control group.
Pain during walking and physical function both improved significantly at 12 weeks. That the program ran entirely online, without a teacher, was the design point. The researchers, led by Kim L. Bennell at the University of Melbourne, wanted to know whether yoga’s benefits held up without in-person supervision. They did.
A 2025 randomized clinical trial published in JAMA Network Open asked the next logical question: is yoga actually as good as the standard exercise recommendation for knee osteoarthritis? Researchers at the University of Tasmania assigned 117 participants to either a yoga program or a conventional strengthening exercise program, both delivered three times per week for 12 weeks.
Yoga was noninferior to strengthening on the primary pain outcome. At 24 weeks, the yoga group showed modestly greater improvements than the strengthening group on WOMAC (Western Ontario and McMaster Universities Osteoarthritis Index) pain, function, and stiffness scores.
That finding was unexpected, because yoga showing a functional edge over dedicated strengthening isn’t what most clinicians would have predicted.
What This Means for You
Setting Your Weekly Practice
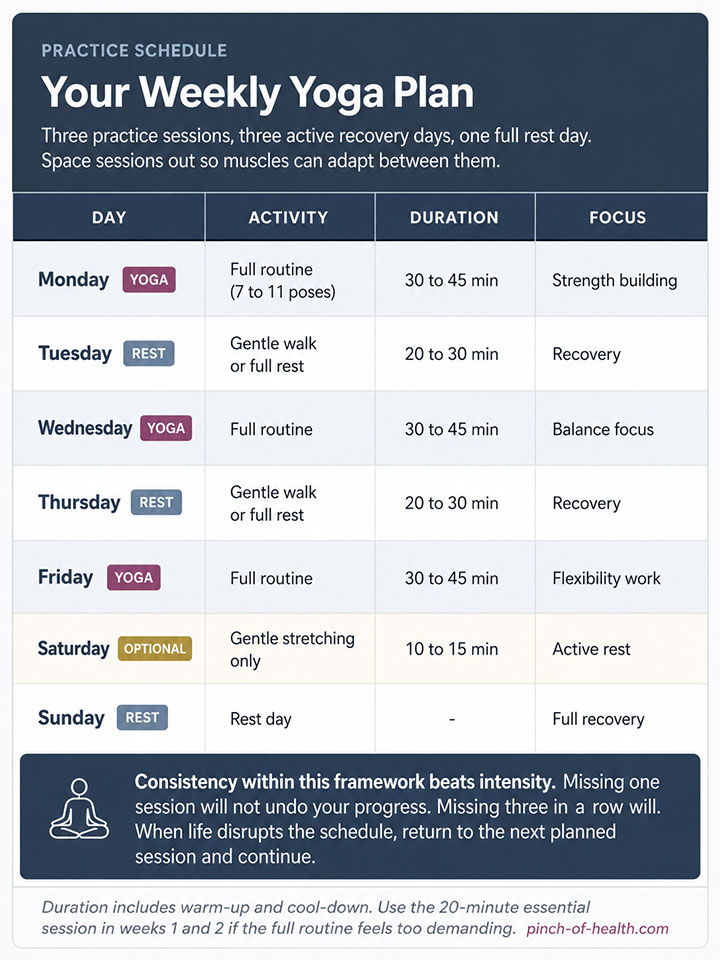
Three 30-minute sessions per week, on non-consecutive days, is the frequency used across the trials that showed the strongest results. Monday, Wednesday, and Friday are a workable structure. The rest days aren’t wasted time: muscles adapt during recovery, not during the session itself.
If 30 minutes is too much at the start, 15 minutes is still useful. The research on compliance is consistent: people who completed 80 percent or more of their planned sessions saw better results than people who pushed harder but attended less. What that means practically is that a short session you did beats a full session you skipped, by more than the math would suggest.
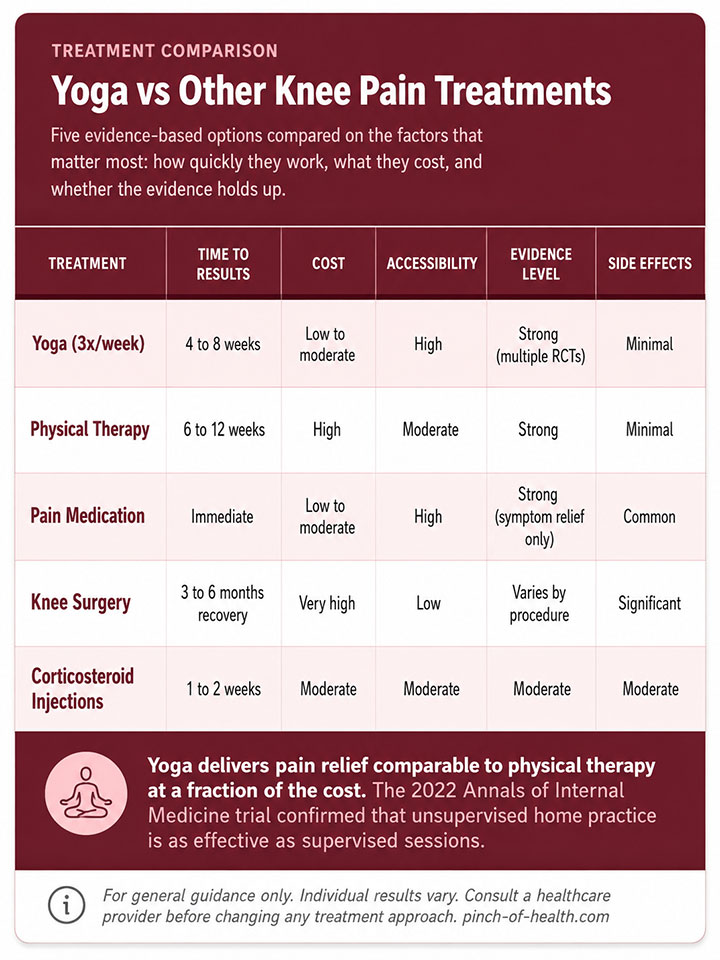
Comparing Your Options
Understanding Pain During Practice
A gentle stretch feels different from joint pain. One engages a muscle and produces warmth, while the other feels wrong in a way that’s hard to misidentify once you know what to look for. The distinction matters because mild muscular discomfort is appropriate and expected, while sharp or pinching joint pain is a signal to stop.
Productive discomfort includes muscles that feel warm and engaged, a mild burning sensation in the working muscles during sustained holds, and a feeling of stretch that eases slightly as you breathe into it.
Pain that is sharp, that produces clicking or grinding, that increases during the hold, or that persists after you release the pose is a signal to back off, modify, or skip that pose entirely.
Your Weekly Schedule
What Yoga Is Actually Doing to Your Knee
The Joint Itself
Three bones meet at the knee: the femur (thighbone), the tibia (shinbone), and the patella (kneecap). Cartilage cushions the points where those bones contact each other. This allows the joint to flex and extend without friction. In osteoarthritis, that cartilage breaks down.
Bone surfaces begin making direct contact. The body responds with inflammation, fluid buildup, and pain that compounds with each weight-bearing step.
Yoga doesn’t regenerate cartilage. Nothing non-surgical does. What yoga can do is substantially reduce the mechanical load placed on what cartilage remains by strengthening the muscles that absorb that load before it reaches the joint.
Building Muscular Support
The quadriceps, hamstrings, glutes, and calves all play a load-sharing role around the knee. When those muscles are well-developed and coordinated, the knee acts as a hinge in a well-supported system. When they’re weak, the joint takes the full mechanical stress of every step, squat, and stair.
Think of it this way: a weak quadriceps forces the knee to work harder on every step downstairs. A well-trained quadriceps absorbs that eccentric load before it reaches the cartilage. The poses in this routine are selected specifically to build those load-sharing muscles in positions that transfer directly to daily movement.
Key Muscle Groups and Their Roles
- Quadriceps (front of thigh): Extend the knee and stabilize the kneecap during movement
- Hamstrings (back of thigh): Bend the knee and counterbalance the quadriceps
- Glutes (buttocks): Control hip movement and reduce valgus stress on the knee
- Calves: Support ankle stability, which affects knee alignment during gait
- Hip adductors and abductors: Keep the knee tracking over the second toe rather than collapsing inward
Flexibility and Proprioception
Tight muscles restrict joint range and create stiffness that makes ordinary movement uncomfortable. Regular stretching lengthens those tissues and allows the knee to move through a fuller, more natural arc. That alone reduces the friction that stiffness creates.
Proprioception is the joint’s positional sense, the feedback system that tells the nervous system where the knee is in space. A pilot RCT published in the Journal of the American Geriatrics Society found that an 8-week chair yoga program improved gait speed in older adults with lower-extremity osteoarthritis.
That improvement reflects better motor coordination rather than pain reduction alone. Yoga’s balance demands train this system directly, in a way that pure strength work often doesn’t.
How Yoga Affects Inflammation
Chronic inflammation is a feature of knee osteoarthritis. The immune system maintains a low-grade activated state. The result is swelling and discomfort that isn’t always tied to a specific mechanical trigger.
The 2024 PLOS ONE meta-analysis suggests yoga may reduce inflammatory markers including C-reactive protein and interleukin-6, based on evidence from the individual trials it reviewed.
What’s less clear is which component of yoga is responsible for that effect. The physical movement, the controlled breathing, the sustained mental focus, and the stress-reduction effects are all operating simultaneously during a session.
Researchers still don’t agree on which of those mechanisms accounts for the largest share of the inflammatory benefit, or whether they’re separable at all. The effect itself is supported. The mechanism is still being worked out.
The 11 Yoga Poses for Knee Support
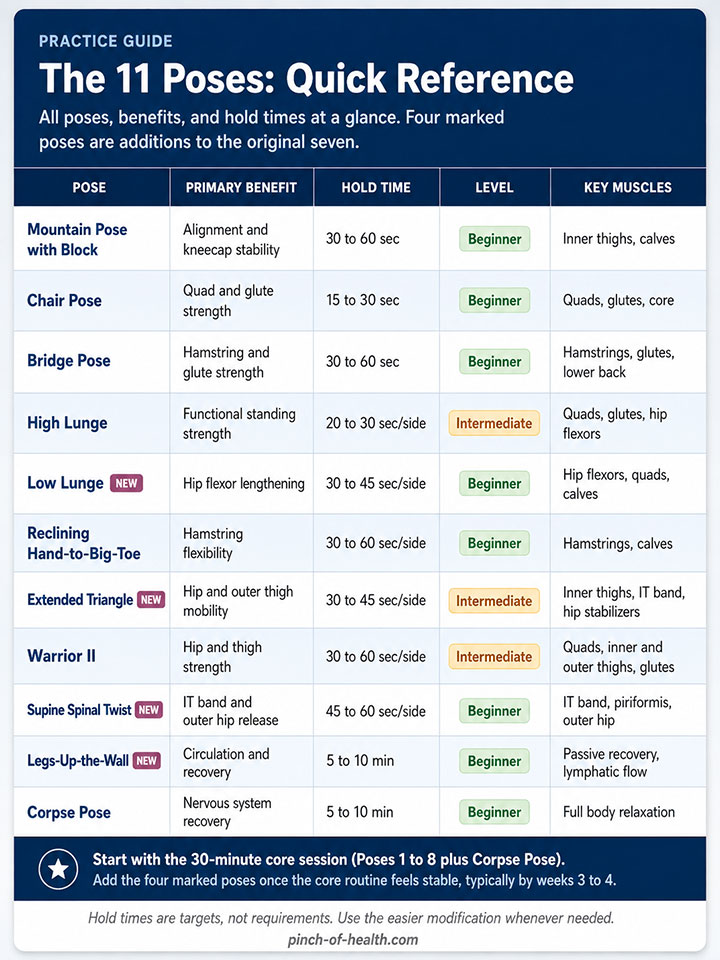
Most yoga-for-knee-pain routines focus on the front of the thigh and call it done. These eleven poses work the full muscular system that the joint depends on: the quadriceps, yes, but also the hamstrings and glutes that counterbalance them, the hip flexors that control pelvic alignment, the IT band and outer hip structures that keep the knee from collapsing inward, and the recovery mechanisms that let the joint clear accumulated swelling between sessions. The Quick Reference Guide below shows the complete set.
Pose 1: Mountain Pose (Tadasana) with Block
The block between the thighs turns a static standing posture into an active exercise. The gentle squeeze engages the inner thigh muscles (hip adductors) that keep the kneecap tracking correctly during movement.
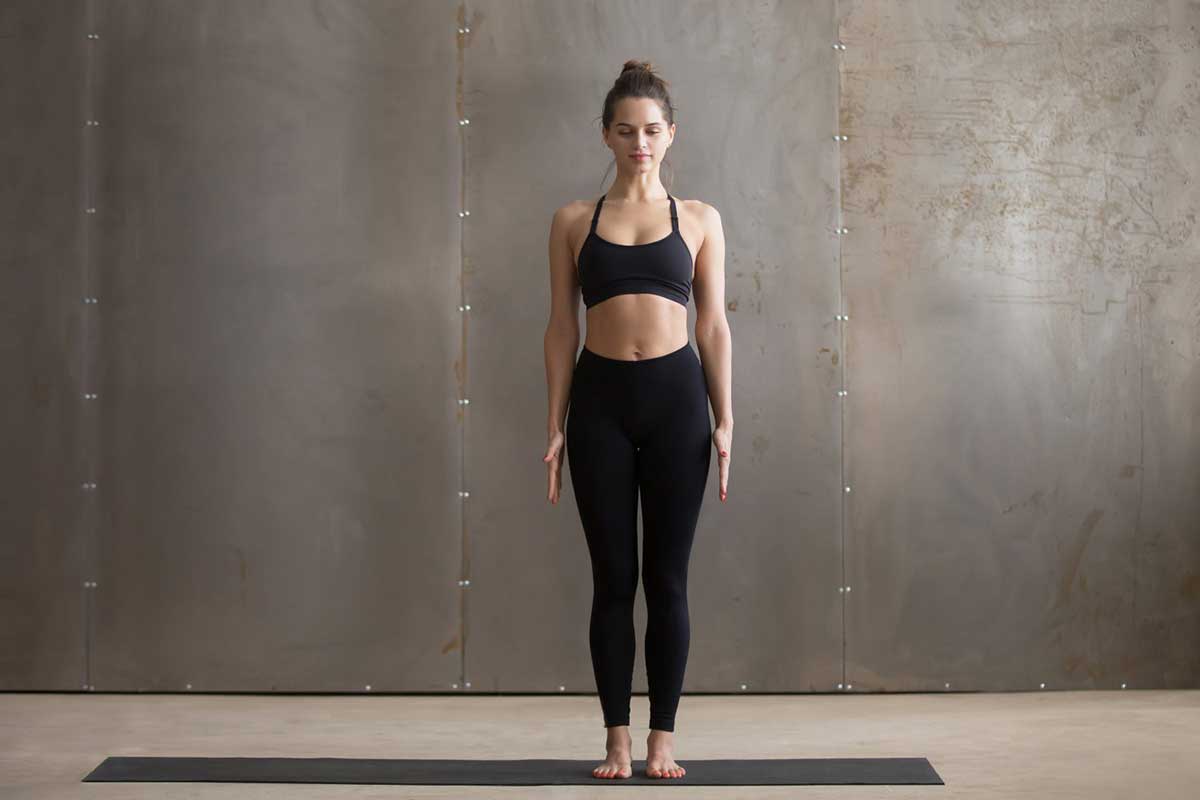
How to do it:
- Stand with feet hip-width apart and a yoga block placed between your thighs.
- Squeeze the block gently, just enough to feel the inner thighs activate.
- Press both feet firmly and evenly into the floor.
- Lengthen through the top of your head, relax your shoulders, and soften your knees slightly.
- Hold for 30 to 60 seconds, then rest for 30 seconds and repeat.
Keep the knees softly bent throughout rather than locking them back. Hyperextension shifts load directly onto the joint rather than into the muscles surrounding it. Without the block, focus on even weight distribution across both feet and let that be the whole pose. Once that’s stable, closing your eyes adds a genuine balance challenge that reveals how much the visual field was compensating for.
Pose 2: Chair Pose (Utkatasana)
Chair Pose is the quadriceps builder in this routine. The quadriceps are the single most important muscle group for knee stability: they control the eccentric load on stairs and slopes, and their weakness is one of the strongest predictors of osteoarthritis progression.
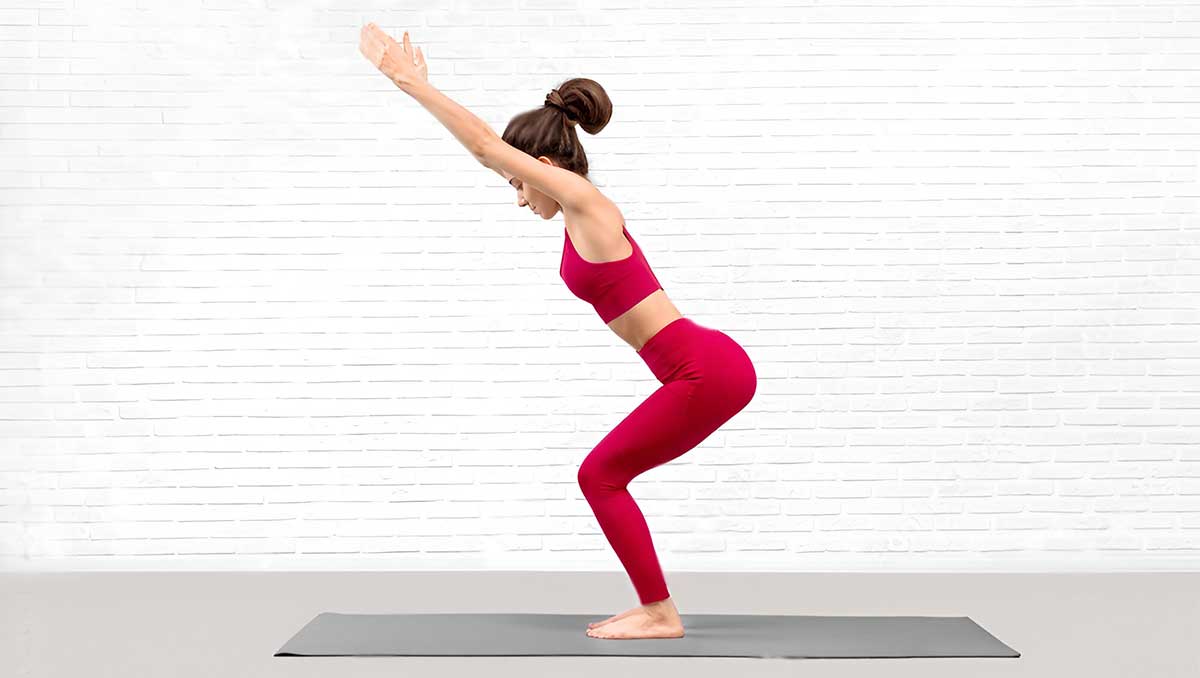
How to do it:
- Stand with feet hip-width apart.
- Bend your knees and lower your hips as if sitting back onto a chair behind you.
- Keep your weight in your heels; your toes should remain liftable throughout.
- Raise your arms to shoulder height or overhead, chest lifted.
- Hold for 15 to 30 seconds, then stand and rest. Build to three rounds.
Look down during the hold: toes should be visible past the knees. If the knees have traveled forward past the toes, sit back further or reduce the depth. Depth matters far less than correct knee position.
Rounding the lower back is the most common error, and it matters because it shifts the work out of the quadriceps and into the lumbar spine, which is the opposite of what this pose is trying to accomplish.
Keep the chest lifted and the torso relatively upright. If holding for 15 seconds is too much, hold for 10, with a wall directly behind you for confidence. Once holding for 30 seconds feels manageable, a gentle pulse, lowering an inch and returning 8 to 10 times, increases the demand without increasing depth.
Pose 3: Bridge Pose (Setu Bandhasana)
Bridge is the deliberate counterpart to Chair Pose. Chair loads the front of the thigh heavily, and Bridge brings the posterior chain, the hamstrings and glutes, back into balance. That balance matters more than most people realize: undertrained hamstrings relative to the quads are one of the primary reasons kneecap tracking goes wrong.
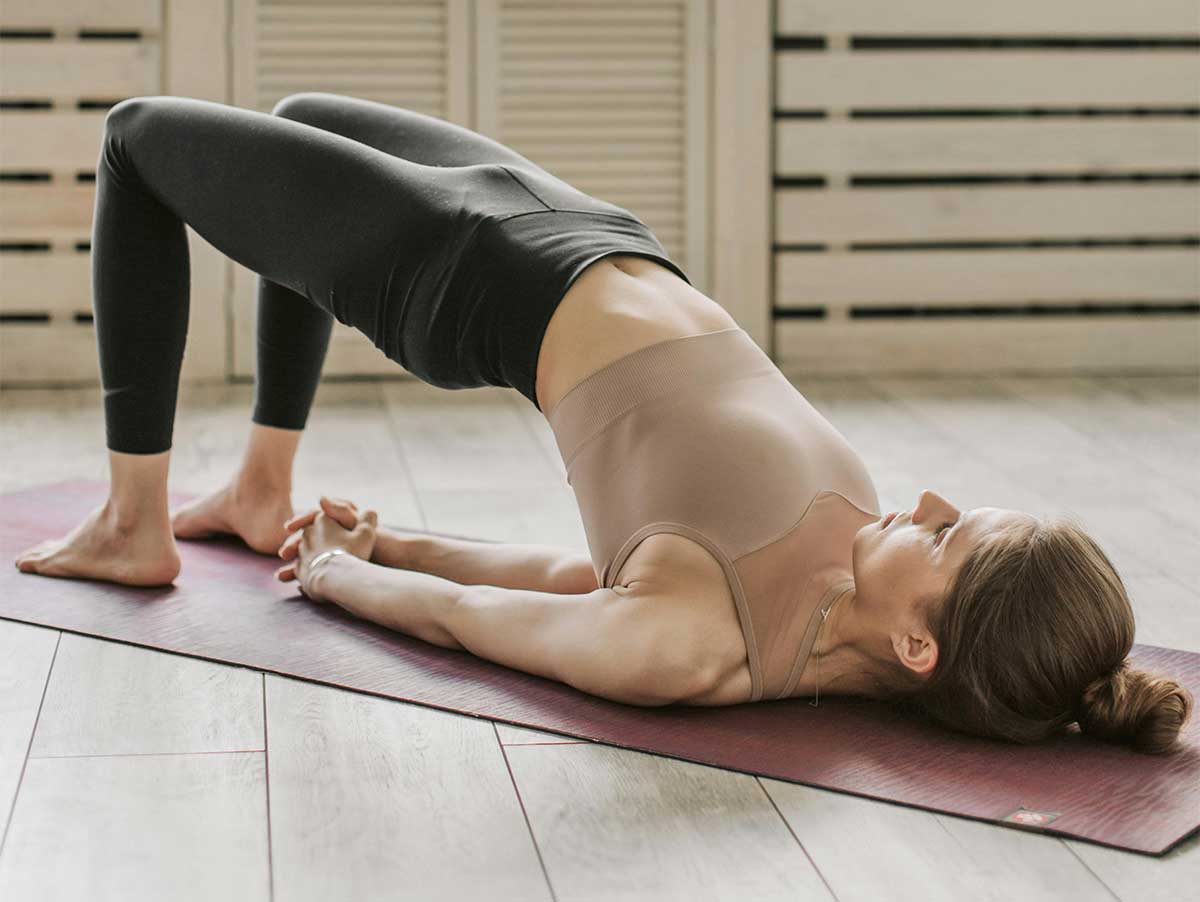
How to do it:
- Lie on your back with knees bent and feet flat on the floor, hip-width apart.
- Rest your arms alongside your body, palms down.
- Press through your feet to lift your hips off the floor.
- Keep your thighs parallel throughout; don’t let the knees drift inward or outward.
- Hold for 30 to 60 seconds, then lower slowly. Repeat two to three times.
You should feel this in the back of your thighs and in your glutes. If you feel it mainly in your lower back, your hips are too high. Lower an inch and recheck.
Place a block between the thighs if the knees tend to splay outward. The block provides instant alignment feedback, and the effort of keeping it there activates the same medial chain the pose is targeting.
Once holding for 45 seconds feels solid, lifting one leg straight toward the ceiling while holding the bridge adds a meaningful challenge without requiring deeper hip flexion.
Pose 4: High Lunge (Crescent Lunge)
High Lunge trains the quadriceps and glutes in a split-stance position that directly mirrors walking and stair-climbing. It’s the most functionally specific strength pose in the routine.
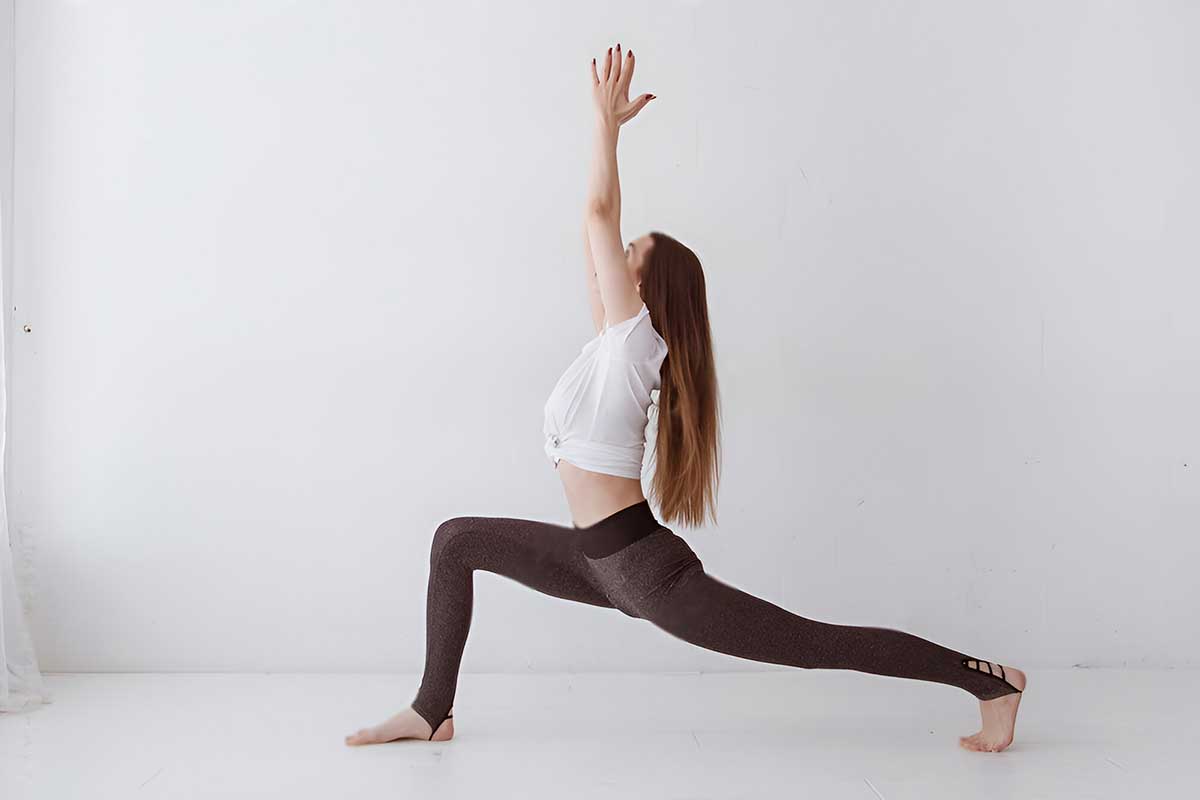
How to do it:
- Step one foot back about three to four feet, back heel lifted.
- Bend the front knee to approximately 90 degrees, directly over the ankle.
- Keep the back leg long, with a slight bend to avoid locking the back knee.
- Raise your arms overhead or keep hands on your hips for balance.
- Hold for 20 to 30 seconds, then switch sides.
The front knee must stack directly over the ankle, not past it. If the knee has drifted forward beyond the toes, step the front foot further forward and reset from there. A narrower stance reduces the demand if full range feels unstable.
Once holding for 30 seconds per side becomes comfortable, a slow pulse, bending and straightening the front knee an inch or two, adds load without changing the alignment demand.
Pose 5: Low Lunge (Anjaneyasana)
Where High Lunge strengthens, Low Lunge lengthens. Specifically, it targets the hip flexors, the muscles at the front of the hip that shorten from prolonged sitting. Tight hip flexors pull the pelvis forward and increase the load on the knee with every step. Releasing them is one of the most overlooked pieces of knee pain management.
How to do it:
- From standing, step one foot back and lower the back knee to the mat, placing a folded blanket under it for cushioning.
- Align the front knee directly over the ankle.
- Gently press the hips forward and down until you feel a stretch in the front of the back hip.
- Rest your hands on the front thigh or extend them overhead.
- Hold for 30 to 45 seconds per side, breathing steadily throughout.
The back knee needs a padded surface. On a bare mat, even five seconds of contact pressure becomes distracting, and a sensitive kneecap will end the pose before the hip flexor gets any useful work.
A doubled blanket or knee pad is the difference between this pose being accessible and it being a nonstarter. Once the hip flexor stretch becomes familiar and comfortable, extending both arms overhead and lengthening through the torso deepens the stretch without changing the knee position.
Pose 6: Reclining Hand-to-Big-Toe Pose (Supta Padangusthasana)
Tight hamstrings pull on the back of the knee and limit how fully the joint can extend. This floor-based stretch releases that tension without any weight on the joint, making it one of the safest hamstring stretches available for people with knee pain.
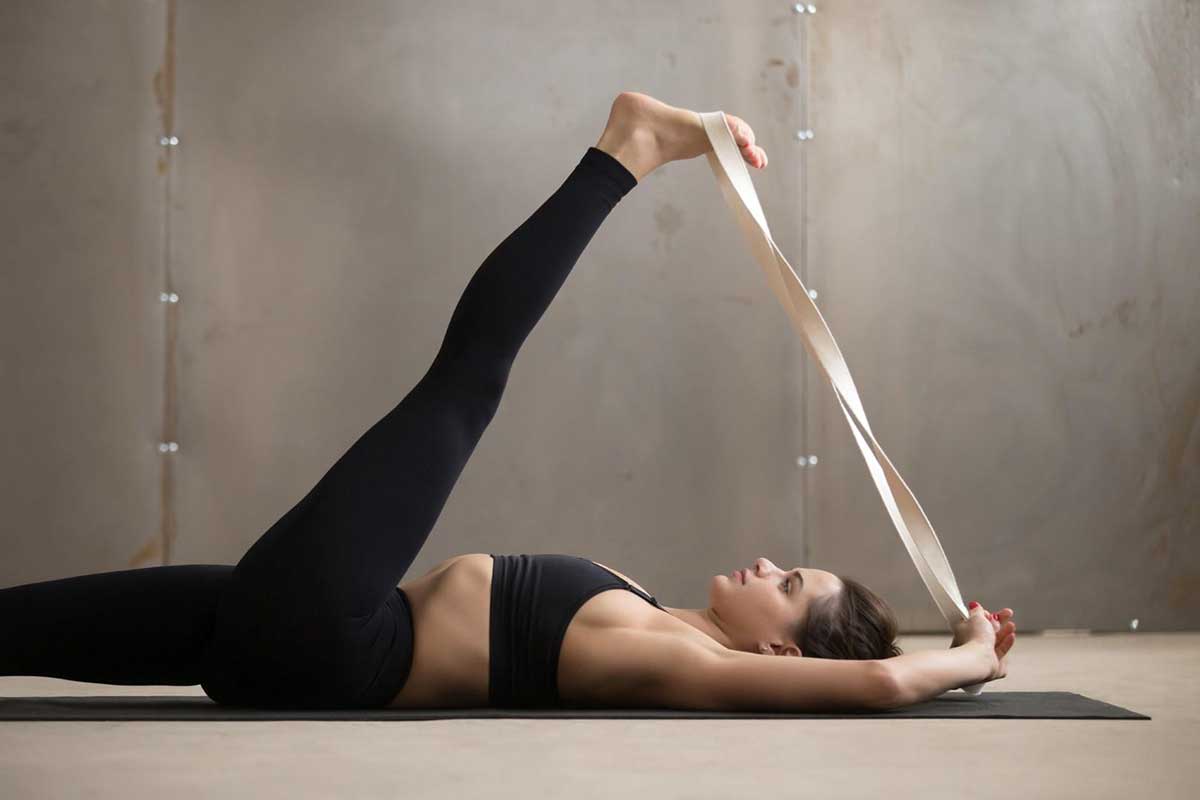
How to do it:
- Lie on your back and loop a strap or towel around one foot.
- Slowly extend that leg toward the ceiling, keeping a slight bend at the knee.
- Keep the opposite leg either bent with the foot flat or extended along the floor.
- Relax the shoulders; let the strap carry the weight of the leg.
- Hold for 30 to 60 seconds, then switch sides.
Use a longer strap so the shoulders stay relaxed throughout. The sensation belongs in the back of the thigh, not behind the knee. If it’s landing behind the knee rather than in the hamstring, bend the lifted leg slightly more. The knee is not the target here.
Pose 7: Extended Triangle Pose (Utthita Trikonasana)
Triangle Pose targets the inner and outer thigh muscles, the IT band, and the hip stabilizers that keep the knee from collapsing inward during movement. It’s one of the most effective poses for improving the lateral support system around the knee, which is often the missing piece when knee pain has a tracking or alignment component.
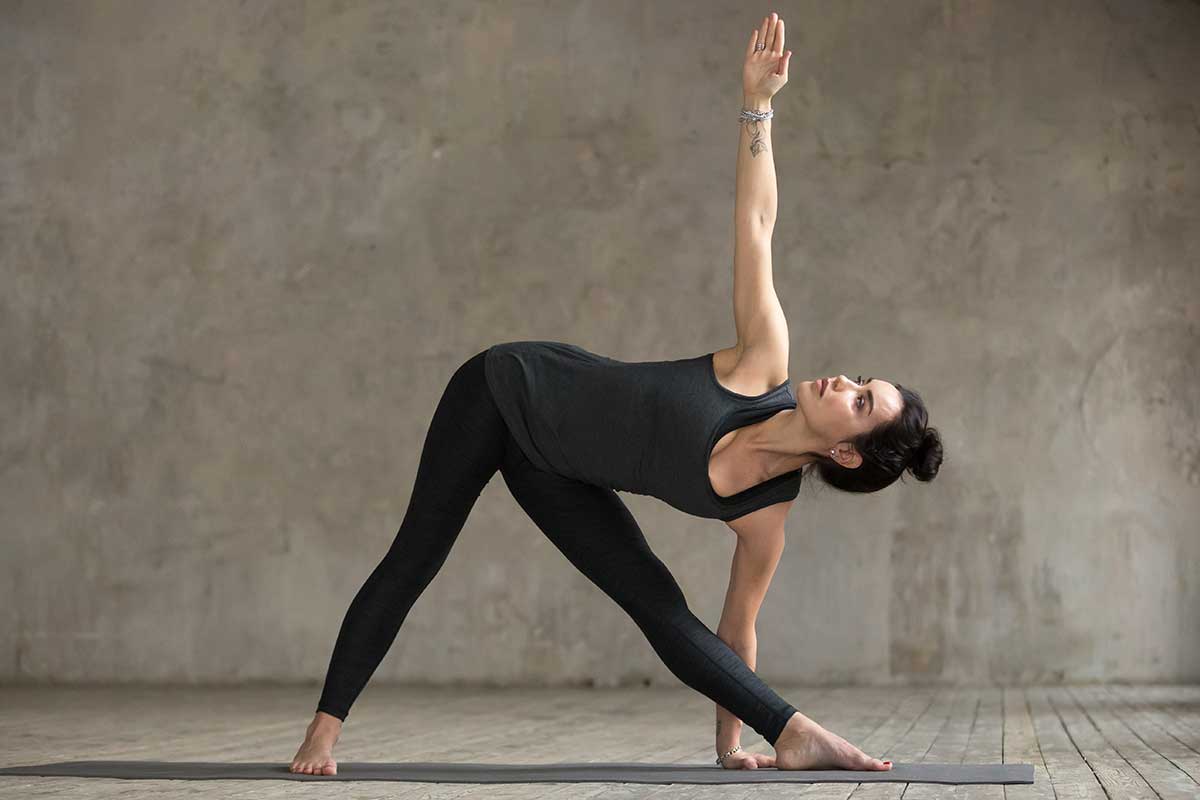
How to do it:
- Stand with feet wide, about three to four feet apart.
- Turn your right foot out 90 degrees and your left foot in slightly.
- Extend your arms out to the sides at shoulder height.
- Hinge sideways at the right hip, reaching the right hand toward the shin or a block, left arm extending toward the ceiling.
- Keep both legs straight, with a very slight softness in the right knee.
- Hold for 30 to 45 seconds per side.
Locking the front knee into hyperextension is the most common error. Keep that joint soft. A block under the bottom hand makes it considerably easier to maintain length through the torso without the pelvis collapsing.
At full height, the block brings the floor up to meet you, which changes the difficulty level enough that beginners can access the pose’s actual benefit rather than just balancing against the limitations of their reach.
Pose 8: Warrior II (Virabhadrasana II)
Warrior II is one of the more physically demanding poses in this routine, and also one of the most complete: it builds inner and outer thigh strength simultaneously and challenges the stabilizing muscles across both hips.
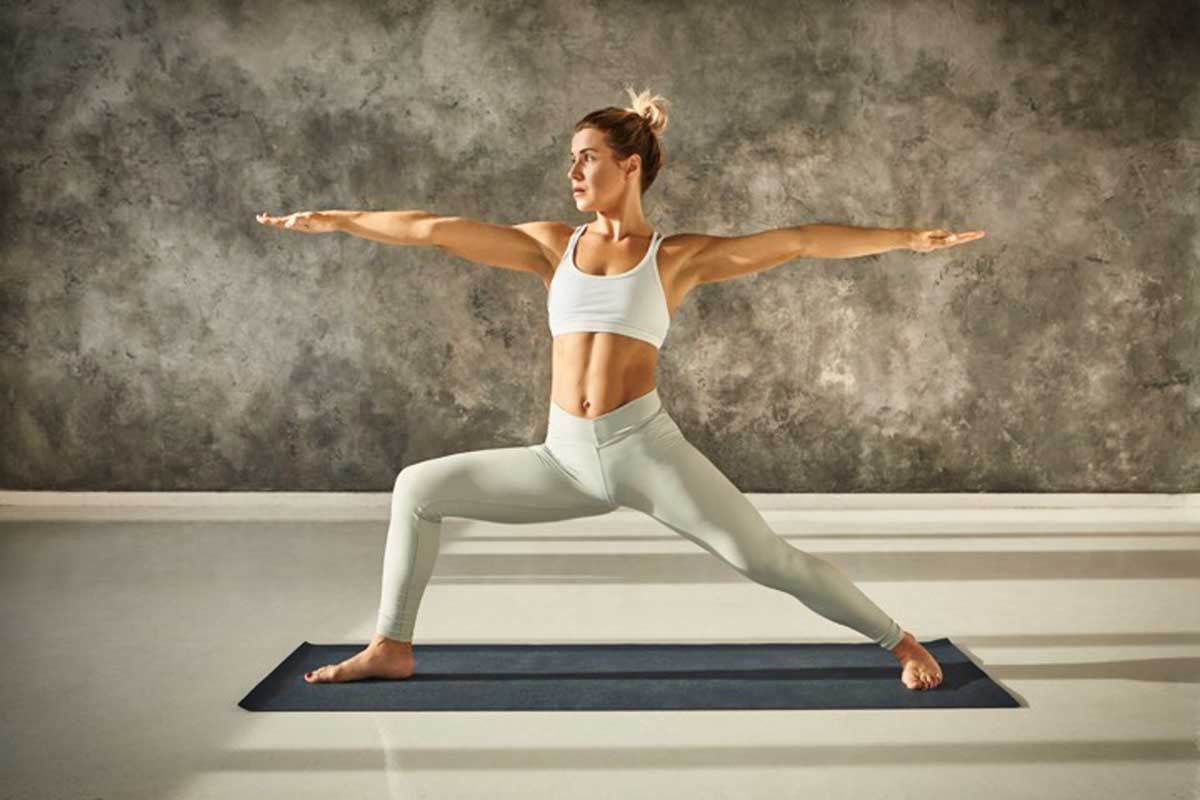
How to do it:
- Stand with feet wide apart, about three to four feet.
- Turn the right foot out 90 degrees and the left foot in slightly.
- Bend the right knee over the right ankle, aiming for approximately 90 degrees.
- Extend both arms out to the sides at shoulder height, parallel to the floor.
- Gaze over the right hand.
- Hold for 30 to 60 seconds per side.
The front knee collapsing inward is the critical fault to watch for. Actively press that knee outward so it tracks toward the second and third toes. This matters because medial knee stress, the kind that accumulates when the knee falls inward, is exactly the loading pattern that accelerates osteoarthritis.
A narrower stance and shallower bend are the right starting modifications for anyone whose knee tends to collapse inward. Once the alignment holds consistently at 30 seconds, a slow straighten-and-bend cycle, keeping form throughout, extends the strength demand without requiring a deeper squat.
Pose 9: Supine Spinal Twist (Supta Matsyendrasana)
The IT band runs from the hip down the outer thigh and attaches near the top of the shin. When it’s tight, it places lateral stress on the knee joint with every step. This gentle supine twist releases tension in the IT band and the outer hip without loading the joint at all.
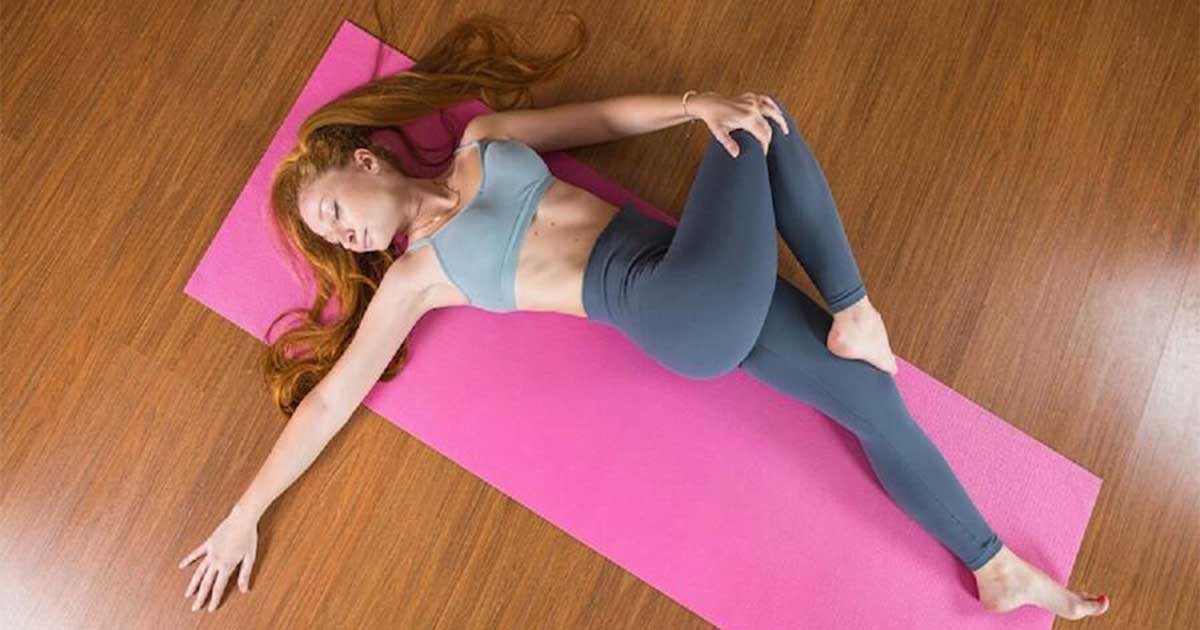
How to do it:
- Lie on your back with knees bent.
- Hug both knees to your chest briefly, then let them fall to one side.
- Extend both arms out to the sides in a T shape, palms down.
- Turn your head gently toward the ceiling or opposite direction to the knees.
- Hold for 45 to 60 seconds per side, breathing slowly.
The sensation belongs in the outer hip and along the side of the thigh, not in the knee itself. If you feel it specifically in the knee, place a folded blanket between the thighs to reduce the rotation angle. No extra props needed for this one otherwise.
Pose 10: Legs-Up-the-Wall (Viparita Karani)
This is the most underestimated pose in the routine. It requires nothing. There is no muscular effort, no coordination, no balance challenge.
What it does is reverse the hydrostatic pressure that builds in the lower legs from sustained upright activity. This supports lymphatic return and reduces the joint swelling that accumulates over an active day.
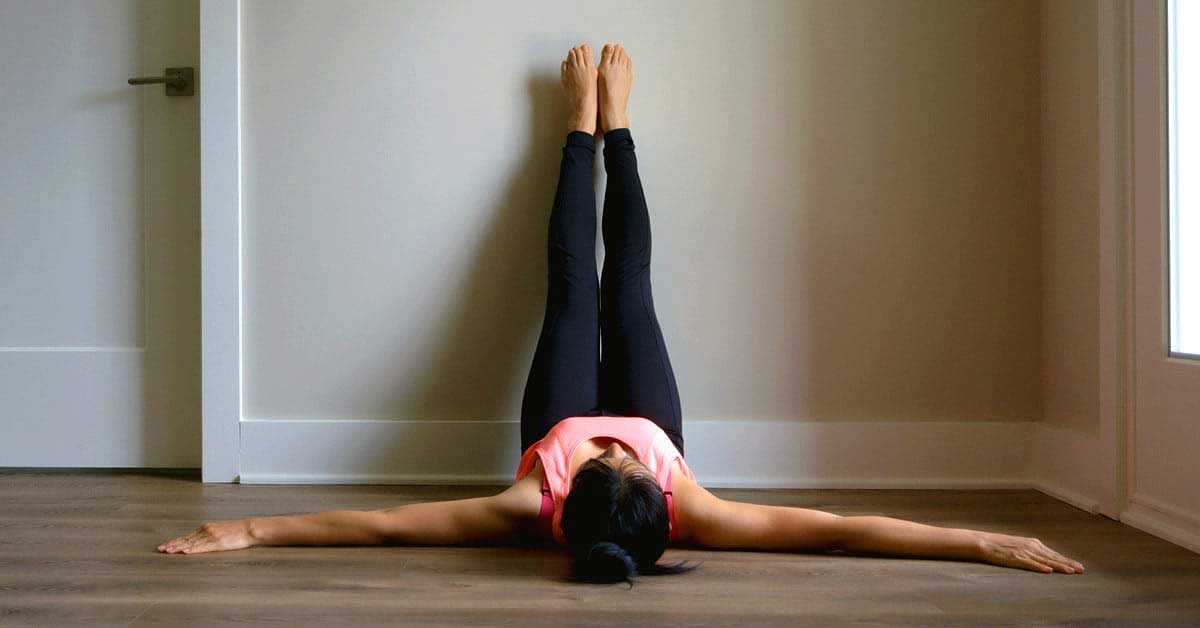
How to do it:
- Sit sideways close to a wall.
- Swing your legs up as you lower your torso to the floor, so your legs rest straight up the wall.
- Adjust your distance from the wall until the position feels comfortable, with the back of the thighs resting against the wall or close to it.
- Rest your arms by your sides, palms up, and close your eyes.
- Stay for 5 to 10 minutes.
If your hamstrings are tight, move away from the wall slightly and let the legs angle away from vertical. The legs don’t need to be perfectly straight. For a deeper release, place a folded blanket under the hips to ease lower-back pressure.
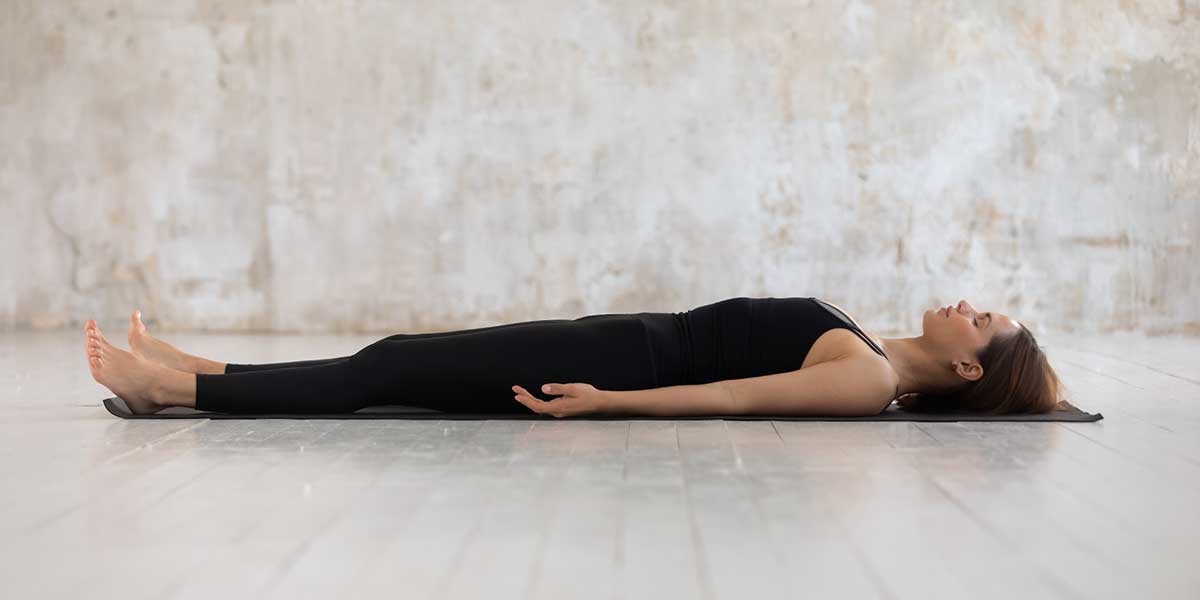
Pose 11: Corpse Pose (Savasana)
Rest is a part of the stimulus, not a departure from it. The nervous system consolidates the proprioceptive feedback and muscular effort of the session during the minutes of stillness at the end. Skipping Corpse Pose is the yoga equivalent of stopping a strength workout before the cool-down.
How to do it:
- Lie on your back with legs relaxed and feet falling naturally outward.
- Rest arms beside the body, palms facing up.
- Close your eyes and breathe naturally.
- Place a rolled blanket under the knees if lower-back pressure is uncomfortable.
- Stay for 5 to 10 minutes.
Your Complete Practice Sequence
30-Minute Core Session (Poses 1 to 8, Corpse)
Warm-up (5 minutes): Seated deep breathing for 10 breaths, followed by slow knee bends and ankle circles lying on your back (10 repetitions each), then 10 Cat-Cow stretches standing with hands on thighs.
Main practice (20 minutes): Mountain Pose with Block, two holds of 45 seconds. Chair Pose, three rounds of 20 seconds with 30-second rests. Bridge Pose, three rounds of 30 seconds. High Lunge, 30 seconds each side, repeated once. Low Lunge, 35 seconds each side. Reclining Hand-to-Big-Toe, 45 seconds each side. Warrior II, 40 seconds each side.
Cool-down (5 minutes): Knee-to-chest stretch, 30 seconds each side. Corpse Pose, 3 minutes.
45-Minute Full Session (All 11 Poses)
Add Extended Triangle (40 seconds each side), Supine Spinal Twist (50 seconds each side), and Legs-Up-the-Wall (7 minutes) between the Reclining Hand-to-Big-Toe and Warrior II sections. Extend Corpse Pose to 8 minutes.
20-Minute Essential Session
Chair Pose, Bridge Pose, Low Lunge, Reclining Hand-to-Big-Toe, Corpse Pose. Useful when time is tight or during the first two weeks when the full routine may be too much.
Practice Tips
Before you start: Clear a space large enough to lie down fully. Have a block, strap, and blanket within reach. Set a timer so you’re not watching the clock. Phone off or on silent.
During practice: If you’re holding your breath, you’re working too hard. Smooth breathing is the readiness signal. Move slowly between poses. Rushing is when form breaks down. Take extra rest whenever it’s needed.
After practice: Roll to your side before pushing to sitting. Don’t sit up directly from lying flat. Drink water. Notice how the knees feel compared to when you started.
Smart Modifications and Which Poses to Avoid
What You Actually Need (and What You Don’t)
A mat is essential. Two blocks, a strap, and a blanket cover the full routine. A bolster and a knee pad are optional but useful for sensitive joints.
How to use your props: Blankets fold under the kneecap in Low Lunge, roll under the knees in Corpse Pose, or stack under the hips to improve alignment in seated poses. Blocks bring the floor closer in standing poses and provide the kneecap-alignment cue in Mountain and Bridge. Straps extend your reach in Reclining Hand-to-Big-Toe without forcing the knee into hyperextension.
Poses to Avoid or Heavily Modify
Lotus Pose (Padmasana): Requires extreme knee flexion combined with external rotation. This can strain or tear knee ligaments, particularly the medial collateral ligament. Replace with a seated cross-legged position with the hips elevated on blankets to reduce the demand on the joint.
Hero’s Pose (Virasana): Compresses the knee joint under direct body weight. In people with existing cartilage damage, this can accelerate wear. Replace with sitting on a tall block or several stacked blankets between the feet to lift the hips well above the level of the knees.
Deep Squat (Malasana): Extreme knee flexion under load. Replace with Chair Pose held at a shallower angle, or a supported squat with the hips resting on a block.
Camel Pose (Ustrasana): The kneeling backbend presses the kneecap directly against the mat while the knee is loaded in a vulnerable position. Replace with Bridge Pose, which provides similar spinal extension benefits without that risk.
Choosing Your Yoga Style
For chronic knee pain, start with Hatha, Restorative, Iyengar, or chair-adapted yoga. These styles hold poses long enough for the muscular engagement to be felt and corrected. Hatha gives clear instruction and time to set alignment.
Restorative eliminates load almost entirely and uses props to support the body fully. Iyengar places more emphasis on alignment precision than any other style and uses props liberally.
Avoid Vinyasa, Power yoga, Hot yoga, and Ashtanga until you have a solid alignment foundation. Flow-based practices move too quickly for a beginner with knee pain to maintain safe mechanics. Hot yoga masks pain signals, which removes the feedback the nervous system needs to protect the joint.
Age-Based Modifications
If you are in the 30-to-50 range, you can generally progress faster and hold poses for longer sooner. For ages 50 to 70, use more props in the early weeks and give balance more attention than depth.
Breathing for Pain Management
When pain or difficulty increases during a hold, the reflex is to hold the breath. Doing so increases muscle tension and often makes discomfort worse. Two approaches help.
Extended exhale breathing: Inhale for a count of four, exhale for a count of six to eight. The extended exhale activates the parasympathetic nervous system, which reduces pain sensitivity and muscle tension. Use this when you feel resistance building in a pose.
Box breathing: Inhale for four counts, hold for four, exhale for four, hold for four. This works well before a session to settle the nervous system, and between poses if you need to reset.
If your breathing becomes strained or jagged, that’s the signal that the pose is too intense in its current form. Ease up before trying again, not after pushing through.
Nutrition Support for Joint Health
Dietary choices don’t replace exercise, but they can reduce the baseline inflammation that makes knee pain worse. The best-supported approach is a pattern that includes more fatty fish (salmon, sardines, mackerel), leafy greens, berries, turmeric with black pepper, nuts, and olive oil, while reducing processed foods, refined sugars, fried foods, and excess alcohol. None of those changes requires a specific protocol, just a direction.
After practice, a smoothie combining frozen berries, spinach, ground flaxseed, plain Greek yogurt, turmeric powder, a pinch of black pepper, and unsweetened almond milk takes under five minutes and covers several anti-inflammatory bases at once. The black pepper matters: curcumin, the active compound in turmeric, is absorbed far more effectively in its presence.
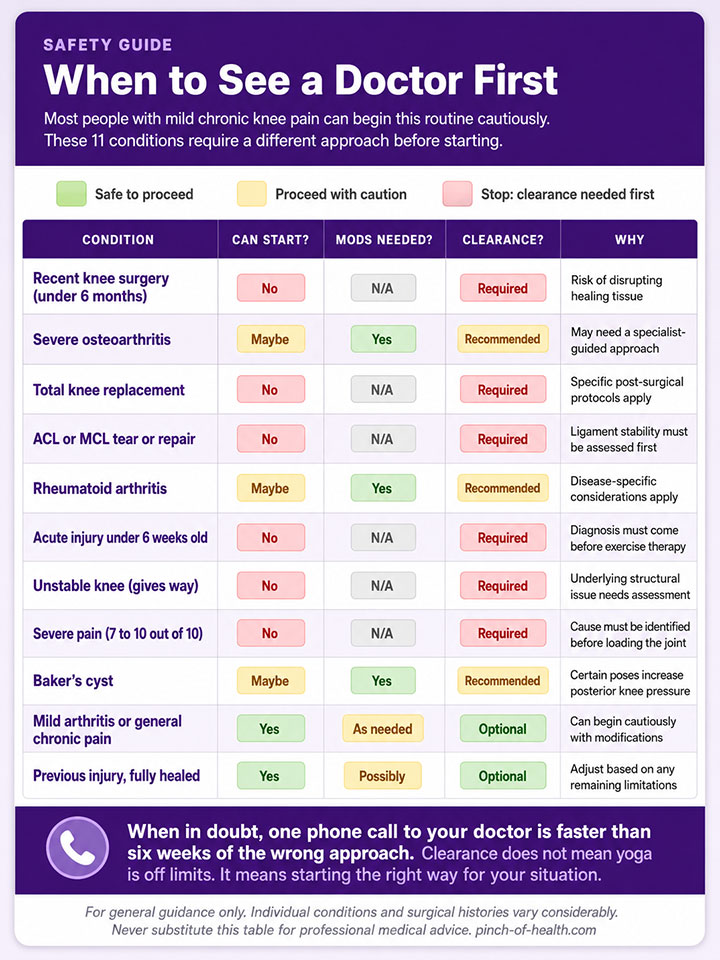
When to See a Doctor First
Stop and see a doctor before continuing if: The knee swells and doesn’t go down. It locks, catches, or gives way. You’re unable to bear weight on it. You develop a fever alongside joint pain. Night pain is waking you up. Any of these signs indicates something that yoga should not be managing on its own.
Troubleshooting
“I feel worse after yoga”
The most common cause is doing too much too soon. Cut each session length in half, reduce the number of poses to five or six, and take an extra rest day between sessions. If form is uncertain, one session with a teacher for alignment feedback is worth more than a month of well-intentioned practice with mechanics that create strain rather than relieve it.
Insufficient props are the other frequent culprit. If you’re holding poses without the support they need, depth and duration become a source of stress rather than stimulus. Add blocks, use blankets, and prioritize comfort over the appearance of doing the pose correctly.
“I can’t hold the poses that long”
This is expected in weeks one and two. Start at 10 to 15 seconds and add five seconds every few sessions. Where the recommended hold is 60 seconds, three rounds of 20 seconds with 10-second rests delivers most of the same stimulus. The total time under load matters more than continuous duration.
“I’m not seeing results after 8 weeks”
Check the honest list first: three sessions per week without skipping, poses held for the recommended time, full-body form rather than partial range of motion, rest days honored. If all of those are genuinely in place, extend to twelve weeks before reassessing.
Some people respond slower than the trial averages. If twelve weeks of honest practice produces no change, that’s when a physical therapist’s assessment becomes valuable, because the issue may be structural in a way yoga alone can’t address.
“My other joints hurt too”
Knee pain rarely exists in isolation. Hip dysfunction, ankle instability, and lumbar issues all feed into how the knee loads during movement. The poses in this routine support the whole lower body rather than targeting the knee in isolation, so some of those adjacent issues may improve alongside the knee. If they don’t, a full physical therapy assessment is more useful than modifying the yoga protocol further on your own.
Month-by-Month Progression
Month one is about learning the poses and building the habit. Expect the positions to feel awkward. Expect some sessions to feel like more effort than relief. The muscles need several weeks of consistent loading before the structural adaptation begins to show up in how the knee performs. Nothing about month one tells you whether the practice is working. That question belongs to month two.
Month two is when most people notice the first real change. Morning stiffness tends to ease first, often in weeks five or six. Pain during walking and stair-climbing follows. Poses that felt unstable or uncomfortable in month one start to feel familiar. The nervous system is beginning to incorporate the proprioceptive training.
Month three and beyond shifts the priority from improvement to maintenance. The gains from months one and two hold as long as the practice continues. Most people find that reducing to two sessions per week preserves the majority of the benefit, with a return to three sessions if symptoms return.
At this point, the program has either become a habit, or it hasn’t. If it has, the work going forward is keeping it interesting rather than keeping it going.
Conclusion
What the evidence for yoga actually says is narrower than most articles describe and more durable than most people expect. Pain and stiffness respond within weeks. Daily function and quality-of-life measures take longer, which is exactly what the research shows and what rarely gets said plainly. A 2025 trial found yoga held its own against conventional strengthening exercise over 24 weeks, which suggests the approach doesn’t fade. It stays.
Your knees have been doing the work of a lifetime. The structural situation most people are managing by the time they look for help like this didn’t develop quickly, and it won’t reverse quickly. Three sessions a week, eleven poses, realistic expectations. That’s what the evidence actually supports.
FAQs
Can I do yoga if I’m overweight?
Yes. The poses in this routine are accessible for a wide range of body types. Use blocks to bring the floor closer in standing poses and a chair for balance support where needed. Building the leg strength through yoga also supports weight management over time, which further reduces the mechanical load on the knee.
What if I can’t get down on the floor?
Chair yoga adapts all of these poses. Chair Pose and Mountain Pose work standing with a chair nearby for support. Warrior II can be performed with the back foot against a wall. A sturdy chair makes Bridge Pose accessible from the floor without a full transition.
Getting down and up safely uses the same controlled movement pattern as Chair Pose: scoot to the edge of the seat, feet hip-width and flat, lean forward slightly, and push through the legs rather than the arms.
Should I practice on days when my knee really hurts?
For mild pain (1 to 3 out of 10), gentle practice is generally appropriate and often helps. At moderate levels (4 to 6 out of 10), use only the gentlest poses and shorten the session. Severe pain (7 to 10 out of 10) calls for rest, ice if the joint is swollen, and a doctor’s opinion if it persists beyond 48 hours.
What is the number-one mistake that makes bad knees worse?
Reducing load-bearing activity to avoid pain. The muscles that support the knee atrophy from disuse faster than they rebuild, which means each round of pain-driven rest leaves the joint slightly less supported than before.
The correct response to mild-to-moderate knee pain is targeted, appropriate movement, not rest. Rest resolves acute flares without addressing the underlying muscle weakness that drove them.
What is the fastest way to cure knee pain?
There isn’t one, and the promise of a fast cure is the most reliable sign that a treatment isn’t worth pursuing. For most people with chronic or osteoarthritis-related knee pain, yoga is a management approach rather than a cure.
Pain medication addresses the symptom but not the cause. Surgery is appropriate for specific structural problems but doesn’t consistently outperform exercise therapy for osteoarthritis. The fastest realistic path to meaningful improvement is the one in this article: three sessions per week for eight to twelve weeks, with realistic expectations for the timeline. That is slower than a cure and better than anything else reliably available.
Can I do yoga if I’ve had knee surgery?
After arthroscopic cleanup, gentle yoga may be appropriate from six to eight weeks post-surgery with surgical clearance. After meniscus repair, typically from three to four months. After ACL reconstruction, usually from six to twelve months with ongoing guidance from a physical therapist. After knee replacement, usually from three to six months with the surgeon’s approval. Start slowly and stop immediately if anything feels wrong.
How soon will my knee pain disappear completely?
For most people with chronic knee pain or osteoarthritis, yoga reduces pain rather than eliminating it. Studies consistently show improvements in the range of 30 to 50 percent reduction in pain scores, not zero pain. Some days will still be worse than others. Progress isn’t linear. The goal is meaningful improvement in quality of life over months, not the absence of any discomfort.
Will I need to practice forever?
If you want to maintain the benefits, yes. The muscle strength and movement quality that yoga builds fade within weeks to months of stopping. Think of it the same way you would brushing your teeth: an ongoing maintenance behavior rather than a course of treatment with an endpoint.
The good news is that two sessions per week appear to maintain most of the gains from a three-times-weekly program once the initial twelve weeks are complete.
Can I combine yoga with other exercises?
Yes. Walking, swimming, and cycling all complement this routine well and can be scheduled on rest days. Avoid high-impact activities on the same days as yoga sessions until the knee is well-supported. Running is worth approaching cautiously with knee pain. The impact load is a real variable that needs deliberate management, not dismissal.
What if both knees hurt?
All poses in this routine work both legs, and even unilateral poses repeat on both sides. If one knee is significantly worse than the other, use more props on that side and don’t try to match symmetry in depth or hold time. Weakness in one leg often leads to compensatory loading of the other, so training both sides helps both joints.
Online vs. in-person yoga: which is better?
Both can be effective, which the Annals of Internal Medicine trial demonstrated directly: unsupervised online yoga produced significant improvements. In-person classes offer real-time form correction, which matters most during the first few weeks when alignment errors are most likely to develop.
A practical approach is to attend a few supervised sessions early in the program and then transition to home practice with periodic teacher check-ins. That captures most of the form benefit without the ongoing cost and scheduling friction of exclusively in-person practice.