The average person carries roughly 10 pounds of head on a neck that evolved for walking upright, not staring at a screen. Every inch the head drifts forward, that load grows by 10 pounds.
If your chin is currently three inches in front of your shoulders (check now, it probably is), your neck muscles are managing close to 40 pounds of continuous pressure.
The problem isn’t that you sit too much, exactly. It’s that your nervous system has adapted to it. After weeks and months of forward posture, your brain stops sending correction signals. It treats the hunched position as neutral. The tension you feel by mid-afternoon isn’t an accumulation of work. Your body is defending a posture it has now learned to call correct.
Yoga for neck and shoulders works precisely because it argues back. Slow, deliberate movement gives your proprioceptive system new information about what upright actually feels like, and over time, your body starts choosing it on its own.
Understanding your neck and shoulder anatomy
Before you learn the routine, it helps to know what you’re actually trying to fix. Your neck and shoulders share a load-bearing relationship that desk work quietly dismantles, and the right yoga reverses it muscle by muscle.
The upper trapezius is the muscle most people grab when they self-massage a sore shoulder. It runs from the base of your skull down to your shoulder blades, and it spends most of a desk day in partial contraction, not enough to build strength but enough to accumulate fatigue. The levator scapulae, running along the side of your neck, lifts your shoulder blade and shortens whenever your shoulders creep toward your ears, which happens more than you think it does.
The rhomboids sit between your shoulder blades and are designed to pull them back and together. Prolonged sitting stretches them into a kind of passive resignation. The sternocleidomastoid runs diagonally across the front and side of your neck and tightens every time your chin drops toward your phone or laptop screen.
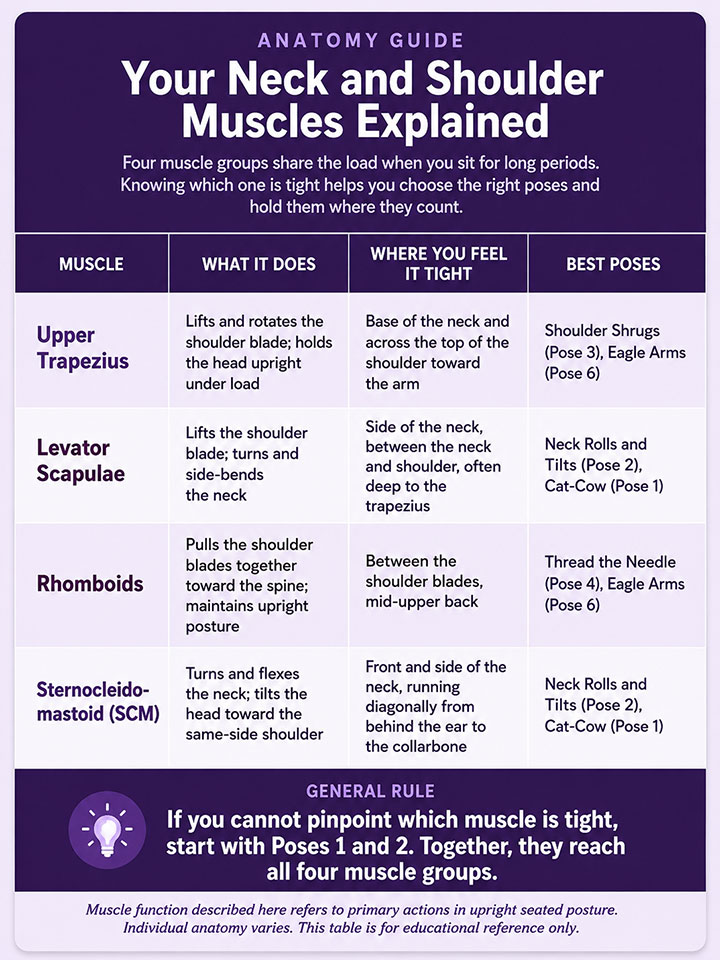
Together, these muscles form what physical therapists call upper crossed syndrome: chest muscles tighten, upper back muscles weaken, the head drifts forward, and the neck and shoulders lock into a compensation pattern that takes deliberate, daily work to reverse.
What sitting actually does to your body
Sitting changes how your muscles function at a tissue level. The two most significant changes are ones most people don’t think about.
The first is fascial dehydration. Fascia, the thin connective tissue that wraps every muscle fiber, stays hydrated and slides freely when you move regularly. During extended stillness, it loses fluid, and the layers begin to adhere. This is the biological source of that stiff, restricted feeling when you try to turn your head after hours at a desk. Robert Schleip and colleagues at Ulm University’s Fascia Research Group found in tissue studies that static stretching followed by adequate rest produced a super-compensation effect in fascial hydration: tissues ended the rest period more hydrated than they started. That finding matters because it tells you something important about pace. These poses need to be held, not rushed.
The second change is proprioceptive drift. Your brain monitors your body’s position through sensors in muscles, joints, and skin. After months of the same posture, those sensors recalibrate. Your nervous system stops treating the forward head position as a deviation and starts treating it as neutral. The yoga in this routine re-educates the sensors. That’s why the posture improvements tend to stick in a way that passive massage alone doesn’t produce.
Chronic stress compounds both processes. Chronically elevated cortisol keeps your muscles in a low-grade state of readiness. They never fully release. Researchers at the National Institute of Mental Health and Neurosciences in Bangalore found that yoga practice was associated with meaningful cortisol reductions, particularly in people under sustained stress. For desk workers, that mechanism matters more than most people realize.
Know what you’re dealing with before you start
Take 60 seconds to assess your current posture before beginning. This gives you a baseline to measure against, and it tells you which poses in this routine will help you most.
Desk Posture Self-Assessment
5 quick checks. Takes under 60 seconds. Tells you which poses matter most right now.
Check your setup before you stretch
Yoga releases existing tension. But if your desk is creating new tension faster than the yoga can undo it, you'll feel temporary relief that doesn't hold.
Five questions will identify your highest-leverage fixes and tell you which poses to prioritize today.
Your 5 checks at a glance
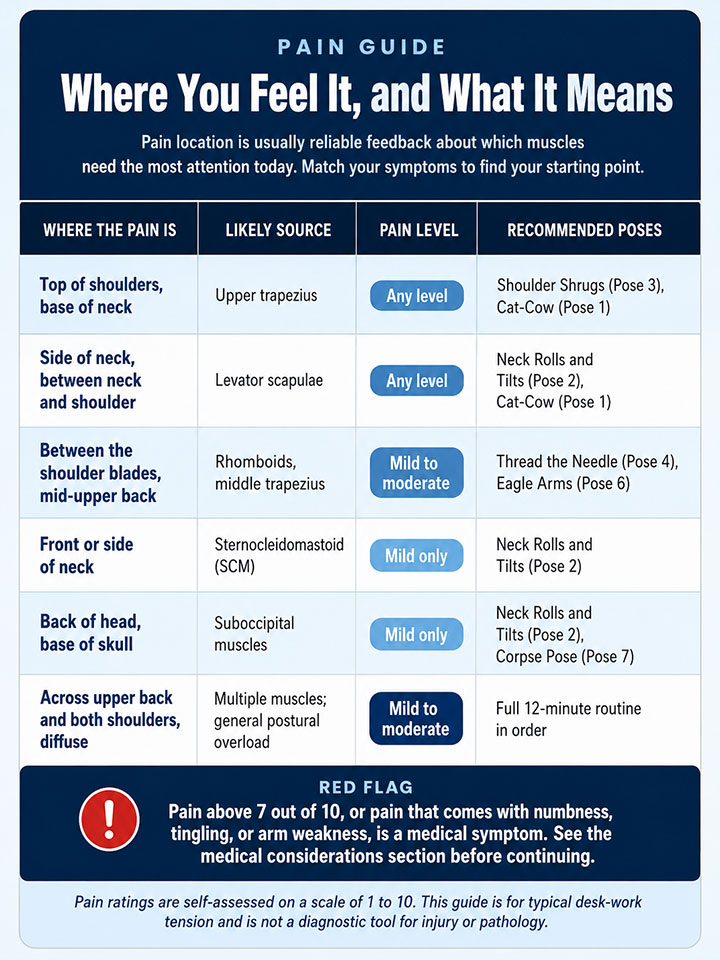
Where your pain tells you to focus
The location of your discomfort is usually a reliable indicator of which muscles need the most attention. Rate your pain level right now on a scale of 1 to 10. You’ll check again after one week of daily practice. The change is often more noticeable than you expect.
The 12-minute tension-release routine
Move slowly. Breathe deeply. Never push into sharp pain. A stretch should feel intense but not unbearable. Each pose includes a modification, so adjust freely based on how your body responds today.
1. Seated cat-cow (2 minutes)
The arch-and-round rhythm works better than a static stretch for a specific mechanical reason. Spinal movement creates a pumping action that draws fluid back into the intervertebral discs, the same discs that flatten slightly under the compressive load of sitting. The mid-back segment is the area most compressed by desk postures, and this movement reaches it first. The rhythm matters more than the depth.
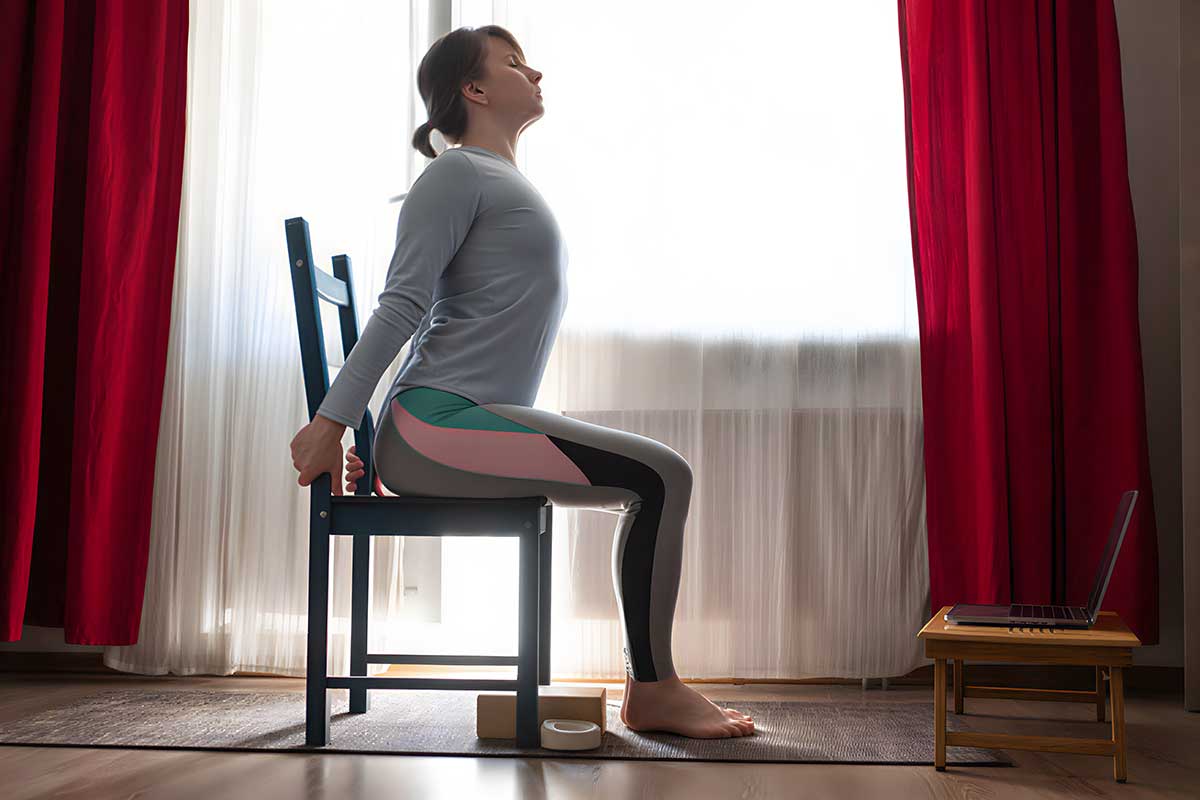
- Sit at the edge of your chair, feet flat on the floor about hip-width apart, hands resting on your knees.
- Breathe in. Arch your back, lift your chest toward the ceiling, and draw your shoulders back and down. Let your gaze lift slightly. Don’t crank the neck back. Allow the gaze to rise gently.
- Breathe out. Round your spine fully, draw your belly button toward your spine, let your shoulders curve forward, and drop your chin toward your chest.
- Repeat 10 to 15 times. Move with the breath. Each inhale creates the arch, each exhale creates the rounding. Make it smooth, not mechanical.
The most common mistake is arching only in the lower back rather than through the whole spine. Think of starting the arch from your mid-back and letting it travel upward. If your lower back feels tender at any point, shrink the range of motion and keep the movement in your upper spine and ribcage. Smaller range is fine and equally effective.
2. Neck rolls and tilts (2 minutes)
Your neck muscles, particularly the scalenes along the side and the sternocleidomastoid running diagonally from behind the ear to the collarbone, hold a disproportionate amount of daily tension for muscles that are never actually asked to do very much. These slow tilts and rotations move each muscle through its full range in a way that most daily routines never provide.
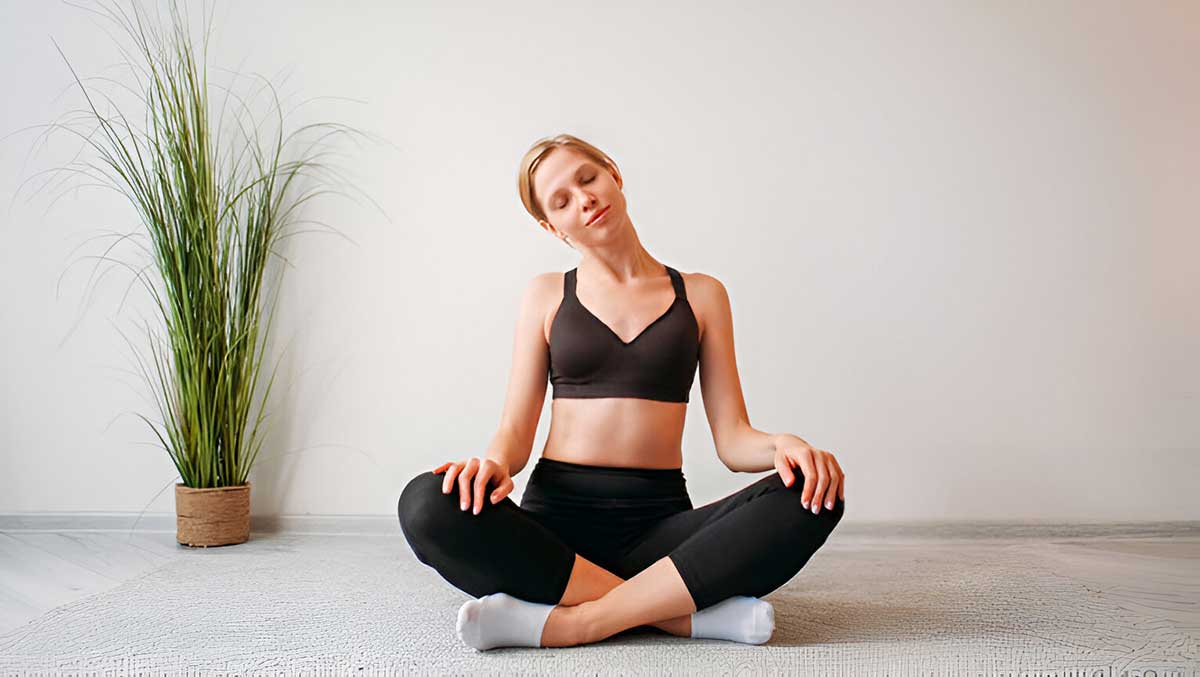
- Sit up tall and let your shoulders drop down away from your ears before you begin.
- Drop your right ear toward your right shoulder. Don’t lift the shoulder to meet the ear. Let gravity do the work. Hold for three to five slow breaths and feel the stretch along the left side of your neck.
- Return to center slowly. Repeat on the left side, holding for three to five breaths.
- Turn your head to look over your right shoulder. Keep your chin level. Don’t let it drop or rise. Hold for three to five breaths.
- Return to center. Turn left. Hold for three to five breaths.
- Repeat three rounds on each side, alternating right and left.
One rule here applies without exception: avoid full head circles. Rolling the head through a full circle compresses the posterior cervical structures and creates more strain than it releases. Stick with the tilts and rotations above. If you experience dizziness at any point, slow down further and reduce the range of movement.
3. Shoulder shrugs and circles (1 minute)
You can feel this muscle contracted right now without even trying. Notice the space between your ears and your shoulders. For most people at a desk, there isn’t much. The trapezius responds to emotional tension, mental focus, and physical load all at once, often without your awareness that it’s contracted at all.
- Sit or stand with your arms relaxed at your sides.
- Breathe in deeply and lift both shoulders straight up toward your ears. Really exaggerate it, as high as they’ll go. Hold for 1 to 2 seconds.
- Breathe out forcefully and drop your shoulders down with intention. Let them fall. The distinction between lowering and releasing matters: you want the latter.
- Repeat 10 times.
- Then roll your shoulders backward in slow circles, up, back, down, forward, five times.
- Reverse direction. Roll forward five times.
If you hear or feel some popping or cracking during the circles, that’s usually just gas bubbles releasing from the joints. Nothing harmful. The coaching cue that makes this pose work: really exaggerate the upward lift, then let the shoulders drop with a slight bounce rather than a controlled lowering. The bounce releases the last bit of held tension.
4. Thread the needle pose (2 minutes)
This is the pose that reaches the muscles most desk workers can’t access with a simple stretch. The space between your shoulder blades, where the rhomboids and middle trapezius fibers run, gets chronically compressed when your shoulders round forward, and a standard shoulder stretch does almost nothing to address it. Threading the needle reaches those muscles through a combination of thoracic rotation and shoulder opening that’s hard to replicate any other way.
What you’re targeting: the rhomboids between the shoulder blades, the middle and lower trapezius, the posterior deltoid at the back of the shoulder, and the muscles along the thoracic spine. The twist also provides a gentle compression-release to the area that tends to feel most knotted by late afternoon.
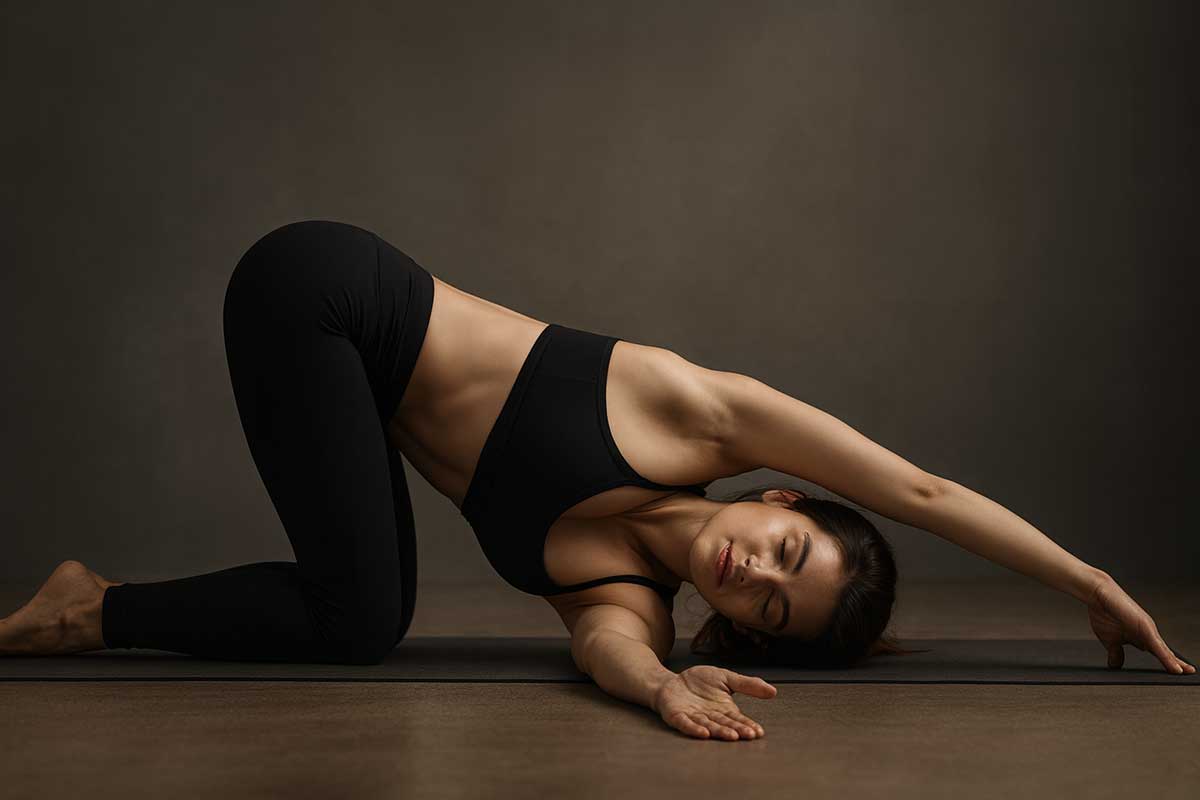
- Start on your hands and knees on the floor, wrists directly under shoulders, knees under hips. Place a folded blanket under your knees if kneeling is uncomfortable.
- Lift your right hand and slide it under your left arm, palm facing up. Thread your arm through until your right shoulder and right ear rest on the floor. Your right arm extends to the left.
- Keep your hips level. Don’t let your right hip collapse toward the floor. That shifts the stretch away from where you want it.
- Your left hand stays where it is or walks slightly forward. Breathe deeply into your upper back for five to eight breaths, feeling the rotation deepen slightly with each exhale.
- Press into your left hand to unwind slowly. Return to hands and knees. Take one breath before switching sides.
- Thread your left arm under your right and repeat.
The most common form error is letting the twist come from the lower back rather than the upper spine. Keep your focus on your mid-back rotating, not your hips. If kneeling isn’t practical, a seated chair modification works: sit sideways near the backrest, then twist toward it and thread one arm behind the back support.
Note for anyone with glaucoma: skip this pose or keep the hold brief, as sustained head-below-heart positions can temporarily increase intraocular pressure.
5. Cow face pose arms (2 minutes)
This pose opens the chest and shoulders in opposite directions at the same time. One arm stretches the back of the shoulder and triceps while the other stretches the front of the shoulder and pectoral. Together, they address both sides of the rounded-shoulder pattern that typing and screen work create. It’s uncomfortable at first for most desk workers because it asks your shoulders to move in directions they haven’t moved in months.
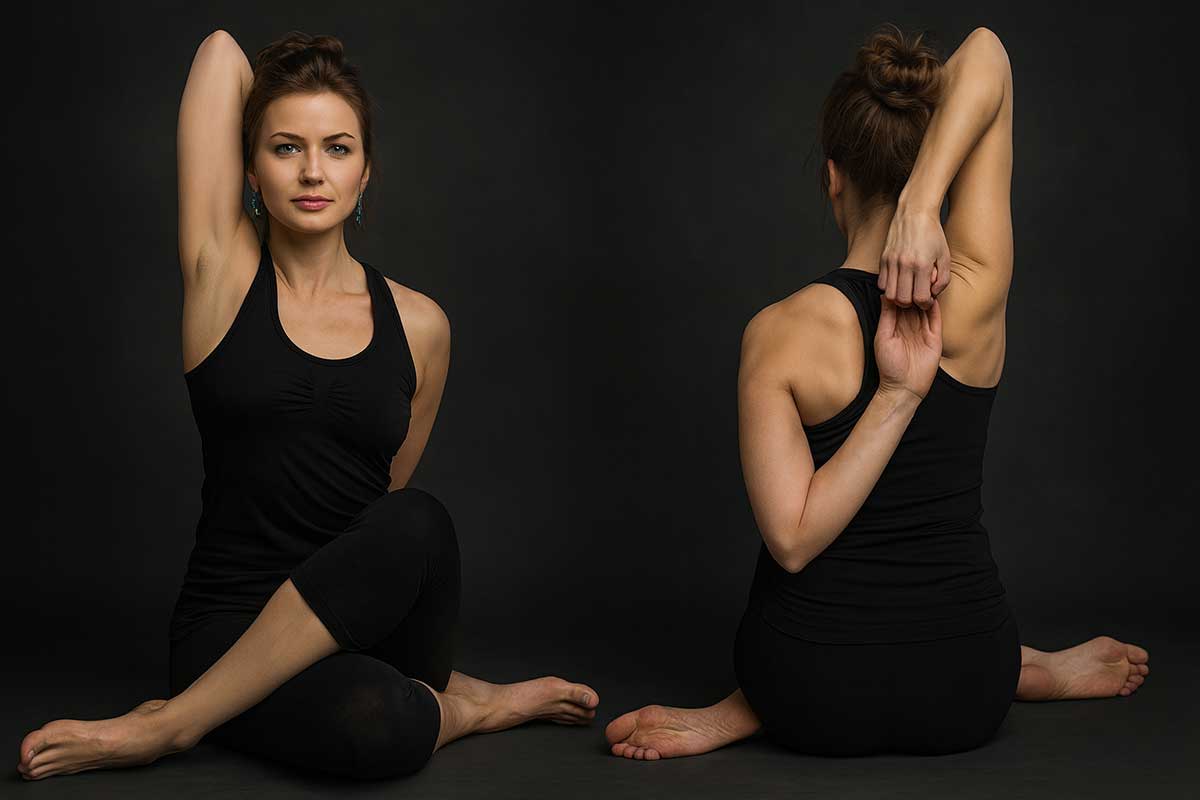
- Sit cross-legged on the floor or at the edge of a chair, sitting tall on your sit bones.
- Reach your right arm straight up, then bend at the elbow and let your right hand drop between your shoulder blades, elbow pointing toward the ceiling.
- Bring your left arm behind your back, bend at the elbow, and reach your left hand up your back toward your right hand.
- If your hands meet, clasp your fingers. If they don’t (and for most people starting out, they won’t), hold a folded belt, yoga strap, or even a bundled shirt between your hands. Hold each end.
- Keep your spine tall throughout. Draw your ribs in slightly so they don’t flare forward. Hold for five to eight breaths.
- Release slowly and shake out your arms. Then switch: left arm up, right arm down.
A strap is not a shortcut. It’s the difference between actually stretching the target muscles and yanking your shoulders into an approximation of the pose. If you’re using one today, expect to need less reach in three to four weeks. That’s a real and measurable change in shoulder mobility.
6. Eagle pose arms (1 minute)
Cross your arms in front of you right now, even loosely, and you’ll feel it: a pull across the space between your shoulder blades that most stretches never touch. Eagle arms goes there deliberately. One minute at most, because the sensation is concentrated.
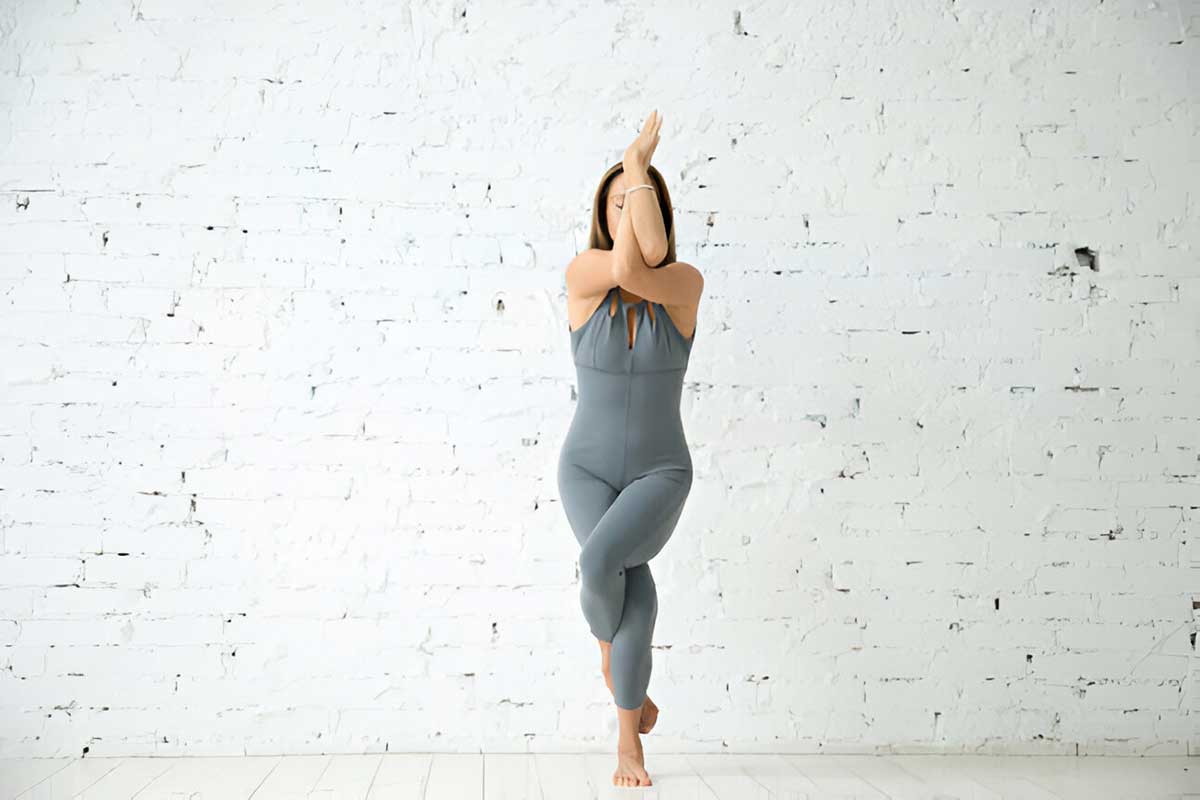
- Sit or stand tall. Extend both arms forward at shoulder height, palms facing each other.
- Cross your right arm over your left at the elbows. Bend both elbows. Your forearms should be roughly vertical.
- Bring the backs of your hands together. If your range allows it, wrap your right hand around to press your palms together.
- Lift your elbows slightly while pressing your forearms together. Feel the stretch spread across your upper back.
- Keep your shoulders drawing down away from your ears. They’ll want to creep up. Hold for five to eight breaths.
- Unwind slowly, extend your arms out wide to release, then repeat with the left arm over the right.
Reaching your fingertips toward the ceiling while keeping the forearms pressed together deepens the stretch across the whole upper back. If you feel pinching at the front of your shoulder, back off the wrap. You’ve gone past your comfortable range.
7. Corpse pose with neck support (2 minutes)
The most underestimated pose in this routine. Stretching changes a muscle’s length, but the nervous system needs a rest period afterward to recalibrate around the new position. Skipping this final rest means the preceding six poses work less effectively, because you’ve interrupted the integration phase. This is the pose that makes the previous 10 minutes stick.
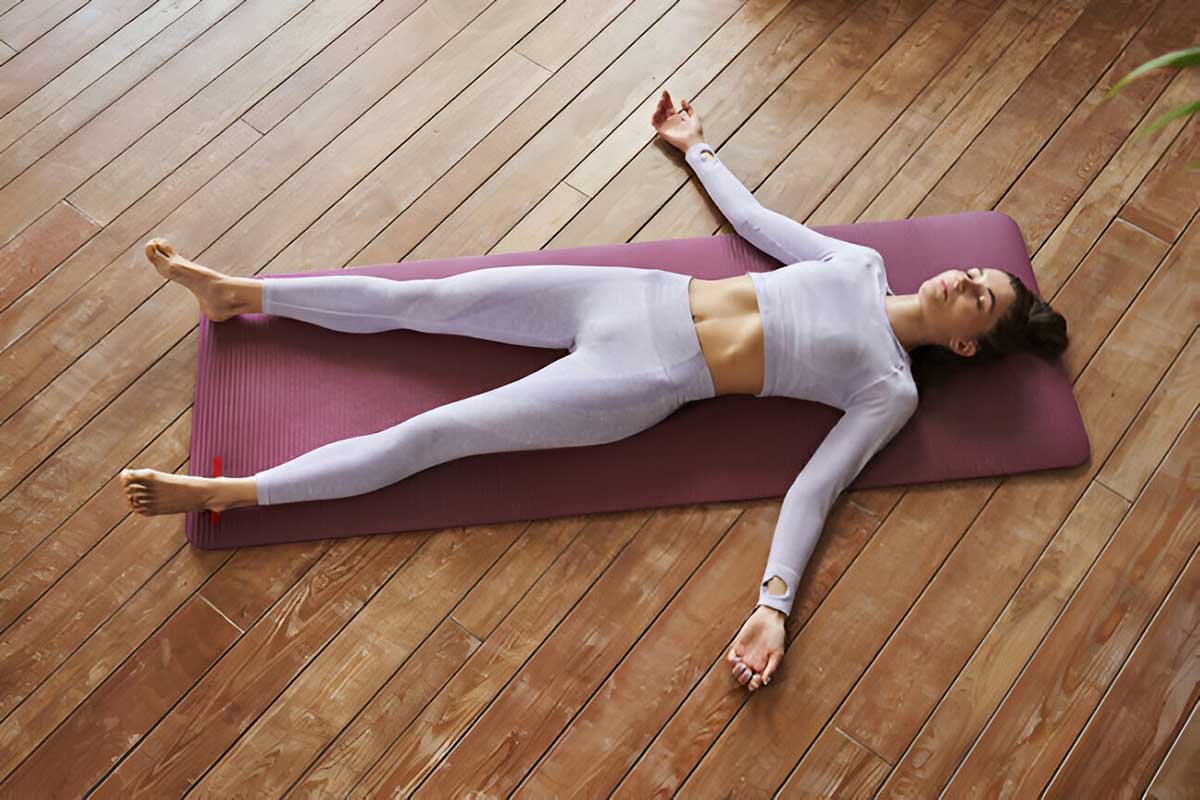
- Lie on your back on the floor, your bed, or a yoga mat.
- Place a rolled towel, small pillow, or folded blanket under your neck, not under your head. The support belongs in the curve of your neck, keeping your cervical spine neutral. Your head should feel cradled, not elevated.
- Let your legs extend naturally and fall where they fall. Your feet will probably roll outward. That’s correct.
- Rest your arms a few inches from your body with palms facing up. This allows your chest to open passively.
- Close your eyes. Let your jaw go slack. Don’t control your breath. Let it happen on its own.
- Stay for at least two minutes. Five is better if you have the time.
If lying flat bothers your lower back, bend your knees and plant your feet on the floor. The rest of the pose stays identical. If you’re at work and can’t get to the floor, rest your head on folded arms on your desk for two minutes with your eyes closed. The nervous system benefit is similar even without the full horizontal position.
Some people fall asleep during this pose. That’s not failure. That’s data. Your body needed the rest more than you realized.
Yoga for Neck and Shoulders Timer
Choose your session length. The timer guides you through each pose with automatic transitions.
How much time do you have?
All three sessions work. The longer ones hold more slowly and finish with more rest time.
Session complete
You finished the full routine. Your fascia just got a little more hydrated and your nervous system got another recalibration signal. Those effects add up.
Why yoga works at the physiological level
Slow, deliberate yoga works at three distinct levels that vigorous stretching or massage alone can’t reach. Each mechanism is real, and understanding them changes how you approach the poses.
Fascia rehydration
Fascia, the thin connective tissue wrapping every muscle fiber, is roughly 70% water by weight. When you hold still for extended periods, that water shifts away from load-bearing regions and the tissue stiffens. The slowness of yoga holds is not incidental. In animal and ex vivo tissue research, Schleip and colleagues at Ulm University found that static stretching followed by an adequate rest phase produced a super-compensation in fascial hydration: the tissue ended up more hydrated than it began, rather than simply returning to baseline. That finding changes the framing. You’re not trying to lengthen the muscles when you hold these poses. You’re waiting for the connective tissue to refill.
Proprioceptive re-education
Sensors in your muscles, joints, and tendons feed constant position data to your brain. When you hold poor posture for months or years, those sensors recalibrate to treat it as neutral. A 2019 meta-analysis in Medicine (Baltimore) that pooled results from 10 randomized controlled trials and 686 participants concluded that yoga practice produced meaningful reductions in neck pain intensity and functional disability, alongside improved cervical range of motion, compared to control groups. What the research doesn’t fully settle is how much of that improvement is structural (tissue that genuinely lengthened) and how much is neurological (a nervous system that learned to allow movement it had been restricting). The honest answer is probably both.
Cortisol and the tension feedback loop
Chronic stress keeps cortisol elevated, and elevated cortisol keeps muscles in a low-grade state of contraction. They never fully release. Thirthalli and colleagues at the National Institute of Mental Health and Neurosciences in Bangalore found that yoga practice was associated with meaningful cortisol reductions, an effect strong enough to support yoga as an adjunct to clinical depression treatment. For desk workers whose tension is stress-driven rather than injury-driven, this cortisol mechanism often explains why the shoulders won’t stay relaxed even after massage. The cortisol signal maintaining muscular tension is still circulating.
A trial published in Complementary Therapies in Medicine by Kuptniratsaikul and colleagues examined 150 sedentary office workers with neck and shoulder pain. Participants were assigned to either Hatha yoga or stretching exercise, with one 30-minute group session weekly and home practice in between. At 4 and 8 weeks, both groups showed significant pain reduction from baseline, and Hatha yoga was found non-inferior to dedicated stretching. The finding matters because it positions yoga as a complete intervention, not a supplement to something else.
Fitting this into your schedule
Consistency matters more than session length. Twelve minutes every morning outperforms one 90-minute class per week, because daily practice gives your nervous system regular recalibration rather than a one-time correction it forgets between sessions.
If 12 minutes isn’t realistic on a given day, run Poses 1, 2, and 3 only. That takes 5 minutes, requires no floor space, and addresses the muscles most likely to be tight from morning screen time. For longer sessions on evenings or weekends, extend the holds to 8 to 10 breaths per pose and add 3 minutes of diaphragmatic breathing before you start. Corpse pose becomes 5 minutes instead of 2.
The most effective scheduling approach is habit-stacking. Tie the routine to something that already happens every morning: right after you brush your teeth, right before you make coffee, or immediately after you open your laptop. The routine doesn’t need its own dedicated decision point. It only needs to follow something that already happens reliably.
The breath break that changes everything
Shallow chest breathing keeps your nervous system in a mild state of alertness. Your muscles stay slightly contracted. Deep diaphragmatic breathing signals the opposite. Your body receives the message that it’s safe to release held tension. Three minutes of this before the yoga routine measurably improves how deeply you can move into the poses.
- Sit tall, one hand on your chest, one hand on your belly.
- Breathe in through your nose for 4 counts. Your belly rises. Your chest stays relatively still.
- Hold for 2 counts at the top of the breath.
- Breathe out through your mouth for 6 counts. Your belly falls.
- Repeat 10 times.
You can do this in your car, at your desk, or in the two minutes before you fall asleep. The exhale being longer than the inhale is the key variable. That ratio activates the parasympathetic response and starts reducing baseline muscle tension before you’ve done a single pose.
Between-session self-massage
Three techniques are worth adding between yoga sessions. None requires equipment you don’t already own.
Tennis ball for the upper back
Place a tennis ball between your upper back and a wall. Lean into it gently and move slowly so the ball rolls across your upper trapezius and the space between your shoulder blades. When you find a tender spot, stay there for 30 to 60 seconds and breathe slowly. That sustained pressure on a trigger point, combined with the exhale, is usually enough to produce a noticeable release. Work both sides for 2 to 3 minutes each.
Finger pressure at the base of the skull
The suboccipital muscles at the base of your skull, a group of four small muscles connecting your skull to your top two cervical vertebrae, are a significant contributor to tension headaches. Place your fingertips at the base of your skull and press gently upward. Hold for 30 seconds. Move your fingers half an inch to the side and repeat, working your way across the base of the skull.
Hand massage for the trapezius
Reach your right hand over your left shoulder and grasp the thick band of muscle between your neck and shoulder. Squeeze and hold for a few seconds. Release. Move your hand slightly toward your neck and repeat, working toward the base of the skull. Switch sides. This is particularly effective at the end of a workday when the trapezius has been partially contracted for hours.
For heat and ice: heat works better for chronic muscle tension (apply for 15 to 20 minutes before your routine), and ice works better for acute inflammation within 48 hours of injury. If you’re dealing with ongoing desk-work tension rather than an injury, heat is almost always the right choice.
Building better desk ergonomics
Yoga releases existing tension. Ergonomics prevents it from accumulating in the first place. A proper desk setup takes 10 minutes to adjust and has a larger daily impact than most people expect.
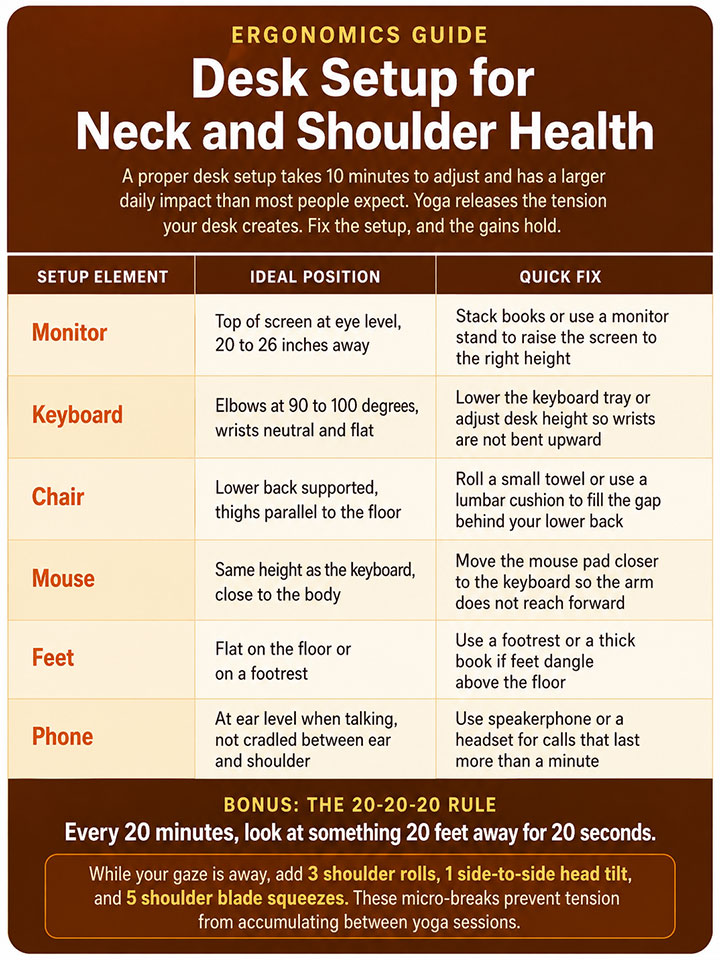
The 20-20-20 rule is worth following even with perfect ergonomics: every 20 minutes, look at something 20 feet away for 20 seconds. While your gaze is away, add three shoulder rolls, one side-to-side head tilt, and five shoulder blade squeezes. These micro-breaks are more effective at preventing tension buildup than trying to undo hours of static posture all at once.
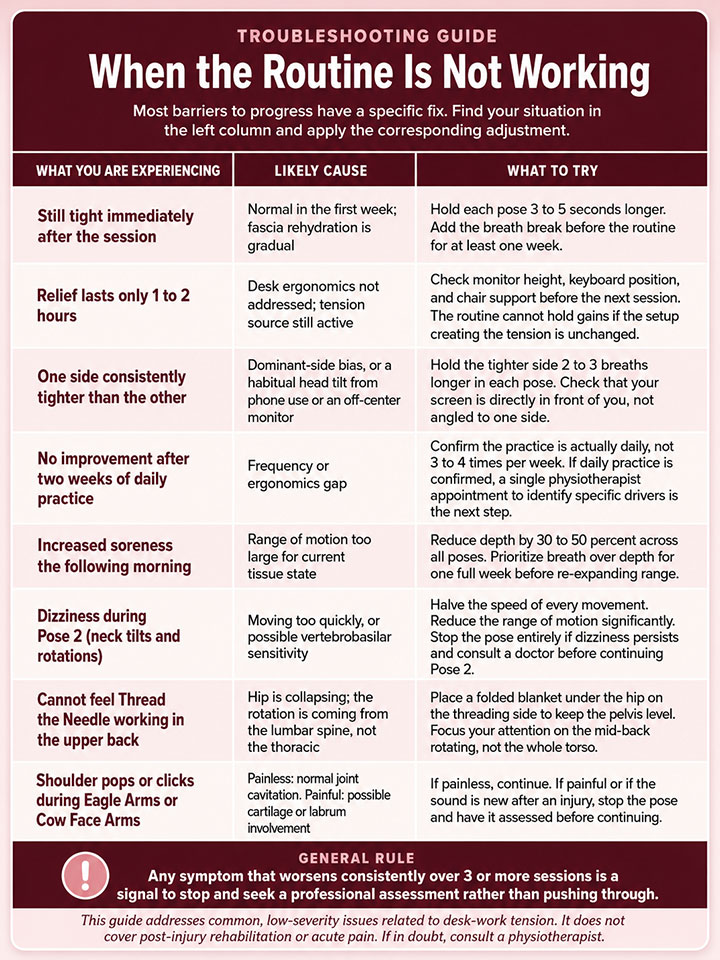
When it’s not working: troubleshooting guide
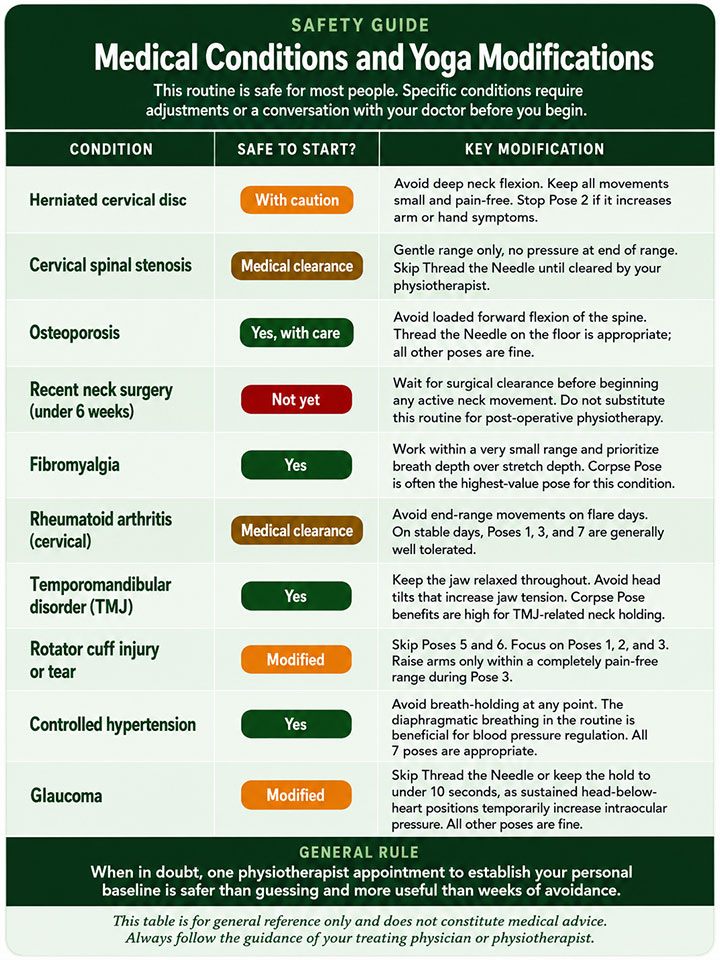
Medical considerations
Yoga is safe for most people, but certain conditions require modifications or a conversation with your doctor before you begin.
Red, yellow, and green flags
Red flags: see a doctor before continuing
- Pain radiating down an arm with numbness or tingling
- Sudden severe pain following an injury
- Pain accompanied by fever, chills, or unexplained weight loss
- Weakness in the hands or difficulty gripping objects
- Loss of bladder or bowel control
- Severe headache with neck stiffness
- Pain that consistently wakes you from sleep
Yellow flags: book a medical appointment within a week
- No change after four weeks of consistent daily practice
- Pain that interferes with sleep most nights
- Gradually worsening symptoms despite regular practice
- Clicking or grinding sensations accompanied by pain
- Pain that has migrated to new areas
Green flags: continue self-care
- Mild to moderate tension that doesn’t limit daily activities
- Pain that improves with movement and stretching
- No numbness, tingling, or weakness
- Gradual improvement over days or weeks
- Pain clearly linked to desk work or screen time
Consistency is the whole game
Everything above is theoretical until you actually do it. And what the research and the coaching experience both keep pointing back to is this: frequency beats intensity, and daily practice beats occasional sessions by a margin that isn’t close.
Think of it as compound interest. A 12-minute session today builds on yesterday’s. Your fascia gets a little more hydrated. Proprioceptors receive another recalibration signal. Cortisol drops a little further. None of these effects are dramatic in a single session. They accumulate. Skip two days and you haven’t lost the progress, but you’ve paused it. String together two weeks and you start to notice things that felt unrelated: sitting up straighter without thinking about it, turning your head to check a blind spot without the familiar catch, waking up without the concrete-block sensation across your shoulders.
The people who make this stick don’t have more time than you. They made the decision smaller. Instead of asking “will I do 12 minutes today,” they attached the routine to something that already happens every day. Brushing teeth, first coffee, closing the laptop at the end of work. The yoga follows the anchor habit and stops needing a decision of its own.
Start with Poses 1 and 2 if committing to all seven feels like too much. Two poses, six minutes, every morning for a week. Then add Pose 3. Then the full routine when the shorter version has become automatic. Five minutes is still practice. Some days that’s what you have, and some days that’s genuinely enough.
Conclusion
The routine is short enough to do before your coffee cools. That matters, because the barrier to daily practice has to be low enough that it doesn’t require willpower to clear it. What yoga for neck and shoulders offers, for this time investment, is a quieter, steadier change than most people expect: a nervous system that gradually stops treating tension as its default setting. The muscles loosen, and then something more useful happens. They stop bracing as their first response to stress. That shift, once it arrives, is worth more than any single session of relief.
FAQs
How long does it take for yoga to relieve neck pain?
Most people notice some loosening after their first session, but meaningful and lasting improvements typically arrive within 2 to 4 weeks of daily practice. A trial by Kuptniratsaikul and colleagues in Complementary Therapies in Medicine found that sedentary office workers showed significant reductions in self-reported neck and shoulder pain at both the 4-week and 8-week follow-up points.
The timeline depends on how severe your tension is when you start, whether you address ergonomics alongside the yoga, your sleep quality, and how consistently you practice. Patience with the process is legitimate advice, not a hedge. The changes are real and they accumulate.
Can I do yoga for neck pain every day?
Yes. These poses are gentle enough for daily practice. Daily practice is, in fact, more effective than occasional longer sessions because your nervous system adapts to whatever input it receives regularly. Think about it the same way you’d think about brushing your teeth. You don’t do it once a week for an hour. Consistent brief practice builds both.
Take a rest day if you feel unusual soreness after a session. Normal muscle awareness the following morning is expected. Pain during or after a session that worsens over time is a signal to ease off and check your form.
Is yoga or physical therapy better for neck pain?
Both are effective, and the better question is which fits your situation. Yoga works well for tension rooted in posture, desk work, and stress: conditions where the problem has built up gradually and is behavioral rather than structural. Physical therapy becomes the better choice when there’s a specific injury, when self-managed practice hasn’t produced improvement after several weeks, or when you need an individualized assessment and hands-on treatment. Many people use both: physical therapy to address a specific issue, then yoga to maintain and prevent recurrence.
What if I can’t do the floor poses at work?
Poses 1, 2, 3, 5, and 6 work entirely in a chair with no floor space needed. Thread the Needle can be modified at a chair: sit sideways near the backrest and twist toward it, threading one arm behind the back support. That gives you six of the seven poses accessible at your desk. Corpse pose becomes a two-minute rest with your head on folded arms, eyes closed. The nervous system reset happens even without the full horizontal position.
Can yoga make neck pain worse?
Only if you push into sharp pain, move too quickly, or hold your breath. A stretch should feel intense but manageable. You should be able to breathe normally throughout. If you’re grimacing, that’s too far. Start with a smaller range of motion and let it build over days rather than sessions. Consistent worsening after practice, rather than temporary soreness, is the signal to reduce intensity and check your form or see a professional.
How do I know if I’m doing the poses correctly?
You should feel the stretch in the muscle groups described in each pose. You should be able to breathe normally throughout. You should feel better, or at minimum no worse, after a session than before it. Film yourself doing a pose and compare to the written instructions, particularly for Thread the Needle where hip alignment is easy to lose. If you’re unsure, one session with a yoga teacher or physical therapist to check your form is worth far more than weeks of guessing.
What is the best sleeping position for neck pain?
Back sleeping with a supportive pillow that maintains the natural curve of your cervical spine (similar to the rolled towel in Corpse Pose) is generally most protective of neck alignment. Side sleeping can also work well if your pillow is thick enough to keep your spine horizontal: your head shouldn’t tilt up or drop down. The position to avoid is stomach sleeping, which requires turning your head to one side for the duration of the night and creates sustained cervical rotation that compounds whatever tension you’re managing during the day.
If you wake up with more neck pain than you went to sleep with, the pillow is usually the issue. A towel rolled to the diameter of the gap between your neck and the mattress is a free and often effective adjustment to try before buying a new pillow.