Stretching feels good, but it may not fix what’s really happening after hours of sitting. Researchers say one missing piece makes all the difference.
Think of your hip flexors like a rubber band left twisted in a drawer for months. The shape is retained. The elasticity is not gone, but it has reorganized itself around the distortion.
That is what sustained sitting does to these muscles. It does more than shorten them. It teaches the nervous system a new default.
Most people reach for stretches when hip flexors start pulling. That is part of the solution. Working for years as a fitness and nutrition coach alongside a competitive karate athlete, I watched hip restrictions show up as a stalled kick a decade before they showed up as back pain.
That taught me early: flexibility without strength reverts within days. The muscles get longer, then gradually return to the shape they spend the most time in.
What actually changes the pattern is a combination of stretch exercises for hip flexors and targeted strengthening work, repeated often enough that the new position becomes the new default. The routine below is ten minutes. The key word is daily.
What Sitting Does to Your Hip Flexors
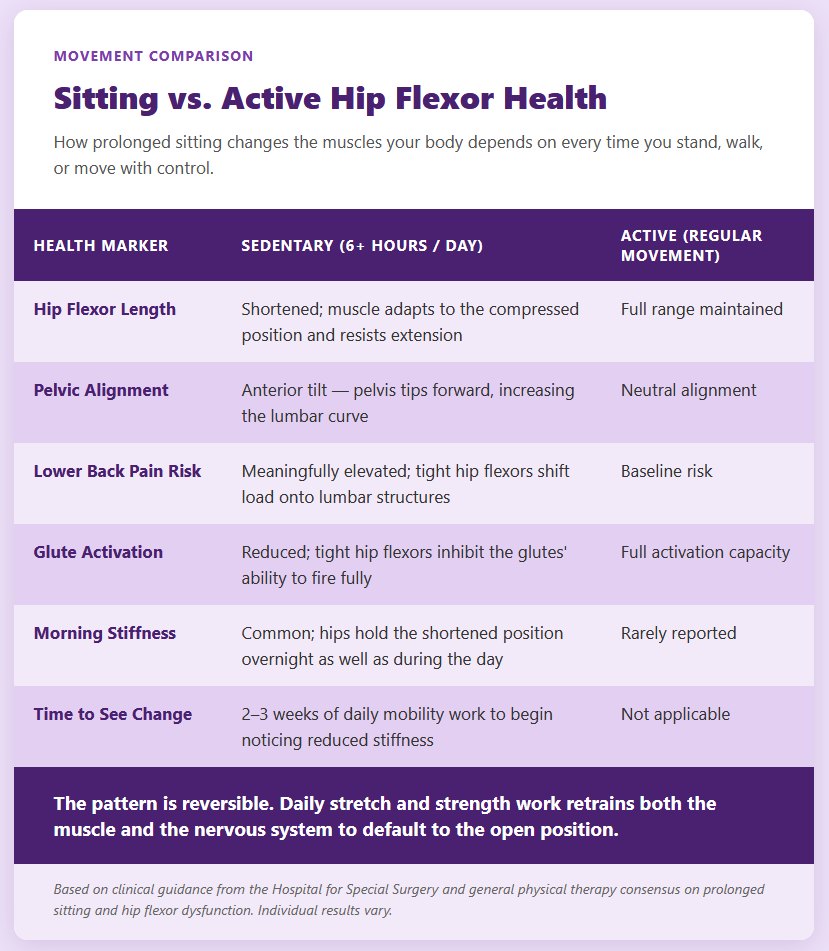
American adults sit for an average of more than six hours a day. Office workers routinely reach nine or ten. That number matters because of what happens inside the hip during those hours: the psoas and iliacus muscles, which together form the primary hip flexor group, stay in a shortened, contracted position for the entire duration.
The Hospital for Special Surgery notes that prolonged compression causes the muscles to adapt to that shortened state, tightening progressively over time. As they tighten, they pull the pelvis forward and increase the natural curve in the lower back. The glutes, which counter this force under normal conditions, begin to lose their ability to fire at full capacity.
Lower back pain is the most visible downstream result, and the World Health Organization identifies it as the leading cause of disability worldwide. Annual treatment costs in the United States are estimated at above $50 billion. Much of that cost traces back to the postural chain reaction that starts with hours of unbroken sitting.
The 2-Minute Self-Test: Checking Your Hip Flexors at Home
Before fixing the problem, it helps to know how significant it is. A modified version of the Thomas Test, the standard clinical assessment for hip flexor length, takes about two minutes on the edge of a bed.
- Sit on the edge of your bed or a sturdy couch.
- Pull one knee toward your chest and hug it close.
- Slowly lower yourself to lie back, keeping that knee pulled in tight.
- Let the other leg hang naturally off the edge.
Watch the hanging leg. If it rests flat with the knee bent at roughly 90 degrees, hip flexor length is probably within normal range.
If the thigh lifts off the surface, or the knee straightens, the hip flexors on that side are shortened. The degree of lift roughly reflects the degree of restriction.
One limitation worth knowing: the Thomas Test measures passive hip extension range but cannot distinguish between a structural restriction and a motor control issue. If your results are severe, or if the test produces pain rather than the sensation of tightness alone, a physical therapist can run a more complete assessment before you begin strengthening work.
Most desk workers who take this test find some restriction on at least one side. The good news is that both stretch and strength exercises change the result, typically within three to four weeks of consistent daily practice.
Tight or Weak? The Distinction Most People Skip
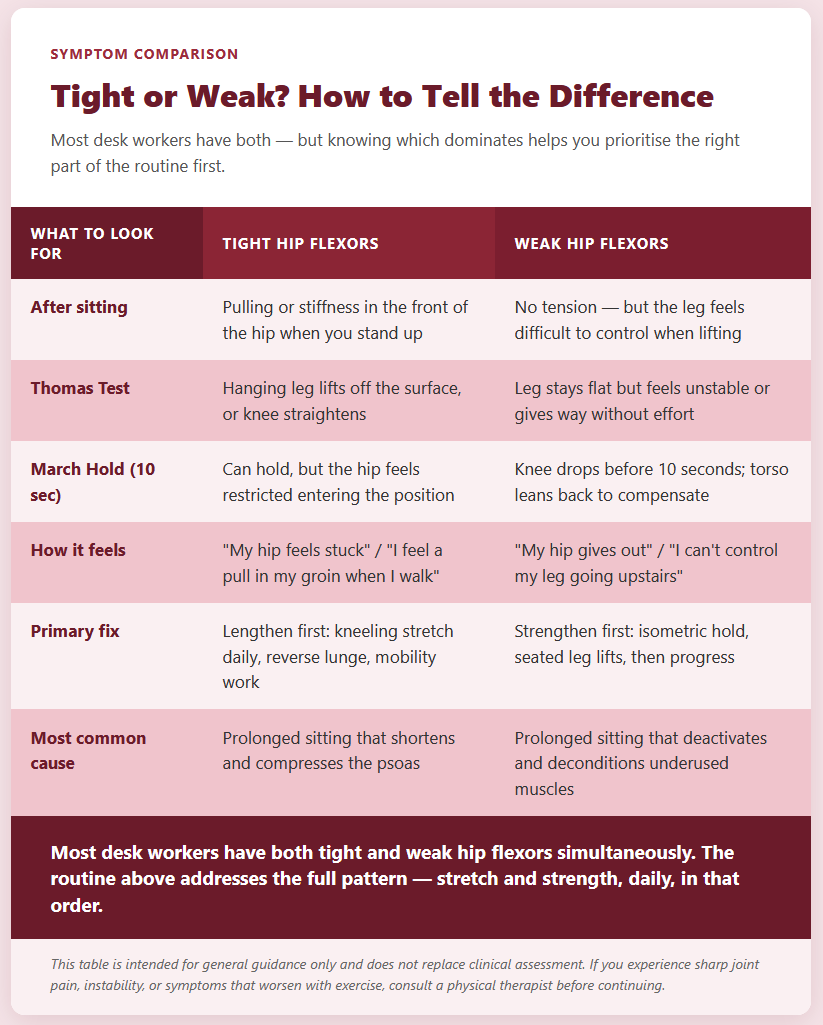
There are two ways hip flexors go wrong, and the fix is different for each. A muscle that is tight but strong needs lengthening work first. A muscle that is weak needs strengthening work first, and stretching it further without building strength underneath can make things worse.
Most people dealing with desk-job hip problems have both issues at once: muscles that are shortened from compression and deconditioned from spending hours doing almost nothing. That combination is why stretching alone rarely holds. The muscle gains length in a session, then loses it again because nothing structural supports the new position.
The routine below addresses both.
Tight hips and weak hips look similar from the outside. They feel different in specific movements.
Hip Flexor Self-Check
3 questions. About 2 minutes. Find out whether your hips are tight, weak, or both — and which part of the routine to prioritise.
Question 1 of 3
After sitting for an hour, what do you feel in the front of your hip when you stand up?
Question 2 of 3
Try the Thomas Test from the article: lie on the edge of the bed, pull one knee to your chest, and let the other leg hang. What does the hanging leg do?
Question 3 of 3
Stand near a wall for balance. Lift one knee to hip height and hold it there for 10 seconds. What happens?
This self-check is a starting guide, not a clinical assessment. If you experience sharp pain during any of these tests, or if your symptoms do not improve after four weeks of consistent daily practice, consult a physical therapist for a full evaluation.
When to See a Professional First
This routine addresses typical desk-job tightness. Some symptoms require a clinical assessment before starting any strengthening or stretching program:
- Sharp pain that shoots down the leg
- Numbness or tingling in the hip, groin, or thigh
- A clicking sensation in the hip accompanied by pain
- Hip pain that wakes you at night
- No improvement after four to six weeks of consistent daily work
These could indicate hip impingement, a labral tear, or nerve compression. All of them need a different approach than a mobility routine. A physical therapist or orthopedist can identify the source and design a targeted plan.
Discomfort during a stretch is normal. Pain with a sharp, catching quality during movement is not.
The 10-Minute Fix: Your 5-Move Hip Flexor Routine
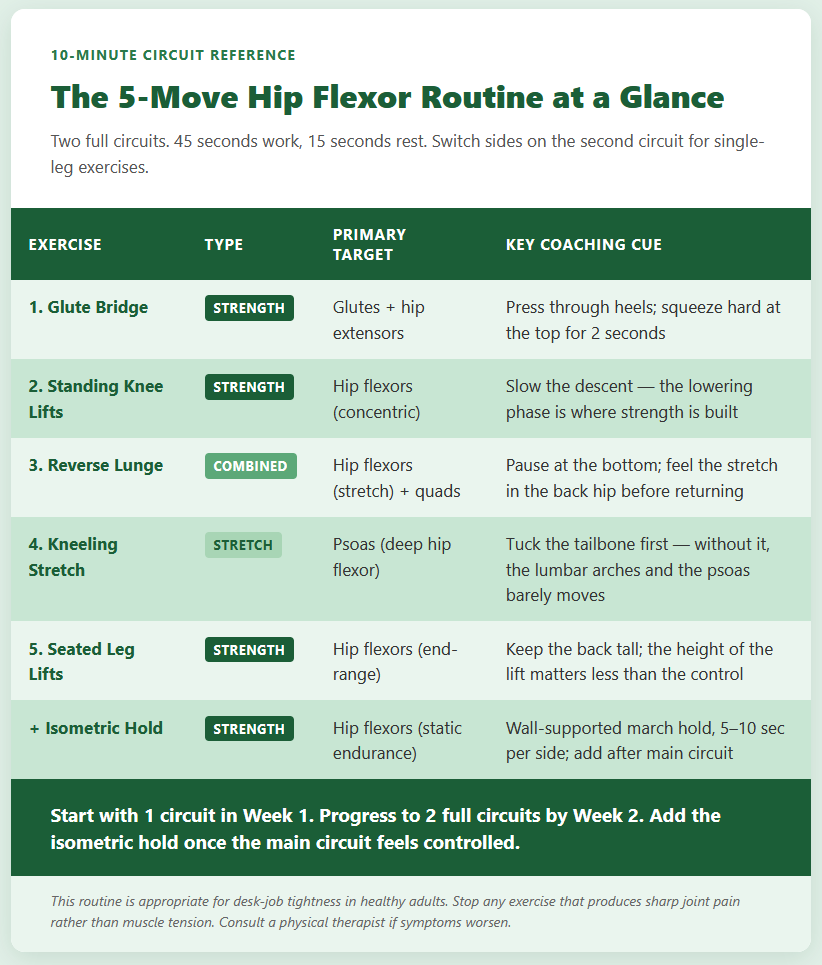
Five exercises. Two circuits. Forty-five seconds of work, fifteen seconds of rest between each move. That is the structure, and it is enough.
Researchers wanted to know whether stretching tight hip flexors could also improve glute function, or whether those were entirely separate problems. A 2025 cohort study in the International Journal of Sports Physical Therapy by Brent Ehresman and colleagues tracked 23 people with confirmed hip flexor tightness through a daily lunge-based stretching program.
The hip flexor length improved, as expected. What the researchers had not expected to see as clearly: gluteus maximus strength and power improved alongside it. The hip flexors and glutes are in a constant reciprocal relationship.
Address one and the other moves.
That relationship is the logic behind this routine. Each move targets the full pattern of hip dysfunction.
1. The Glute Bridge
When hip flexors are shortened and overactive, the glutes typically go quiet. This is measurable, not metaphor. The muscles stop producing their full activation potential because the reciprocal relationship between hip flexors and extensors shifts toward whichever side spends more time working.
The glute bridge is the corrective entry point because it works in exactly the opposite position to sitting. In hip extension, the glutes are required to engage.
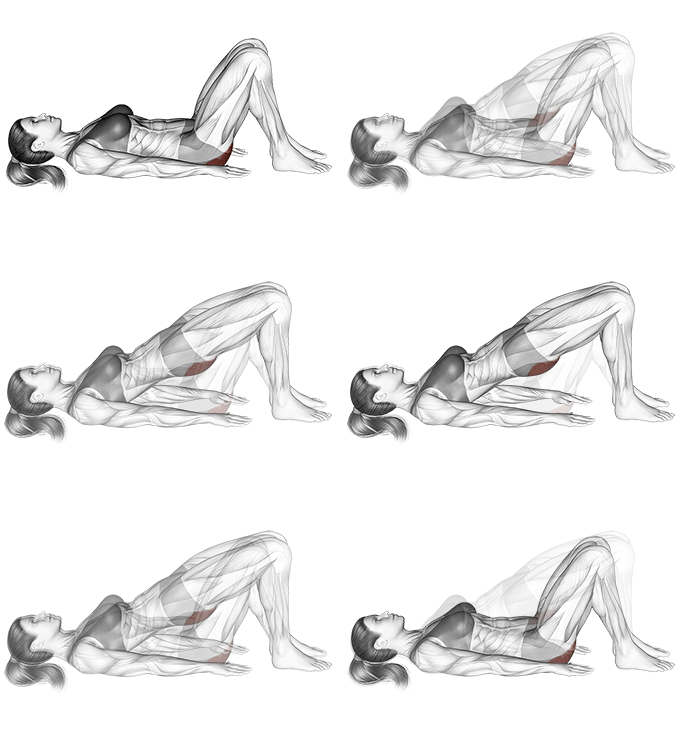
- Lie on your back with knees bent and feet flat on the floor, hip-width apart.
- Press through your heels and drive your hips toward the ceiling.
- Squeeze the glutes firmly at the top for two seconds.
- Lower slowly and with control. Repeat for 45 seconds.
Keep the lower back neutral throughout. The drive comes from the glutes, not from arching the spine. If you feel this primarily in the lower back, reduce the height of the bridge until the glutes take over the work.
Research by Bret Contreras and colleagues in the Journal of Applied Biomechanics found that exercises performed in the hip-extension position produce significantly greater gluteus maximus activation than squat-pattern movements.
The bridge position places you in exactly that extended range, which is why it consistently outperforms squats as a glute activation tool for people whose primary goal is waking up muscles that have been sitting idle.
2. Standing Knee Lifts
Standing knee lifts train the hip flexors concentrically: they strengthen the muscle through its active range, which is what sitting progressively removes. The goal is not height. It is control.

- Stand with feet hip-width apart. Hold a wall or desk for balance if needed.
- Slowly lift one knee toward chest height, keeping the torso upright. Do not lean back to compensate.
- Hold at the top for one second.
- Lower with control. Do not let the foot drop. Alternate legs for 45 seconds.
The return phase is where most people take a shortcut. Dropping the foot rather than lowering it removes the eccentric load, and that eccentric phase is where meaningful strength gains happen. Slow the descent to a two-count. That is the work.
3. Bodyweight Reverse Lunge
The reverse lunge does two things at once. The front leg bears the load and stabilizes through a full range of knee flexion. The back leg’s hip flexor is stretched under body weight, which is why it produces more hip flexor release than a forward lunge of the same stride length.
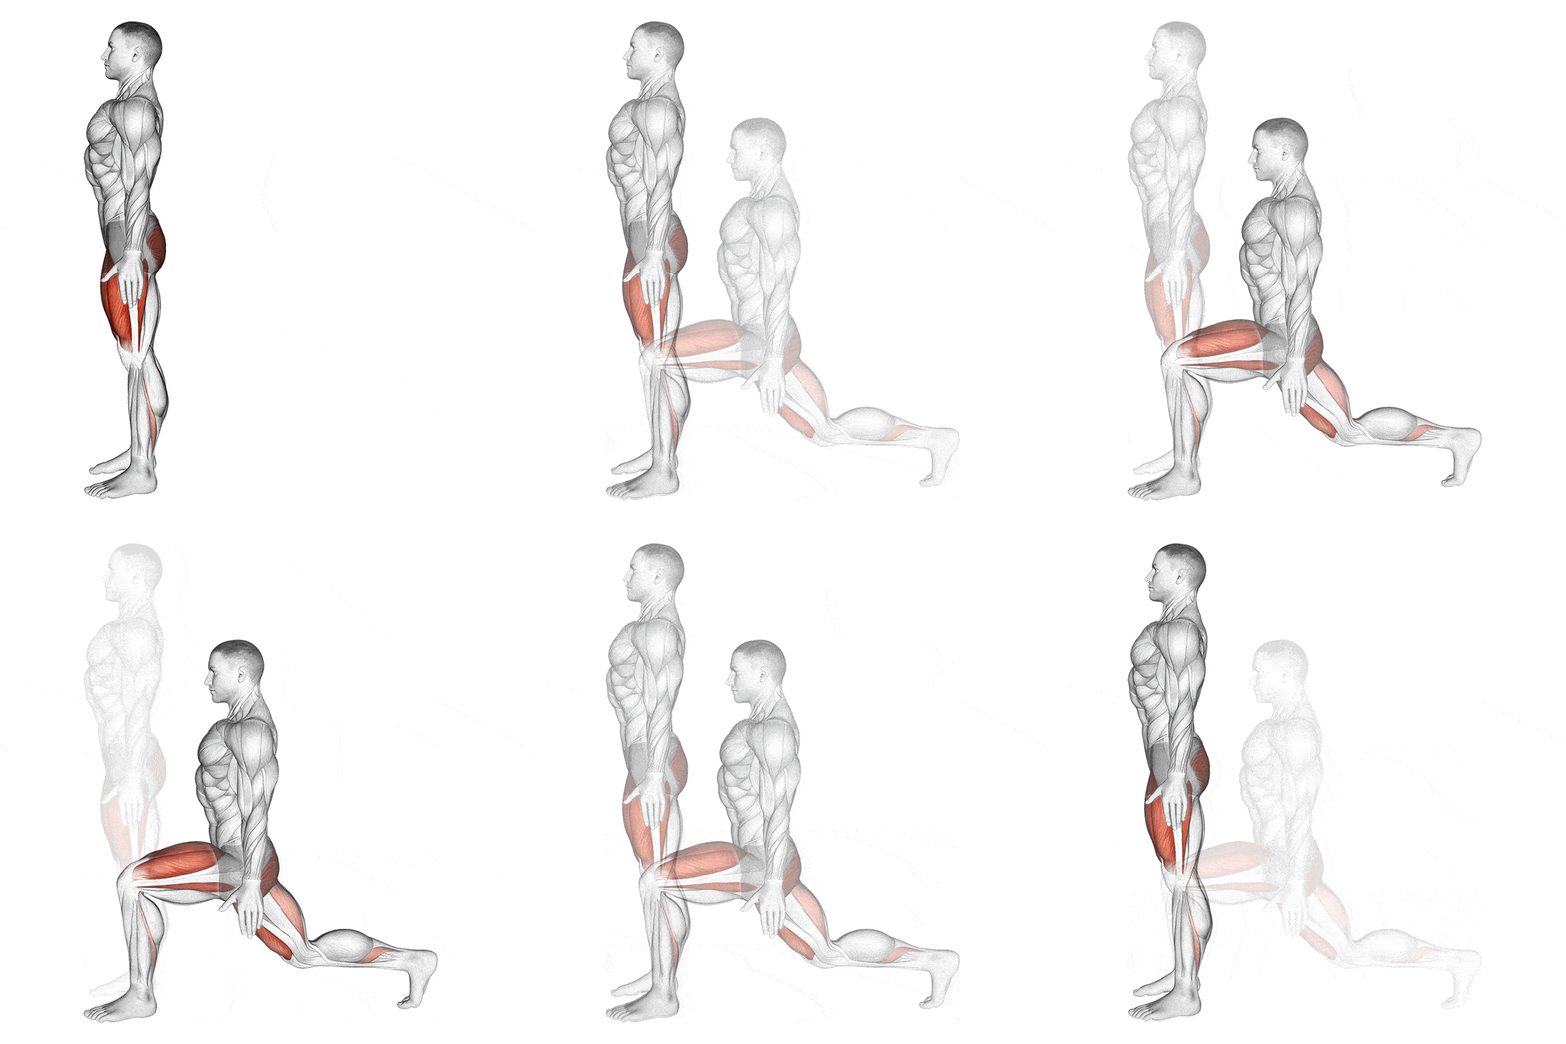
- Stand with feet together.
- Step one foot back, landing on the ball of the foot.
- Lower the back knee toward the floor until you feel a stretch in the front of the back hip.
- Keep the front knee directly over the ankle. Keep the torso upright throughout.
- Press through the front heel to return to standing. Alternate legs for 45 seconds.
At the bottom of each lunge, pause for a full breath. That pause is the moment of stretch. You are loading the hip flexor in the direction it most resists.
The Ehresman study above found that daily movements in exactly this pattern improved both hip flexor flexibility and gluteus maximus strength and power in participants who started with confirmed tightness. Static stretching alone cannot hold this. Dynamic movement in this plane is what starts to change the pattern underneath.
4. The Kneeling Hip Flexor Stretch
This is the most important move in the routine. The Hospital for Special Surgery, Harvard Health, and physical therapists across multiple disciplines consistently name the kneeling hip flexor stretch as the primary corrective movement for sitting-related tightness, because it targets the psoas directly. The psoas is the deep hip flexor that prolonged sitting shortens most aggressively.
Most people do it wrong.
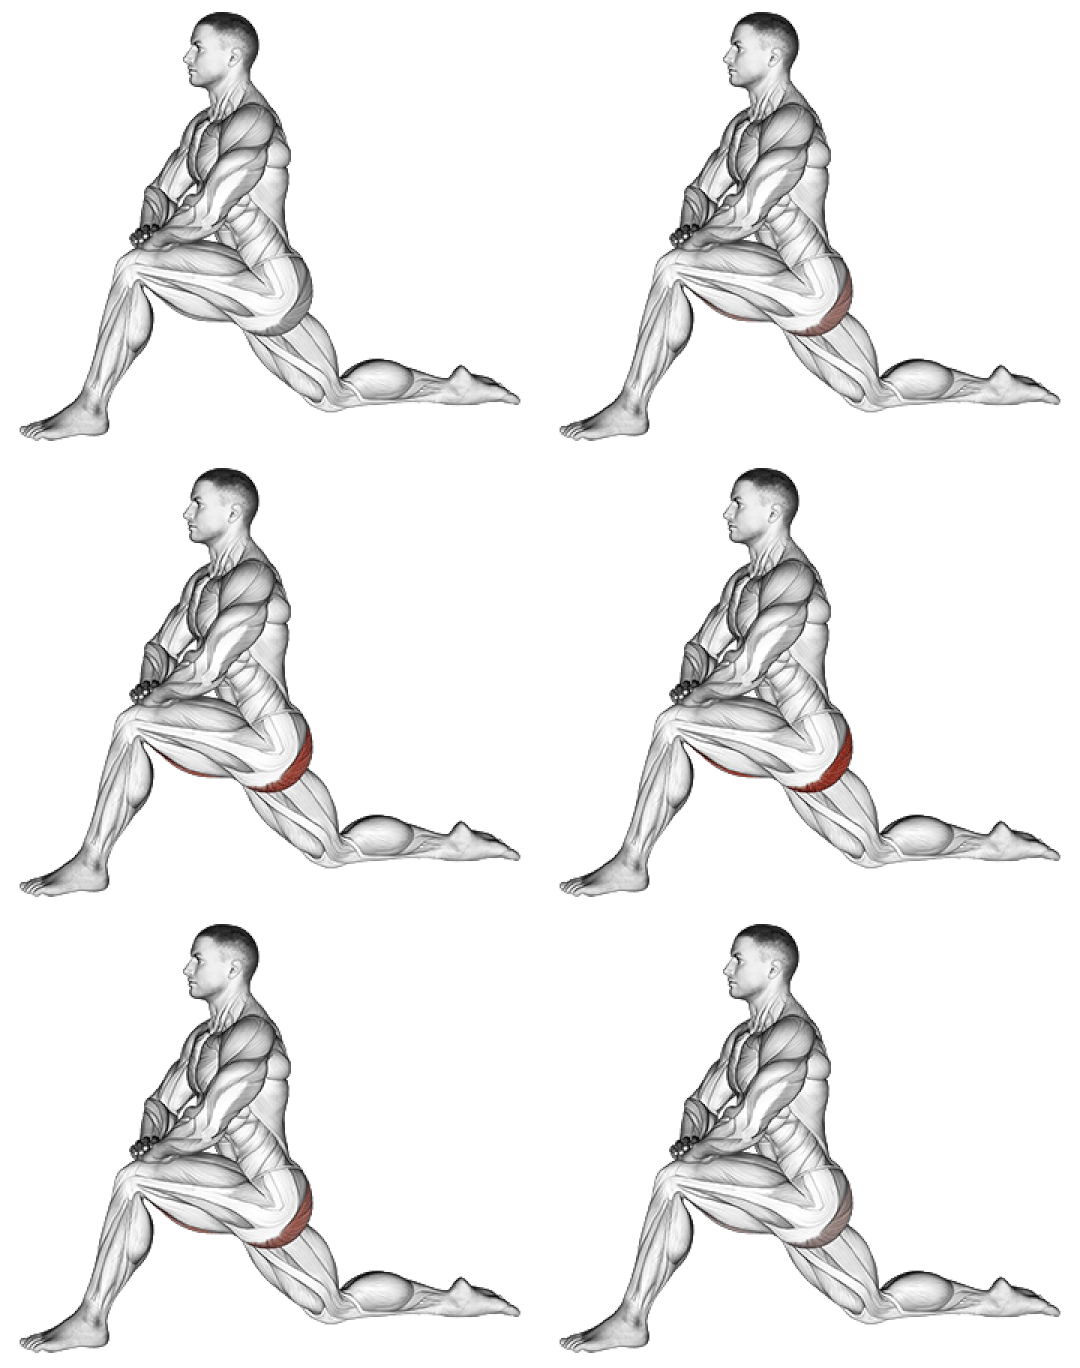
- Kneel on your right knee on a padded surface. Place the left foot flat in front of you with the knee bent at 90 degrees.
- Before moving forward, tuck the tailbone under. Think of drawing your lower abdominals toward your spine and rotating the pelvis slightly backward.
- Keeping the torso tall, press the hips forward slowly until you feel a stretch in the front of the right hip and thigh.
- Hold that position for the full 45 seconds, breathing steadily throughout.
- Switch sides on the second circuit.
The tailbone tuck is what separates an effective stretch from an arched back. Without posterior pelvic tilt, the lumbar spine extends instead of the hip flexor lengthening.
The sensation of a good stretch is there, but the psoas barely changes position. If you have been doing this stretch for months without much result, this is probably why.
For a more demanding variation, from the standard kneeling position, add a reach overhead with the same-side arm as the kneeling knee, angling it slightly toward the opposite side at about 45 degrees. Physical therapist Dr. John Rusin describes this variant as among the most complete hip flexor mobilizations available without equipment.
The diagonal reach elongates the stretch from the top of the psoas through to its femoral attachment. The standard version addresses the mid-range. The reach version works the full length of the muscle.
The stretch should feel strong and sustained, not sharp. A sharp sensation in the hip joint itself, distinct from muscle tension in the front of the thigh, is a signal to reduce range or have the hip assessed before continuing.
5. Seated Leg Lifts
Seated leg lifts train the hip flexors in the one position they need most help with: active hip flexion against gravity, from a shortened starting point. It is not comfortable. That is the point.
- Sit on the floor with both legs extended in front of you. Bend the right knee and plant that foot flat.
- Engage the core. Sit tall without rounding the back.
- Lift the left leg three to four inches off the ground. Hold for two to three seconds.
- Lower slowly and with control. Work for 45 seconds, then switch legs on the second circuit.
The height of the lift is secondary. The control throughout the range is not. If the back rounds or the working hip rises, stop and reset before continuing.
One Extra Move: Isometric Hip Flexor Work
Isometric exercises for hip flexors involve holding the muscle in contraction without movement through a range. They are particularly useful for people who experience pain with dynamic exercises, for those building back from a strain, and for anyone who wants to target end-range strength specifically.
The wall-supported march hold requires no equipment and can be done from a standing position.
- Stand facing a wall with both hands resting lightly against it for balance.
- Lift one knee to hip height, keeping the thigh roughly parallel to the floor.
- Hold that position for 5 to 10 seconds without letting the thigh drop or the pelvis tilt to either side.
- Lower the foot with control and switch legs. Perform 4 to 6 holds per side.
The challenge is maintaining pelvic neutral throughout. The moment the standing-side hip drops outward, or the holding-side knee drifts inward, the load shifts away from the hip flexor and into compensating structures. Keep the holds short and precise rather than extending them until form breaks down.
Add this move after the main circuit, or use it as a standalone option on days when floor work is not possible.
Can’t Get on the Floor? Desk-Friendly Variations
All five exercises have standing or seated versions that work for people returning from injury, beginners building from zero, or anyone fitting the routine into a workday.
Chair-based glute bridge: Sit at the edge of the chair. Press through the heels and lift the hips, squeezing the glutes. Hold two seconds. Lower and repeat.
Desk-assisted knee lifts: Hold the desk for balance and focus on lifting the knee deliberately rather than swinging the leg. The same eccentric control on the way down applies here.
Shallow reverse lunge: Reduce the step depth to a comfortable range. The hip flexor stretch still occurs at any range. A smaller step makes it more manageable for people with balance concerns or significant tightness.
Standing hip flexor stretch: Step one foot back, bend the back knee slightly, tuck the tailbone, and press the hips forward. Hold a wall or desk for stability. This is the standing equivalent of the kneeling version and the most accessible stretch for people over 60 or those with significant knee sensitivity.
Seated leg extensions: From a chair, extend one leg straight, flex the foot, and hold five seconds. Lower and repeat. This is a lower-demand version of the floor-based seated leg lifts.
For beginners or adults over 60 with significant tightness, spending the first week with these desk-based versions before progressing to the floor routine is a sensible starting point. The standing hip flexor stretch and chair-based bridge in particular can be done without leaving the workstation.
5 Mistakes That Slow Hip Flexor Recovery
Stretching but never strengthening. Tight hip flexors are usually also weak ones. Stretching improves flexibility in a session, but strengthening maintains it.
Without the strength component, the muscle returns to its shortened position within a day or two because nothing holds the new length in place.
Skipping the tailbone tuck in the kneeling stretch. This is the most common technical error in the routine. Without posterior pelvic tilt, the lumbar spine arches instead of the hip flexor lengthening.
The sensation feels like a stretch. The psoas barely moves.
Rushing through reps. Controlled speed under tension is what signals the nervous system to reorganize around a new length and strength level.
Fast, sloppy reps produce metabolic fatigue without meaningful adaptation. Slow the movement down and let each phase count.
Doing the routine only when you think of it. Consistency matters more than intensity here. Five minutes daily outperforms 30 minutes once a week.
Set a recurring reminder for a specific time. Same trigger, same slot, every day.
Holding your breath. The exhale during the hardest phase of each exercise is not optional. Breath-holding increases intra-abdominal pressure and masks the feedback signals that tell you when form is starting to break down. Breathe out on the effort.
One thing worth saying plainly: some people’s hip flexors are not the primary source of their discomfort at all. Piriformis tension, hip impingement, and lumbar facet issues can all produce symptoms that look identical to hip flexor tightness from the outside. If this routine produces no improvement after four weeks, the diagnosis may need revisiting before the treatment continues.
Level Up: Adding Resistance
Once you have completed four weeks of the bodyweight routine and the morning stiffness has reduced, you can add resistance to accelerate progress.
- Resistance bands looped around the thighs during glute bridges increase the demand on the glute medius alongside the gluteus maximus.
- Light ankle weights (1 to 3 kg) during standing knee lifts and seated leg lifts build end-range strength faster than bodyweight alone.
- A yoga block or folded blanket under the back foot during the kneeling stretch deepens the hip flexor release without changing the technique.
None of these additions are required. They are useful if you have plateaued on the bodyweight version or if the routine has started to feel manageable rather than challenging.
Your 4-Week Recovery Plan
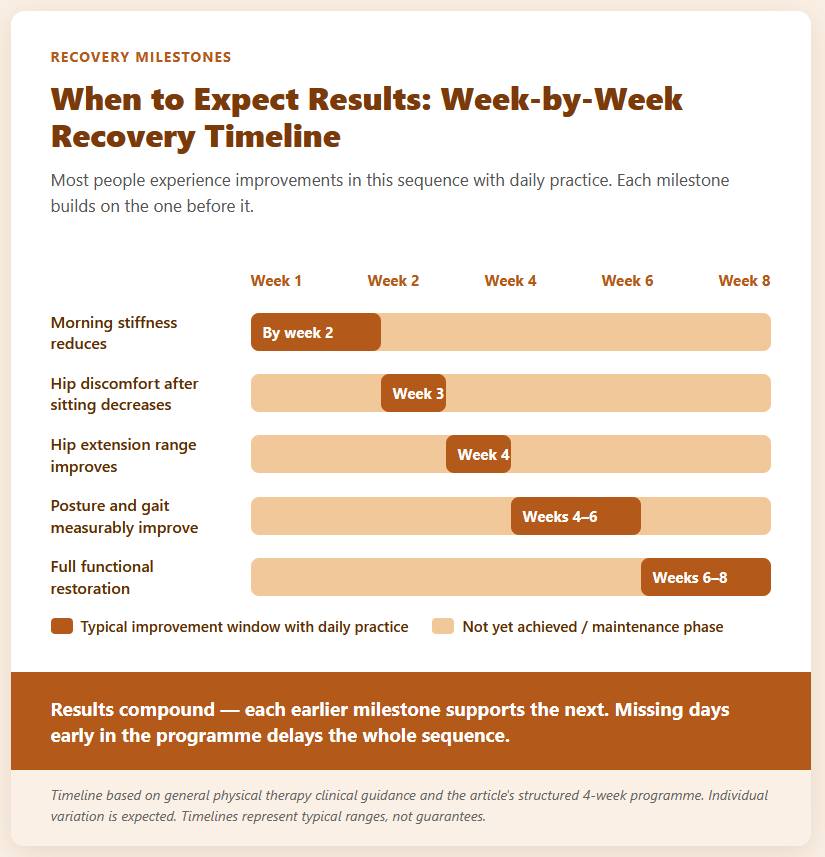
Most people notice a reduction in morning stiffness within the first two weeks of daily practice. Physical therapists typically report measurable improvements in hip extension range within four to six weeks of structured stretching and strengthening work.
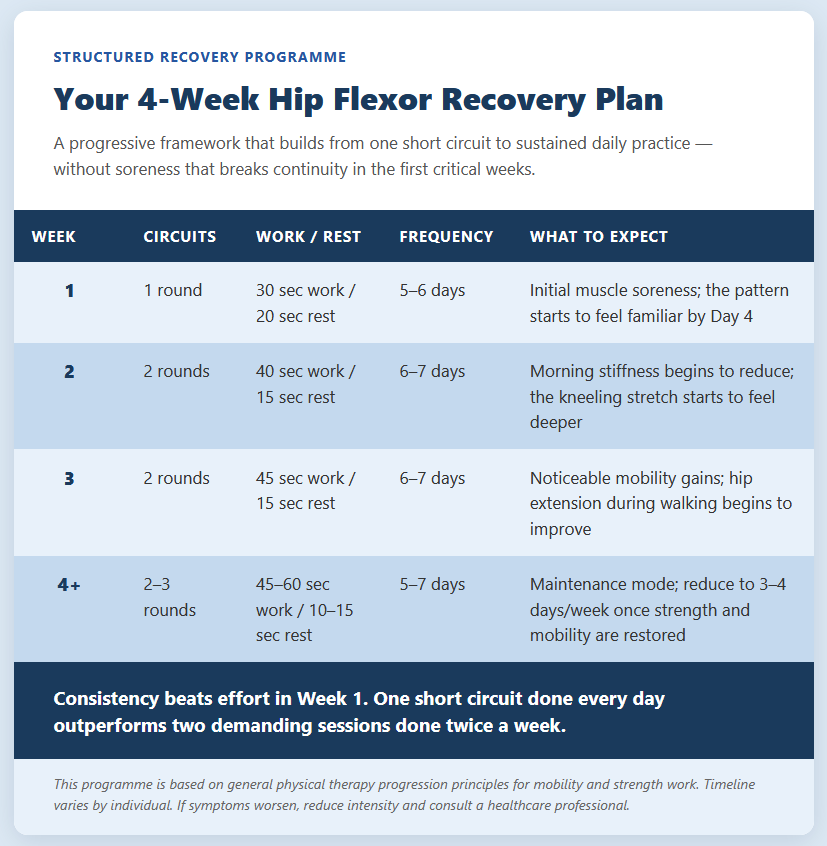
The plan starts conservatively because the first week is about establishing the movement pattern, not achieving maximum effort. Shorter hold times and one circuit allow the body to adapt without soreness that disrupts continuity in the critical early phase.
By week four, two full circuits with 45-second work intervals should feel manageable. At that point, the goal shifts from restoration to maintenance.
Three to four sessions per week is typically enough to hold the gains. Dropping below that frequency tends to allow the old compression pattern to reassert itself gradually.
3 Daily Habits That Reinforce the Routine
The 10-minute routine is the core. These habits extend its effect across the rest of the day without requiring additional dedicated sessions.
The 30-minute rule. Set a timer. Every 30 minutes of sitting, stand and move for at least 60 seconds. Research by Thorp and colleagues in Medicine and Science in Sports and Exercise found that 30-minute standing breaks reduce the blood glucose spike that follows prolonged sitting.
The hip benefit is almost beside the point, but it is there too. Two problems, one timer.
Walk with intention. Walking moves the hip flexors through extension with each rear-leg push-off: a small dose of exactly the movement that sitting removes. Short walks during phone calls, after meals, or between tasks accumulate over a week into meaningful movement volume.
A supervised hip flexor stretching program studied in Gait and Posture produced measurable improvements in stride length and peak hip extension during walking. How far each leg reaches back, how fully the hip opens mid-stride. Those mechanics changed with consistent practice.
Check your chair height. Hips should be at approximately 90 degrees when seated, with feet flat on the floor.
If your hips sit lower than your knees, the hip flexors are under additional compression load throughout the workday. Adjust the chair height or add a seat cushion to level the position.
What Else Your Hip Flexors Affect
Tight hip flexors rarely stay contained to one region. They connect anatomically to structures that influence posture, movement mechanics, and pain patterns throughout the lower body.
Anterior pelvic tilt. The exaggerated lower back arch that hip flexor tightness creates shifts the center of gravity forward and compresses the lumbar vertebrae. Many people experience this as lower back fatigue rather than hip pain, which is one reason the source often goes unidentified for years.
IT band tension. Tight hip flexors change the mechanics of the leg swing. The knee starts absorbing forces it was never designed to handle, and the IT band loads differently as a result. People spend months treating lateral knee pain without ever looking at the hip that changed the gait that caused it.
Reduced glute activation. This one runs in both directions. Tight hip flexors inhibit full glute contraction, and weak glutes fail to counter the hip flexors’ pull.
Addressing both simultaneously, which is what this routine does, breaks the cycle rather than treating one side of it.
Gait and balance. Hip restriction is an underappreciated factor in balance problems, particularly in adults over 50. When the hip flexors cannot fully extend, the stride shortens, and the body compensates through posture changes that reduce stability. This is one reason hip flexibility work often produces improvements in balance that appear unrelated to the hips on the surface.
The rubber band analogy has a second half. Restore its original shape and the elasticity returns, but only if you repeat the restoration often enough that the new shape becomes as familiar as the old one.
Ten minutes a day is not a long time. What makes the difference is that those ten minutes happen every day, at roughly the same point in the day, until the hips stop defaulting to the compressed position and start defaulting to the open one.
That shift takes weeks, not days. Sometimes six. Sometimes eight.
The people who do not get there are rarely the ones who quit. They are the ones who stretched diligently but never added the strength side, or who added the strength but never made it consistent enough for the nervous system to reorganize around it. Both pieces. Every day.
FAQs
How long does it take to loosen tight hip flexors?
Most people notice reduced morning stiffness within two weeks of daily practice. Meaningful improvements in hip extension range typically appear by week four. Full restoration of normal function (where the hip flexors no longer pull into tightness after a day of sitting) generally takes six to eight weeks of consistent combined stretching and strengthening work.
Can I do these exercises every day?
Yes. Bodyweight mobility work at this intensity is safe for daily practice. Hip flexors respond well to frequent, low-load stimulation. Take an extra rest day if you experience unusual soreness that affects your ability to move normally, but for most people daily practice is both safe and preferable to less frequent longer sessions.
Do hip flexor exercises help lower back pain?
Often, yes. Tight hip flexors pull the pelvis into anterior tilt, which increases compressive load on the lumbar spine. Loosening the hip flexors and strengthening the glutes reduces that forward pull.
Many people with low-grade chronic lower back pain find consistent hip flexor work reduces their symptoms within four to six weeks. That said, lower back pain has multiple causes, and not all of them trace back to the hips. If hip flexor work produces no improvement after four weeks, a clinical assessment is worth pursuing.
What is the best exercise to strengthen hip flexors?
Standing knee lifts and seated leg lifts are the most direct strengthening exercises for the hip flexors because they work the muscle concentrically through its active range without the compensation patterns that sitting has already trained into the movement. The isometric march hold is the most targeted option for people who need to build strength before progressing to dynamic work.
What emotion is held in the hip flexors?
Some movement therapies, particularly practices rooted in somatic psychology, suggest that the hips store anxiety or unresolved stress. The psoas, in particular, contracts during a startle or fear response, partly because it connects to the autonomic nervous system’s threat response pathway.
Whether or not the emotional framing holds up clinically, the relief that many people feel after deep hip flexor stretching is real. The most likely explanation is mechanical: chronic muscle tension at the front of the hip creates a low-level holding pattern that, when released, produces a broader physical and sometimes emotional sense of ease.
How should I sleep to loosen my hip flexors?
Sleep on your back with a pillow or rolled towel under your knees, or on your side with a pillow between your knees. Both positions keep the hip flexors in a more neutral length than sleeping on your stomach, which places the hip in prolonged extension and can increase morning stiffness. Stomach sleeping is the position most likely to compound hip flexor tightness overnight.
What not to do with tight hip flexors?
Avoid sitting for more than 30 minutes without a movement break. Avoid forcing stretches into sharp pain rather than sustained tension. Avoid starting high-impact activities like running or jumping without first addressing the restriction, since tight hip flexors alter gait mechanics in ways that increase load on the knees and lower back.
And avoid treating this as a problem that resolves itself with rest. Hip flexor tightness responds to movement, not to less of it.