Not every yoga pose is safe for sciatica. In fact, one of the most popular stretches can backfire. Here’s how to choose the right poses for your pain.
The most searched yoga pose for sciatica is the pigeon pose. Physiotherapists who treat the condition will often tell you it’s also one of the positions most likely to make symptoms worse. The traditional version, with the front leg folded under the body and weight loaded directly into the hip, compresses the very muscles surrounding the sciatic nerve.
That doesn’t mean yoga is the wrong choice. It means the right pose depends on what’s causing the compression in the first place. Piriformis syndrome, disc herniation, and spinal stenosis all produce sciatica-like pain, and they respond differently to the same yoga position. The 12 yoga poses below are organized by cause, so you’re using the right approach for your situation rather than guessing.
AT A GLANCE
Best poses for most people: Reclining Pigeon, Knees-to-Chest, Eye of the Needle, Bridge Pose, Cat-Cow
Poses to avoid: Standing Forward Fold, Seated Forward Fold, traditional Pigeon Pose, deep, rotational twists with a rounded back
The rule that overrides everything: if a pose produces tingling or numbness traveling toward the foot, stop immediately. Discomfort in the hip or lower back is usually acceptable. Pain traveling down the leg is not.
Why yoga and sciatica make an odd but useful pair
Most yoga-for-sciatica advice stops at tight muscles. Stretch the piriformis, release the hamstrings, and the nerve gets more room. That’s the simplified version, and it’s not entirely wrong. But it misses the mechanism that explains why two people doing the same poses get completely different results, and why some people improve while still in significant structural compression.
The tight-muscle explanation involves the piriformis, deep hip rotators, and hamstrings, all of which run near or across the nerve’s path. When any of these become chronically shortened, usually from sustained sitting or muscle imbalance, they add compressive force to a nerve that already has limited room to move. Yoga asana practice that targets these specific muscles can reduce that compression meaningfully within days to weeks.
Core strengthening works more slowly but matters more over the long run. The transverse abdominis and multifidus muscles stabilize the lumbar spine from the inside out. When they’re underactive, the spine’s load passes more of its force to the discs and nerve roots with every movement. Yoga builds this kind of deep stability through balance-demanding poses that require controlled, small-range movement rather than simple contraction exercises.
The third mechanism is less obvious. Chronic pain changes how the nervous system processes input, and the brain can amplify pain signals from areas that are mildly damaged or structurally healed.
Research in pain neuroscience has established this clearly. Yoga’s combination of slow breathing and deliberate, non-threatening movement appears to reduce that amplification, partly through parasympathetic nervous system activation. This is not the same as pain “going away.” It’s the pain signal becoming quieter relative to what the tissue actually warrants.
What the research actually says
The evidence base for yoga and low back pain is solid. The evidence specifically for sciatica is more limited, though what exists points consistently in the same direction.
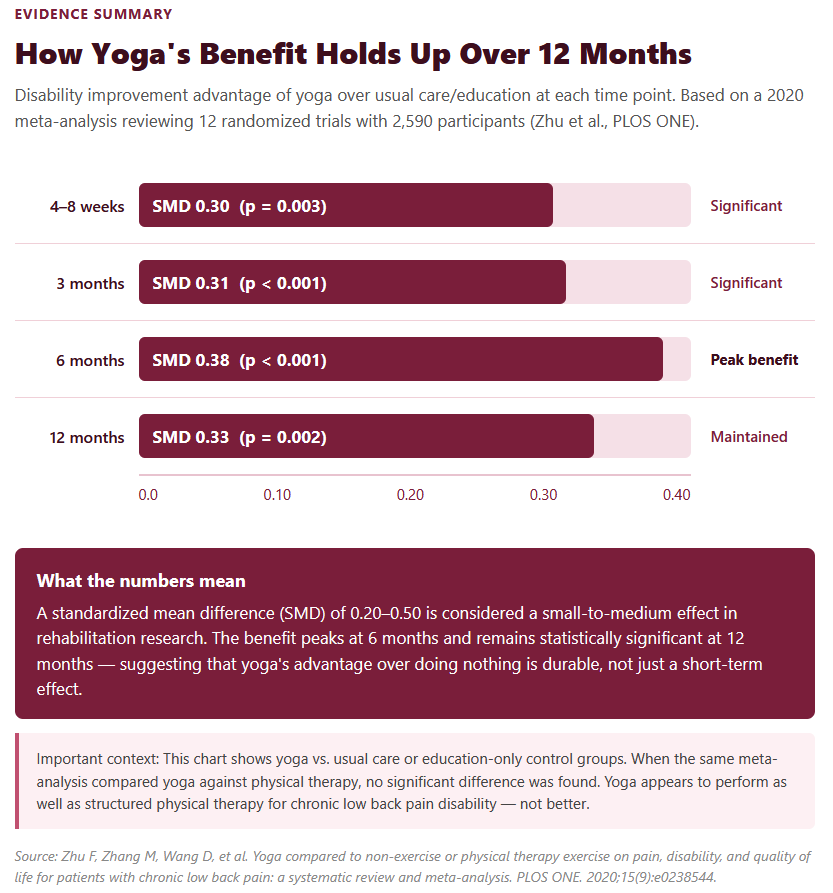
The broadest picture comes from a 2020 meta-analysis in PLOS ONE that reviewed 12 randomized trials totaling more than 2,500 participants with chronic low back pain. Yoga outperformed usual care and education on both pain intensity and functional disability at every measured time point. The honest finding about physical therapy: yoga performed comparably, not better. Claims that yoga is superior to physical therapy for sciatica are not supported by this evidence.
Two trials have looked at yoga directly in people with confirmed sciatica. A 2015 study from Robin Monro and colleagues, published in the Journal of Back and Musculoskeletal Rehabilitation, went furthest in terms of clinical specificity.
They recruited 61 adults with confirmed lumbar disc extrusions or bulges, 62 percent of whom had sciatica. After a 3-month yoga program, the yoga group’s disability scores on the Roland Morris Disability Questionnaire were 3.29 points lower than the control group’s. That’s a meaningful functional difference. No adverse effects were reported.
Researchers Akhilesh Singh and Om Singh, writing in the International Journal of Yoga in 2013, ran a 4-week trial with 60 participants who had classical sciatica symptoms. One group received yoga asanas only. The other received yoga combined with Ayurvedic oil massage.
Both groups showed significant reductions in pain, rigidity, and difficulty walking. The asana-only group’s results were statistically comparable to the combined group, which says something about how much of the benefit comes from the movement itself.
Then there’s a benefit most sciatica guides don’t mention. A secondary analysis of a 320-person randomized trial, published in the Journal of General Internal Medicine in 2019, found meaningful improvements in sleep quality at 52 weeks in chronic low back pain patients after 12 weeks of yoga practice. The sleep benefit is real. Specific hours-per-night figures cited elsewhere are not in the literature.
Understanding your sciatica: the anatomy that matters
The sciatic nerve exits the lower lumbar spine through five roots: L4, L5, S1, S2, and S3. These roots merge into a single nerve that travels through the pelvis, usually underneath the piriformis muscle, then runs down the back of the thigh and branches at the knee into the lower leg. What compresses the nerve determines your symptoms and, more practically, which poses will help.
Herniated discs at L4-L5 or L5-S1 push disc material toward the nerve roots as they leave the spinal canal. This produces symptoms that typically worsen with sitting and forward bending, because both actions increase disc pressure.
Yoga’s backbend poses are often more useful than its forward folds for disc-related sciatica. This is counterintuitive enough that many people avoid backbends during a flare, when a gentle cobra pose might actually provide relief.
Piriformis syndrome differs in its anatomy and in what provides relief. The piriformis muscle sits deep in the buttock and rotates the hip outward. The sciatic nerve runs alongside it, and in a minority of people directly through it.
When the piriformis becomes tight or reactive, it compresses the nerve from the side rather than from the spine. Hip-opening poses that externally rotate and stretch the piriformis tend to work best here, while they can be neutral or slightly aggravating for disc herniation cases.
Spinal stenosis, more common in adults over 50, involves a narrowing of the spinal canal or its exit points. Extension-based poses can worsen symptoms by reducing an already tight space further. Flexion-based poses, which open the posterior spinal spaces, often provide more relief. This is roughly the opposite of disc herniation management.
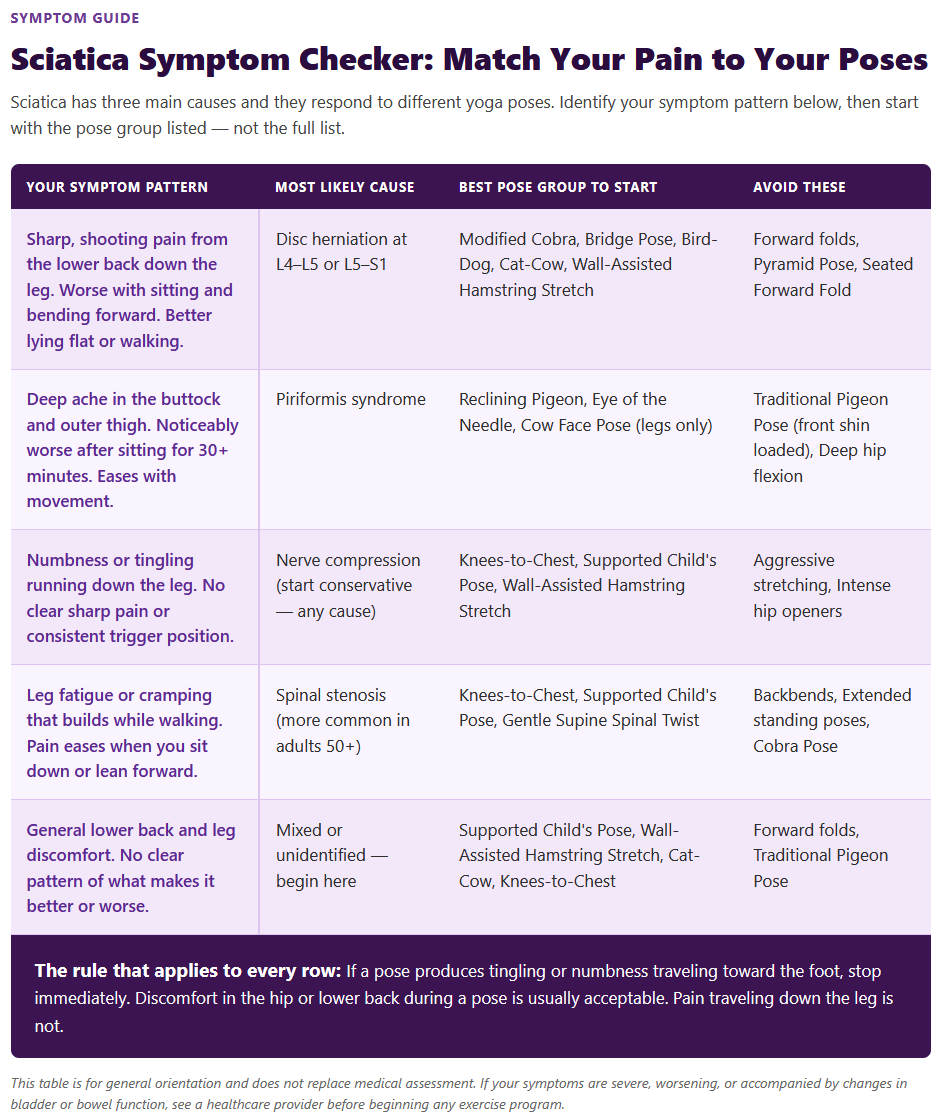
Which pattern best describes your sciatica right now?
12 yoga poses for sciatica relief
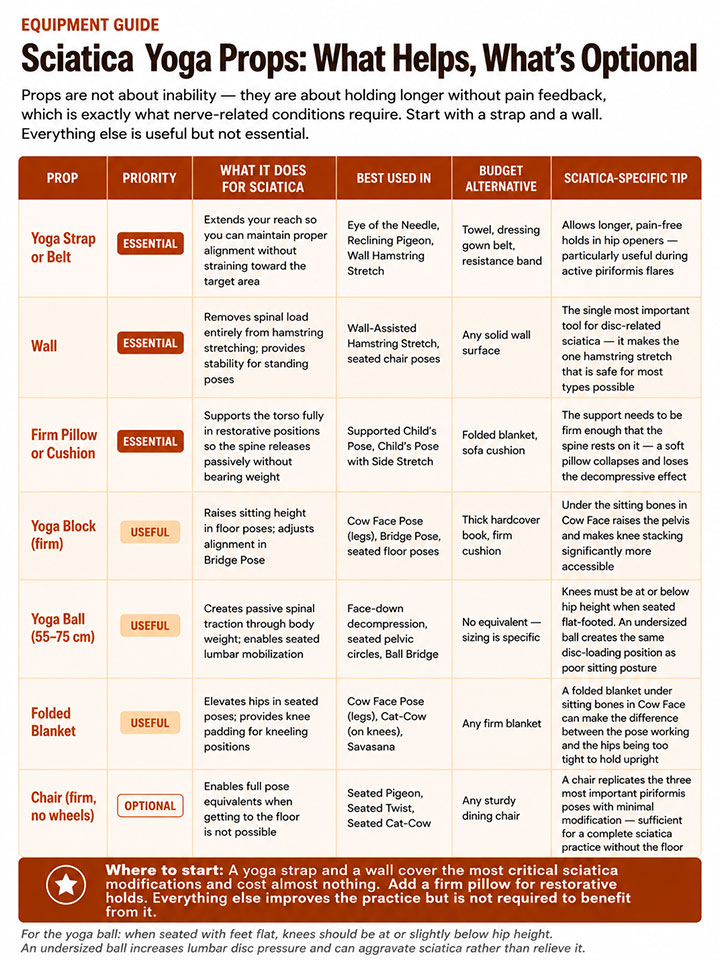
These 12 poses are organized by what they treat, not by difficulty level. Using the symptom table above, identify which pattern best matches yours before starting. If you’re unsure, the “all causes” group at the end is a safe place to begin.
For acute flare-ups
When the nerve is actively inflamed, the goal is gentle decompression. Stretching a reactive nerve often increases pain. Avoid all hip openers during an acute phase and stick to these two poses only.
1. Knees-to-Chest (Apanasana)
This is the right starting point during a flare because it does one thing well: it gently opens the posterior spinal spaces without loading the nerve. The slow rocking motion also has a mild analgesic effect through joint movement and muscular warmth.
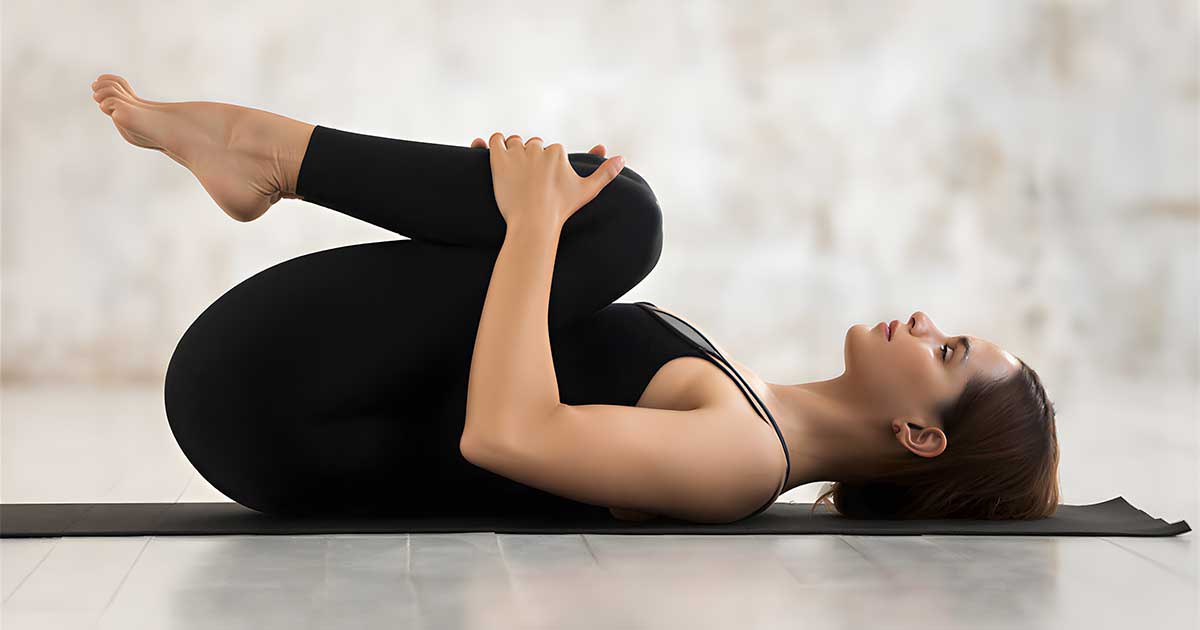
- Lie on your back and draw both knees toward your chest.
- Wrap your arms around your shins or clasp your hands behind your thighs.
- Rock side to side slowly, 5 to 8 repetitions.
- Hold with gentle traction for 30 to 60 seconds.
If hugging both knees sends pain further down the leg, try one knee at a time. A pillow under your head is fine if your neck feels strained.
2. Gentle Supine Spinal Twist (Supta Matsyendrasana)
The warning here comes before the instructions, because this pose causes more problems than it solves when done incorrectly. A twist that forces the knee down, or that rounds the lower back during rotation, compresses the disc and irritates the nerve. The version that helps involves almost no movement at all.
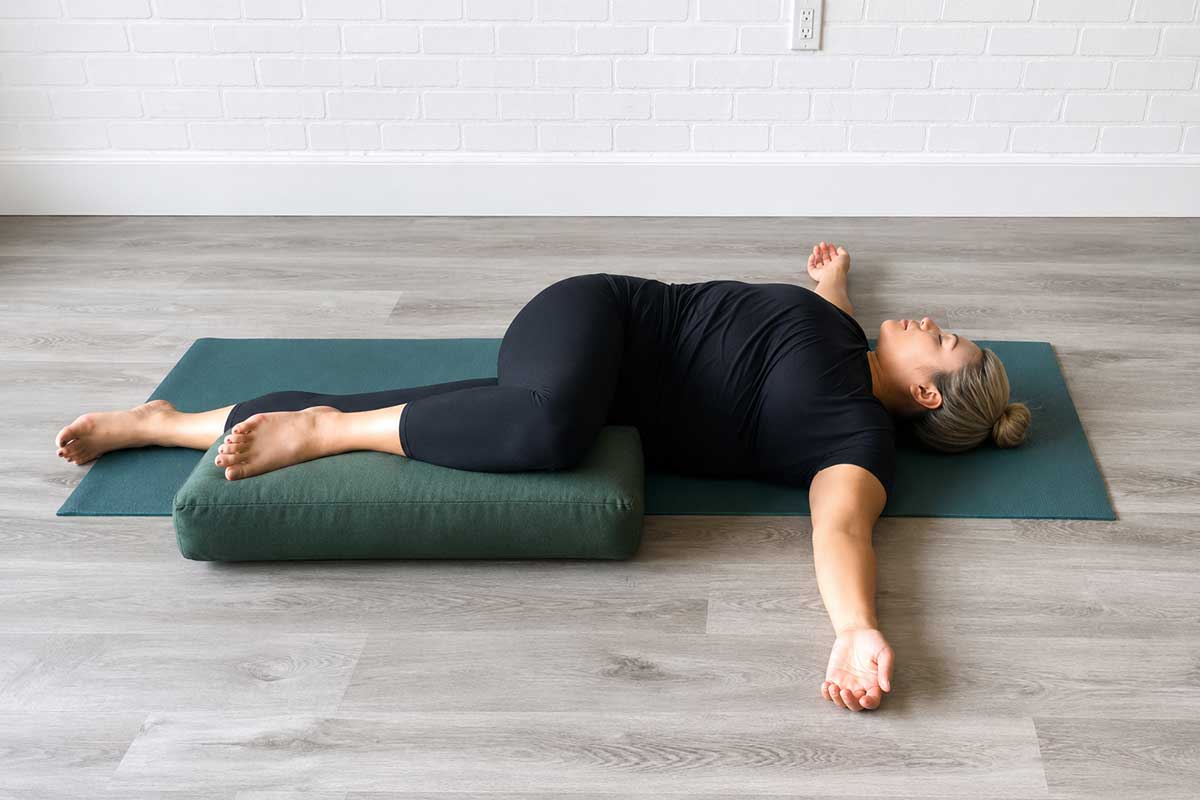
- Lie on your back with both knees bent and feet flat.
- Let both knees fall slowly to the left, only as far as they go without forcing.
- Keep both shoulders in contact with the floor throughout.
- Hold for 30 to 60 seconds, then draw both knees back to center before switching sides.
During an acute flare, the range of motion may be only 10 to 15 degrees. That’s correct. The decompressive benefit is present even in a small range of movement.
For piriformis syndrome
These three poses target the external hip rotators directly. If your pain is primarily in the buttock and outer thigh, and noticeably worse after sitting for 30 minutes or more, this is your most relevant category.
3. Reclining Pigeon Pose (Supta Kapotasana)
Most people with piriformis syndrome find this pose more effective than its seated equivalent. The reason is straightforward: the floor removes the weight-bearing component that aggravates the nerve, which means you can hold the position longer without triggering an inflammatory response. It’s also considerably safer than the traditional floor pigeon, which places direct pressure on the hip joint itself.

- Lie on your back with both knees bent, feet flat on the floor.
- Cross your right ankle just above your left knee, keeping the right foot flexed.
- Thread your right hand through the gap between your legs and clasp both hands behind your left thigh.
- Gently draw your left leg toward your chest until you feel a stretch in the right outer hip.
- Hold 60 seconds per side, working toward 3 minutes per side over several weeks.
One useful diagnostic detail: if you feel tingling in your foot before you’ve deepened the stretch at all, your piriformis may be acutely inflamed. Back off to Knees-to-Chest until the acute phase passes. A towel looped around the left thigh works if you can’t reach it with your hands.
4. Eye of the Needle Pose (Sucirandhrasana)
This pose covers similar territory to Reclining Pigeon, but the hand position is different and many people find it easier to control depth with. Use it as your primary pose if Reclining Pigeon feels too intense, or as a warm-up before moving into the deeper version.
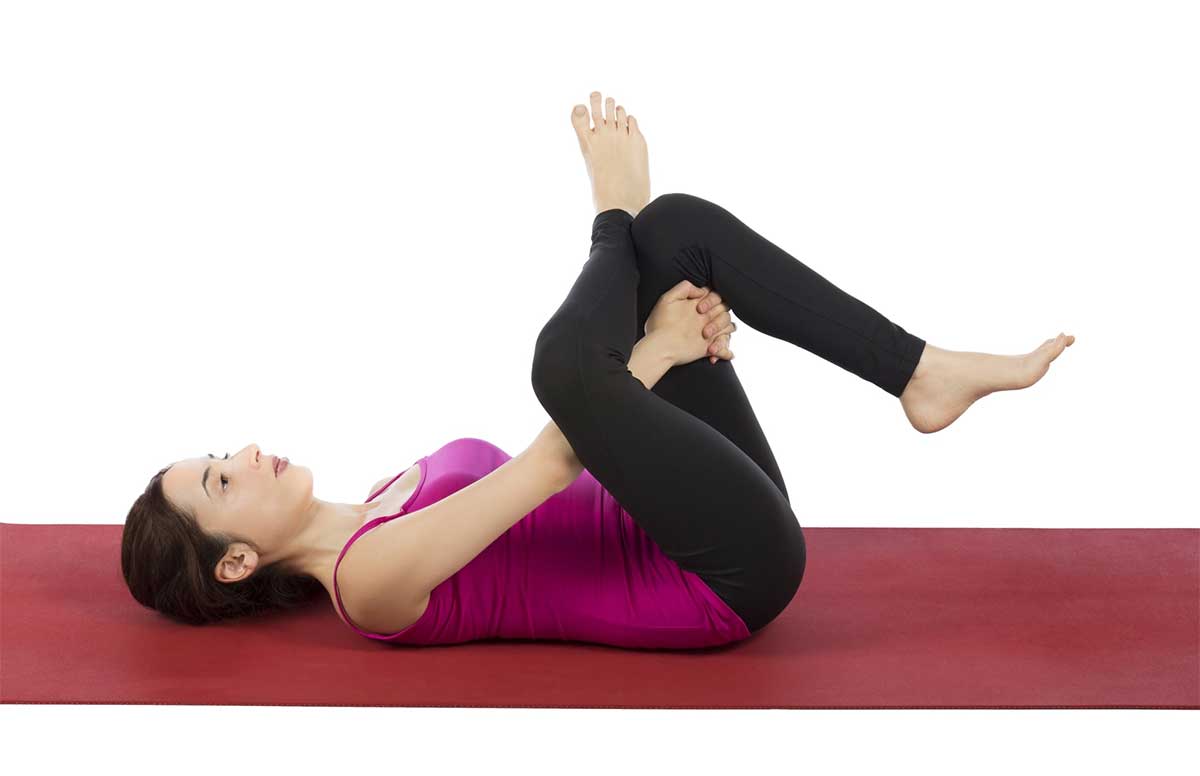
- Lie on your back with both knees bent.
- Cross your right ankle over your left thigh and flex both feet.
- Lift your left foot off the floor and thread your right hand through the space between your legs.
- Clasp your hands behind your left thigh or on top of your shin.
- Gently draw your left leg toward your chest. Hold 30 to 60 seconds per side.
Keep your head on the floor throughout. If lifting the left leg increases symptoms, rest your left foot on a wall at hip height instead of lifting it free.
5. Cow Face Pose, Legs Only (Gomukhasana)
This is the most intense of the three piriformis poses. It stretches multiple hip rotators simultaneously. Save it for non-flare days, and only after the nerve has settled.
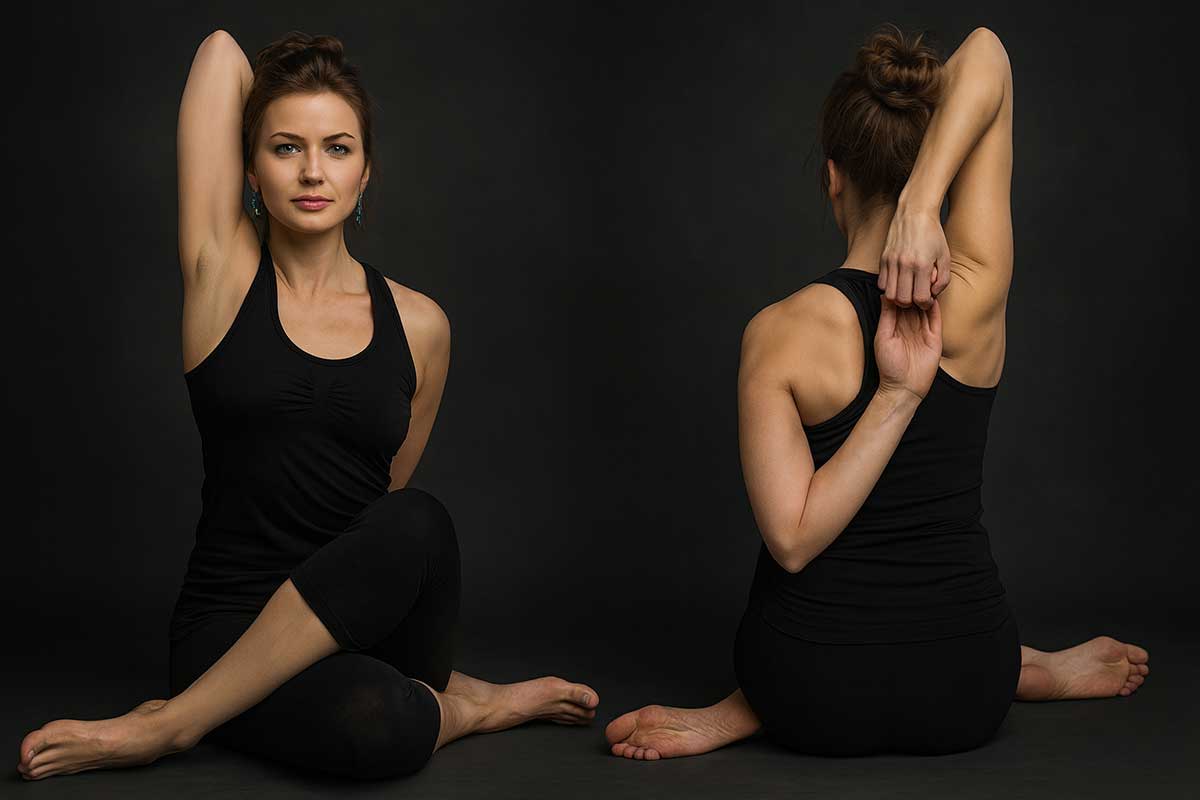
- Sit upright on a folded blanket or yoga block to raise your hips off the floor.
- Bend your right knee and slide your right foot to the outside of your left hip.
- Cross your left knee over your right, stacking the knees as closely as you can.
- Sit tall and breathe steadily for 30 to 60 seconds, then switch sides.
The knees may not fully stack, particularly at first. The priority is an upright spine, not leg geometry. Sitting on extra height from a block or firm blanket usually makes the stacking more accessible.
For disc herniation and spinal decompression
If your symptoms worsen with sitting and forward bending, and improve with walking or lying flat, disc herniation at L4-L5 or L5-S1 is the more likely cause. These four poses prioritize extension and core stability over hip opening.
6. Modified Cobra Pose (Bhujangasana)
A backbend is often the right move for disc-related sciatica, not the cautious rest most people choose. The mechanism runs like this: when the nucleus of a herniated disc is pushed toward the nerve root by sustained flexion (sitting, bending forward), a gentle backward extension can shift that disc material anteriorly, reducing the pressure on the nerve root.
This is the biomechanical basis of McKenzie extension therapy, which has a reasonable evidence base for disc-related lower back pain. It doesn’t work for everyone, but for many people it’s the first thing that actually provides acute relief.
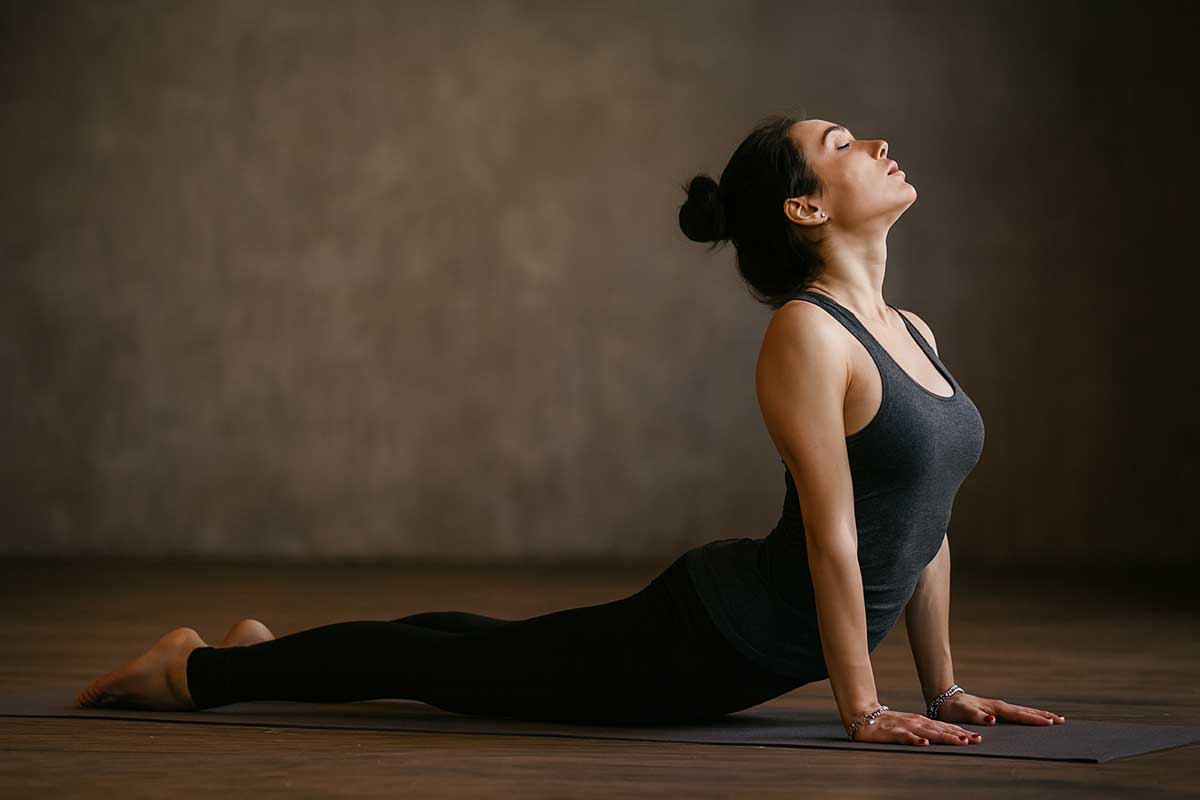
- Lie face down with your forehead resting on the floor.
- Place your palms under your shoulders with elbows close to your sides.
- Press your pubic bone and thighs firmly into the floor.
- Inhale and slowly lift your head and chest, using mostly your back muscles rather than pushing with your hands.
- Go only as high as feels comfortable. Hold for 15 to 30 seconds, then lower slowly.
If this pose produces leg symptoms rather than relieving them, stop. Some disc herniations do not respond to extension. If that’s your pattern, the flexion-based poses in the earlier groups will be more useful.
7. Bridge Pose (Setu Bandhasana)
Bridge activates the glutes and posterior chain while the spine holds a neutral position. Weak gluteus maximus is a consistent finding in people with chronic sciatic pain. The muscles don’t directly take pressure off the nerve, but stronger glutes change the mechanical load patterns through the pelvis and lumbar spine over time. Those load changes matter most at the disc and nerve root level, which is precisely where disc-related sciatica originates.
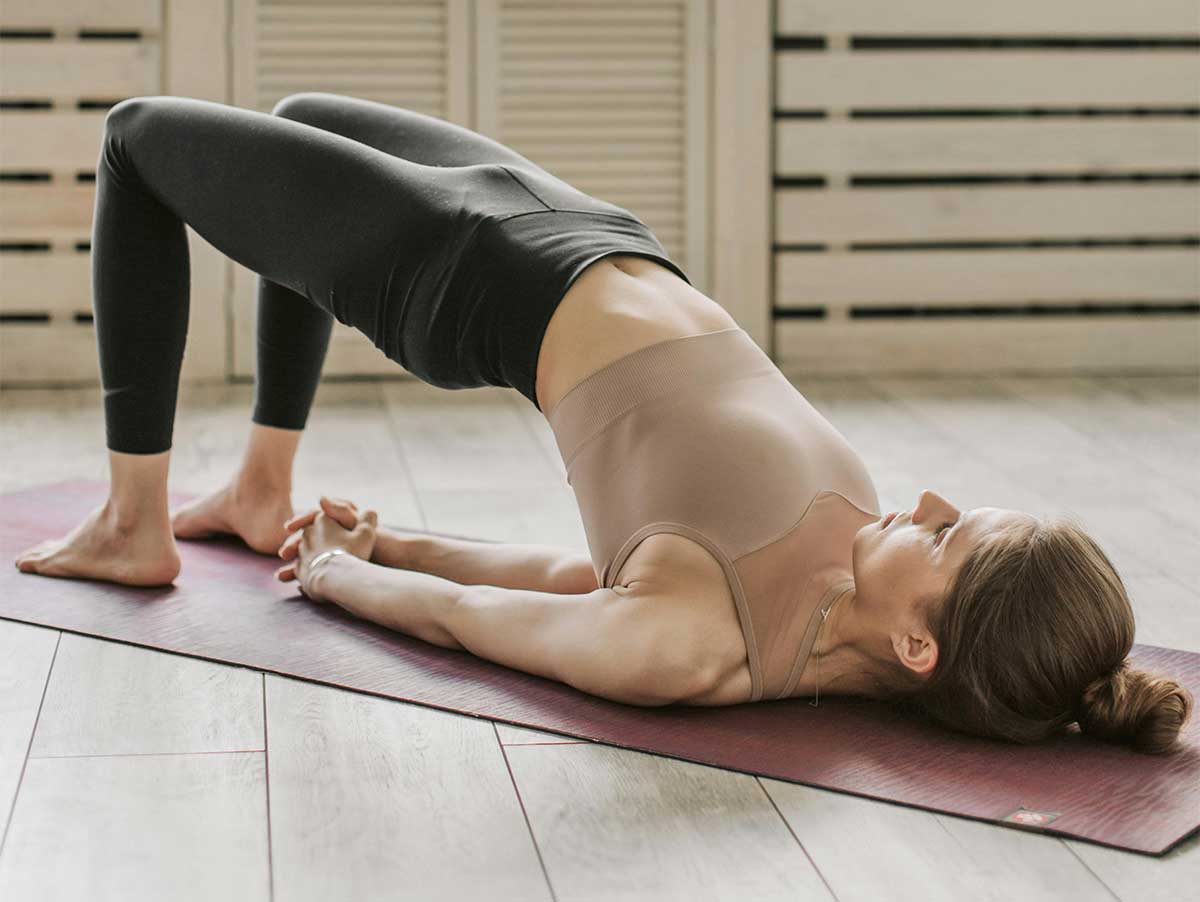
- Lie on your back with your knees bent and feet flat, hip-width apart.
- Press your feet into the floor and squeeze your glutes as you lift your hips.
- Hold at the top for 5 full breaths, keeping your knees parallel and your back flat.
- Lower slowly. Repeat 5 to 8 times.
A yoga block placed between your thighs helps maintain knee alignment and brings the inner hip stabilizers into the movement. If this causes lumbar tightness, reduce the height of the lift rather than stopping altogether.
8. Bird-Dog (Parsva Balasana)
This is the most demanding of the four poses, and also the most directly targeted at spinal stability. Maintaining a neutral spine while extending opposite limbs simultaneously activates the multifidus and transverse abdominis, which are the deep muscles responsible for protecting the lumbar vertebrae from excessive movement under load.
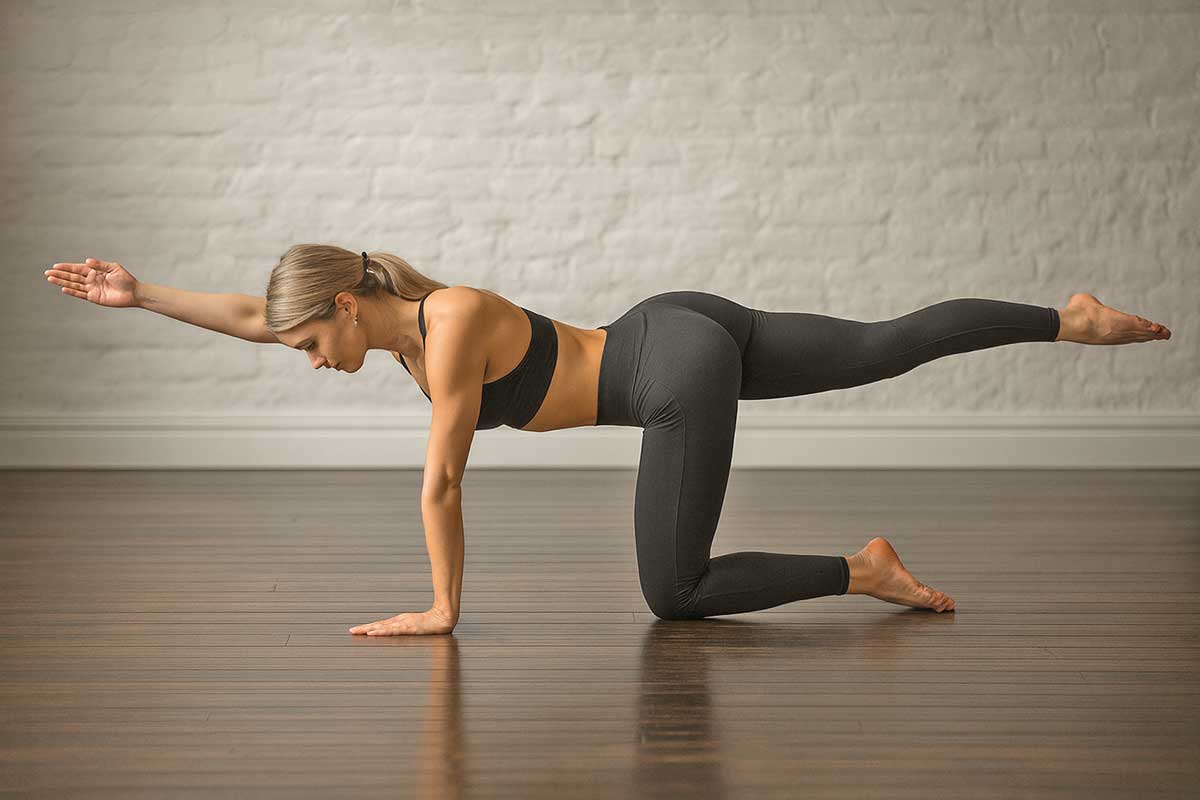
- Start on your hands and knees with wrists under shoulders and knees under hips.
- Extend your right arm forward and your left leg back at the same time.
- Keep your hips level. Do not allow the lifted hip to rotate toward the ceiling.
- Hold for 5 full breaths, then return to center and switch sides.
- Perform 5 to 8 repetitions per side.
If the full extension is too challenging at first, start with only the arm or only the leg. One point of contact with the floor is acceptable until the deep stability improves.
9. Cat-Cow (Marjaryasana-Bitilasana)
Cat-cow is the recovery pose of this group: gentle enough for daily use, effective enough to warrant consistent practice. Its main value is restoring the lumbar spine’s natural range of motion after periods of sustained posture, whether sitting, sleeping, or standing in one position.
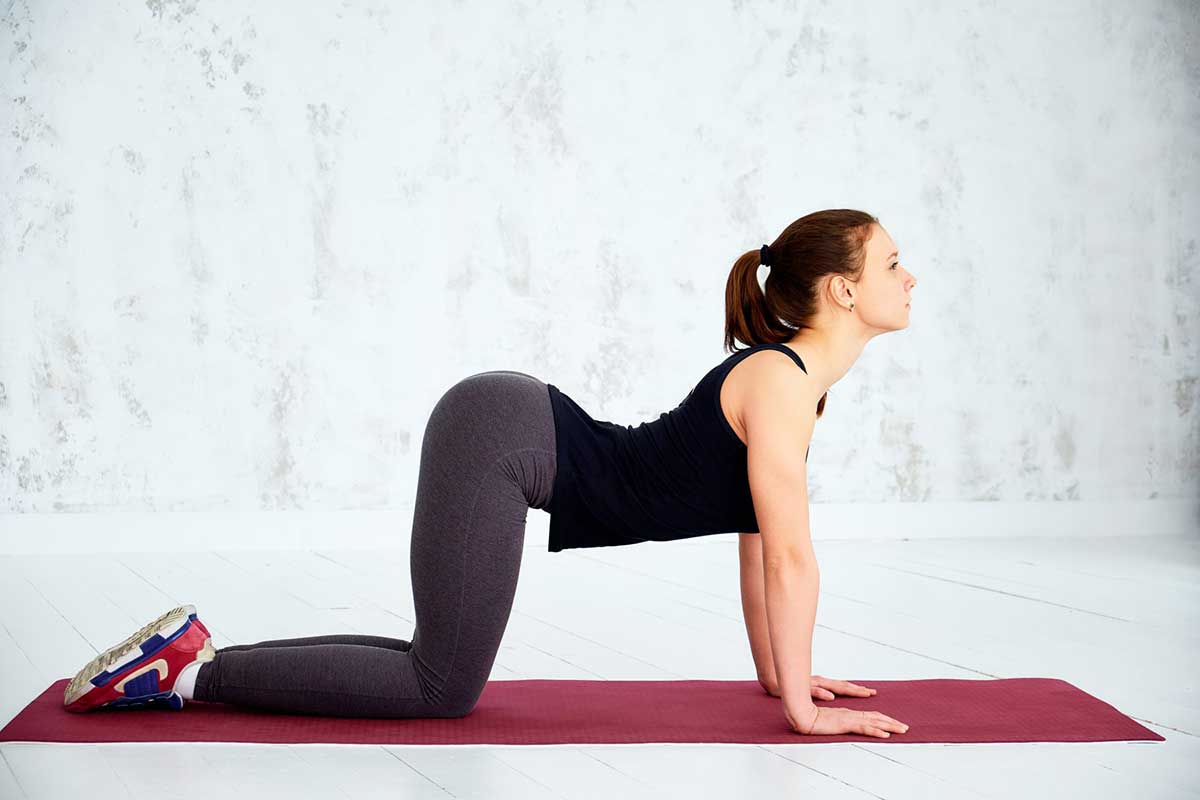
- Start on your hands and knees with a neutral spine.
- Inhale and drop your belly toward the floor, lifting your tailbone and looking gently upward (Cow).
- Exhale and round your spine toward the ceiling, tucking your chin and pelvis (Cat).
- Move between the two positions slowly for 60 to 90 seconds, following your breath.
If being on all fours is uncomfortable, this translates to a chair: place your hands on your knees and move between arching and rounding the spine. The movement is the same.
Across all causes
These three poses work without a diagnosis.
10. Supported Child’s Pose
Child’s pose works for sciatica relief in ways that forward folds don’t, because the spine is supported and unloaded rather than bearing the weight of the upper body. The lumbar elongation is passive and gravity-assisted, not actively forced.
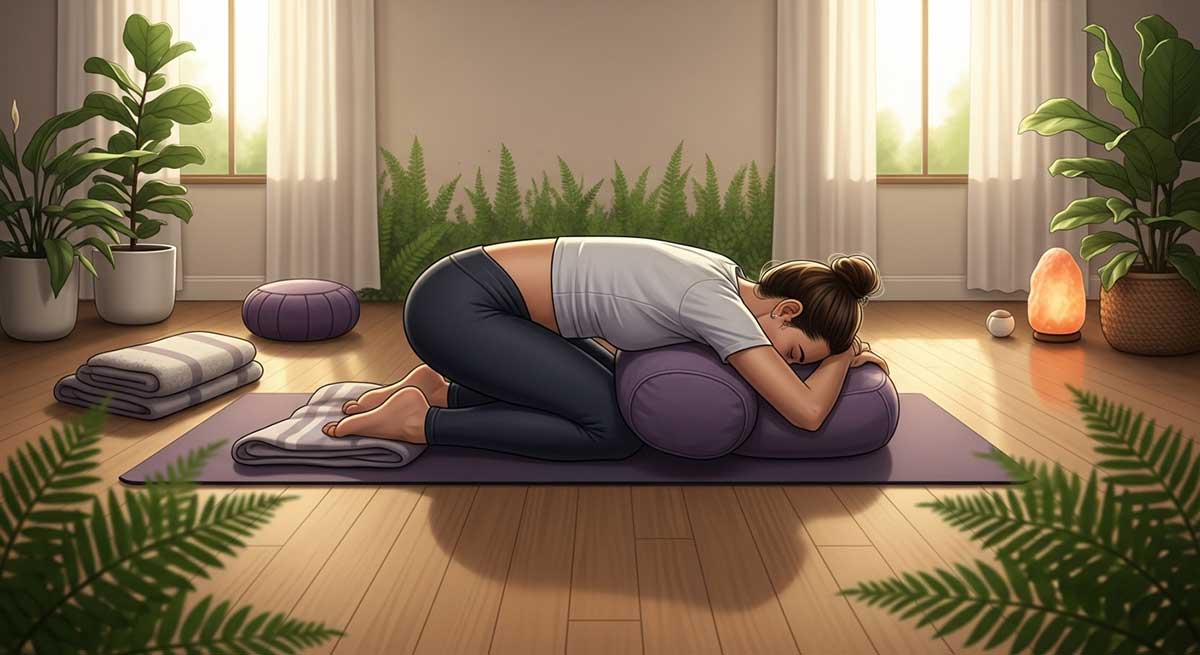
- Kneel with your knees wider than hip-width and your big toes touching.
- Place a firm pillow or folded blanket lengthwise between your knees for support.
- Fold forward and rest your torso on the support, head turned to one side.
- Breathe slowly and hold for 2 to 3 minutes.
For seniors or anyone who finds kneeling difficult: sit in a chair, place a firm pillow on a desk, and fold forward onto it. The spinal effect is close enough to the floor version to be worthwhile.
11. Supported Child’s Pose with Side Stretch
This variation adds a lateral stretch to the standard version, which decompresses the facet joints on one side of the lumbar spine. Useful when sciatic symptoms are consistently worse on one side, which is the more common pattern.
- Come into supported child’s pose as described above.
- Walk your hands to the right until you feel a stretch along the left side of your torso.
- Hold for 60 to 90 seconds, then walk hands back to center.
- Repeat on the other side.
12. Wall-Assisted Hamstring Stretch
Standard standing hamstring stretches simultaneously flex the lumbar spine and tension the sciatic nerve. For disc-related sciatica, that combination carries real aggravation risk. The wall version removes the spinal load entirely, making it the one hamstring stretch that works for most sciatica types.
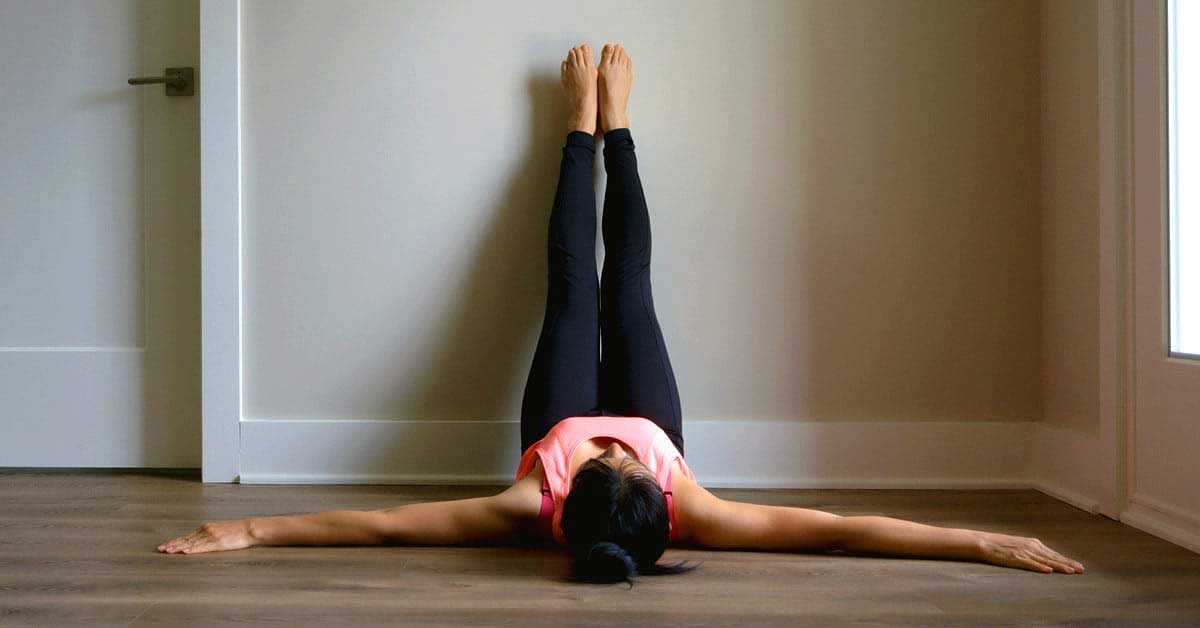
- Lie on your back with your hips close to a wall (legs up the wall pose, but keep one leg bent)
- Extend one leg up the wall, keeping the other leg bent with the foot on the floor.
- For more stretch, move your hips closer to the wall. For less, move further away.
- Hold 60 to 90 seconds per side.
If keeping the extended leg straight produces leg symptoms, bend the knee slightly. The decompressive benefit remains even with a soft knee.
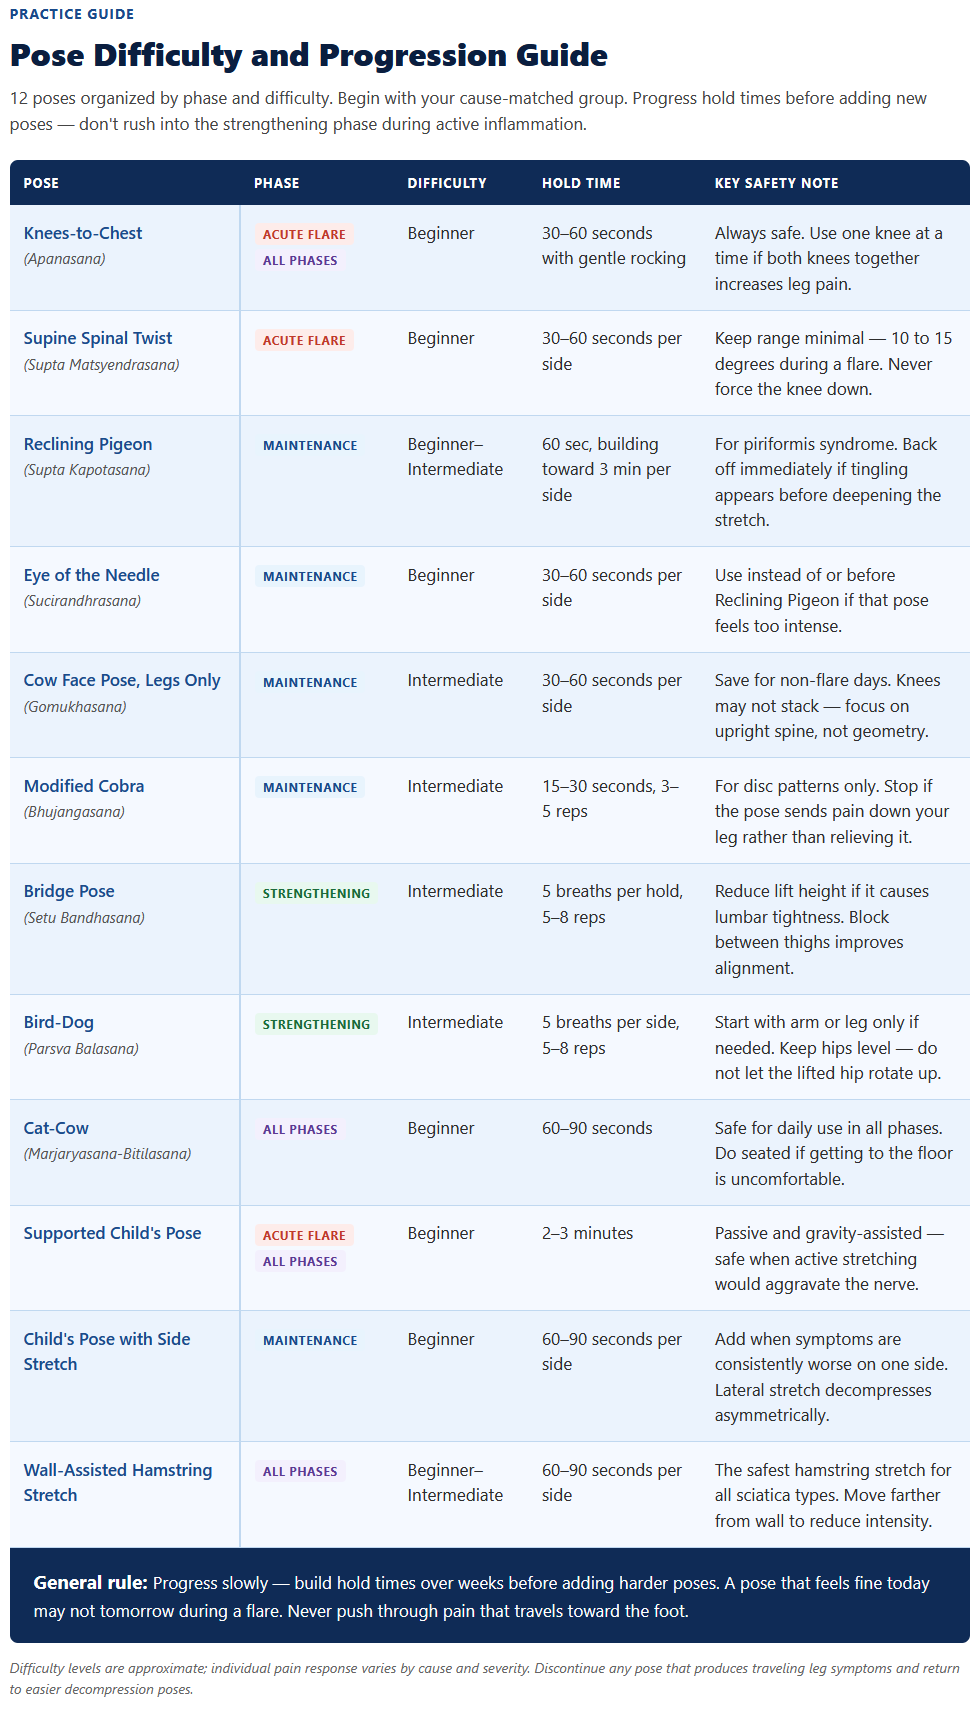
Using a yoga ball for sciatica
A yoga ball (exercise ball or stability ball) offers a different kind of relief than the floor-based poses above. Lying or sitting over one creates gentle spinal traction through body weight alone, and small seated movements can mobilize the lumbar spine in ways that chair-based yoga doesn’t.
Three positions that many people with sciatica find useful: lying face down over the ball with arms and legs hanging loose for 30 to 60 seconds (passive spinal decompression), gentle seated pelvic circles while sitting on top of the ball, and the ball bridge (heels resting on the ball, hips lifted as in Bridge Pose).
Sizing matters for the seated work: your knees should be at or slightly below hip height with your feet flat on the floor. An undersized ball puts your hips into the same flexed position that aggravates disc-related symptoms.
One thing it is not: a full-time desk chair replacement. The active muscle engagement that makes it useful gives way to fatigue after about 20 minutes of sustained sitting, and unstructured sitting on any surface, with or without a backrest, still loads the lumbar discs over time.
Yoga poses that make sciatica worse
Forward folds are the most common mistake. Standing Forward Fold (Uttanasana), Seated Forward Fold (Paschimottanasana), and Pyramid Pose all combine lumbar flexion with sciatic nerve tensioning.
For disc herniation cases, these two forces together increase disc pressure and stretch an already irritated nerve. The fact that these poses feel like they should help (tight hamstrings, stretched back) is part of why they’re so frequently done wrong.
Traditional pigeon pose, with the shin of the front leg parallel to the mat and weight loaded into the hip, places direct compressive pressure on the outer hip in a way the reclining version avoids. People in an acute piriformis flare often find it triggers rather than relieves symptoms.
Deep, rotational twists that involve rounding the lower back, such as Marichyasana, flex and rotate the lumbar spine at the same time. For disc-related sciatica, that’s two compressive forces at once.
The distinction to hold throughout: discomfort in the hip or lower back is usually acceptable. Pain that travels down the leg is not.
Daily practice: when and how long
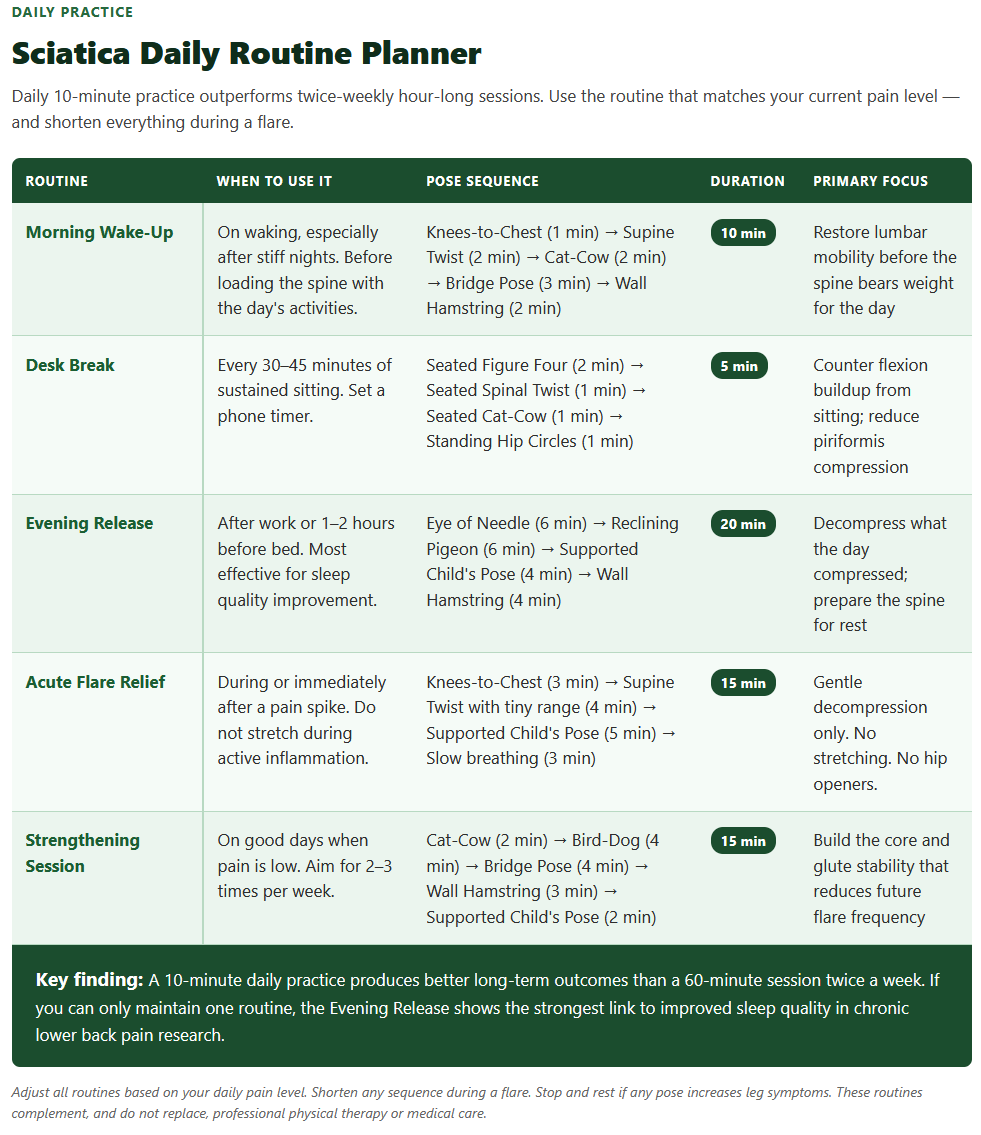
The poses above work best when practiced consistently rather than intensively. A 10-minute daily routine produces better outcomes over time than a 60-minute session twice a week. The evidence from the Singh 2013 trial was based on supervised practice over 4 weeks. Maintaining results typically requires continuing independently after that initial phase.
Morning practice addresses the stiffness that accumulates during sleep, when the spine holds a sustained position for hours. Evening practice addresses the compression that builds through a day of sitting or standing. If you have time for only one, evening routines appear to benefit sleep quality more directly, based on the pattern seen in the 2019 Journal of General Internal Medicine study.
During acute flare-ups, shorten and simplify: Knees-to-Chest, gentle Supine Twist, and Supported Child’s Pose together make a complete acute-phase practice at 5 to 10 minutes total. More is not better when the nerve is actively irritated.
Chair yoga for sciatica at work
Four poses that can be done at a desk without getting on the floor:
Seated Spinal Twist: Sit tall. Place your right hand on your left knee and your left hand behind the seat. Gently rotate your shoulders to the left, looking over your left shoulder. Hold 30 seconds, then switch sides.
Seated Figure Four: Sit with feet flat on the floor. Place your right ankle on your left thigh. Gently press the right knee downward and, if available, lean forward slightly with a straight back. Hold 30 seconds. This is the chair equivalent of Seated Pigeon.
Seated Cat-Cow: Sit at the edge of your chair with hands on knees. Arch your back and look up (Cow), then round your spine and look down (Cat). Move slowly for 60 seconds.
Standing Hip Circles: Stand behind your chair and rest your hands on the back for stability. Draw large slow circles with your hips, 8 in each direction.
Set a timer for every 30 to 45 minutes as a reminder to do one of these. The compression that builds from sustained sitting accumulates faster than most people expect.
When yoga is not enough
Yoga helps most people with sciatica. A smaller group has symptoms that require medical assessment before starting any movement practice.
See a healthcare provider if you have loss of bowel or bladder control (this requires prompt attention), leg weakness that has been progressively worsening over days, pain that followed a fall or injury, symptoms that are not responding after four weeks of consistent conservative care, or sciatica during pregnancy that is severe or accompanied by other symptoms.
Sciatica that is bilateral (affecting both legs simultaneously), or associated with numbness in the inner thighs and groin, can indicate cauda equina syndrome, which is a spinal cord emergency. This is rare but requires immediate medical assessment.
Frequently Asked Questions
Is there one “miracle” pose for sciatica?
There isn’t, and the reason matters. Sciatica has three main causes with distinct anatomical patterns, and what relieves piriformis syndrome can aggravate disc herniation. The phrase “miracle stretch” typically refers to Reclining Pigeon or a figure-four variant, which does work well for piriformis syndrome specifically. For disc herniation at L4-L5 or L5-S1, that same pose can worsen compression on the nerve root. The actual “miracle” is matching the pose to the cause.
What’s the worst thing you can do for sciatica?
Sustained sitting in a flexed posture is probably more damaging than anything done in a yoga class. Among yoga poses specifically, standing forward folds and deep, rotational twists with a rounded lower back carry the most consistent aggravation risk across all types of sciatica. The instinct to rest completely without moving also slows recovery for most people. Gentle, deliberate movement is almost always better than stillness.
Can yoga cure sciatica completely?
It depends on the cause. For piriformis syndrome that developed from muscle imbalance or prolonged sitting, consistent yoga practice over several months can resolve symptoms entirely. For structural problems like a significant disc herniation or spinal stenosis, yoga manages symptoms and may reduce their frequency and severity, but it doesn’t change the underlying anatomy. Most people find they can keep symptoms low and manageable with regular practice.
How often should I practice yoga for sciatica?
Daily practice of 10 to 15 minutes produces better outcomes than longer, less frequent sessions. Start with 5 minutes if that seems more realistic. The 4-week trial by Singh and Singh, published in the International Journal of Yoga, involved supervised daily practice. Independent maintenance is needed afterward to hold the gains.
What if I feel pain during a pose?
Mild discomfort in the target area during a gentle stretch is expected and usually fine. Electrical, shooting, or tingling sensations that travel toward the foot are different. These indicate nerve involvement and are a signal to back off immediately. Stay out of any pose that produces traveling symptoms, even if it felt fine the day before.
When should I see a doctor?
See a provider for sciatica that includes bladder or bowel changes, leg weakness that is worsening over days, pain that followed a fall or accident, symptoms that are not improving after four weeks of conservative care, or bilateral leg symptoms. Emergency signs like saddle numbness (inner thighs and groin) or sudden severe leg weakness require immediate assessment.