Recent research from Cleveland Clinic shows that therapeutic yoga programs can reduce back pain intensity by up to 40% and significantly improve back-related function. Another study published in the Journal of Pain Research found yoga to be “a valuable component of the comprehensive management of low back pain, a condition for which traditional therapies often fall short.”
Yoga offers a gentle yet powerful solution that goes beyond quick fixes. It doesn’t just mask the pain – it addresses the root causes. Think of it as giving your spine a much-needed conversation with your muscles. This simple routine takes less than 15 minutes and works for complete beginners.
Understanding your lower back pain
Before we jump into the poses, let’s understand what’s happening in your back. Most lower back pain stems from these common culprits:
| Pain Cause | Symptoms | Recommended Poses | Why It Helps |
|---|---|---|---|
| Tight hamstrings | Lower back pulls when bending | Downward Dog, Child’s Pose | Releases posterior chain tension |
| Weak core | Pain when standing/walking | Bridge Pose, Cat-Cow | Strengthens supporting muscles |
| Hip tightness | Sciatica-like pain | Reclined Pigeon | Opens hip flexors and piriformis |
| Poor posture | Aching after sitting | Cat-Cow, Spinal Twist | Counteracts forward head posture |
| Muscle imbalances | One-sided pain | All poses with bilateral focus | Restores muscular balance |
Your complete pose guide
| Pose Name | Difficulty Level | Hold Time | Best For | Equipment Needed |
|---|---|---|---|---|
| Cat-Cow Flow | Beginner | 5-8 breaths | Spinal mobility | Yoga mat or blanket |
| Downward Dog (bent knees) | Beginner-Intermediate | 5-8 breaths | Hamstring/spine stretch | Yoga mat |
| Child’s Pose | Beginner | 8-10 breaths | Instant relief | Yoga mat, optional pillow |
| Bridge Pose | Beginner-Intermediate | 5-8 breaths | Core strength | Yoga mat, optional block |
| Reclined Pigeon | Beginner | 30-60 seconds each side | Hip tightness | Yoga mat, optional strap |
| Supine Spinal Twist | Beginner | 30-60 seconds each side | Spinal mobility | Yoga mat, optional pillow |
1. The Cat-Cow Flow (Marjaryasana-Bitilasana)
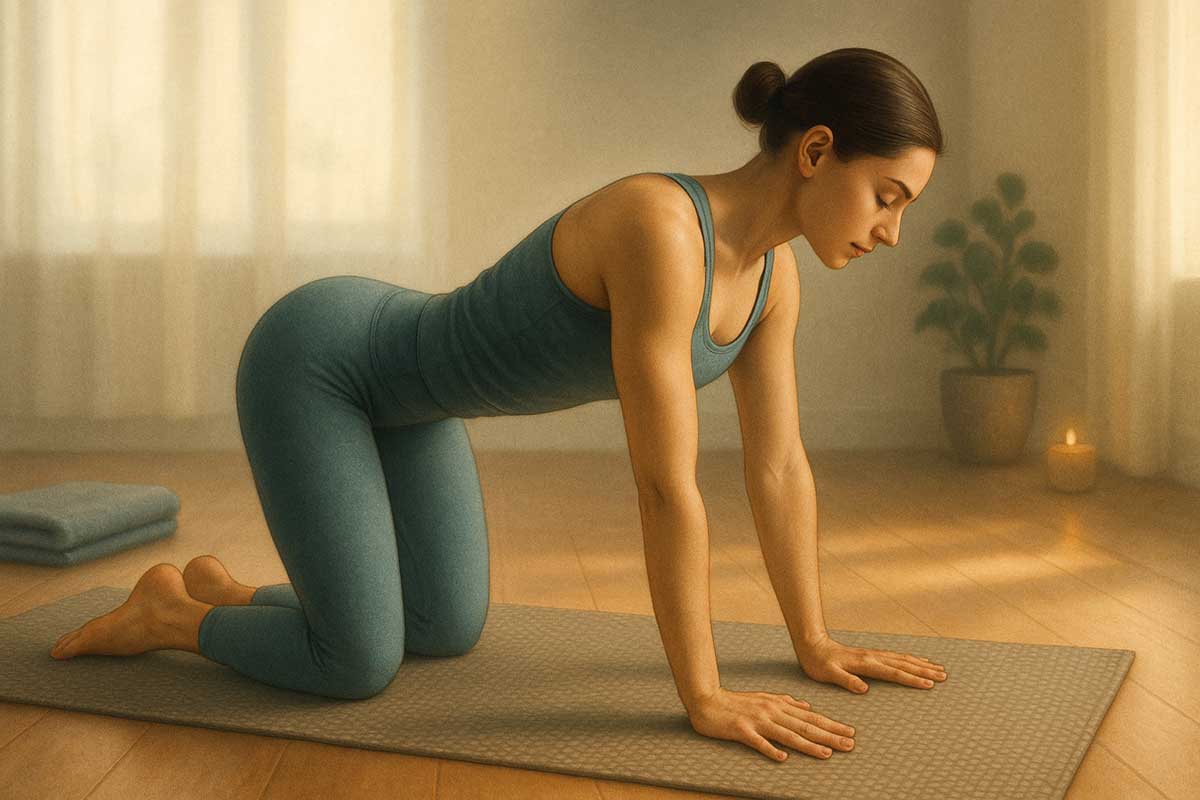
Your spine craves movement, especially if you’ve been sitting all day. Cat-Cow is like a gentle wake-up call for every vertebra in your back. This flowing motion loosens tight muscles and brings fresh blood to your spine.
Anatomical Focus: Erector spinae, multifidus, and deep spinal stabilizers
Why It Works: When you sit for hours, your spine gets stuck in one position. Cat-Cow teaches your back to move again. It’s like oiling a rusty hinge – suddenly everything glides smoothly. This movement pattern specifically targets the thoracic and lumbar spine, promoting flexion and extension mobility.
How to do it:
Start on your hands and knees. Place your wrists under your shoulders and knees under your hips. Think of making a perfect table with your body.
As you breathe in slowly, drop your belly toward the floor. Lift your chest and tailbone up. This is Cow pose. Feel that gentle arch in your back.
As you breathe out completely, round your spine toward the ceiling. Tuck your chin to your chest and draw your belly button up. This is Cat pose.
Flow between these positions for 5-8 breaths. Let your breath guide the movement – it should feel like a slow, rhythmic dance.
Breath pattern:
Inhale into Cow, exhale into Cat. Make each breath last 4-5 seconds.
Common mistakes to avoid:
- Moving too quickly without breath coordination
- Placing hands too far forward
- Forcing the movement instead of flowing gently
Modifications:
- Place a folded blanket under your knees for comfort
- Use your forearms instead of hands if wrists hurt
- Perform seated in a chair by arching and rounding your back
Progressive variations:
- Week 1-2: Hold each position for 2 seconds
- Week 3-4: Add side-to-side movement
- Week 5+: Increase to 10-12 repetitions
2. The Downward-Facing Dog (Adho Mukha Svanasana) with Bent Knees
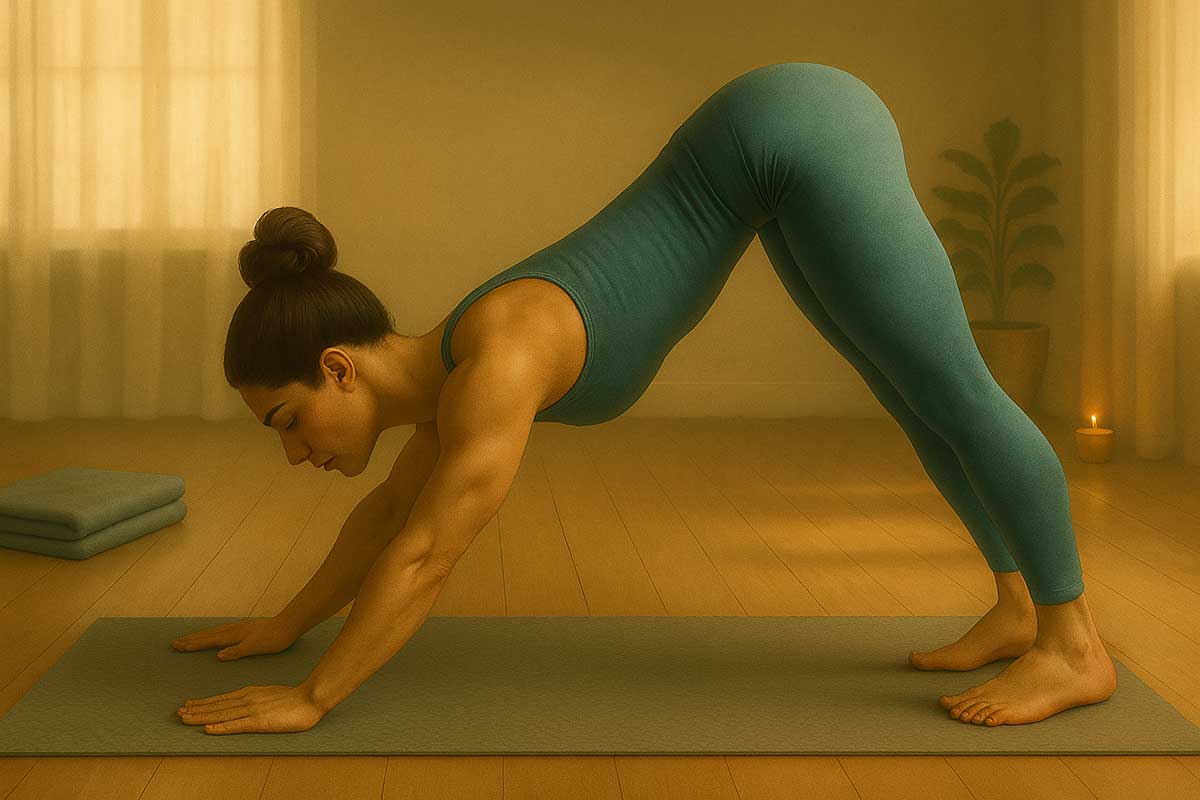
Here’s something most people don’t know: tight hamstrings are sneaky back pain culprits. When your hamstrings are tight, they pull on your pelvis. This throws your whole spine out of whack.
Anatomical Focus: Hamstrings, calves, latissimus dorsi, and spinal extensors
Why It Works: Traditional Downward Dog can make pain worse if you force straight legs. The bent-knee version is your friend. It lets you stretch your spine without fighting tight hamstrings. This modification allows your pelvis to tilt properly, creating space in your lower back.
How to do it:
From your hands and knees, tuck your toes under. Lift your hips up and back, coming into an upside-down V shape.
Here’s the key: bend your knees as much as you need. Focus on making your spine long and straight. Your legs can worry about straightening later.
Press your hands firmly into the ground. Imagine you’re trying to push the floor away from you. Hold for 5-8 breaths.
Breath pattern:
Deep, steady breaths through your nose. Use each exhale to lengthen your spine.
Common mistakes to avoid:
- Forcing straight legs when hamstrings are tight
- Collapsing through the shoulders
- Looking forward instead of between your legs
Modifications:
- Use blocks under your hands to reduce shoulder strain
- Step your feet wider for more stability
- Practice against a wall with hands elevated
Progressive variations:
- Week 1-2: Hold for 3-5 breaths with very bent knees
- Week 3-4: Gradually straighten legs while maintaining spine length
- Week 5+: Add single-leg lifts or forearm variation
Pro-Tip: Try “pedaling” your feet – bend one knee while straightening the other. This gives each hamstring a gentle, individual stretch.
3. The Child’s Pose (Balasana)
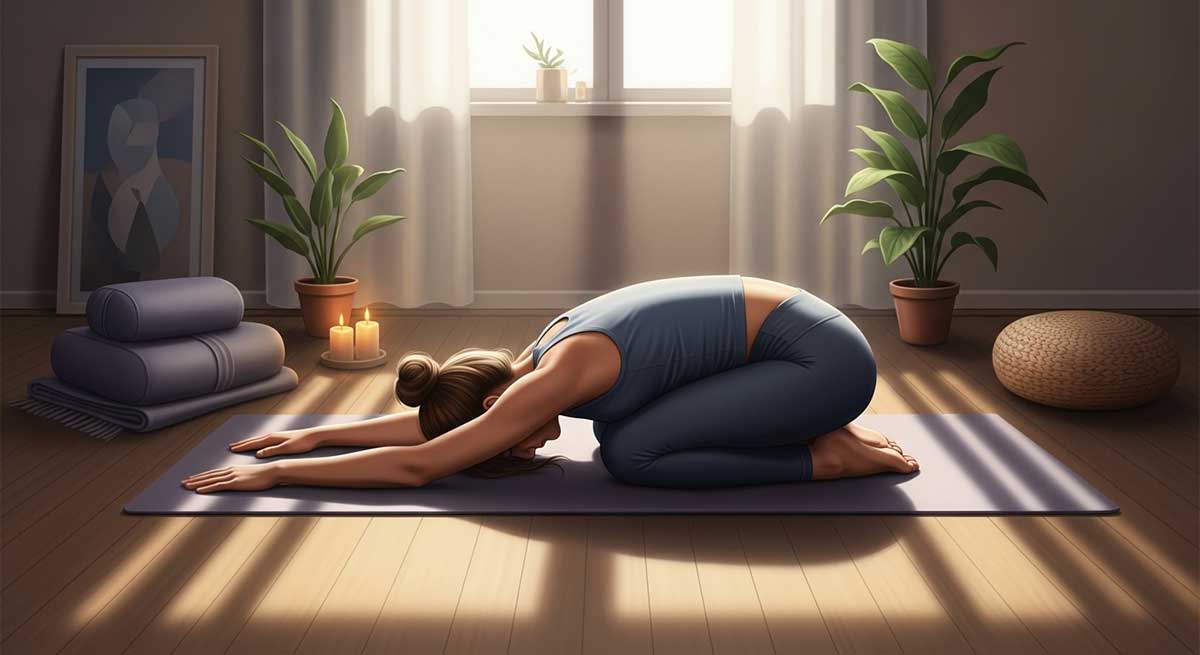
Think of Child’s Pose as a warm hug for your entire back. It’s the ultimate reset button when your lower back feels cranky. This pose gently stretches your spine, hips, and thighs all at once.
Anatomical Focus: Latissimus dorsi, spinal extensors, hip flexors, and quadriceps
Why It Works: The magic happens because you’re in a fetal position. Your back naturally rounds, which can feel incredibly relieving after sitting or standing with an arched back all day. This passive stretch allows your nervous system to calm down.
How to do it:
Sit back on your heels. Slowly fold forward, bringing your forehead toward the ground. Extend your arms in front of you or rest them alongside your body.
If your hips don’t reach your heels, don’t worry. Just fold forward as far as feels good. You can also try the wide-knee version – separate your knees while keeping your big toes touching.
Breathe deeply and stay here for 8-10 breaths. Let gravity do the work.
Breath pattern:
Focus on deep belly breathing. Feel your back expand with each inhale.
Common mistakes to avoid:
- Forcing your head to the floor
- Sitting up too quickly
- Tensing your shoulders
Modifications:
- Place a pillow or block under your forehead
- Put a rolled towel behind your knees if they’re tight
- Use the wide-knee version for pregnancy or larger bellies
Progressive variations:
- Week 1-2: Use props generously for comfort
- Week 3-4: Try extending arms to different sides
- Week 5+: Hold for longer periods (2-3 minutes)
Pro-Tip: Can’t get your forehead to the floor? Place a pillow or yoga block underneath it. You’ll release neck tension too.
4. The Bridge Pose (Setu Bandhasana)
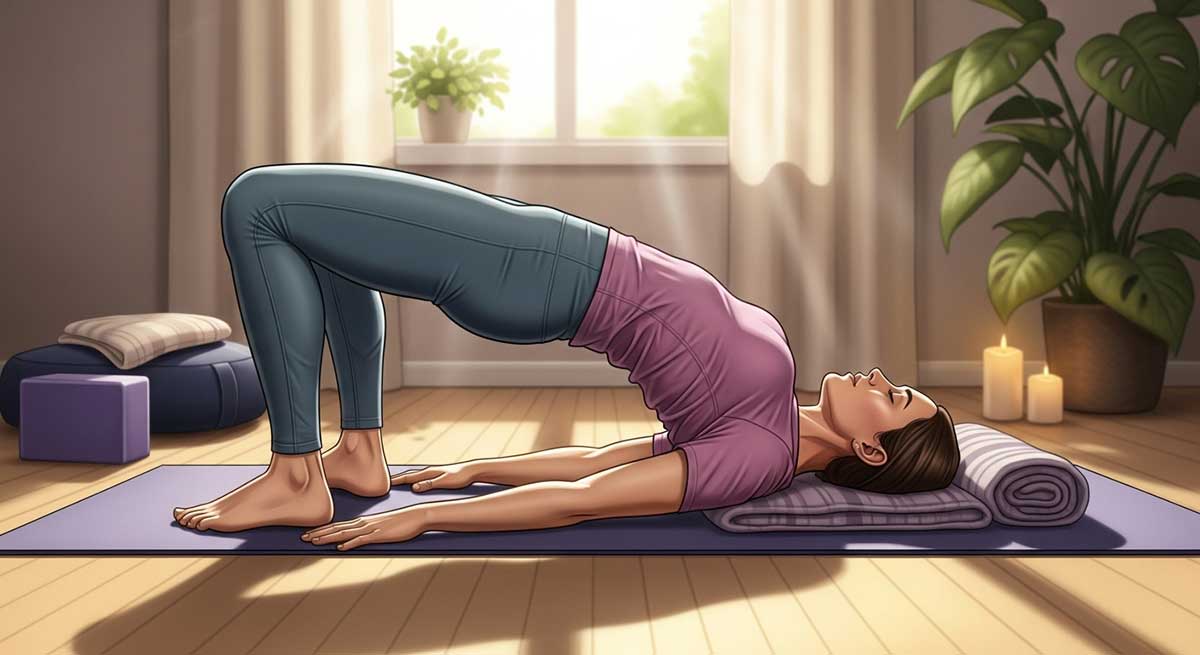
A weak core is like having a house with a shaky foundation. Your lower back ends up doing extra work to keep you upright. Bridge Pose strengthens your core and glutes without a single crunch.
Anatomical Focus: Glutes, hamstrings, core muscles, and hip flexors (stretch)
Why It Works: This pose teaches your glutes to do their job. When your glutes are strong, they take pressure off your lower back. It’s like hiring a bodyguard for your spine. Bridge also opens tight hip flexors from sitting too much.
How to do it:
Lie on your back with knees bent and feet flat on the floor. Your feet should be hip-width apart and close to your glutes.
Press your feet down and slowly lift your hips. Squeeze your glutes at the top. Your body should make a straight line from knees to shoulders.
Don’t lift too high – you shouldn’t feel this in your lower back. Hold for 5-8 breaths, then slowly lower down.
Breath pattern:
Inhale to prepare, exhale to lift. Breathe steadily while holding.
Common mistakes to avoid:
- Lifting too high and arching the back
- Letting knees fall outward
- Holding breath while in the pose
Modifications:
- Place a block between your thighs to engage inner muscles
- Support your sacrum with hands for restorative version
- Use a wall to keep your feet properly positioned
Progressive variations:
- Week 1-2: Hold for 3-5 breaths
- Week 3-4: Add single-leg lifts
- Week 5+: Try bridge with leg extensions
Pro-Tip: Place a yoga block or pillow between your thighs. Squeeze it gently to engage your inner thighs and keep proper alignment.
5. The Reclined Pigeon Pose (Supta Kapotasana)

Tight hips don’t just affect your hips – they’re often the hidden cause of lower back pain. When your hip muscles are tight, they pull on your pelvis and spine. It’s like having a rope tied around your waist, constantly tugging.
Anatomical Focus: Piriformis, IT band, hip flexors, and glute complex
Why It Works: The piriformis muscle is a common troublemaker. When it’s tight, it can irritate your sciatic nerve, causing pain that shoots down your leg. Reclined Pigeon gives this muscle the stretch it desperately needs while being gentler on your knees than traditional pigeon.
How to do it:
Lie on your back with both knees bent. Cross your right ankle over your left thigh, just above the knee.
Thread your hands behind your left thigh and gently pull it toward your chest. You should feel a stretch in your right hip and glute.
Keep your head and shoulders relaxed on the ground. Hold for 30 seconds to 1 minute, then switch sides.
Breath pattern:
Use slow, deep breaths to relax into the stretch. Each exhale should deepen the release.
Common mistakes to avoid:
- Pulling too aggressively
- Lifting head and shoulders off the ground
- Forgetting to breathe deeply
Modifications:
- Use a strap around your thigh if you can’t reach
- Place a pillow under your head for comfort
- Keep the bottom foot on the ground if pulling the leg is too intense
Progressive variations:
- Week 1-2: Light stretch, focus on breathing
- Week 3-4: Increase depth gradually
- Week 5+: Try figure-4 against a wall
Pro-Tip: Can’t reach your thigh? Use a towel or yoga strap looped around your leg. No shame in using props – they help you get the stretch you need.
6. The Supine Spinal Twist (Supta Matsyendrasana)
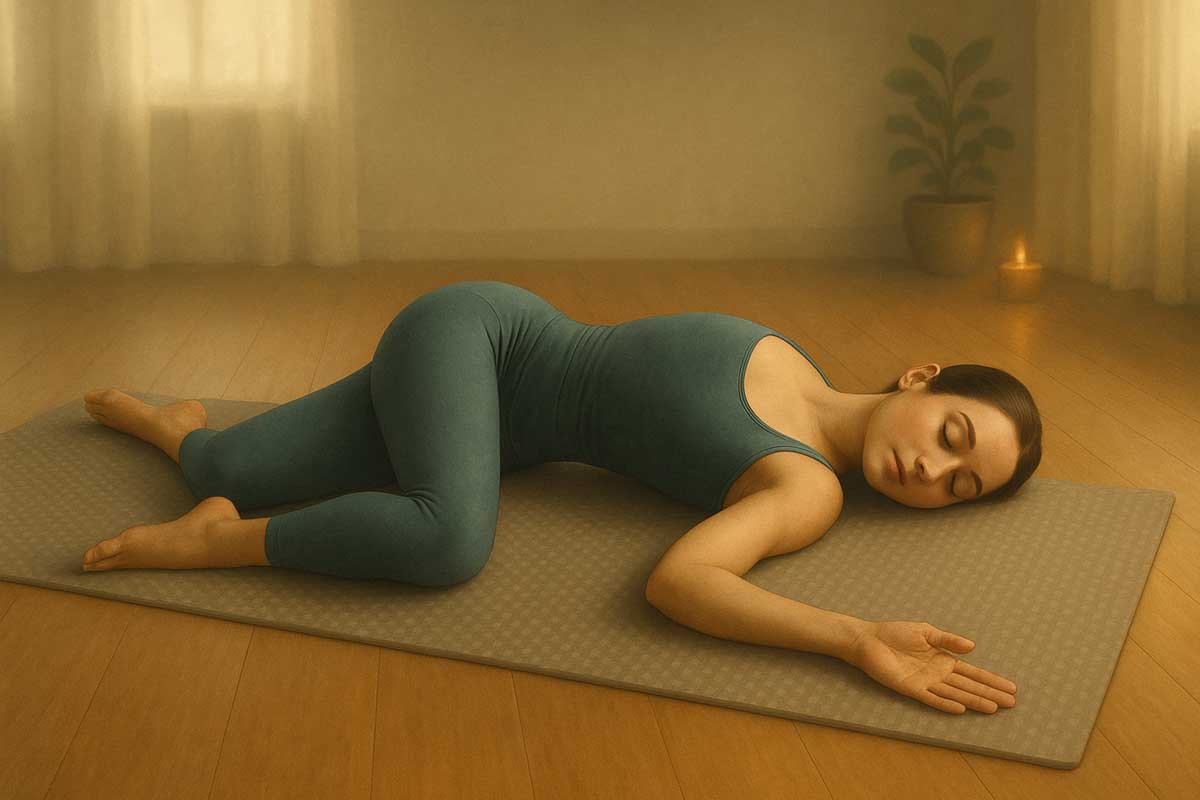
Your spine is designed to move in all directions, including rotation. But daily life often keeps us moving in straight lines. This gentle twist helps restore your spine’s natural mobility.
Anatomical Focus: Obliques, spinal rotators, and quadratus lumborum
Why It Works: Twisting poses massage your internal organs and can help release tension in your obliques – the muscles that wrap around your sides. When these muscles are tight, they can contribute to lower back stiffness. This supine version is much safer than seated twists.
How to do it:
Lie on your back and hug your right knee to your chest. Keep your left leg straight or slightly bent.
Drop your right knee across your body to the left side. Keep both shoulders on the ground – this is crucial.
Turn your head to the right if it feels comfortable. Hold for 30 seconds to 1 minute, then repeat on the other side.
Breath pattern:
Breathe into your ribs and back. Use each exhale to gently deepen the twist.
Common mistakes to avoid:
- Forcing the twist too deeply
- Lifting the opposite shoulder
- Twisting from the neck instead of the spine
Modifications:
- Place a pillow between your legs
- Support the dropped knee with a bolster
- Keep your head centered if neck turning is uncomfortable
Progressive variations:
- Week 1-2: Very gentle twist with lots of support
- Week 3-4: Hold for longer periods
- Week 5+: Try extending the bottom leg for deeper stretch
Pro-Tip: If your knee doesn’t reach the floor, place a pillow or bolster underneath it. The stretch should feel good, not forced.
Equipment & setup guide
You don’t need expensive gear to start this routine. Here’s what helps and budget-friendly alternatives:
Essential equipment:
- Yoga mat or thick blanket
- 1-2 pillows or cushions
- Bath towel or yoga strap
Helpful additions:
- Yoga block (or thick book)
- Bolster (or firm couch cushion)
- Wall space
Budget-friendly substitutions:
- Beach towel instead of yoga mat
- Thick books instead of blocks
- Belt or scarf instead of yoga strap
- Couch cushions instead of bolsters
Space requirements: 6 feet by 3 feet of floor space
Progressive practice schedule
Don’t try to do everything perfectly on day one. Your body needs time to adapt.
Week 1-2: Foundation building
Focus: 3-4 poses only, proper form over depth
Frequency: Daily, 5-10 minutes
Poses to prioritize: Cat-Cow, Child’s Pose, Bridge (gentle), Supine Twist
Week 3-4: Full routine integration
Focus: Complete all 7 poses, increase hold times
Frequency: 4-5 times per week, 10-15 minutes
New additions: Downward Dog, Reclined Pigeon
Week 5+: Advanced modifications
Focus: Pose progressions, longer holds
Frequency: 3-4 times per week, 15-20 minutes
Progressions: Single-leg bridges, deeper twists, forearm downward dog
Optimal practice timing
| Pain Level | Frequency | Best Time | Duration | Focus |
|---|---|---|---|---|
| Acute pain | Daily (gentle poses only) | Morning & evening | 5-10 minutes | Cat-Cow, Child’s Pose |
| Moderate pain | 4-5 times per week | Morning or pre-bed | 10-15 minutes | Full gentle routine |
| Prevention/maintenance | 3-4 times per week | Any time | 15-20 minutes | Full routine with variations |
Moves to avoid with lower back pain
Knowing what not to do is just as important as knowing what to do. Some yoga poses can make lower back pain worse, especially when you’re already hurting.
Poses to skip during acute pain:
Deep Forward Folds (like Standing Forward Bend with straight legs): When your hamstrings are tight, forcing a forward fold puts enormous strain on your lower back. It’s like trying to fold a piece of cardboard the wrong way – something’s going to give, and it’s usually your spine. Alternative: Try seated forward fold with bent knees or use blocks under your hands.
Full Wheel Pose (Urdhva Dhanurasana): This deep backbend compresses your lumbar spine like an accordion. If your back is already irritated, this pose can make things much worse. Alternative: Stick with gentle Bridge Pose until you build strength.
Intense Twists (like Seated Spinal Twist without modifications): Deep twisting can torque your lower back, especially if you’re not warmed up properly. Alternative: Use supine twists and keep movements gentle.
Camel Pose (Ustrasana): Another deep backbend that can compress the lumbar spine. Alternative: Try heart opening stretches against a wall.
Full Pigeon Pose: The traditional version can strain the lower back if you lack hip flexibility. Alternative: Always use the reclined version described above.
Movement patterns to avoid:
- Quick, jerky movements
- Deep twisting without warming up
- Forcing any stretch
- Holding your breath during poses
Safety guidelines & when to see a doctor
Red flag symptoms – seek immediate medical attention:
- Severe pain after injury or fall
- Pain with fever
- Loss of bladder or bowel control
- Numbness or weakness in legs
- Pain that worsens at night
- Pain radiating down both legs
Practice safely:
- Stop if any pose increases pain
- Start slowly and build gradually
- Listen to your body over any instruction
- Modify poses as needed
- Stay hydrated
Medical conditions requiring caution:
- Herniated disc: Avoid forward folds and twists
- Sciatica: Focus on hip openers and gentle movements
- Pregnancy: Use wide-knee modifications
- Osteoporosis: Avoid deep twists and forward folds
Complementary lifestyle tips
Your yoga practice works best when supported by healthy daily habits:
Ergonomic workspace setup:
- Monitor at eye level
- Feet flat on floor
- Take movement breaks every 30 minutes
- Use a lumbar support cushion
Sleep position recommendations:
- Side sleeping with pillow between knees
- Back sleeping with pillow under knees
- Avoid stomach sleeping
- Replace old mattresses that lack support
Daily movement habits:
- Walk for 10-15 minutes after sitting
- Take stairs when possible
- Park farther away for extra steps
- Do gentle stretches during TV time
Anti-inflammatory nutrition:
- Include omega-3 rich foods (fish, walnuts)
- Eat colorful vegetables and fruits
- Limit processed foods and sugar
- Stay well hydrated
Track your progress
Consistency beats perfection. Use this simple tracking method to monitor your improvement:
Weekly check-in questions:
- What’s my pain level today (1-10 scale)?
- How did I sleep last night?
- What activities feel easier this week?
- Which poses feel more comfortable?
- Am I moving more throughout the day?
Monthly progress markers:
- Can I touch my toes more easily?
- Do I have less morning stiffness?
- Can I sit longer without discomfort?
- Am I sleeping better?
- Do I feel stronger overall?
Conclusion
There you have it – a complete system for managing lower back pain through gentle yoga. This routine takes less time than scrolling through social media, but the benefits last all day.
The key is consistency, not perfection. Even five minutes of gentle movement is better than nothing. Start with just 2-3 poses that feel good to you. Add more as your body adapts and your confidence grows.
Your spine has been carrying you through life – it’s time to show it some gratitude. Begin with this routine today, track your progress, and notice how your back responds. You might be surprised at how quickly things improve when you give your body what it needs: gentle movement, strength, and a little daily attention.
FAQs
How soon will I feel relief?
Many people notice some improvement within the first week. Significant changes typically occur after 2-4 weeks of consistent practice.
Should I practice if I’m in pain?
Gentle movement often helps, but never practice through sharp or severe pain. When in doubt, consult your healthcare provider.
Can I do this routine every day?
Yes, these gentle poses are safe for daily practice. Listen to your body and take rest days when needed.
What if I can’t do a pose?
Every pose has modifications. Use props, reduce the range of motion, or skip poses that don’t feel right for your body.
Is yoga better than physical therapy for back pain?
Both can be effective. Yoga complements medical treatment but doesn’t replace professional healthcare when needed.
How long should I hold each pose?
Follow the time recommendations in the table above, but adjust based on your comfort level. Quality matters more than duration.


