Those endless crunches are targeting the wrong muscles. They work your rectus abdominis – the “six-pack” muscle on the surface. But your real core strength comes from much deeper muscles that crunches barely touch.
Your deep core stabilizers are the transverse abdominis, multifidus, and pelvic floor muscles. They wrap around your midsection like a natural corset. They keep your spine stable and your posture strong. Strengthening the transversus abdominis is important for a strong core. It may help reduce back pain, lower your risk of injury, and in some cases, make your waist appear smaller.
Yoga activates these deep muscles in ways that crunches simply can’t. The flowing movements, breath work, and balance challenges wake up your entire core system. Not just the surface muscles.
This 7-step yoga flow will awaken and strengthen those crucial, often-neglected core muscles. Your back will thank you. Your posture will improve. And yes, your abs will finally start to show.
What are your deep core stabilizers and why do they matter?
Think of your deep core like a natural corset. It wraps around your middle, from your ribs to your pelvis. This internal girdle has four main parts working together:
| Deep Core Muscle | Location | Primary Function | Why It Matters |
|---|---|---|---|
| Transverse Abdominis (TrA) | Deepest abdominal layer, wraps horizontally around torso | Pulls navel toward spine, creates internal pressure | Foundation of core stability, reduces waist circumference |
| Multifidus | Small muscles along the spine | Stabilizes individual vertebrae during movement | Prevents back pain, improves spinal control |
| Pelvic Floor | Bottom of pelvis, forms a hammock | Supports pelvic organs, assists with breathing | Controls continence, enhances sexual function |
| Diaphragm | Top of core cylinder, main breathing muscle | Primary breathing muscle, works with other core muscles | Coordinates with deep core during all movements |
The science behind deep core vs. surface muscles
Here’s the key difference between deep core work and traditional ab exercises:
Surface muscles (rectus abdominis):
- Create visible “six-pack” definition
- Work in one direction (flexion)
- Activated by crunches and sit-ups
- Important for spinal flexion movements
Deep core stabilizers:
- Work in all directions simultaneously
- Activate before any movement begins
- Create internal pressure for spinal stability
- Function during breathing and daily activities
Research shows that people with back pain often have delayed activation of their transverse abdominis. This means their deep core doesn’t turn on fast enough to protect their spine during movement.
Your core strength assessment
Before starting the flow, assess your current deep core function:
Test 1: dead bug hold
- Lie on your back, arms up, knees bent at 90 degrees
- Lower one arm overhead while extending the opposite leg
- Can you hold for 10 seconds without your back arching?
Test 2: single-leg bridge
- In bridge pose, lift one foot 2 inches off the ground
- Can you hold for 30 seconds without your hips dropping?
Test 3: wall sit with arms
- Sit against a wall, knees at 90 degrees
- Raise both arms overhead
- Can you hold for 60 seconds without losing the curve in your lower back?
If you struggled with any of these, the following flow is perfect for you.
Strong deep core stabilizers give you:
- Better posture that doesn’t require constant effort
- Less back pain during daily activities (studies show 30-40% reduction)
- Improved balance and coordination
- Enhanced athletic performance in all sports
- A flatter, more toned midsection without traditional “ab work”
- Reduced injury risk during lifting and daily movements
- Better breathing patterns and oxygen delivery
Traditional ab exercises like crunches work from the outside in. Yoga works from the inside out. It teaches these deep muscles to fire first, before the surface muscles kick in. That’s how you build real, functional strength.
The 7-step flow to activate your deep core
This flow takes about 15-20 minutes. Move slowly and focus on your breath. Each pose builds on the last one, creating a complete deep core workout.
Quick reference flow chart
| Step | Pose | Duration | Focus | Difficulty |
|---|---|---|---|---|
| 1 | Cat-Cow | 8-10 breaths | Breath-core connection | Beginner |
| 2 | Bird-Dog | 5 breaths each side, 3 rounds | Stability & coordination | Beginner |
| 3 | Plank | 30-60 seconds | Integrated strength | Intermediate |
| 4 | Side Plank | 20-45 seconds each side | Lateral stability | Intermediate |
| 5 | Boat Pose | 20-45 seconds | Deep core endurance | Advanced |
| 6 | Bridge + Leg Lift | 5 lifts each leg | Dynamic stability | Intermediate |
| 7 | Supine Twist | 1-2 minutes each side | Release & integration | Beginner |
Progression timeline
- Week 1-2: Focus on form and breath connection. Hold poses for minimum times.
- Week 3-4: Increase hold times by 10-15 seconds. Add extra rounds.
- Week 5-6: Try advanced variations. Focus on seamless transitions.
- Week 7+: Create your own sequences using these foundational poses.
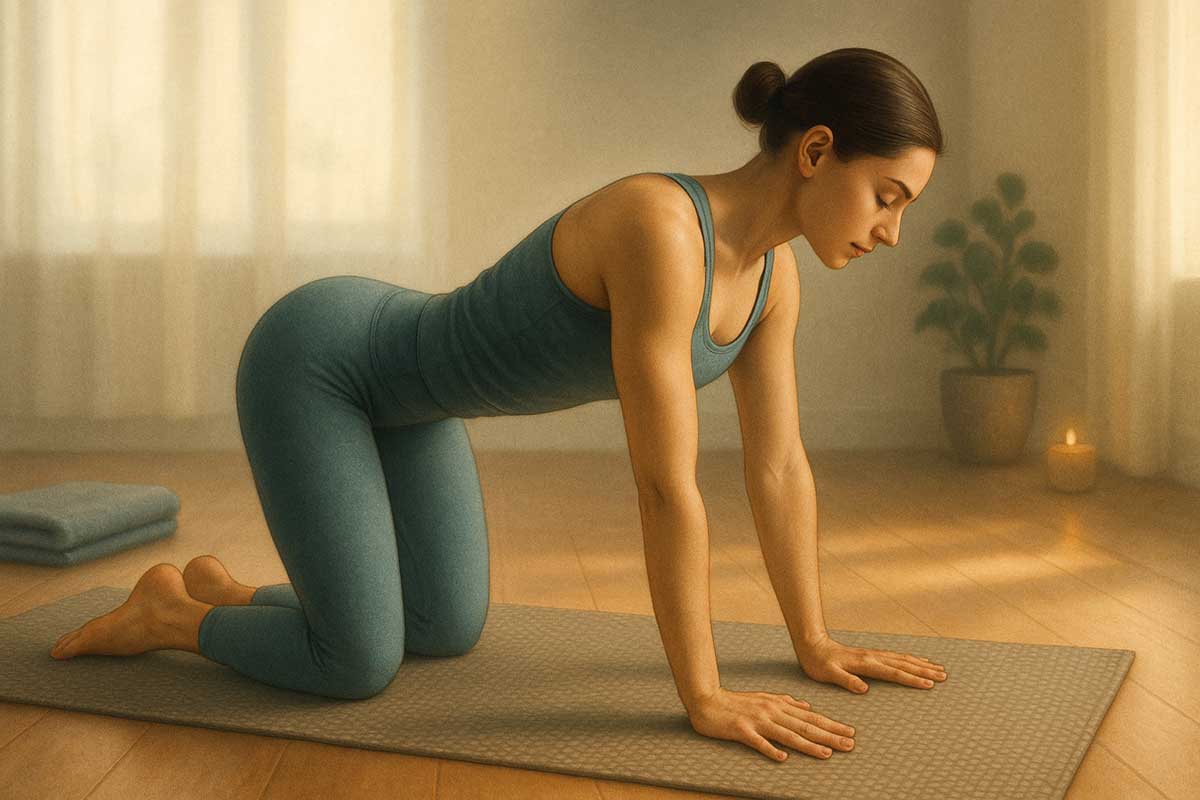
Step 1: Foundational breathwork in cat-cow (Marjaryasana-Bitilasana)
Setup position:
- Start on your hands and knees in tabletop position
- Place your wrists directly under your shoulders, fingers spread wide
- Position your knees directly under your hips, hip-width apart
- Keep your spine in neutral alignment, eyes looking down at the mat
- Distribute weight evenly between hands and knees
Cow pose (inhale movement):
- Begin your inhale slowly through your nose
- Drop your belly toward the floor, creating a gentle arch in your lower back
- Lift your chest forward and up, opening through your heart
- Gently lift your gaze toward the ceiling without straining your neck
- Feel the expansion across your chest and the front of your torso
- Keep your shoulders away from your ears
Cat pose (exhale movement):
- Begin your exhale slowly through your mouth or nose
- Draw your belly button gently toward your spine
- Round your spine toward the ceiling, starting from your tailbone
- Tuck your chin toward your chest, creating length in your neck
- Feel the stretch between your shoulder blades
- Push the floor away with your hands to deepen the spinal curve
Breath and movement coordination:
- Each inhale should last 4-5 seconds, matching the cow movement
- Each exhale should last 4-5 seconds, matching the cat movement
- Pause briefly between movements to feel the position
- Repeat for 8-10 complete breath cycles
- Move slowly and deliberately – this isn’t about speed
Feel it working: On each exhale, feel your navel draw in toward your spine. This is your transverse abdominis turning on. Don’t force it. Let the breath do the work.
Common mistakes to avoid:
- Moving too fast – this is about breath awareness, not cardio
- Forcing the belly to pull in – it should happen naturally with the exhale
- Holding your breath – keep breathing steadily throughout
- Overly aggressive movements that strain the neck or lower back
- Placing too much weight on your wrists – engage your core to reduce pressure
Modifications:
- For wrist sensitivity: Make fists and rest on knuckles, or use yoga blocks under palms
- For knee discomfort: Place a folded blanket or extra mat under your knees
- For limited mobility: Perform seated in a chair, hands on knees
Progression tips:
- Week 1: Focus only on the breath-movement connection
- Week 2+: Add a gentle 10% engagement of your deep core throughout the movement
- Advanced: Hold each position for 2-3 breaths instead of flowing continuously
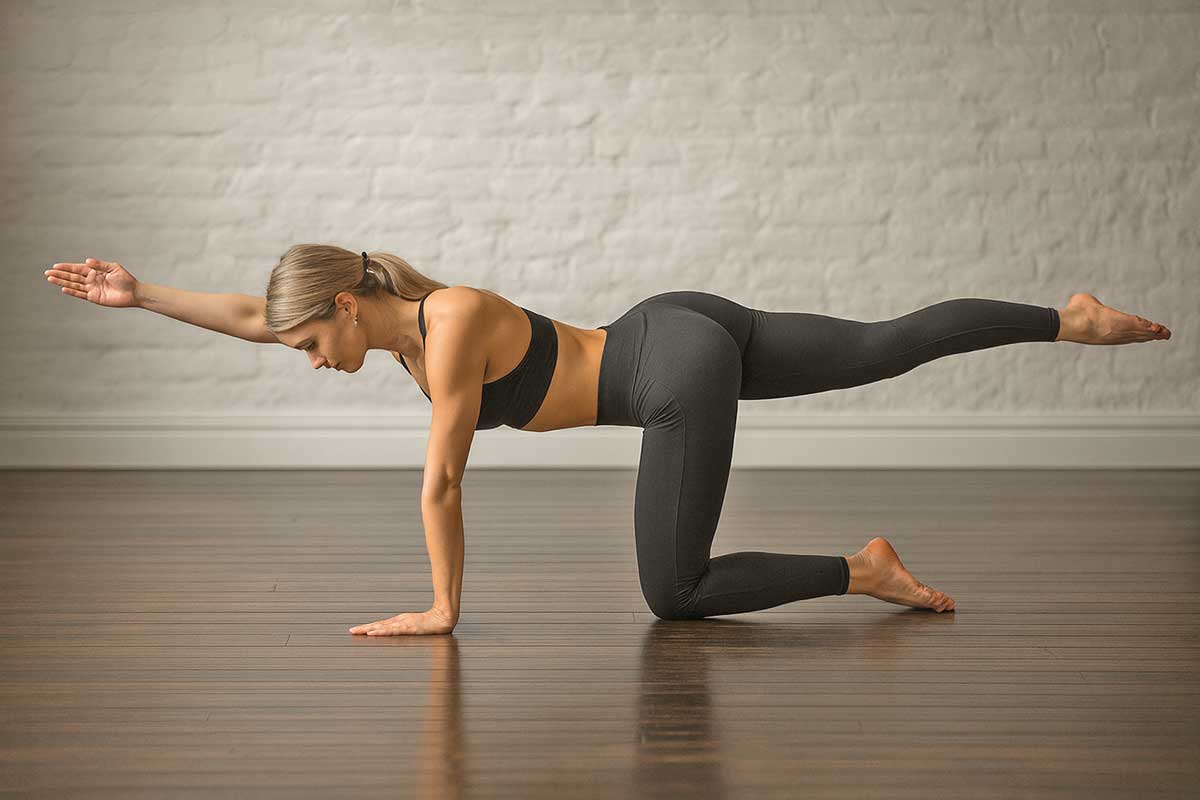
Step 2: Awakening the stabilizers with bird-dog pose (Utthita Chakravakasana)
Setup position:
- Start in the same tabletop position as Cat-Cow
- Ensure your wrists are under shoulders, knees under hips
- Engage your core gently (about 20% effort) before moving
- Keep your spine in neutral – not arched or rounded
- Look down at the mat to maintain neck alignment
Preparation phase:
- Take 3 deep breaths in tabletop to center yourself
- Practice lifting just one arm forward, then lower it down
- Practice lifting just one leg back, then lower it down
- Feel how your core naturally engages to maintain balance
Full bird-dog position:
- Right arm forward: Reach your right arm straight ahead at shoulder height
- Keep your arm in line with your ear, not higher or lower
- Left leg back: Extend your left leg straight behind you at hip height
- Point your toes down toward the floor
- Create one long line from fingertips to toes
- Keep your hips square to the ground – don’t let them rotate
Maintaining stability:
- Press your standing hand firmly into the mat
- Engage your standing leg by pressing the shin down
- Draw your shoulder blades down your back
- Keep your pelvis level – imagine balancing a cup of water on your lower back
- Breathe steadily – don’t hold your breath
- Focus your gaze on the mat to help with balance
Hold and transition:
- Hold for 5 complete breaths (about 30 seconds)
- Lower your arm and leg down slowly and with control
- Rest briefly in tabletop position
- Repeat on the opposite side (left arm, right leg)
- Complete 3 rounds on each side
Feel it working: Imagine a corset tightening around your midsection to prevent wobbling. Your deep core muscles are working hard to keep you steady. If you shake a little, that’s normal. You’re waking up muscles that may have been sleeping.
Common mistakes to avoid:
- Lifting the arm or leg too high – stay at shoulder/hip height
- Rotating the hips when lifting the leg
- Looking up or to the side instead of maintaining neutral neck
- Holding your breath during the hold
- Rushing through the transitions
- Collapsing onto the supporting arm
Modifications:
- Beginner: Lift only the arm for 1 week, then only the leg for 1 week
- Knee sensitivity: Use extra padding under the supporting knee
- Wrist issues: Make a fist with the supporting hand or use blocks
- Balance challenges: Perform next to a wall for light support
- Limited range: Lift limbs only as high as comfortable while maintaining form
Advanced progressions:
- Hold for 8-10 breaths instead of 5
- Add small pulses with the extended limbs while holding
- Close your eyes to challenge proprioception
- Place a small weight or water bottle on your lower back to test stability
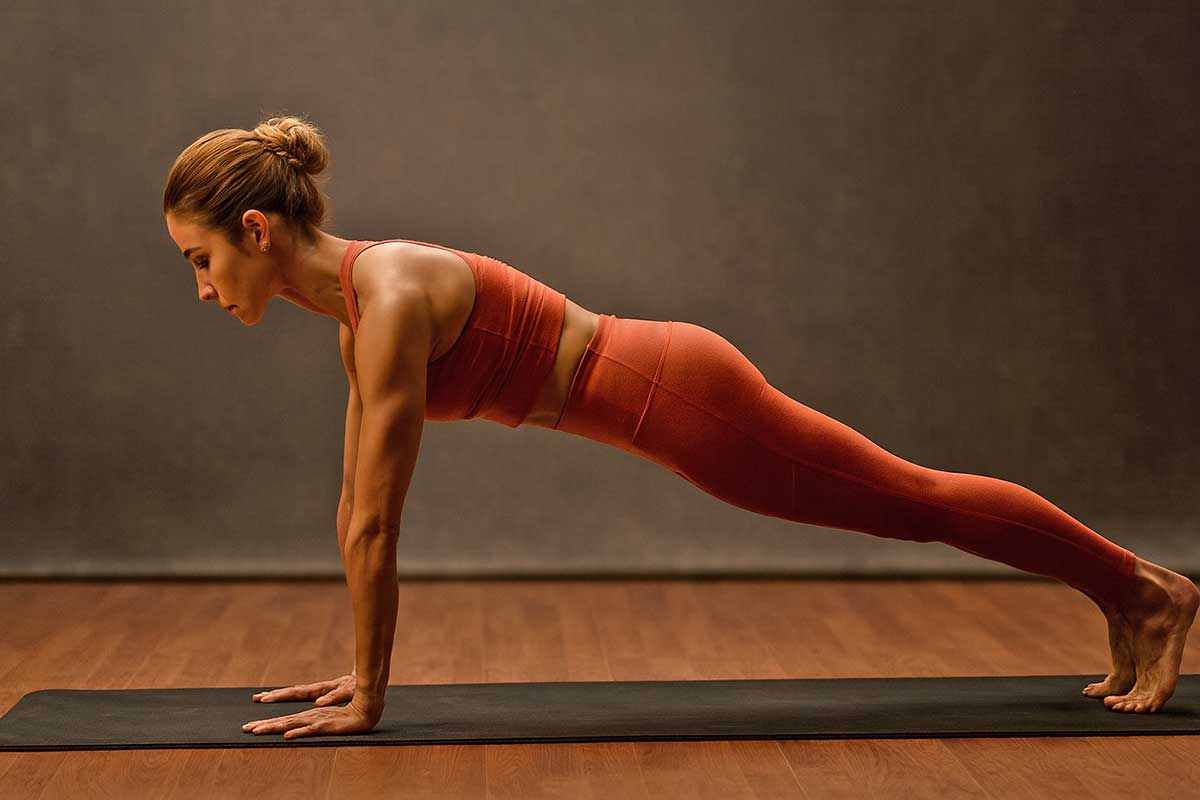
Step 3: Building integrated strength in plank pose (Phalakasana)
Setup and entry:
- From tabletop position, tuck your toes under
- Step your right foot back, then your left foot back
- Alternatively, move into plank from downward-facing dog
- Create a straight line from the crown of your head to your heels
- Position your shoulders directly over your wrists
Hand and arm positioning:
- Spread your fingers wide like starfish
- Press down through your palms, especially the base of your index fingers
- Keep your arms straight but don’t lock out your elbows
- Draw your shoulder blades down your back, away from your ears
- Create a slight external rotation in your arms (thumbs forward slightly)
Core and torso engagement:
- Draw your navel gently toward your spine (30-40% effort)
- Keep your ribs knitted together, don’t let them flare out
- Maintain length through your spine – don’t pike your hips up
- Keep your pelvis in neutral – not tilted forward or back
- Breathe steadily through your nose, don’t hold your breath
Leg and hip alignment:
- Keep your legs straight and strong
- Press your heels back as if pushing against a wall
- Engage your quadriceps (front thigh muscles) to support your knees
- Keep your feet hip-width apart, toes pointing down
- Squeeze your glutes lightly to support your lower back
Duration and breathing:
- Start with 15-30 seconds and build up gradually
- Work toward holding for 60 seconds with good form
- Breathe in through your nose for 4 counts, out for 4 counts
- If you start shaking, focus on your breath to maintain the pose
- Come down when form starts to deteriorate, not when it feels “easy”
Feel it working: Press the ground away and feel your entire front core firing up. From your pubic bone to your sternum, everything should be working. Your deep stabilizers are the foundation holding everything together.
Proper exit:
- Lower your knees to the mat slowly with control
- Sit back on your heels in child’s pose for 30 seconds
- Take 3-5 deep breaths before moving to the next pose
Common mistakes to avoid:
- Lifting your hips too high (creating an inverted V-shape)
- Letting your hips sag below the line of your body
- Looking up or forward instead of down at the mat
- Holding your breath or breathing too rapidly
- Placing too much weight on your wrists instead of engaging your core
- Coming up on your toes instead of keeping heels reaching back
Modifications:
- Knee plank: Drop your knees to the mat, maintaining straight line from head to knees
- Incline plank: Place your hands on a chair, couch, or wall for easier angle
- Wall plank: Stand arm’s length from wall, place palms flat against wall
- Forearm modification: Lower to forearms if wrists are sensitive
Advanced progressions:
- Single-arm plank: Lift one arm forward for 10 seconds, alternate
- Plank with leg lift: Lift one foot 2 inches off ground, hold for 10 seconds
- Plank up-downs: Move from forearm plank to full plank and back
- Plank with shoulder taps: Touch left hand to right shoulder, alternate
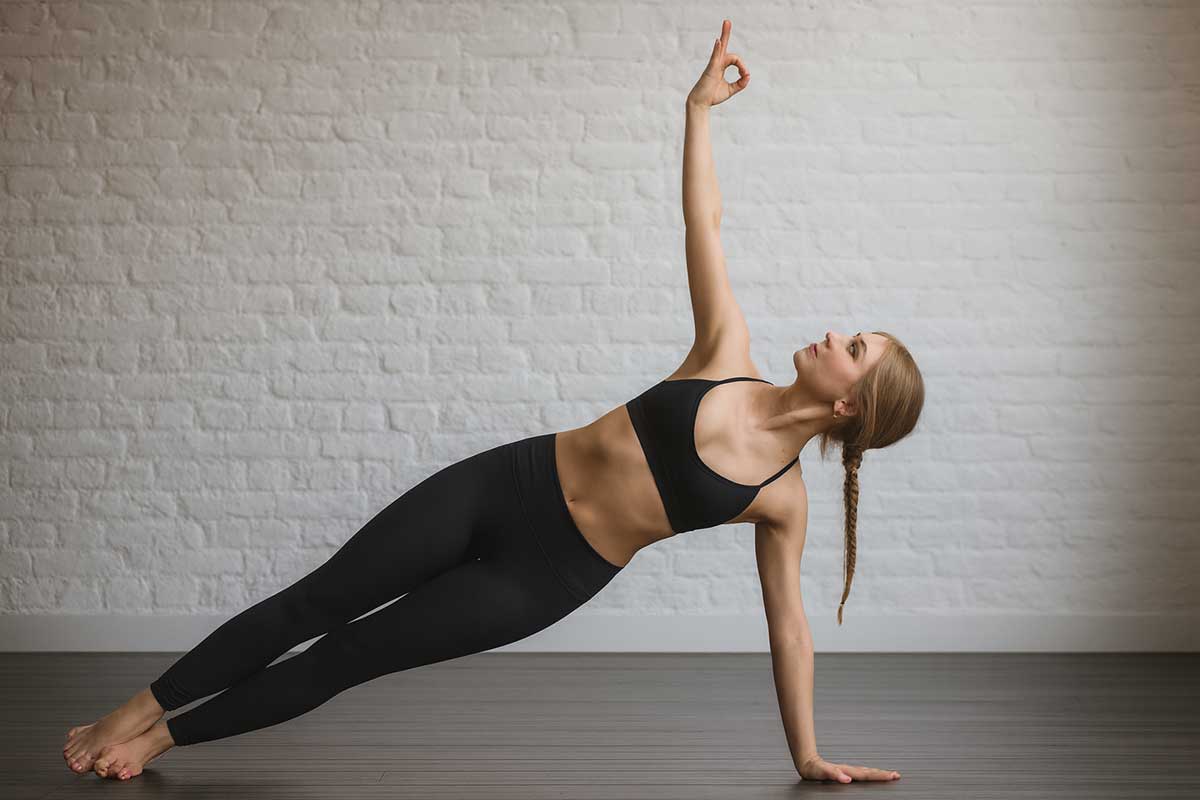
Step 4: Targeting the obliques with side plank (Vasisthasana)
Entry from plank:
- From full plank pose, shift your weight onto your right hand
- Roll onto the outer edge of your right foot
- Stack your left foot directly on top of your right foot
- Keep your body in one straight line from head to feet
Hand and arm foundation:
- Press your right palm firmly into the mat
- Position your right hand slightly forward of your right shoulder
- Keep your supporting arm straight and strong
- Draw your right shoulder blade down your back
Body alignment:
- Stack your left shoulder directly over your right shoulder
- Keep your head in line with your spine, not dropping or lifting
- Create one straight line from the crown of your head to your heels
- Don’t let your hips sag toward the floor or pike them up
Hip and core engagement:
- Lift your hips up and away from the floor
- Engage your obliques (side waist muscles) to maintain the line
- Draw your bottom waist up and away from the floor
- Keep your core gently engaged throughout
Top arm options:
- Easier: Place your left hand on your left hip
- Moderate: Extend your left arm straight up toward the ceiling
- Advanced: Reach your left arm over your head, creating a side bend
Leg positioning:
- Keep both legs straight and strong
- Press your feet together or stack them precisely
- Engage your leg muscles to help support the pose
- Think about reaching your top leg away from your head
Breathing and duration:
- Hold for 20-45 seconds, building up gradually
- Breathe steadily through your nose
- If you start to shake, focus on your breath and strong foundation
- Come down before your form deteriorates
Transition and repeat:
- Lower your hips to the mat slowly with control
- Return to plank pose briefly to reset
- Roll to your left side and repeat on the other side
- Rest in child’s pose after completing both sides
Feel it working: Lift your hips high and feel the engagement along the side of your waist. Your obliques and transverse abdominis work together here. The deeper you breathe, the more you’ll feel it.
Common mistakes to avoid:
- Letting the hips sag down toward the floor
- Rolling the top shoulder forward instead of stacking it
- Placing the supporting hand too far under the shoulder
- Holding your breath due to the challenge of the pose
- Collapsing onto the supporting arm instead of actively pressing away
- Looking up or down instead of maintaining neutral neck
Modifications:
- Knee down: Lower your bottom knee to the mat for support
- Forearm side plank: Lower to your forearm instead of your hand
- Wall support: Practice against a wall with your back lightly touching
- Bent knee: Keep your top leg straight, bend your bottom knee for stability
- Chair support: Place your top hand on a chair for additional support
Advanced progressions:
- Hold for 60+ seconds with perfect form
- Tree pose variation: Bend your top knee and place foot on your inner thigh
- Leg lifts: Lift your top leg up and down while holding the side plank
- Arm reaches: Reach your top arm under your torso and back up
- Star pose: Lift both your top arm and top leg simultaneously
Step 5: The ultimate deep core challenge: boat pose (Navasana)
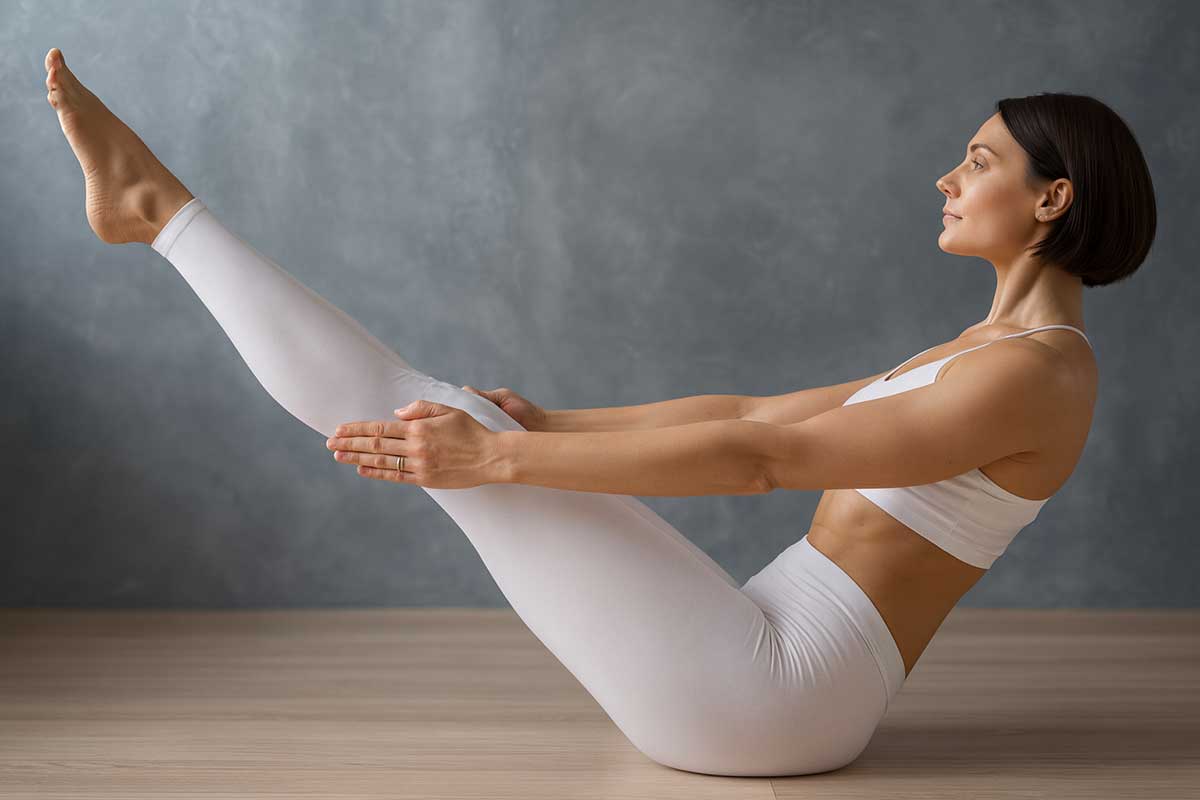
- Sit with your knees bent, feet on the floor. Lean back slightly and lift your feet.
- Extend your legs if you can, creating a V-shape with your body.
- Reach your arms forward, parallel to the ground.
- Hold for 20-45 seconds. Take breaks as needed.
- Modifications: Keep your knees bent, or hold the backs of your thighs with your hands.
Feel it working: This is the peak pose. Feel your deep abdominal muscles working to keep your spine long and your body lifted. Your entire core system is firing. Breathe deeply to keep those stabilizers engaged.
Step 6: Dynamic core engagement with bridge pose (Setu Bandhasana) with leg lift
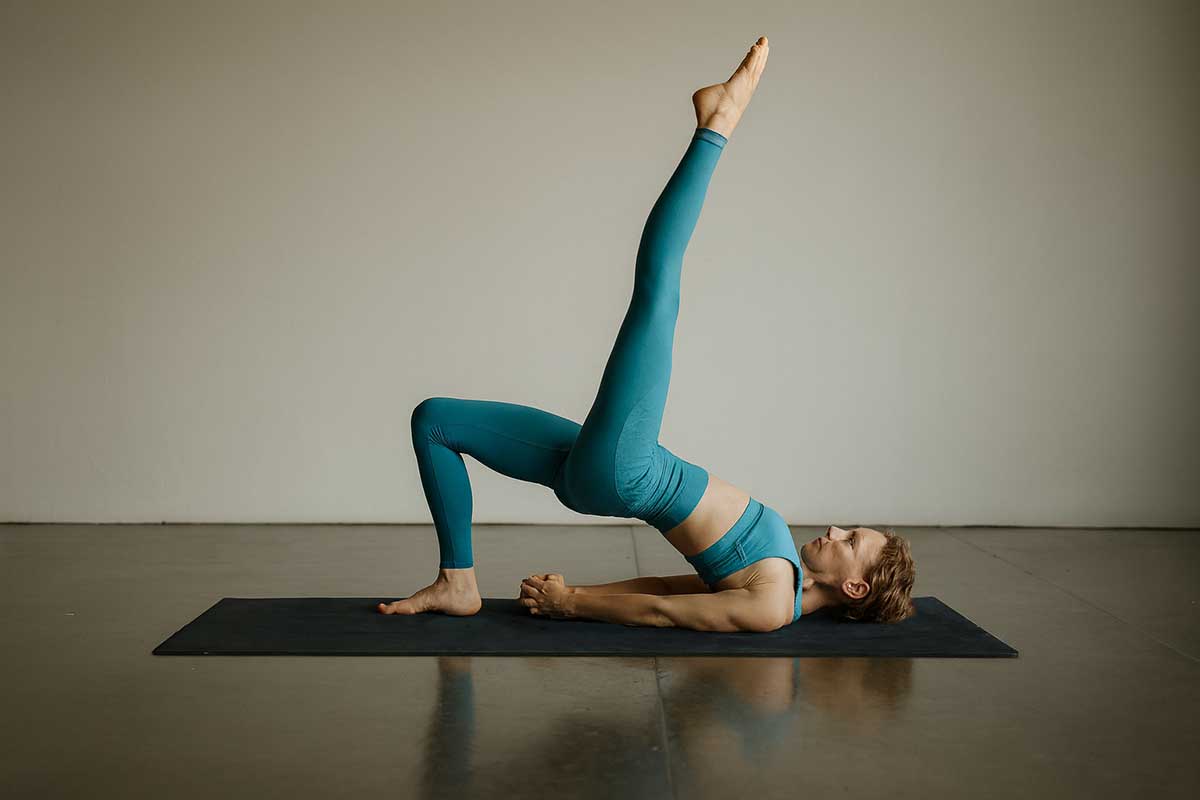
- Lie on your back with knees bent, feet flat on the floor.
- Press your feet down and lift your hips into bridge pose.
- Slowly lift your right knee toward your chest. Keep your hips level.
- Lower your foot back down and repeat with the left leg.
- Do 5 lifts on each side.
Feel it working: The stability in your hips comes directly from your deep core and glutes working together. Keep breathing. If your hips drop when you lift a leg, your stabilizers are learning to work harder.
Step 7: releasing and resetting with a gentle supine twist (Supta Matsyendrasana)
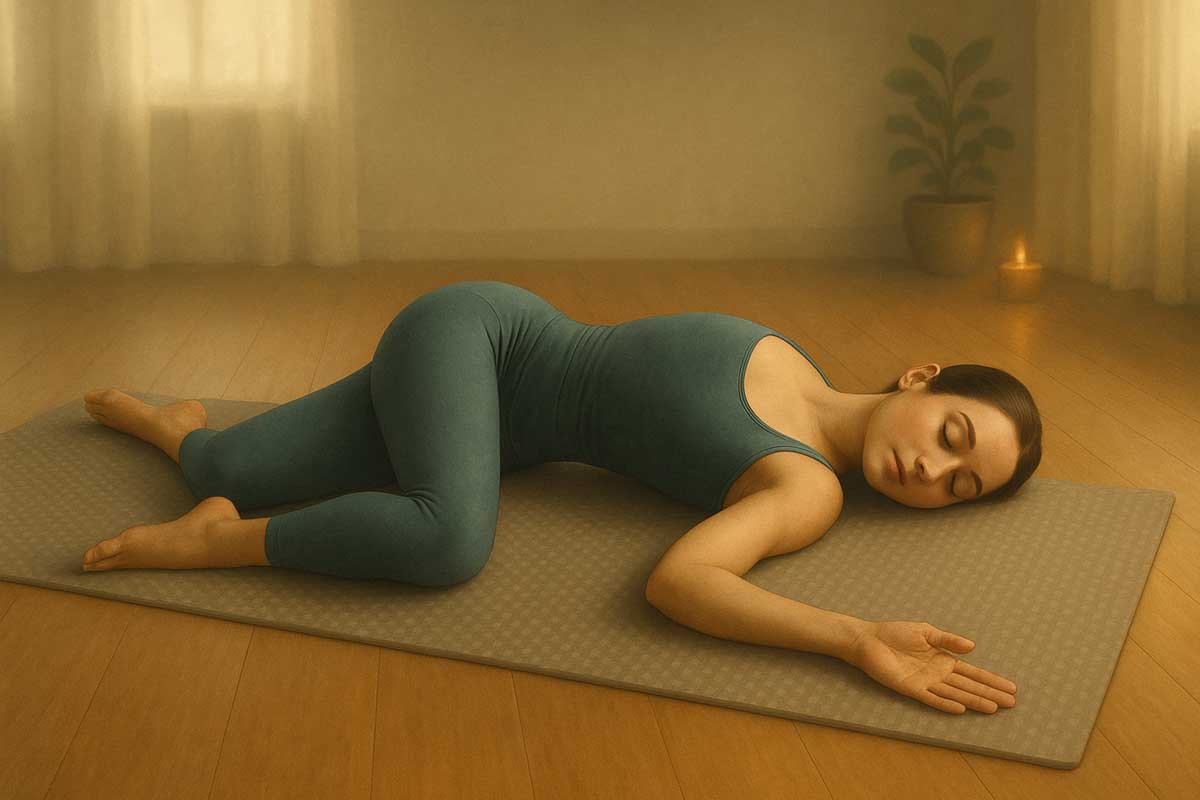
- Stay on your back. Hug both knees into your chest.
- Drop both knees to the right and extend your arms out wide.
- Turn your head to the left if it feels comfortable.
- Hold for 1-2 minutes, then switch sides.
Feel it working: This isn’t about “working” anymore. Feel the residual warmth and activation in your core while you gently stretch. Your muscles have been challenged, and now they get to relax and reset.
Your complete core strength program
Your new core awareness doesn’t stop when you roll up your yoga mat. Here’s your complete integration plan:
Daily deep core activation protocol
| Activity | Technique | Frequency | Intensity |
|---|---|---|---|
| Morning Activation | 5 deep breaths with gentle navel-to-spine | Daily upon waking | 20% effort |
| Desk Work | Light core engagement while sitting tall | Every hour for 2 minutes | 10-15% effort |
| Before Exercise | 3 breath cycles with deep core activation | Before any workout | 30% effort |
| Lifting Objects | Breath + core engagement before lifting | Every time you lift | 40-50% effort |
| Walking | Gentle core support with natural gait | During purposeful walks | 15% effort |
Weekly training schedule options
Beginner schedule (weeks 1-4):
- Monday: Full 7-step flow
- Wednesday: Steps 1-3 + 7 (gentle practice)
- Friday: Full 7-step flow
- Sunday: Steps 1, 2, 7 (recovery practice)
Intermediate schedule (weeks 5-8):
- Monday: Full flow + 1 extra round of challenging poses
- Tuesday: Steps 2, 3, 4, 6 (stability focus)
- Thursday: Full flow with longer holds
- Saturday: Full flow + additional yoga poses
Advanced schedule (week 9+):
- Create your own sequences using these foundations
- Add other yoga poses that challenge your core
- Practice daily for 10-15 minutes minimum
Troubleshooting common issues
“I don’t feel my deep core working”
- Start with breath work only for one week
- Place one hand on chest, one on belly – only the belly should move during deep breathing
- Try the “elevator” technique: imagine your pelvic floor lifting up floor by floor on each exhale
“My back hurts during the poses”
- Drop to easier modifications immediately
- Focus on Step 1 (Cat-Cow) for several weeks before progressing
- Consider consulting a physical therapist if pain persists
“I can’t balance in Bird-Dog”
- Start with opposite arm and leg on the ground
- Lift just the arm for 1 week, then just the leg for 1 week
- Use a wall for support if needed
“Plank is too hard”
- Start with wall push-up position
- Progress to incline push-up position (hands on chair/couch)
- Then try knee plank before full plank
Complementary practices
Breathing exercises for enhanced core function:
- 360-Degree Breathing: 5 minutes daily, expanding ribs in all directions
- Box Breathing: 4 counts in, 4 hold, 4 out, 4 hold – activates deep core
- Diaphragmatic Breathing: Lying down, hand on belly, slow deep breaths
Lifestyle modifications:
- Sleep Position: Side sleeping with pillow between knees supports core alignment
- Sitting: Change positions every 30 minutes, use lumbar support
- Exercise: Add this flow before any other workout for injury prevention
The goal isn’t to constantly clench your abs. It’s to develop the awareness and strength so your deep core muscles support you naturally. Research shows that improvements in postural sway, particularly among older adults, can be enhanced immediately after training participants to activate and isolate the transverse abdominis (TrA) muscle.
Conclusion
True core strength doesn’t come from endless crunches. It comes from awakening the deep stabilizers that support everything you do.
This 7-step flow targets those muscles in a way that traditional ab exercises can’t. You’ll move better, feel stronger, and finally see the results you’ve been working toward.
Your action plan:
- Week 1: Focus on the assessment tests and Steps 1-3 of the flow
- Week 2-4: Add the remaining steps gradually, focusing on form over intensity
- Week 5+: Follow the progressive schedules and integrate daily activation techniques
- Ongoing: Make this flow a cornerstone of your fitness routine
Expected results timeline:
- Week 1-2: Increased awareness of your core muscles
- Week 3-4: Improved posture throughout the day
- Week 5-8: Noticeable strength gains and reduced back discomfort
- Week 9-12: Significant improvement in balance, stability, and overall core function
Remember to track your progress using the assessment tests. Retest every 2-4 weeks to see your improvement.
FAQs
How often should I do this flow?
Start with 3-4 times per week. As you get stronger, you can practice daily. Listen to your body and rest when needed.
Can I do this if I have back pain?
This gentle approach is often helpful for back pain, but consult your healthcare provider first. Start with just Steps 1 and 7 if you have acute pain.
When will I see results?
Most people notice improved posture within 1-2 weeks. Strength gains typically appear in 3-4 weeks with consistent practice.
Is this suitable for beginners?
Yes! Every pose includes modifications. Start with the easier versions and progress at your own pace.
Can I add this to my existing workout routine?
Absolutely! This flow works perfectly as a warm-up before other exercises or as a standalone practice.


