Every 3 seconds, someone breaks a bone due to osteoporosis. By age 50, half of all women will experience an osteoporotic fracture in their lifetime. The annual healthcare cost? Over $19 billion in the US alone. Your doctor probably told you to walk more, take calcium, and hope for the best. But what if I told you there’s something better?
A 12-minute daily yoga routine can increase bone density by 0.9% in the spine and 6.8% in the hips within 10 years, according to Columbia University research. This beats walking, which only maintains current bone density.
A groundbreaking study by Dr. Loren Fishman at Columbia University followed 741 volunteers for over 10 years. Those who practiced a simple 12-minute daily yoga routine increased bone density in the spine by 0.9% and in the hips by 6.8%. The participants didn’t just slow bone loss—they actually reversed it. This wasn’t about stretching or relaxation. This was about building stronger bones in less time than it takes to walk around the block.
The secret lies in how yoga works your bones differently than walking ever could.
Who should try this routine?
Perfect for:
- Adults over 50 with osteoporosis or osteopenia
- People who can’t do high-impact exercise
- Anyone wanting to prevent bone loss
- Those with limited mobility (can be done seated)
Check with your doctor first if you have:
- Severe osteoporosis (T-score below -2.5)
- Recent fractures
- Balance problems
- Chronic pain conditions
Why yoga is your secret weapon for stronger bones
More than just stretching
Your bones are living tissue. Inside them, tiny cells called osteocytes act like construction workers. When they sense stress and pressure, they get to work building new bone. The key is giving them the right kind of signal.
Walking sends a message: “We need some bone here.” But yoga sends a different message: “We need STRONG bone here, and we need it now.”
Why it beats walking
Picture this: walking is like leaning against a wall. You’re applying gentle, steady pressure. Now imagine trying to push that same wall over. That’s yoga.
When you hold Tree Pose, your leg muscles pull on your hip bones from multiple directions. Your core muscles brace against your spine. One muscle group fights another, creating what scientists call isometric contraction. This pulling and pushing force tells your bones to get stronger, fast.
| Exercise Type | Force Applied | Bone Response | Time Needed |
|---|---|---|---|
| Walking | 1-2x body weight | Maintains current density | 30-60 minutes |
| Yoga | Up to 8x body weight | Can increase density | 12 minutes |
| Weight lifting | 3-5x body weight | Increases density | 45-60 minutes |
Walking gives you weight-bearing pressure. Yoga gives you muscle-pulling pressure. The difference? Walking maintains your current bone density. Yoga can actually increase it.
Plus, you get bonus benefits walking can’t match: better balance, stronger muscles, and improved posture. All of these directly cut your risk of falling—and falling is what turns weak bones into broken bones.
Scientific backup
Dr. Fishman’s study, published in Topics in Geriatric Rehabilitation, showed that yoga practitioners had:
- 85% fewer fractures than the control group
- Improved balance scores
- Better quality of life measures
- No adverse effects from the practice
Your 12-minute, bone-building daily practice
Get ready to flow: what you’ll need
Space requirements: 6×6 feet of clear floor space
Start where you are. Perfect poses don’t build bones—consistent practice does. If you can’t do a pose exactly as described, modify it. Your bones will still benefit.
Quick reference: your 12-pose sequence
| Pose | Target Area | Hold Time | Difficulty |
|---|---|---|---|
| Tree Pose | Hips, balance | 30 sec each side | Beginner |
| Triangle | Spine, legs | 30 sec each side | Beginner |
| Warrior II | Legs, core | 30 sec each side | Beginner |
| Side Angle | Full body | 30 sec each side | Intermediate |
| Revolved Triangle | Spine rotation | 30 sec each side | Intermediate |
| Locust | Back muscles | 30 seconds | Intermediate |
| Bridge | Spine, glutes | 30 seconds | Beginner |
| Hand-to-Foot I | Hamstrings | 30 sec each side | Beginner |
| Hand-to-Foot II | Hips | 30 sec each side | Intermediate |
| Straight-Leg Twist | Spine | 30 sec each side | Beginner |
| Bent-Knee Twist | Core, spine | 30 sec each side | Beginner |
| Corpse Pose | Full body | 60 seconds | Beginner |
The routine: 12 poses, 1 minute each
Hold each pose for 30 seconds, then take 30 seconds to transition to the next one. Set a timer if it helps you stay on track.
Pose 1: Tree Pose (Vriksasana)
Why it works for you: Builds balance and strengthens hip bones, a common fracture site.
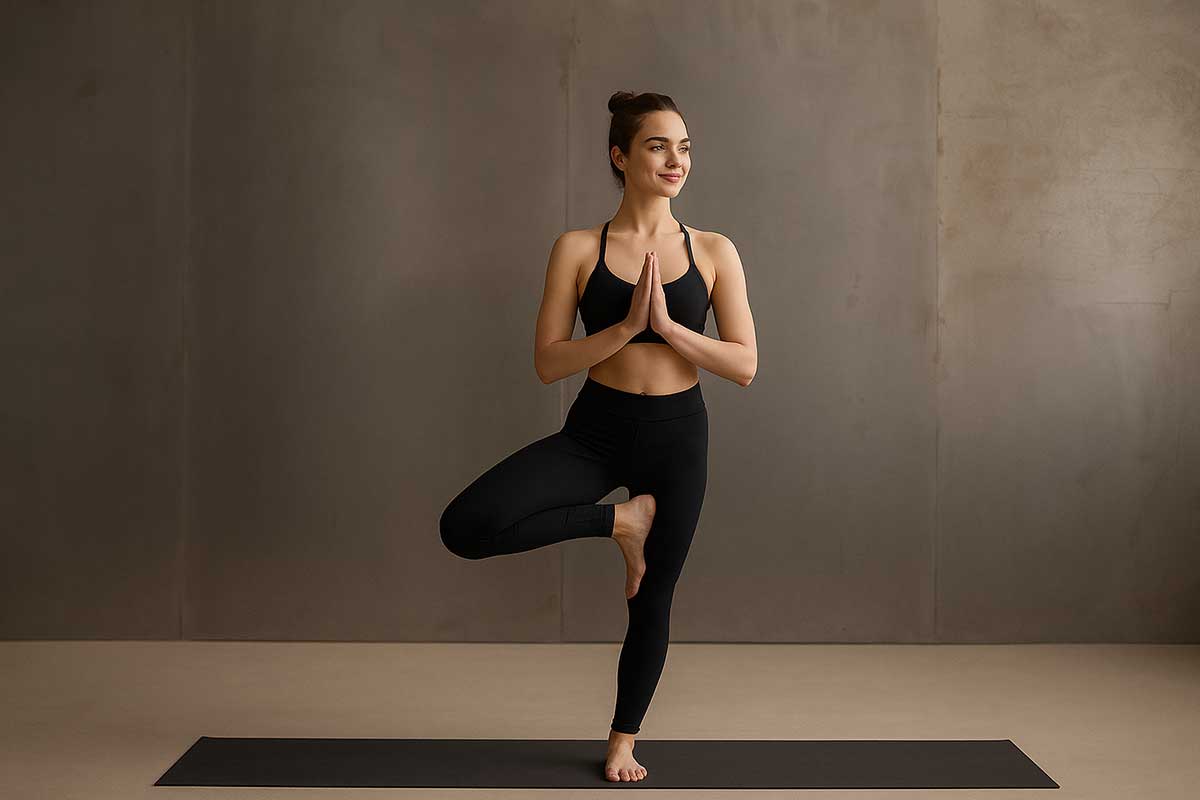
Step-by-step instructions:
- Stand with the chair to your right side
- Place your right hand on the chair for balance
- Lift your left foot and place it on your inner right ankle (never on the knee)
- Press your foot into your leg and your leg into your foot
- Hold for 30 seconds, then switch sides
Pose 2: Triangle Pose (Trikonasana)
Why it works for you: Strengthens your spine while building leg and hip bone density.
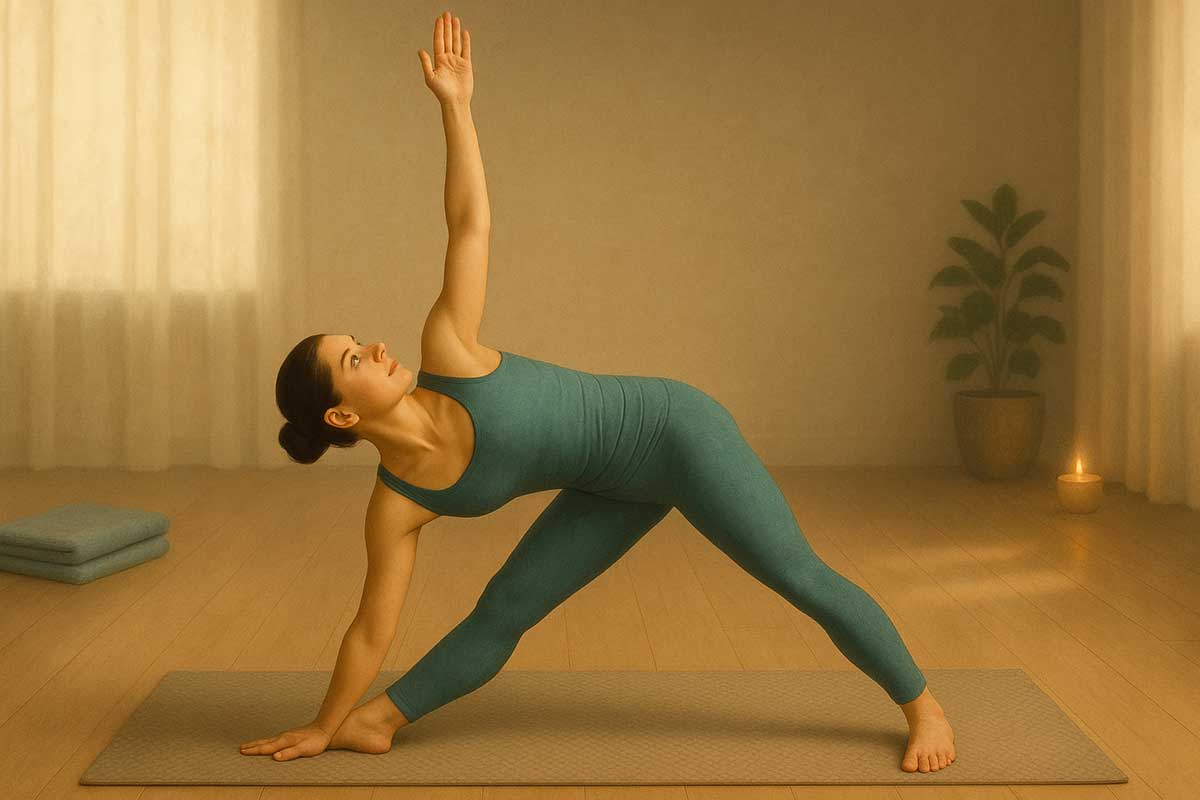
Step-by-step instructions:
- Stand with feet 3 feet apart
- Turn right foot out 90 degrees
- Place right hand on chair seat or yoga block
- Extend left arm toward ceiling
- Keep both sides of your waist long
- Hold for 30 seconds, then switch sides
Pose 3: Warrior II (Virabhadrasana II)
Why it works for you: Builds powerful leg bones while strengthening your core.
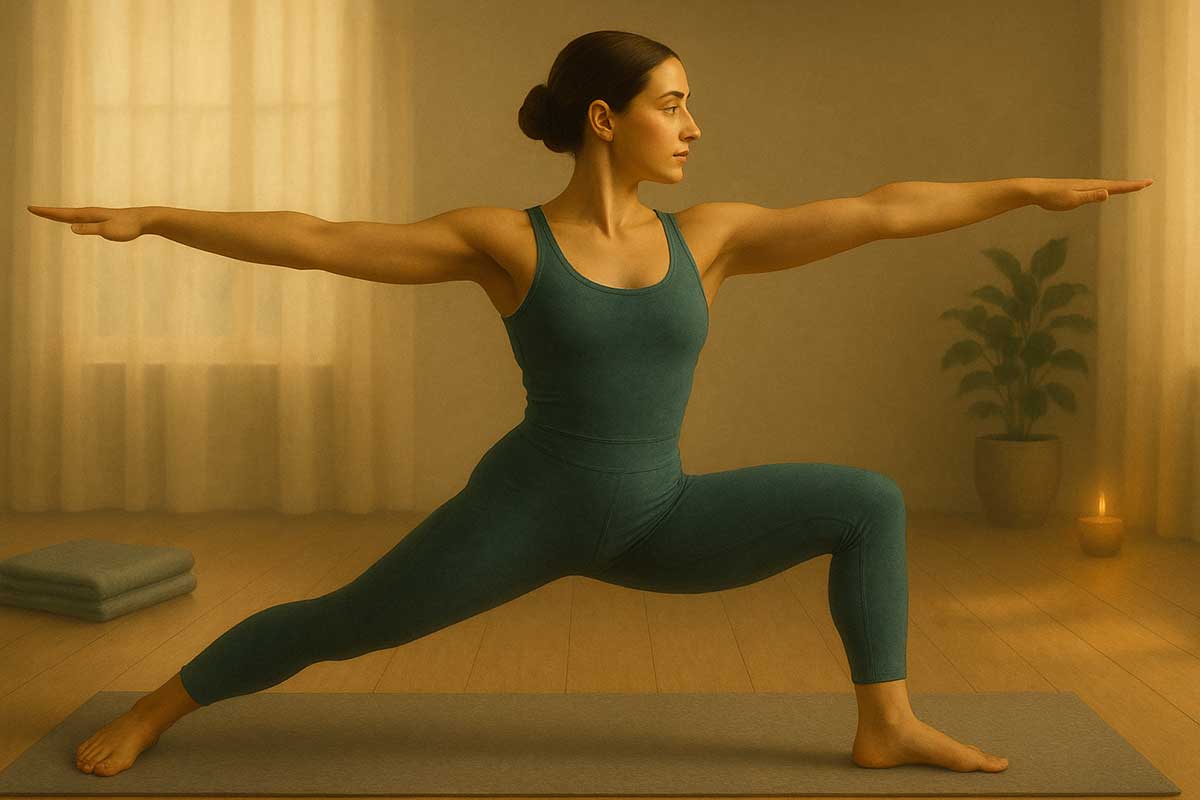
Step-by-step instructions:
- Stand with feet 3-4 feet apart
- Turn right foot out 90 degrees, left foot in 15 degrees
- Bend right knee over ankle
- Extend arms parallel to floor
- Look over right hand
- Hold for 30 seconds, then switch sides
Pose 4: Side Angle Pose (Parsvakonasana)
Why it works for you: Creates a full-body pulling action that signals bones throughout your torso.
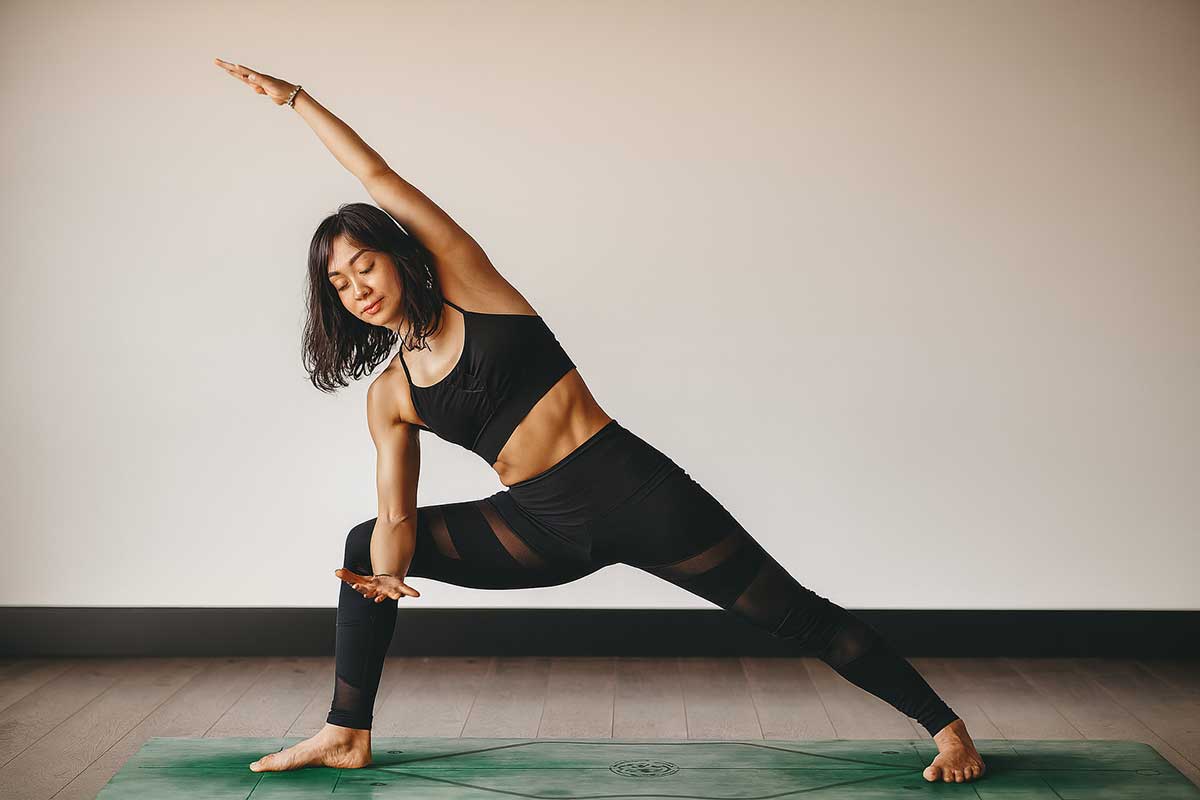
Step-by-step instructions:
- From Warrior II, place right forearm on right thigh
- Extend left arm over ear
- Create one long line from left fingertips to left heel
- Breathe deeply
- Hold for 30 seconds, then switch sides
Pose 5: Revolved Triangle Pose (Parivrtta Trikonasana)
Why it works for you: Safely strengthens spine rotation while building back bone density.
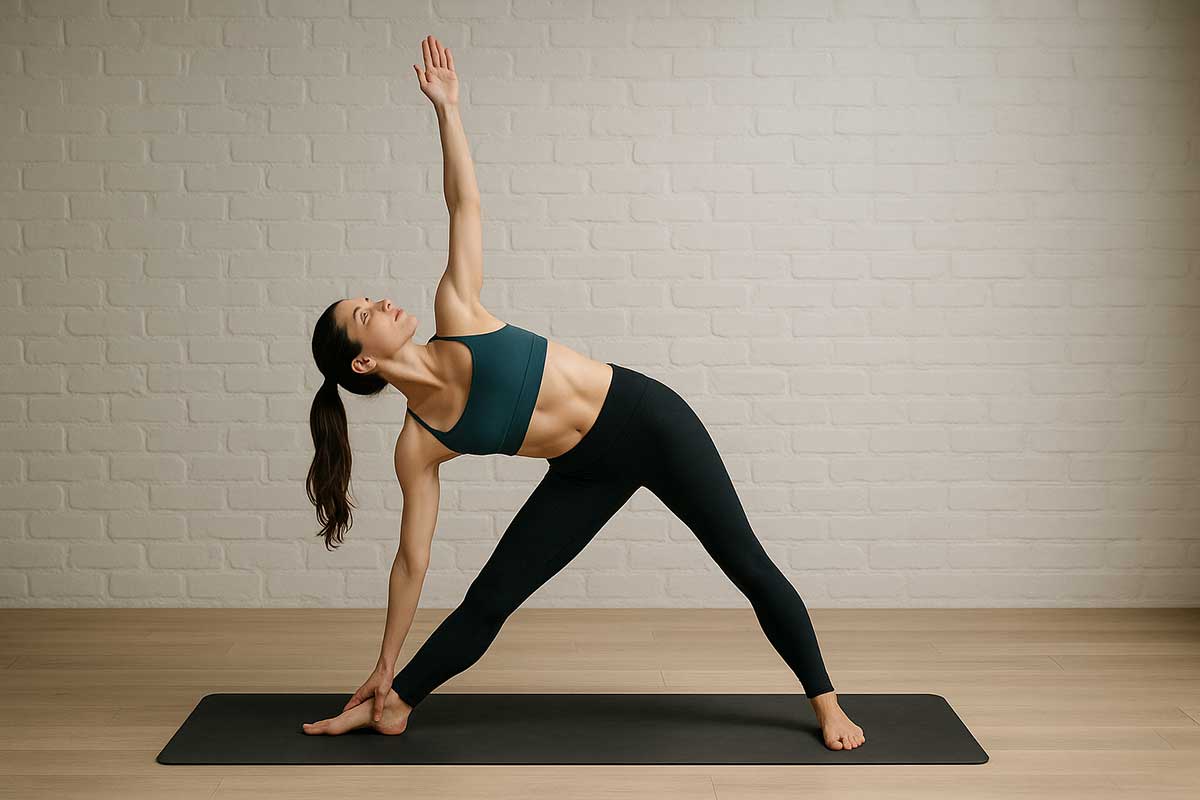
Step-by-step instructions:
- Stand with feet 3 feet apart
- Turn right foot out 90 degrees
- Place left hand on chair or block in front of right foot
- Place right hand on hip (don’t force the twist)
- Keep spine long and straight
- Hold for 30 seconds, then switch sides
Pose 6: Locust Pose (Salabhasana)
Why it works for you: Builds crucial back strength to prevent spinal fractures.

Step-by-step instructions:
- Lie face down on your mat
- Place arms by your sides, palms down
- Lift chest and upper ribs off floor
- Keep legs relaxed on the ground
- Look straight down to protect your neck
- Hold for 30 seconds
Pose 7: Bridge Pose (Setu Bandhasana)
Why it works for you: Strengthens the entire back of your body while building spine density.
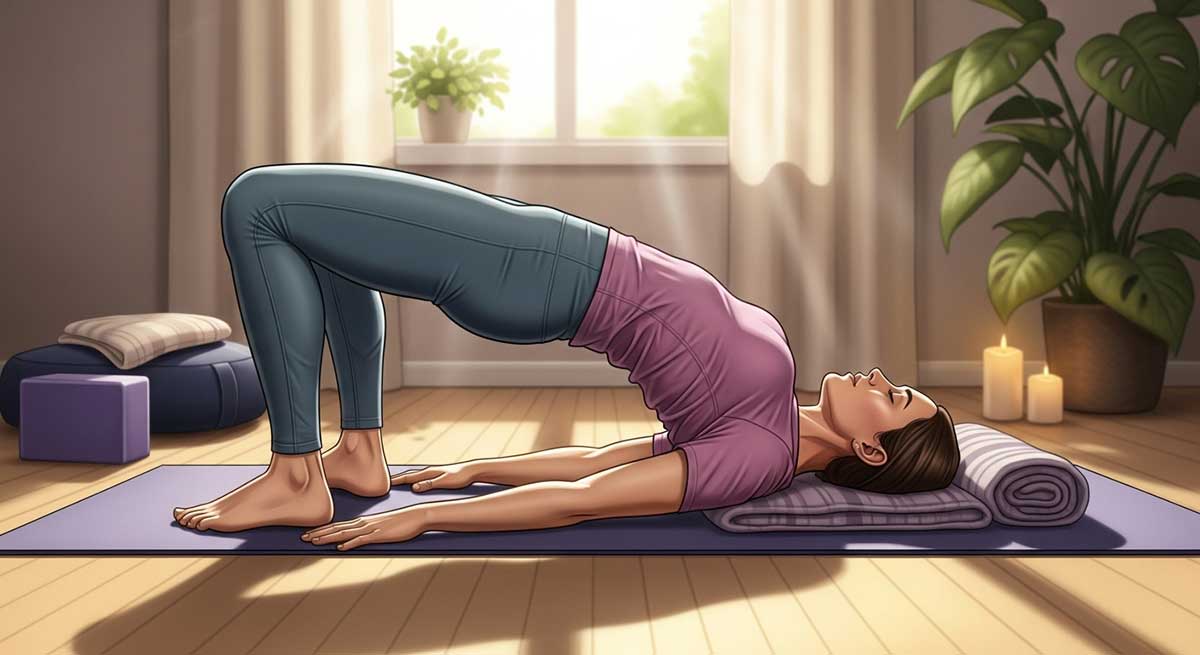
Step-by-step instructions:
- Lie on your back, knees bent, feet hip-width apart
- Place arms by sides, palms down
- Press feet down and lift hips
- Keep knees parallel
- Breathe normally
- Hold for 30 seconds
Pose 8: Supine Hand-to-Foot Pose I (Supta Padangusthasana I)
Why it works for you: Builds hamstring and hip flexibility while strengthening leg bones.
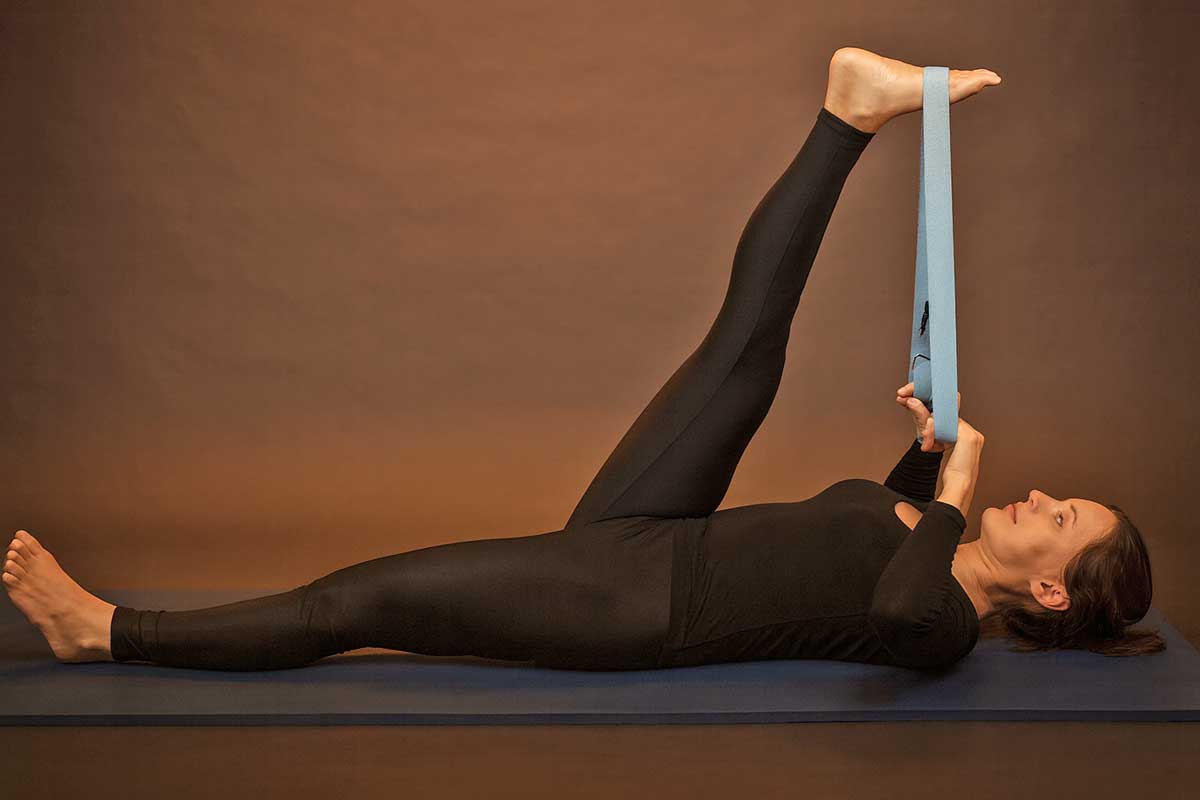
Step-by-step instructions:
- Lie on your back
- Loop strap or towel around right foot
- Straighten right leg toward ceiling
- Keep left leg extended on floor
- Hold strap ends in both hands
- Hold for 30 seconds, then switch sides
Pose 9: Supine Hand-to-Foot Pose II (Supta Padangusthasana II)
Why it works for you: Builds hip bone density while improving hip flexibility.
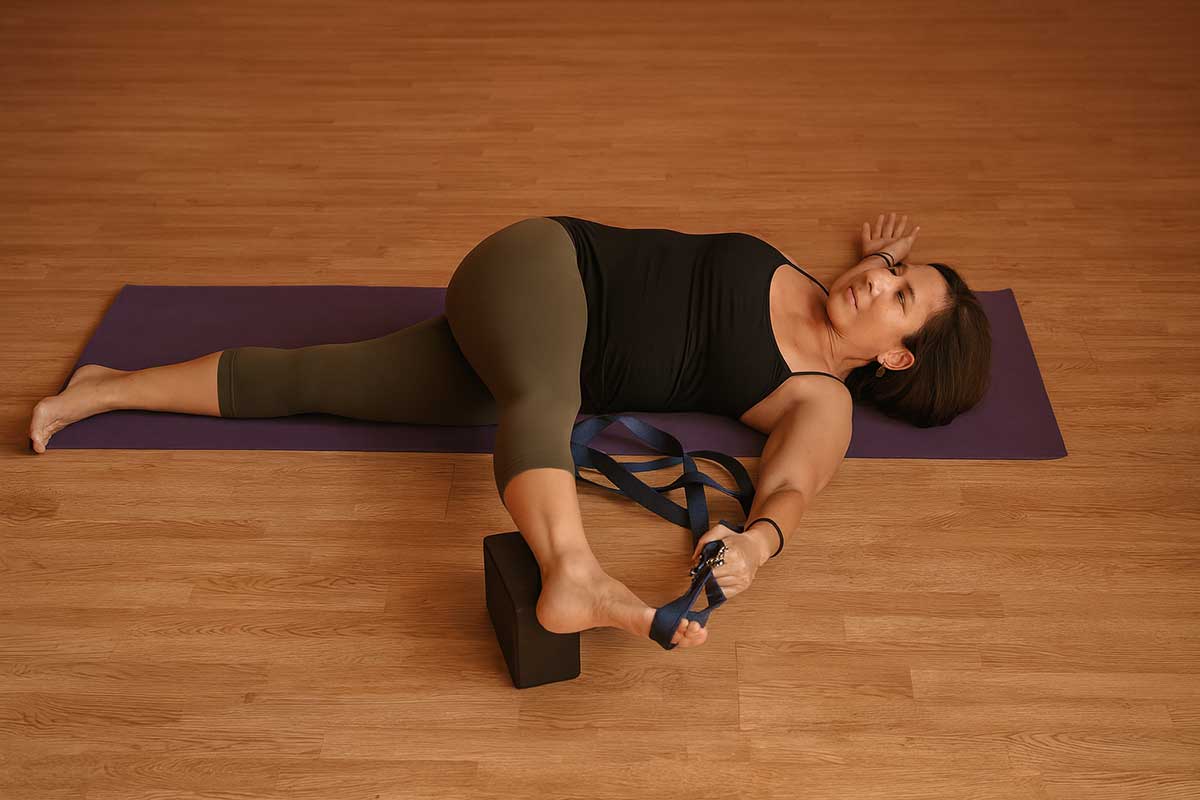
Step-by-step instructions:
- From previous pose, lower right leg out to the side
- Keep left leg and left hip grounded
- Hold strap with right hand only
- Don’t force the stretch
- Hold for 30 seconds, then switch sides
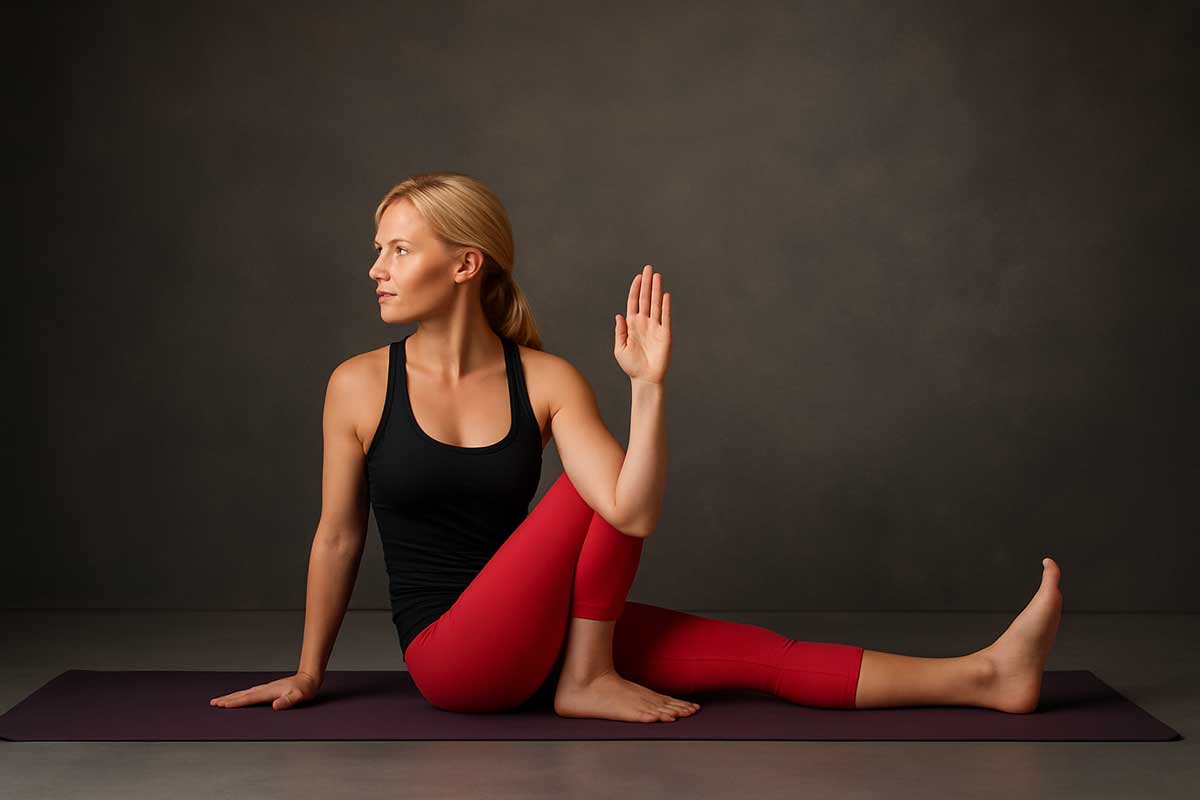
Pose 10: Straight-Legged Twist (Marichyasana)
Why it works for you: Safely builds spinal mobility and bone strength.
Step-by-step instructions:
- Sit with legs extended
- Bend right knee, place foot outside left thigh
- Sit tall and place left hand behind you
- Gently twist to the right, keeping spine long
- No deep twisting or compression
- Hold for 30 seconds, then switch sides
Pose 11: Bent-Knee Twist (Matsyendrasana)
Why it works for you: Continues building safe spinal rotation and core strength.

Step-by-step instructions:
- Sit with legs extended
- Cross right foot over left leg
- Place right hand behind you for support
- Gently hug right knee with left arm
- Twist gently to the right, keeping spine tall
- Hold for 30 seconds, then switch sides
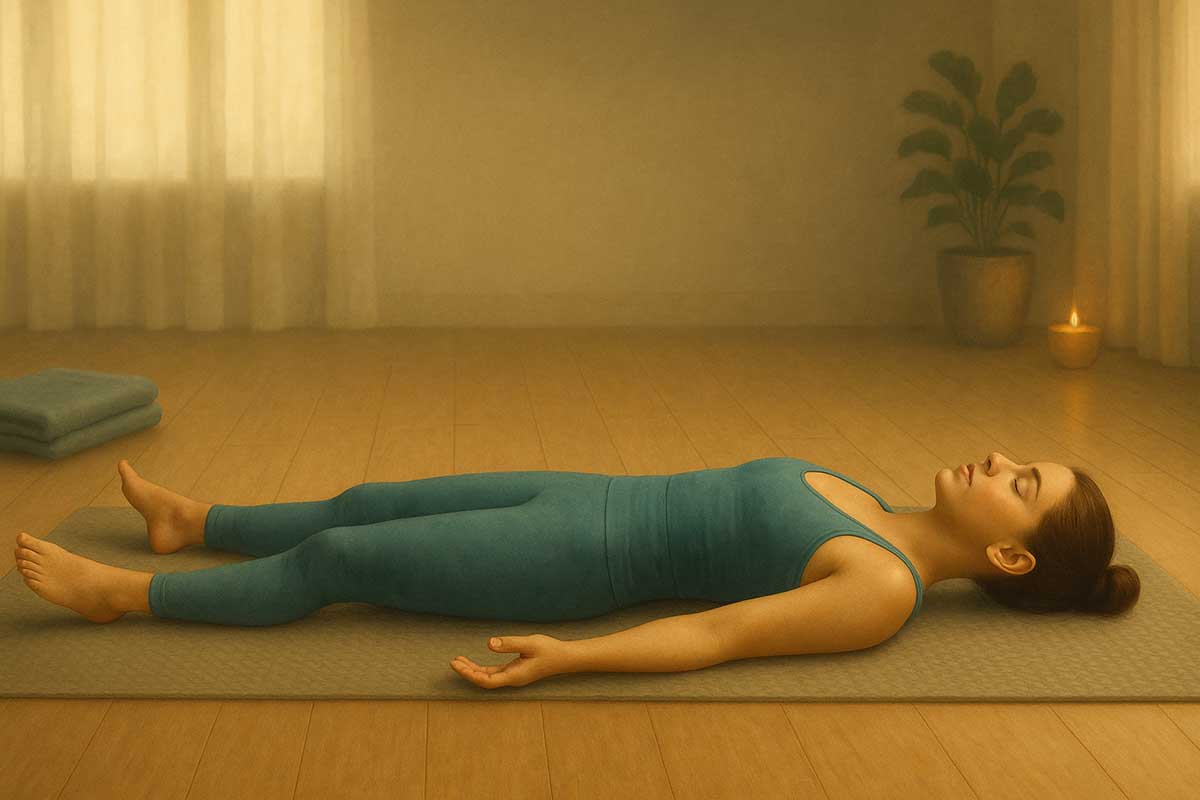
Pose 12: Corpse Pose (Savasana)
Why it works for you: Allows your nervous system to integrate all the bone-building signals you just sent.
Step-by-step instructions:
- Lie on your back, legs extended
- Let arms rest by sides, palms up
- Close your eyes
- Breathe naturally
- Let your body completely relax
- Hold for 1 full minute
Modifications for different needs
If you have limited mobility
Most poses can be adapted for chair practice:
- Tree Pose: Sit and place foot on opposite calf
- Triangle: Sit sideways in chair and lean to one side
- Twists: Sit and rotate upper body while holding chair back
If you’re just starting out
- Hold poses for 15 seconds instead of 30
- Use wall support for all standing poses
- Skip poses that feel uncomfortable
- Build up gradually over 2-3 weeks
If you’re more advanced
- Hold poses for 45-60 seconds
- Try poses without chair support when safe
- Add gentle flowing movements between poses
- Focus on deeper breathing patterns
The golden rules of safe yoga for osteoporosis
Your body, your rules
These three rules will keep you safe while maximizing your bone-building benefits.
Rule #1: No forward folds
Never round your spine forward when you have osteoporosis. This includes touching your toes, sitting forward bends, or any pose that curves your spine like the letter C. Why? Your vertebrae are weaker and can crush under this type of pressure. When you need to reach down, bend your knees and keep your back straight.
Rule #2: Twist with care
Twisting is fine—deep, compressed twisting is not. Think of wringing out a towel versus gently turning a doorknob. Your twists should come from your upper back while keeping your lower spine long and stable. Never force a twist or hold one for too long.
Rule #3: Listen to your body
Sharp pain is your body’s way of saying “stop.” Dull muscle fatigue is normal and good—it means you’re working. But any shooting, stabbing, or sudden pain means you need to back off immediately. Consistency beats intensity every single time.
Warning signs to stop immediately
- Sharp, shooting pain
- Dizziness or lightheadedness
- Chest pain or trouble breathing
- Sudden muscle spasms
- Loss of balance that feels unsafe
Poses to avoid with osteoporosis
| Avoid | Why | Safe alternative |
|---|---|---|
| Forward folds (touching toes) | Risk vertebral fractures | Bend knees, keep back straight |
| Deep backbends (full wheel) | Can compress spine | Gentle bridge pose |
| Deep twists | Can fracture vertebrae | Gentle, supported twists |
| Jumping or bouncing | High impact stress | Slow, controlled movements |
| Inversions (headstands) | Fall risk, neck stress | Legs up the wall |
Make it a habit: your 30-day kickstart plan
From “I should” to “I did”
The difference between people who succeed and people who don’t isn’t motivation—it’s systems. Here’s your simple system for making this routine stick.
Week 1-2: Build the chain Do your 12-minute routine every day, even if you don’t feel like it. Mark an X on your calendar each day you complete it. Your only job is to not break the chain.
Week 3-4: Find your anchor Link your yoga routine to something you already do without thinking. Right after you brush your teeth. Before your morning coffee. After you check your email. This connection makes it automatic.
Motivational tip: Put your yoga mat somewhere you’ll trip over it. Visual cues trigger action better than willpower ever will.
Track your progress: Notice how you feel after 30 days. Better balance? Less back stiffness? Stronger legs when you stand up? These changes happen before any bone density test could measure them.
Your 30-day success recipe
Ingredients:
- 12 minutes of daily time
- 1 yoga mat
- 1 commitment to consistency
- Patience for gradual results
Instructions:
- Choose the same time each day (morning works best for most people)
- Set up your space the night before
- Start with a 2-minute breathing warm-up
- Complete your 12-minute routine
- End with 1 minute of gratitude for your body
- Mark an X on your calendar
- Repeat for 30 days
Expected results after 30 days:
- Improved balance and stability
- Less morning stiffness
- Better posture throughout the day
- Increased confidence in movement
- Stronger sense of body awareness
Troubleshooting common challenges
| Challenge | Solution |
|---|---|
| “I don’t have time” | Do it while coffee brews or before shower |
| “I keep forgetting” | Set phone reminder and lay out mat the night before |
| “Some poses hurt” | Modify or skip them – listen to your body |
| “I don’t see results” | Progress is slow – focus on how you feel, not just bone scans |
| “I feel silly” | Remember: you’re doing something scientifically proven |
Breathing techniques for maximum benefits
Your breath is your secret weapon for bone building. Proper breathing increases oxygen flow to your bones and helps you hold poses longer.
Basic bone-building breath pattern
- Inhale for 4 counts as you move into the pose
- Hold for 4 counts while maintaining the position
- Exhale for 6 counts while deepening the pose
- Continue this pattern throughout the 30-second hold
Pose-specific breathing tips
- Standing poses (Tree, Triangle, Warrior II): Breathe deeply into your belly to activate core muscles
- Twisting poses: Inhale to lengthen spine, exhale to gently deepen the twist
- Backbends (Locust, Bridge): Breathe into your back ribs to support your spine
- Lying poses: Use slower, deeper breaths to help your nervous system relax
Common mistakes that reduce bone-building benefits
Standing poses mistakes
Tree pose:
- ❌ Placing foot on the side of the knee (can cause injury)
- ✅ Place foot above or below the knee, never on it
- ❌ Holding your breath
- ✅ Breathe steadily throughout the pose
Triangle pose:
- ❌ Collapsing over the front leg
- ✅ Keep both sides of your waist equally long
- ❌ Placing hand directly on knee
- ✅ Use a chair or block for support
Warrior II:
- ❌ Letting the front knee cave inward
- ✅ Keep knee tracking over the ankle
- ❌ Sinking into the pose without muscle engagement
- ✅ Stay strong and lifted throughout
Floor poses mistakes
Bridge pose:
- ❌ Squeezing your glutes too hard
- ✅ Engage glutes gently while breathing normally
- ❌ Rolling knees out to the sides
- ✅ Keep knees parallel and hip-width apart
Twisting poses:
- ❌ Forcing the twist by pulling with your arms
- ✅ Initiate the twist from your core, use arms for light support
- ❌ Hunching your shoulders
- ✅ Keep shoulders relaxed and spine tall
Your progressive timeline: what to expect when
Weeks 1-2: Foundation phase
What you’re building: Habit formation and basic pose familiarity What to expect:
- Some muscle soreness (normal and good!)
- Better sleep quality
- Improved awareness of your posture
- Initial balance improvements
Goals this phase:
- Complete routine 10 out of 14 days
- Focus on form over holding time
- Learn to use props without feeling self-conscious
Weeks 3-4: Strength phase
What you’re building: Muscle strength and endurance What to expect:
- Poses feel easier to hold
- Better balance in standing poses
- Less morning stiffness
- Increased confidence in movement
Goals this phase:
- Hold most poses for full 30 seconds
- Need chair support less often
- Complete routine 12 out of 14 days
Months 2-3: Integration phase
What you’re building: Movement patterns and deeper strength What to expect:
- Noticeable improvement in daily activities
- Better posture throughout the day
- Increased overall energy
- Friends may comment on how you’re moving better
Goals this phase:
- Practice 25+ days per month
- Try some poses without chair support
- Notice which poses have become your favorites
Months 4-6: Mastery phase
What you’re building: Consistent bone-building stimulus What to expect:
- Routine feels natural and automatic
- Significant balance improvements
- Stronger core and back muscles
- Ready for your next bone density test
Goals this phase:
- Maintain daily practice habit
- Consider learning additional bone-safe poses
- Track improvements in daily activities
Month 12+: Long-term benefits
What you’re building: Measurable bone density improvements What to expect:
- Potential bone density increases on DEXA scans
- Sustained improvements in strength and balance
- Lower risk of falls and fractures
- Yoga has become part of who you are
Real results: what study participants experienced
Based on Dr. Fishman’s published research and participant feedback:
Sarah, age 67: “After 8 months, I could stand on one foot for 30 seconds. Before yoga, I couldn’t balance for 5 seconds. My doctor was amazed at my bone scan results.”
Robert, age 72: “I was skeptical that 12 minutes could make a difference. But after 6 months, I stopped using the handrail going upstairs. My back pain is nearly gone.”
Maria, age 58: “The routine became my morning ritual. I actually look forward to it now. My posture improved so much that people ask if I’ve lost weight.”
Dr. Fishman’s research notes: “We were surprised by how quickly participants reported feeling stronger and more confident. The bone density improvements took time, but the functional benefits started within weeks.”
Seasonal modifications for year-round practice
Summer practice tips (June-August)
- Practice early morning before heat builds up
- Stay extra hydrated before and after
- Use a fan if practicing indoors
- Wear lightweight, breathable clothing
- Consider shorter holds (20 seconds) on very hot days
Winter practice tips (December-February)
- Warm up longer before starting poses
- Keep room temperature comfortable (68-72°F)
- Wear layers you can remove as you warm up
- Pay extra attention to joint mobility
- Use this season to focus on consistency indoors
Spring/fall practice tips (March-May, September-November)
- Perfect seasons to establish or re-establish routine
- Take advantage of comfortable temperatures
- Consider practicing outdoors if space allows
- Use seasonal energy shifts to deepen your practice
- Great time to assess progress and set new goals
Conclusion
Twelve minutes a day isn’t much. You spend more time than that waiting in line at the grocery store. But those 12 minutes can be the difference between growing stronger or growing weaker as you age.
Dr. Fishman’s research participants didn’t just maintain their bone density—they increased it. In their spines. In their hips. In just 12 minutes a day.
You have the power to build a stronger skeleton. You have the knowledge to do it safely. You have a proven system to make it happen. It starts with a single breath and a single pose. Begin today.
FAQs
How long before I see results in my bone density?
Bone density changes take 12-24 months to show up on DEXA scans. But you’ll feel stronger, more balanced, and have better posture within weeks.
Can I do this routine if I’ve already had fractures?
Check with your doctor first. The routine can often be modified safely, but medical clearance is important.
What if I can’t hold poses for 30 seconds?
Start with 10-15 seconds and build up gradually. Consistency matters more than duration.
Should I still take calcium and vitamin D?
Yes, continue any supplements your doctor prescribed. This routine works alongside, not instead of, medical treatment.
Can men do this routine too?
Absolutely. While osteoporosis is more common in women, men can develop it too and benefit equally from this practice.
Is this better than weight training?
Both are effective. This routine offers convenience and lower injury risk, while weight training may build bone density faster.
What if I miss a few days?
Just start again. Don’t let missed days turn into missed weeks. Progress isn’t lost as quickly as you might think.


