Your Achilles tendon is your body’s strongest tendon. It connects your calf muscles to your heel bone, handling forces up to 8 times your body weight during running. When this tendon gets overloaded or irritated, it develops tiny tears and becomes painful.
Two types of Achilles problems:
- Mid-portion tendinopathy: Pain 2-6 cm above the heel
- Insertional tendinopathy: Pain right at the heel bone
Why your tendon hurts: Think of your tendon like a rope made of thousands of tiny fibers. When you overuse it or load it incorrectly, some fibers get damaged. Your body tries to repair them, but without proper stimulus, it often creates weaker, disorganized tissue. That’s where targeted exercises come in.
Treatment approach comparison
| Method | Volume | Time Commitment | Success Rate | Patient Satisfaction |
|---|---|---|---|---|
| Traditional Alfredson | 180 reps daily | 20-30 min | 65-85% | Moderate (high dropout) |
| Heavy-Slow Resistance | 24-36 reps | 10-15 min | 70-90% | High (better compliance) |
| This Hybrid Approach | 45-60 reps | 15 min | 75-90% | High (manageable volume) |
Research backing: Studies by Beyer et al. (2015) and Malliaras et al. (2013) show HSR training matches traditional protocols with better patient adherence.
The evolution beyond the “gold standard” for Achilles relief
That sharp pain shooting up your heel when you take your first steps in the morning? You’re not alone. Achilles tendonitis affects millions of people every year, turning simple activities like walking upstairs or going for a jog into painful ordeals.
For decades, doctors and physical therapists have relied on the Alfredson protocol as the “gold standard” treatment. This approach requires 180 heel drops daily for 12 weeks. While effective, many patients struggle with the high volume and time commitment.
Here’s what recent research reveals: a simplified approach using heavy-slow resistance training can deliver the same results. Studies show this method often leads to better patient satisfaction and higher completion rates. You get the healing power of proven science in a format that actually fits your busy life.
This article provides a powerful 5-step daily routine that takes just 15 minutes. Each step builds on the latest research to give your Achilles tendon exactly what it needs to heal stronger than before.
Quick reference guide
Exercise summary table
| Step | Exercise | Time | Sets x Reps | Equipment | Target Pain Level |
|---|---|---|---|---|---|
| 1 | Warm-up & Assessment | 2 min | N/A | None | 1-3/10 |
| 2 | Isometric holds | 2 min | 3 x 45 sec | None | 2-4/10 |
| 3 | HSR training | 5 min | 3 x 8-12 | Weight/backpack | 3-5/10 |
| 4 | Eccentric drops | 3 min | 3 x 15 | Step/platform | 3-5/10 |
| 5 | Cool-down | 3 min | 3 x 30 sec | Towel/roller | 1-2/10 |
Total Time: 15 minutes | Frequency: 5-6 days per week | Expected Results: 30-50% pain reduction in 6-8 weeks
Step 1: The foundational warm-up & pain assessment (2 minutes)
Your tendon needs preparation before it can handle therapeutic loads. Think of this like warming up your car on a cold morning – you wouldn’t rev the engine immediately.
Why this matters: A proper warm-up increases blood flow to the tendon and surrounding muscles. This preparation reduces injury risk and helps you establish your pain baseline for the session.
The routine:
Ankle Circles (1 minute total):
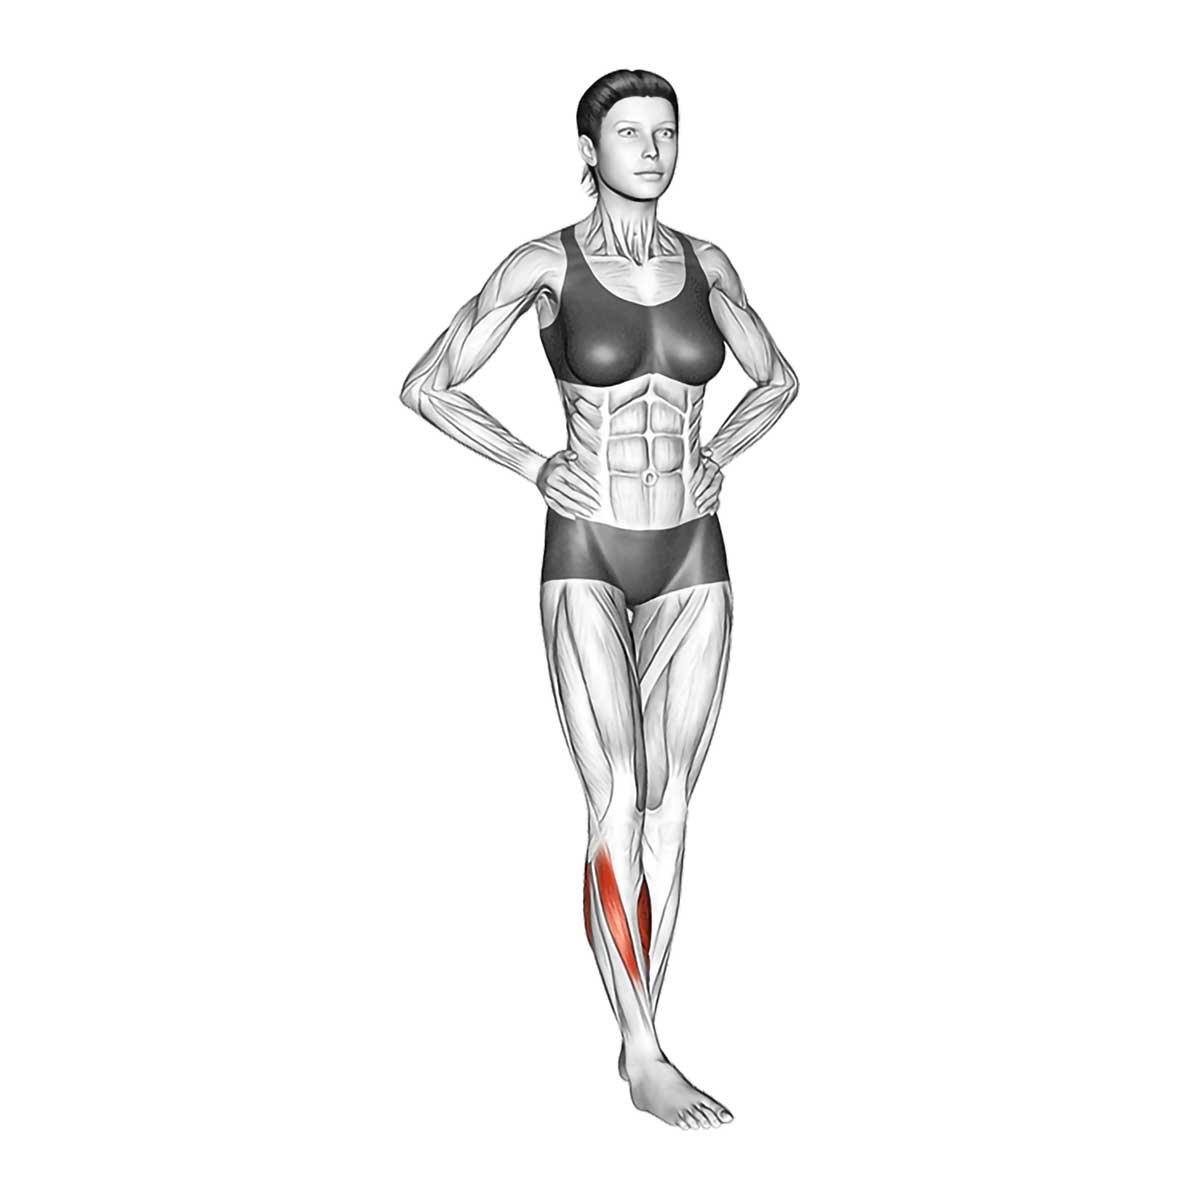
- Stand comfortably with feet hip-width apart
- Lift your affected foot slightly off the ground
- Draw slow, controlled circles for 30 seconds clockwise
- Reverse direction for 30 seconds counterclockwise
- Focus on smooth, fluid movements
Gentle Calf Stretches (30 seconds each):
Standing Calf Stretch (Gastrocnemius):
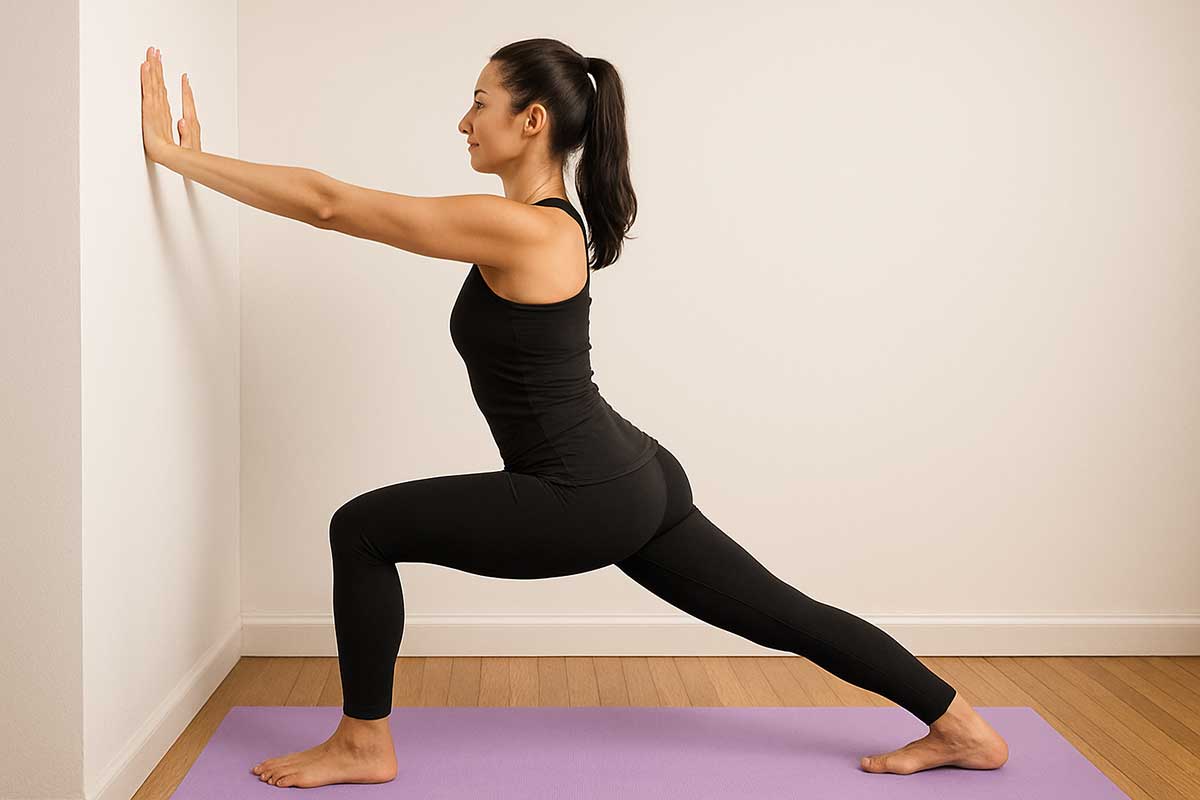
- Place your hands against a wall
- Step your affected leg back about 3 feet
- Keep your heel down and leg straight
- Hold for 30 seconds – you should feel a gentle pull, not pain
Bent-Knee Calf Stretch (Soleus):
- Same position as above
- Bend your back knee slightly while keeping the heel down
- Hold for 30 seconds
- This targets the deeper calf muscle
Pain Check-In (30 seconds): Rate your current Achilles pain on a 1-10 scale. Write this number down. You’ll use it to guide your exercise intensity and track progress over time.
Pro tip box: morning stiffness strategy
If your tendon feels very stiff in the morning, spend an extra 30 seconds on ankle pumps before getting out of bed. Simply flex and point your foot 10-15 times while lying down.
Step 2: Isometrics for immediate pain relief (2 minutes)
Here’s something most people don’t know: simply tensing your calf muscles without moving can actually reduce your pain. This phenomenon, called exercise-induced analgesia, gives your nervous system a reset.
The science: Isometric contractions activate pain-inhibiting pathways in your brain. They’re like a natural pain reliever that comes from within your own body.
The routine:
Isometric Heel Raise Hold:
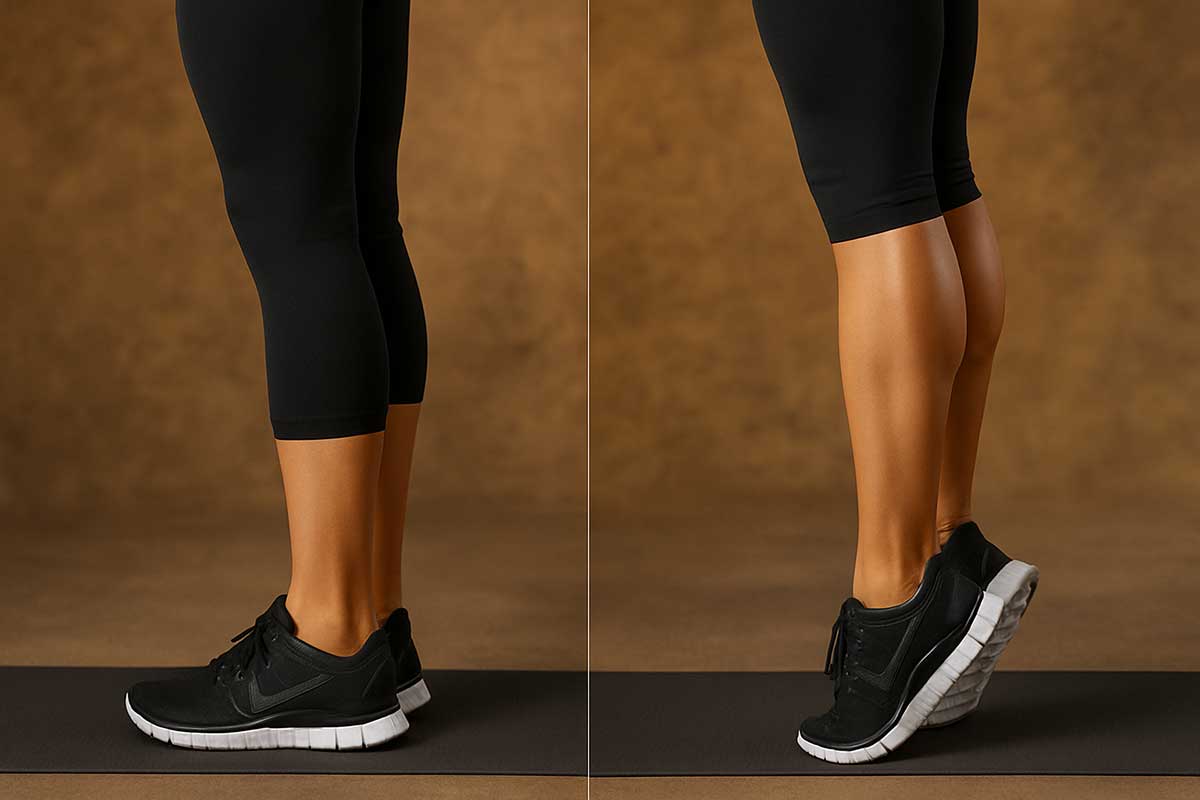
- Stand on a flat surface with feet hip-width apart
- Slowly rise up onto the balls of both feet
- Shift your weight primarily to the affected leg
- Hold this position for 45 seconds (the muscle should feel like it’s working)
- Lower slowly and rest for 15 seconds
- Repeat 2 more times
Key points:
- Your pain shouldn’t increase significantly during the hold
- If you can’t hold for 45 seconds, start with 30 and build up
- Focus on steady breathing throughout the hold
Modification options:
| Fitness Level | Hold Time | Sets | Notes |
|---|---|---|---|
| Beginner | 20-30 sec | 2 | Use wall for balance |
| Intermediate | 45 sec | 3 | Standard protocol |
| Advanced | 60 sec | 3 | Single leg only |
Step 3: The heavy-slow strength phase (5 minutes)
This is where the magic happens. Heavy-Slow Resistance (HSR) training represents the biggest advancement in tendon rehabilitation in the past decade. Instead of doing hundreds of light repetitions, you’ll do fewer reps with more resistance and slower movements.
Why this works better: Tendons respond exceptionally well to slow, controlled loading. The extended time under tension stimulates collagen production and tendon remodeling more effectively than rapid movements. Studies show HSR often achieves the same results as the traditional Alfredson protocol with better patient compliance.
Choose your version:
At-Home Version – The Weighted Single-Leg Heel Raise:
Equipment needed: A backpack and some weight (books, water bottles, or actual weights)
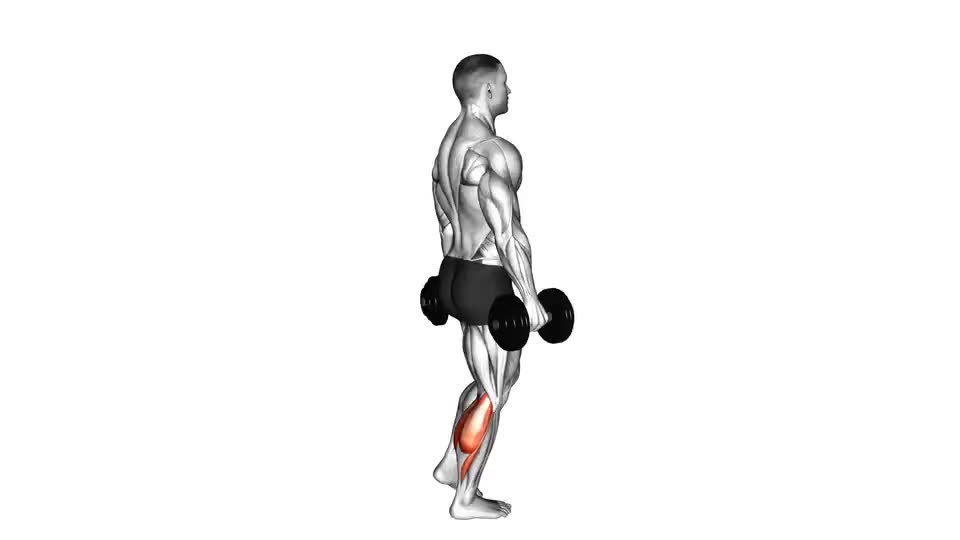
- Fill your backpack with 5-10 pounds to start (increase weekly as tolerated)
- Stand on your affected leg only
- Hold onto a wall or chair for balance if needed
- Perform the movement with this timing:
- 3-second rise to the top (concentric phase)
- Brief pause at the top
- 3-second lower down (eccentric phase)
- Complete 3 sets of 8-12 repetitions
- Rest 60 seconds between sets
Gym Version – Calf Raise Machine:
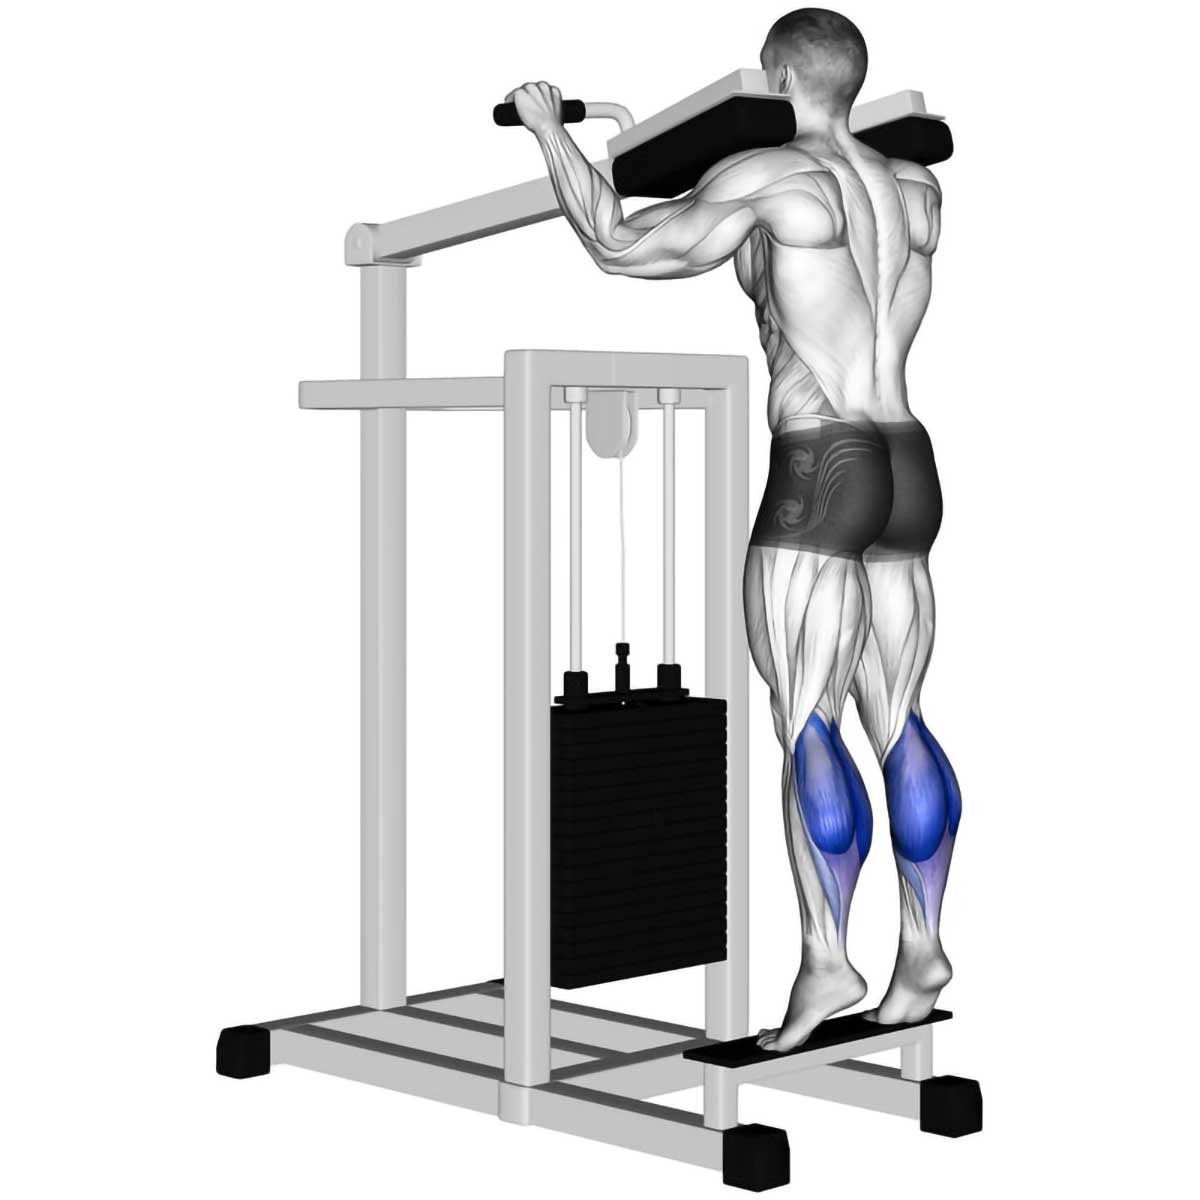
- Select a weight that makes the last 2-3 reps challenging but achievable
- Sit or stand at the calf raise machine
- Use the same 3-second up, 3-second down tempo
- Complete 3 sets of 8-12 repetitions
- Rest 60 seconds between sets
Progression strategy: When you can complete 3 sets of 12 with good form, increase the weight by 5-10%. This progressive overload is crucial for continued tendon adaptation.
Equipment alternatives & budget solutions
| Equipment Needed | Budget Option | Mid-Range | Premium |
|---|---|---|---|
| Weights | Books, water jugs | Dumbbells ($20-40) | Adjustable weights ($80-150) |
| Step platform | Sturdy curb, stairs | Foam step ($15-25) | Adjustable platform ($40-80) |
| Balance support | Wall, chair | Resistance band ($10-15) | Balance trainer ($50-100) |
DIY weight ideas:
- Gallon water jugs = 8 lbs each
- Textbooks = 2-4 lbs each
- Laundry detergent = 5-10 lbs
- Paint cans = 5-15 lbs each
Step 4: The classic eccentric heel drop – with a twist (3 minutes)
The eccentric heel drop from the famous Alfredson protocol deserves its reputation. However, you’ll use it as a targeted finishing move rather than your entire workout. This approach gives you the proven benefits without the overwhelming volume.
The science: Eccentric loading (lengthening the muscle under tension) creates specific adaptations in tendon tissue. It helps reorganize collagen fibers and reduces the sensitivity of pain receptors in the tendon.
The routine:
Standard Eccentric Heel Drops:
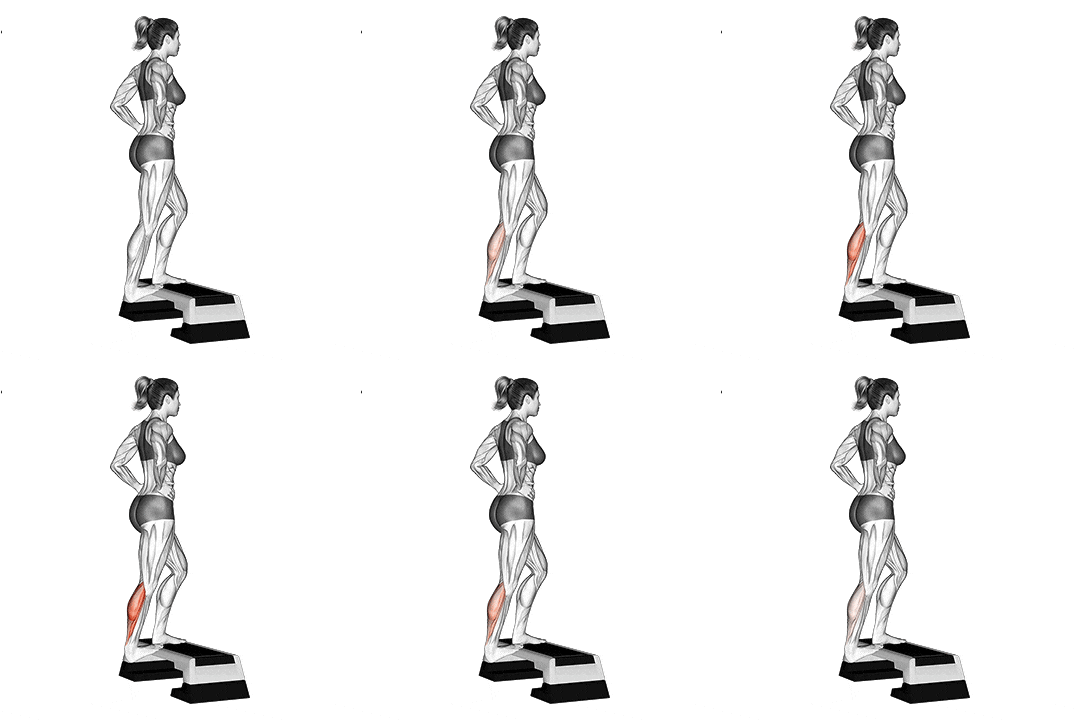
- Stand on the edge of a step or sturdy platform
- Rise up onto the balls of both feet
- Lift your non-affected foot off the step
- Slowly lower your affected heel below the level of the step
- Take 3-4 seconds for the lowering phase
- Use your good leg to return to the starting position
- Complete 3 sets of 15 repetitions
Critical modification for insertional tendonitis: If your pain is right at the heel bone (insertional type), perform these heel drops on a flat surface instead. Going below step level can compress the tendon against the heel bone and worsen your symptoms.
Pain monitoring: You may feel some discomfort during these, but it shouldn’t exceed 5/10 on your pain scale. Some mild pain is acceptable and even expected.
Tendon type modifications:
| Tendinopathy Type | Exercise Modification | Key Points |
|---|---|---|
| Mid-portion | Standard heel drops off step | Full range of motion |
| Insertional | Heel drops on flat surface | Avoid compression |
| Mixed presentation | Start flat, progress to step | Listen to your body |
Step 5: The cool-down and mobility maintenance (3 minutes)
Recovery doesn’t stop when your strengthening exercises end. This final step promotes blood flow, reduces muscle tension, and maintains the flexibility gains from your hard work.
Why cooling down matters: Your muscles and fascia tighten naturally after exercise. Active recovery techniques help flush metabolic waste products and prevent excessive stiffness.
The routine:
Foam Rolling the Calves (90 seconds):
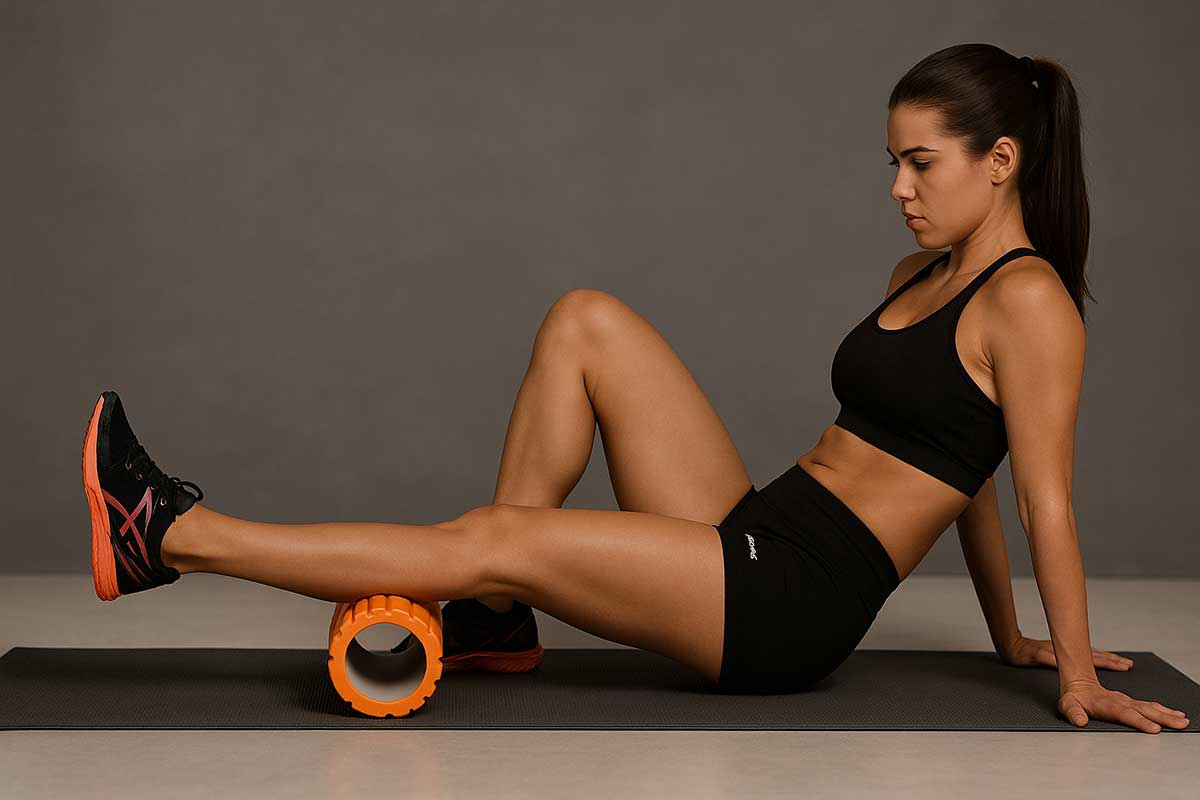
- Sit on the floor with the foam roller under your calf
- Support your weight with your hands
- Roll slowly from just above the ankle to below the knee
- Spend extra time on any tender spots
- Roll both the outer and inner portions of your calf
- If you don’t have a foam roller, use a tennis ball against the wall
Towel Stretch (90 seconds):
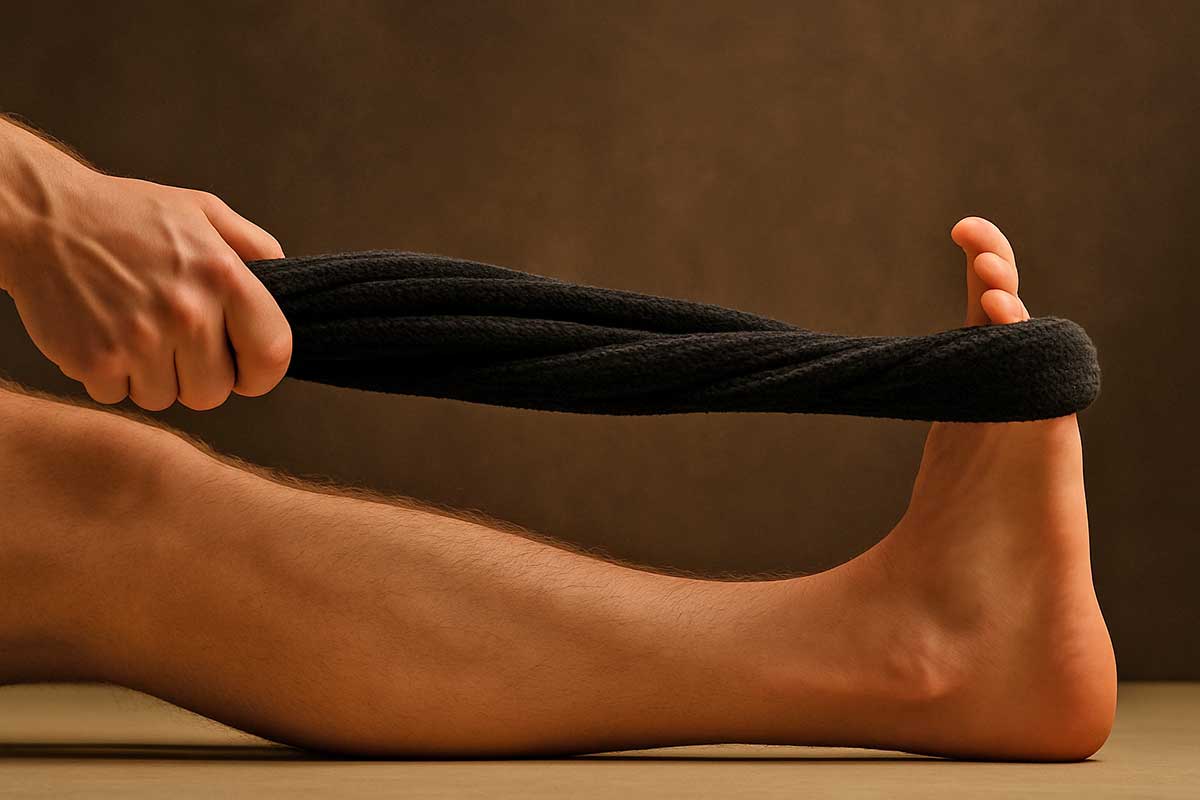
- Sit with your affected leg extended straight
- Loop a towel around the ball of your foot
- Gently pull the towel to bring your toes toward your shin
- Hold for 30 seconds, relax for 10 seconds
- Repeat 3 times total
- You should feel a comfortable stretch, not pain
Your 12-week recovery timeline
Detailed progression plan
| Week | HSR Weight | Eccentric Reps | Expected Improvement | Key Milestones | Red Flags |
|---|---|---|---|---|---|
| 1-2 | 5-10 lbs | 10-12 | Minimal pain change | Establish routine, perfect form | Pain >6/10 during exercise |
| 3-4 | 10-15 lbs | 12-15 | 10-20% pain reduction | Better morning stiffness | No improvement in morning pain |
| 5-6 | 15-20 lbs | 15 | 30-40% pain reduction | Improved daily function | Worsening pain with activities |
| 7-8 | 20-25 lbs | 15 | 40-60% pain reduction | Return to walking/hiking | Persistent night pain |
| 9-10 | 25-30 lbs | 15 | 60-75% pain reduction | Light jogging trials | Pain with basic activities |
| 11-12 | 30-35 lbs | 15 | 70-85+ % pain reduction | Sport-specific activities | No functional improvement |
Weekly expectations guide
Weeks 1-2: Foundation Phase Your main goal is consistency. Don’t worry if you don’t feel much better yet. Your tendon is just beginning to respond to the new stimulus. Morning stiffness might actually feel worse temporarily – this is normal.
Weeks 3-4: Early Response Phase You should notice your first real improvements. Morning stiffness starts to ease. Walking upstairs becomes less painful. This is when many people get excited and want to do more – resist this urge.
Weeks 5-6: Building Momentum Real functional improvements begin. You can walk longer distances without pain. Sleep improves because night pain decreases. This is often when people want to return to running – too early.
Weeks 7-8: Strength Returns Your calf feels stronger. Single-leg activities become easier. You might try a few jogging steps – keep it very short and pay attention to next-day soreness.
Weeks 9-10: Function Restoration Normal daily activities should be pain-free. Light recreational activities become possible. You can start thinking about sport-specific training.
Weeks 11-12: Return to Full Activity Most people can return to their previous activity level, often stronger than before. Some may need a few more weeks – everyone heals differently.
At-a-glance troubleshooting
- Pain too high? → Reduce weight or reps by 25%
- No equipment? → Use books in backpack, wall for balance
- Morning stiffness worse? → Add extra rest day
- Plateau in progress? → Increase weight by 5-10%
Comprehensive troubleshooting guide
| Problem | Possible Cause | Immediate Solution | Long-term Strategy |
|---|---|---|---|
| Pain increases during exercise | Too much load too fast | Reduce weight by 25-50% | Progress more slowly |
| Morning stiffness worsens | Overtraining or inflammation | Take 2-3 days complete rest | Add extra rest days weekly |
| No improvement after 4 weeks | Incorrect diagnosis or technique | Review form, consider PT consult | Get professional assessment |
| Pain spreads to other areas | Compensatory patterns | Check shoe wear, gait analysis | Address whole kinetic chain |
| Sudden sharp pain during exercise | Possible re-injury | Stop immediately, ice, rest | Medical evaluation needed |
| Exercise feels too easy | Need progression | Increase weight by 10-15% | Follow progression schedule |
| Can’t complete full routine | Fitness or pain limitations | Modify sets/reps, split sessions | Build tolerance gradually |
| Pain worse 24 hours later | Exercise intolerance | Reduce intensity by 50% | Very gradual progression |
Your Achilles recovery kitchen: nutrition for healing
Anti-inflammatory meal ideas
Breakfast options:
- Greek yogurt with berries and walnuts
- Oatmeal topped with ground flaxseed and cinnamon
- Smoothie with spinach, pineapple, and ginger
Lunch options:
- Salmon salad with leafy greens and olive oil
- Lentil soup with turmeric and vegetables
- Quinoa bowl with roasted vegetables and avocado
Dinner options:
- Grilled chicken with sweet potato and broccoli
- Baked cod with asparagus and brown rice
- Turkey and vegetable stir-fry with anti-inflammatory spices
Collagen-supporting nutrients
| Nutrient | Daily Target | Best Food Sources | Why It Helps |
|---|---|---|---|
| Vitamin C | 75-90 mg | Citrus, berries, peppers | Collagen synthesis |
| Protein | 1g per lb body weight | Lean meats, fish, legumes | Building blocks |
| Omega-3 | 1-2g | Fish, flaxseed, walnuts | Reduces inflammation |
| Zinc | 8-11 mg | Oysters, beef, pumpkin seeds | Tissue repair |
| Copper | 0.9 mg | Shellfish, nuts, dark chocolate | Collagen formation |
Recovery smoothie recipes
The Tendon Healer:
- 1 cup tart cherry juice (anti-inflammatory)
- 1/2 banana (potassium for muscle function)
- 1 scoop vanilla protein powder
- 1 tbsp ground flaxseed (omega-3s)
- 1/2 cup Greek yogurt
- Ice cubes
The Collagen Builder:
- 1 cup pineapple chunks (vitamin C + bromelain)
- 1/2 cucumber (hydration + silica)
- Handful of spinach (iron + folate)
- 1 tbsp chia seeds (omega-3s + protein)
- 1 cup coconut water
- Fresh mint leaves
Hydration guidelines
- Aim for half your body weight in ounces of water daily
- Add electrolytes if sweating heavily
- Limit alcohol during acute healing phases
- Green tea provides antioxidants without dehydration
Equipment essentials & home gym setup
Complete setup under $50
| Item | Purpose | Budget Option | Price Range |
|---|---|---|---|
| Weights | HSR loading | Water jugs, books | Free |
| Step platform | Heel drops | Stairs, sturdy box | Free |
| Towel | Stretching | Any towel | $5-10 |
| Tennis ball | Self-massage | Standard tennis ball | $3-5 |
| Resistance band | Balance assist | Light resistance | $8-15 |
| Foam roller | Recovery | Pool noodle substitute | $10-20 |
Mid-range setup ($50-150)
| Item | Purpose | Recommended Product | Price Range |
|---|---|---|---|
| Adjustable dumbbells | Progressive loading | PowerBlocks or Bowflex | $80-120 |
| Aerobic step | Heel drops | Reebok or CAP | $25-40 |
| Quality foam roller | Recovery | TriggerPoint or Gaiam | $20-35 |
| Yoga mat | Floor exercises | Manduka or Jade | $30-60 |
| Massage ball | Trigger points | Lacrosse or Theracane ball | $8-15 |
Premium setup ($150+)
| Item | Purpose | Premium Option | Price Range |
|---|---|---|---|
| Cable machine | Variable resistance | TRX or resistance tower | $100-300 |
| Vibrating foam roller | Advanced recovery | Hyperice or Theragun | $150-400 |
| Balance trainer | Stability training | BOSU or stability disc | $80-150 |
| Percussion massager | Deep tissue work | Theragun or Hypervolt | $200-400 |
Return to activity protocol
Phase 1: Pain-free daily activities (weeks 1-4)
Goals: Reduce pain, improve function Activities allowed: Walking, swimming, cycling (low resistance) Activities to avoid: Running, jumping, sports
Progression markers:
- Walk 30 minutes without increased pain
- Climb stairs normally
- Stand from sitting without stiffness
Phase 2: Light recreation (weeks 5-8)
Goals: Build endurance, test function Activities allowed: Hiking, recreational cycling, yoga Activities to avoid: High-impact sports, sprinting
Progression markers:
- Single-leg calf raises x 15 pain-free
- Hop in place 10 times without pain increase
- No morning stiffness
Phase 3: Sport preparation (weeks 9-10)
Goals: Restore power, agility Activities allowed: Light jogging, sport-specific drills Activities to avoid: Competitive sports, maximum efforts
Running progression:
- Week 9: Walk 5 min, jog 1 min, repeat 5 times
- Week 10: Walk 3 min, jog 2 min, repeat 5 times
- Monitor pain 24 hours after each session
Phase 4: Return to sport (weeks 11-12+)
Goals: Full activity restoration Activities allowed: Progressive return to all activities Key point: Listen to your body, build gradually
Sport-specific guidelines:
| Sport | Key Considerations | Progression Tips |
|---|---|---|
| Running | Start with short, slow runs | Increase distance 10% weekly |
| Tennis | Lateral movements stress tendon | Practice movement patterns first |
| Basketball | Jumping and landing forces | Plyometric preparation needed |
| Soccer | Kicking and cutting motions | Ball work before full contact |
| Cycling | Generally tendon-friendly | Monitor cleat position |
Success metrics & progress tracking
Functional improvement checklist
Week 2 Goals:
Week 4 Goals:
Week 6 Goals:
Week 8 Goals:
Week 12 Goals:
Pain tracking template
Daily Log:
- Morning stiffness (0-10): ___
- Pain before exercise (0-10): ___
- Pain during exercise (0-10): ___
- Pain 2 hours after (0-10): ___
- Pain next morning (0-10): ___
Weekly Assessment:
- Best day this week: ___
- Worst day this week: ___
- Average pain level: ___
- Activities completed: ___
- Goals for next week: ___
Load progression tracker
| Week | Date | HSR Weight | Eccentric Reps | Sets Completed | Pain Level | Notes |
|---|---|---|---|---|---|---|
| 1 | ||||||
| 2 | ||||||
| 3 |
Contraindications & when NOT to do these exercises
Absolute contraindications:
- Complete Achilles rupture
- Active infection in the area
- Severe swelling with red, hot skin
- Sharp, sudden onset pain (possible tear)
Relative contraindications (modify or postpone):
- Recent corticosteroid injection (<6 weeks)
- Significant insertional bone spurs
- Pregnancy with balance concerns
- Uncontrolled diabetes with neuropathy
- Blood clotting disorders
Medical conditions requiring modification:
- Rheumatoid arthritis: Start with lower loads
- Diabetes: Monitor feet daily for changes
- Peripheral artery disease: Ensure adequate circulation
- Previous Achilles surgery: Follow surgeon’s guidelines
Drug interactions affecting healing:
- Fluoroquinolone antibiotics: Increase rupture risk
- Corticosteroids: Impair tendon healing
- NSAIDs: May interfere with adaptation signals
- Blood thinners: Monitor for unusual swelling
Professional help guidelines
Seek immediate medical attention for:
- Sudden, severe pain with a “pop” sensation
- Complete inability to bear weight
- Visible deformity or significant swelling
- Signs of infection (fever, red streaks)
Consider physical therapy if:
- No improvement after 6-8 weeks of consistent exercise
- Pain spreads to other areas
- Difficulty performing exercises with proper form
- History of recurrent Achilles problems
- Competitive athlete needing sport-specific training
Red flags requiring medical evaluation:
- Pain that wakes you from sleep consistently
- Numbness or tingling in the foot
- Color changes in the foot or ankle
- Progressive weakness in the calf muscle
Research context & evidence base
This program combines elements from several landmark studies:
- Alfredson et al. (1998): Original eccentric protocol study showing 65-85% success rate with 180 daily repetitions over 12 weeks.
- Beyer et al. (2015): Demonstrated Heavy-Slow Resistance training achieved similar outcomes to Alfredson protocol with only 36 repetitions, 3x/week.
- Malliaras et al. (2013): Systematic review showing isometric exercises provide immediate analgesic effects for tendon pain.
- Rio et al. (2015): Established pain monitoring guidelines using 0-10 scale during tendon loading exercises.
Success rates from clinical studies:
- Traditional Alfredson: 65-85% good/excellent outcomes
- Heavy-Slow Resistance: 70-90% good/excellent outcomes
- Combined approaches: 75-90+ % success rates
- Patient satisfaction consistently higher with lower-volume protocols
Timeline expectations based on research:
- Week 2-4: Initial pain reduction
- Week 6-8: Functional improvements
- Week 12-16: Return to sport activities
- Week 24: Long-term success assessment
Your weekly plan & the path forward
Training frequency: Perform this complete 5-step routine 5-6 days per week. Your tendon needs consistent stimulus to heal, but also requires at least one full rest day to adapt and rebuild.
Managing pain during exercises: Use the 1-10 pain scale as your guide. During exercises, your pain shouldn’t exceed 4-5/10. If it does, reduce the weight, range of motion, or number of repetitions. Mild discomfort is normal and often necessary for healing.
Tracking your progress: Keep a simple log with three pieces of information:
- Your pain level before starting (from Step 1)
- The weight or difficulty level you used
- How you felt 24 hours later
Beyond the routine: This exercise program works best as part of a comprehensive approach. Consider these additional factors:
Footwear matters: Shoes with proper heel support and cushioning can significantly reduce tendon stress during daily activities. Avoid flat shoes or going barefoot on hard surfaces during your recovery.
Activity modification: Temporarily avoid high-impact activities like running, jumping, or sports that require quick direction changes. Walking and swimming are usually well-tolerated alternatives.
Sleep and nutrition: Your tendon heals most effectively during sleep. Aim for 7-8 hours nightly. Adequate protein intake (about 1 gram per pound of body weight) provides the building blocks for tendon repair.
Printable resources
Exercise instruction cards
Card 1: Warm-Up
- Ankle circles: 30 sec each direction
- Calf stretch: 30 sec straight leg, 30 sec bent
- Rate pain 1-10, write it down
Card 2: Isometric Hold
- Rise on both feet, shift to affected leg
- Hold 45 seconds, feel muscle working
- Rest 15 seconds, repeat 3 times
Card 3: Heavy-Slow Resistance
- Add weight (backpack with books)
- Single leg, 3 seconds up, 3 seconds down
- 3 sets of 8-12 reps, rest 60 seconds
Card 4: Eccentric Drops
- Edge of step, rise with both feet
- Lower affected heel slowly, 3-4 seconds
- 3 sets of 15 reps
Card 5: Cool-Down
- Roll calves 90 seconds
- Towel stretch: 3 x 30 seconds
- Rate improvement from start
Progress tracking sheets
Monthly Progress Chart:
- Week 1: Starting point – Pain ___/10, Weight ___lbs
- Week 2: Morning stiffness improving? Y/N, Weight ___lbs
- Week 3: Daily activities easier? Y/N, Weight ___lbs
- Week 4: Exercise tolerance better? Y/N, Weight ___lbs
Pain Diary Template
Daily Quick Check: Date: ___ Morning stiffness: ___/10 Exercise pain: ___/10 Evening pain: ___/10 Sleep quality: ___/10 Notes: ________________
Mobile-friendly elements
Timer recommendations:
- Step 1: Use phone timer for 2-minute warm-up
- Step 2: 45-second holds with 15-second rest
- Step 3: Count “1-Mississippi, 2-Mississippi, 3-Mississippi” for tempo
- Step 4: 3-4 second lowering phase
- Step 5: 30-second stretch holds
Exercise reminder schedule: Set phone alarms for:
- Morning: Pain rating before getting up
- Exercise time: Your chosen 15-minute window
- Evening: Pain rating and progress notes
- Weekly: Weight progression check
Progress photo guidelines:
- Take photos weekly, same time of day
- Show side view of heel position during exercises
- Document any visible swelling changes
- Compare calf muscle symmetry between legs
Conclusion
Your Achilles tendon has an incredible capacity to heal and adapt. Give it the right stimulus consistently, and you’ll be back to the activities you love – often stronger and more resilient than before your injury began.
This modern, evidence-based routine gives your Achilles tendon exactly what it needs to heal stronger than before. The combination of pain-relieving isometrics, strength-building heavy-slow resistance, proven eccentric loading, and proper recovery creates the optimal environment for tendon healing.
Success doesn’t happen overnight, but it does happen with consistency. Stick to the plan, track your progress, and trust the process.
FAQs
How long before I see results?
Most people notice some improvement in morning stiffness within 2-3 weeks. Significant functional improvements typically occur around weeks 4-6. Full recovery usually takes 8-16 weeks depending on severity and compliance.
Can I do this with other foot injuries?
This program is specifically for Achilles tendonitis. If you have plantar fasciitis, ankle sprains, or other conditions, consult a healthcare provider before starting. Some exercises may need modification.
What if I miss several days?
Missing 2-3 days won’t significantly impact your progress. Missing a full week may require stepping back in intensity by 10-20%. Consistency matters more than perfection.
Is this safe for older adults?
Yes, but older adults should start with lighter weights and progress more slowly. The isometric phase is particularly beneficial for seniors. Consider starting with 2-3 days per week initially.
Can I do this if I’m still running?
It’s best to reduce running volume by 50-75% during the first 4-6 weeks. The tendon needs time to adapt to the new exercise stimulus without competing demands.
What if one leg is much weaker?
This is common. Start both legs at the same intensity level. The weaker side will often catch up within 2-4 weeks due to neurological adaptations.
Should I ice after exercises?
Ice isn’t necessary unless you have significant swelling. Light movement and gentle stretching are more beneficial for recovery than ice.
When should I see a physical therapist?
Consider professional help if: pain worsens after 2 weeks, no improvement after 6 weeks, you develop pain in other areas, or you’re unsure about proper form.
Can I do this twice daily for faster results?
No. Tendons need 48 hours between intense loading sessions to adapt properly. More isn’t better with tendon rehabilitation.
What about heel lifts or orthotics?
Temporary heel lifts (1/4 inch) can reduce symptoms during acute phases. Long-term use isn’t recommended as it can create dependency. Custom orthotics may help if you have significant biomechanical issues.


