Your metabolism starts slowing down around age 30, dropping about 3-5% each decade. By 40, maintaining a strong core becomes harder but more important than ever. A weak core doesn’t just affect how you look in the mirror – it impacts how you feel every day.
Strong core muscles protect your spine. They improve your posture during those long desk hours. They prevent the nagging lower back pain that seems to appear out of nowhere. Most importantly, they help you move with confidence and energy through your daily activities.
But who has time for lengthy gym sessions? You don’t need them. This 12-minute bodyweight routine gives you everything you need to build a stronger, tighter core without leaving home. No equipment. No excuses. Just results.
The science behind core strength after 40
Your body changes in predictable ways after 40. Understanding these changes helps you train smarter, not harder.
Muscle mass decline
Adults lose 3-8% of muscle mass per decade after age 30. Core muscles aren’t immune to this process. Without targeted training, your deep stabilizers weaken, leading to poor posture and back pain.
Hormonal shifts
Declining growth hormone and testosterone affect muscle protein synthesis. Both men and women experience these changes, though women face additional challenges during perimenopause and menopause.
Postural changes
Years of desk work create forward head posture and rounded shoulders. Your core muscles adapt to these positions, becoming less effective at their primary job – stabilizing your spine.
Why bodyweight training works
Your muscles respond well to bodyweight exercises at any age. These movements teach functional strength patterns you use daily. Plus, they’re safer than loaded exercises when performed correctly.
Research shows that consistent bodyweight training can reverse age-related muscle loss. A 2019 study found that adults who performed regular core exercises maintained better posture and reported less back pain than sedentary peers.
The perfect 12-minute core recipe
Think of this workout as a recipe for success. Here’s what you need:
- Prep Time: 1 minute (get into position)
- Active Time: 12 minutes
- Recovery Time: 24-48 hours between sessions
- Serves: All fitness levels (with modifications)
- Ingredients: Your body + 6 feet of floor space
- Equipment: None required
Instructions:
- Clear a small floor space
- Set a timer for intervals (45 seconds work, 15 seconds rest)
- Move through exercises in order
- Complete 1-2 rounds based on your fitness level
- Cool down with gentle stretching
Exercise modification matrix
| Exercise | Beginner | Intermediate | Advanced | Knee Issues | Back Issues |
|---|---|---|---|---|---|
| Plank | Knee plank (30s) | Full plank (45s) | Single-arm plank | Wall plank | Incline plank on stairs |
| Bird-Dog | Opposite arm/leg holds | Dynamic movement | Add resistance band | Tabletop hold only | Seated version |
| Glute Bridge | Basic bridge | Single-leg bridge | Bridge with leg ext. | Pillow under knees | Smaller range |
| Dead Bug | Single limb moves | Opposite limbs | Add resistance | Bent knee version | Arms only |
| Bicycle Crunch | Slow alternating | Standard pace | Add pulse at top | Seated twist | Upper body only |
| Leg Lower | Bent knees | Straight legs | Single leg | Chair-assisted | Hands under lower back |
| Russian Twist | Feet on floor | Feet elevated | Add object | Seated in chair | Upper body twist only |
Weekly progression schedule
| Week | Frequency | Duration | Focus | Intensity Notes |
|---|---|---|---|---|
| 1-2 | 3x/week | 7 minutes (1 round) | Form mastery | Learn proper technique |
| 3-4 | 4x/week | 7-12 minutes | Endurance building | Hold positions longer |
| 5-6 | 4-5x/week | 12 minutes | Strength gains | Add second round |
| 7-8 | 5x/week | 12 minutes | Consistency | Focus on perfect form |
| 9+ | 5-6x/week | 12-15 minutes | Maintenance | Add advanced variations |
Core strength assessment tool
Rate yourself honestly on a scale of 1-5 for each category:
| Assessment Area | Score 1 | Score 3 | Score 5 |
|---|---|---|---|
| Plank Hold | Under 15 seconds | 30-45 seconds | 60+ seconds |
| Back Pain Frequency | Daily | Weekly | Rarely/Never |
| Energy Levels | Often tired | Sometimes tired | Usually energetic |
| Posture Awareness | Slouch often | Sometimes notice | Naturally upright |
| Exercise Consistency | Sporadic | 2-3x/week | 4+ times/week |
Total Score:
- 5-12: Start with beginner modifications, 3x/week
- 13-20: Use standard exercises, aim for 4x/week
- 21-25: Try advanced variations, 5-6x/week
The 7 foundational core-strength moves
1. The modified plank: your foundation for a rock-solid core
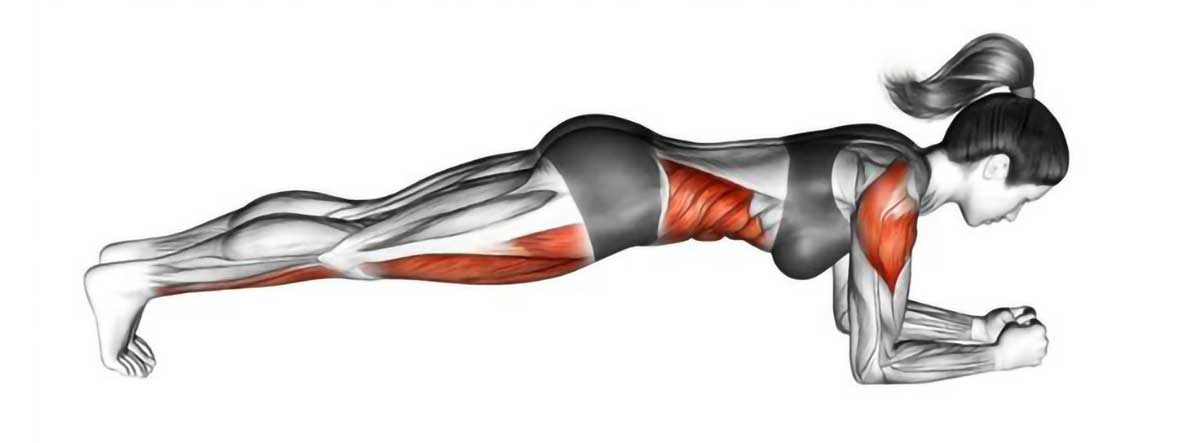
The plank reigns supreme in core training. Unlike crunches that only work your surface muscles, planks activate your entire core system. Your deep stabilizers, obliques, and back muscles all work together.
How to do it:
Start on your hands and knees. Lower onto your forearms, keeping them parallel. Extend your legs back, balancing on your toes. Your body should form a straight line from head to heels.
Can’t hold a full plank yet? Drop to your knees. You’ll still get great benefits while building strength.
Perfect your form:
- Keep your head neutral, looking down at the floor
- Engage your glutes to prevent your hips from sagging
- Don’t let your hips pike up toward the ceiling
- Breathe steadily throughout the hold
Breathing pattern:
Inhale through your nose for 4 counts, exhale through your mouth for 4 counts. This helps maintain core tension.
Pro-tip:
Imagine a “zipping up” sensation from your pelvic floor to your navel to properly engage your deep core muscles. This mental cue helps activate the muscles you can’t see but desperately need for true core strength.
Common mistakes to avoid:
- Sagging hips: This puts stress on your lower back. Squeeze your glutes to lift your hips.
- Holding your breath: Steady breathing helps you hold the position longer and safer.
- Looking up: Keep your head in line with your spine to avoid neck strain.
2. The bird-dog: the ultimate balancer and back protector
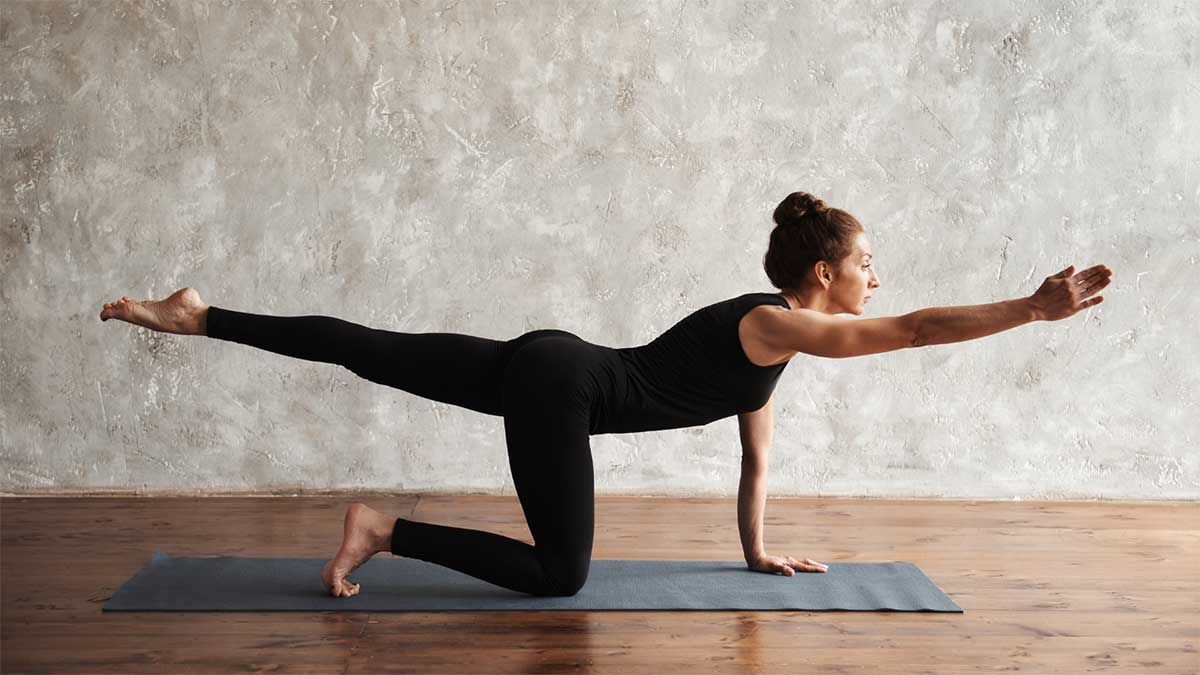
The bird-dog looks simple but delivers powerful results. It teaches your core to stabilize while your limbs move – exactly what you need for daily activities like carrying groceries or playing with kids.
How to do it:
Start on hands and knees. Keep your spine neutral. Slowly extend your right arm forward while extending your left leg back. Hold for 2 seconds, then return to start. Switch sides.
Master the movement:
- Move slowly and with control
- Keep your hips level – don’t let them twist
- Extend through your fingertips and heel
- Keep your core tight throughout
Breathing pattern:
Exhale as you extend the limbs, inhale as you return to center.
Beginner modification:
Start with just the legs. Once you can do 10 clean reps, add the arms. Balance improves with practice.
Common mistakes to avoid:
- Moving too fast: Speed reduces the stability challenge. Take 3 seconds to extend, 3 seconds to return.
- Hip rotation: Keep your hips square to the floor throughout the movement.
- Arching your back: Maintain neutral spine position by engaging your core.
3. The glute bridge: awaken your posterior chain
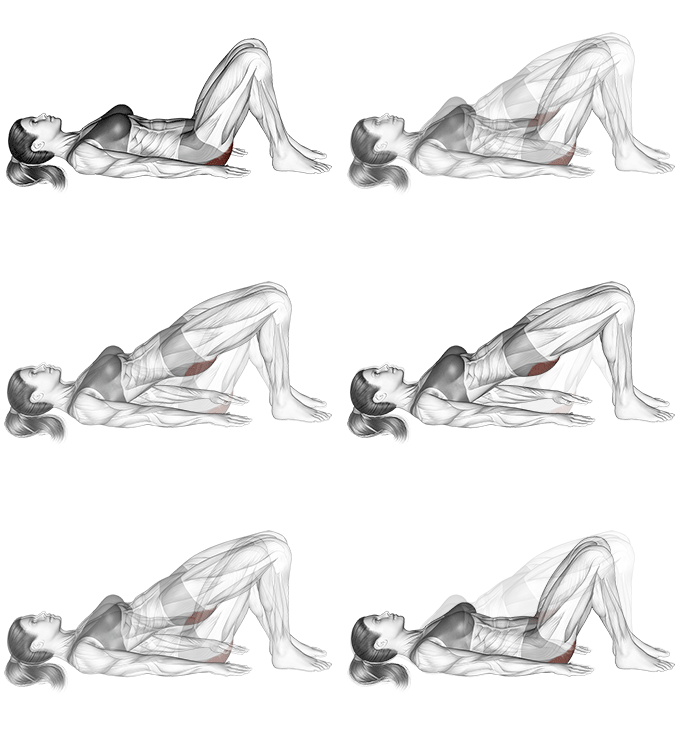
Your glutes are part of your core system. Weak glutes often lead to lower back pain and poor posture. This exercise wakes them up and teaches them to work with your abs.
How to do it:
Lie on your back with knees bent, feet flat on the floor. Squeeze your glutes and lift your hips until your body forms a straight line from knees to shoulders. Hold for 1 second, then lower slowly.
Key points:
- Drive through your heels, not your toes
- Squeeze your glutes at the top
- Don’t arch your lower back excessively
- Keep your core engaged throughout
Breathing pattern:
Exhale as you lift up, inhale as you lower down.
Strong glutes take pressure off your lower back. You’ll notice better posture and less pain during long sitting periods.
Common mistakes to avoid:
- Pushing through your toes: This activates your calves instead of glutes. Focus on heel drive.
- Over-arching: Stop when you feel a straight line from knees to shoulders.
- Rushing the movement: Control the lowering phase for maximum benefit.
4. The dead bug: master core control
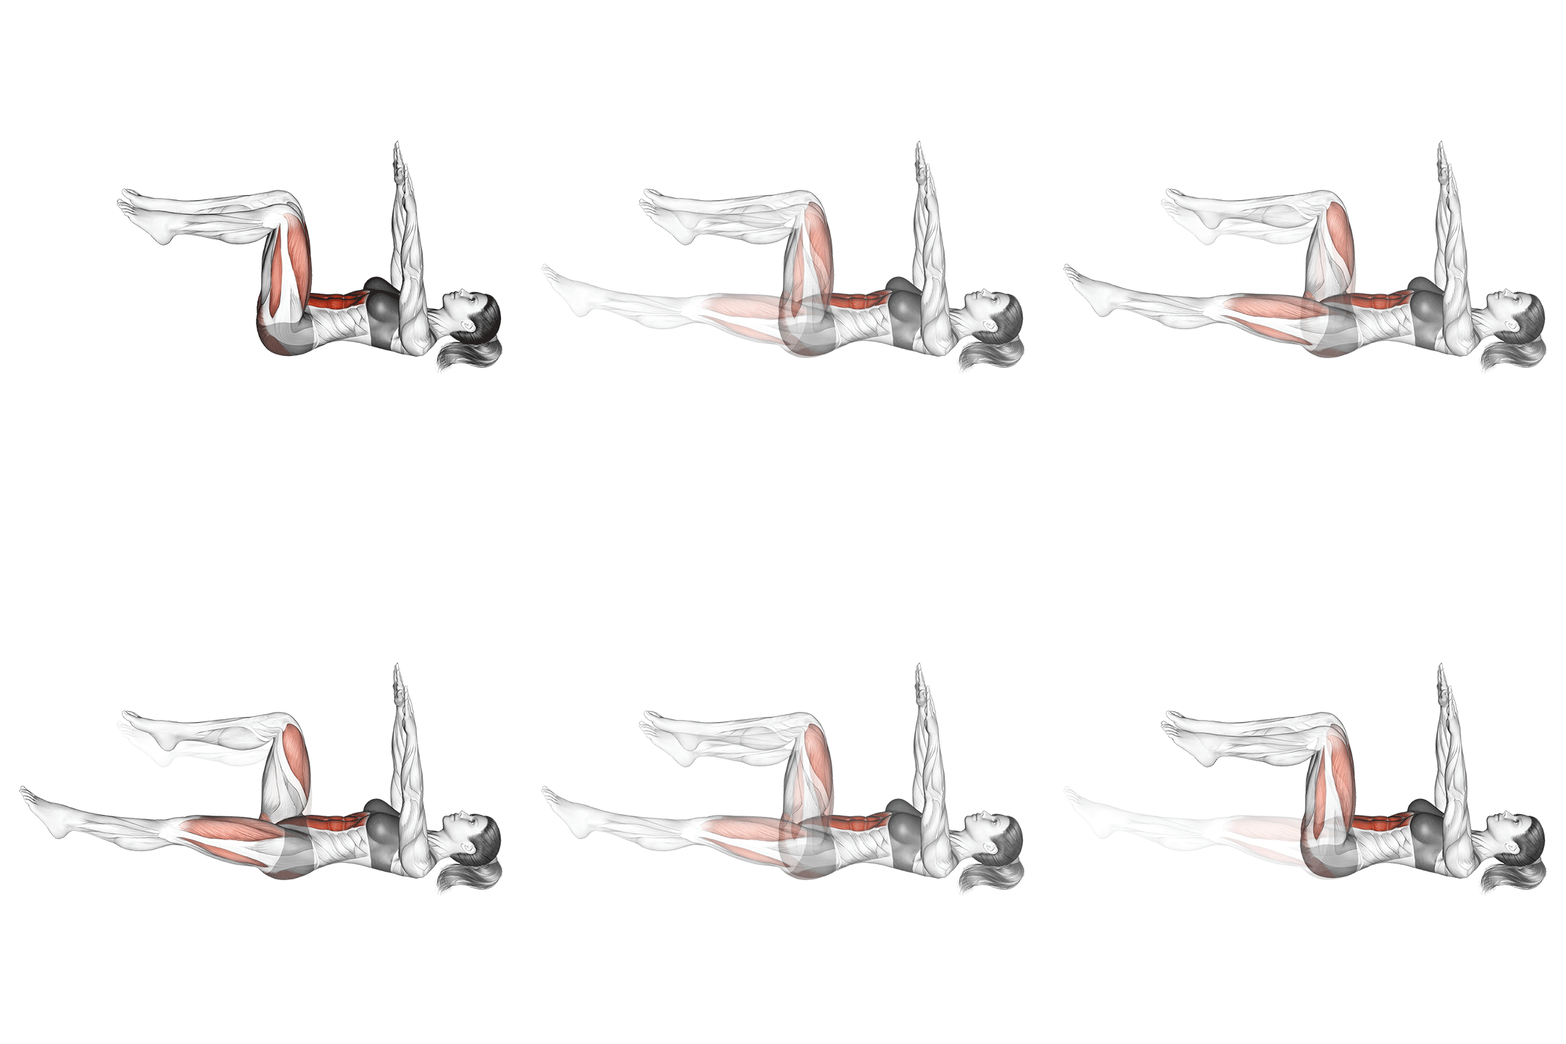
The dead bug teaches your core to resist movement while your limbs work independently. It’s like a moving plank that challenges your stability in new ways.
How to do it:
Lie on your back with arms reaching toward the ceiling. Bend your knees to 90 degrees, shins parallel to the floor. Slowly lower your right arm overhead while extending your left leg straight. Return to start and switch sides.
Perfect your technique:
- Keep your lower back pressed gently into the floor
- Move slowly – take 3 seconds to lower, 3 seconds to return
- Don’t let your back arch as you move
- Coordinate the opposite arm and leg movement
Breathing pattern:
Exhale as you extend the limbs, inhale as you return to center.
Key cue:
Press your lower back gently into the floor throughout the movement to ensure your core remains engaged. If your back arches, you’re going too far.
Common mistakes to avoid:
- Moving too far: Only go as far as you can maintain back contact with the floor.
- Holding your breath: Continuous breathing helps maintain core stability.
- Same-side movement: Always use opposite arm and leg for proper core challenge.
5. The bicycle crunch: a dynamic twist for your obliques
Traditional crunches only work one plane of movement. The bicycle crunch adds rotation, targeting your obliques for a more complete core workout.
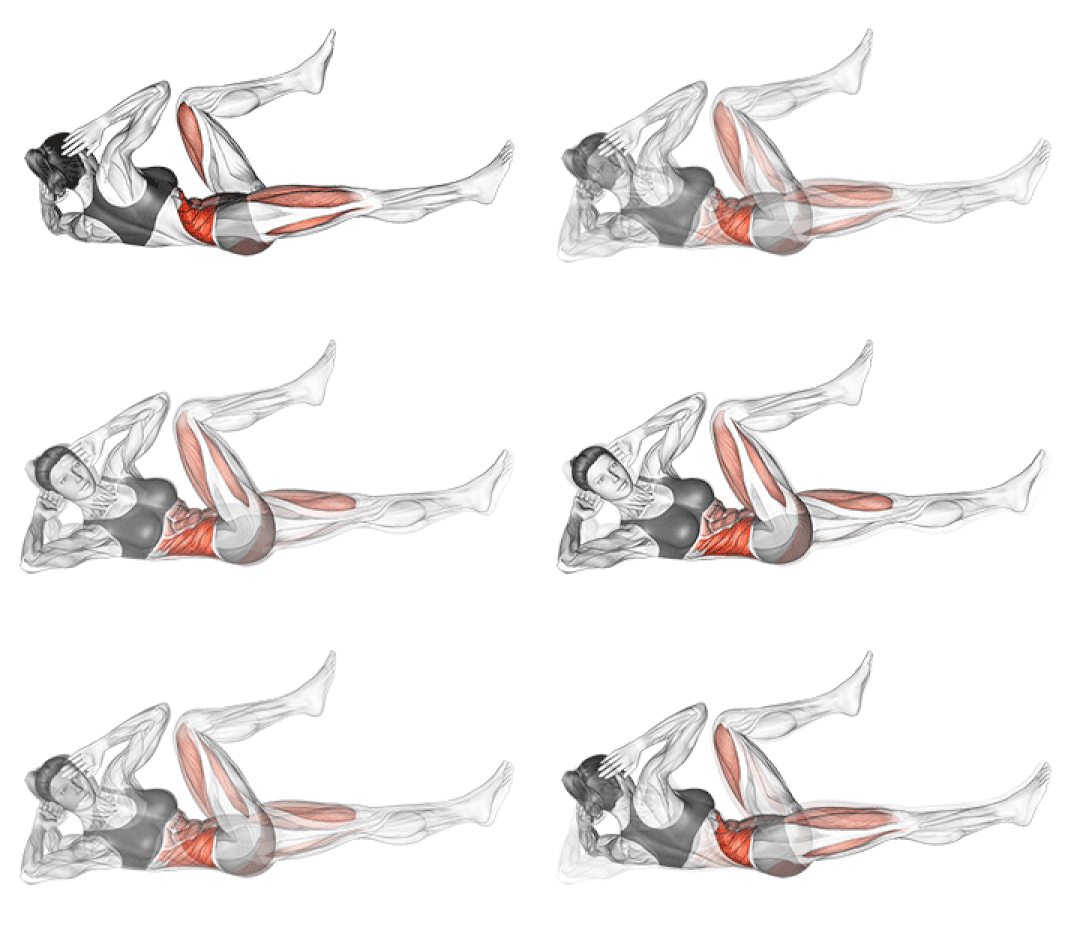
How to do it:
Lie on your back with hands behind your head. Lift your shoulder blades off the ground. Bring your right elbow toward your left knee while extending your right leg. Switch sides in a pedaling motion.
Form focus:
- Rotate from your core, not just your arms
- Don’t pull on your neck with your hands
- Keep your shoulder blades lifted throughout
- Focus on bringing your ribs toward your opposite hip
Breathing pattern:
Exhale with each twist, inhale as you switch sides.
Pacing is key:
Don’t rush through this movement. Quality beats speed every time. Focus on feeling your obliques work with each twist.
Common mistakes to avoid:
- Neck pulling: Your hands support your head, not yank it forward.
- Using momentum: Control each twist rather than swinging back and forth.
- Incomplete rotation: Make sure your ribs rotate, not just your shoulders.
6. The leg lower: a true test of lower abdominal strength
Your lower abs often get neglected in traditional core workouts. The leg lower specifically targets these hard-to-reach muscles.
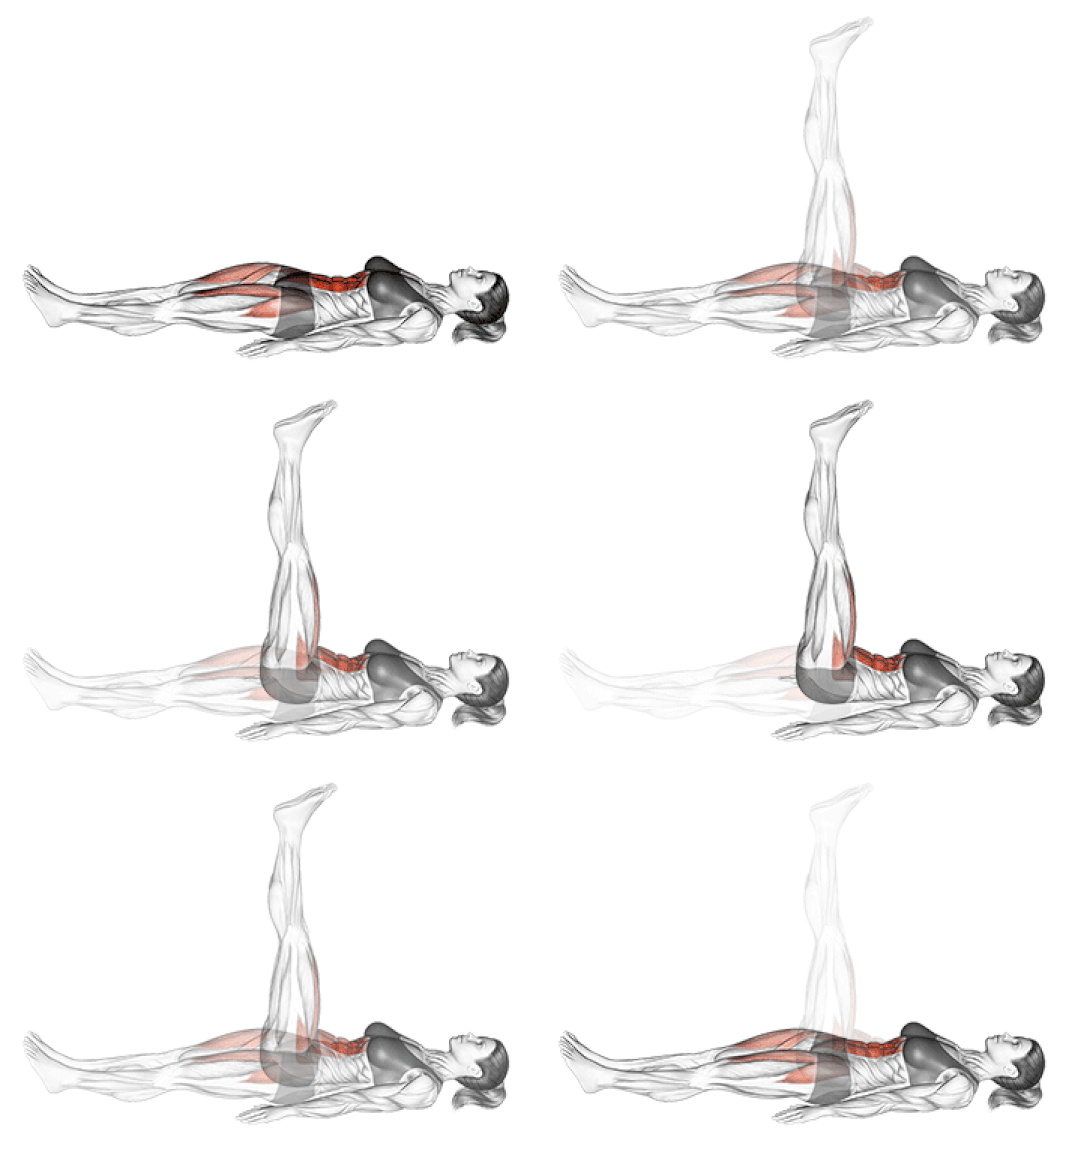
How to do it:
Lie on your back with legs straight up toward the ceiling. Slowly lower your legs toward the floor, stopping when you feel your lower back start to arch. Lift back to start.
Master the movement:
- Keep your lower back on the floor throughout
- Lower only as far as you can maintain good form
- Use a slow, controlled tempo
- If it’s too hard, bend your knees slightly
Breathing pattern:
Exhale as you lower your legs, inhale as you lift them back up.
Beginner’s tip:
Start with bent knees and progress to straight legs as your strength increases. Even a small range of motion counts when done correctly.
Common mistakes to avoid:
- Going too low: Stop before your back arches off the floor.
- Using momentum: Control both the lowering and lifting phases.
- Tensing your neck: Keep your head relaxed on the floor.
7. The Russian twist (bodyweight): whittle your middle
This final exercise targets your obliques and improves rotational strength. You’ll feel it working the sides of your waist – perfect for creating that tighter midsection.
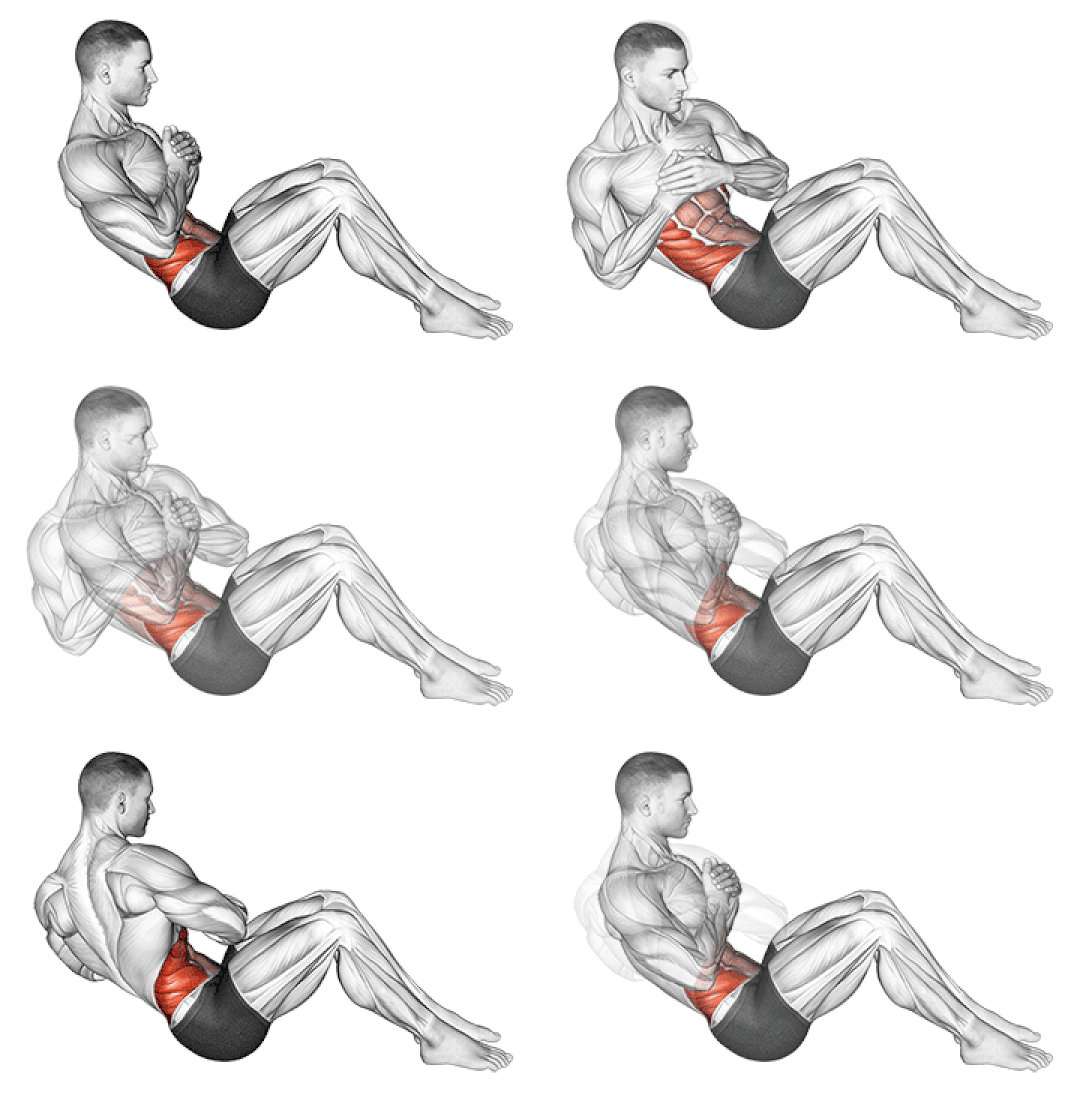
How to do it:
Sit with knees bent, feet flat on the floor. Lean back slightly, keeping your chest up. Rotate your torso from side to side, touching the floor beside your hip with each twist.
Perfect your form:
- Rotate from your core, not just your shoulders
- Keep your feet on the ground for stability
- Maintain good posture throughout
- Don’t just swing your arms – make your core do the work
Breathing pattern:
Exhale with each twist to either side.
Want more challenge? Lift your feet off the ground. But master the basic version first.
Common mistakes to avoid:
- Rounding your back: Maintain an upright posture throughout.
- Moving too fast: Focus on controlled rotations for maximum muscle engagement.
- Using only your arms: The rotation should come from your torso.
Track your progress
Consistent tracking helps you stay motivated and see real improvements. Use this simple system:
Weekly assessment checklist
Week 1-2 goals:
Week 3-4 goals:
Week 5-8 goals:
Strength benchmarks by month:
| Month | Plank Hold | Bird-Dog Quality | Energy Level | Back Pain |
|---|---|---|---|---|
| 1 | 20-30 seconds | Some wobbling | Slightly better | Less frequent |
| 2 | 35-45 seconds | More stable | Noticeable improvement | Much less |
| 3 | 45-60 seconds | Very stable | Significantly better | Rare episodes |
Putting it all together: your daily core-strength ritual
Your 12-minute routine is simple:
- 45 seconds work, 15 seconds rest
- Move through all 7 exercises
- Complete 1-2 rounds based on your fitness level
Start with 3 days per week. As you get stronger, work up to 5 days. Consistency trumps intensity every time.
Schedule suggestions:
- Beginner: Monday, Wednesday, Friday
- Intermediate: Monday through Friday
- Advanced: Daily, alternating between 1 and 2 rounds
The best workout is the one you’ll actually do. Pick a time that works for your schedule and stick with it.
Quick reference workout card
Print this out and keep it nearby during your workouts:
Round 1 (7 minutes):
- Plank – 45s | Rest 15s
- Bird-Dog – 45s | Rest 15s
- Glute Bridge – 45s | Rest 15s
- Dead Bug – 45s | Rest 15s
- Bicycle Crunch – 45s | Rest 15s
- Leg Lower – 45s | Rest 15s
- Russian Twist – 45s | Rest 60s
Round 2 (Optional – 5 minutes):
Repeat exercises 1-7
Integrating core strength into daily life
Your core workout is just the beginning. Here’s how to maintain core engagement throughout your day:
At your desk
- Sit tall with your shoulders back
- Engage your core muscles every 30 minutes
- Take walking breaks to reset your posture
- Use a stability ball as your chair 2-3 hours daily
During daily activities
- Lifting objects: Brace your core before lifting, keep objects close to your body
- Walking: Imagine a string pulling your head toward the ceiling
- Standing: Distribute weight evenly on both feet, slightly engage your abs
- Carrying groceries: Use your core to maintain upright posture
Evening wind-down
- Practice diaphragmatic breathing for 5 minutes
- Gentle cat-cow stretches to release tension
- Child’s pose to stretch your lower back
Troubleshooting common issues
“I feel back pain during exercises”
Possible causes: Moving too fast, poor form, or pre-existing issues
Solutions:
- Reduce range of motion
- Focus on form over speed
- Try beginner modifications
- Consult a healthcare provider if pain persists
“I can’t hold the positions long enough”
This is normal! Everyone starts somewhere.
Solutions:
- Start with shorter holds (20-30 seconds)
- Use modifications until you build strength
- Rest longer between exercises if needed
- Consistency matters more than duration
“I don’t feel my muscles working”
Possible causes: Incorrect form or insufficient mind-muscle connection
Solutions:
- Slow down your movements
- Focus on the target muscles during each exercise
- Use the breathing cues provided
- Consider working with a fitness professional initially
“My knees hurt during floor exercises”
Solutions:
- Use a yoga mat or thick towel for cushioning
- Try wall or standing variations
- Avoid deep knee bends
- Consider seated alternatives from the modification table
Beyond the workout: lifestyle support for core strength
Exercise alone won’t give you the results you want. Your habits outside the workout matter just as much.
Nutrition for core strength after 40
Protein Requirements: Adults over 40 need 1.2-1.6 grams of protein per kilogram of body weight daily to maintain muscle mass. Good sources include:
- Lean meats and fish
- Eggs and dairy products
- Beans and legumes
- Greek yogurt and cottage cheese
Timing Matters: Eat protein within 2 hours after your workout to support muscle recovery.
Hydration guidelines:
- Drink 16-20 ounces of water 2 hours before exercise
- Sip water during your workout if needed
- Rehydrate with 16-24 ounces for every pound lost during exercise
Foods that support recovery:
- Anti-inflammatory options: Berries, leafy greens, fatty fish
- Complex carbohydrates: Sweet potatoes, quinoa, oats
- Healthy fats: Avocados, nuts, olive oil
Sleep for muscle recovery
Quality sleep affects everything from hormone production to muscle repair. Poor sleep disrupts growth hormone release, which peaks during deep sleep phases.
Sleep optimization tips:
- Aim for 7-9 hours per night
- Keep your bedroom cool (65-68°F)
- Avoid screens 1 hour before bedtime
- Create a consistent bedtime routine
Post-workout sleep: Exercise can improve sleep quality, but avoid intense workouts within 3 hours of bedtime.
Stress management
Chronic stress releases cortisol, which can lead to belly fat storage and muscle breakdown. Your 12-minute core routine actually helps with stress relief too.
Additional stress-relief strategies:
- Practice deep breathing exercises
- Try meditation or mindfulness apps
- Spend time in nature when possible
- Maintain social connections
Equipment-free alternatives and progressions
While this routine requires no equipment, you can add variety with common household items:
Household item progressions
- Pillows: Place under your back during dead bugs for instability challenge
- Towels: Use as sliders for mountain climbers or plank variations
- Water bottles: Light resistance for Russian twists
- Stairs: Incline planks for beginners
- Wall: Wall sits to strengthen your posterior chain
Advanced progressions (month 3+)
Once you master the basic routine, try these challenges:
- Single-arm planks
- Plank up-downs
- Dead bug with resistance bands
- Single-leg glute bridges
- Weighted Russian twists with a gallon of water
What to expect: your transformation timeline
Setting realistic expectations helps you stay motivated throughout your journey.
Week 1-2: foundation building
- Physical: Some muscle soreness is normal
- Mental: Learning proper form and building the habit
- Energy: May feel tired initially as your body adapts
- Improvements: Better awareness of your core muscles
Week 3-4: early gains
- Physical: Improved endurance, less muscle soreness
- Mental: Exercises start feeling more natural
- Energy: Slight improvements in daily energy levels
- Improvements: Better posture awareness, slight strength gains
Week 5-8: visible progress
- Physical: Noticeable strength improvements, better muscle tone
- Mental: Exercise becomes a welcomed habit
- Energy: Consistently better energy throughout the day
- Improvements: Reduced back pain, improved confidence
Month 3+: long-term benefits
- Physical: Significant strength gains, visible muscle definition
- Mental: Exercise is now part of your identity
- Energy: Sustained high energy levels
- Improvements: Excellent posture, pain-free movement, enhanced quality of life
Medical considerations and safety
When to consult a healthcare provider:
- You have a history of back problems or injuries
- You experience pain during or after exercises
- You have high blood pressure or heart conditions
- You’re returning to exercise after a long break
- You have osteoporosis or bone density concerns
Exercise contraindications:
- Acute back pain: Wait until cleared by a healthcare provider
- Recent abdominal surgery: Follow your surgeon’s guidelines
- Pregnancy: Modify exercises and consult your doctor
- Uncontrolled hypertension: Monitor intensity carefully
Safety red flags – stop exercising if you experience:
- Sharp, shooting pains
- Dizziness or lightheadedness
- Chest pain or difficulty breathing
- Severe muscle cramps
- Numbness or tingling in extremities
Conclusion
Twelve minutes a day. Seven simple exercises. No gym required. This routine gives you everything you need to build a stronger, tighter core after 40.
Strong core muscles support better posture during long work days. They prevent back pain that can sideline your activities. They help you move with confidence and energy through everything life throws at you.
You don’t need perfect conditions to start. You don’t need fancy equipment or hours of free time. You just need to begin. Your future self will thank you for taking control of your fitness today.
The science is clear: consistent bodyweight training can reverse age-related muscle loss and improve your quality of life. The modifications ensure safety for all fitness levels. The tracking tools help you stay motivated and see real progress.
FAQs
How soon will I see results?
Most people notice improved posture and reduced back stiffness within 2-3 weeks. Visible muscle changes typically appear after 6-8 weeks of consistent training.
Can I do this if I have a herniated disc?
Consult your healthcare provider first. Many of these exercises can be modified for back issues, but professional guidance is essential for safety.
Is 12 minutes really enough?
Yes! Research shows that short, intense workouts can be as effective as longer sessions when performed consistently. Quality trumps quantity.
What if I miss several days in a row?
Don’t worry – just restart where you left off. Consider reducing intensity slightly if you’ve been off for more than a week.
Can I do other exercises on the same days?
Absolutely. This core routine complements other activities. Just avoid intense ab work immediately before or after.
Do I need to warm up before starting?
A brief 2-3 minute warm-up of gentle movements helps, but isn’t essential for this low-intensity routine.
What’s the best time of day to do this?
Whenever you can be consistent. Morning works well for building habits, but evening sessions can help with stress relief.
How do I know if I’m progressing?
Use the tracking tools provided. Look for longer hold times, better form, less fatigue, and improved daily posture.
Should I feel sore after every workout?
Not necessarily. Some mild muscle fatigue is normal, but severe soreness every time may indicate you’re overdoing it.
Can I do this routine every day?
Yes, but start with 3-4 days per week. Your muscles need recovery time, especially when you’re beginning.


