Hip pain that gets worse when you sit, squat, or twist? You might be dealing with hip impingement. This condition affects about 10-15% of young adults, with most cases occurring between ages 20-40. The good news? The right exercises can make a real difference in your daily comfort and movement.
Research shows that 85% of people with hip impingement see significant improvement with proper exercise programs. Non-surgical treatment greatly reduces complications while promoting quicker recovery and better long-term outcomes.
Let’s explore what hip impingement really is and how specific exercises can help you feel better.
Quick start summary
If you’re in pain right now:
- Start with Phase 1 gentle movements (pelvic tilts, gentle stretches)
- Avoid deep squats, prolonged sitting, and aggressive stretching
- Use the 2/10 pain rule – stop if pain goes above 2 out of 10
- See a doctor if you have severe pain, night pain, or can’t bear weight
Timeline expectations:
- Week 1-2: Focus on pain reduction
- Week 3-8: Build mobility and basic strength
- Week 8+: Return to normal activities with functional exercises
Understanding hip impingement (FAI)
What is hip impingement?
Hip impingement, also called femoroacetabular impingement (FAI), happens when your hip bones don’t fit together quite right. Think of it like a door that doesn’t close smoothly because the frame is slightly off.
Your hip joint is a ball-and-socket connection. The ball (femoral head) sits in the socket (acetabulum). With hip impingement, extra bone growth or unusual bone shapes cause these parts to pinch or rub against each other during movement.
Hip impingement types comparison
| Type | Location | Bone shape | Most common symptoms | Typical activities affected |
|---|---|---|---|---|
| Cam | Ball (femoral head) | Extra bone on ball | Deep groin pain, catching | Squatting, getting out of cars |
| Pincer | Socket (acetabulum) | Extra bone on socket rim | Groin + outer hip pain | Deep flexion, prolonged sitting |
| Mixed | Both | Combination of both | Variable pain patterns | Multiple activities affected |
Mixed impingement is the most common type, affecting about 70% of people with FAI.
Common symptoms you might be experiencing
Hip impingement often shows up as:
Pain patterns:
- Deep ache in your groin or front of your hip
- Sharp pain when you move in certain ways
- Discomfort that gets worse with activity
- Pain after sitting for 30+ minutes
Movement issues:
- Clicking or catching feelings in your hip
- Stiffness, especially in the morning
- Trouble with deep bending movements
- Feeling like your hip might “give out”
Problem activities:
- Getting in and out of cars
- Putting on socks or shoes
- Deep squats or lunges
- Sitting for long periods
- Climbing stairs
Self-assessment tools
Simple movement test:
- Lie on your back
- Bring your knee toward your chest
- If you feel pinching in your groin before 90 degrees, this suggests possible impingement
Functional limitation checklist:
If you checked 3+ items, hip impingement might be affecting your daily life significantly.
Understanding your diagnosis
Common diagnostic tests:
- X-rays: Show bone shape and joint spacing
- MRI: Reveals soft tissue damage (labrum, cartilage)
- Physical exam: Tests range of motion and pain patterns
Questions to ask your healthcare provider:
- What type of impingement do I have?
- How severe is my condition?
- Are there activities I should avoid completely?
- What’s my prognosis with conservative treatment?
- When should I consider other treatments?
Why exercises are crucial (but not a cure for bone structure)
Here’s the truth: exercises won’t change your bone shape. But they can do something just as important – they help your hip work better with the structure you have.
Research shows exercise sessions including joint mobilizations, soft tissue mobility, stretching, and motor-control exercises can improve Hip Outcome Score values significantly. Studies indicate that patients can fully recover and manage future episodes of pain from FAI with proper exercise programs.
Exercises help by:
- Improving how your muscles support your hip joint
- Increasing flexibility in tight areas
- Building strength where you need it most
- Teaching your body better movement patterns
- Reducing pain and inflammation
Think of it like learning to drive a car with a scratch on the windshield. The scratch doesn’t go away, but you learn to work around it effectively.
Crucial first step: When to see a doctor or physical therapist
Before starting any exercise program, consider seeing a healthcare professional if you have:
Red flag symptoms:
- Severe pain (7+/10) that stops normal activities
- Pain that wakes you up at night
- Inability to bear weight on your leg
- Hip pain after a fall or injury
- Numbness or tingling in your leg
- Fever with hip pain
When to worry vs. when to self-manage:
Seek immediate help:
- Sudden, severe pain
- Complete inability to move hip
- Signs of infection (fever, redness, warmth)
OK to try self-management first:
- Mild to moderate pain (2-5/10)
- Gradual onset of symptoms
- Pain that improves with rest
- No neurological symptoms
Why professional help matters: A proper diagnosis ensures you’re treating the right problem. What feels like hip impingement could be a labral tear, arthritis, or muscle strain. A physical therapist can also create a plan that’s specifically designed for your needs and limitations.
Complete treatment approach
Exercise vs. other treatments
Conservative treatment success rates:
- 70-85% of people improve with exercise and activity modification
- Physical therapy shows best results when started early
- Manual therapy combined with exercises is more effective than exercises alone
Treatment hierarchy:
- First line: Exercise, activity modification, education
- Second line: Physical therapy, manual therapy
- Third line: Injections for pain management
- Last resort: Surgery (only 15-20% of cases need surgery)
Role of manual therapy
Manual therapy techniques can boost exercise effectiveness:
- Joint mobilizations to improve movement
- Soft tissue work to reduce muscle tension
- Trigger point release for tight areas
- Movement education and correction
When surgery might be needed
Surgery may be considered if:
- No improvement after 6+ months of conservative treatment
- Severe structural abnormalities
- Significant labral tears
- Failed return to high-level athletics
However, research shows non-surgical treatment greatly reduces the risk of complications while promoting quicker recovery, resulting in better long-term outcomes.
Golden rules: Before you start any exercise
The importance of pain-free movement
Your body is smart – pain is its way of protecting you. Follow this simple rule: if an exercise causes sharp or increasing pain, stop immediately.
Pain scale guide:
- 0-2/10: Safe to exercise – some mild discomfort is OK
- 3-4/10: Caution zone – modify exercises, reduce intensity
- 5+/10: Stop immediately – rest and reassess
Use the “2 out of 10” pain rule. On a scale where 10 is the worst pain you can imagine, stay at or below a 2 during exercises. Some mild discomfort from stretching is normal, but sharp or worsening pain isn’t.
Gradual progression: Start slow and build up
Your hip didn’t develop problems overnight, and it won’t get better overnight either. Start with easier exercises and gradually work up to harder ones. This approach prevents flare-ups and builds lasting strength.
Consistency is key
Doing exercises once in a while won’t help much. Aim for daily gentle movements and strength exercises 3-4 times per week. Short, regular sessions beat long, occasional workouts.
Warm-up and cool-down
Always start with 5-10 minutes of gentle movement like walking or marching in place. End with some gentle stretching. This prepares your joint for exercise and helps it recover afterward.
Exercise progression timeline
| Phase | Duration | Goals | Exercise frequency | Pain level | Key focus |
|---|---|---|---|---|---|
| Phase 1 | 1-3 weeks | Reduce pain, gentle mobility | Daily gentle movements | 0-2/10 | Calm inflammation |
| Phase 2 | 3-8 weeks | Restore mobility, basic strength | 3-4x/week structured | 0-2/10 | Build foundation |
| Phase 3 | 8+ weeks | Functional strength, return to activity | 3-4x/week progressive | 0-3/10 | Return to life |
Phase 1: Gentle mobilization & pain reduction (Focus: Calm the hip)
When your hip is irritated, your first goal is to reduce inflammation and gently restore basic movement. These exercises are safe for most people and can be done daily.
Exercise prescription details – Phase 1
| Exercise | Sets | Reps | Hold time | Progression | Difficulty |
|---|---|---|---|---|---|
| Pelvic tilts | 2-3 | 10-15 | 5 seconds | Add resistance band | ⭐ Easy |
| Knee to chest | 2-3 | 5-8 each leg | 15-20 seconds | Increase range slowly | ⭐ Easy |
| Hip rotations | 2-3 | 5-8 each way | 10-15 seconds | Add gentle resistance | ⭐ Easy |
| Foam rolling | 1-2 | 30-60 sec/area | N/A | Increase pressure gradually | ⭐ Easy |
Pelvic tilts (supine)
How to do it:
- Lie on your back with knees bent, feet flat on the floor
- Gently tilt your pelvis to flatten your lower back against the floor
- Hold for 5 seconds, then relax
- Repeat 10-15 times
Body position checkpoints:
- Keep your shoulders relaxed on the floor
- Don’t hold your breath
- Movement should be small and controlled
What you should feel: Gentle activation in your lower abdominal muscles
What you shouldn’t feel: Lower back pain or hip pinching
Why it helps: This gentle movement improves pelvic mobility and activates your core muscles without stressing your hip joint.
Gentle knee to chest (single leg)
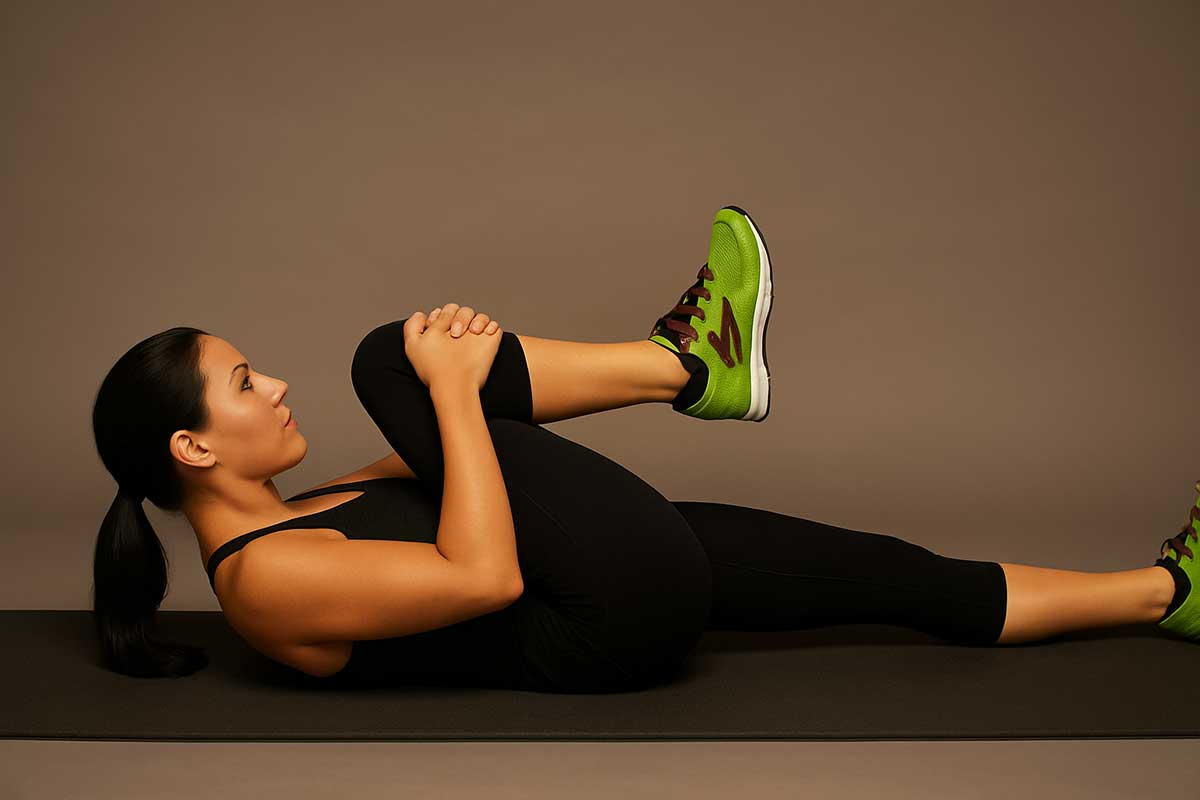
How to do it:
- Lie on your back with both knees bent
- Slowly bring one knee toward your chest
- Stop when you feel the first hint of pinching or discomfort
- Hold for 15-20 seconds
- Lower slowly and repeat with the other leg
- Do 3-5 repetitions per leg
Body position checkpoints:
- Keep your other foot flat on the floor
- Don’t force the movement
- Keep your head relaxed on the floor
What you should feel: Gentle stretch in your hip flexor and buttock
What you shouldn’t feel: Sharp groin pain or pinching sensation
Why it helps: This movement gently stretches your hip flexors and helps you identify your pain-free range of motion.
Supine hip rotations
How to do it:
- Lie on your back with knees bent, feet flat
- Let your knees gently fall to one side (only as far as comfortable)
- Hold for 10-15 seconds
- Return to center and repeat on the other side
- Do 5-8 repetitions each direction
Body position checkpoints:
- Keep both shoulders on the floor
- Move slowly and controlled
- Don’t force the range of motion
What you should feel: Gentle stretch in your lower back and hip
What you shouldn’t feel: Sharp pain or significant discomfort
Why it helps: Gentle rotation helps maintain hip mobility without putting weight through the joint.
Foam rolling for associated muscles
How to do it:
Focus on areas around your hip, not directly on the painful joint:
- Roll your outer thigh (IT band) gently
- Work on your quadriceps (front of thigh)
- Address tight hamstrings (back of thigh)
- Spend 30-60 seconds on each area
Body position checkpoints:
- Support yourself with your arms
- Roll slowly – about 1 inch per second
- Breathe normally throughout
What you should feel: Pressure and possible mild discomfort in tight muscles
What you shouldn’t feel: Sharp pain or increased hip symptoms
Why it helps: Reducing tension in surrounding muscles can decrease stress on your hip joint and improve overall movement quality.
Phase 2: Restoring mobility & foundational strength (Focus: Re-educate movement)
Once your pain is more manageable, you can work on improving flexibility and building basic strength. Start these exercises when you can do Phase 1 exercises comfortably.
Exercise prescription details – Phase 2
| Exercise | Sets | Reps | Hold time | Progression | Difficulty |
|---|---|---|---|---|---|
| Hip flexor stretch | 2-3 | 2-3 each leg | 20-30 seconds | Deeper range, add weight | ⭐⭐ Moderate |
| Piriformis stretch | 2-3 | 2-3 each leg | 20-30 seconds | Different positions | ⭐⭐ Moderate |
| Groin stretch | 2-3 | 2-3 holds | 20-30 seconds | Gentle forward lean | ⭐⭐ Moderate |
| Glute bridges | 2-3 | 10-15 | 2-3 seconds | Single leg, add weight | ⭐⭐ Moderate |
| Clamshells | 2-3 | 10-15 | 2 seconds | Add resistance band | ⭐⭐ Moderate |
| Bird-dog | 2-3 | 5-8 each side | 5-10 seconds | Add movement, weights | ⭐⭐ Moderate |
| Hip abduction | 2-3 | 8-12 | 10-15 seconds | Add band resistance | ⭐⭐ Moderate |
Key stretches
Hold each stretch for 20-30 seconds and repeat 2-3 times.
Hip flexor stretch (kneeling)
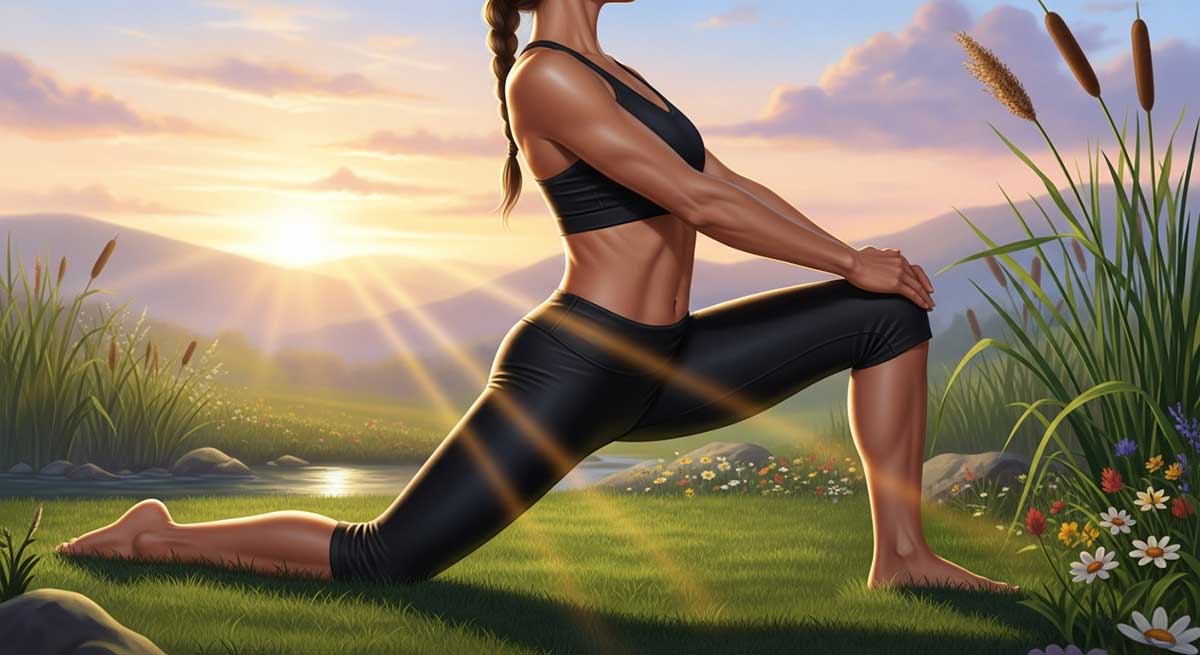
How to do it:
- Kneel on your affected leg with your other foot forward
- Keep your back straight and gently push your hips forward
- You should feel a stretch in the front of your hip and thigh
- For a gentler version, do this stretch standing with one foot elevated behind you
Body position checkpoints:
- Keep your torso upright – don’t lean forward
- Tuck your tailbone slightly under
- Keep your front knee over your ankle
What you should feel: Stretch in the front of your hip and thigh
What you shouldn’t feel: Lower back pain or sharp hip pain
Why it helps: Hip flexors often get tight from sitting. Stretching them reduces stress on your hip joint and improves your posture.
Piriformis stretch (figure-4)
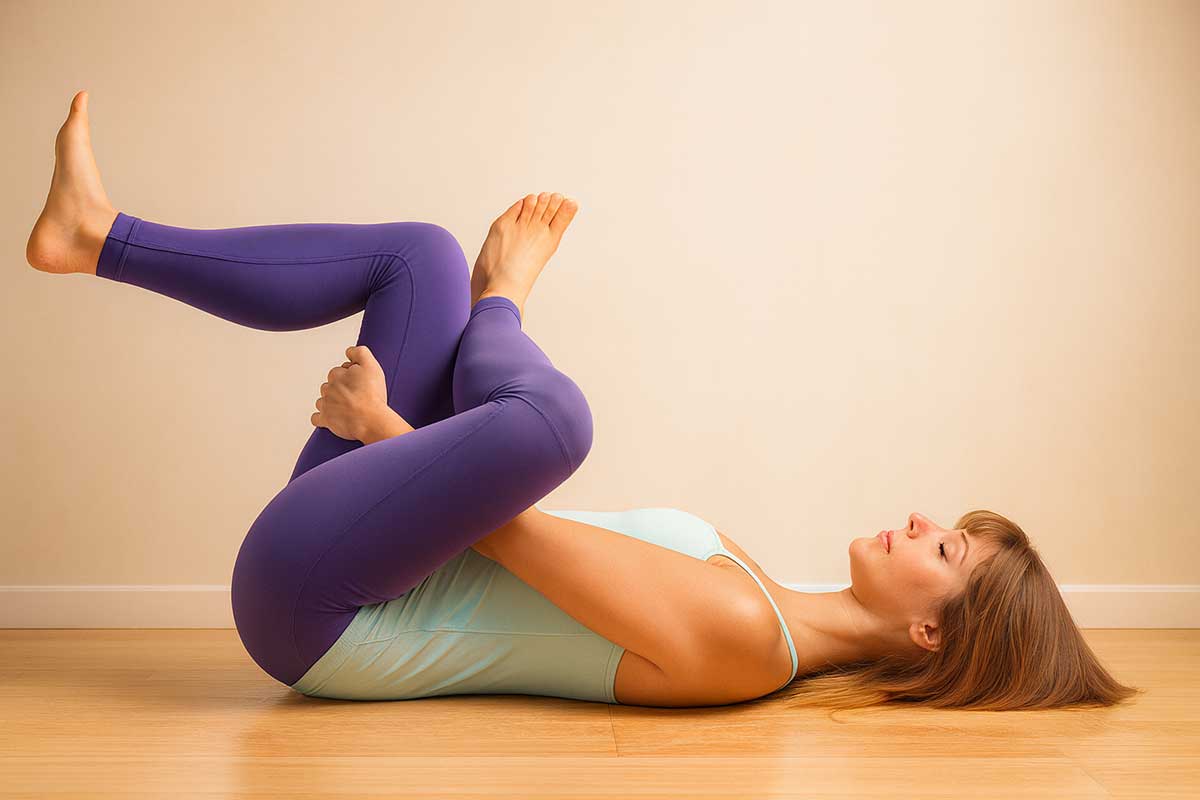
How to do it:
- Lie on your back and cross your affected ankle over your opposite knee
- Gently pull the uncrossed leg toward your chest
- You’ll feel a stretch deep in your buttock area
- Keep your head relaxed on the floor
Body position checkpoints:
- Keep your lower back flat on the floor
- Pull with your arms, not by forcing your hip
- Relax your shoulders
What you should feel: Deep stretch in your buttock and possibly outer hip
What you shouldn’t feel: Sharp groin pain or numbness
Why it helps: The piriformis muscle can contribute to hip stiffness and pain. Stretching it improves hip rotation and reduces tension.
Groin stretch (seated butterfly)
How to do it:
- Sit with the soles of your feet together
- Gently hold your ankles and sit up tall
- Lean forward slightly from your hips (not your back)
- Don’t force your knees down – let gravity do the work
Body position checkpoints:
- Sit on a firm surface
- Keep your back straight as you lean forward
- Don’t bounce or force the stretch
What you should feel: Gentle stretch along your inner thighs
What you shouldn’t feel: Sharp groin pain or lower back discomfort
Why it helps: Tight inner thigh muscles can alter hip mechanics. This stretch addresses that tightness safely.
Foundational strengthening exercises
Glute bridges
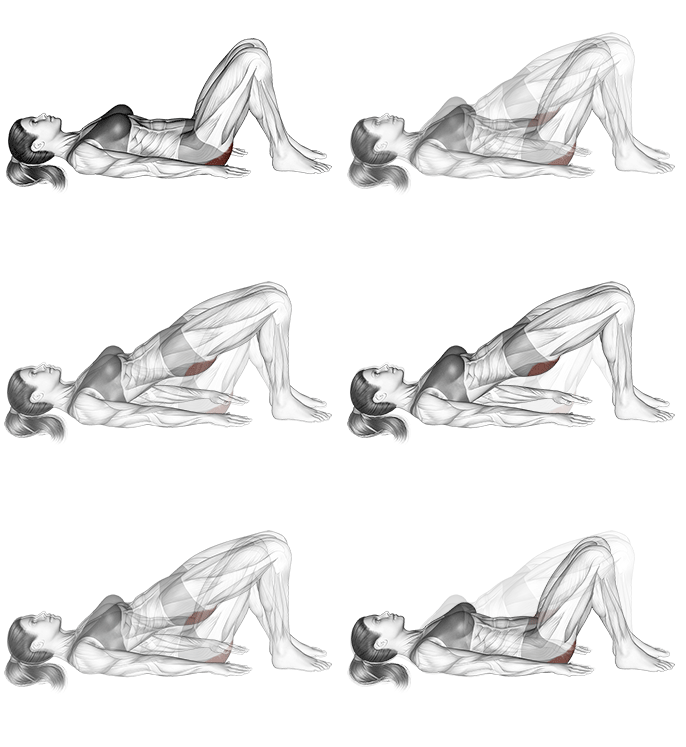
How to do it:
- Lie on your back with knees bent, feet flat
- Squeeze your buttocks and lift your hips up
- Make a straight line from your knees to your shoulders
- Hold for 2-3 seconds, then lower slowly
- Start with 10-15 repetitions
Body position checkpoints:
- Push through your heels, not your toes
- Don’t arch your back excessively
- Keep your knees pointing forward
What you should feel: Strong contraction in your buttocks and back of thighs
What you shouldn’t feel: Lower back pain or hip pinching
Why it helps: Strong glutes support your hip joint and improve your walking pattern. This exercise is safe and effective for building that strength.
Clamshells
How to do it:
- Lie on your side with knees bent at 90 degrees
- Keep your feet together and lift your top knee up
- Move slowly and focus on feeling your outer hip muscles work
- Lower with control
- Do 10-15 repetitions, then switch sides
Body position checkpoints:
- Keep your hips stacked on top of each other
- Don’t rock backward as you lift
- Keep the movement small and controlled
What you should feel: Muscle activation on the side of your hip
What you shouldn’t feel: Hip pinching or lower back strain
Why it helps: This targets your gluteus medius, a key muscle for hip stability during walking and standing.
Bird-dog
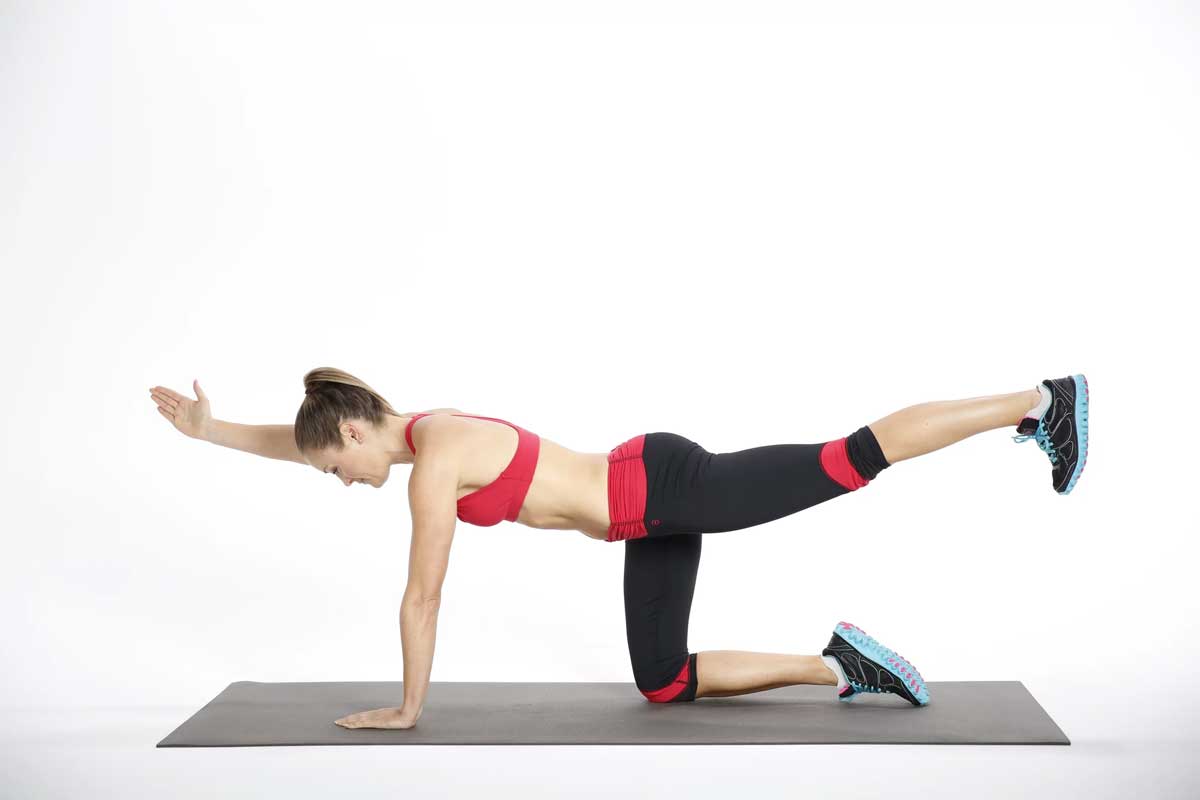
How to do it:
- Start on your hands and knees
- Slowly extend your opposite arm and leg at the same time
- Hold for 5-10 seconds while keeping your core tight
- Return to start and repeat with the other arm and leg
- Do 5-8 repetitions per side
Body position checkpoints:
- Keep your back flat – don’t let it sag or arch
- Extend your arm and leg only as high as you can control
- Keep your head in line with your spine
What you should feel: Core muscles working to keep you stable
What you shouldn’t feel: Lower back pain or loss of balance
Why it helps: This exercise teaches your core and glutes to work together, which is essential for proper hip function.
Isometric hip abduction
How to do it:
- Stand with your side against a wall
- Press your leg sideways into the wall
- Hold for 10-15 seconds while keeping your body straight
- Relax and repeat 5-8 times
- Turn around and work the other side
Body position checkpoints:
- Keep your body straight – don’t lean into the wall
- Press with the side of your leg, not your foot
- Engage your core for stability
What you should feel: Muscle activation on the outside of your hip
What you shouldn’t feel: Hip joint discomfort or back strain
Why it helps: This safely activates your hip abductor muscles without requiring large movements that might cause pain.
Phase 3: Building functional strength & control (Focus: Return to activity prep)
When you can do Phase 2 exercises without pain, you’re ready for more challenging movements. These exercises prepare you for daily activities and sports.
Exercise prescription details – Phase 3
| Exercise | Sets | Reps | Hold time | Progression | Difficulty |
|---|---|---|---|---|---|
| Modified squats | 2-3 | 8-12 | N/A | Deeper range, add weight | ⭐⭐⭐ Hard |
| Static lunges | 2-3 | 6-10 each leg | N/A | Add weight, walking lunges | ⭐⭐⭐ Hard |
| Step-ups | 2-3 | 6-10 each leg | N/A | Higher step, add weight | ⭐⭐⭐ Hard |
| Single-leg RDL | 2-3 | 5-8 each leg | N/A | Add weight, eyes closed | ⭐⭐⭐ Hard |
| Front plank | 2-3 | 15-60 seconds | 15-60 seconds | Add movement, weight | ⭐⭐⭐ Hard |
| Side plank | 2-3 | 15-45 seconds | 15-45 seconds | Add leg lifts, weight | ⭐⭐⭐ Hard |
Functional strengthening exercises
Modified bodyweight squats
How to do it:
- Stand with feet slightly wider than shoulder-width
- Point your toes slightly outward
- Lower down only as far as comfortable (maybe to a chair or box initially)
- Keep your chest up and weight over your heels
- Stand back up by squeezing your glutes
- Start with 8-12 repetitions
Body position checkpoints:
- Keep your knees tracking over your toes
- Don’t let your knees cave inward
- Maintain a neutral spine throughout
What you should feel: Muscle work in your thighs and buttocks
What you shouldn’t feel: Sharp groin pain or knee discomfort
Why it helps: Squats are a fundamental movement pattern. Learning to do them correctly helps with everything from getting out of bed to picking things up.
Modifications:
- Use a box or chair to limit how deep you go
- Hold onto something for balance
- Try different foot positions to find what feels best
Static lunges
How to do it:
- Step one foot forward into a lunge position
- Lower your back knee toward the ground (don’t let it touch)
- Push through your front heel to return to the starting position
- Complete all reps on one side before switching
- Start with 6-10 repetitions per leg
Body position checkpoints:
- Keep most of your weight on your front leg
- Don’t let your front knee drift past your toes
- Keep your torso upright
What you should feel: Leg muscles working, especially in your front leg
What you shouldn’t feel: Knee pain or hip pinching
Why it helps: Lunges build single-leg strength and stability, which you need for walking, climbing stairs, and sports.
Step-ups
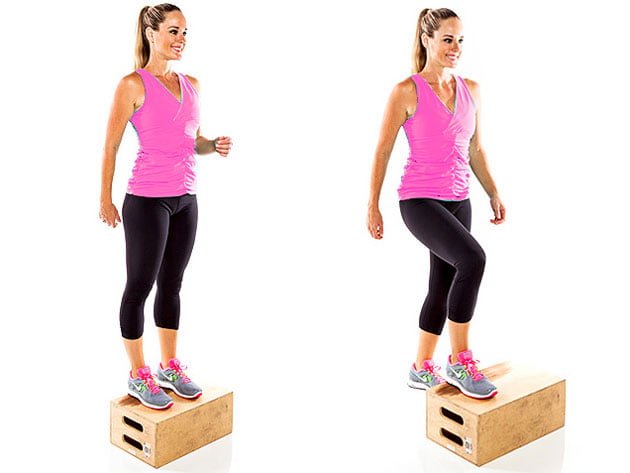
How to do it:
- Use a step or sturdy box (start with a low height)
- Step up with one foot, pushing through your heel
- Stand tall on the step, then step back down slowly
- Complete all reps on one side before switching
- Start with 6-10 repetitions per leg
Body position checkpoints:
- Don’t push off with your bottom foot
- Control the descent – don’t just drop down
- Keep your knee aligned over your foot
What you should feel: Muscle work in your stepping leg
What you shouldn’t feel: Knee pain or hip discomfort
Why it helps: This movement closely mimics climbing stairs and builds functional strength in a safe way.
Single-leg Romanian deadlifts (modified)
How to do it:
- Hold onto a wall or chair for balance
- Stand on one leg and slowly hinge forward at your hips
- Let your free leg drift behind you for balance
- Go only as far as you can maintain good form
- Return to standing by squeezing your glutes
- Start with 5-8 repetitions per leg
Body position checkpoints:
- Keep your back straight as you hinge forward
- Push your hips back, don’t just bend over
- Keep your standing leg slightly bent
What you should feel: Stretch and strength in your hamstrings and glutes
What you shouldn’t feel: Lower back strain or loss of balance
Why it helps: This exercise strengthens your hamstrings and glutes while improving balance and body awareness.
Plank variations
How to do it:
- Front plank: Hold a push-up position on your forearms, keeping your body straight
- Side plank: Lie on your side and lift up onto your forearm, creating a straight line from head to feet
- Start with 15-30 second holds
- Gradually increase time as you get stronger
Body position checkpoints:
- Keep your body in a straight line – don’t sag or pike
- Breathe normally throughout the hold
- Keep your shoulders directly over your elbows
What you should feel: Core muscles working to maintain position
What you shouldn’t feel: Lower back pain or shoulder strain
Why it helps: A strong core supports your entire body and takes stress off your hip joints during movement.
CRITICAL: Exercises and activities to AVOID or MODIFY with hip impingement
Knowing what not to do is just as important as knowing what to do. These activities commonly aggravate hip impingement:
Activities to avoid or modify
| Activity | Why problematic | How to modify | Alternative options |
|---|---|---|---|
| Deep squats | Forces hip into impingement position | Limit depth, wider stance, box squats | Chair squats, partial range |
| High knee lifts | Aggressive hip flexion causes pinching | Keep knees below 90 degrees | Marching in place |
| Low chairs | Sustained hip flexion increases stress | Use cushions, take breaks | Higher chairs, standing desk |
| Pivoting under load | Twisting on leg increases joint stress | Turn with whole body | Step and turn |
| Deep cycling | Aggressive hip flexion position | Raise seat and handlebars | Recumbent bike, elliptical |
Deep squats
Why to avoid: Deep squatting forces your hip into the exact position that causes pinching.
How to modify: Limit squat depth, use a wider stance, try box squats to control how low you go.
High knee lifts
Why to avoid: Bringing your knee aggressively toward your chest can trigger impingement pain.
How to modify: Keep knee lifts gentle and within your pain-free range.
Prolonged sitting in low chairs
Why to avoid: Sitting with your hips lower than your knees puts sustained stress on the joint.
How to modify: Use a cushion to raise your hips, take frequent breaks, choose higher chairs when possible.
Repetitive pivoting under load
Why to avoid: Twisting on your leg while carrying weight increases stress on the hip joint.
How to modify: Turn with your whole body instead of just your hip, avoid carrying heavy items while turning.
Problematic gym exercises
Common issues:
- Leg press with excessive depth
- Deep cycling positions
- Aggressive stretching into painful ranges
How to modify:
- Adjust machine settings to limit range of motion
- Raise your bike seat and handlebars
- Stop stretches before you feel pinching
Managing hip impingement at work
Desk setup recommendations
- Chair height: Hips should be level with or slightly higher than knees
- Monitor position: Top of screen at eye level to prevent forward head posture
- Foot support: Feet flat on floor or footrest
- Back support: Use lumbar support to maintain natural spine curve
Break strategies for office workers
Every 30 minutes:
- Stand and walk for 2-3 minutes
- Do 5-10 pelvic tilts in your chair
- Perform seated hip flexor stretches
Hourly routine:
- Walk to get water or use restroom
- Do standing hip circles
- Stretch your hip flexors standing
Standing desk considerations
Benefits for hip impingement:
- Reduces sustained hip flexion
- Encourages movement throughout day
- Can reduce overall hip stiffness
Setup tips:
- Use anti-fatigue mat
- Wear supportive shoes
- Alternate between sitting and standing
- Keep one foot elevated on footrest
Sport-specific return guidelines
Running modifications
Return-to-running protocol:
- Week 1-2: Walk-jog intervals (1 minute jog, 2 minutes walk)
- Week 3-4: Increase jogging intervals gradually
- Week 5+: Continuous running if pain-free
Form considerations:
- Maintain upright posture
- Avoid overstriding
- Land with feet under your center of gravity
- Consider softer running surfaces initially
Cycling adjustments
Bike fit modifications:
- Raise seat height to reduce hip flexion
- Move seat forward to open hip angle
- Raise handlebars for more upright position
- Consider wider, shorter cranks
Swimming techniques
Recommended strokes:
- Backstroke (least hip flexion)
- Modified freestyle with rotation
- Water walking/jogging
Avoid initially:
- Aggressive flip turns
- Breaststroke (requires significant hip flexion)
- Butterfly stroke
Team sport considerations
Safe return activities:
- Light jogging in straight lines
- Passing drills without cutting
- Shooting practice (sport-dependent)
Avoid initially:
- Aggressive cutting and pivoting
- Jumping and landing drills
- Contact situations
Supporting your recovery
Anti-inflammatory foods
Include more:
- Fatty fish (salmon, mackerel, sardines)
- Leafy greens (spinach, kale)
- Berries (blueberries, cherries)
- Nuts and seeds
- Olive oil
- Turmeric and ginger
Limit:
- Processed foods high in sugar
- Trans fats and excessive omega-6 oils
- Excessive alcohol
- Refined carbohydrates
Sleep quality impact
Why sleep matters:
- Tissue repair occurs during sleep
- Poor sleep increases pain sensitivity
- Inadequate rest slows healing
Sleep position tips:
- Side sleeping with pillow between knees
- Avoid sleeping on affected side initially
- Use supportive mattress and pillows
Stress management
Why stress affects healing:
- Chronic stress increases inflammation
- Stress can increase pain perception
- Poor stress management affects sleep quality
Stress reduction strategies:
- Regular gentle exercise
- Meditation or deep breathing
- Adequate social support
- Professional counseling if needed
Weight management considerations
Impact on hip health:
- Excess weight increases joint loading
- Weight loss can reduce symptoms
- Gradual weight loss is safest approach
Safe strategies with hip impingement:
- Focus on nutrition rather than intense exercise initially
- Use low-impact activities for cardio
- Work with healthcare provider on plan
When exercises aren’t helping
Common reasons for lack of progress
Exercise-related factors:
- Not doing exercises consistently
- Poor exercise form or technique
- Progressing too quickly
- Choosing inappropriate exercises
Lifestyle factors:
- Continuing aggravating activities
- Poor sleep or high stress
- Inadequate nutrition
- Smoking (impairs healing)
Medical factors:
- Concurrent injuries or conditions
- Severe structural abnormalities
- Need for additional treatments
Alternative exercise options
If traditional exercises don’t work:
- Pool/aquatic therapy
- Tai chi or gentle yoga
- Pilates (modified)
- Resistance band exercises
- Isometric strengthening
Signs you need professional help
Red flags indicating need for evaluation:
- Pain getting worse despite proper exercise
- New symptoms developing
- Unable to perform daily activities
- No improvement after 6-8 weeks
- Loss of strength or range of motion
What to expect: Recovery milestones
Week 1-2 expectations
Realistic goals:
- Reduced pain with daily activities
- Improved tolerance for sitting
- Better sleep quality
- Increased confidence with movement
What’s normal:
- Some days better than others
- Mild soreness after exercises
- Gradual rather than dramatic improvement
Month 1-3 progress markers
Functional improvements:
- Easier getting in/out of car
- Less stiffness in morning
- Ability to put on shoes/socks more easily
- Improved walking tolerance
Exercise progression:
- Moving from Phase 1 to Phase 2 exercises
- Increased repetitions and hold times
- Better exercise form and control
Long-term management strategies
Ongoing habits for success:
- Regular exercise routine
- Good movement patterns in daily life
- Periodic check-ins with healthcare provider
- Stress management and adequate sleep
Realistic outcome expectations:
- 70-85% of people see significant improvement
- Complete elimination of symptoms isn’t always realistic
- Focus on functional improvement and quality of life
- Some activity modifications may be permanent
Conclusion
Hip impingement doesn’t have to control your life. With the right approach to exercise and activity modification, most people can significantly improve their symptoms and return to the activities they love. Start slowly, stay consistent, and don’t hesitate to seek professional help when you need it.
Your journey to better hip health starts with the first gentle movement. Take it one day at a time, and celebrate the small improvements along the way.
FAQs
How long does it take for exercises to help hip impingement?
Most people start noticing some improvement within 2-4 weeks of consistent exercise. Significant changes typically take 6-12 weeks. Remember, consistency matters more than intensity.
Can I still run or play sports with hip impingement?
This depends on your symptoms and the severity of your condition. Many people can return to sports with proper management, but you may need to modify your activities. Start with low-impact activities and gradually progress as your symptoms improve.
Will exercises fix the bone spurs?
Exercises won’t change your bone structure, but they can significantly improve how your hip functions. Many people with bone spurs live active, pain-free lives by managing their condition properly.
What’s the difference between stretching and strengthening for FAI?
Stretching helps improve your range of motion and reduces muscle tension that can worsen symptoms. Strengthening builds the muscle support your hip needs to function properly. You need both for the best results.
Should I use heat or ice?
Ice is generally better for acute pain or after activities that aggravate your symptoms. Heat can be helpful before exercises to warm up your muscles. Try both and see what feels better for you.


