Millions deal with “text neck” and “desk slump” every single day. The good news is that you don’t need a gym membership or fancy gear to fix it.
A simple 10-minute routine can turn things around. Research shows that exercise interventions can improve postural alignment, targeting the head, neck, shoulders, and spine. Studies confirm that exercise programs lasting 8 weeks with 20-minute sessions three times weekly can reduce musculoskeletal pain and improve postural angles. You can do these moves at home. No weights. No equipment. Just your body and 10 minutes.
What’s Your Posture Type? Take the 60-Second Assessment
Before you start, identify your specific posture problems. Answer these five questions:
Your Results: Most people check 2-3 boxes. The exercises in this routine target all five patterns. If you checked boxes 1-2, pay extra attention to chin tucks and wall angels. If you checked box 3, focus on glute bridges.
Why a 10-Minute Habit Beats a 1-Hour Workout
Here’s the truth about fixing posture: long workouts don’t win. Small, daily actions do.
Think of it like brushing your teeth. You don’t brush for an hour once a week. You brush for two minutes twice a day. Your muscles work the same way. They need regular reminders to hold proper form.
Ten minutes is easy to commit to. You can do it before your morning coffee. You can fit it in during lunch. You can squeeze it in before bed. The low time commitment makes it stick.
Studies show that specific exercises targeting muscles involved in postural misalignment can be effective when done with proper intensity, volume, and duration. Short, home-based exercise programs have proven feasible and successful for older adults, with 6-week programs showing reduced kyphosis and better function.
Short workouts build habits. Habits create change. Change becomes your new normal.
The Science of Small Actions:
Research on habit formation shows that actions taking less than 10 minutes are 3x more likely to become daily habits. Your brain finds it easier to commit when the time cost feels minimal. This is why our routine works where hour-long gym sessions fail.
Your 20-Second Posture Audit
Before you start, let’s see where you stand—literally.
Try the Wall Test. It takes 20 seconds and shows you exactly what needs work.
Here’s how:
Stand with your back against a wall. Your heels should be about six inches away from the baseboard. Now check these three points:
- The back of your head should touch the wall
- Your shoulder blades should touch the wall
- Your glutes should touch the wall
Notice any gaps? Most people have a big space behind their lower back or neck. That’s your starting point. That’s what we’re fixing.
This is your goal alignment. Take a mental snapshot. You’ll want to check back in a few weeks to see how far you’ve come.
Did You Know? For every inch your head moves forward from neutral, it adds 10 pounds of pressure on your neck and upper back. If your head sits 3 inches forward (common for desk workers), that’s 30 extra pounds of strain every day.
Understanding Your Craniovertebral Angle
The craniovertebral angle (CVA) measures forward head posture. A normal CVA is 49-53 degrees. Anything below 50 degrees indicates forward head posture. Research shows that motor-learning-based exercise programs can improve CVA and deep neck flexor endurance in just 4 weeks.
You don’t need to measure this precisely at home. The Wall Test gives you the same information. If your head doesn’t touch the wall, your CVA needs work.
The 7 Bodyweight Exercises to Realign Your Spine
Each move targets a specific problem. Each one builds on the last. Together, they create balance from your neck to your hips.
Exercise 1: The Wall Angel
Why It Works: Your chest muscles get tight from hunching over. This move opens them up while training your shoulder blades to sit back where they belong. Scapular stabilization exercises have been shown to decrease forward head and shoulder posture while improving shoulder range of motion.
Research Says: A study on scapular stabilization found that specific exercises targeting these muscles significantly improved postural alignment and reduced pain in participants with forward head and rounded shoulder posture.
How-To Steps:
- Stand with your back flat against a wall
- Press your arms against the wall, elbows bent at 90 degrees
- Slowly slide your arms up the wall, like you’re making a snow angel
- Keep your arms, back, and head touching the wall the entire time
- Slide back down to starting spot
- Move slowly and with control
- Do this for 60 seconds
What You Should Feel: A stretch across your chest and work in your upper back between the shoulder blades.
What You Should NOT Feel: Pain in your lower back or neck strain. If you feel this, you’re arching too much or forcing the range.
Pro-Tip: If your arms come off the wall, you’re going too high. Start with a smaller range. You’ll improve fast.
Breathing: Breathe out as you slide up. Breathe in as you slide down.
RPE (Rate of Perceived Exertion): This should feel like a 5-6 out of 10. Challenging but not painful.
Exercise 2: Scapular Squeeze
Why It Works: The muscles between your shoulder blades (rhomboids) often go to sleep when you slouch. This wakes them up and teaches them to pull your shoulders back. These are the muscles that keep your shoulders from rounding forward all day.
Research Says: Strengthening the scapular stabilizers directly addresses one of the root causes of rounded shoulders and upper back pain.
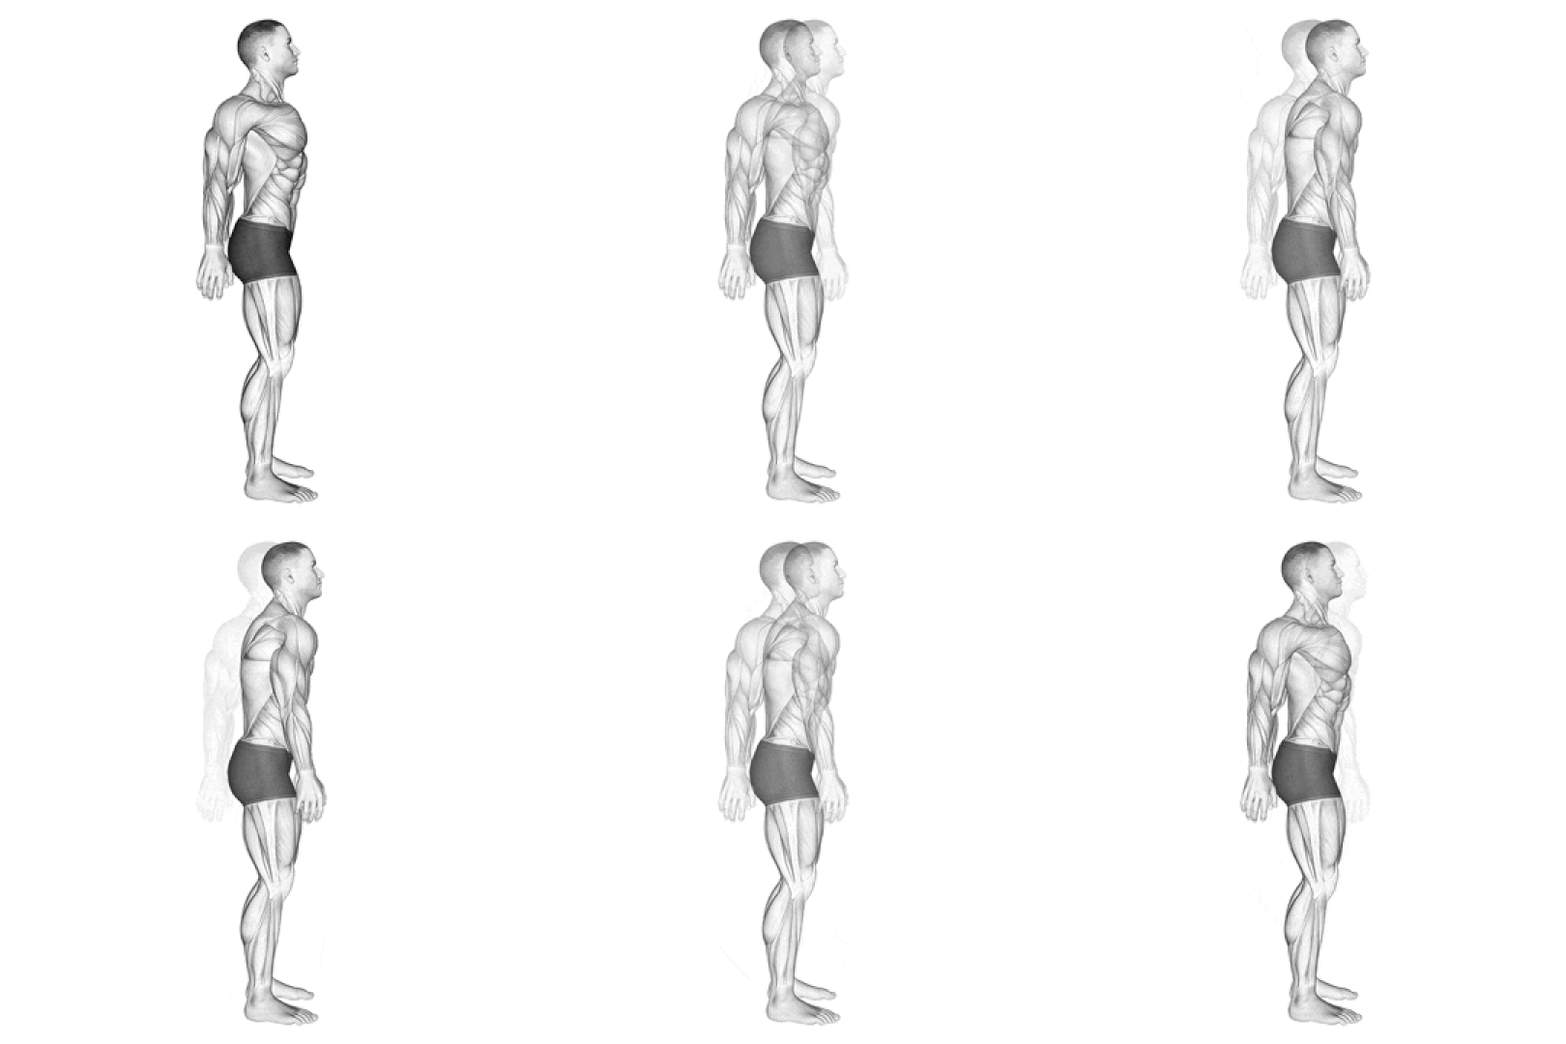
How-To Steps:
- Sit or stand with your arms at your sides
- Roll your shoulders back and down
- Squeeze your shoulder blades together, like you’re trying to hold a pencil between them
- Hold for five seconds
- Release slowly and repeat
- Do two sets of six reps (30 seconds each set)
- Rest 15 seconds between sets
What You Should Feel: Work in the muscles between your shoulder blades. You might feel them “wake up” if they’ve been weak.
What You Should NOT Feel: Tension in your neck or shoulders hiking up toward your ears.
Pro-Tip: Don’t shrug your shoulders up toward your ears. Keep them down and back. Think “back pockets” – like you’re trying to put your shoulder blades in your back pockets.
Breathing: Breathe normally. Don’t hold your breath during the squeeze.
RPE: This should feel like a 6 out of 10.
Exercise 3: Cat-Cow Stretch
Why It Works: Your mid-back (thoracic spine) gets stiff from sitting. This move adds back the flex you’ve lost and helps your spine remember how to move. Spinal mobility is essential for maintaining proper posture throughout the day.
Research Says: Improving thoracic spine mobility through specific exercises can reduce thoracic kyphosis (excessive upper back rounding) and improve overall posture.
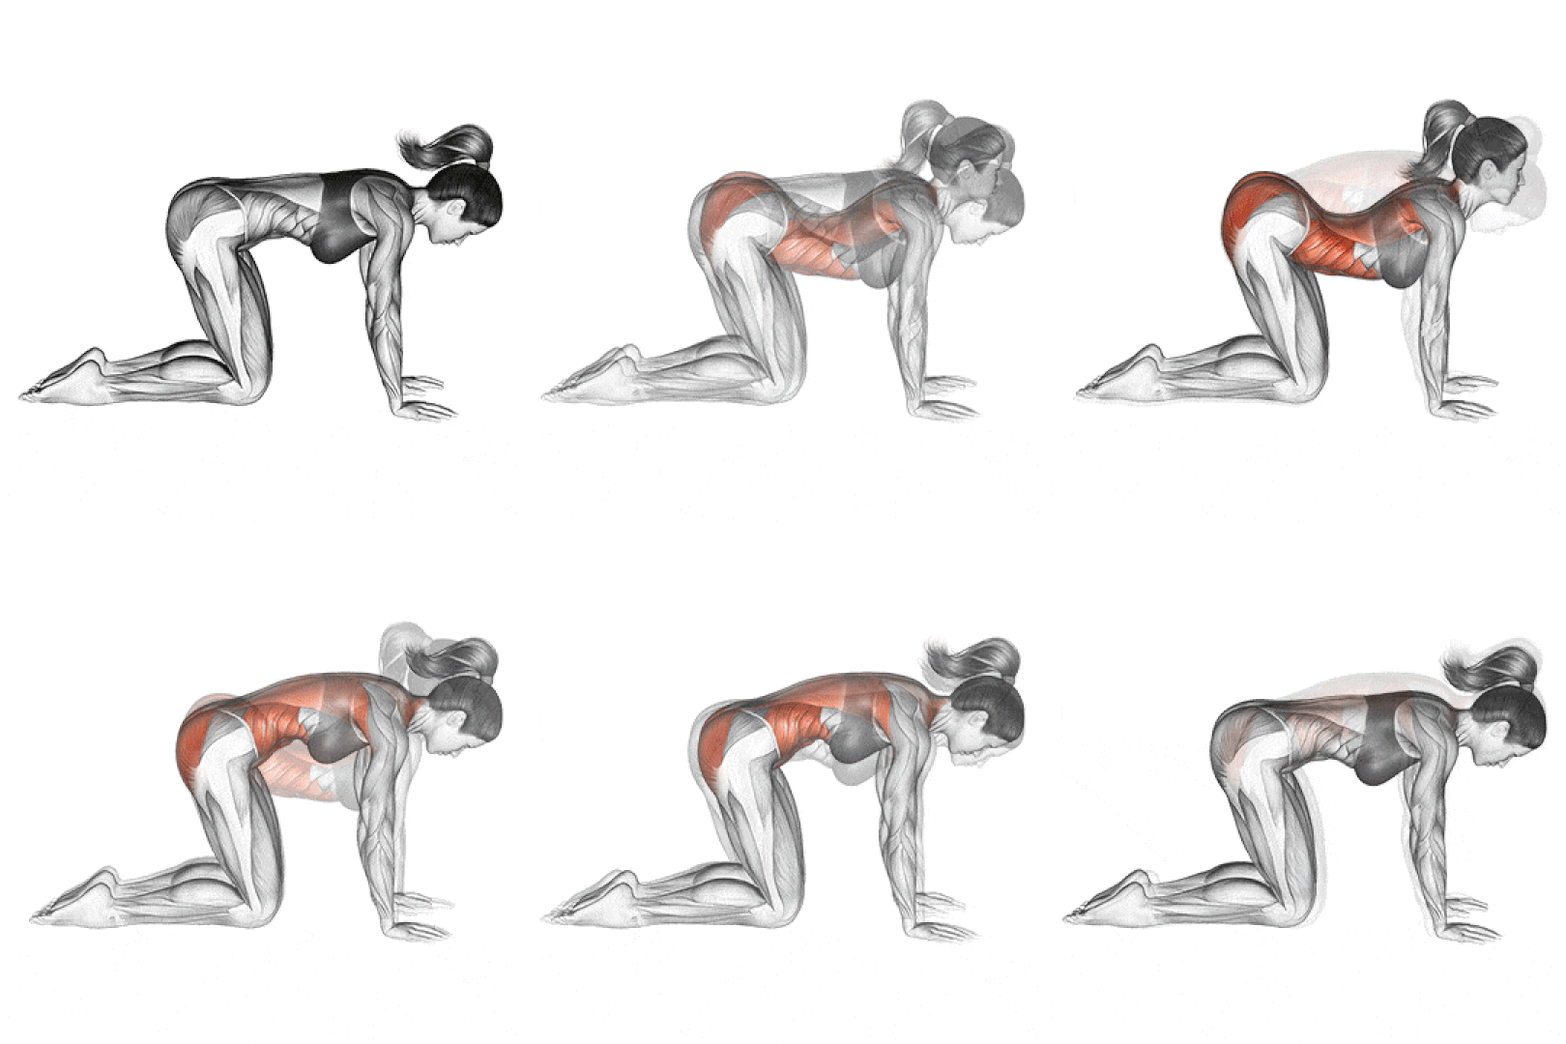
How-To Steps:
- Get on your hands and knees (tabletop position)
- Hands should be under shoulders, knees under hips
- Arch your back up like a scared cat, tucking your chin to chest
- Hold for two seconds
- Let your belly drop toward the floor, lifting your head and chest (cow pose)
- Hold for two seconds
- Flow between these two spots for 90 seconds
- Move slowly and smoothly
What You Should Feel: Movement through your entire spine, from your lower back to your neck. Each part should bend.
What You Should NOT Feel: Any sharp pain or crunching sounds in your spine.
Pro-Tip: Move slowly. This isn’t a race. Feel each part of your spine as it bends. Think about creating a wave motion from your tailbone to your head.
Breathing: Breathe in as you drop into cow. Breathe out as you arch into cat.
RPE: This should feel like a 4-5 out of 10. This is a mobility move, not a strength move.
Exercise 4: Thoracic Spine Rotation
Why It Works: Your mid-back needs to twist. When it can’t, your neck and lower back take over. That causes pain. This move unlocks the rotation you need for daily activities like checking your blind spot while driving or reaching behind you.
Research Says: Thoracic rotation exercises are a key component of comprehensive corrective exercise programs that have been shown to reduce kyphosis and improve balance.
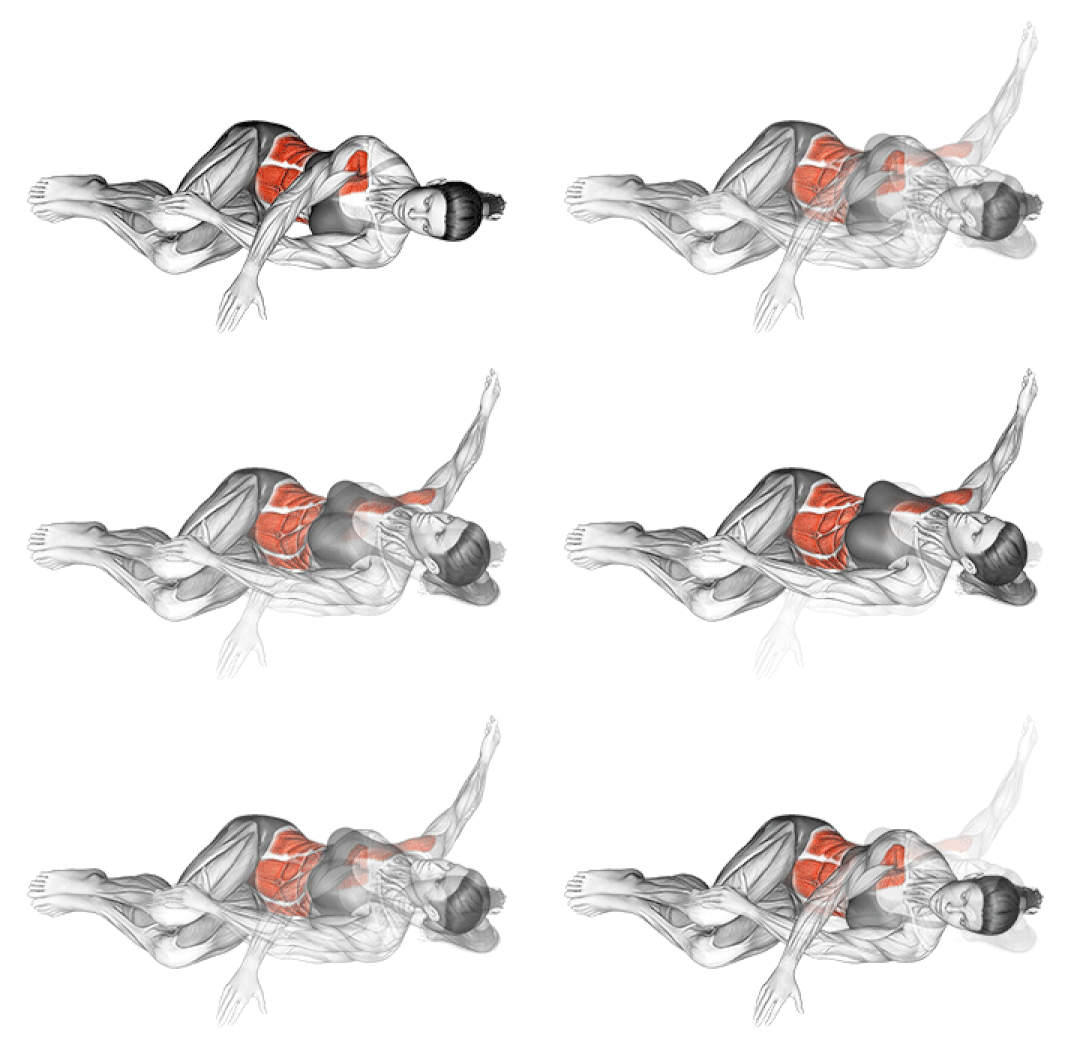
How-To Steps:
- Lie on your side with your knees bent at 90 degrees
- Place a pillow between your knees to keep them stable (optional)
- Extend your arms straight out in front of you, palms together
- Keeping your knees still and stacked, rotate your top arm open toward the ceiling
- Try to touch the floor behind you with your hand
- Keep your eyes on your moving hand
- Come back to center
- Do 45 seconds per side (about 10 rotations per side)
What You Should Feel: A stretch across your chest and rotation through your mid-back.
What You Should NOT Feel: Your knees separating or lower back twisting. The rotation should come from your mid-back only.
Pro-Tip: Your knees stay stacked. Only your upper body rotates. If your shoulder won’t reach the floor, that’s okay. Go as far as you can without forcing it.
Breathing: Breathe out as you rotate open. Breathe in as you return to center.
RPE: This should feel like a 5-6 out of 10.
Exercise 5: Glute Bridge
Why It Works: Weak glutes mean a tilted pelvis. A tilted pelvis means a curved lower back. Strong glutes create a stable base for your entire spine. They also counteract the hip flexor tightness you get from sitting all day.
Research Says: Comprehensive corrective exercise programs that include glute activation have been shown to improve posture and reduce lower back pain.
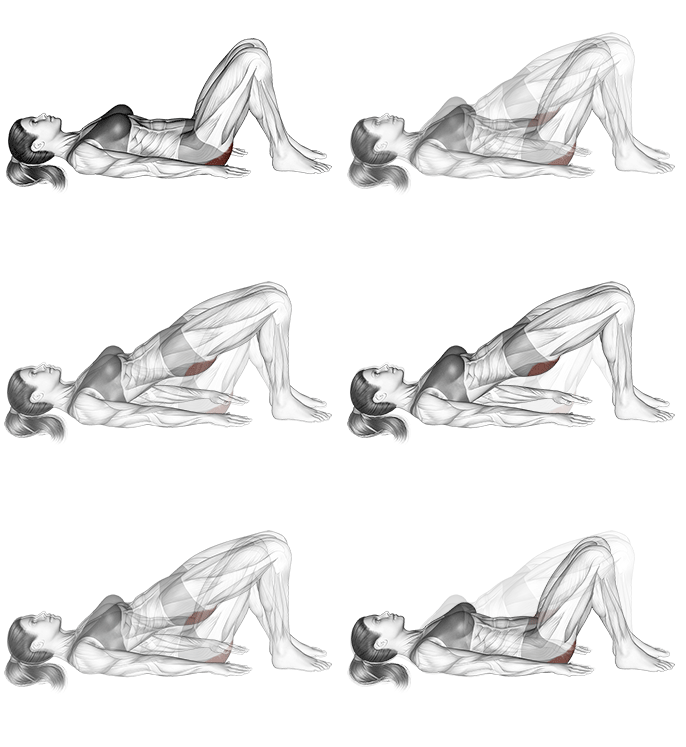
How-To Steps:
- Lie on your back with your knees bent and feet flat
- Place your feet hip-width apart, heels about 6 inches from your glutes
- Arms rest at your sides, palms down
- Squeeze your glutes and lift your hips toward the ceiling
- Your body should form a straight line from knees to shoulders
- Hold for two seconds at the top
- Lower down slowly with control
- Don’t rest completely between reps
- Do two sets of 15 reps (30 seconds each set)
- Rest 15 seconds between sets
What You Should Feel: Work in your glutes (butt muscles) and hamstrings (back of thighs).
What You Should NOT Feel: Cramping in your hamstrings or strain in your lower back. If you feel this, your feet are too close to your body.
Pro-Tip: Push through your heels, not your toes. Imagine pushing the floor away from you. Squeeze your glutes hard at the top. Don’t over-arch your back.
Breathing: Breathe out as you lift. Breathe in as you lower.
RPE: This should feel like a 6-7 out of 10.
Exercise 6: Chin Tucks
Why It Works: “Text neck” pushes your head forward. This weakens the deep muscles in front of your neck (deep cervical flexors). Chin tucks build those muscles back up and pull your head into proper alignment. These muscles act like guy-wires holding a telephone pole upright.
Research Says: Motor-learning-based exercise programs that include chin tucks have been shown to improve craniovertebral angle and deep neck flexor endurance in randomized controlled trials.
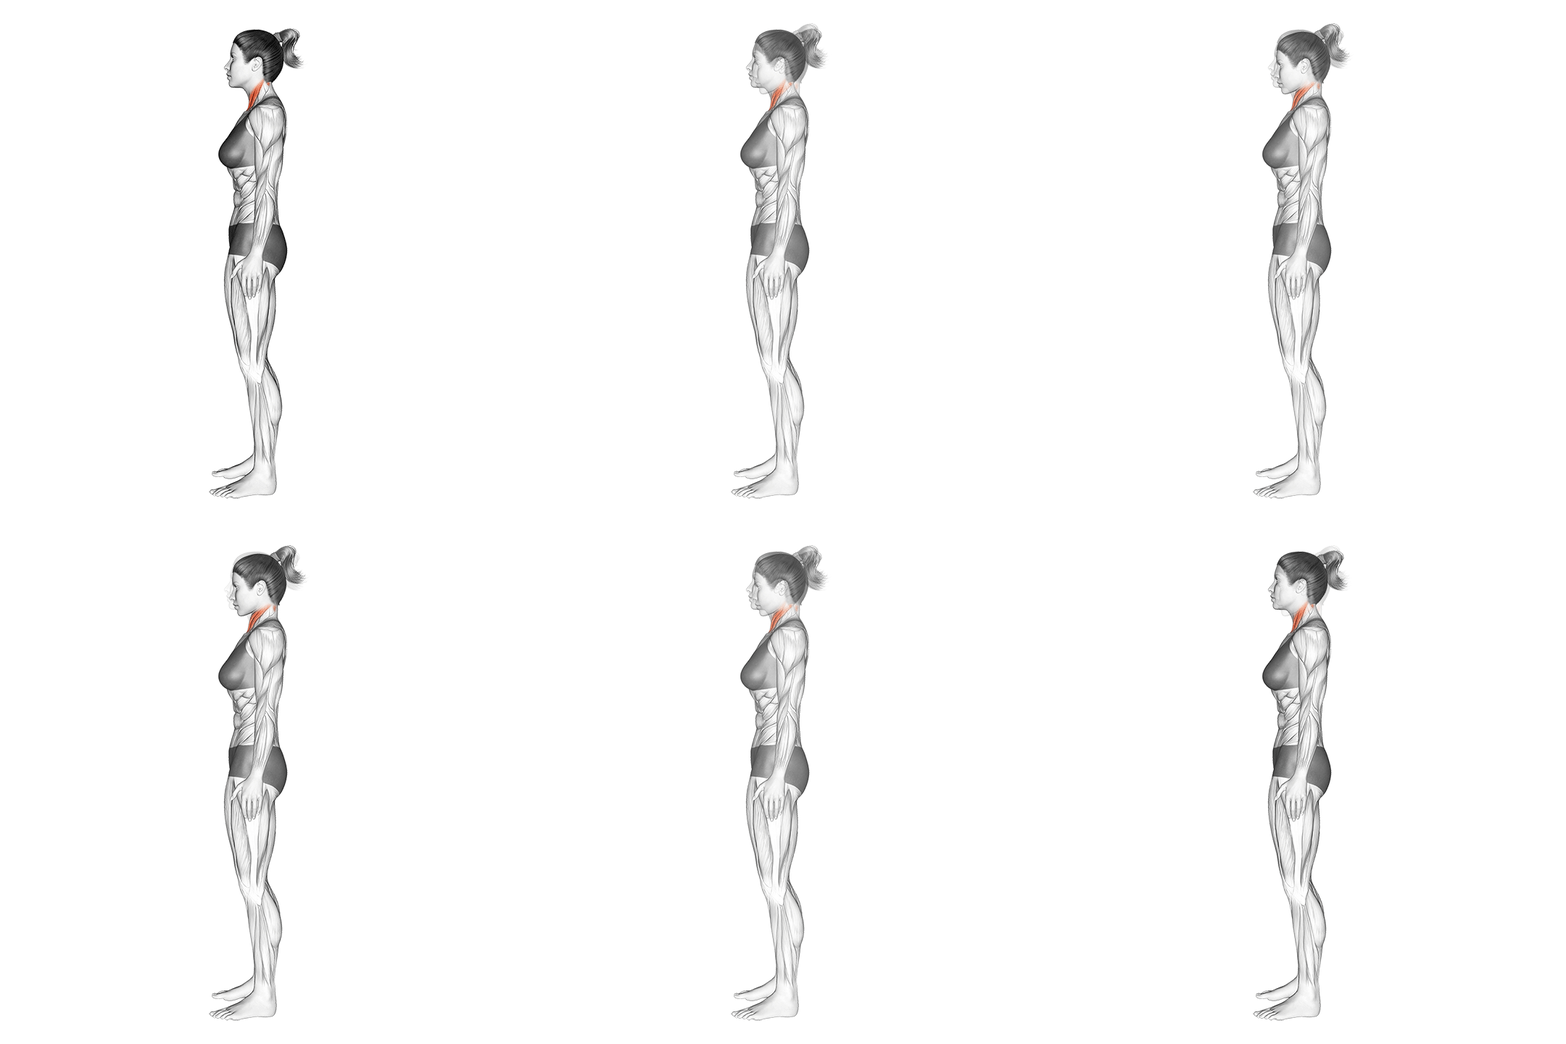
How-To Steps:
- Sit or stand with your shoulders back
- Keep looking straight ahead, eyes level
- Pull your chin straight back, like you’re making a double chin
- Don’t tilt your head down or up
- You should feel the back of your neck lengthen
- Hold for five seconds
- Release and repeat
- Do two sets of six reps (30 seconds each set)
- Rest 15 seconds between sets
What You Should Feel: Work in the front of your neck and a stretch at the base of your skull.
What You Should NOT Feel: Pain or crunching in your neck vertebrae.
Pro-Tip: Don’t tilt your head down. Your eyes stay level with the floor. You’re sliding your head back, not nodding. Place a finger on your chin and push straight back if you need a guide.
Breathing: Breathe normally throughout.
RPE: This should feel like a 5-6 out of 10.
Exercise 7: The Doorway Chest Stretch
Why It Works: Tight chest muscles (pectorals) pull your shoulders forward all day. Stretching them gives your back muscles a fighting chance to pull you upright. This is especially helpful after the strengthening exercises.
Research Says: Combining chest stretches with back-strengthening exercises is more effective than either alone for correcting rounded shoulders.
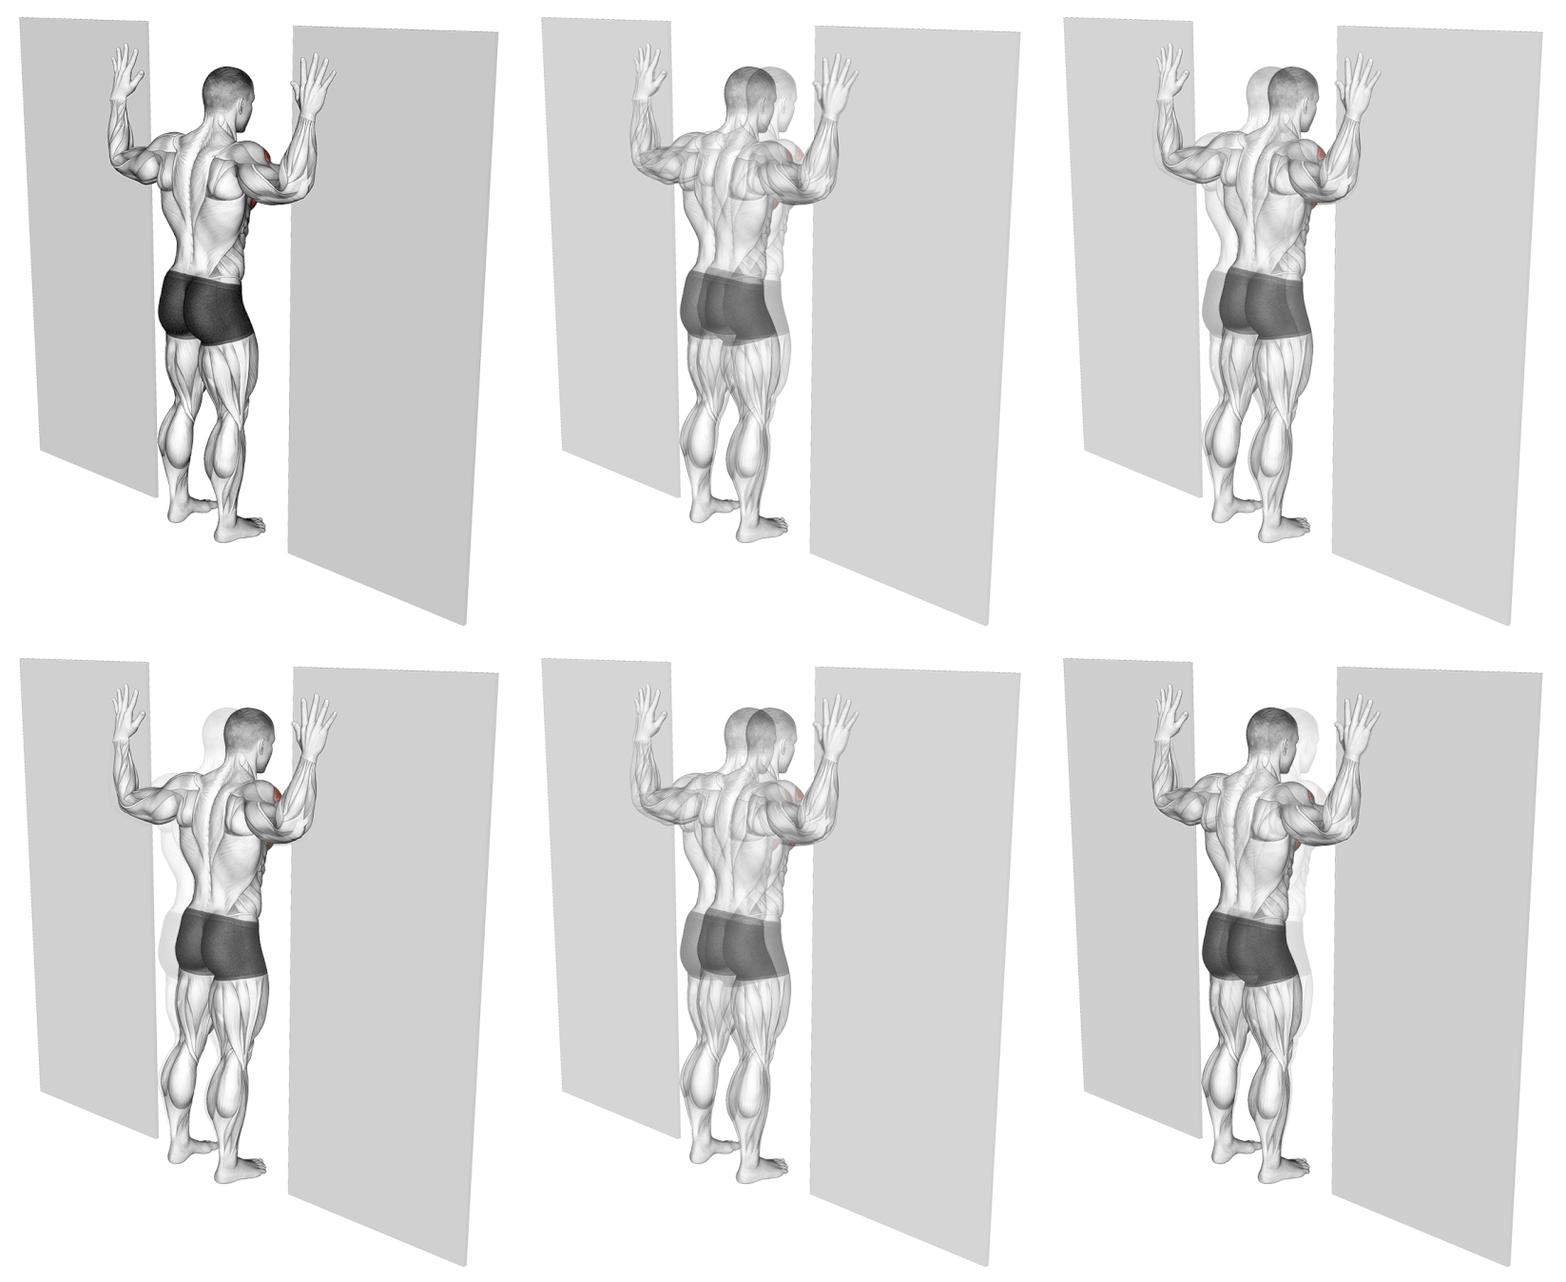
How-To Steps:
- Stand tall in the middle of a doorway.
- Place both forearms vertically against the door frame, elbows bent about 90° and at shoulder height (like in the image).
- Step one foot slightly forward into the doorway.
- Gently lean your torso forward until you feel a comfortable stretch across the front of your chest and shoulders.
- Keep your chest lifted, core tight, and back neutral (don’t arch your lower back).
- Hold for 20–30 seconds.
- Step back to release, then repeat 2–3 times.
What You Should Feel: A stretch across your chest and front of your shoulders.
What You Should NOT Feel: Shoulder pain or a pulling sensation in your armpit. If you feel this, lower your arm position.
Pro-Tip: Keep your core tight. Don’t arch your lower back to get a deeper stretch. The stretch should come from leaning forward, not from bending your spine.
Breathing: Take slow, deep breaths. Try to relax deeper into the stretch with each exhale.
RPE: This should feel like a 4-5 out of 10. Stretches should never be painful.
10-Minute Posture Exercise Timer
Follow along with audio cues and visual guidance
🎉 Great Work!
You completed your 10-minute posture routine!
Exercise Modifications for All Fitness Levels
Not everyone starts at the same place. Here’s how to adjust each exercise:
| Exercise | Beginner | Standard | Advanced |
|---|---|---|---|
| Wall Angels | 30 seconds, arms at 45° angle | 60 seconds, full range | 90 seconds with light resistance band around wrists |
| Scapular Squeeze | 1 set of 6 reps, 3-second holds | 2 sets of 6 reps, 5-second holds | 3 sets of 8 reps, 10-second holds |
| Cat-Cow | 60 seconds, smaller range | 90 seconds, full range | 2 minutes with 3-second holds in each position |
| Thoracic Rotation | 30 seconds per side, smaller range | 45 seconds per side | 60 seconds per side with light weight in hand |
| Glute Bridge | 1 set of 10 reps, both legs | 2 sets of 15 reps, both legs | Single leg, 2 sets of 10 per leg |
| Chin Tucks | 1 set of 6 reps, 3-second holds | 2 sets of 6 reps, 5-second holds | 2 sets of 10 reps, 10-second holds |
| Doorway Stretch | 20 seconds per side | 30 seconds per side | 45 seconds per side, multiple arm angles |
When to Progress: Move to the next level when the current level feels easy (RPE of 4 or below). This usually takes 2-3 weeks.
Part 4: Your Daily 10-Minute Posture Protocol
Here’s your exact routine. Print this. Bookmark it. Do it daily.
| Exercise | Time | Sets | Rest | Notes |
|---|---|---|---|---|
| Wall Angels | 60 seconds | 1 | – | Keep arms on wall throughout |
| Scapular Squeezes | 30 seconds | 2 | 15 sec | No shoulder shrugging |
| Cat-Cow Stretch | 90 seconds | 1 | – | Slow, controlled movements |
| Thoracic Spine Rotations | 45 seconds per side | 1 | – | Keep knees stacked |
| Glute Bridges | 30 seconds | 2 | 15 sec | Squeeze at the top |
| Chin Tucks | 30 seconds | 2 | 15 sec | Eyes stay level |
| Doorway Chest Stretch | 30 seconds per side | 1 | – | Don’t arch back |
| Total Active Time | 8 minutes | – | – | – |
| Rest Between | 2 minutes | – | – | Distributed |
| Grand Total | 10 minutes | – | – | You’re done! |
Use the Interactive Exercise Timer below to guide you through the routine.
Start your timer. Work through each move. Take short breaks when you need them. That’s it. That’s the routine.
Do this once a day. Pick the same time each day. Make it a habit. Your body will thank you.
Best Times to Do Your Routine:
- Morning: Wakes up stiff muscles and sets your posture for the day
- Lunch: Breaks up sitting time and re-energizes you
- Evening: Releases tension built up during the day
- After work: Transitions you from work mode to home mode
Pick one time and stick to it for at least 21 days. That’s how long it takes to build a habit.
The 5 Biggest Mistakes That Ruin Your Results
Even simple exercises can go wrong. Avoid these common errors:
Mistake 1: Doing the Exercises Too Fast
Quality beats quantity. Rushing through the movements means your muscles don’t have time to learn the proper patterns. Each rep should take 3-5 seconds.
Fix: Set a timer. Count slowly in your head. Focus on feeling the right muscles work.
Mistake 2: Skipping the Warm-Up
Jumping straight into the routine on cold muscles increases injury risk and decreases effectiveness.
Fix: Spend 2 minutes doing arm circles (10 forward, 10 backward), shoulder rolls (10 each direction), and gentle neck rolls before starting the routine.
Mistake 3: Not Breathing Properly
Holding your breath during exercises causes tension and raises blood pressure. Your muscles need oxygen to work.
Fix: Match your breath to the movement. Generally, breathe out during the effort (lifting, squeezing) and breathe in during the release.
Mistake 4: Only Doing Exercises When Pain Appears
Waiting until your neck hurts means you’re always playing catch-up. Posture correction is about prevention, not just treatment.
Fix: Do the routine daily, even on days when you feel fine. This is maintenance, not crisis management.
Mistake 5: Compensating With the Wrong Muscles
Your body is smart. If the right muscles are weak, other muscles will try to help. This means you might do wall angels by arching your back instead of moving your shoulder blades.
Fix: Go back to the “What You Should NOT Feel” sections for each exercise. If you feel strain in the wrong places, reduce your range or intensity.
Part 5: Beyond the Workout: 3 Micro-Habits for 24/7 Posture
The 10-minute routine builds strength. These tiny habits keep you aligned all day long.
The Ergonomic Scan
Check your workspace right now. Your monitor should sit at eye level. Your chair should support your lower back. Your feet should rest flat on the floor.
Bad setup means even strong muscles can’t save you. Fix your space. It takes five minutes and makes a huge difference.
The Perfect Desk Setup Guide
| Element | Ideal Measurement | Quick Fix |
|---|---|---|
| Monitor Height | Eye level = top 1/3 of screen | Stack books under monitor or use monitor arm |
| Monitor Distance | Arm’s length away (20-26 inches) | Move keyboard closer to you, not monitor farther |
| Chair Height | Feet flat, knees at 90°, thighs parallel to floor | Adjust chair or use footrest |
| Armrest Height | Elbows at 90°, shoulders relaxed and down | Remove armrests or adjust to proper height |
| Keyboard Position | Wrists straight (neutral), not bent up or down | Use negative tilt keyboard tray or lower desk |
| Mouse Position | Same height as keyboard, close to body | Don’t reach forward for mouse |
| Lower Back Support | Small cushion at belt line | Roll up towel or use lumbar support pillow |
| Seat Depth | 2-3 finger width between seat edge and back of knees | Adjust seat pan or use back cushion |
Test Your Setup: You should be able to sit for 30 minutes without shifting or feeling discomfort. If you can’t, something needs adjusting.
The “Get Up” Rule
Set a timer. Stand and stretch for 30 seconds every half hour. Walk to the water cooler. Do a quick shoulder roll. Just move.
Sitting for hours undoes your hard work. Short breaks keep your muscles awake.
Simple Desk Break Routine (30 seconds):
- Stand up (5 seconds)
- Roll shoulders back 5 times (5 seconds)
- Do 3 standing cat-cow stretches (10 seconds)
- Walk around your desk or to the water fountain (10 seconds)
Do this 8-10 times per workday. Your spine will thank you.
Mindful Alignment
Here’s a simple trick: every time you’re waiting—in line, at a red light, for your coffee to brew—reset your posture.
Pull your shoulders back. Stand tall through your head. Tighten your core just a bit.
These tiny resets add up to hours of better alignment each week.
Desk Setup Evaluator
Quick assessment of your workspace ergonomics
Daily Posture Hacks: Small Changes, Big Impact
Add these habits throughout your day:
| Daily Activity | Posture Hack | Why It Works |
|---|---|---|
| Using your phone | Hold phone at eye level, not down at chest | Prevents text neck and forward head posture |
| Driving | Adjust rearview mirror up 1 inch higher than usual | Forces you to sit upright to see; slouching makes mirror useless |
| Standing in line | Put weight on both feet, slight knee bend | Keeps pelvis neutral instead of hip-shifted stance |
| Carrying bags | Switch sides every 2 minutes | Prevents lateral imbalances and one-sided muscle tightness |
| Sleeping | Sleep on back or side with pillow between knees | Maintains spinal alignment during 7-8 hours of sleep |
| Watching TV | Sit with feet on floor, small pillow behind lower back | Prevents “couch slouch” that undoes your daily work |
| Working at laptop | Place laptop on books, use separate keyboard | Laptops force you to look down; this raises the screen |
| Brushing teeth | Do 10 calf raises while brushing | Activates posterior chain and prevents standing slouch |
Pick 3-4 of these to start. Add more as they become automatic.
Track Your Progress: The 4-Week Transformation Timeline
Set realistic expectations. Here’s what research and clinical experience show:
| Week | What to Expect | How to Measure | Typical Changes |
|---|---|---|---|
| Week 1 | Initial muscle soreness, increased body awareness, exercises feel challenging | Baseline Wall Test, note difficulty level | You’ll notice when you’re slouching more often |
| Week 2 | Less muscle fatigue, exercises feel easier, better endurance | Check if you can do full 60 seconds without stopping | Exercises that were hard now feel moderate |
| Week 3 | Visible alignment changes, less end-of-day pain, improved posture awareness | Repeat Wall Test, compare to baseline | Head may touch wall now, less gap in lower back |
| Week 4 | Habit feels natural, automatic posture corrections, significant pain reduction | CVA check (head touches wall easily), pain scale | 30-50% reduction in daily discomfort |
| Month 2 | Stronger muscles, better postural endurance | Hold good posture for 20+ minutes without fatigue | Friends may comment you look taller |
| Month 3 | Long-term habit formation, postural muscles work automatically | Good posture feels natural, not forced | You catch yourself correcting posture without thinking |
What the Research Shows:
Studies on therapeutic exercises for forward head posture show meaningful improvements in postural angles within 4-8 weeks. Participants typically see 2-5 degree improvements in craniovertebral angle, which translates to visible changes in head position. Comprehensive corrective exercise programs lasting 8 weeks have shown significant reductions in thoracic kyphosis angle and improved balance.
Track Your Progress: Use the Progress Tracker tool below to log your daily workouts and measure improvements.
When to See a Professional: Red Flag Symptoms
These exercises are safe for most people. But some symptoms need medical attention:
Stop and See a Doctor If You Experience:
- Sharp, shooting pain down your arms or legs
- Numbness or tingling in your hands or feet
- Dizziness or lightheadedness during neck exercises
- Pain that gets worse with exercise, not better
- Loss of bladder or bowel control (seek emergency care immediately)
- Severe headaches that start during or after exercises
- Weakness in your arms or legs
- Pain that wakes you up at night
See a Physical Therapist If:
- You have existing back or neck injuries
- Pain persists beyond 6 weeks of daily exercise
- You’re unsure if you’re doing exercises correctly
- You need personalized modifications
- You have a diagnosed spinal condition (scoliosis, herniated disc, etc.)
These exercises work for postural problems caused by weak muscles and poor habits. They don’t fix structural issues, injuries, or diseases. Know the difference.
Your Questions Answered
“I feel this in my neck, not my shoulders. Am I doing it wrong?”
Yes, probably. Neck strain during shoulder exercises means you’re compensating. Check these fixes:
- For Wall Angels: Lower your arm position. Start at 45 degrees instead of 90.
- For Scapular Squeezes: Make sure you’re not shrugging. Keep shoulders down.
- For all exercises: Do a gentle chin tuck before starting. This activates the right muscles.
If neck strain continues, see a physical therapist. You may need one-on-one form correction.
“How long before I see results?”
Short answer: 2-3 weeks for feeling better, 4-6 weeks for visible changes.
Long answer: You’ll notice increased body awareness within days. Muscles will feel less fatigued by week 2. Visible postural changes appear around week 3-4. Friends might comment you look taller by week 6-8.
Pain reduction varies. Some people feel 30% better in 2 weeks. Others take 6 weeks. Consistency matters more than time.
“Can I do this routine twice a day?”
Yes, if you want faster results. Many people do the routine morning and evening. Just make sure you’re not experiencing muscle soreness that interferes with daily activities.
Best approach: Do the full routine once daily. Add a quick 3-minute version (wall angels, chin tucks, doorway stretch) at lunch or before bed.
“What if I can’t get my arms all the way up the wall?”
That’s completely normal. Tight chest muscles and weak back muscles make wall angels hard at first.
What to do: Go as high as you can while keeping your arms on the wall. Even 6 inches of movement helps. You’ll gain range quickly. Most people can do full range within 2 weeks.
“Should I feel sore the next day?”
Mild muscle soreness is normal for the first few days, especially in your upper back and neck. This is DOMS (delayed onset muscle soreness) and shows you’re working muscles that have been inactive.
Normal soreness: Dull ache in muscles, improves with movement, gone within 48 hours.
Not normal: Sharp pain, pain that worsens with movement, pain lasting more than 3 days, pain in joints (not muscles).
If you’re very sore, take a rest day or reduce intensity by 50%.
“Can I do these exercises if I have existing back pain?”
Generally yes, but with caution. These exercises are designed to reduce back pain caused by poor posture. They’re not meant for acute injuries.
Safe to do: Chronic, dull back pain that’s worse at end of day. Pain that improves with movement.
Not safe to do: Recent injury (less than 6 weeks), severe pain (7+ out of 10), pain from a specific incident (fall, accident), diagnosed herniated disc or fracture.
When in doubt, ask your doctor or physical therapist first.
No Equipment? No Problem: Alternative Options
You truly need nothing for this routine. But here are alternatives if your situation is different:
| “I don’t have…” | Solution | Works Just as Well? |
|---|---|---|
| A wall | Use floor for supine (lying down) wall angels | Yes, just different angle |
| A doorway | Use corner of room, or hold resistance band and stretch arms apart | Yes, same stretch achieved |
| Space to lie down | Do all exercises standing or seated | Mostly, though floor exercises are more effective |
| 10 minutes all at once | Split into 2 × 5 minute sessions or 3 × 3 minute sessions | Yes, if done consistently |
| A quiet space | Use headphones with timer notifications | Yes, privacy not required |
| Perfect form | Start where you are, improve each day | Yes, progression is the goal |
The exercises matter more than the perfect setup.
The Posture-Friendly Lifestyle: Supporting Your Progress
Exercise alone isn’t enough. These lifestyle factors affect your posture too:
Nutrition for Strong Bones and Muscles
Your spine needs proper nutrition to maintain strength and alignment:
Key Nutrients:
- Protein: 0.8-1g per pound of body weight daily. Supports muscle repair and growth.
- Calcium: 1,000-1,200mg daily. Keeps vertebrae strong.
- Vitamin D: 1,000-2,000 IU daily. Helps absorb calcium and supports muscle function.
- Magnesium: 310-420mg daily. Reduces muscle tension and supports bone health.
- Omega-3 fatty acids: Reduces inflammation that can cause postural pain.
Best food sources: Lean meats, fish, eggs, dairy, leafy greens, nuts, seeds.
Hydration’s Role in Spinal Health
Your spinal discs are 80% water. Dehydration makes them less effective at cushioning your vertebrae.
How much: Aim for half your body weight in ounces daily. A 150-pound person needs 75 ounces (about 9 cups).
Signs you’re dehydrated: Increased back stiffness, especially in morning. Worsening posture as day progresses.
Sleep Position Recommendations
You spend 7-8 hours sleeping. That’s 1/3 of your life. Sleep position affects posture.
Best positions:
- Back sleeping: Use one pillow under head, one under knees. Keeps spine neutral.
- Side sleeping: Pillow between knees, pillow fills gap between neck and mattress.
Avoid: Stomach sleeping pushes head and neck into rotation for hours.
Pillow height guide:
- Back sleepers: 4-6 inch loft (thinner)
- Side sleepers: 5-7 inch loft (thicker)
Wrong pillow height forces your neck into poor alignment all night.
Stress Management
Cortisol (stress hormone) increases muscle tension. Chronically tense muscles pull your posture out of alignment.
Simple stress reducers:
- 5 minutes of deep breathing before bed
- 10-minute walk outside daily
- Limit news/social media scrolling
- Set work boundaries (no email after 7pm)
Lower stress means looser muscles. Looser muscles mean better posture.
Advanced Tips: Taking Your Posture to the Next Level
Once the basic routine feels easy (after 4-6 weeks), try these progressions:
Progressive Overload Strategies
Add resistance:
- Loop a light resistance band around your wrists during wall angels
- Hold a light weight (2-5 pounds) during thoracic rotations
- Wear a weighted vest during glute bridges
Increase time under tension:
- Hold wall angels at the top for 3 seconds each rep
- Pause glute bridges for 5 seconds at the top
- Hold chin tucks for 10 seconds instead of 5
Add instability:
- Do glute bridges with feet on an exercise ball
- Stand on one leg during scapular squeezes
- Close your eyes during chin tucks (challenges your balance system)
Try isometric variations:
- Hold wall angel position at 45 degrees for 30 seconds
- Hold glute bridge at top for 60 seconds straight
- Hold thoracic rotation end position for 10 seconds each side
Combining With Other Activities
This routine pairs well with:
- Yoga: Do posture routine before yoga class for better alignment
- Running: Do it after runs to counteract forward lean
- Weight training: Do it on rest days or as a warm-up
- Desk work: Do it during lunch break to reset alignment
Monthly Reassessment
Every 4 weeks, reassess your progress:
- Repeat the Wall Test – measure gaps
- Take side-view photos in the same spot
- Rate your daily pain (1-10 scale)
- Check your endurance (can you hold good posture for 30+ minutes?)
- Review your workout log (did you miss days?)
If progress stalls, increase intensity or check your daily habits. The 10-minute routine works, but sitting for 12 hours daily can overpower it.
Related Resources: Expand Your Knowledge
Want to go deeper? Research these topics:
For Desk Workers:
- Ergonomic workspace setup guides
- Active sitting strategies
- Best desk stretches for every hour
For Specific Conditions:
- Exercises for text neck
- Rounded shoulder correction programs
- Lower back pain relief routines
- Cervical spine strengthening
For Better Results:
- Muscle activation techniques
- Proprioception training
- Core stability exercises
- Breathing mechanics for posture
For Long-Term Health:
- Bone density and posture
- Age-related postural changes
- Preventing dowager’s hump
- Spinal health after 50
Each topic builds on the foundation you’re creating with this 10-minute routine.
The Bottom Line: Consistency Wins
Perfect form doesn’t matter as much as showing up. Doing these exercises at 70% quality every single day beats doing them perfectly twice a week.
Your body adapts to what you do most often. If you sit hunched for 12 hours and exercise perfectly for 10 minutes, the sitting wins. But if you exercise for 10 minutes daily AND add posture hacks throughout the day, you create lasting change.
Small actions, repeated daily, rewire your nervous system. Your muscles learn new patterns. Your brain establishes new defaults. Eventually, good posture becomes automatic.
That’s the goal. Not perfect posture through constant effort, but good-enough posture that happens naturally.
Conclusion
Bad posture didn’t happen overnight. It won’t fix overnight either.
But 10 minutes a day? That’s doable. That’s sustainable. That’s how real change happens.
Research confirms that exercise interventions can significantly improve forward head posture, rounded shoulders, and thoracic kyphosis. Multiple studies show that specific therapeutic exercises produce meaningful improvements in postural angles within 4-8 weeks when done consistently.
You’ve got the tools. You’ve got the plan. You’ve got 10 minutes.
Your back pain can ease. Your confidence can grow. Your energy can return.
Here’s what to do right now:
- Do the Wall Test and note your starting point
- Set a daily reminder on your phone for the same time each day
- Use the Exercise Timer tool below for your first session
- Log it in the Progress Tracker
- Commit to 30 days without skipping
That’s it. Thirty days. Ten minutes each day. Three hundred minutes total to change how you feel in your body.


