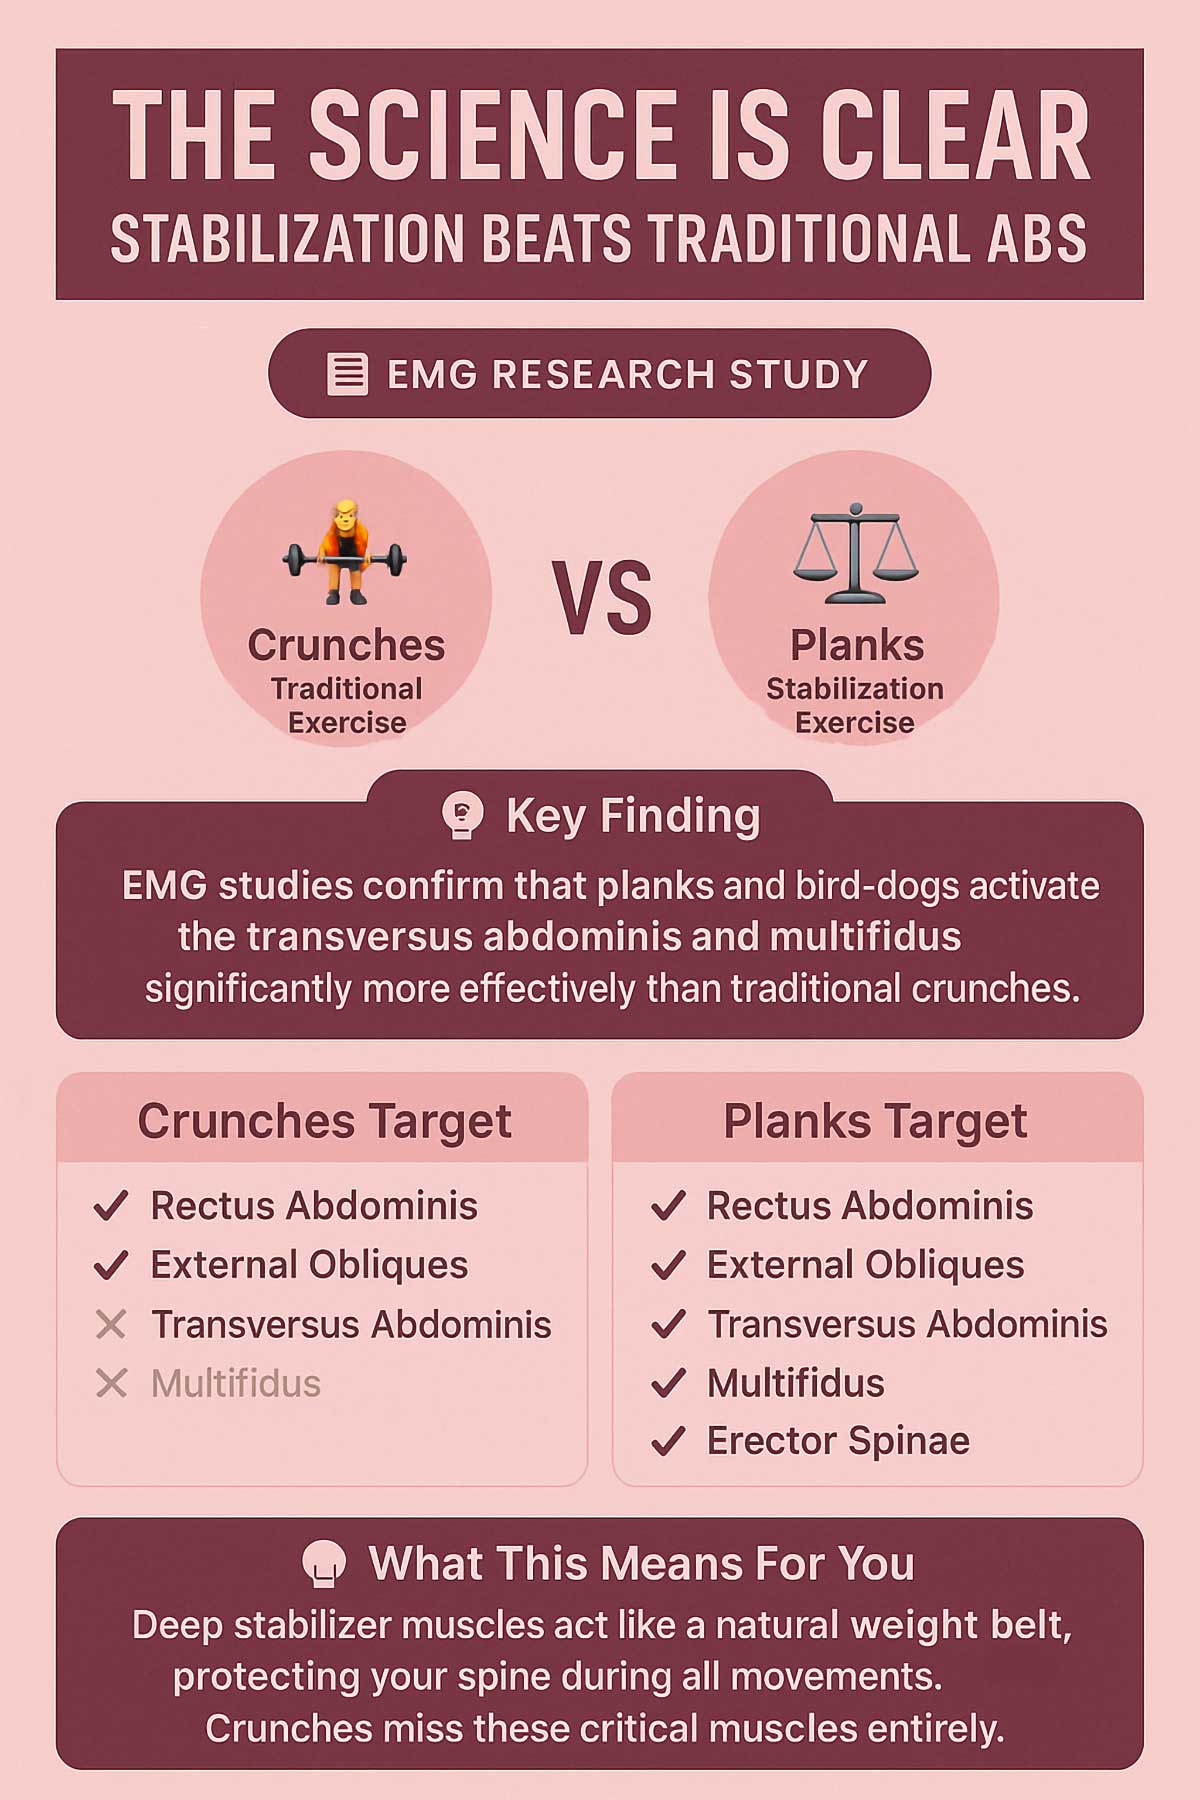
Most people think core training means endless sit-ups and crunches. But these moves only work the surface muscles—the ones you can see. They ignore the deep stabilizers that actually protect your spine and power your every move. Worse, repetitive spinal flexion can strain your lower back over time.
A 2012 study using EMG technology found that planks and stabilization exercises activate the transversus abdominis and multifidus significantly more than traditional crunches.
A strong core isn’t just about a six-pack. It’s the foundation of all movement. It keeps your back healthy, improves your balance, and makes you more athletic. Core stabilization exercises target the deep muscles of your trunk—the ones that keep you steady and pain-free.
This article is for you if:
- You want to prevent or reduce back pain
- You’re tired of doing endless crunches with minimal results
- You need a quick workout that fits into a busy schedule
- You want to improve your athletic performance
- You’re looking for exercises you can do anywhere without equipment
This article gives you a 12-minute, no-equipment routine. Seven simple yet powerful exercises. You can do them anywhere. No gym required.
Why Core Stability Matters More Than Core Strength
The Difference Between a Six-Pack and a Strong Core
Core stability is about resisting unwanted movement. It protects your spine during daily activities and sports. Core strength is about creating movement—like bending or twisting.
Think of your core as the foundation of a house. You need it solid and stable before you worry about the decorations.
The core isn’t just your abs. It includes all the muscles that surround your spine and pelvis. The deep stabilizers—transversus abdominis, multifidus, pelvic floor, and diaphragm—work together to create a stable base. The surface muscles—rectus abdominis (your six-pack) and external obliques—help with movement but don’t provide the same protective benefit.
Core Stability vs Core Strength: What’s the Difference?
| Aspect | Core Stability | Core Strength |
|---|---|---|
| Primary Function | Resists unwanted movement | Creates movement |
| Muscle Type | Deep stabilizers (transversus abdominis, multifidus) | Surface muscles (rectus abdominis, external obliques) |
| Movement Pattern | Isometric holds, anti-rotation | Dynamic flexion, rotation |
| Example Exercises | Plank, bird-dog, dead bug | Crunches, sit-ups, Russian twists |
| Spinal Loading | Low to minimal | Higher, repetitive |
| Best For | Injury prevention, posture, daily function | Aesthetic development, sport-specific power |
| Training Duration | Longer holds (30-60 seconds) | Higher reps (15-30) |
When your deep stabilizers work well, good things happen. Back pain decreases. Posture improves. Balance gets better. Power transfers more efficiently from your legs to your arms during athletic movements.
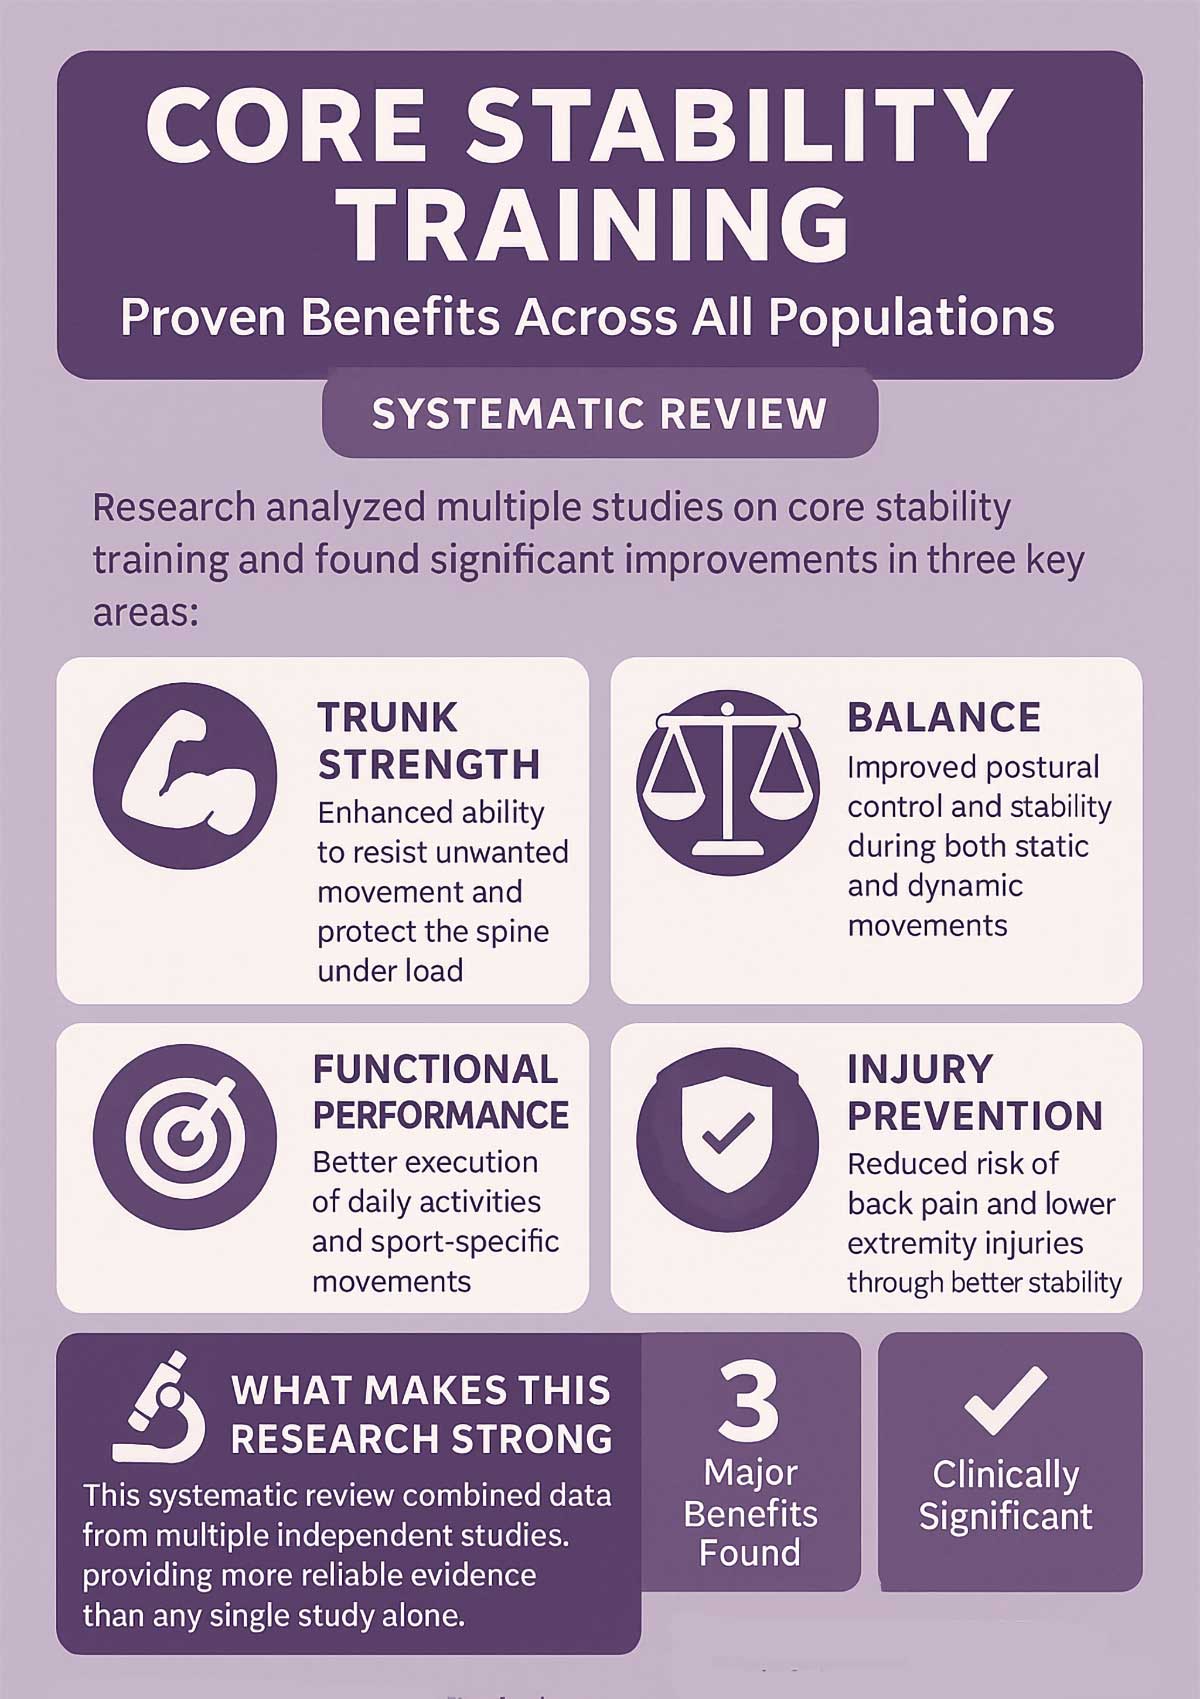
A systematic review published in the Journal of Physical Therapy Science analyzed multiple studies on core stability training. Researchers found that participants who performed stabilization exercises showed significant improvements in trunk strength, balance, and functional performance compared to those doing traditional ab exercises.
Another review examined how stabilization training affects athletic performance. The findings showed improvements in postural control, injury prevention, and strength transfer from core training. Athletes who included anti-rotation and stabilization work in their programs showed better power output in sports-specific movements.
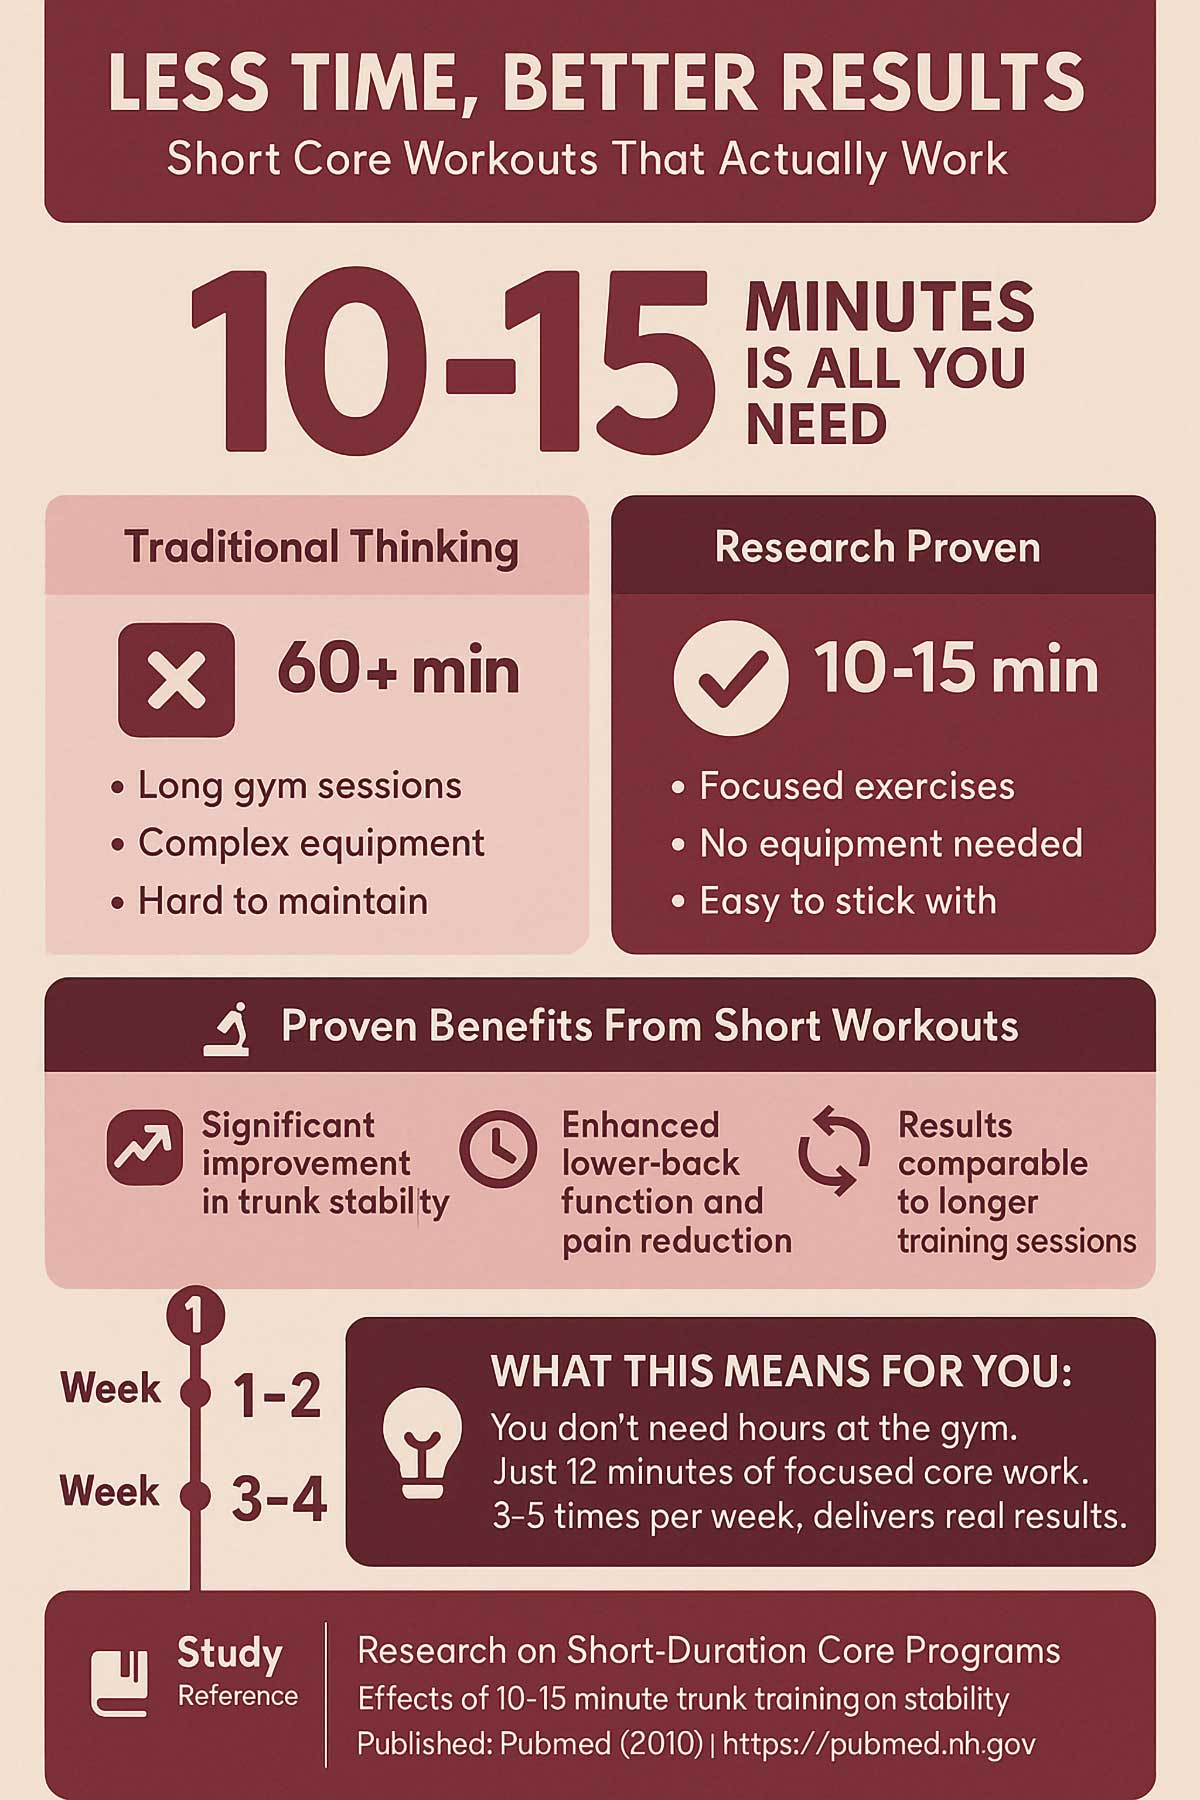
Studies show that focused trunk programs lasting just 10 to 15 minutes can boost stability and lower-back function. Short workouts work. You don’t need hours in the gym.
Common Myths About Core Training
Myth 1: You need gym equipment for effective core training. False. Your body weight provides plenty of resistance for building core stability. The exercises below prove this.
Myth 2: More crunches mean a stronger core. Wrong type of strength. Crunches build endurance in your rectus abdominis but do little for the deep stabilizers that protect your spine.
Myth 3: Core training is just for athletes. Everyone needs core stability. Whether you’re lifting groceries, playing with your kids, or sitting at a desk, your core keeps you safe and functional.
Myth 4: You should feel the burn in your abs. Not always. Effective stabilization work often feels like subtle tension rather than a burning sensation. You’re training endurance and control, not muscle fatigue.
The 12-Minute Core Stabilization Workout
Perform each exercise for 45 seconds, followed by a 15-second rest. Complete two full rounds for a total of 12 minutes.
Set a timer. Move through each exercise with control. Focus on quality over speed.
Before You Start: 2-Minute Warm-Up
Don’t skip this. Cold muscles don’t perform well.
- Cat-Cow Stretch (30 seconds): On hands and knees, alternate between arching and rounding your spine
- Hip Circles (30 seconds): Standing, make large circles with your hips in both directions
- Arm Circles (30 seconds): Extend arms out to sides and make small to large circles
- Bodyweight Squats (30 seconds): 10-15 slow, controlled squats to activate your lower body
The Workout at a Glance
| Exercise | Duration | Primary Target | Difficulty Level | Key Benefit |
|---|---|---|---|---|
| Plank | 45 seconds | Anterior core, deep stabilizers | Beginner | Full core endurance |
| Bird-Dog | 45 seconds | Anti-rotation, coordination | Beginner | Spinal stability during limb movement |
| Glute Bridge | 45 seconds | Posterior chain, pelvic stability | Beginner | Hip and lower back support |
| Dead Bug | 45 seconds | Anti-extension, pelvic control | Beginner-Intermediate | Core stability with limb movement |
| Side Plank | 45 seconds each side | Lateral stability, obliques | Intermediate | Prevents side-bending |
| Superman | 45 seconds | Posterior chain, spinal extensors | Beginner | Back strength and posture |
| Pallof Press (Imaginary) | 45 seconds | Anti-rotation | Intermediate | Rotational stability |
The 7 Core-Stabilizing Exercises
1. The Plank
How to Do It:
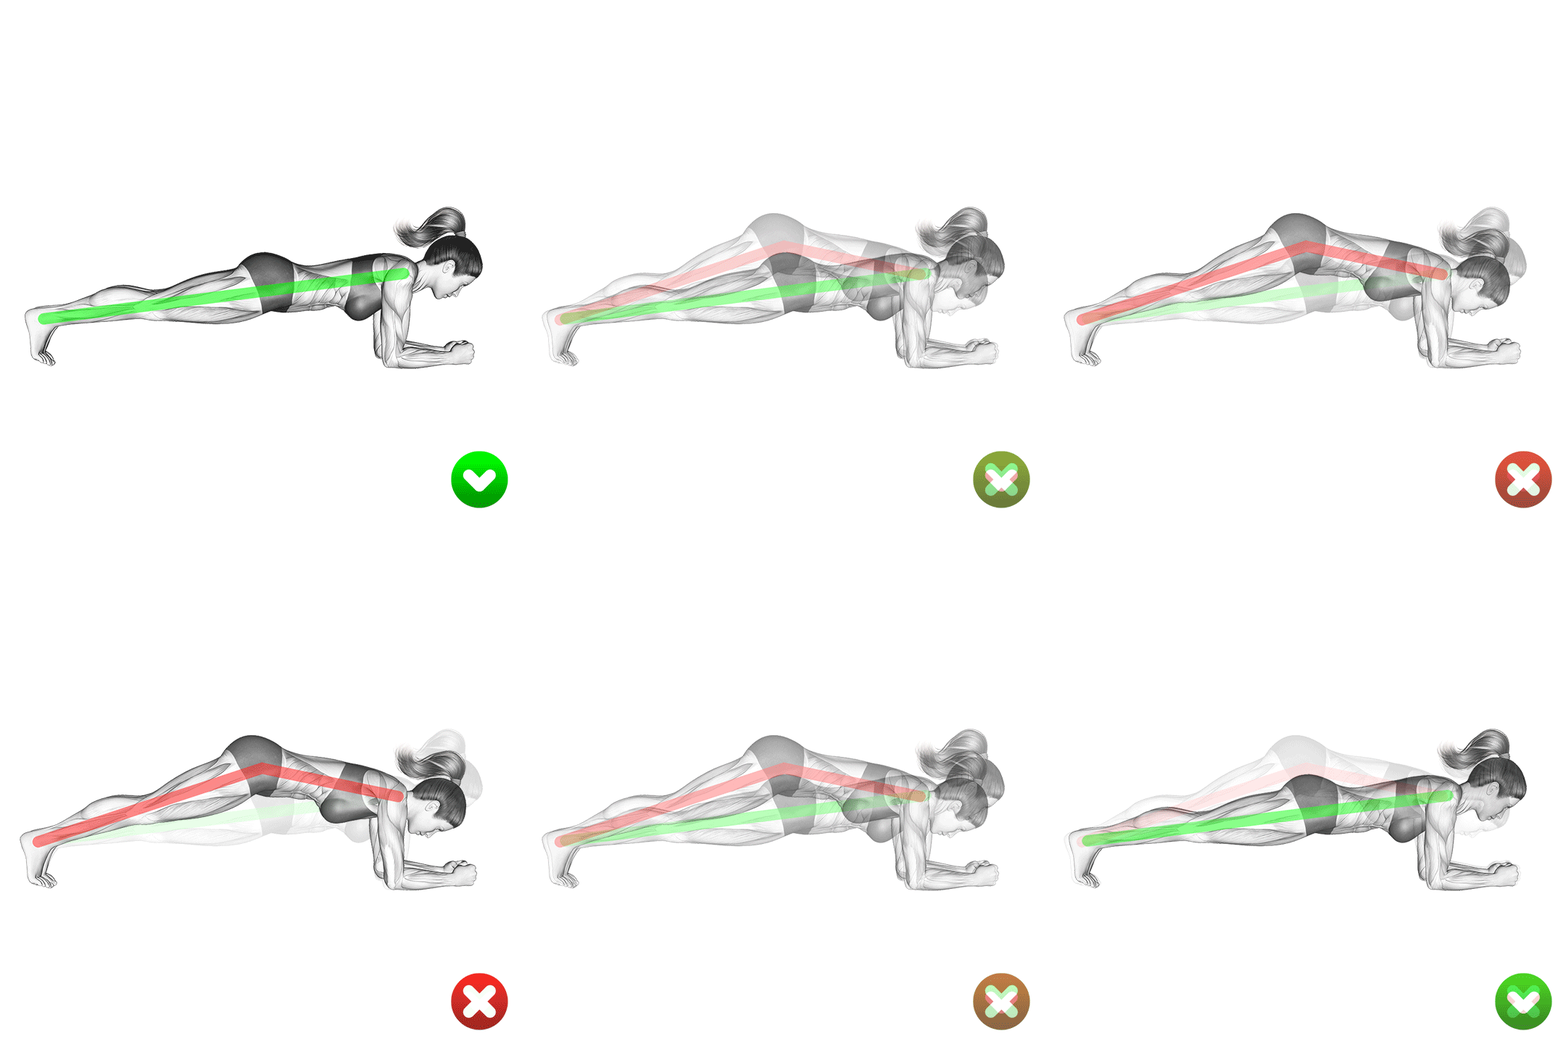
- Start on your forearms and toes, body in a straight line from head to heels
- Pull your belly button toward your spine and squeeze your glutes
- Keep your neck neutral by looking at the floor about a foot in front of you
- Hold this position without letting your hips sag or pike up
Breathing: Take steady breaths in through your nose and out through your mouth. Don’t hold your breath.
Why It Works: The plank engages your entire core isometrically. It builds endurance in the deep stabilizers without any spinal movement. EMG studies show planks activate the transversus abdominis more effectively than crunches. This muscle acts like a natural weight belt around your spine.
Feel It Here: You should feel tension across your entire midsection, in your glutes, and in your shoulders. If you only feel your arms burning, adjust your form.
Common Mistakes:
- Letting hips sag toward the floor (puts pressure on lower back)
- Pushing hips too high (reduces core engagement)
- Holding breath (increases blood pressure unnecessarily)
- Tensing neck and shoulders (causes upper body fatigue)
Modification: Drop to your knees for an easier version. Keep the rest of your body in the same alignment. You can also do an incline plank with hands on a chair or wall.
Progression: Lift one foot slightly off the ground for added challenge. Alternate feet every 10 seconds.
2. The Bird-Dog
How to Do It:
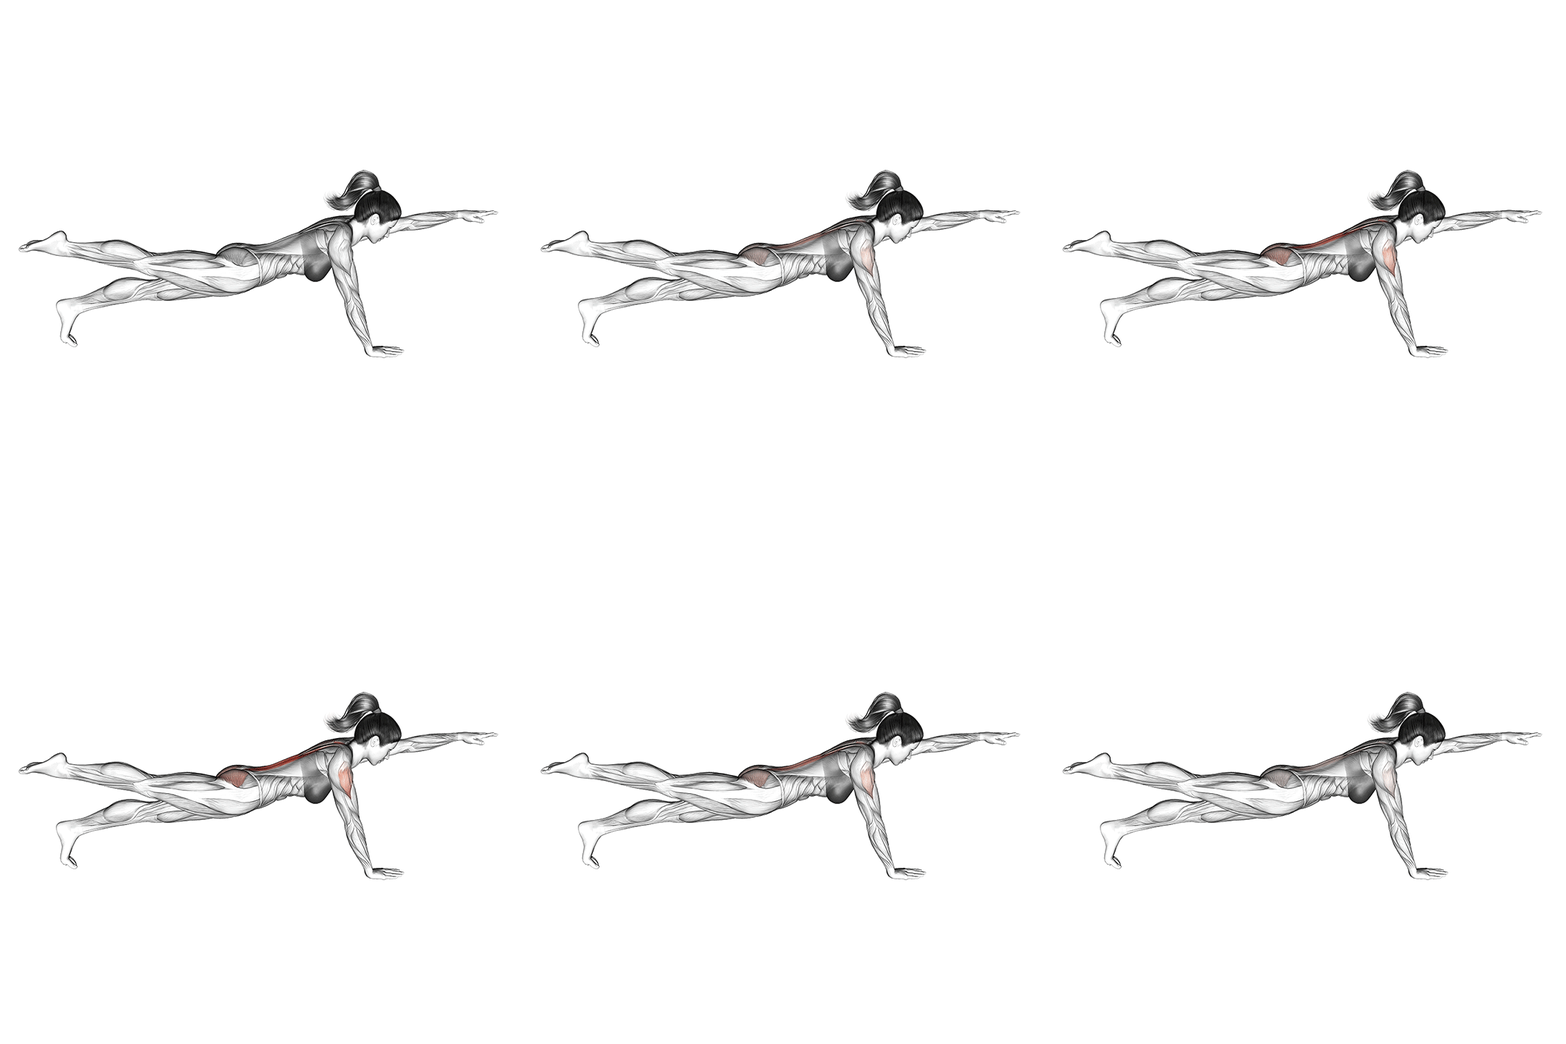
- Start on your hands and knees with your spine neutral
- Extend your right arm forward and left leg back at the same time
- Hold for a moment, then return to start
- Alternate sides with each rep
Breathing: Exhale as you extend your limbs. Inhale as you return to start.
Why It Works: This exercise challenges anti-rotation and improves coordination between your upper and lower body. EMG studies show it’s highly effective at activating deep stabilizers like the multifidus. These small muscles run along your spine and provide segmental stability. A strong multifidus can reduce lower back pain significantly.
Feel It Here: You should feel your core working to keep your torso still. Your glutes and shoulders will also engage. The challenge is keeping your hips level and preventing rotation.
Common Mistakes:
- Rotating hips or shoulders as you extend limbs
- Arching lower back excessively
- Rushing through the movement
- Extending limbs too high (past parallel to floor)
Pro-Tip: Imagine balancing a glass of water on your lower back to keep your hips level. This mental cue helps prevent twisting.
Modification: Extend just your arm or just your leg until you build enough stability to do both together.
Progression: Add a pause at full extension for 3-5 seconds. For an advanced version, touch your elbow to your opposite knee under your body before extending again.
3. The Glute Bridge
How to Do It:
- Lie on your back with knees bent and feet flat on the floor, hip-width apart
- Press through your heels and lift your hips toward the ceiling
- Squeeze your glutes at the top and keep your core tight
- Lower back down with control
Breathing: Exhale as you lift your hips. Inhale as you lower down.
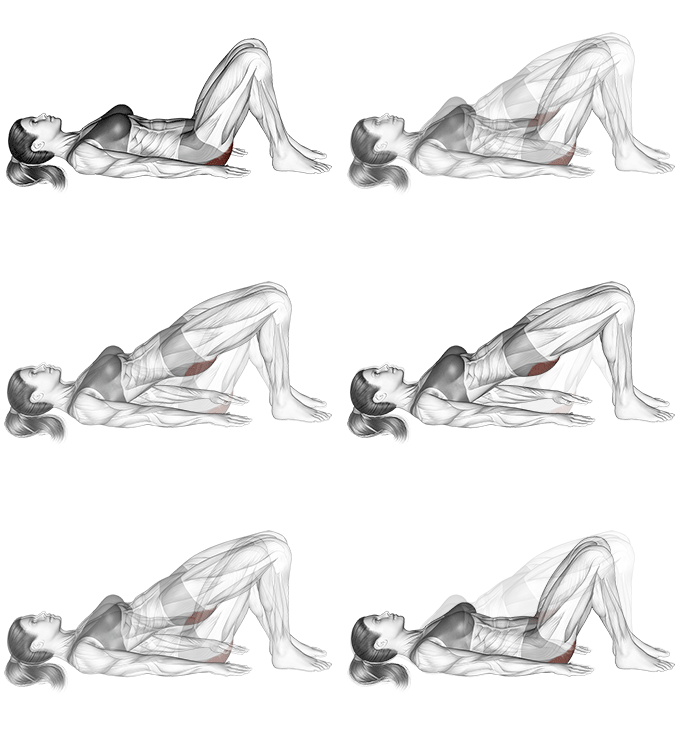
Why It Works: This move activates your glutes and hamstrings. These muscles are a key part of the posterior chain and essential for pelvic stability. A stable pelvis means a protected lower back. Many people have weak glutes from sitting too much, which forces the lower back to compensate.
Feel It Here: You should feel this primarily in your glutes and hamstrings, with secondary tension in your core. If you feel it mostly in your lower back or hamstrings cramping, adjust your foot position.
Common Mistakes:
- Overarching lower back at the top
- Pushing hips too high (past neutral spine)
- Letting knees fall inward or outward
- Using momentum instead of control
Modification: For an extra challenge, try a single-leg glute bridge. Extend one leg straight while lifting your hips. This increases the stability demand on your core.
Progression: Place your feet on an elevated surface like a step. You can also add a pause at the top for 3-5 seconds.
4. The Dead Bug
How to Do It:
- Lie on your back with arms extended toward the ceiling and knees bent at 90 degrees
- Slowly lower your right arm overhead while extending your left leg straight
- Return to start and switch sides
- Move slowly and with control
Breathing: Exhale as you extend your limbs. Inhale as you return to start.
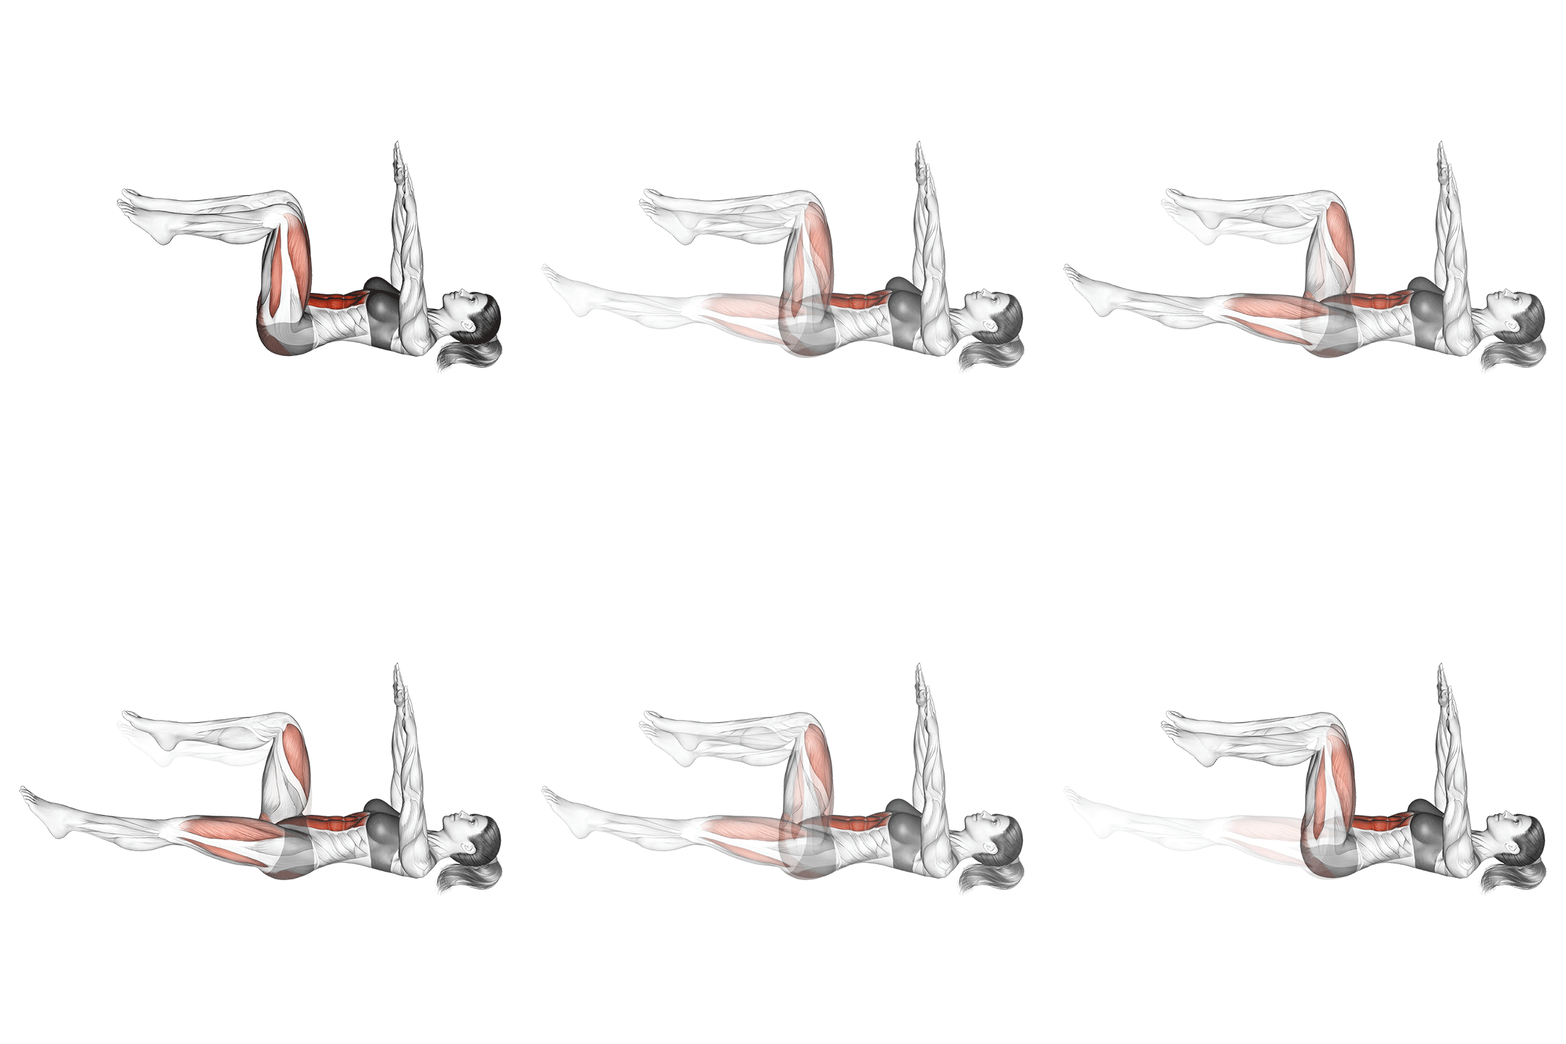
Why It Works: The dead bug is excellent for teaching your core to stabilize the pelvis and spine while your limbs are in motion. This mirrors real-life movements where your trunk stays still while your arms and legs move. It’s one of the best exercises for learning anti-extension control.
Feel It Here: You should feel constant tension in your deep core muscles. Your lower back should stay pressed gently into the floor throughout the movement.
Common Mistakes:
- Allowing lower back to arch off the floor
- Moving too quickly (using momentum)
- Extending limbs too far (losing core control)
- Holding breath during the movement
Pro-Tip: Press your lower back gently into the floor throughout the movement. If your back arches, you’ve extended too far. Reduce your range of motion.
Modification: Keep your knees bent as you lower your legs instead of straightening them. You can also do arms only or legs only until you build enough control.
Progression: Slow down the tempo to 4-5 seconds per rep. For an advanced version, extend both arms and both legs at the same time while keeping your back flat.
5. The Side Plank
How to Do It:
- Lie on your side with your forearm on the ground, elbow under shoulder
- Stack your feet and lift your hips off the ground
- Keep your body in a straight line from head to feet
- Hold, then switch sides
Breathing: Breathe steadily throughout the hold. Don’t let your breath stop.
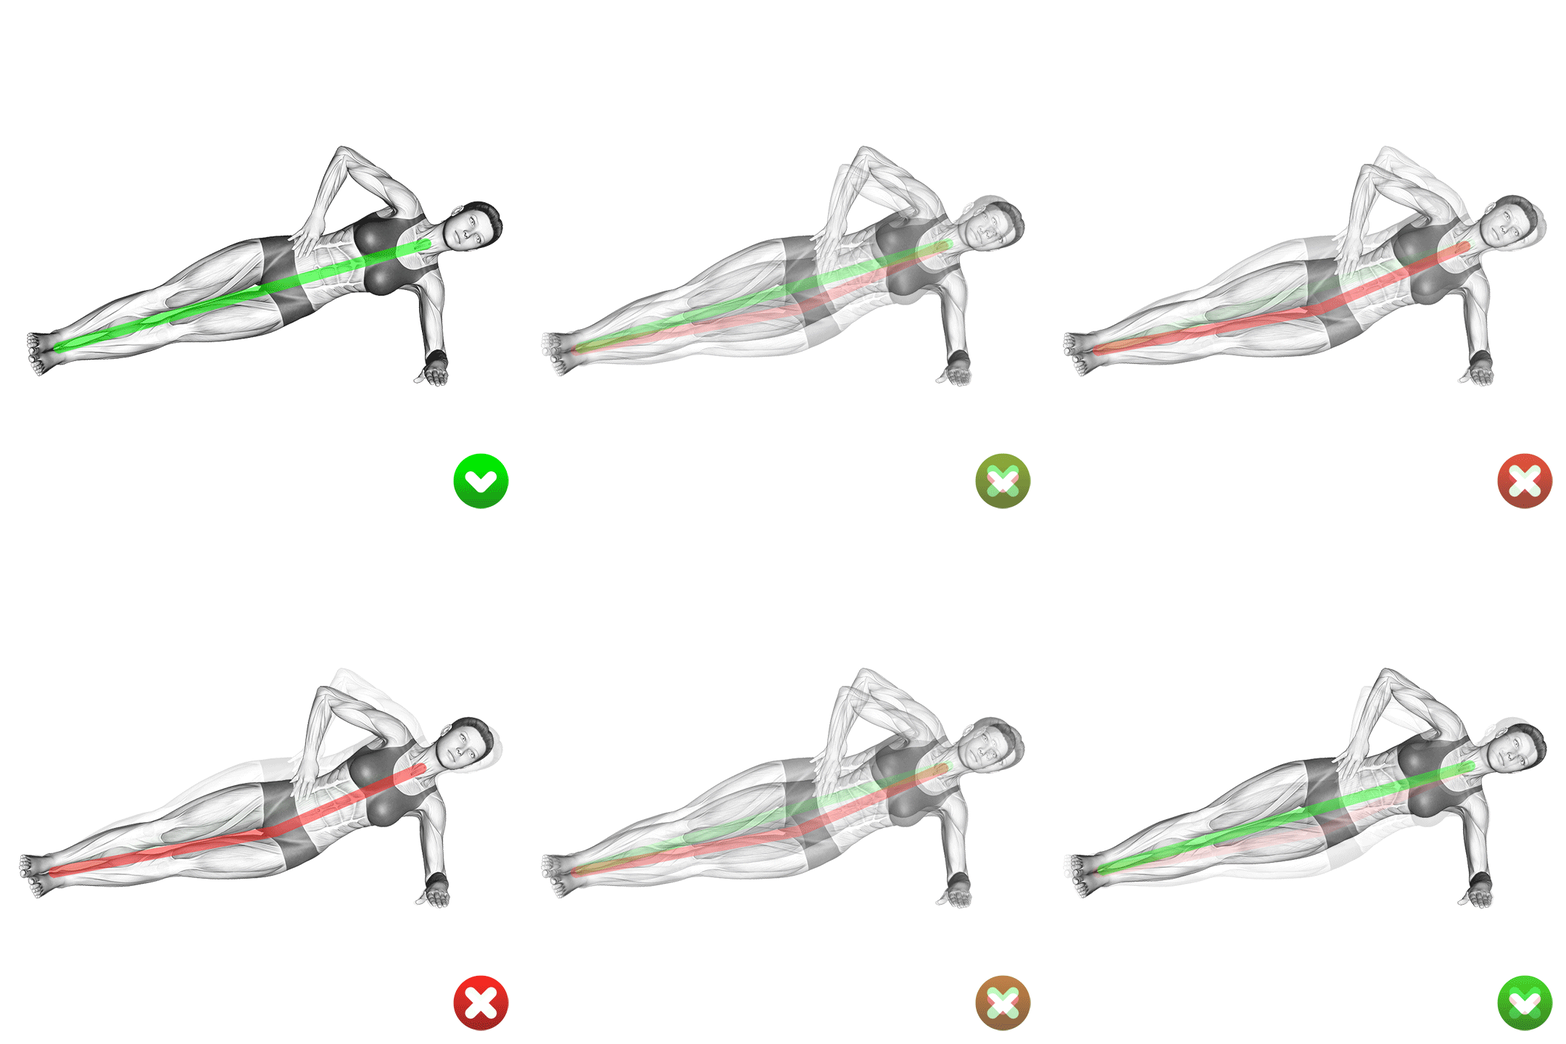
Why It Works: Side planks target your obliques and quadratus lumborum. These muscles are crucial for lateral stability and preventing side-to-side bending of the spine. They often get neglected in traditional ab workouts. Strong lateral stabilizers protect you during activities that involve side-to-side movement or carrying loads on one side of your body.
Feel It Here: You should feel this along the side of your torso facing up, in your obliques and hip. Your shoulder will also work to support your body weight.
Common Mistakes:
- Letting hips sag toward the floor
- Rolling forward or backward
- Tensing neck and shrugging shoulder toward ear
- Forgetting to engage the bottom oblique
Modification: Stagger your feet or drop your bottom knee to the floor. Both options reduce the load while still working the target muscles. You can also do a side plank from your hand instead of forearm.
Progression: Raise your top leg for added challenge. For an advanced version, add hip dips—lower your hip toward the floor and lift back up while maintaining the plank position.
6. The Superman
How to Do It:
- Lie face down with arms extended overhead
- Lift your arms, chest, and legs off the ground at the same time
- Hold for a moment at the top
- Lower back down with control
Breathing: Exhale as you lift. Inhale as you lower down.
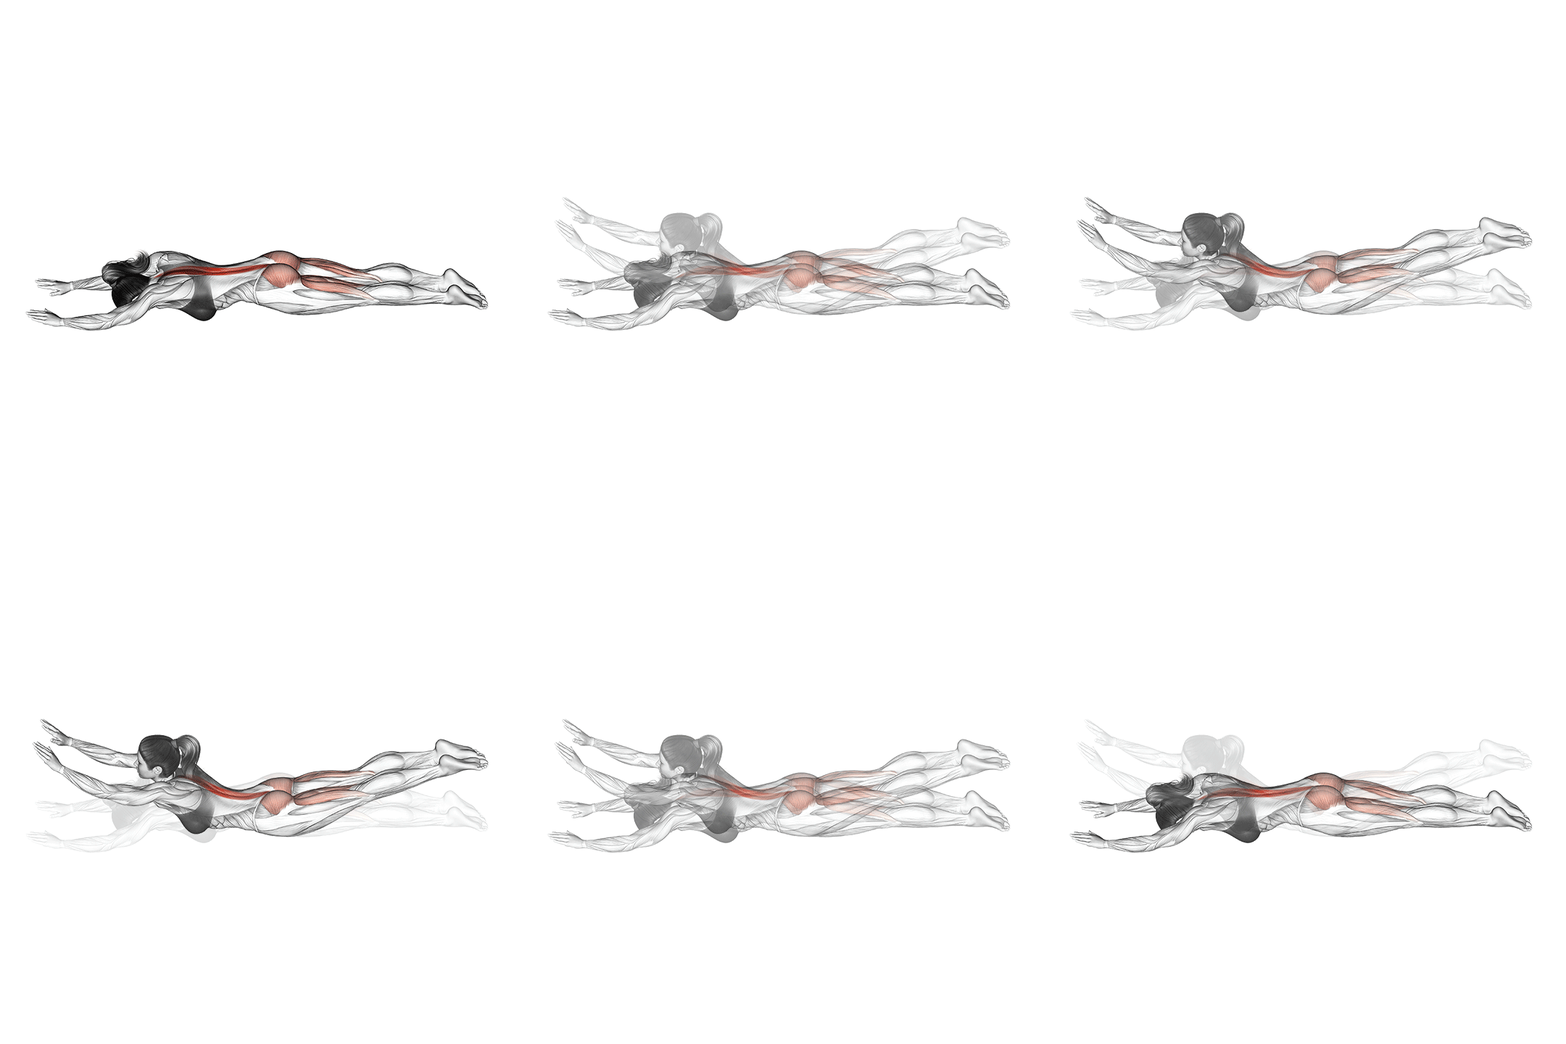
Why It Works: The superman strengthens your entire posterior chain. This includes the erector spinae muscles that support your spine. Strong back extensors balance out the front-side work and prevent injury. Many people focus only on anterior core work and develop muscle imbalances that lead to poor posture.
Feel It Here: You should feel this along your entire back, from your glutes up through your mid-back. Your shoulders will also engage.
Common Mistakes:
- Cranking head back too far (neck strain)
- Using momentum to swing up
- Holding breath during the lift
- Lifting too high (hyperextending spine)
Pro-Tip: Keep your neck in a neutral position by looking at the floor. Don’t crane your head back. Think about lengthening your body rather than lifting high.
Modification: Lift just your upper body or just your legs until you build enough strength to do both. You can also alternate lifting opposite arm and leg (like bird-dog but lying down).
Progression: Hold at the top for 3-5 seconds before lowering. For an advanced version, add small pulses at the top position.
7. The Pallof Press (Imaginary)
How to Do It:
- Stand or kneel with your feet hip-width apart
- Clasp your hands together at your chest
- Press your hands straight out in front of you
- Hold for a few seconds, then return to your chest
- Keep your torso facing forward without twisting
Breathing: Exhale as you press out. Inhale as you return to chest.
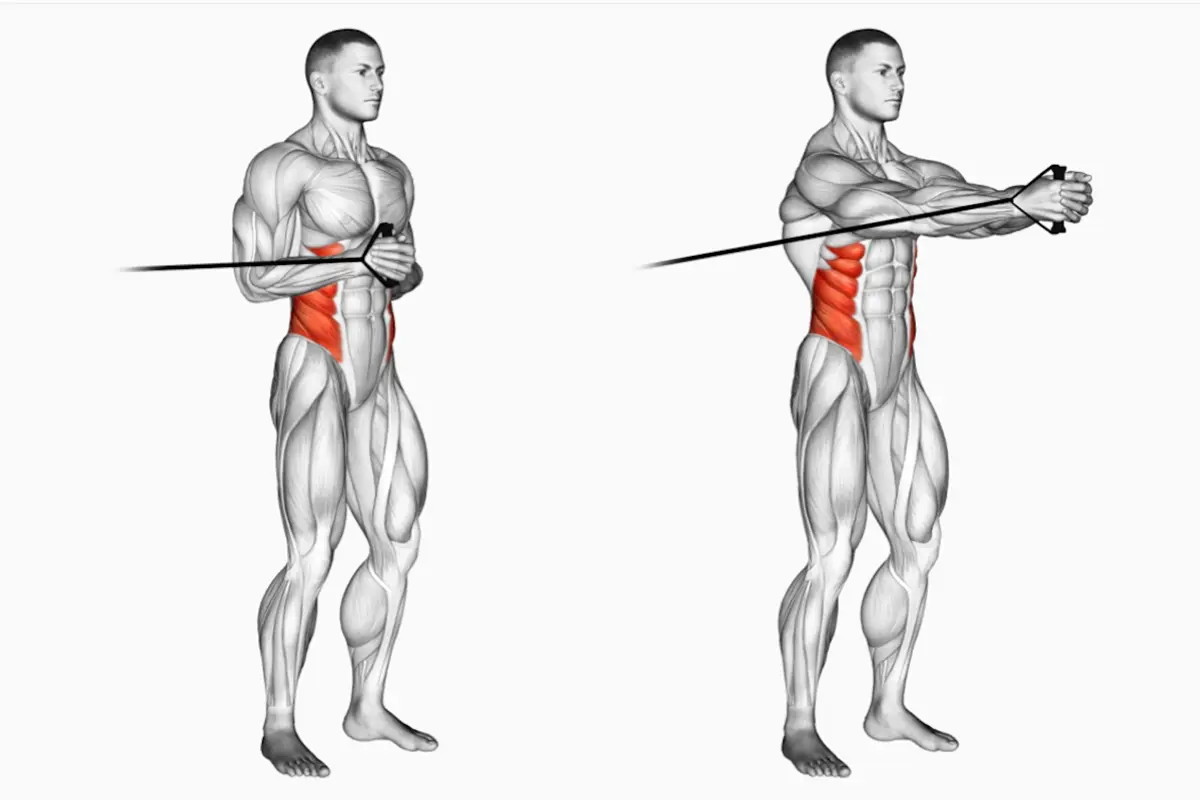
Why It Works: This is an anti-rotation exercise. Even without a band, the act of pressing your hands away from your chest and resisting the urge to twist engages your rotational stabilizers. These muscles protect your spine during twisting movements. In real life, you constantly resist rotation—think about carrying a bag on one shoulder or opening a heavy door.
Feel It Here: You should feel your obliques and deep core working to keep your torso stable and facing forward.
Common Mistakes:
- Allowing torso to rotate as arms extend
- Shrugging shoulders toward ears
- Rushing through the movement
- Not fully extending arms
Pro-Tip: Tighten your core before pressing out. Breathe steadily throughout. For added challenge, imagine you’re pressing against resistance.
Modification: Start with shorter presses. You can also do this seated for more stability.
Progression: Hold the extended position for 5-10 seconds. For an advanced version, do this in a half-kneeling position, which requires more stability from your hips and core.
12-Minute Core Workout Timer
7 exercises • 45 seconds work • 15 seconds rest • 2 rounds
Exercise Progression Chart
| Exercise | Beginner Version | Intermediate (Current) | Advanced Version |
|---|---|---|---|
| Plank | Knees down or incline plank | Standard forearm plank | Single-leg plank or plank with shoulder taps |
| Bird-Dog | Arm or leg only | Opposite arm and leg | Add 3-5 second hold or elbow-to-knee variation |
| Glute Bridge | Standard two-leg bridge | Two-leg bridge with pause | Single-leg bridge or feet elevated |
| Dead Bug | Arms or legs only | Opposite arm and leg | Slow tempo or full extension (all limbs) |
| Side Plank | Knee down or staggered feet | Standard side plank | Top leg raised or hip dips |
| Superman | Upper or lower body only | Full superman | Hold at top or add pulses |
| Pallof Press | Seated version | Standing version | Half-kneeling position |
Your 4-Week Program Design
Weekly Training Schedule
| Day | Week 1-2 (Beginner) | Week 3-4 (Intermediate) | Week 5+ (Advanced) |
|---|---|---|---|
| Monday | 1 round, use beginner modifications | 2 rounds, standard versions | 2 rounds, add advanced progressions |
| Tuesday | Rest or light activity | Rest or light activity | Rest or light activity |
| Wednesday | 1 round, focus on form | 2 rounds, standard versions | 2 rounds, advanced progressions |
| Thursday | Rest or light activity | Active recovery (walking, yoga) | Active recovery (walking, yoga) |
| Friday | 1 round, beginner modifications | 2 rounds, standard versions | 2 rounds, mix standard and advanced |
| Saturday | Optional: 1 round | 2 rounds, standard versions | 2 rounds, all advanced versions |
| Sunday | Rest | Rest | Rest |
How to Track Your Progress
Week 1-2: Can you complete the entire routine without stopping? Can you hold good form for the full 45 seconds?
Week 3-4: Are you ready to remove modifications? Does the routine feel less challenging?
Week 5-6: Can you hold a plank for 60 seconds? Are you ready for advanced progressions?
Week 8+: Can you complete all exercises in advanced versions? Do you notice less back pain or better posture?
When to Increase Difficulty
Advance to the next level when you can complete two full rounds with proper form and the exercises feel manageable. Don’t rush. Building stability takes time.
Signs you’re ready to progress:
- You can maintain proper form throughout the entire 45 seconds
- The exercise feels noticeably easier than when you started
- You can breathe steadily without gasping
- You feel muscle engagement but not strain or pain
- You’ve been at the current level for at least 2 weeks
Signs you should stay at current level:
- Your form breaks down before the time is up
- You feel pain (different from muscle fatigue)
- You’re holding your breath or can’t breathe steadily
- You haven’t been consistent with the routine
The Science Behind Core Stabilization
Research Summary: What Studies Show
| Study Focus | Key Finding | Practical Application |
|---|---|---|
| Core stability vs traditional abs | Stabilization exercises activate transversus abdominis and multifidus significantly more than crunches | Choose planks and dead bugs over crunches for true core protection |
| Training duration effectiveness | 10-15 minute focused sessions improve stability and lower-back function | Short, consistent workouts are enough—you don’t need hour-long sessions |
| Athletic performance impact | Core stability training improves postural control, injury prevention, and strength transfer | Athletes benefit from anti-rotation work for better power output |
| Balance and function | Systematic reviews show improvements in trunk strength, balance, and functional performance | Regular practice translates to better daily movement and reduced fall risk |
How Stabilization Training Works
Your nervous system learns to activate the right muscles at the right time. The deep stabilizers fire before you move your limbs—this is called anticipatory postural control. When this system works well, your spine stays protected.
Research using EMG technology reveals that people with lower back pain show delayed activation of their deep stabilizers. Core stabilization training retrains this timing, which is why it’s so effective for pain reduction.
The studies aren’t just theory. A 2010 research paper found that participants who completed short-duration core routines (similar to the 12-minute program above) showed significant improvements in trunk stability and reported less lower-back discomfort.
Troubleshooting Common Problems
Problem-Solution Guide
| Problem | Likely Cause | Solution |
|---|---|---|
| Lower back hurts during plank | Hips sagging or overarched back | Drop to knees, focus on pulling belly button to spine, squeeze glutes harder |
| Can’t hold plank for 45 seconds | Normal for beginners | Start with 20-30 seconds, gradually increase time each week |
| Neck hurts during exercises | Poor head position or tension | Keep neck neutral (look at floor), relax shoulders away from ears |
| Shaking during holds | Muscles fatiguing (normal) or poor form | If form is good, shaking is fine. If form breaks down, take a break |
| Feel exercises in wrong muscles | Compensation patterns | Reduce range of motion, slow down, focus on feeling the right muscles |
| Not feeling anything in core | Not engaging muscles properly | Practice bracing: cough lightly and feel your abs tighten—maintain that |
| Wrist pain during plank | Too much pressure on wrists | Try forearm plank instead, or distribute weight more evenly |
| Hamstring cramps in glute bridge | Feet too far from body | Move feet closer to glutes, focus on pushing through heels |
Red Flags: When to See a Professional
Seek medical advice if you experience:
- Pain that radiates down your legs
- Numbness or tingling in your limbs
- Pain that worsens over several weeks
- Loss of bladder or bowel control
- Pain following a fall or injury
- Severe pain that doesn’t improve with rest
Integrating Core Stability into Your Life
Your Core is Always On
Core stability isn’t just for workout time. Your deep stabilizers should work all day long.
Daily Core Engagement Checklist
| Activity | How to Engage Core | Frequency |
|---|---|---|
| Sitting at desk | Pull shoulders back, stack ribs over pelvis, gentle core tension | Every time you sit |
| Standing in line | Shift weight evenly on both feet, slight core brace | Throughout the day |
| Lifting objects | Brace core before lift, hinge at hips, keep object close | Every time you lift |
| Walking | Maintain tall posture, gentle core engagement with each step | During all walks |
| Getting out of chair | Engage core, lean forward slightly, push through legs | Multiple times daily |
| Reaching overhead | Brace core before reaching, avoid excessive back arch | As needed |
| Carrying groceries | Engage core, distribute weight evenly or alternate sides | Weekly shopping trips |
| Playing with kids | Brace before lifting, use legs not back, maintain neutral spine | Daily play time |
Activity-Specific Applications
For Runners: Core stability improves running efficiency. Your trunk stays stable while your legs move, reducing energy waste. Do this routine 2-3 times per week, plus one-leg balance work.
For Weightlifters: Strong stabilizers allow you to lift heavier safely. Your spine stays protected under load. Do core work on rest days or after your main lifts.
For Desk Workers: Combat sitting with regular movement breaks. Every hour, stand up and do a 30-second plank or 10 bird-dogs. Set a timer as a reminder.
For Yoga Practitioners: Many yoga poses require core stability. Plank variations and balance poses benefit from stronger deep stabilizers. This routine complements your practice.
For Swimmers: Core stability improves body position in water. Your stroke becomes more efficient when your trunk doesn’t wobble. Do this routine 3 times per week on land.
3-Minute Desk Reset Routine
When you’ve been sitting too long, try this quick reset:
- Standing Hip Circles (30 seconds): Loosen up stiff hips
- Wall Plank (30 seconds): Hands on wall, walk feet back until body is diagonal
- Standing Bird-Dog (30 seconds): Balance on one leg, extend opposite arm forward
- Standing Spinal Twist (30 seconds): Gentle rotation side to side
- Glute Squeezes (30 seconds): Stand tall, squeeze glutes 20 times
- Deep Breathing (30 seconds): 5 deep breaths, focus on rib expansion
Complementary Activities
| Activity | Core Benefit | Recommended Frequency |
|---|---|---|
| Pilates | Excellent for deep stabilizer work | 1-2 times per week |
| Yoga | Balance and flexibility with core engagement | 2-3 times per week |
| Swimming | Low-impact full-body stability training | 1-3 times per week |
| Tai Chi | Balance and controlled movement | 2-3 times per week |
| Rock Climbing | Dynamic stability in multiple planes | 1-2 times per week |
Safety and Contraindications
Who Should Modify or Avoid These Exercises
Modify if you have:
- Recent abdominal surgery (wait 6-8 weeks, get doctor clearance)
- Diastasis recti (abdominal separation)
- Herniated disc (avoid exercises that cause pain)
- Osteoporosis (avoid spinal flexion and extension)
- Pregnancy (especially second and third trimester)
Completely avoid if you have:
- Acute back injury (wait until cleared by doctor)
- Severe spinal conditions (get professional guidance first)
- Recent fractures or bone injuries
Proper Form Checkpoints for Safety
Before each exercise, run through these safety checks:
✓ Neutral spine: Not excessively arched or rounded ✓ Shoulders relaxed: Away from ears, not hunched ✓ Steady breathing: Never holding breath ✓ Core engaged: Gentle tension maintained ✓ Controlled movement: No jerking or momentum ✓ Pain-free: Muscle fatigue yes, pain no
Conclusion
A stable core is the secret to a healthy back, better performance, and improved overall function. These seven exercises target the deep muscles that protect your spine and power your movement. No equipment needed. Just 12 minutes a day.
Stop wasting time on crunches that only work surface muscles. Start building real stability that makes everything else in life easier.
Sarah, our marketing manager from the beginning? She switched to this routine six weeks ago. Her morning back pain is gone. She sits taller at work. She just ran her first 5K without the usual lower back fatigue.
Your back will thank you. Your athletic performance will improve. Your daily movements will feel smoother and stronger.
Your Action Plan
This Week:
- Complete the 2-minute warm-up
- Do one round of all seven exercises using beginner modifications if needed
- Schedule three workout days on your calendar
This Month:
- Work up to two full rounds
- Track your progress weekly
- Notice improvements in daily activities
This Quarter:
- Progress to advanced versions of exercises
- Reduce or eliminate back pain
- Feel confident in your core strength
Consistency beats intensity here. Do this routine three to five times per week. You’ll feel the difference within a few weeks. Stick with it, and you’ll build a foundation that lasts.
The best time to start was yesterday. The second best time is right now. Drop down and hold a plank. Your journey to a stronger, more stable core starts today.
FAQs
How long until I see results?
Most people notice improvements within 2-3 weeks. You’ll feel stronger and more stable during the exercises first. Reduced back pain and better posture typically follow within 4-6 weeks. Visible changes in muscle tone take 8-12 weeks with consistent practice.
Can I do this every day?
You could, but 3-5 times per week is ideal. Your muscles need recovery time. On rest days, stay active with walking, swimming, or yoga.
What if I feel pain during an exercise?
Stop immediately. Pain is different from muscle fatigue. Muscle fatigue feels like burning or tiredness. Pain is sharp, pinching, or stabbing. If something hurts, skip that exercise and consult a healthcare provider.
I have back pain now. Is this safe?
For most people, yes. These exercises are often prescribed for back pain rehabilitation. Start with modifications and progress slowly. If you have severe or acute back pain, get clearance from a doctor or physical therapist first.
Can I do these if I’m pregnant?
Many of these exercises are pregnancy-safe with modifications, but always check with your healthcare provider first. You may need to avoid lying flat on your back after the first trimester.
Should I do this before or after other workouts?
Either works. Some people prefer core work as a warm-up. Others do it after their main workout. If you do it before, use it as activation work and save max effort for after your main training.
What if I can’t do 45 seconds?
Start where you are. Do 20 seconds if that’s what you can manage. Add 5 seconds each week. Progress takes time.
Do I need to do both rounds?
For maximum benefit, yes. But one round is better than nothing. If you only have 6 minutes, do one round consistently.


