Recent studies show that specific exercises work better than injections for long-term relief of hip bursitis. While injections might ease your pain temporarily, they don’t fix the root problem. The right exercises do.
What you’re dealing with isn’t just simple “hip bursitis.” It’s often part of a bigger issue called Greater Trochanteric Pain Syndrome (GTPS). The real culprit? Weak gluteal muscles that can’t properly support your hip. This article will show you exactly how to strengthen these muscles with seven proven exercises that outperform injections for lasting comfort.
You’ll learn why these exercises work, how to do them correctly, which movements to avoid, and get a complete roadmap for recovery.
Who gets hip bursitis and why you’re not alone
You’re not imagining things, and you’re definitely not alone. GTPS affects specific groups more than others:
- Women are 4 times more likely to develop this condition due to wider pelvic structure
- Peak age is 40-60 years when tendons start showing wear and tear
- Active people and sedentary people both can develop it for different reasons
- People with previous hip injuries often develop compensatory movement patterns that lead to GTPS
Understanding these patterns helps us fix the problem more effectively.
How to know if you really have GTPS
Before diving into exercises, let’s make sure you’re dealing with the right condition. True GTPS has specific characteristics that separate it from other hip problems.
GTPS self-assessment checklist
Check off symptoms that match your experience:
If you checked 6 or more boxes, you likely have GTPS. If you have fewer matches, consider seeing a healthcare provider to rule out other conditions.
Red flags: when to see a doctor immediately
Seek medical attention right away if you have:
- Severe pain (8/10 or higher) that doesn’t improve with rest
- Numbness, tingling, or weakness in your leg
- Pain that started after a fall or injury
- Fever along with hip pain
- Complete inability to bear weight on your leg
Understanding your risk factors
Knowing what puts you at risk helps prevent future episodes and guides your treatment approach.
| Risk factor | Impact level | Why it matters | What you can do |
|---|---|---|---|
| Female gender | High | Wider pelvis creates different hip mechanics | Focus on hip stabilizer strengthening |
| Age 40-60 | High | Peak time for tendon degeneration | Start prevention exercises early |
| Obesity/Overweight | High | Increased load on hip structures | Weight management + strengthening |
| Previous hip injury | High | Altered movement patterns | Address movement compensations |
| Leg length difference | Moderate | Uneven loading of hips | Consider shoe inserts, focus on weaker side |
| Sedentary lifestyle | Moderate | Weak gluteal muscles | Start with basic activation exercises |
| High-impact sports | Moderate | Repetitive stress on tendons | Proper warm-up and cross-training |
The “why” – understanding the root cause of your hip pain
Beyond the bursa: what’s really going on
Let’s clear up some confusion. Most people think “hip bursitis” means inflammation of a small fluid-filled sac (the bursa) on the outside of your hip. While this can happen, research now shows it’s usually not the main problem.
Current studies indicate that gluteal tendon problems are the primary cause of what we used to call “trochanteric bursitis.” Think of your hip like a busy intersection. Your gluteal tendons are like the traffic controllers, managing all the movement and stress that passes through. When these tendons get weak or overworked, they can’t do their job properly.
The modern understanding points to Greater Trochanteric Pain Syndrome (GTPS). This condition involves your gluteal tendons, particularly where they attach to the bony bump on the outside of your hip (the greater trochanter). When these tendons are weak, they create excessive stress on themselves and the surrounding tissues, including that bursa.
Why strengthening is your best bet
Your gluteal muscles are your hip’s natural shock absorbers and stabilizers. When they’re strong, they take pressure off the tender spots around your hip. When they’re weak, everything else has to work overtime.
Here’s a simple way to think about it: imagine your hip joint as a suspension bridge. Your gluteal muscles are the main support cables. If those cables are weak, the bridge starts to sag and stress the smaller support structures. Strengthen those main cables, and the whole system works better.
This isn’t just theory. Your body has an amazing ability to adapt and heal when you give it the right tools.
The evidence is in: treatment comparison
Recent systematic reviews comparing different treatments show clear winners and losers for long-term outcomes.
| Treatment | Short-term relief (0-6 weeks) | Long-term outcomes (6+ months) | Side effects | Typical cost |
|---|---|---|---|---|
| Exercise therapy | Moderate (starts week 2-4) | Excellent (sustained improvement) | Minimal muscle soreness | Low ($0-50) |
| Corticosteroid injections | High (immediate-2 weeks) | Poor (symptoms often return) | Joint damage risk, infection risk | Medium ($200-500) |
| Physical therapy | Good (2-6 weeks) | Excellent (with exercise compliance) | Minimal | Medium-High ($300-1200) |
| Shock wave therapy | Moderate (3-6 weeks) | Good (variable results) | Temporary pain increase | High ($1000-3000) |
| Surgery | High (immediate) | Variable (50-80% success) | Infection, nerve damage, scar tissue | Very High ($5000-15000) |
The research is clear: exercise-based treatments provide the best long-term value. One key study found that patients who did specific strengthening exercises had significantly better global improvement ratings than those who received injections. The exercise group maintained their gains over time, while the injection group often saw their pain return.
This makes sense when you think about it. Injections are like putting a band-aid on a leaky pipe. Exercise fixes the pipe itself.
Your complete exercise program: the 7 superior exercises
Before we start, let’s talk about pain management during exercises. Some discomfort is normal when building strength, but you need to stay within safe limits.
Exercise pain scale guidelines
- 0-3/10: Green light – continue exercising
- 4-5/10: Yellow light – reduce intensity but continue
- 6+/10: Red light – stop and modify the exercise
Progressive exercise schedule
Your exercises will progress over time. Here’s your roadmap:
| Exercise | Beginner (Week 1-2) | Intermediate (Week 3-6) | Advanced (Week 7-12) | Maintenance |
|---|---|---|---|---|
| Glute Bridge | 2 sets x 8-10 reps | 3 sets x 12-15 reps | 3 sets x 15-20 reps + band | 2-3x/week |
| Clamshells | 2 sets x 8-10 per side | 3 sets x 12-15 + light band | 3 sets x 15-20 + medium band | 2-3x/week |
| Side-lying Leg Raise | 2 sets x 6-8 per side | 3 sets x 10-12 per side | 3 sets x 15-20 per side | 2-3x/week |
| Prone Hip Extension | 2 sets x 6-8 per side | 3 sets x 10-12 per side | 3 sets x 12-15 per side | 2-3x/week |
| Standing Hip Abduction | 2 sets x 8-10 per side | 3 sets x 12-15 per side | 3 sets x 15-20 + band | 2-3x/week |
| Wall Squat | 2 sets x 8-10 reps | 3 sets x 12-15 reps | 3 sets x 15-20 reps | 2-3x/week |
| Bird-Dog | 2 sets x 5-6 per side | 3 sets x 8-10 per side | 3 sets x 10-15 per side | 2-3x/week |
1. The glute bridge: your foundation for a stronger hip
Why it works: This exercise activates your gluteus maximus, the largest muscle in your body and the powerhouse of hip stability. When this muscle is strong, it takes pressure off the smaller structures around your hip that are causing pain.
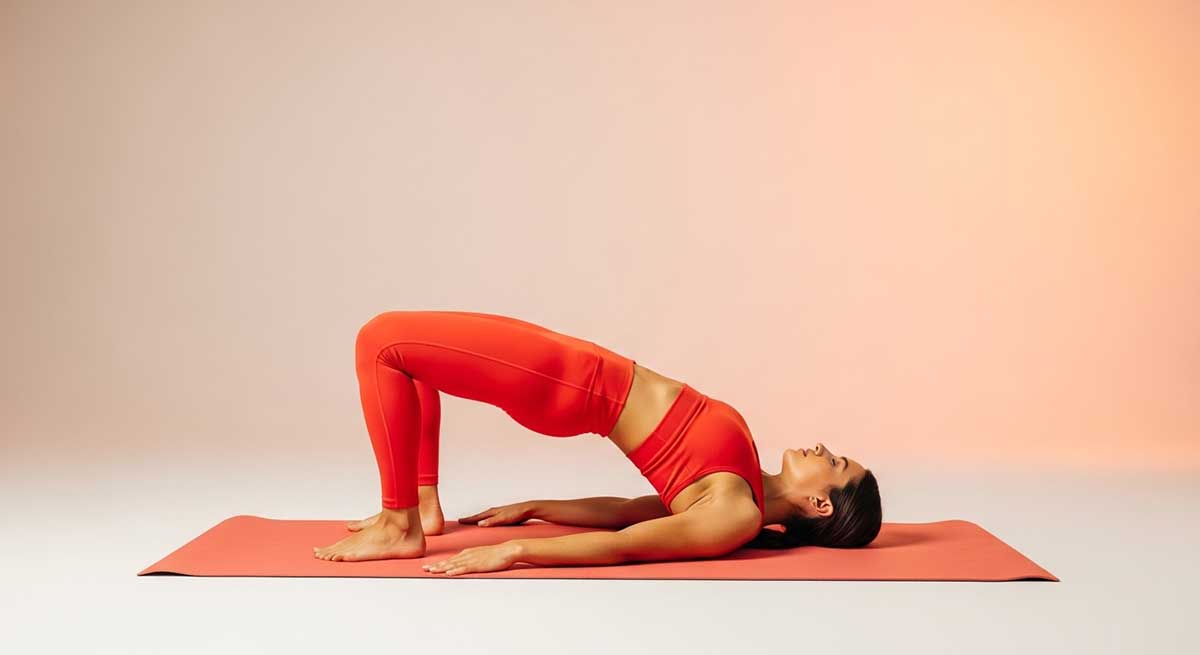
Step-by-step instructions:
- Lie on your back with knees bent and feet flat on the floor
- Keep your feet hip-width apart, about 12 inches from your glutes
- Squeeze your glute muscles and lift your hips up until your body forms a straight line
- Hold for 2-3 seconds at the top, focusing on the squeeze
- Lower slowly, taking 3 seconds to come down
- Don’t let your knees cave inward
Pro tips:
- Focus on squeezing your glutes, not arching your back
- Place a resistance band around your knees to also work your hip stabilizers
- Put a pillow between your knees and squeeze it for extra activation
Common mistakes:
- Lifting too high and arching the back
- Using momentum instead of muscle control
- Holding breath instead of breathing normally
2. Clamshell: target your hip’s hidden stabilizer
Why it works: The clamshell strengthens your gluteus medius, a smaller but vital muscle that keeps your pelvis level when you walk. When this muscle is weak, other structures have to compensate, leading to pain and dysfunction.
Step-by-step instructions:
- Lie on your side with knees bent at 45 degrees
- Keep your feet together and stack your hips
- Keep your core engaged to prevent rolling backward
- Lift your top knee while keeping your feet touching
- Hold for 1-2 seconds at the top
- Lower slowly and with control
Pro tips:
- Start without resistance, then add a band around your knees
- Keep your pelvis stable – don’t let it roll backward
- Focus on the muscles on the side of your hip doing the work
Troubleshooting:
- If you feel it in your back, engage your core more
- If it’s too easy, add a resistance band
- If it hurts, reduce the range of motion
3. Side-lying leg raise: build lateral hip strength
Why it works: This exercise directly targets the gluteus medius and minimus, the muscles responsible for moving your leg away from your body. These are often the weakest muscles in people with GTPS.
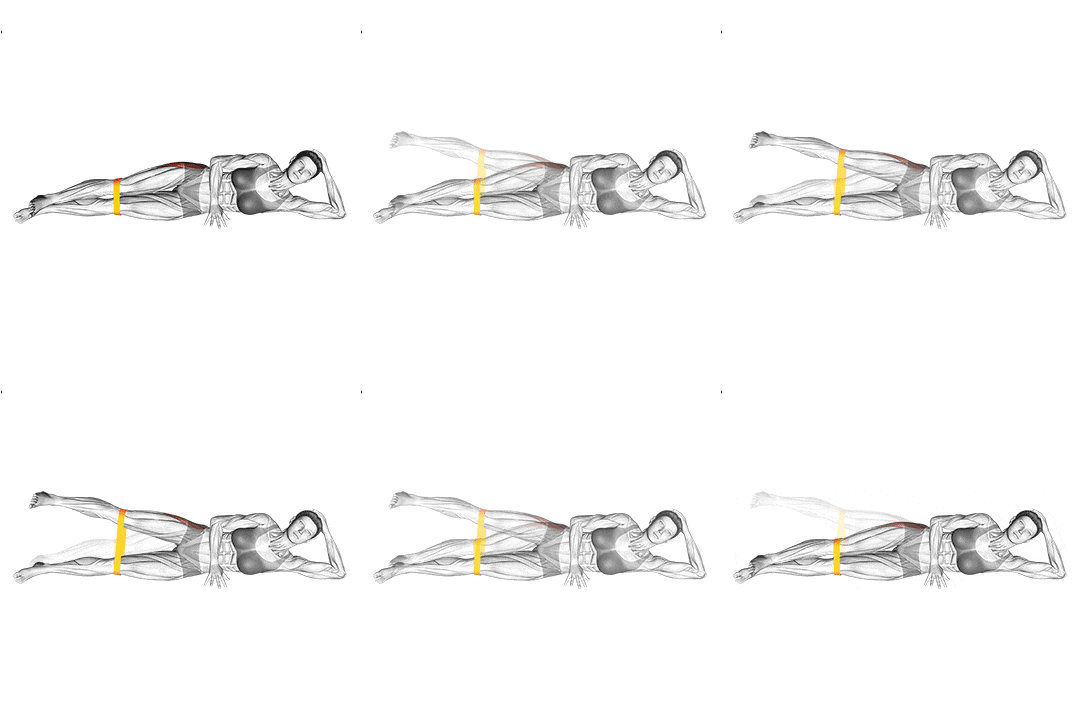
Step-by-step instructions:
- Lie on your side with your bottom leg slightly bent for support
- Keep your top leg straight and in line with your body
- Lift your top leg 6-8 inches, leading with your heel
- Don’t let your hip roll forward or backward
- Hold briefly at the top
- Lower with control, taking 2-3 seconds
Pro tips:
- Don’t lift too high – quality over quantity
- Keep your toes pointing forward, not up toward the ceiling
- Focus on feeling the muscles on the outside of your hip working
Modifications:
- Easier: Bend your top knee slightly
- Harder: Add an ankle weight or resistance band
4. Prone hip extension: isolate and strengthen your glutes
Why it works: This exercise isolates your gluteus maximus while keeping your hip in a neutral position. It’s excellent for people who have trouble feeling their glutes work in other exercises.
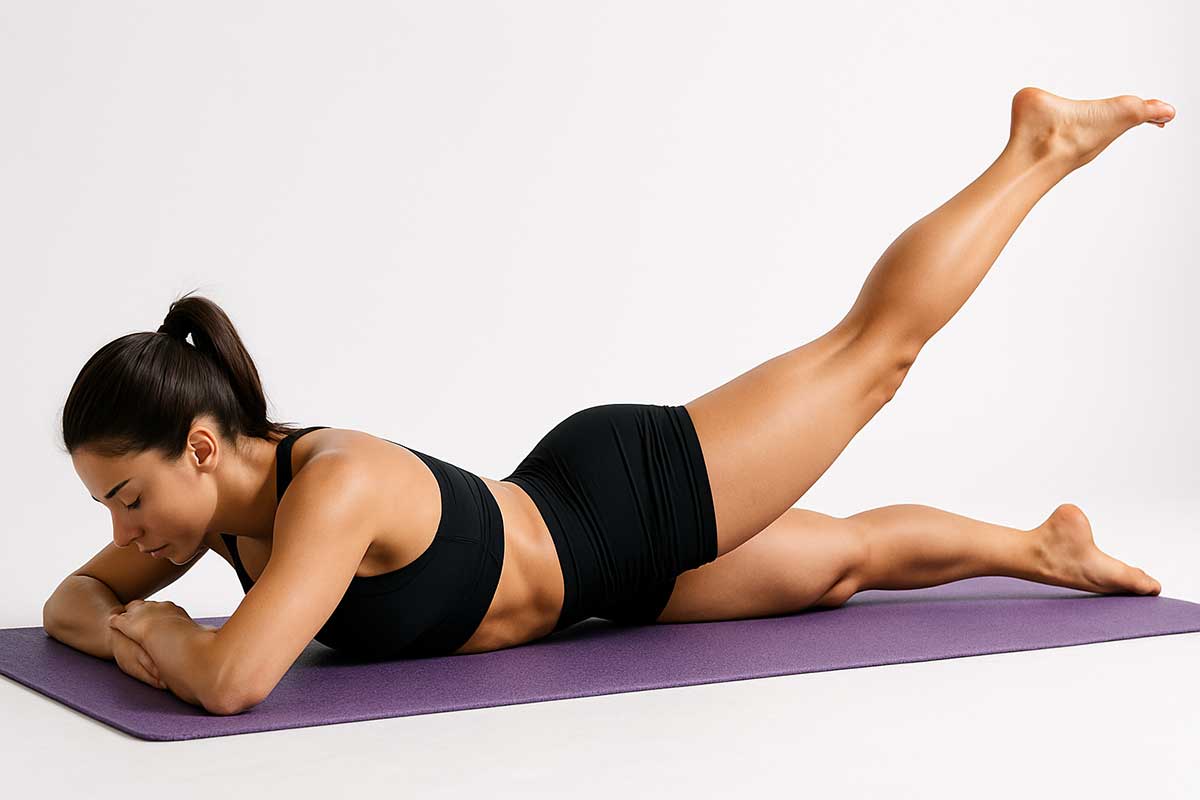
Step-by-step instructions:
- Lie face down on a firm surface (bed or exercise mat)
- Rest your forehead on your arms
- Keep one leg straight and lift it 4-6 inches off the ground
- Focus on squeezing your glute muscle, not your lower back
- Hold for 2 seconds
- Lower slowly
Pro tips:
- Keep your pelvis pressed against the floor
- If you feel your lower back working more than your glutes, lift your leg less high
- Tighten your core to prevent back extension
Warning signs:
- Back pain means you’re lifting too high or not engaging your core
- If you can’t feel your glutes, try squeezing them before lifting
5. Standing hip abduction: functional strength for daily life
Why it works: This exercise mimics movements you do every day, like stepping sideways or balancing on one leg. It strengthens your gluteus medius in a position that transfers directly to real-life activities.
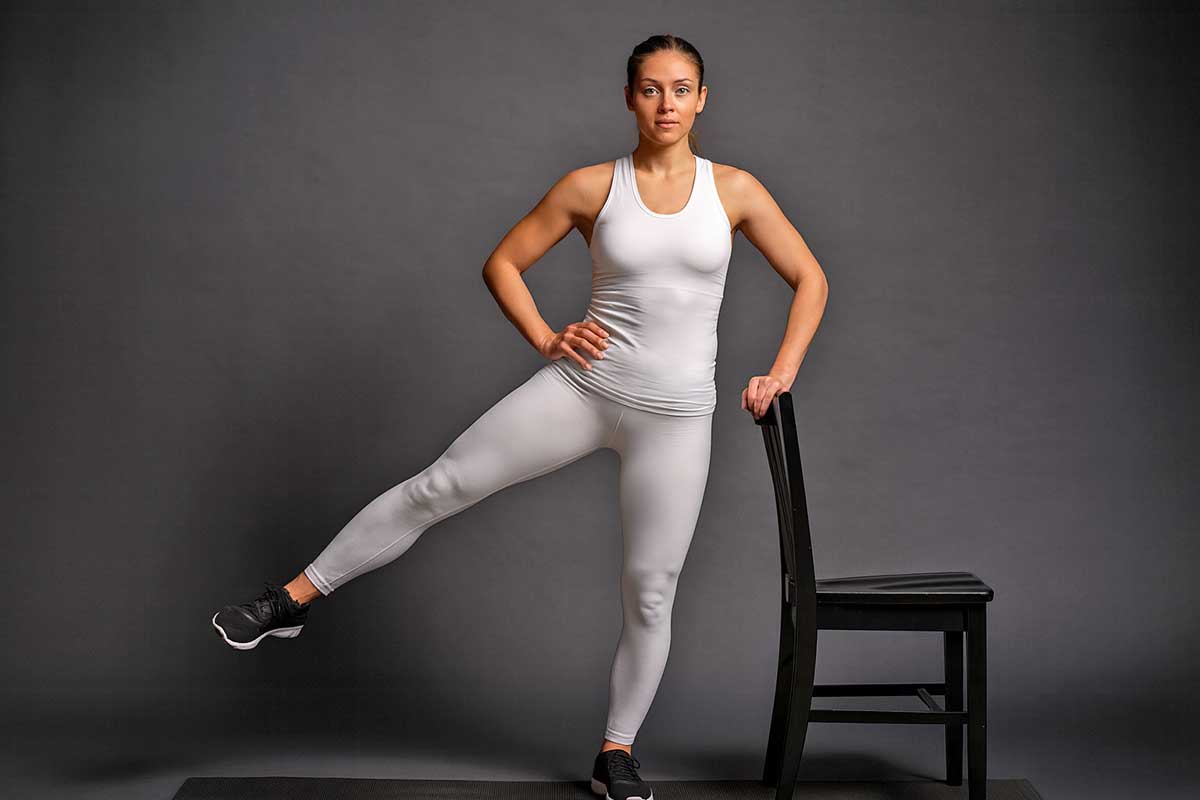
Step-by-step instructions:
- Stand with one hand on a wall or chair for light support (don’t lean heavily)
- Keep your standing leg slightly bent
- Lift your other leg out to the side 6-8 inches
- Keep your toes pointing forward and your trunk upright
- Hold for 1 second
- Lower with control
Pro tips:
- Don’t lean away from the moving leg
- Keep your trunk upright and focus on the muscles on the outside of your hip
- Start with body weight, then add a resistance band around your ankles
Progression options:
- Week 1-2: Use wall support
- Week 3-4: Light fingertip touch for balance only
- Week 5+: No hand support, add resistance band
6. Wall squat with ball: safe lower body strengthening
Why it works: This variation allows you to strengthen your quads and glutes without putting excessive stress on your hip joint. The ball provides support and feedback for proper form while building functional strength.
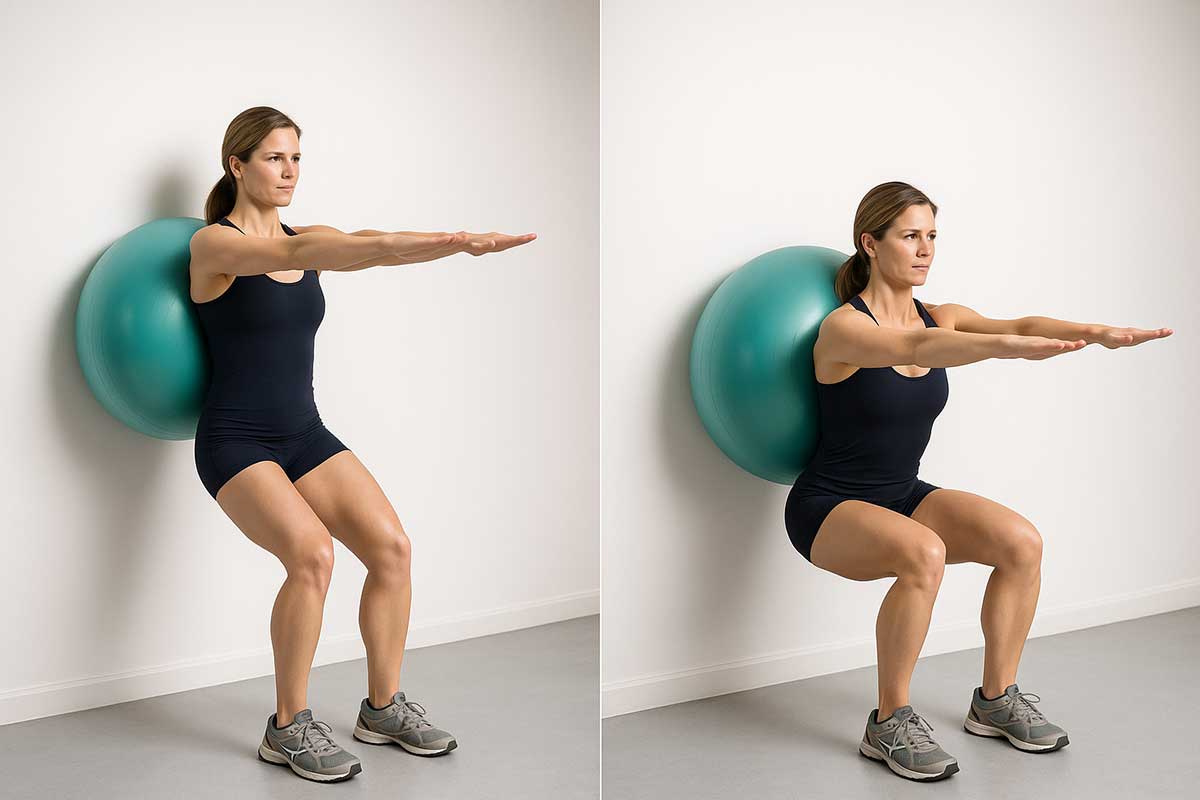
Step-by-step instructions:
- Place a stability ball (or pillow) between your lower back and the wall
- Walk your feet out 12-18 inches and keep them hip-width apart
- Lower down as if sitting in a chair, keeping the ball in contact with your back
- Go down only as far as comfortable (usually 45-60 degrees)
- Keep your knees aligned over your ankles
- Push through your heels to return to standing
Pro tips:
- Don’t go too deep if it causes hip pain
- Focus on controlled movement and engaging your glutes as you stand up
- Keep your weight evenly distributed between both feet
Safety notes:
- Stop if you feel pain on the outside of your hip
- Don’t go deeper than 90 degrees at the knee
7. Bird-dog: core stability meets glute activation
Why it works: This exercise combines core stability with glute strengthening. A stable core allows your glutes to work more effectively, and this exercise trains both systems to work together like they do in real life.
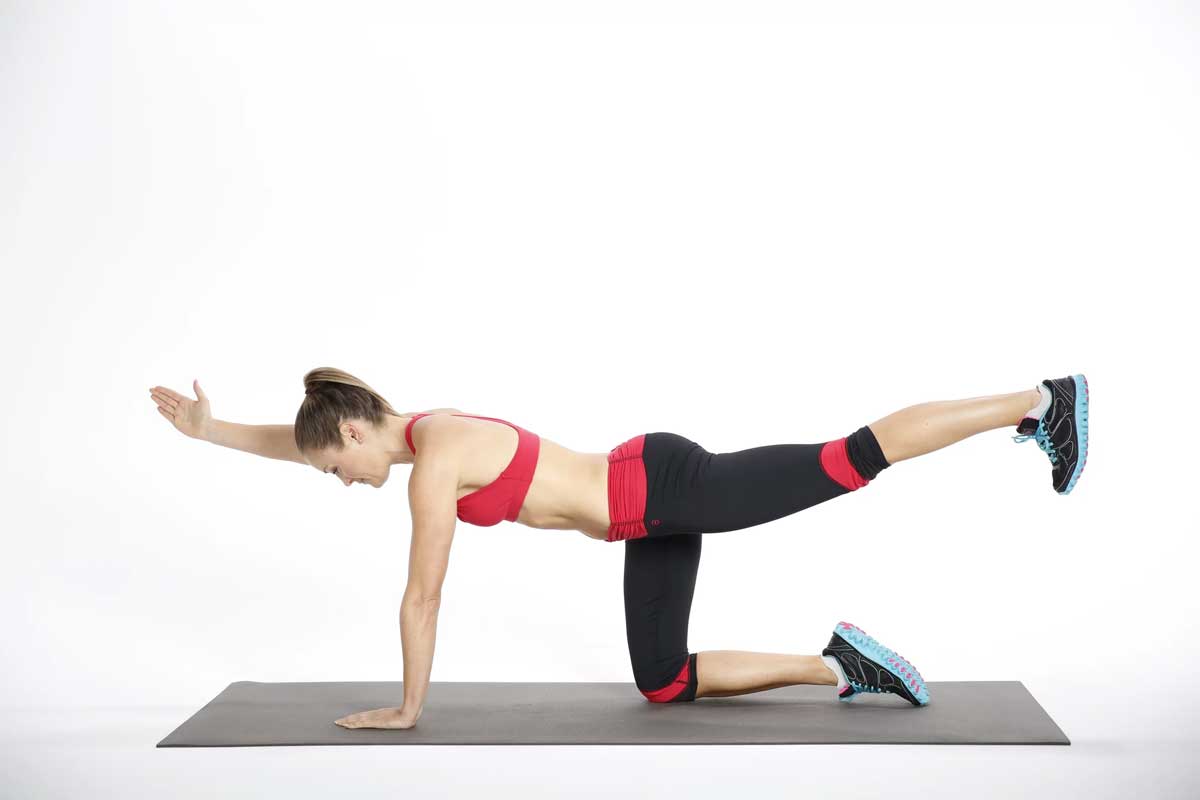
Step-by-step instructions:
- Start on your hands and knees with neutral spine
- Engage your core muscles
- Slowly extend your opposite arm and leg simultaneously
- Hold for 3-5 seconds while maintaining balance
- Focus on keeping your hips level and spine straight
- Return to starting position slowly
- Switch sides
Pro tips:
- Focus on keeping your hips level and your core engaged
- Start by just lifting one limb at a time if the full version is too challenging
- Don’t rush the movement – control is more important than speed
Common issues:
- Hip hiking: Focus on keeping hips level
- Back arching: Engage core more, reduce range of motion
- Loss of balance: Start with single-limb movements
Exercise troubleshooting guide
“I can’t feel my glutes working”
This is common, especially if you’ve been inactive or have chronic pain. Try these activation techniques:
Pre-exercise activation:
- Lie on your side and squeeze your glute muscles for 5 seconds, 10 times
- Do 10 gentle glute bridges before your main exercises
- Place your hand on your glute to feel it contract
During exercise:
- Slow down your movements
- Reduce range of motion and focus on muscle contraction
- Try the exercises with your hand on your glute to feel it working
“The exercises hurt”
Pain during exercise needs immediate attention:
For hip pain during exercise:
- Reduce range of motion by 50%
- Slow down the movement
- Try the easiest version of each exercise
- Stop if pain exceeds 3/10
For other areas:
- Back pain: Engage core more, reduce range of motion
- Knee pain: Check foot position and alignment
- General soreness: Normal for new exercise, should improve in 2-3 days
“I’m not seeing progress”
Progress in GTPS recovery can be subtle. Look for these improvements:
- Week 1-2: Better sleep, less morning stiffness
- Week 3-4: Easier to get up from chairs, less pain with daily activities
- Week 6-8: Improved walking tolerance, less night pain
- Week 10-12: Return to higher-level activities
If you don’t see any improvements by week 4, consider:
- Increasing exercise frequency
- Adding resistance to exercises
- Consulting a physical therapist
- Checking for other contributing factors
Your weekly exercise schedule
Consistency beats intensity when it comes to GTPS recovery. Here’s your week-by-week plan:
Weeks 1-2: Foundation building
Schedule:
- Monday: Exercises 1-3 (15 minutes)
- Tuesday: Gentle walking (10-15 minutes)
- Wednesday: Exercises 4-7 (15 minutes)
- Thursday: Rest or gentle stretching
- Friday: Full routine (20 minutes)
- Weekend: Light activity, avoid prolonged sitting
Goals:
Learn proper form, establish routine, begin pain reduction
Weeks 3-6: Building strength
Schedule:
- Monday: Full routine (25 minutes)
- Tuesday: Walking or swimming (20-30 minutes)
- Wednesday: Full routine (25 minutes)
- Thursday: Light activity or gentle stretching
- Friday: Full routine (25 minutes)
- Weekend: Recreational activities as tolerated
Goals:
Increase strength, improve function, reduce pain further
Weeks 7-12: Advanced strengthening
Schedule:
- Monday/Wednesday/Friday: Advanced routine (30 minutes)
- Tuesday/Thursday: Cross-training activities
- Weekend: Return to recreational activities
Goals:
Build robust strength, prevent recurrence, return to full activities
Maintenance phase (12+ weeks)
Schedule:
- 3x per week: Maintenance exercises (20 minutes)
- Regular activity: Return to sports and activities with good form
The “what not to do” – exercises and habits to avoid
Understanding what to avoid is just as important as knowing what to do. Certain movements can compress or irritate the already sensitive tissues around your hip.
Why some movements hurt
When you have GTPS, the tissues on the outside of your hip are sensitive to compression and stretching. Movements that bring your knee across your body or put you in deep hip flexion can squeeze these tissues against the bone, increasing pain and inflammation.
The complete “avoid for now” list
| Activity/Exercise | Why to Avoid | Safe Alternative |
|---|---|---|
| Deep squats below 90° | Excessive hip flexion compresses tissues | Wall squats to 45-60° |
| Lunges with deep range | Hip flexion + loading | Stationary lunges with shallow depth |
| Running/jogging | High-impact repetitive loading | Walking, swimming, cycling |
| Jumping exercises | High-impact forces | Step-ups, marching |
| Aggressive hip stretching | Can compress bursa | Gentle stretching only |
| IT band stretching | Compresses lateral hip structures | Focus on hip flexor stretches |
| Side-lying with affected hip down | Direct pressure on painful area | Sleep on back or unaffected side |
| Prolonged sitting | Hip flexor tightening | Stand/walk every 30 minutes |
| Stairs (when painful) | Single-leg loading with hip flexion | Use handrail, go slowly |
Sleep position optimization
Poor sleep positions can undo your daily progress. Here’s how to sleep comfortably:
Best positions:
- Back sleeping: Pillow under knees for support
- Unaffected side: Pillow between knees, pillow supporting affected leg
- Slight elevation: Small pillow under affected hip for support
Avoid:
- Sleeping directly on the affected side
- Crossing your legs while sleeping
- Sleeping on your stomach (causes hip extension)
Pain management recipes
Acute phase recipe (weeks 1-2)
Morning routine (10 minutes):
- Gentle heat application: warm shower or heating pad (10 minutes)
- 5 gentle glute bridges to “wake up” the muscles
- 2-minute gentle walk around the house
Afternoon check-in (5 minutes):
- Stand and walk for 2 minutes every hour
- Gentle hip circles (10 each direction)
- Check your sitting posture
Evening wind-down (15 minutes):
- Exercise routine as scheduled
- Ice if swollen or very painful (15 minutes)
- Gentle self-massage around the hip (avoid direct pressure on painful spot)
Recovery phase recipe (weeks 3-8)
Daily essentials:
- Exercise routine 3x per week minimum
- Daily walk: start at 10 minutes, increase by 2 minutes weekly
- Hourly movement breaks during prolonged sitting
- Heat before exercise, ice after if needed
Weekly progress check:
- Rate your pain from 1-10 each morning
- Note improvements in daily activities
- Track exercise progression
Maintenance phase recipe (week 8+)
Ongoing prevention:
- Strength exercises 2-3x per week
- Regular cardiovascular exercise
- Workplace ergonomics check monthly
- Annual “tune-up” with exercises if pain returns
Lifestyle modifications for faster healing
Workplace ergonomics checklist
If you sit at a desk:
If you stand at work:
Daily activity modifications
Getting in/out of cars:
- Sit down first, then swing both legs in together
- Use your arms to help lift yourself out
- Avoid twisting while seated
Stairs:
- Use handrail for support
- Go slowly, especially going down
- Lead with your stronger leg going up
- Consider taking stairs one at a time initially
Household tasks:
- Avoid prolonged standing activities
- Use a stool when cooking or doing dishes
- Take breaks during cleaning
- Ask for help with heavy lifting
Footwear recommendations
Good choices:
- Athletic shoes with good arch support
- Low-heeled shoes (under 2 inches)
- Shoes that don’t slip at the heel
- Custom orthotics if you have flat feet or high arches
Avoid:
- High heels over 2 inches
- Completely flat shoes with no support
- Worn-out shoes with compressed heels
- Flip-flops for extended walking
Nutrition for tendon health
While exercise is the primary treatment, good nutrition supports the healing process.
Anti-inflammatory foods to include
Daily staples:
- Fatty fish: Salmon, mackerel, sardines (2-3x per week)
- Colorful vegetables: Berries, leafy greens, bell peppers
- Healthy fats: Olive oil, avocados, nuts
- Lean proteins: Chicken, turkey, beans, quinoa
Hydration goals:
- 8-10 glasses of water daily
- Extra water before and after exercise
- Limit alcohol, which can interfere with healing
Foods that may increase inflammation
Limit these:
- Processed foods high in sugar
- Trans fats and excessive saturated fats
- Excessive alcohol
- High-sodium processed foods
Supplement considerations
Possibly helpful (discuss with your doctor):
- Omega-3 fatty acids (1000-2000mg daily)
- Vitamin D (if deficient)
- Magnesium for muscle function
- Curcumin for anti-inflammatory effects
Important: Supplements aren’t magic bullets. Focus on a healthy diet first, and always discuss supplements with your healthcare provider.
Technology and tools to support your recovery
Helpful smartphone apps
Exercise tracking:
- General fitness apps for logging workouts
- Timer apps for exercise intervals
- Habit tracking apps for consistency
Pain management:
- Pain diary apps for tracking patterns
- Meditation apps for stress management
- Sleep tracking for recovery monitoring
Equipment that can help
Basic equipment (optional but helpful):
- Resistance bands: Light, medium, and heavy
- Stability ball for wall squats
- Yoga mat for floor exercises
- Heating pad and ice packs
Advanced equipment:
- Foam roller for general muscle care (avoid direct pressure on hip)
- Massage ball for trigger points
- Therabands for progressive resistance
When technology hurts
Wearable device warnings:
- Step counters might encourage too much too soon
- Don’t use pain as motivation to push through
- Focus on consistency over high numbers
Return-to-activity guidelines
Getting back to your favorite activities requires a gradual, systematic approach.
General return-to-activity principles
- Pain-free before progression: Don’t advance to the next level if you’re still having significant pain with current activities
- Gradual increase: Increase activity by no more than 10% per week
- Listen to your body: Some mild discomfort is normal, but sharp or increasing pain means slow down
- Maintain strength exercises: Continue your strengthening routine even after returning to activities
Walking and hiking return protocol
- Week 1-2: Start with 10-15 minutes flat walking
- Week 3-4: Increase to 20-30 minutes, add gentle hills
- Week 5-8: Build to pre-injury walking duration
- Week 9+: Add backpack weight gradually if hiking
Red flags: Stop and reassess if you have increased hip pain during or after walking
Running return protocol
Prerequisites:
- Pain-free walking for 45+ minutes
- Completed 6+ weeks of strengthening
- No morning stiffness
Progression:
- Week 1: Walk 10 minutes, jog 1 minute, repeat 3x
- Week 2: Walk 5 minutes, jog 2 minutes, repeat 4x
- Week 3: Walk 5 minutes, jog 5 minutes, repeat 3x
- Week 4: Continuous jogging for 15-20 minutes
- Week 5+: Gradually increase distance by 10% per week
Cycling guidelines
Good news: Cycling is usually well-tolerated earlier in recovery
Setup considerations:
- Proper bike fit to avoid hip flexion extremes
- Start with flat terrain
- Gradually increase duration before increasing intensity
Progression:
- Start with 15-20 minutes easy cycling
- Increase by 5-10 minutes per week
- Add hills after 4+ weeks of flat riding
Strength training return
Bodyweight first:
- Master all 7 exercises in this program
- Add resistance bands or light weights
- Focus on perfect form over heavy weight
Gym return protocol:
- Weeks 1-2: Upper body and core exercises only
- Weeks 3-4: Add light lower body exercises (avoid deep squats)
- Weeks 5-8: Gradually return to full lower body routine
- Week 9+: Return to previous weights gradually
Exercises to modify:
- Squats: Limit depth to comfortable range
- Lunges: Use shorter stride, less depth
- Deadlifts: Start with light weight, perfect form
Yoga and pilates modifications
Generally safe:
- Gentle hip flexor stretches
- Core strengthening exercises
- Balance and stability work
Modify or avoid:
- Deep hip stretches
- Poses that compress the outer hip
- High-impact or jumping movements
Progress tracking tools
Daily pain and function log
Keep a simple log for the first 8 weeks to track your progress:
Daily ratings (1-10 scale):
- Morning pain level
- Worst pain during the day
- Pain interference with daily activities
- Sleep quality
- Overall mood/motivation
Weekly function check:
- Getting up from chairs
- Walking tolerance
- Stair climbing comfort
- Sleep position options
- Exercise tolerance
Exercise log template
Track your exercise progression:
For each exercise session:
- Date and time
- Exercises completed
- Sets and repetitions achieved
- Resistance level used
- Pain during exercise (0-10)
- Notes about form or difficulty
Milestone celebrations
Recognize your progress with these milestones:
- Week 2: Completing first full week of exercises
- Week 4: First pain-free morning
- Week 6: Walking 30 minutes without increased pain
- Week 8: Sleeping comfortably on both sides
- Week 12: Returning to recreational activities
- 6 months: Full recovery and prevention routine established
When to see a professional
Consider consulting a physical therapist or doctor if:
- Your pain is severe (7/10 or higher) and doesn’t improve with rest
- You experience numbness or tingling in your leg
- Your symptoms don’t improve after 4-6 weeks of consistent exercise
- You’re unsure about proper exercise form
Conclusion
Taking control of your hip pain through targeted strengthening exercises is more powerful than relying on temporary fixes like corticosteroid injections. The seven exercises outlined here work because they address the root cause of your pain: weak gluteal muscles that can’t properly support your hip.
Remember, you’re not just treating symptoms—you’re building a stronger, more resilient body that can handle the demands of daily life. While injections might offer quick relief, these exercises offer something better: lasting improvement and the confidence that comes from taking an active role in your recovery.
FAQs
How long until I see results?
Realistic timeline:
- Week 1-2: Some improvement in morning stiffness
- Week 4-6: Noticeable reduction in daily pain
- Week 8-12: Significant functional improvement
- 3-6 months: Near-complete recovery for most people
Factors that affect healing speed:
- Your baseline fitness level
- Consistency with exercises
- Severity of initial symptoms
- Other health conditions
- Stress levels and sleep quality
Can I exercise through pain?
Safe pain levels:
- 0-3/10: Safe to continue
- 4-5/10: Reduce intensity but continue
- 6+/10: Stop and modify
Type of pain matters:
- Muscle fatigue/soreness: Usually okay
- Sharp, shooting pain: Stop immediately
- Pain that increases during exercise: Stop and reassess
Will this come back?
Recurrence rates:
- Without ongoing strength maintenance: 30-50% recurrence
- With consistent maintenance exercises: Less than 15% recurrence
Prevention strategies:
- Continue strength exercises 2-3x per week long-term
- Maintain good movement patterns
- Address risk factors (weight, activity modifications)
- Early intervention if symptoms return
Do I need physical therapy?
You might benefit from PT if:
- You’re not seeing improvement after 4-6 weeks
- You have other musculoskeletal issues
- You need help with proper exercise form
- You want a personalized exercise progression
- You have access and it fits your budget
You can probably self-manage if:
- You’re seeing steady improvement with these exercises
- You’re comfortable with exercise form
- You don’t have other complicated health issues
- You’re motivated to maintain consistency
What about massage, acupuncture, or other treatments?
May be helpful as add-ons:
- Massage (avoid direct pressure on painful area)
- Acupuncture for pain management
- Heat therapy
- Gentle yoga or tai chi
Primary focus should remain:
- Strengthening exercises (most important)
- Activity modification
- Gradual return to activities
Treatments with limited evidence:
- Ultrasound therapy
- Electrical stimulation
- Most topical creams or gels


