Tight hips and hamstrings affect millions of people, especially those who spend long hours sitting or engage in repetitive activities like running.
The good news is that yoga offers a scientifically-backed solution that doesn’t require hours of your day. Research shows that regular yoga practice significantly improves hamstring and spinal flexibility, even with sessions as brief as 90 minutes per week. One study of women around age 52 found meaningful gains in sit-and-reach flexibility after just six weeks of weekly Iyengar yoga sessions.
But what if you could see results with even less time? This guide presents a simple, effective 15-minute daily routine featuring 8 specific yoga poses designed to target and release tension in your hips and hamstrings. The secret isn’t in marathon stretching sessions – it’s in consistency. Short, regular practice yields real, lasting results that you’ll feel in your daily movements.
What the Research Shows: The Science Behind Yoga for Flexibility
Study Results That Will Surprise You
The evidence for yoga’s flexibility benefits is stronger than you might think. A comprehensive 16-week study showed participants improved their sit-and-reach test scores by 3.5 centimeters and their groin and hip flexibility by an impressive 6 centimeters. That’s enough improvement to go from struggling to touch your toes to comfortably reaching past them.
College athletes practicing yoga just twice per week for 12 weeks showed significant improvements in their Functional Movement Screen scores – a test that measures how well your body moves through basic patterns. The yoga group outperformed control groups doing traditional stretching routines.
Even more encouraging, studies on older adults show that flexibility improvements can happen quickly. Participants stretching five times per week for just six weeks saw measurable gains in hamstring flexibility. Your age doesn’t disqualify you from becoming more flexible – consistency does the work.
Why Yoga Beats Traditional Stretching
Yoga doesn’t just stretch muscles – it trains your nervous system to relax and release tension. Traditional static stretching works, but yoga’s combination of breathing, gentle movement, and longer holds creates what researchers call “neurological adaptations.” Your brain literally learns to let your muscles lengthen more easily.
Studies comparing yoga to traditional stretching show yoga participants maintain their flexibility gains longer and report less muscle tension throughout the day. The mind-body connection makes all the difference.
The “Why” Before the “How”: Flexibility Explained
What’s the Difference Between Flexibility and Mobility?
These terms get thrown around a lot, but they’re not the same thing. Flexibility refers to your muscle’s ability to lengthen passively – think of how far you can reach toward your toes when someone gently pushes your back. Mobility, on the other hand, is your joint’s active range of motion – how far you can lift your leg on your own.
The yoga routine you’ll learn targets both. You’ll lengthen tight muscles while also improving your joints’ ability to move freely through their full range of motion.
Why Are My Hips and Hamstrings So Tight?
Your hip flexors and hamstrings weren’t designed for the modern lifestyle. When you sit for hours, your hip flexors shorten and tighten while your glutes “turn off.” Your hamstrings, meanwhile, stay in a shortened position, losing their natural length over time.
Add activities like running or cycling, and these muscles work hard but within a limited range of motion. The result? Chronic tightness that can contribute to lower back pain, poor posture, and restricted movement patterns.
The Biomechanics Behind the Tightness:
- Hip flexors adapt to shortened positions within 2-3 weeks of prolonged sitting
- Hamstrings lose sarcomeres (muscle fiber units) when not regularly stretched to full length
- Fascial tissue (connective tissue wrapping muscles) becomes dense and restrictive
- Neural tension develops, making muscles “guard” against stretching
The good news is that this tightness isn’t permanent. Studies show that older adults can improve hamstring flexibility with just five stretching sessions per week over six weeks. Your body wants to move – it just needs consistent encouragement.
Assess Your Starting Point: Flexibility Tests You Can Do at Home
Before starting any flexibility program, it helps to know where you stand. These simple tests will give you baseline measurements to track your progress.
Baseline Flexibility Assessment
| Test | How to Measure | Poor | Fair | Good | Excellent |
|---|---|---|---|---|---|
| Sit-and-Reach | Sit with legs extended, reach toward toes, measure distance from fingertips to toes | More than 15cm away | 10-15cm away | Touch toes to 5cm past | More than 5cm past toes |
| Hip Flexor Test (Thomas Test) | Lie on bed edge, pull one knee to chest, let other leg hang | Thigh lifts above horizontal | Thigh level with bed | Thigh drops below horizontal | Significant drop below horizontal |
| Hamstring 90/90 Test | Lie down, lift one leg to 90°, straighten knee | Less than 70° knee extension | 70-80° extension | 80-90° extension | Full extension (180°) |
| Hip Internal Rotation | Sit with knees bent, rotate feet outward | Less than 30° rotation | 30-35° rotation | 35-40° rotation | More than 40° rotation |
Testing Tips:
- Measure consistently at the same time of day
- Warm up with 5 minutes of light movement first
- Don’t force any position – measure your comfortable end range
- Take photos from the side for visual progress tracking
- Retest every 2 weeks
Your 15-Minute Daily Flexibility Routine
Perform each of the following poses as a sequence. Hold each pose for the recommended time, focusing on deep, steady breathing to relax into the stretch. Remember: you’re not trying to force your way into flexibility. Let your breath guide you deeper into each pose naturally.
Pose 1: Cat-Cow (Marjaryasana/Bitilasana)
Focus: Spinal Warm-up and Core Mobility
Duration: 90 seconds
Start on your hands and knees with your wrists under your shoulders and knees under your hips. As you inhale, drop your belly down while lifting your chest and tailbone toward the ceiling – this is Cow pose. As you exhale, round your spine toward the ceiling, tucking your chin to your chest – this is Cat pose.
Move slowly between these positions, letting your breath guide the movement. Complete 5-8 rounds, synchronizing each movement with your breathing.
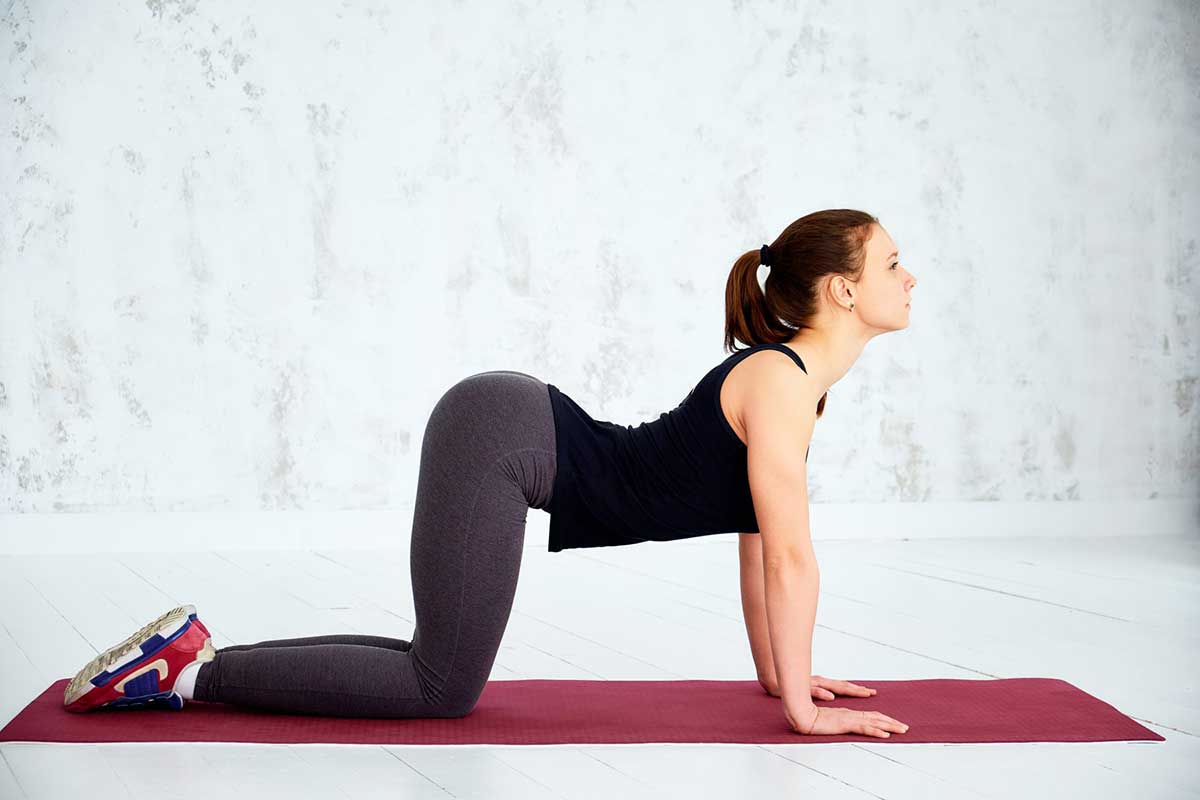
Why it Works: Cat-Cow gently awakens your spine and core muscles, preparing your body for deeper stretches. This movement improves blood flow to the area and helps establish the mind-body connection you’ll need for the poses ahead. Research shows that spinal mobility exercises like this can reduce lower back stiffness by up to 40% when done consistently.
Cat-Cow Modifications
| Limitation | Beginner Modification | Intermediate | Advanced |
|---|---|---|---|
| Knee pain | Place folded towel under knees | Use yoga mat | Full pose on hard surface |
| Wrist issues | Make fists and rest on knuckles | Hands flat with wrist support | Full weight on hands |
| Limited spinal mobility | Smaller range of motion | Moderate movement | Full flexion/extension |
| Pregnancy (2nd/3rd trimester) | Avoid deep belly drops | Gentle movements only | Traditional pose not recommended |
Pose 2: Downward-Facing Dog (Adho Mukha Svanasana)
Focus: Full-Body Stretch, Hamstring Lengthening
Duration: Hold for 60 seconds
From your hands and knees, tuck your toes under and lift your hips up and back. Your body should form an inverted V shape. Keep your hands firmly planted and your arms straight. Don’t worry if your heels don’t touch the ground – that will come with time.
Try “pedaling” your feet by bending one knee while straightening the other leg. This gentle movement helps awaken your hamstrings and calves.
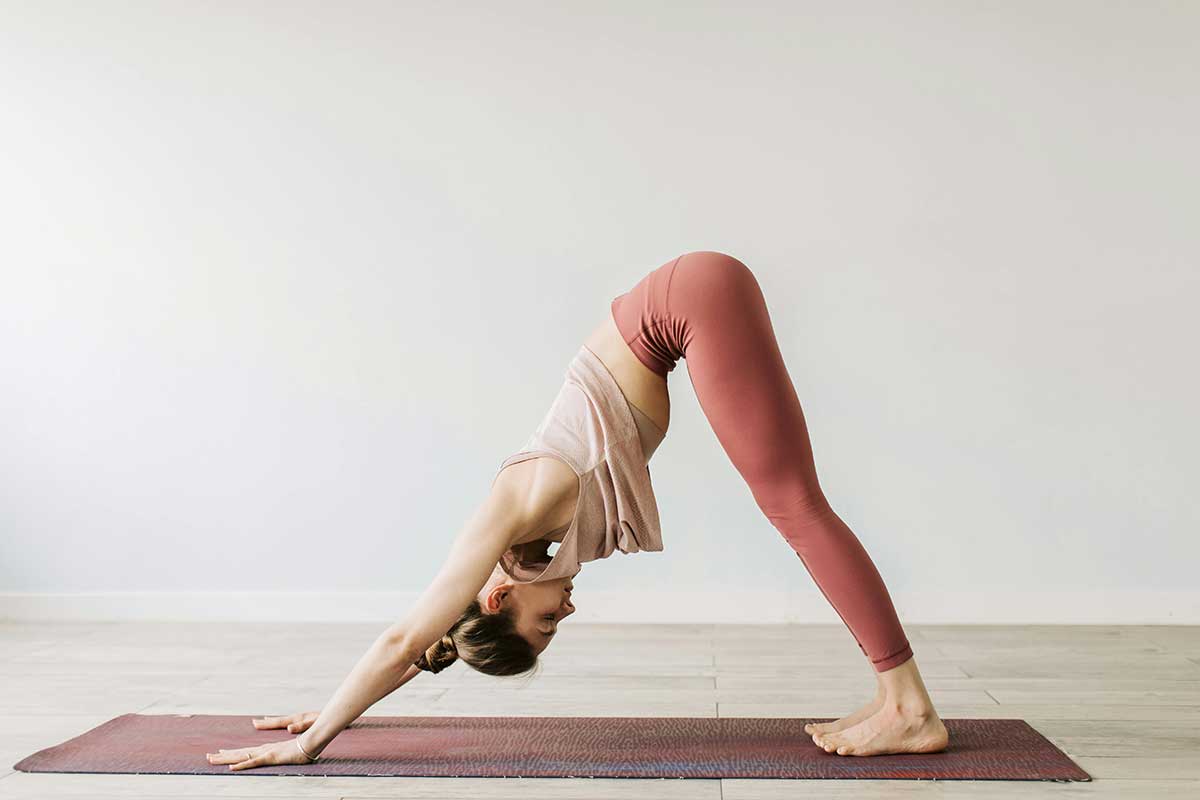
Why it Works: This pose stretches the entire posterior chain – the back of your body from your calves to your hamstrings and spine. It’s also an inversion, which means it reverses the effects of sitting and standing all day while building upper body strength. Studies show that poses targeting the posterior chain can improve hamstring flexibility by 15-20% over 8 weeks.
Downward Dog Modifications
| Limitation | Beginner Modification | Intermediate | Advanced |
|---|---|---|---|
| Tight hamstrings | Bend knees generously, focus on spine length | Slight knee bend, pedal feet | Straight legs, heels reaching down |
| Wrist pain | Use forearms (Dolphin prep) | Hands on yoga blocks | Full pose with firm foundation |
| Shoulder tightness | Hands wider than shoulders | Standard shoulder-width apart | Hands closer together |
| High blood pressure | Keep head higher, use blocks under hands | Brief holds only | Avoid if severe |
Pose 3: Low Lunge (Anjaneyasana)
Focus: Deep Hip Flexor Release
Duration: Hold for 45 seconds per side (90 seconds total)
From Downward-Facing Dog, step your right foot forward between your hands. Lower your left knee to the ground and untuck your left toes. Keep your right knee directly over your ankle – not pushing forward past your toes.
Place your hands on your front thigh or reach them overhead. Gently press your hips forward to deepen the stretch in your left hip flexor.
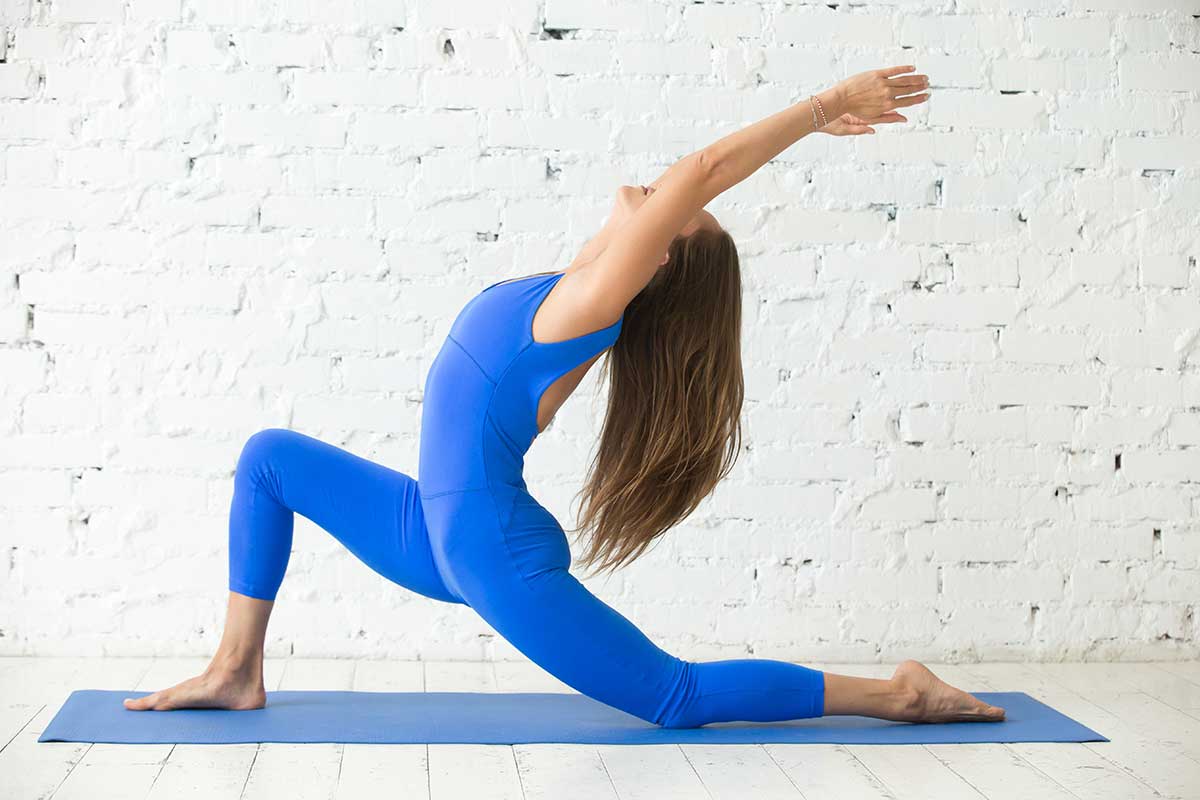
Alignment Tip: Keep your hips squared and facing forward. It’s tempting to let the back hip open to the side, but you’ll get a better stretch by keeping everything aligned.
Switch sides and repeat with your left foot forward.
Why it Works: This pose directly targets your hip flexors, the muscles that become chronically tight from prolonged sitting. Releasing tension here can immediately improve how your hips feel when you walk and stand. Research indicates that hip flexor stretches can reduce anterior pelvic tilt by an average of 6 degrees in office workers after 6 weeks of consistent practice.
Low Lunge Modifications
| Limitation | Beginner Modification | Intermediate | Advanced |
|---|---|---|---|
| Knee sensitivity | Extra padding under back knee | Towel under knee | No padding needed |
| Balance issues | Keep hands on front thigh | One hand on thigh, one reaching up | Both arms overhead |
| Hip tightness | Less forward hip movement | Moderate hip press | Deep hip flexor stretch |
| Lower back pain | Hands remain on thigh | Slight backbend only | Full backbend with arms up |
Pose 4: Half Splits (Ardha Hanumanasana)
Focus: Intense Hamstring Stretch
Duration: Hold for 45 seconds per side (90 seconds total)
From Low Lunge with your right foot forward, shift your hips back over your left knee. Straighten your right leg and flex your right foot, keeping your heel on the ground.
Place your hands on the ground on either side of your straight leg, or use yoga blocks for support. Keep your chest open and your back straight as you fold forward from your hips.
You should feel a deep stretch along the back of your straight leg. If it’s too intense, don’t hesitate to use blocks under your hands or bend your front knee slightly.
Switch sides and repeat with your left leg straight.
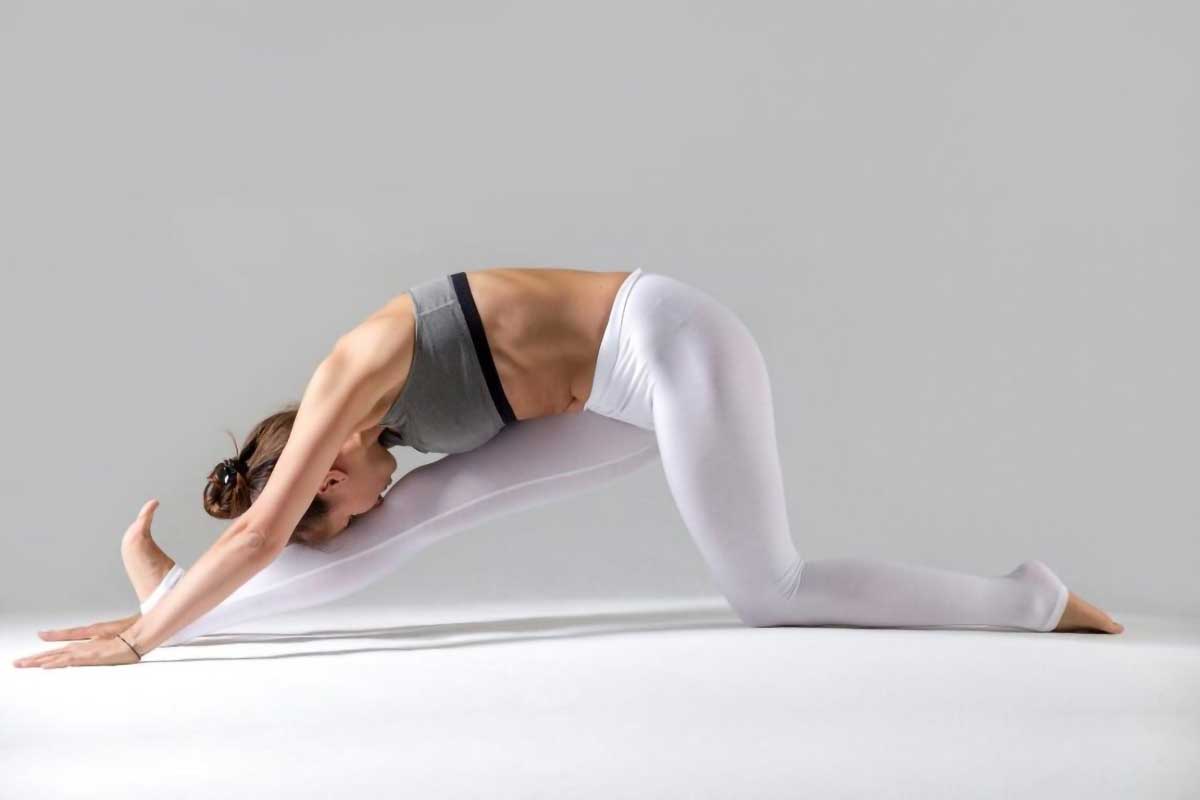
Why it Works: This pose isolates and lengthens the hamstring of your front leg. It’s essentially a supported version of touching your toes, making it one of the most effective poses for improving your sit-and-reach flexibility. Studies show that positions similar to Half Splits can improve hamstring extensibility by 12-18% over 6 weeks when practiced daily.
Half Splits Modifications
| Limitation | Beginner Modification | Intermediate | Advanced |
|---|---|---|---|
| Very tight hamstrings | Keep front knee bent, use high blocks | Slight front knee bend, blocks under hands | Straight leg, hands on floor |
| Lower back rounds | Higher hand support, less forward fold | Moderate fold with straight spine | Deep fold maintaining spine length |
| Balance challenges | Keep back toes tucked for stability | Traditional position | Add slight twist for challenge |
| Hip discomfort | Pad under back knee | Standard position | Hold longer or add gentle bounces |
Pose 5: Head to Knee Pose (Janu Sirsasana)
Focus: Hamstring, Groin, and Back Stretch
Duration: Hold for 60 seconds per side (120 seconds total)
Sit on the ground with your legs extended. Bend your right knee and place the sole of your right foot against your inner left thigh. Your right knee should rest on or near the ground.
Keeping your left leg straight, hinge forward from your hips toward your extended leg. Reach your hands toward your left foot, shin, or knee – wherever you can comfortably reach without rounding your back.
The key here is folding from your hips, not rounding your spine. Think of leading with your chest rather than your head.
Switch sides, bending your left knee and folding over your right leg.
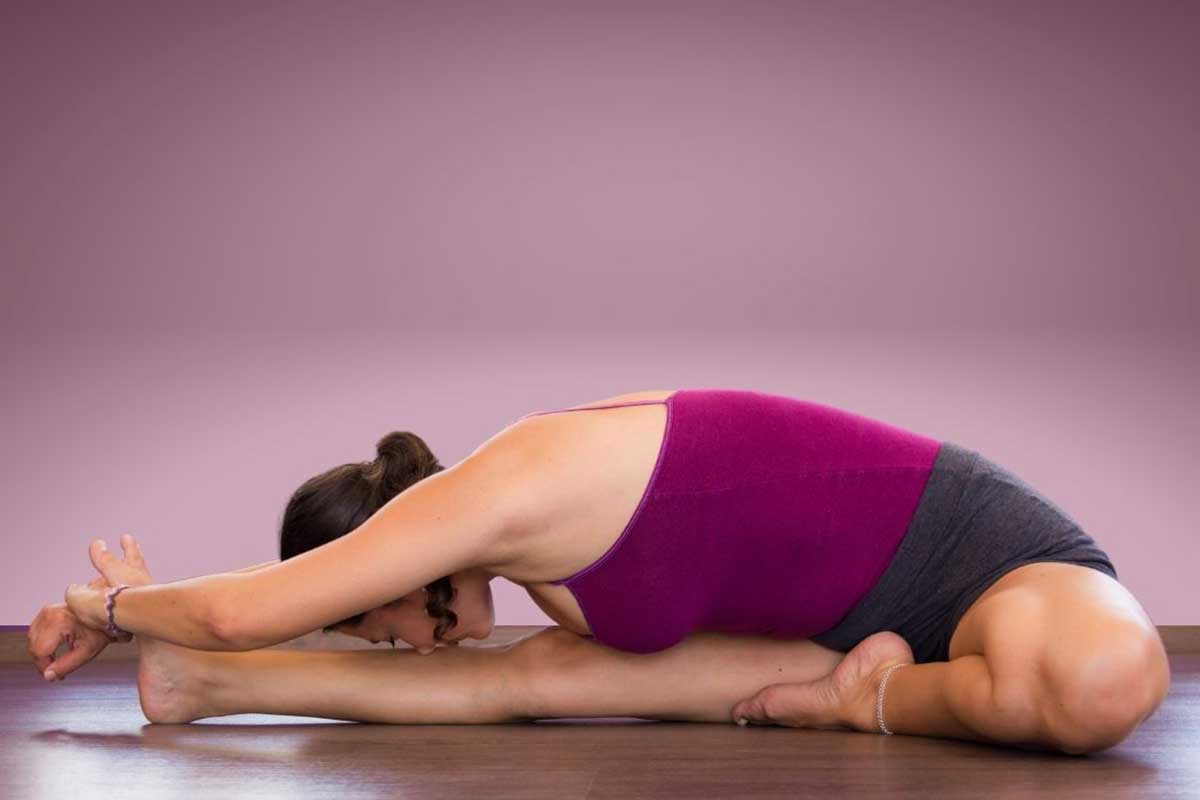
Why it Works: This forward fold stretches your hamstrings while the bent leg position opens your hips and inner thighs. The seated position also provides a gentle stretch for your spine and helps improve posture. The asymmetrical nature allows you to work on each leg individually, addressing imbalances that often develop from daily activities.
Head to Knee Modifications
| Limitation | Beginner Modification | Intermediate | Advanced |
|---|---|---|---|
| Can’t sit up straight | Sit on folded blanket or cushion | Small pillow under hips | Sit directly on floor |
| Bent knee won’t drop | Support knee with pillow/block | Let knee hang naturally | Knee rests on or near floor |
| Can’t reach foot | Use yoga strap around foot | Reach to shin or knee | Hands to foot or beyond |
| Tight hamstrings | Keep extended leg slightly bent | Straight leg, gentle forward fold | Deep fold with straight spine |
Pose 6: Lizard Pose (Utthan Pristhasana)
Focus: Deep Outer Hip and Groin Opener
Duration: Hold for 45 seconds per side (90 seconds total)
From a Low Lunge position with your right foot forward, place both hands inside your right foot. Walk your right foot slightly to the right, widening your stance.
You can stay on your hands, or for a deeper stretch, lower down to your forearms. Keep your back leg straight and strong, pressing through your heel.
This is an intense pose, so listen to your body. You might need to stay higher on your hands, and that’s perfectly fine.
Switch sides with your left foot forward.
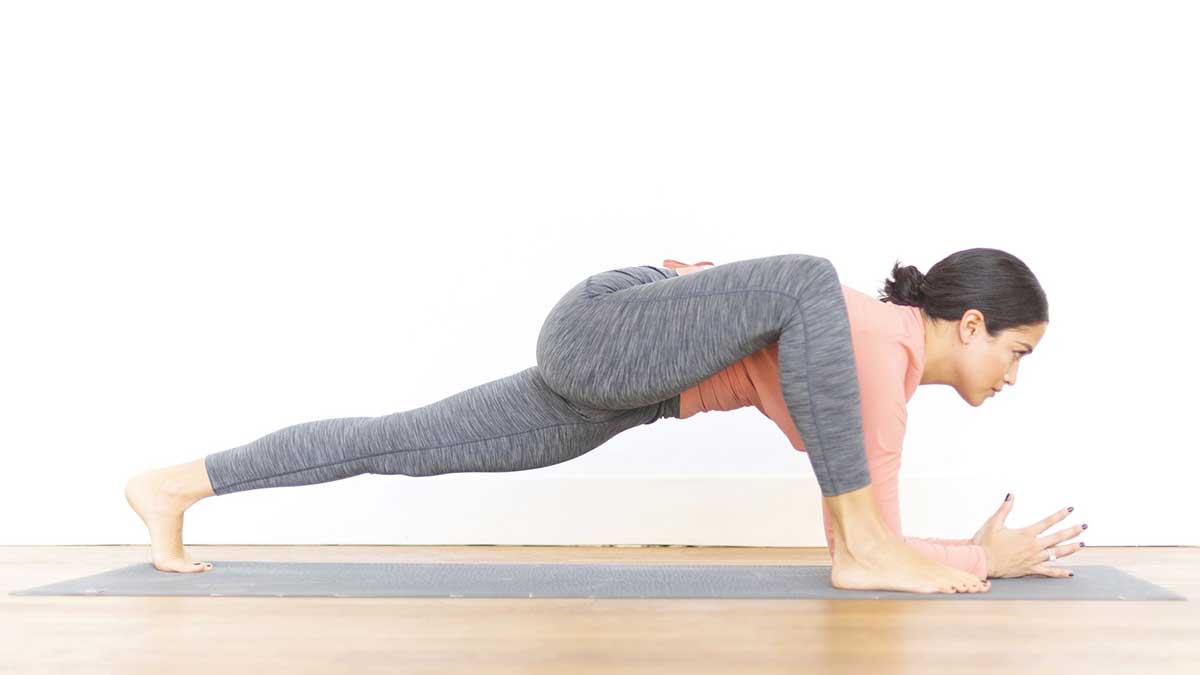
Why it Works: Lizard pose targets the deep muscles of your hip and groin – areas that often get missed by more straightforward stretches. This pose is particularly helpful if you experience outer hip tightness or IT band issues. Research shows that multi-planar hip stretches like Lizard pose can improve hip mobility in all directions by 20-25% over 8 weeks.
Lizard Pose Modifications
| Limitation | Beginner Modification | Intermediate | Advanced |
|---|---|---|---|
| Too intense | Stay on hands, use blocks | Lower to forearms briefly | Full forearm variation |
| Knee discomfort | Pad under back knee | Standard position | Add gentle hip circles |
| Wrist pain | Use forearms from start | Alternate between hands/forearms | Stay on hands with blocks |
| Hip tightness | Narrower front foot position | Standard wide stance | Wider stance or add side bend |
Pose 7: Happy Baby (Ananda Balasana)
Focus: Lower Back and Inner Groin Release
Duration: Hold for 60 seconds
Lie on your back and draw your knees toward your chest. Grab the outsides of your feet with your hands, or hold your ankles or shins if that’s more comfortable.
Gently draw your knees down toward the ground beside your ribcage. Keep your lower back pressed into the floor and your shoulders relaxed.
You can rock gently side to side if that feels good, massaging your lower back.
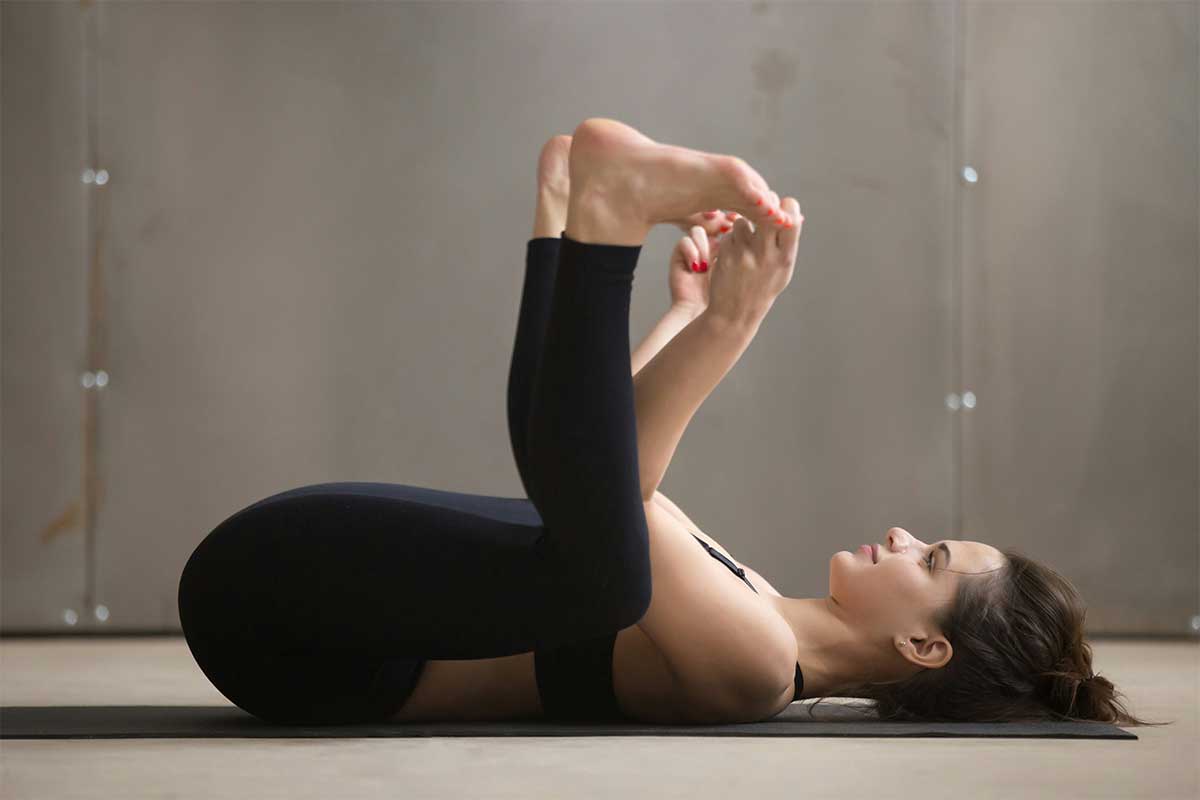
Why it Works: After all those hip-opening poses, Happy Baby provides a gentle release for your lower back and inner thighs. This pose also helps decompress your sacrum and can relieve tension built up from the more intense stretches. The supine position allows gravity to assist the stretch while keeping you completely supported.
Happy Baby Modifications
| Limitation | Beginner Modification | Intermediate | Advanced |
|---|---|---|---|
| Can’t reach feet | Hold behind thighs or use strap | Hold ankles or shins | Grab feet easily |
| Tight hips | Keep knees wider apart | Standard knee position | Draw knees closer to armpits |
| Lower back lifts | Support head with pillow | Keep tailbone down | Rock gently side to side |
| Neck tension | Small pillow under head | No pillow needed | Turn head gently side to side |
Pose 8: Reclined Spinal Twist (Supta Matsyendrasana)
Focus: Spinal Mobility and Glute Stretch
Duration: Hold for 60 seconds per side (120 seconds total)
Still lying on your back, extend your arms out to the sides in a T shape. Draw your right knee toward your chest, then cross it over to your left side, letting it rest on the ground.
Keep both shoulders pressed into the ground as you turn your head to the right (opposite direction from your knee). You should feel a gentle twist through your spine and a stretch in your right glute and outer hip.
Hold for 60 seconds, then switch sides by drawing your left knee to your chest and crossing it to the right.
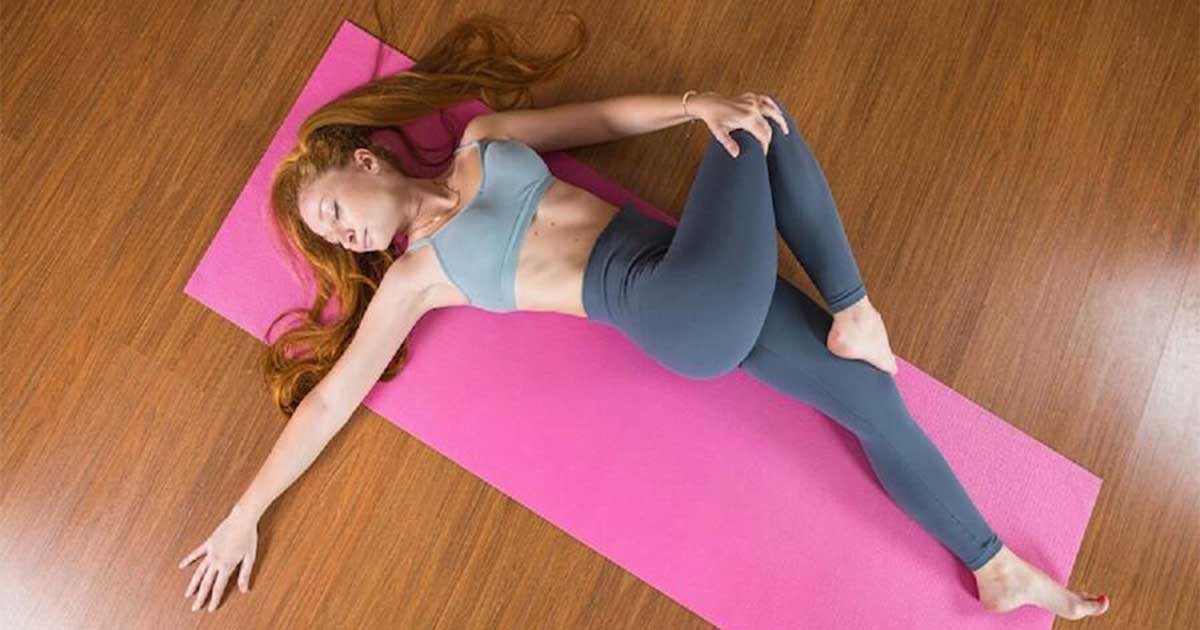
Why it Works: This gentle twist neutralizes your spine after all the forward folds and hip opening. It releases your outer hips and glutes while improving spinal mobility – the perfect way to end your flexibility routine. Spinal rotation exercises like this can improve thoracic spine mobility by 15-20% and help prevent the stiffness that develops from forward-focused activities.
Reclined Spinal Twist Modifications
| Limitation | Beginner Modification | Intermediate | Advanced |
|---|---|---|---|
| Knee won’t reach floor | Support knee with pillow | Let knee hang naturally | Knee rests on ground |
| Shoulders lift up | Don’t force the twist as deep | Moderate twist depth | Full twist with shoulders down |
| Neck discomfort | Keep head centered | Turn head gently | Full head turn opposite direction |
| Hip tightness | Smaller twist angle | Standard twist | Add gentle pressure to knee |
15-Minute Hip & Hamstring Flow
Prepare Your Space
Find your quiet space, grab any props you need, and take three deep breaths
Today's Hip & Hamstring Sequence:
- Cat-Cow - 90 seconds
- Downward-Facing Dog - 60 seconds
- Low Lunge - 90 seconds (both sides)
- Half Splits - 90 seconds (both sides)
- Head to Knee - 120 seconds (both sides)
- Lizard Pose - 90 seconds (both sides)
- Happy Baby - 60 seconds
- Reclined Spinal Twist - 120 seconds (both sides)
Routine Variations for Different Schedules and Goals
Life doesn’t always allow for a full 15-minute practice. Here are adaptations for various situations:
Express 8-Minute Morning Version
Perfect for busy weekdays:
- Cat-Cow (60 seconds)
- Downward Dog (45 seconds)
- Low Lunge – both sides (60 seconds total)
- Half Splits – both sides (90 seconds total)
- Happy Baby (60 seconds)
- Reclined Twist – both sides (90 seconds total)
Deep Stretch 25-Minute Weekend Version
When you have extra time:
- Hold each pose 50% longer
- Add transition movements between poses
- Include 5 minutes of meditation after the sequence
- Add extra hip-opening poses like Pigeon or Butterfly
Travel-Friendly No-Props Version
For hotel rooms and small spaces:
- Replace Half Splits with standing forward fold
- Use a towel instead of yoga blocks
- Do Lizard pose at the wall if floor space is limited
- All poses can be done in a 6×3 foot space
Desk-Worker Specific Sequence
Extra focus on areas tight from sitting:
- Double the time in Low Lunge (90 seconds per side)
- Add neck stretches between Cat-Cow rounds
- Include seated spinal twists
- End with legs up the wall pose if possible
Equipment Guide: What You Need (And What You Don’t)
Essential Props
| Item | Purpose | Cost Range | DIY Alternative | When You’ll Need It |
|---|---|---|---|---|
| Yoga blocks (2) | Support in seated poses and standing forward folds | $15-25 | Thick books or sturdy boxes | If you can’t touch the ground comfortably |
| Yoga strap | Assisted stretching, reaching feet in seated poses | $10-15 | Belt, towel, or resistance band | If you can’t grab your feet in poses |
| Bolster or firm pillow | Comfort in longer holds, knee support | $30-50 | Firm couch pillows or folded blankets | For knee comfort and relaxation poses |
| Non-slip yoga mat | Safety and comfort | $20-60 | Towel on carpet | If practicing on slippery surfaces |
Nice-to-Have Props
| Item | Purpose | Cost Range | DIY Alternative |
|---|---|---|---|
| Meditation cushion | Comfortable seated poses | $25-45 | Folded blanket or firm pillow |
| Yoga wheel | Deep backbends and massage | $40-80 | Not easily replaceable |
| Cork blocks | Eco-friendly, stable support | $25-35 | Foam blocks work just as well |
Money-Saving Tip: Start with DIY alternatives. Invest in proper equipment only after you’ve established a consistent practice and know what you actually use.
Progress Tracking: Milestones and Expectations
What to Expect Week by Week
| Week | Physical Changes | How to Measure | Mental/Emotional Changes | Notes |
|---|---|---|---|---|
| 1-2 | Reduced morning stiffness | Rate stiffness 1-10 daily | May feel challenged but motivated | Focus on form over depth |
| 3-4 | 1-2cm sit-and-reach improvement | Weekly measurement | Routine feeling more natural | Some temporary muscle soreness is normal |
| 5-6 | Easier daily movements (stairs, bending) | Functional movement assessment | Anticipating practice time | Noticeable habit formation |
| 7-8 | 3-4cm total improvement in tests | Formal reassessment | Feeling accomplished and strong | Others may notice posture improvements |
| 9-12 | 5-8cm improvement, significant daily ease | Photo comparisons helpful | Practice feels essential, not optional | Long-term benefits becoming clear |
Troubleshooting Common Problems
“I’m Not Getting More Flexible!”
Possible Causes:
- Not holding poses long enough (minimum 30 seconds needed for tissue change)
- Forcing poses instead of breathing into them
- Inconsistent practice (3+ days per week minimum)
- Not warming up adequately before deeper poses
Solutions:
- Focus on breath quality over pose depth
- Try practicing at different times of day (many people are more flexible in evening)
- Consider if stress, dehydration, or poor sleep are affecting flexibility
- Add 5 minutes of light movement before starting the routine
“My Back Hurts During Forward Folds”
Likely Issues:
- Rounding spine instead of hinging from hips
- Trying to touch toes before hamstrings are ready
- Sitting on tight hip flexors in seated poses
Solutions:
- Bend knees as much as needed in all forward folds
- Sit on a cushion or folded blanket to tilt pelvis forward
- Focus on lengthening spine before deepening forward bend
- Consider adding gentle backbends between forward folds
“I Feel Dizzy in Downward Dog”
Common Causes:
- Blood pressure changes from inversion
- Holding breath during the pose
- Coming up too quickly
Solutions:
- Hold pose for shorter periods initially (15-30 seconds)
- Focus on steady breathing throughout
- Come to hands and knees before sitting back or standing
- Avoid if you have uncontrolled high blood pressure
“My Wrists Hurt”
Quick Fixes:
- Make fists and balance on knuckles
- Use yoga blocks to reduce wrist angle
- Try forearm variations when possible
- Warm up wrists with circles before practice
Safety Guidelines and Red Flags
When to Stop and Seek Help
Stop immediately if you experience:
- Sharp, shooting pain (different from stretch sensation)
- Numbness or tingling
- Pain that worsens during the pose
- Dizziness or nausea
- Joint pain (rather than muscle stretch)
Seek medical advice before starting if you have:
- Recent injury to hips, knees, or lower back
- Herniated discs or sciatica
- Osteoporosis or other bone conditions
- Uncontrolled high blood pressure
- Pregnancy (especially after first trimester)
Age-Specific Modifications
For Practitioners Over 50:
- Always warm up for at least 5 minutes before stretching
- Hold poses for longer periods (60-90 seconds) as tissues need more time to adapt
- Use props generously – your flexibility goals may be different from younger practitioners
- Pay extra attention to balance and use wall support when needed
For Pregnant Practitioners:
- Avoid deep twists and poses on the belly after first trimester
- Use wider stance in poses like Low Lunge
- Never stretch to the point of discomfort
- Consult with healthcare provider before beginning
For Teens and Young Adults:
- Can progress more quickly but shouldn’t skip proper warm-up
- May need less time in poses (30-45 seconds often sufficient)
- Focus on proper form to build good habits
Building the Habit: Making Flexibility Practice Stick
Habit Stacking Examples
Link your new yoga routine to established habits:
| Current Habit | + Yoga Practice | Total Time | Best For |
|---|---|---|---|
| Morning coffee brewing | 5 hip opener poses while coffee makes | 8 minutes | Morning people |
| Lunch break | Full 15-minute routine | 15 minutes | Office workers |
| Before shower | 8-minute express version | 8 minutes | Evening workout people |
| After dinner | Gentle evening variation | 12 minutes | Family-focused schedules |
| Before bed routine | 3 restorative poses | 5 minutes | Better sleep seekers |
Environmental Setup for Success
Create Your Practice Space:
- Choose a consistent location
- Keep props nearby and easily accessible
- Ensure adequate space (6 feet long, 3 feet wide minimum)
- Good ventilation and comfortable temperature
- Minimize distractions (phone in another room)
Schedule Optimization:
- Same time each day builds stronger habits
- Morning practice energizes, evening practice relaxes
- Start with 3 days per week, build to daily
- Mark practice days on calendar for accountability
Advanced Integration Strategies
Combining with Other Activities
For Runners:
- Do this routine after runs, when muscles are warm
- Pay extra attention to Hip Flexor and Hamstring poses
- Add calf stretches to the sequence
For Office Workers:
- Break the routine into segments: morning hip flexors, lunchtime hamstrings, evening full sequence
- Practice desk-friendly variations during work breaks
- Focus extra time on spinal twists and backbends
For Athletes:
- Use as part of cool-down routine after training
- Modify intensity based on training season
- Pay attention to sport-specific tight areas
Seasonal Adaptations
Winter Practice:
- Longer warm-up needed in cold weather
- Hold poses longer as muscles may be stiffer
- Consider practicing in a warmer room
Summer Practice:
- You may be naturally more flexible in heat
- Stay hydrated and avoid overheating
- Outdoor practice can be energizing
Measuring Long-Term Success
Beyond flexibility measurements, track these indicators of success:
Functional Improvements:
- Easier to put on socks and shoes
- Less stiffness getting out of bed or car
- Improved posture throughout the day
- Reduced frequency of back or hip pain
- Better performance in sports or exercise
Quality of Life Markers:
- Improved sleep quality
- Better stress management
- Increased body awareness
- Greater confidence in movement
- Enhanced mood and energy levels
Remember, flexibility is not just about touching your toes – it’s about moving through life with greater ease, comfort, and confidence. This 15-minute daily investment in your body will pay dividends in every aspect of your physical well-being.
Your journey to better flexibility starts with a single breath and a willingness to begin. Trust the process, be patient with your body, and celebrate every small improvement along the way. Consistency, not perfection, is the key to lasting change.
FAQs
How long before I see results?
Most people notice reduced stiffness within 1-2 weeks. Measurable flexibility improvements typically appear by week 3-4. Significant changes that others notice usually take 6-8 weeks of consistent practice.
Should I feel pain during stretches?
No. You should feel a gentle pulling sensation that you can breathe through comfortably. Sharp, shooting, or intense pain means you’re pushing too hard or may have an underlying issue that needs attention.
Can I do this if I have back problems?
Many people with back issues find yoga helpful, but you should consult your healthcare provider first. Generally, avoid deep forward folds and twists if you have acute back pain. Focus on gentle movements and use props for support.
What if I can barely touch my knees?
That’s your starting point, and it’s perfect. Use props like blocks or straps to make poses accessible. Bend your knees in forward folds. Sit on cushions in seated poses. Flexibility is a journey, not a destination.
How does this compare to other flexibility methods?
Research suggests yoga is more effective than static stretching alone because it combines stretching with strength, balance, and nervous system training. It’s comparable to PNF (proprioceptive neuromuscular facilitation) stretching in effectiveness but more accessible for home practice.
Can I do this routine every day?
Yes, this routine is designed for daily practice. However, listen to your body. If you’re very sore, take a rest day or do a gentler version. Consistency matters more than perfection.
Will I lose flexibility if I stop?
Flexibility gains start to decline after about 2-3 weeks of inactivity, but they don’t disappear overnight. Even practicing twice a week can maintain most of your gains. Once you’ve built significant flexibility, it’s easier to regain if lost.
What’s the best time of day to practice?
Your body is generally stiffer in the morning and more flexible in the evening. Morning practice energizes and sets a positive tone for the day. Evening practice helps you unwind. Choose the time you’ll be most consistent.
Should I eat before practicing?
Light practice is fine on a full stomach, but deep twists and inversions are more comfortable 2-3 hours after eating. A small snack 30 minutes before is usually fine.
Can kids do this routine?
Children are naturally flexible but can benefit from the body awareness aspects of yoga. Shorten hold times to 15-30 seconds for kids under 12. Make it playful with animal names for poses.


