This 15-minute yoga routine targets the root causes: tight chest muscles, weak upper back, and poor spinal alignment. Practice 6 specific poses daily to reverse forward head posture, strengthen supporting muscles, and prevent future pain. Most people see improvement within 2 weeks of consistent practice.
What is tech neck?
Research shows 60% of office workers experience neck pain, with computer users being 3 times more likely to develop chronic cervical spine issues.
Here’s what happens to your body: Your head weighs about 10-12 pounds. But for every inch it moves forward from its natural position, it adds 10 pounds of pressure on your cervical spine. When you crane your neck to look at your computer, your head can exert up to 60 pounds of force on your neck muscles. That’s like carrying a bowling ball on your shoulders all day.
This constant forward head posture creates a domino effect. Your chest muscles tighten and shorten. Your upper back muscles weaken and stretch. Your shoulders round forward. Your neck works overtime just to hold your head up.
Self-assessment quiz: what’s your neck health status?
Check all that apply:
Results:
- 0-1 boxes: Low risk – use this routine for prevention
- 2-3 boxes: Mild tech neck – follow the full routine daily
- 4+ boxes: Moderate to severe – start with gentle modifications
The science behind tech neck
How tech neck develops
- Week 1-2: Muscle fatigue and minor stiffness
- Week 3-4: Muscle imbalances begin forming
- Month 2-3: Chronic tension patterns establish
- Month 4+: Structural changes and chronic pain
Key muscle groups affected
- Tight areas: Pectorals, upper trapezius, levator scapulae, suboccipitals
- Weak areas: Deep neck flexors, middle trapezius, rhomboids, serratus anterior
The pain cascade
Poor posture → Muscle imbalances → Joint dysfunction → Pain → Compensation patterns → More pain
But here’s the good news: yoga can reverse these patterns. It’s not just about stretching tight muscles. The right poses strengthen weak areas, restore proper alignment, and teach your body how to hold itself with ease.
Routine timing guide
| Time available | Poses to include | Best times | Expected benefits |
|---|---|---|---|
| 5 minutes | Moves 1, 2, 6 | Morning wake-up | Quick tension release |
| 10 minutes | Moves 1, 2, 3, 6 | Lunch break | Moderate relief + posture reset |
| 15 minutes | All 6 moves | Evening wind-down | Full routine benefits |
| 20 minutes | All moves + hold longer | Weekend sessions | Deep restoration |
Severity-based approach
| Pain level (1-10) | Recommended approach | Hold times | Repetitions | Weekly goal |
|---|---|---|---|---|
| Mild (1-3) | Full routine | 30-60 seconds | 1-2 rounds | Daily practice |
| Moderate (4-6) | Gentle variations | 15-30 seconds | 1 round | 5-6 days/week |
| Severe (7-10) | Consult doctor first | 10-15 seconds | As tolerated | Medical clearance needed |
The 6-pose neck rescue routine
At-a-glance routine guide
| Pose | Duration | Primary target | Difficulty |
|---|---|---|---|
| Seated Cat-Cow | 8-10 breaths | Spinal mobility | ⭐⭐ |
| Thread the Needle | 5 breaths each side | Upper back tension | ⭐⭐⭐ |
| Forward Bend + Clasp | 5-8 breaths | Chest opening | ⭐⭐ |
| Cow Face Arms | 5 breaths each side | Shoulder mobility | ⭐⭐⭐⭐ |
| Sphinx Pose | 8-10 breaths | Posture strengthening | ⭐⭐ |
| Legs-Up-Wall | 3-5 minutes | Nervous system reset | ⭐ |
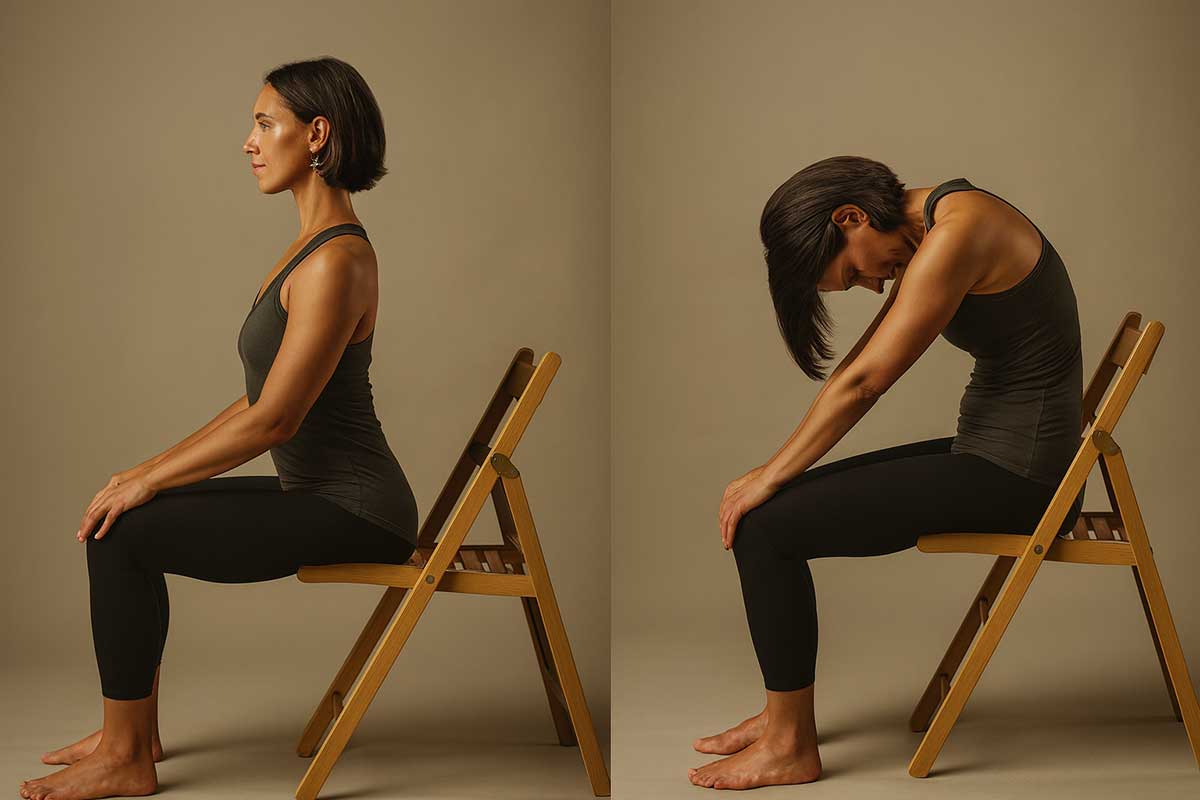
Pose 1: Seated cat-cow (Marjaryasana-Bitilasana)
Why it works:
This gentle spinal warm-up targets your thoracic spine (upper back). When this area moves freely, it takes pressure off your neck and shoulders. It’s like oiling a rusty hinge – everything starts moving better.
Target muscles:
Spinal erectors, deep neck flexors, thoracic spine
How to do it:
- Sit tall in a chair with feet flat on the floor
- Place your hands on your knees
- Inhale: Arch your back, push your chest forward, and look slightly up (Cow pose)
- Focus on drawing your shoulders down and back
- Exhale: Round your spine, drop your chin to chest, and spread your shoulder blades apart (Cat pose)
- Repeat for 8-10 slow breaths
Breath pattern:
4-second inhale for cow, 4-second exhale for cat
Beginner modification:
Keep movements smaller, focus on gentle mobility
Advanced variation:
Add gentle head movements, looking up and down
Avoid this:
Don’t force the movement or hold your breath
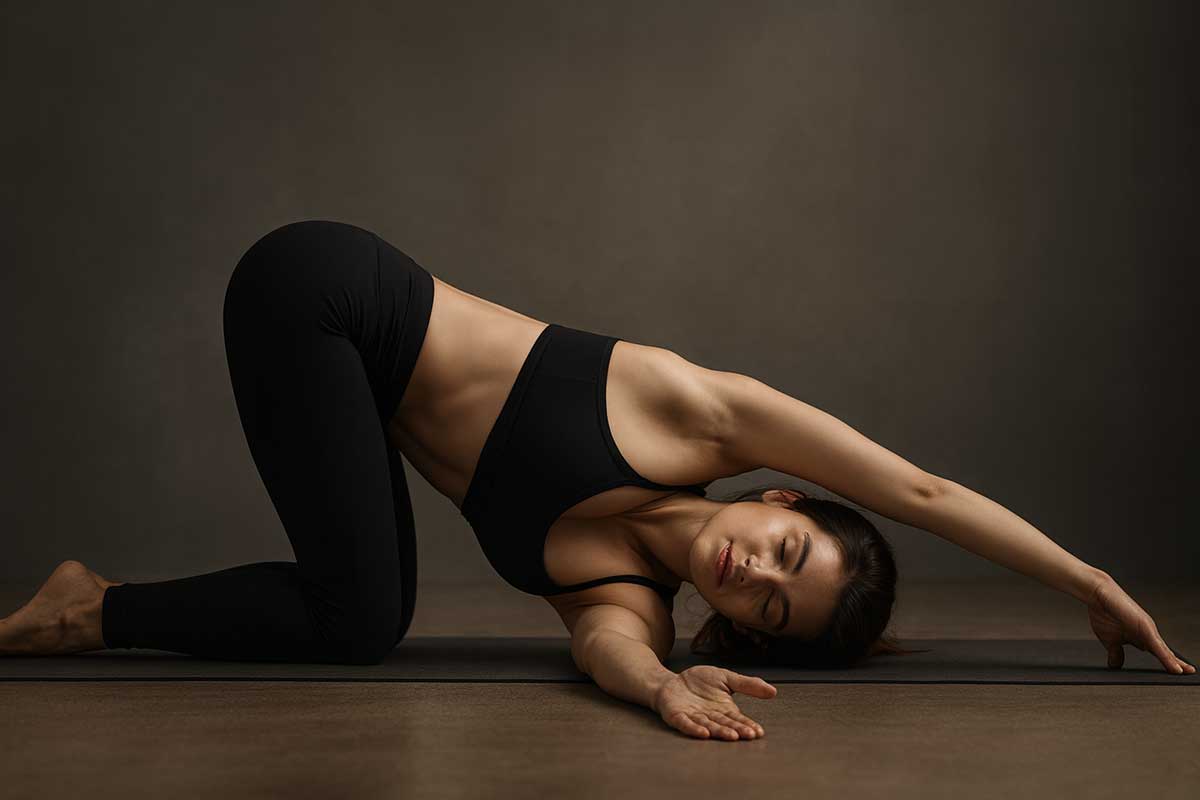
Pose 2: Thread the needle pose (Urdhva Mukha Pasasana)
Why it works:
This pose directly targets those tight knots between your shoulder blades. You know, the ones that feel like concrete after a long day at your desk. It provides a deep, releasing stretch across your upper back muscles.
Target muscles:
Middle trapezius, rhomboids, posterior deltoid
How to do it:
- Start on your hands and knees
- Inhale and lift your right arm toward the ceiling
- Exhale and “thread” your right arm under your left arm
- Rest your right shoulder and ear on the mat or a cushion
- Hold for 5 deep breaths, feeling the stretch across your upper back
- Return to center and repeat on the other side
Breath pattern:
Deep, relaxed breathing to allow muscles to release
Beginner modification:
Place a cushion under your shoulder for support
Advanced variation:
Reach the top arm over your head for a deeper twist
What you’ll feel:
A deep stretch between your shoulder blades and along the side of your neck. This is exactly where tech neck creates the most tension.
Avoid this:
Don’t force your arm under – let gravity do the work
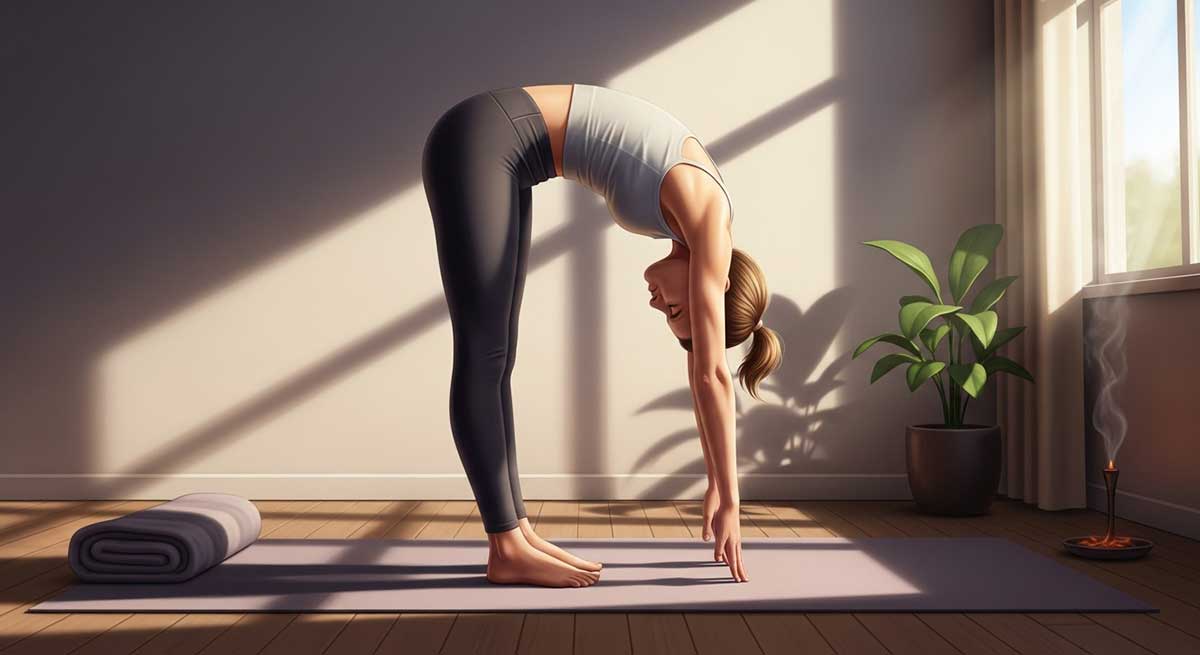
Pose 3: Standing forward bend with clasped hands (Uttanasana variation)
Why it works:
This pose does double duty. It lengthens your hamstrings, which releases tension up your entire back chain. The clasped hands behind your back open your chest and shoulders, directly countering the forward hunch of tech neck.
Target muscles:
Pectorals, anterior deltoids, hamstrings, spinal erectors
How to do it:
- Stand with feet hip-width apart
- Interlace your fingers behind your back
- Inhale and squeeze your shoulder blades together to open your chest
- Exhale and hinge forward at your hips, keeping a generous bend in your knees
- Let your head hang heavy, releasing all neck tension
- Allow your clasped hands to move up and over toward the floor
- Hold for 5-8 breaths
Breath pattern:
Long exhales to release tension, soft inhales to maintain the pose
Beginner modification:
Hold a towel between your hands if you can’t clasp
Advanced variation:
Straighten legs gradually as flexibility improves
Avoid this:
Don’t round your back or force your head down
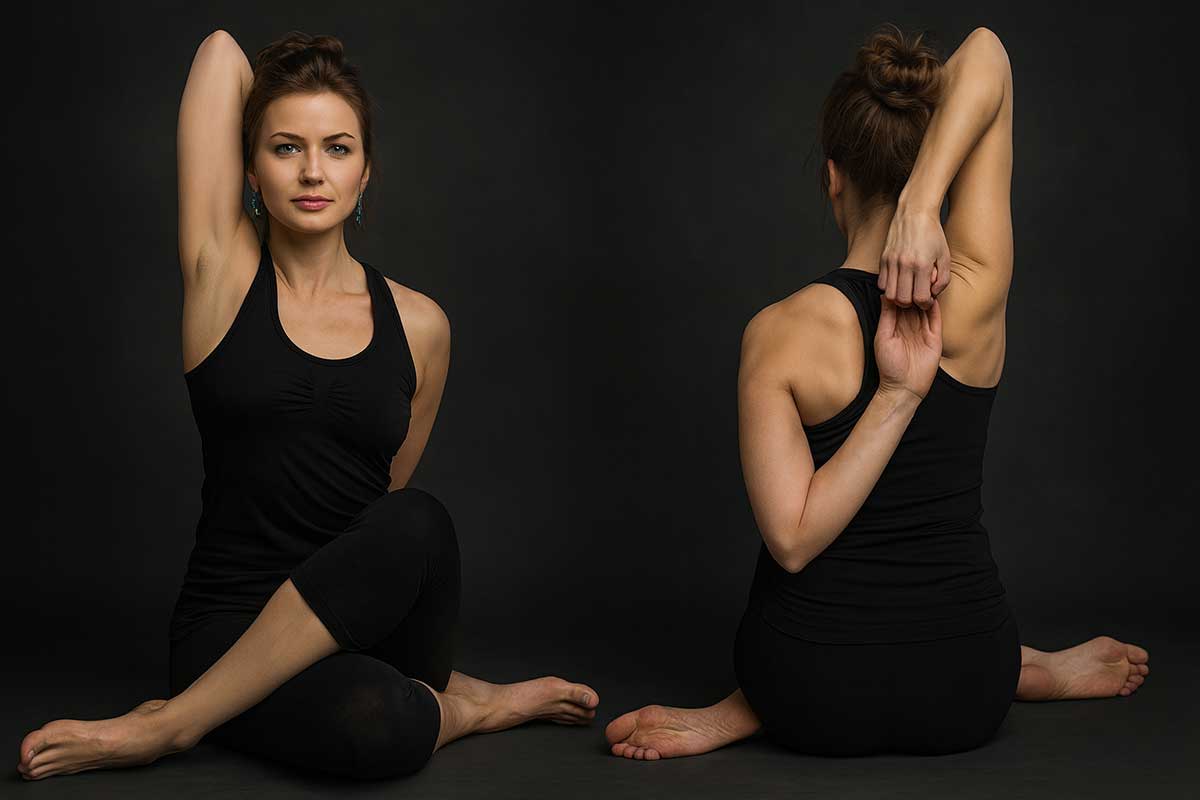
Pose 4: Cow face pose arms (Gomukhasana arms)
Why it works:
This is one of the most effective stretches for tight shoulders. It targets your external rotators and triceps – areas that get locked up and limit shoulder mobility. When your shoulders can’t move properly, your neck compensates.
Target muscles:
Triceps, posterior deltoid, external rotators, latissimus dorsi
How to do it:
- Sit tall in a chair or on the floor
- Reach your right arm up, bend your elbow, and let your hand fall to the middle of your back
- Reach your left arm behind your back and try to clasp the fingers of your right hand
- Sit up straight, keeping your head from pushing forward
- Hold for 5 breaths and switch sides
Breath pattern:
Steady, even breaths while maintaining the stretch
Beginner modification:
Use a strap, towel, or shirt between your hands
Advanced variation:
Gently pull with the bottom hand to increase the stretch
Can’t reach?
No problem! Hold a strap, towel, or even your shirt between your hands. The stretch is just as effective.
Avoid this:
Don’t force your shoulders or allow your head to jut forward
Pose 5: Sphinx pose (Salamba Bhujangasana)
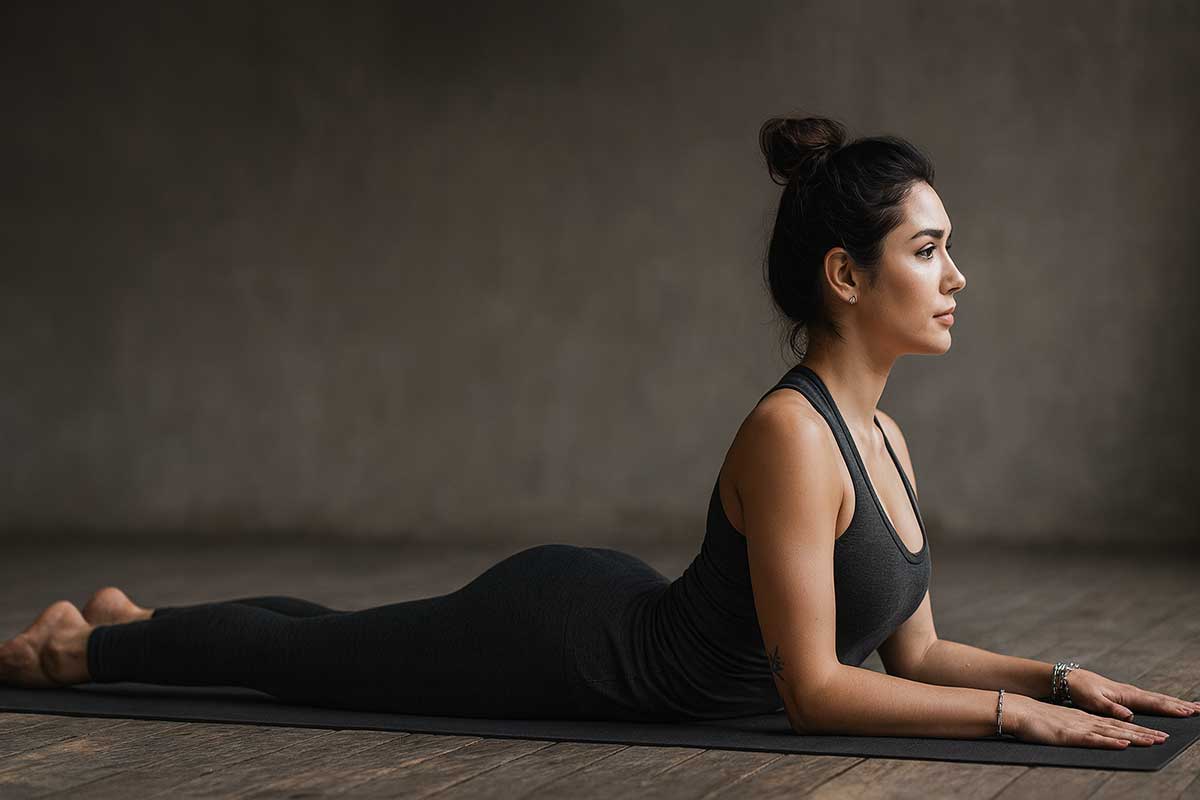
Why it works:
This gentle backbend strengthens your spinal muscles and helps restore the natural curve of your lower back. Better lower back posture supports your entire spine. It also stretches the front of your neck and chest while teaching your shoulders to stay down.
Target muscles:
Spinal erectors, deep neck extensors, anterior chest muscles
How to do it:
- Lie on your stomach on a mat or carpet
- Place your forearms on the floor, parallel to each other
- Position your elbows directly under your shoulders
- Press into your forearms to lift your head and chest off the floor
- Keep your gaze forward, not up, to keep the back of your neck long
- Hold for 8-10 breaths
Breath pattern:
Deep belly breathing to engage the core and support the spine
Beginner modification:
Place a pillow under your chest for support
Advanced variation:
Lift slightly higher while maintaining neck alignment
Focus point:
Think about lengthening through the crown of your head rather than lifting up. This protects your neck while strengthening your back.
Avoid this:
Don’t crane your neck up or compress the back of your neck
Pose 6: Legs-up-the-wall pose (Viparita Karani)
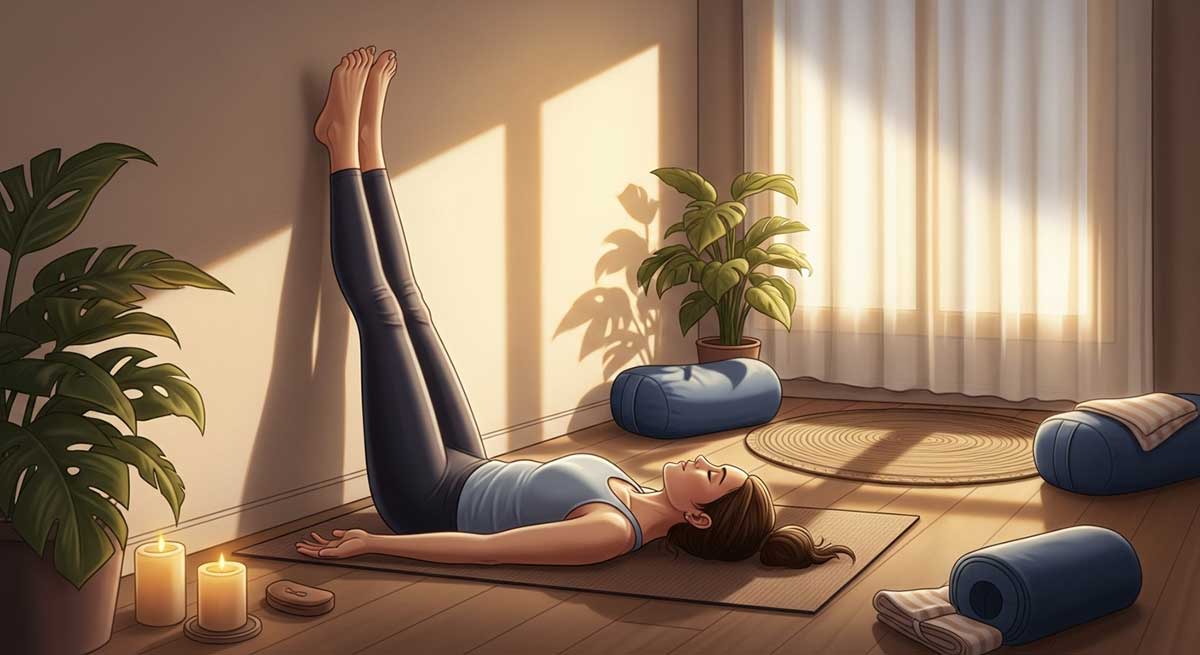
Why it works:
This restorative pose is like hitting the reset button on your nervous system. Chronic pain often goes hand in hand with chronic stress. This pose switches your body into “rest and repair” mode, allowing all your neck and back muscles to completely relax.
Target areas:
Nervous system, circulation, muscle relaxation
How to do it:
- Sit sideways next to a wall
- Swing your legs up the wall as you lie back on the floor
- Shuffle your hips as close to the wall as feels comfortable
- Rest with your arms out to the sides, palms facing up
- Close your eyes and breathe deeply for 3-5 minutes
Breath pattern:
Long, slow breaths – 4 counts in, 6 counts out
Beginner modification:
Place a pillow under your lower back and head
Advanced variation:
Stay for up to 10 minutes if comfortable
Pro tip:
Place a small pillow under your lower back for extra support. This pose should feel completely effortless.
Avoid this:
Don’t stay in the pose if your legs go numb – adjust your position
Workplace ergonomics checklist
Desk setup optimization
| Area | Correct position | Check ✓ |
|---|---|---|
| Monitor | Top of screen at eye level | [ ] |
| Keyboard | Elbows at 90° when typing | [ ] |
| Mouse | Same level as keyboard | [ ] |
| Chair | Feet flat on floor, back supported | [ ] |
| Neck | Ears over shoulders | [ ] |
| Shoulders | Relaxed, not hunched | [ ] |
Movement break recipe
Every 30 minutes:
- 3 chin tucks
- 5 shoulder blade squeezes
Every 60 minutes:
- Stand and stretch arms overhead
- Do 5 seated cat-cow movements
- Walk around for 2 minutes
Every 2 hours:
- Complete the 5-minute routine
- Assess and adjust your posture
- Check ergonomic setup
Emergency neck relief protocol
3-minute acute pain relief
When pain strikes suddenly, follow this sequence:
- Minute 1: Gentle neck rotations (5 each direction)
- Minute 2: Seated cat-cow (8 breaths)
- Minute 3: Chin to chest stretch (hold 30 seconds)
Red flag symptoms – seek immediate medical attention
- Severe pain radiating down your arm
- Numbness or tingling in your hands
- Dizziness or vision changes
- Pain after injury or trauma
- Fever with neck stiffness
Poses to avoid when your neck hurts
Not all yoga poses are neck-friendly. Avoid these until your pain improves:
High-risk poses
| Pose | Why to avoid | Better alternative |
|---|---|---|
| Headstand | Extreme cervical pressure | Legs-Up-Wall |
| Shoulderstand | Excessive neck flexion | Supported bridge |
| Plow Pose | Forces neck into extreme flexion | Gentle spinal twist |
| Camel Pose | Can overextend strained neck | Sphinx Pose |
| Wheel Pose | Too intense for healing neck | Gentle backbends |
General safety rules
- Stop if any pose increases pain
- Avoid positions that cause dizziness
- Never force a stretch
- Listen to your body above all else
The 2-week neck relief challenge
Week 1: Foundation building
Days 1-3: 5-minute routine, focus on form
Days 4-7: 10-minute routine, add breath awareness
Week 2: Integration and progress
Days 8-10: Full 15-minute routine
Days 11-14: Add workplace breaks, track progress
Daily habit tracker
| Week | Day | Routine done | Pain level (1-10) | Notes |
|---|---|---|---|---|
| 1 | 1 | [ ] | ___ | __________ |
| 1 | 2 | [ ] | ___ | __________ |
| 1 | 3 | [ ] | ___ | __________ |
| (Continue for 14 days) | ||||
Success indicators
- Week 1: Less morning stiffness
- Week 2: Improved range of motion
- Month 1: Reduced pain frequency
- Month 2: Better posture habits
Beyond the mat: daily integration
Your 2-minute desk reset
You can’t do yoga poses all day, but you can build in micro-breaks that make a huge difference. Set a timer for every hour. When it goes off:
- Stand up and do 3 slow seated cat-cow movements
- Drop your chin to your chest for a gentle neck stretch
- Roll your shoulders back 5 times
These tiny actions interrupt the forward head posture before it builds up into pain.
The pillow talk you need
Your pillow choice can make or break your neck health. Here’s what to look for:
| Sleep position | Pillow type | Key features |
|---|---|---|
| Back sleeper | Memory foam contour | Supports natural neck curve |
| Side sleeper | Medium-firm, thicker | Fills gap between shoulder and head |
| Stomach sleeper | Very thin or none | Minimizes neck rotation |
The mindfulness habit
Building body awareness is just as important as stretching and strengthening. Try this simple technique:
Set 3 random alarms throughout your day. When they go off, pause and scan your body:
- Are your shoulders creeping up toward your ears?
- Is your head jutting forward?
- Are you holding tension in your jaw?
Simply noticing these patterns helps you catch them before they turn into pain. Gently reset your posture and take a deep breath.
Complementary treatment comparison
| Treatment | Time to relief | Cost | Best for | Combines well with yoga? |
|---|---|---|---|---|
| Yoga | 2-4 weeks | Low | Prevention + mild pain | N/A – this IS yoga! |
| Physical Therapy | 4-8 weeks | Medium-High | Moderate to severe pain | Yes ✓ |
| Massage | Immediate-1 week | Medium | Muscle tension | Yes ✓ |
| Medication | Hours-days | Low-Medium | Acute pain episodes | Consult doctor |
| Chiropractic | Days-weeks | Medium | Joint dysfunction | Often ✓ |
When to add professional help
Consider professional treatment if:
- Pain persists after 4 weeks of consistent practice
- Symptoms worsen despite following the routine
- You experience numbness or tingling
- Pain interferes with sleep or daily activities
Weekly progress tracker
Week 1 assessment
Starting measurements:
- Pain level (1-10): ___
- Range of motion (can you look over your shoulder?): ___
- Morning stiffness (minutes until mobile): ___
Week 2 assessment
Improvement check:
- Pain level (1-10): ___
- Range of motion: ___
- Morning stiffness: ___
Week 4 assessment
Final results:
- Pain level (1-10): ___
- Range of motion: ___
- Morning stiffness: ___
- Days per week practicing: ___
Medical disclaimers and safety
Important safety information
This routine is for educational purposes and should not replace professional medical advice. Consult a healthcare provider before starting if you have:
- History of neck injury or surgery
- Herniated discs
- Severe arthritis
- Any condition affecting your spine
Contraindications by condition
| Condition | Safe poses | Avoid | Modifications needed |
|---|---|---|---|
| Herniated disc | 1, 6 | 2, 3, 4, 5 | Medical clearance first |
| Arthritis | All with mods | Forced stretching | Gentle range only |
| Recent injury | 6 only | All others | Wait for healing |
Conclusion
Chronic neck pain doesn’t have to be your new normal. This routine isn’t a magic pill – it’s a daily practice of self-care. Consistency beats intensity every time.
Start with just 5 minutes if 15 feels like too much. Do what you can, when you can. Your neck will thank you for any movement and attention you give it.
The poses above address the root causes of tech neck: tight chest muscles, weak upper back muscles, and poor spinal alignment. But the real power comes from making small, consistent changes to how you hold and move your body throughout the day.
Your next steps
- Today: Complete the self-assessment quiz and try the 5-minute routine
- This week: Practice daily and set up your workspace ergonomics
- Next month: Track your progress and celebrate improvements
- Ongoing: Make this routine a permanent part of your wellness practice
Your comfort and freedom of movement are worth 15 minutes of your day. Your future pain-free self will thank you for starting today.
Remember: Small, consistent actions create lasting change. You have the power to break free from the cycle of tech neck pain. Start now, be patient with the process, and trust in your body’s ability to heal and adapt.
The path to a pain-free neck begins with a single breath and one gentle movement. Take that first step today.
FAQs
Can yoga reduce neck pain?
Yes, yoga can significantly reduce neck pain by addressing root causes: tight chest muscles, weak upper back muscles, and poor posture. Studies show regular practice reduces pain intensity by 40-60% within 4 weeks.
How long does it take to see results?
Most people notice reduced stiffness within 3-5 days. Significant pain relief typically occurs within 2-4 weeks of daily practice. Consistent daily practice is key to lasting results.
Can yoga make neck pain worse?
Only if done incorrectly. Follow modifications for your pain level and stop any pose that increases discomfort. Always prioritize proper form over depth of stretch.
What’s the best time of day to practice?
Morning helps prevent stiffness, evening helps release daily tension. Choose what fits your schedule – consistency matters more than timing.
Which exercise is best for neck pain?
The seated cat-cow is the most universally beneficial, as it gently mobilizes the spine and can be done anywhere. For targeted relief, thread the needle effectively releases upper back tension.
How do I relieve neck pain in 5 minutes?
Follow our emergency protocol: 1 minute of gentle neck rotations, 2 minutes of seated cat-cow, and 2 minutes of chin-to-chest stretches. This provides quick tension release.
What is the best sleeping position for neck pain?
Sleep on your back with a contour pillow that supports your neck’s natural curve, or on your side with a thicker pillow that fills the gap between your shoulder and head. Avoid stomach sleeping.
Should I do yoga if my neck hurts?
Yes, gentle yoga can help, but choose appropriate modifications. If pain is severe (7-10/10) or includes numbness/tingling, consult a healthcare provider first.
Can yoga reverse neck hump?
Yes, yoga can help reduce forward head posture (“neck hump”) by strengthening posterior neck muscles and stretching tight anterior muscles. Sphinx pose and cow face arms are particularly effective.
How to permanently relieve neck pain?
Combine daily yoga practice with ergonomic workspace setup, regular movement breaks, proper sleeping position, and postural awareness. Consistency is key – permanent relief requires ongoing self-care.
Is hot yoga good for neck pain?
Heat can help muscles relax, but hot yoga may cause dizziness or dehydration that worsens neck issues. Start with regular yoga and add heat gradually if well-tolerated.
Can yoga help a pinched nerve in the neck?
Yoga can help by reducing muscle tension around the nerve and improving posture, but severe pinched nerves need medical evaluation. Gentle poses like legs-up-wall are safest.
Should I continue if I feel sore?
Mild muscle soreness is normal. Sharp pain or increased stiffness means you need to modify or rest. The difference: soreness feels like worked muscles, pain feels sharp or shooting.
Can I do this routine if I have arthritis?
Generally yes, but consult your healthcare provider first. You may need specific modifications like shorter hold times and gentler movements. Heat application before practice can help.
What should you not do with a pinched nerve in your neck?
Avoid sudden movements, heavy lifting, sleeping on your stomach, high-impact activities, and yoga poses that crane your neck (like plow pose or unsupported headstands).
How to release tension in shoulder and neck?
Focus on move 2 (thread the needle) and move 4 (cow face arms) from our routine. These directly target the muscle knots between your shoulder blades and tight shoulder muscles.
Does strengthening the neck reduce neck pain?
Yes, but focus on deep neck flexors and upper back muscles rather than superficial neck muscles. Sphinx pose in our routine strengthens the right muscles for better posture support.


