If you spend hours hunched over a computer or constantly looking down at your phone, your body adapts. Your chest muscles get tight. Your upper back muscles get weak. This creates what experts call “upper crossed syndrome”—a fancy term for shoulders that roll forward and heads that jut out.
Quick self-assessment: do you have slouching shoulders?
Stand against a wall with your back flat. Let your arms hang naturally. If your knuckles face forward instead of toward your sides, you have forward shoulder posture. Other signs include:
- Your head sits forward of your shoulders when viewed from the side
- You can pinch more than an inch of skin between your shoulder blades
- You feel tight across your chest when you try to pull your shoulders back
- Your upper back rounds when you sit or stand normally
The hidden costs of poor posture
Poor shoulder posture doesn’t just affect how you look. Research shows it can reduce lung capacity by up to 30%. It also increases your risk of headaches, neck pain, and even digestive issues. One study found that people with forward head posture had 66% more tension headaches than those with neutral alignment.
The science behind your slouch
Here’s what happens inside your body when you slouch. Your pectoral muscles (chest) and anterior deltoids (front shoulders) become short and tight. They literally pull your shoulders forward. Meanwhile, your rhomboids and middle trapezius (upper back muscles) stretch out and become weak.
Think of it like a tug-of-war where one side always wins. Your tight chest muscles are the stronger team, constantly pulling your shoulders into that rounded position. This isn’t just about looking confident—poor posture can lead to headaches, neck pain, and even breathing problems.
| Tight muscles (need stretching) | Weak muscles (need strengthening) | Result |
|---|---|---|
| Pectoralis major & minor | Rhomboids | Shoulders roll forward |
| Anterior deltoids | Middle trapezius | Head juts forward |
| Upper trapezius | Lower trapezius | Rounded upper back |
| Levator scapulae | Deep neck flexors | Neck pain and tension |
Why traditional stretching isn’t enough
Most people try to fix their posture by doing a few chest stretches. But sustainable change requires both stretching tight muscles AND strengthening weak ones. That’s called “reciprocal inhibition”—when you strengthen one muscle group, the opposing tight muscles naturally begin to relax.
Most yoga classes focus on general flexibility. But fixing slouched shoulders requires targeted poses that stretch the tight muscles and strengthen the weak ones. That’s where these trainer-approved poses come in.
We consulted with certified physical trainers to handpick 7 specific yoga poses that directly counteract this muscle imbalance. This isn’t just about stretching—it’s a targeted plan to pull your shoulders back and help you stand taller.
7 practitioner-approved poses to fix slouching shoulders
1. The foundation: mountain pose (Tadasana) with a twist
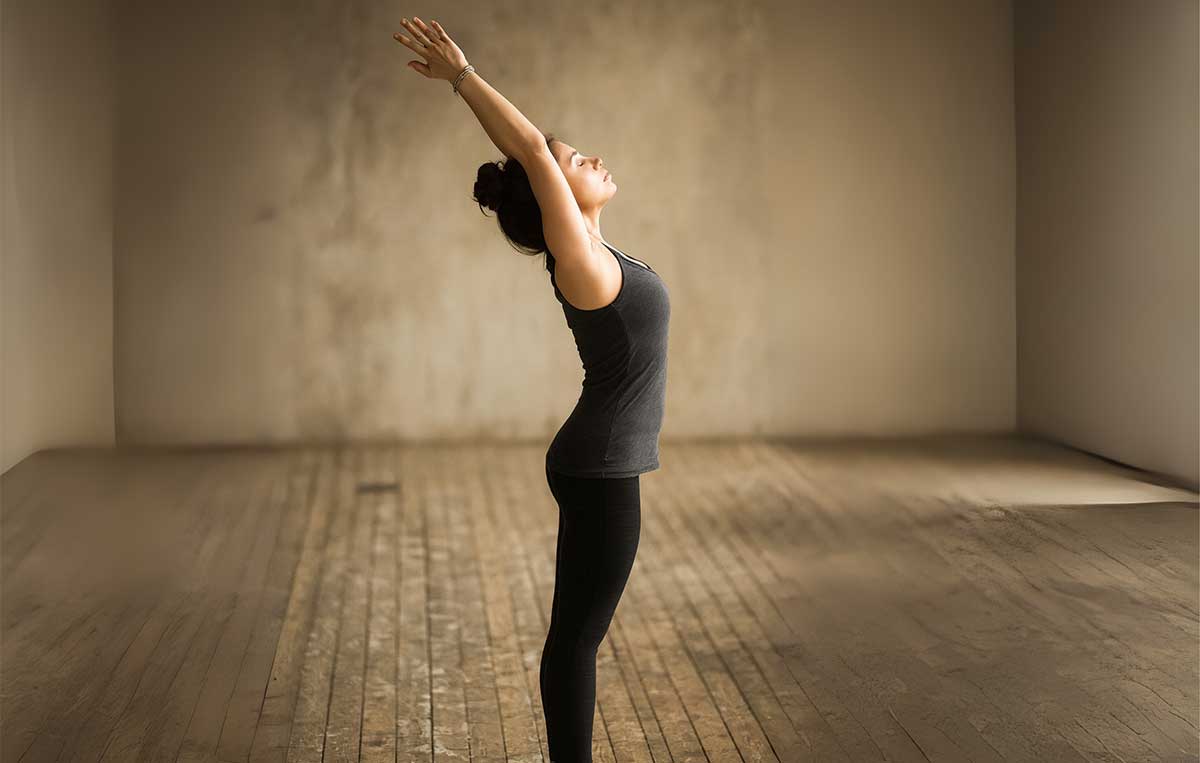
Difficulty level: Beginner | Hold time: 30-60 seconds | Muscle focus: Postural awareness
This isn’t just standing around. Mountain Pose retrains your brain and body to recognize proper alignment. It wakes up those sleepy back muscles that have forgotten how to work.
Step-by-step instructions:
- Stand with feet hip-width apart
- Distribute your weight evenly across your feet
- Engage your leg muscles
- Roll your shoulders up, back, and down without puffing your chest
- Imagine your shoulder blades sliding down toward your back pockets
- Hold for 30 seconds, breathing into the space between your shoulder blades
Trainer’s tip:
Don’t just push your chest out. This can arch your lower back. The goal is to broaden your collarbones and drop your shoulders down, not create tension.
Why it works:
Mountain Pose teaches your nervous system what good posture feels like. Most people have lost this body awareness after years of slouching. This pose serves as your daily alignment check.
2. The chest opener: cobra pose (Bhujangasana)
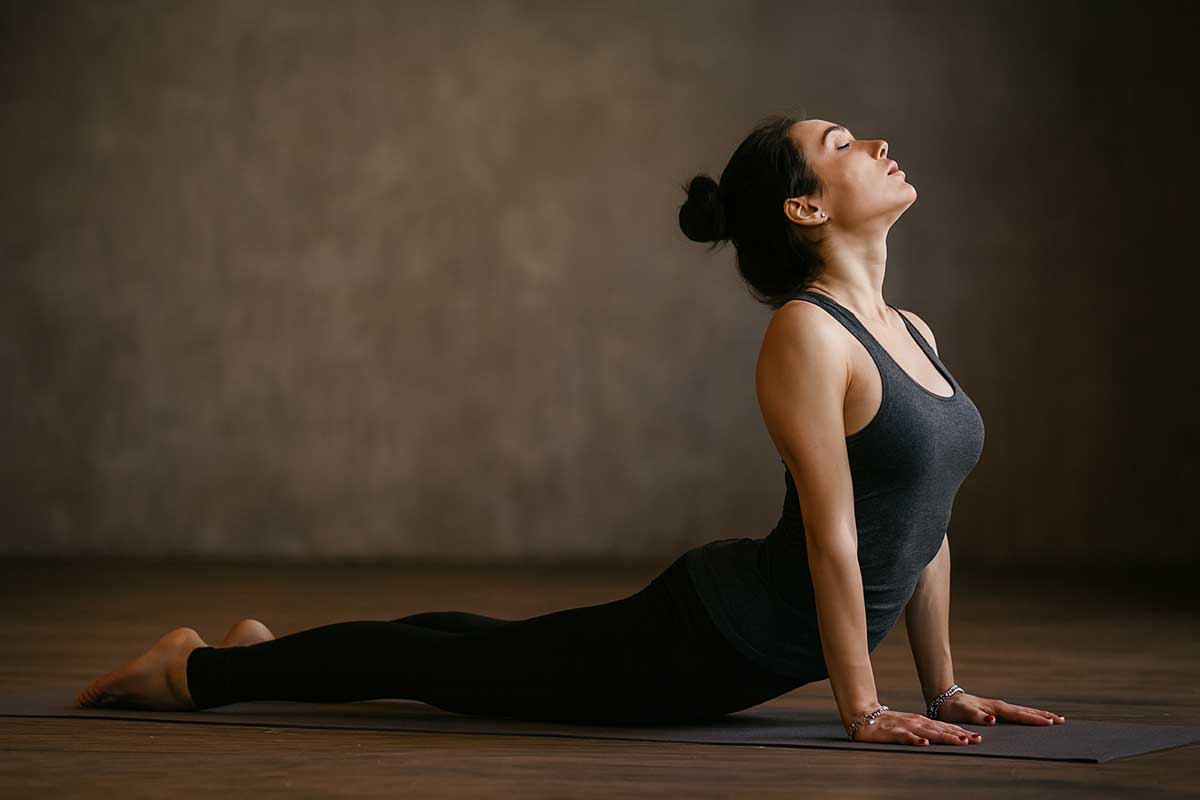
Difficulty level: Beginner-Intermediate | Hold time: 15-20 seconds, 3 reps | Muscle focus: Chest stretch, back strength
Cobra directly attacks those tight chest muscles that pull your shoulders forward. It also begins to strengthen your upper back—hitting both sides of the posture equation.
Step-by-step instructions:
- Lie face down with hands under your shoulders, elbows tucked in
- Press the tops of your feet into the mat to engage your legs
- Inhale and lift your head and chest, keeping lower ribs down
- Pull your shoulders back and away from your ears
- Hold for 15-20 seconds
Trainer’s tip:
Avoid using arm strength to push up too high. This is a back-strengthening pose. If you feel pinching in your lower back, lower down.
Why it works:
Cobra stretches the pectoralis major and minor—the exact muscles that create that forward shoulder pull. The gentle backbend also activates your rhomboids and middle traps.
Modification for beginners:
Keep your forearms on the ground instead of pressing up on your hands. This reduces intensity while still providing benefits.
Advanced variation:
Try Upward Facing Dog by straightening your arms and lifting your thighs off the ground.
3. The back strengthener: locust pose (Salabhasana)
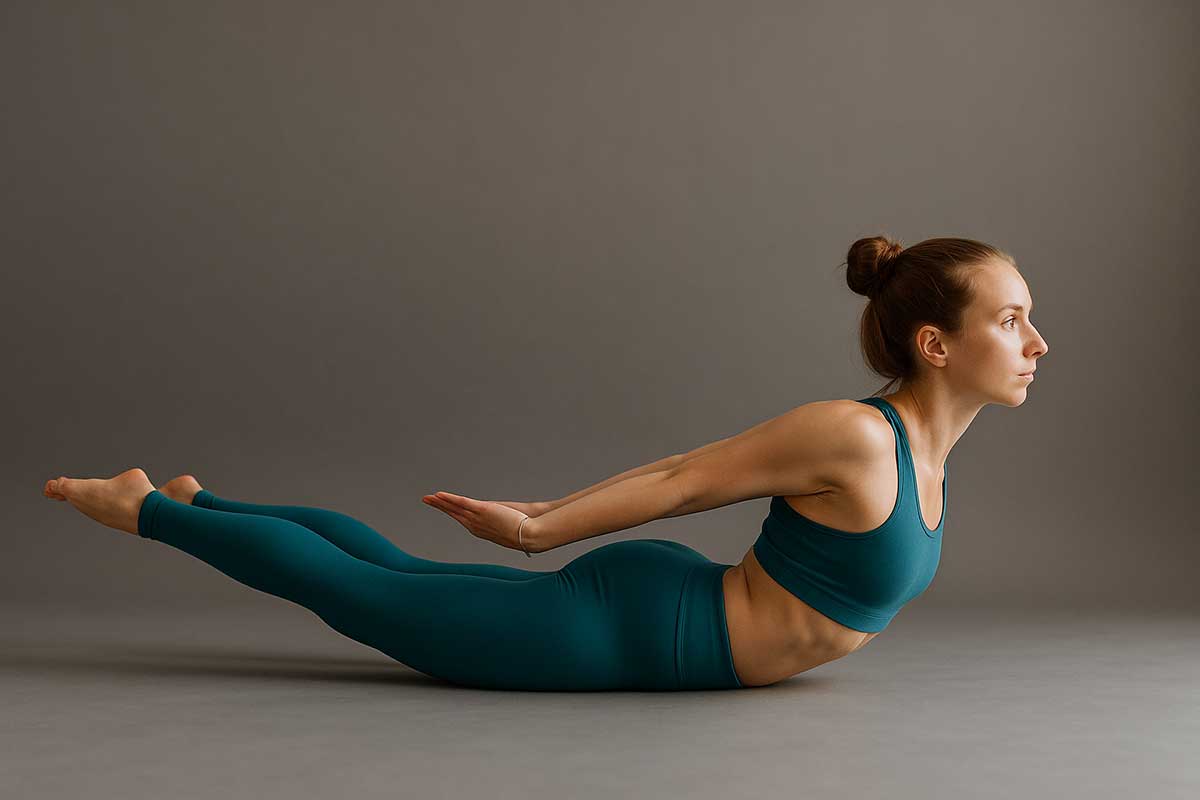
Difficulty level: Intermediate | Hold time: 15 seconds, 2-3 reps | Muscle focus: Posterior chain strength
This is your secret weapon for building back strength. Locust targets every muscle you need to hold your shoulders in proper alignment.
Step-by-step instructions:
- Lie face down with arms alongside your body, palms up
- Inhale and lift your head, chest, arms, and legs off the floor
- Reach back with fingertips and toes, keeping your neck long
- Imagine a string pulling your arms back to open your chest
- Hold for 15 seconds, release, and repeat twice
Trainer’s tip:
Don’t bend your knees. Power comes from keeping legs straight and engaged. Focus on length, not just height.
Why it works:
Locust is like a gym workout for your posterior chain. It strengthens your rhomboids, middle trapezius, and rear deltoids—the exact muscles that need to get stronger to pull your shoulders back.
Modification for beginners:
Lift only your chest and arms, keeping your legs on the ground. Build up to lifting everything together.
Advanced variation:
Hold small weights (1-2 lbs) in your hands while performing the pose.
4. The shoulder mobilizer: cow face pose arms (Gomukhasana arms)
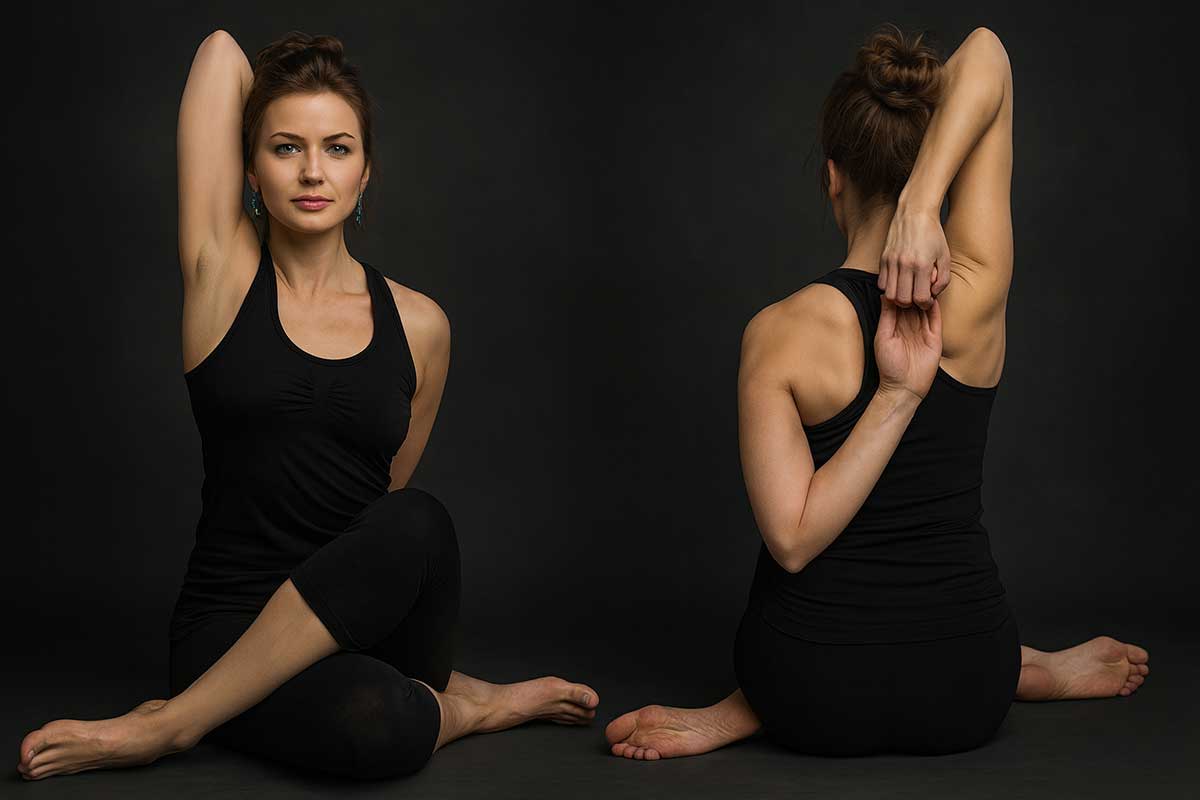
Difficulty level: Intermediate | Hold time: 30 seconds each side | Muscle focus: Shoulder mobility
Your shoulder joints need mobility to move out of that forward position. This pose provides deep stretches for muscles you can’t reach any other way.
Step-by-step instructions:
- Sit tall in a comfortable position
- Reach your right arm up, bend the elbow, let your hand fall to mid-back
- Reach your left arm down and around, bending elbow to clasp right fingers
- Can’t reach? Hold a strap, towel, or belt between your hands
- Hold for 30 seconds, breathing into the stretch. Switch sides
Trainer’s tip:
Keep your head aligned over your spine. Don’t let it jut forward. Gently press your top elbow back.
Why it works:
This pose stretches your rotator cuff and the small muscles around your shoulder blades. These often-ignored muscles get incredibly tight from slouching and need direct attention.
Modification for beginners:
Use a strap, towel, or belt between your hands if you can’t clasp fingers. Focus on the stretch rather than forcing the connection.
Advanced variation:
Perform the arm position while in a seated spinal twist to add core engagement.
5. The reset button: cat-cow stretch (Marjaryasana-Bitilasana)
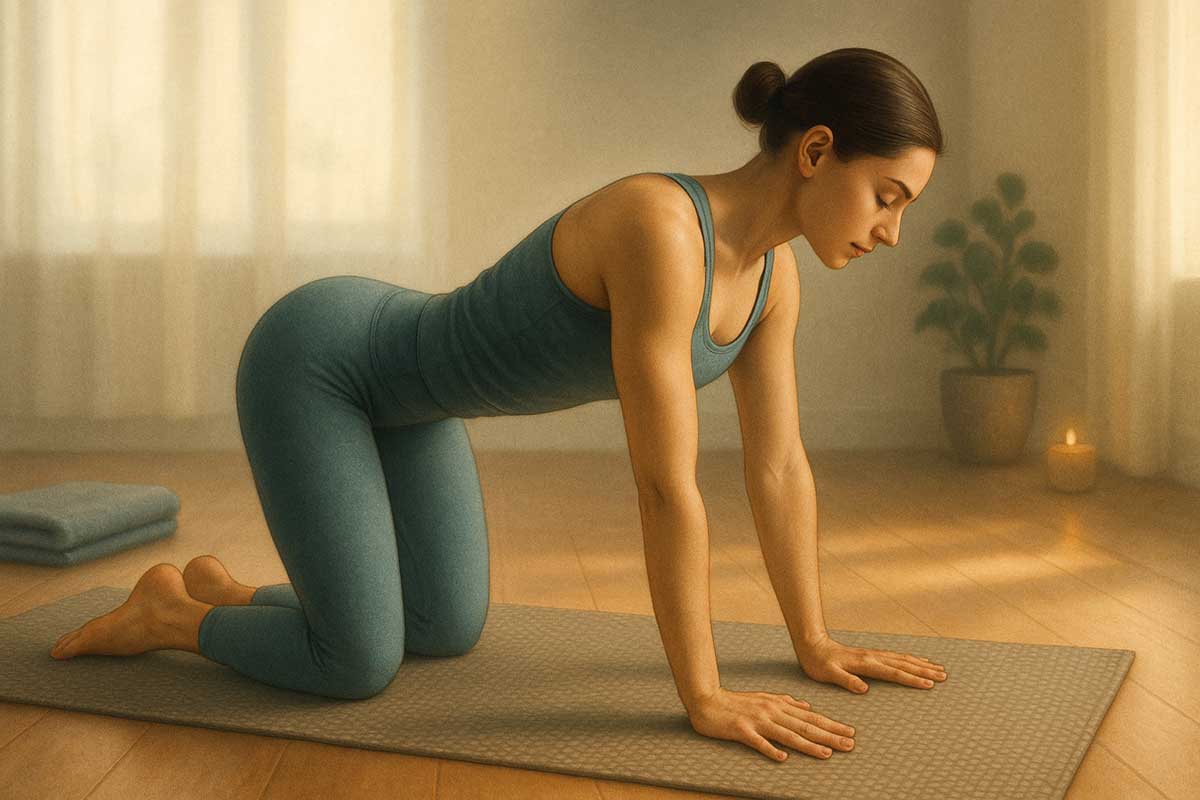
Difficulty level: Beginner | Duration: 5-8 breaths | Muscle focus: Spinal mobility
Cat-Cow teaches you the difference between a rounded spine and an open chest. This awareness is crucial for catching yourself before you slouch.
Step-by-step instructions:
- Start on hands and knees in tabletop position
- Inhale: drop your belly, lift chest and tailbone (Cow), pull shoulders from ears
- Exhale: round your spine, press mat away, tuck chin (Cat)
- Feel the stretch between shoulder blades in Cat position
- Flow between positions for 5-8 breaths
Trainer’s tip:
Start the movement from your tailbone, not your neck. Let your spine follow naturally.
Why it works:
This dynamic movement improves spinal flexibility and teaches you to actively control the position of your shoulder blades. The Cat position gives you a deep stretch between your shoulders.
Modification for beginners:
Place a pillow under your knees for comfort. Move slowly and stop if you feel any discomfort.
Advanced variation:
Add side-to-side movement, creating circles with your spine while maintaining the cat-cow rhythm.
6. The all-in-one lengthener: downward-facing dog (Adho Mukha Svanasana)
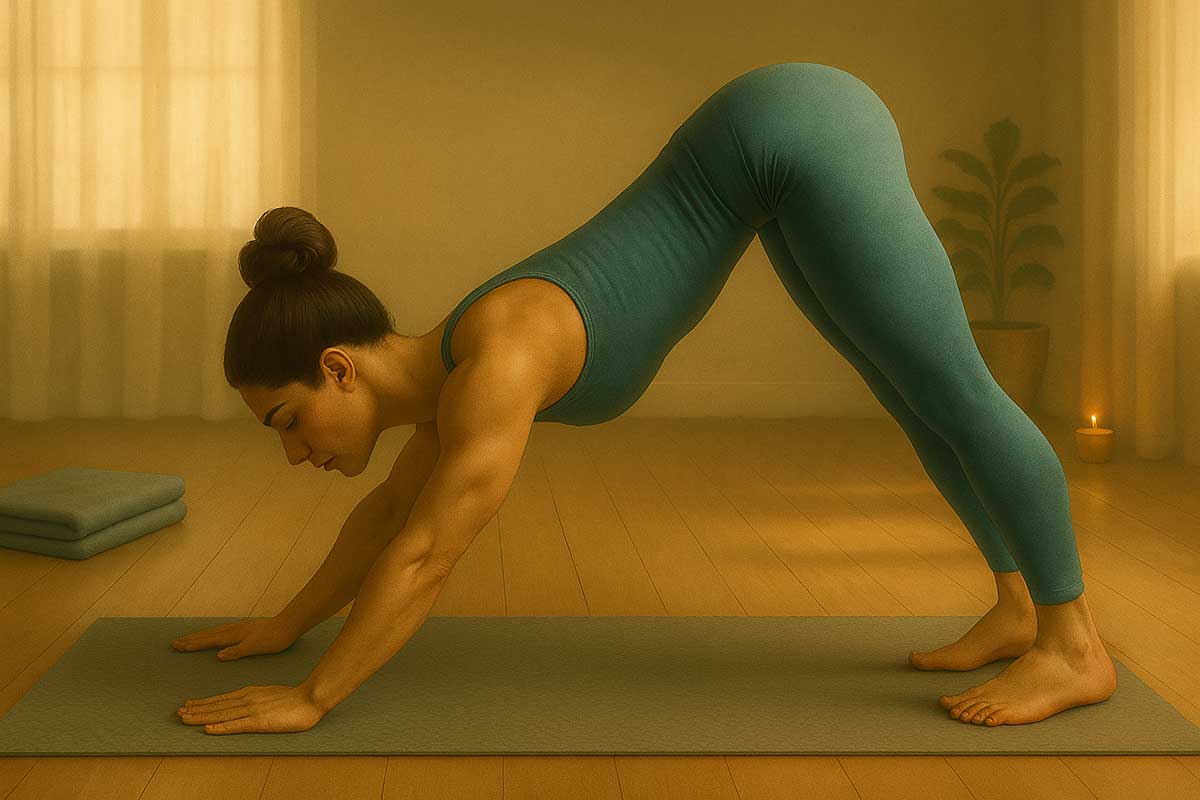
Difficulty level: Beginner-Intermediate | Hold time: 30-45 seconds | Muscle focus: Full posterior chain
Down Dog lengthens your entire back body while building the arm and shoulder strength you need for better posture.
Step-by-step instructions:
- From hands and knees, lift your hips up and back
- Bend knees generously to prioritize a long, straight spine
- Press firmly into hands and rotate upper arms outward
- Let your head hang heavy
- Hold for 30-45 seconds
Trainer’s tip:
Don’t worry about getting heels to the floor. A straight spine matters more for posture than straight legs.
Why it works:
Down Dog opens your shoulders and builds strength in your upper back. The inverted position also helps decompress your spine after hours of sitting.
Modification for beginners:
Place your hands on blocks or step your feet closer to your hands. Keep knees bent as much as needed.
Advanced variation:
Try one-legged down dog, lifting alternate legs while maintaining shoulder stability.
7. The active wall stretch: wall angels
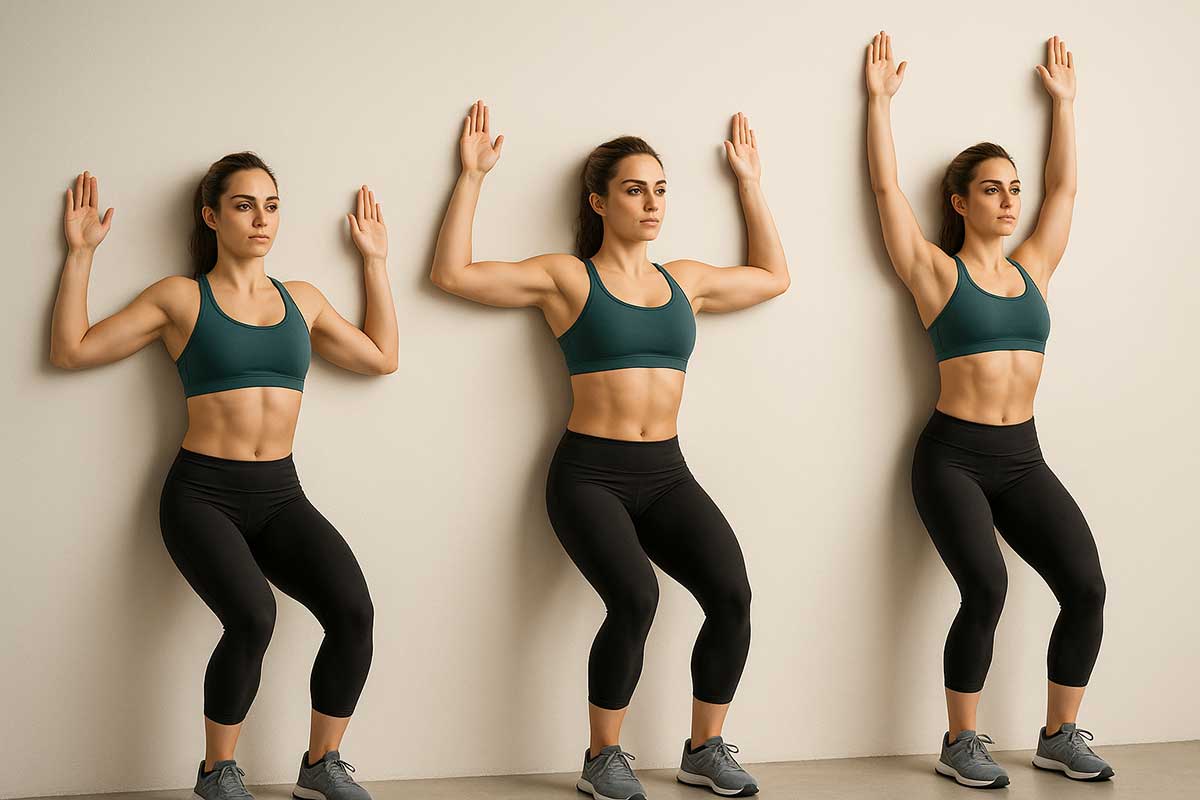
Difficulty level: Beginner-Intermediate | Repetitions: 8-10 slow reps | Muscle focus: Active strengthening
This physical therapy favorite actively trains the muscles that hold your shoulders back. It’s like doing bicep curls for your posture muscles.
Step-by-step instructions:
- Stand with your back against a wall, feet a few inches away
- Keep tailbone, upper back, and head against the wall
- Bend arms to 90 degrees and press elbows and backs of hands into wall
- Slowly slide arms up the wall, maintaining contact
- Slide back down. Repeat 8-10 times slowly
Trainer’s tip:
If your lower back arches too much, engage your core. Only slide arms up as high as you can with good form.
Why it works:
Wall Angels strengthen your external rotators and mid-back muscles while stretching your chest. It’s the perfect combination for fixing forward shoulders.
Modification for beginners:
Stand farther from the wall to reduce the range of motion needed. Focus on keeping your back flat against the wall.
Advanced variation:
Hold light weights (1-2 lbs) while performing the movement, or try the exercise lying on a foam roller.
Your 10-minute daily posture reset routine
Here’s how to sequence these poses for maximum impact:
| Pose | Time/reps | Purpose | Focus cue |
|---|---|---|---|
| Mountain Pose | 1 minute | Foundation setting | “Shoulders down and back” |
| Cat-Cow | 2 minutes (8 breaths) | Spine warm-up | “Initiate from tailbone” |
| Cobra | 3 sets x 15 seconds | Chest opening | “Lift with back muscles” |
| Locust | 3 sets x 15 seconds | Back strengthening | “Reach arms back” |
| Cow Face Arms | 30 seconds each side | Shoulder mobility | “Keep head aligned” |
| Downward Dog | 45 seconds | Integration | “Straight spine priority” |
| Wall Angels | 10 slow reps | Active training | “Maintain wall contact” |
Progressive timeline: what to expect
Week 1-2: You’ll notice increased awareness of your posture throughout the day. Don’t be discouraged if the poses feel difficult—your muscles are learning.
Week 3-4: You’ll start catching yourself before you slouch. The poses will feel more natural, and you may notice less tension in your neck and shoulders.
Week 5-8: Your posture will begin to improve automatically. Others may comment that you look taller or more confident.
Beyond 2 months: Good posture becomes your new normal. You’ll maintain better alignment even during stressful or tired moments.
Scientific support for yoga and posture
Research consistently shows yoga’s effectiveness for posture improvement. A 2017 study in the International Journal of Yoga found that participants who practiced specific yoga poses for 8 weeks showed significant improvement in forward head posture and rounded shoulders.
Dr. Sarah Mitchell, a physical therapist specializing in postural correction, explains: “Yoga addresses both the flexibility and strength components needed for lasting postural change. Unlike passive stretching, yoga poses require active engagement, which builds the muscle memory needed for good posture.”
Another study published in the Journal of Physical Therapy Science demonstrated that just 4 weeks of targeted yoga practice reduced neck pain by 40% in office workers with forward head posture.
Troubleshooting common challenges
“I can’t hold the poses long enough” Start with 5-10 seconds and gradually increase. Quality matters more than duration.
“My wrists hurt in Downward Dog” Try using blocks under your hands or modify by placing forearms on the ground instead.
“I don’t feel anything in Mountain Pose” This means your body awareness needs development. Focus on micro-movements and breathing.
“Wall Angels are impossible” Start with just moving your arms up and down without worrying about maintaining wall contact. Build up gradually.
“I can’t reach in Cow Face Arms” Use a strap, belt, or towel. The stretch is beneficial even without touching fingers.
Equipment recommendations
Essential:
- Yoga mat with good grip (6mm thickness recommended)
- Yoga strap or belt for modifications
Helpful:
- Yoga blocks for support in poses
- Wall space for Wall Angels
- Timer or app to track hold times
Optional:
- Light weights (1-2 lbs) for advanced variations
- Foam roller for additional muscle release
Alternative poses for specific conditions
For lower back issues:
- Replace Cobra with gentle Sphinx pose (forearms down)
- Modify Locust by lifting only chest and arms
For neck problems:
- Keep head neutral in all poses
- Skip any pose that causes neck discomfort
- Focus extra time on gentle Cat-Cow movements
For shoulder injuries:
- Avoid Cow Face Arms until cleared by a healthcare provider
- Modify Down Dog by placing hands on blocks or an elevated surface
Workplace integration
Desk-friendly mini versions:
- Seated Mountain Pose: Practice alignment while sitting
- Shoulder blade squeezes: Pull shoulder blades together for 5 seconds
- Neck stretches: Gentle side-to-side movements
- Doorway chest stretch: Use office doorways for quick chest opening
Meeting break sequences: Between meetings, do a 2-minute version:
- Mountain Pose (30 seconds)
- Shoulder rolls (30 seconds)
- Wall Angels if available (1 minute)
Lifestyle tips to support your practice
Desk setup checklist:
- Monitor at eye level to prevent neck strain
- Keyboard and mouse positioned to keep elbows at 90 degrees
- Chair supports the natural curve of your lower back
- Feet flat on floor or footrest
Daily habits that help:
- Set hourly reminders to check your posture
- Take phone calls standing up when possible
- Sleep on your back with a thin pillow to maintain neck alignment
- Carry bags evenly distributed (not always on one shoulder)
When to see a professional
While yoga can significantly improve posture, some cases need professional help. Consider seeing a physical therapist if you experience:
- Persistent pain that doesn’t improve after 4 weeks of consistent practice
- Numbness or tingling in your arms or hands
- Severe headaches that worsen with movement
- Difficulty performing daily activities due to pain or stiffness
Consistency beats intensity
Ten minutes daily beats one hour weekly every time. Your muscles have memory. They’ve learned to slouch through repetition, and they’ll learn to stand tall the same way.
Your nervous system needs daily reminders of what good posture feels like. Miss a few days, and those old patterns creep back in. But stick with this routine, and you’ll start catching yourself before you slouch.
These poses address the root cause of slouching by balancing the muscles around your shoulders and spine.
Quick success tips:
- Practice at the same time each day to build a habit
- Use a mirror to check your form, especially for Wall Angels
- Start with shorter holds and gradually increase time
- Focus on quality over quantity—perfect form beats forcing a pose
FAQs
How quickly will I see results?
Most people notice increased body awareness within days. Physical changes typically appear after 2-3 weeks of consistent practice.
Can I do these poses if I have arthritis?
Gentle yoga can help arthritis, but consult your doctor first. Focus on pain-free movement and avoid forcing any position.
What if I miss a few days?
Don’t worry. Just restart when you can. Consistency over perfection is the key to long-term success.
Are these poses safe during pregnancy?
Most are safe in early pregnancy, but avoid Cobra and Locust in later stages. Always check with your healthcare provider.
Can kids do these poses?
Yes! Children often respond quickly to posture work. Make it fun by creating stories around each pose.
What’s the best time of day to practice?
Morning helps set good posture for the day. Evening practice can undo damage from hours of slouching. Choose what works for your schedule.


