One finding kept appearing across multiple studies. It challenges one of the biggest assumptions people have about building strength.
The common outlook on yoga is that it’s for flexibility, not strength. A push-up builds muscle. A barbell row builds muscle. Yoga, supposedly, just loosens what’s already there.
That distinction turns out to be shakier than it sounds. Hold a plank for sixty seconds, and the shoulders start trembling for the same reason they tremble under a loaded barbell: muscle fibers working against resistance, with nowhere to hide.
None of this requires equipment. Seven poses, ten minutes, a mat on the floor. What’s harder to explain is why researchers keep finding that a practice built around stillness produces some of the same strength markers as training built around motion.
Why Yoga for Strength Actually Works
Your body weighs enough to challenge your muscles on its own. Hold a chair pose, and your quads carry your full body weight through a bent-knee angle. Hold a plank, and your shoulders, core, and glutes all fire at once to keep you from sagging toward the floor.
A push-up uses that same principle to build arm and chest strength. Yoga poses do it too, and often ask more muscle groups to stabilize at the same time than a single-strength exercise does.
That’s isometric loading. The muscle contracts and holds, rather than shortening and lengthening through a full range of motion, the way a bicep curl does.
Both build strength. They load the tissue differently.
What the Research Actually Shows
Caren Lau and colleagues at the Chinese University of Hong Kong wanted to know whether a slow, static style of exercise could produce measurable strength gains in adults who weren’t already active. They tracked 173 Hong Kong adults through a 12-week Hatha yoga program, testing push-up and curl-up performance against a waitlisted control group who changed nothing about their routines.
The yoga group came out ahead on both tests, in men and in women, and the improvement was strong enough to hold up statistically even with a relatively small sample. The pattern wasn’t perfectly clean, though.
Among participants over 53, curl-up strength barely moved more than it did in the control group, even as push-up strength and flexibility improved in that same age group. Researchers still don’t fully agree on why older muscles respond unevenly to the same stimulus.
That unevenness shows up again on a larger scale. Divya Sivaramakrishnan and her team at the University of Edinburgh pooled 22 randomized trials on yoga and physical function in older adults.
Lower-body strength came out significantly better in the yoga groups, whether the comparison was against people doing nothing or against people doing another structured exercise program. The effect was real but modest, roughly the size you’d expect from a solid home fitness routine, not from months in a weight room.
The most direct test came from Neha Gothe and Edward McAuley at the University of Illinois, who randomly assigned 118 sedentary older adults to either eight weeks of Hatha yoga or eight weeks of conventional stretching-and-strengthening exercise. Both groups improved by similar amounts on standardized balance, strength, and mobility tests. Yoga held its own against a program built specifically to build strength.
That trial didn’t include anyone who did nothing at all, so it can’t say how either group would have fared against a couch. It can only say yoga wasn’t the weaker option on the table.
Some of what’s happening here is what exercise scientists call neuromuscular adaptation. Before muscle tissue itself grows, the nervous system gets more efficient at recruiting the fibers already there, and that shows up as real strength gains within a few weeks.
True tissue-level adaptation follows later, and only if the loading stays consistent enough to demand it. That two-stage timeline is part of why a beginner routine can feel dramatically easier by week three, well before any visible change in the mirror.
The Muscle Groups You’ll Work
This routine hits every major muscle group: front, back, upper, and lower body. Nothing gets left out.
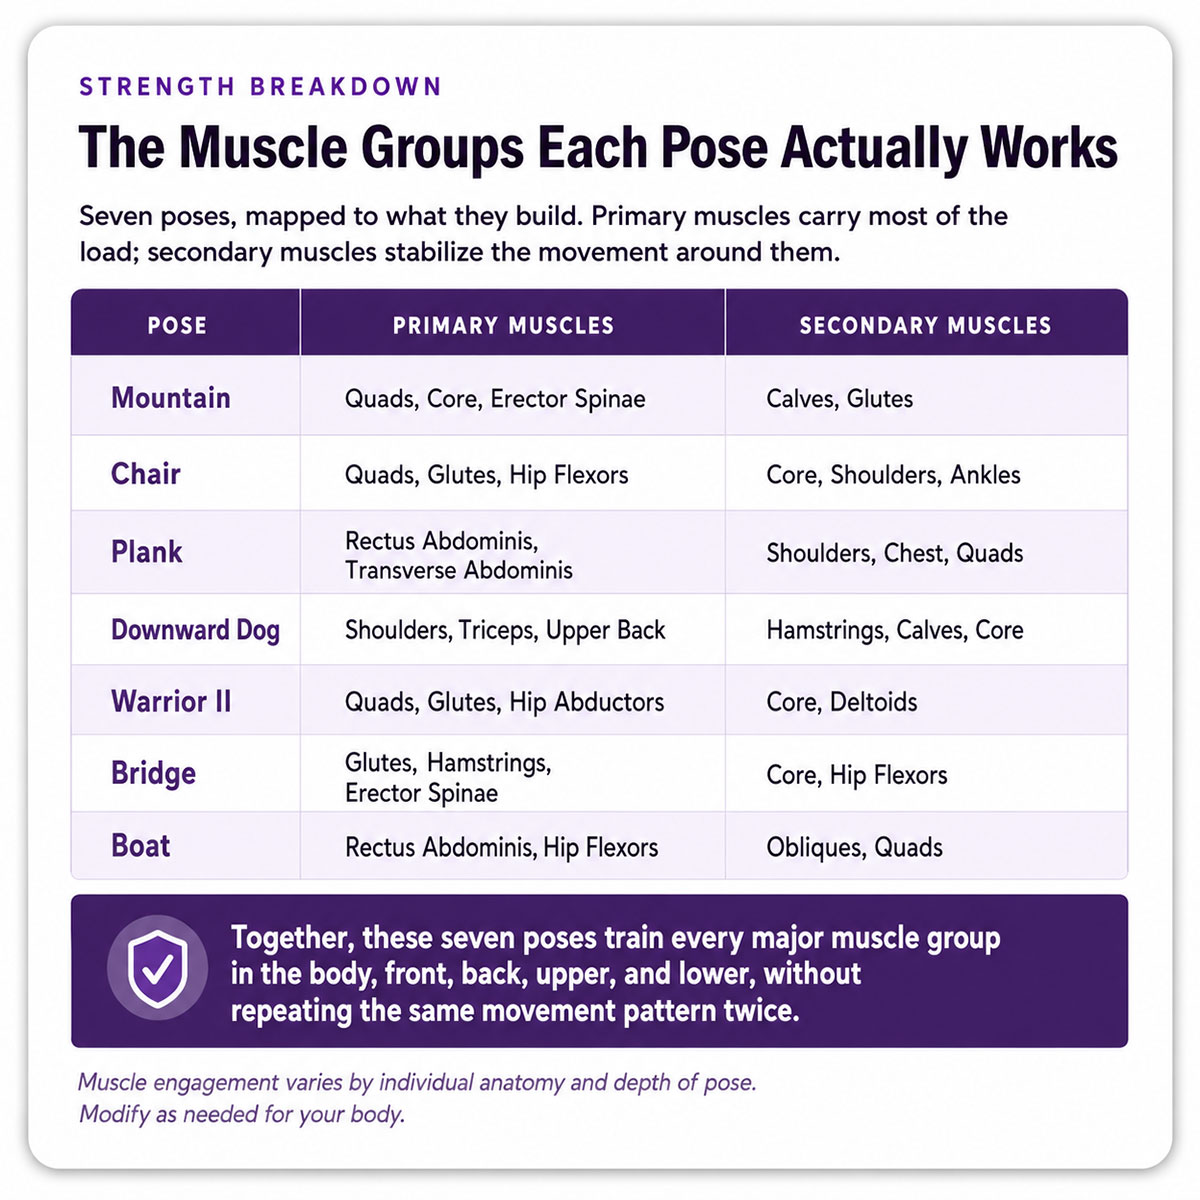
Chair Pose and Warrior II load the quads and glutes the way a wall sit would. Plank and Boat Pose load the core the way a dead bug or a hollow hold would. Downward Dog and Bridge Pose ask the shoulders and posterior chain to do work that most people only assign to rows and deadlifts.
Which Type of Yoga Actually Builds Strength?
Not all yoga trains the body the same way, and that’s worth sorting out before you roll out a mat.
Hatha yoga, the style behind every study above and the style this routine is built on, holds each pose for a stretch of breaths before moving to the next one. That stillness is the point. It’s what creates the isometric loading described earlier, and it’s forgiving enough for someone who has never done a single push-up.
Vinyasa and Power Yoga link poses into a continuous flow, closer to a cardio-strength hybrid than a series of static holds. They raise the heart rate more and burn more calories per session.
They also move fast enough that a beginner’s form tends to break down before the strength benefit shows up. Save those styles for once the poses in this routine feel familiar in your body, not before.
What You’ll Need
Yoga for strength at home doesn’t ask for much.
Essential:
- A yoga mat, or a towel on carpet, works fine
- Comfortable clothing that lets you move
- A water bottle
- Clear floor space about 6 feet by 3 feet
Optional but helpful:
- Yoga blocks or a stack of thick books for modifications
- A chair or wall for balance support
- A timer or phone to track holds
Cost drops to zero if you already own a towel and some floor space. A basic mat costs $15 to $30, and that’s the only piece of equipment most people ever buy.
Your 10-Minute Full-Body Strength Routine
Seven poses, moving in a sequence that warms the body before asking more of it. Hold each pose for the recommended time. Focus on breath and form over speed.
Breathing Guide: Use Your Breath
Breath powers the practice, and it follows a simple pattern.
- Inhale during lengthening movements, such as raising your arms or lifting your chest.
- Exhale during deepening movements, such as folding forward or sinking lower into a pose.
- While holding a pose, breathe steadily on a four-count in and a four-count out through your nose.
- Never hold your breath. If you can’t breathe smoothly, ease up on the pose.
PRO TIP: Set a timer for each pose and don’t watch the clock. Watch your breath instead.
Pose 1: Mountain Pose (Tadasana) – The Foundation (1 minute)
Focus: Grounding and full-body engagement
- Stand with your feet hip-width apart and press all four corners of each foot into the mat.
- Lift your kneecaps slightly without locking your knees, and draw your belly button toward your spine.
- Roll your shoulders back and down, then reach your arms alongside your body with palms facing forward.
- Lengthen through the crown of your head and hold, breathing steadily for one minute.
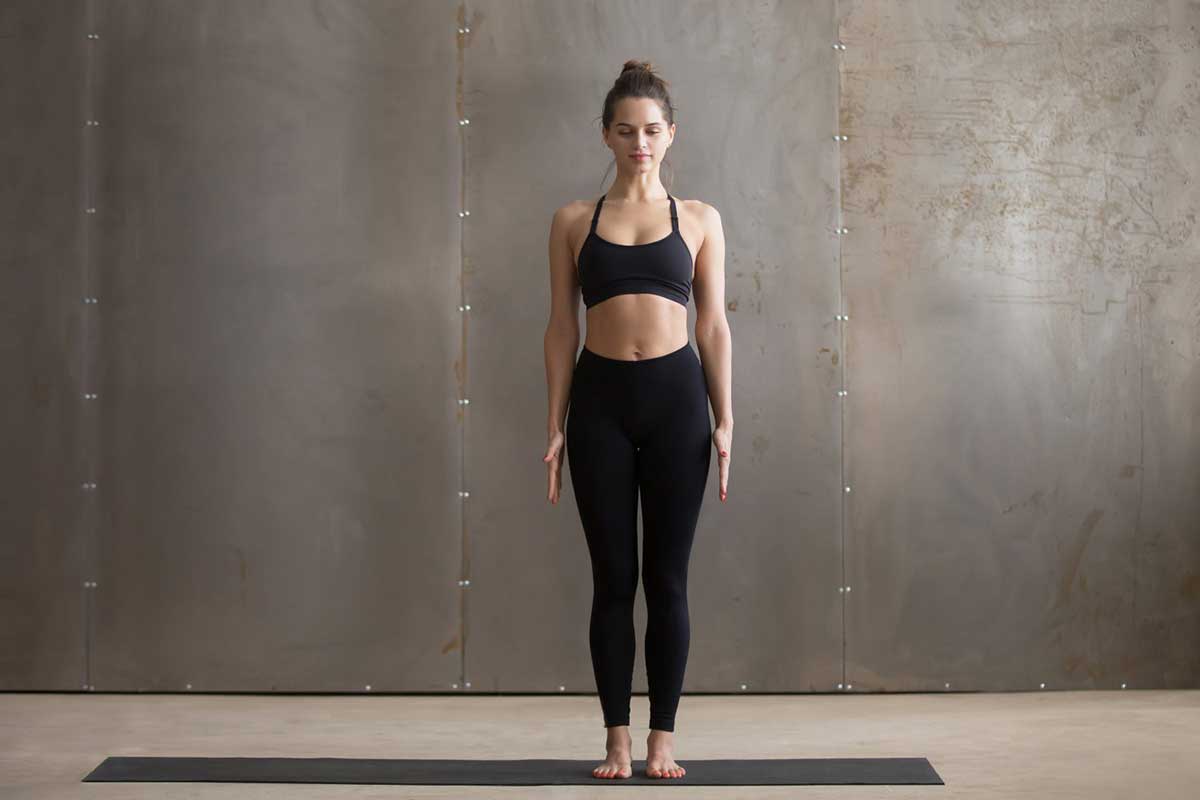
Strength Benefit: This isn’t standing still. Your legs, core, and back all activate to hold you upright, and that’s the stable base every other pose in this routine builds from.
Pose 2: Chair Pose (Utkatasana) – The Lower Body (1 minute)
- From Mountain Pose, bend your knees and sink your hips back as if sitting into a chair.
- Shift your weight into your heels until you can wiggle your toes freely.
- Raise your arms overhead with palms facing each other, and press your thighs together for extra engagement.
- Keep your chest lifted and your gaze forward, and hold for one minute.
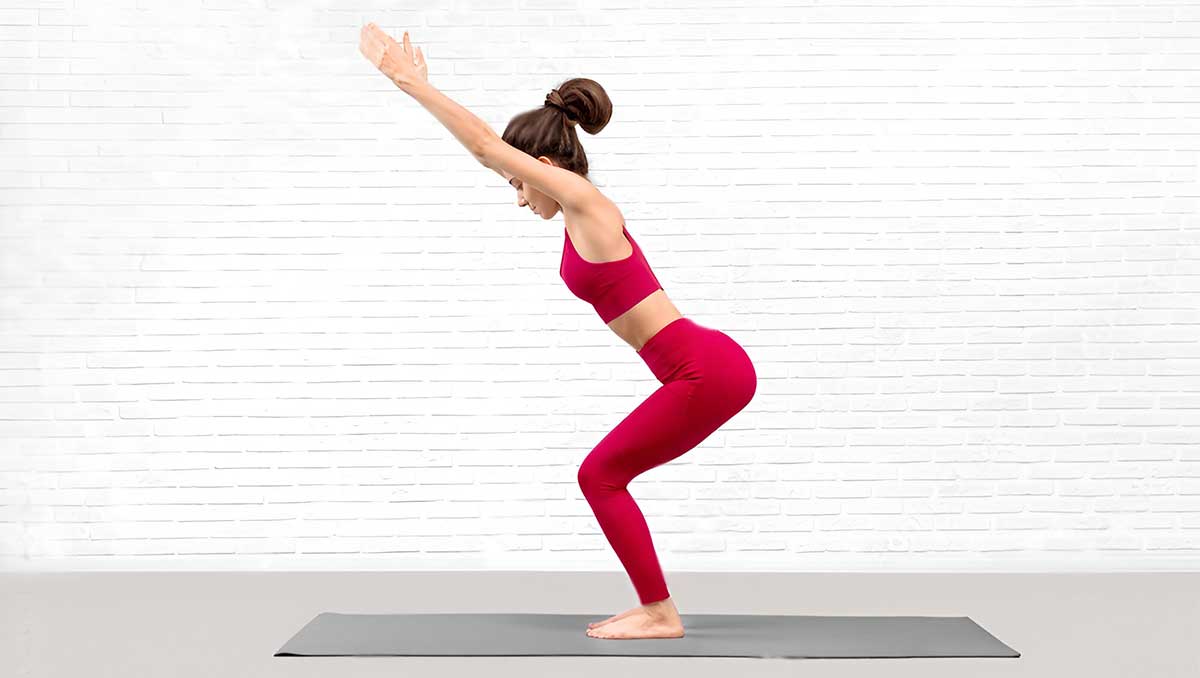
Modification: New to this pose? Don’t sink as deep. Even a small bend works the same muscles.
Your thighs will burn partway through, mostly in the quads and glutes, with your ankles working quietly to keep you balanced. That’s the muscle working, not a warning sign, and each breath helps you hold a few seconds longer than the last.
Pose 3: Plank Pose (Phalakasana) – The Core Builder (1 minute)
Focus: Core, shoulders, and arm strength
- Start on your hands and knees, then step your feet back one at a time.
- Stack your shoulders directly over your wrists and form a straight line from head to heels.
- Pull your belly button toward your spine and squeeze your glutes and quads.
- Keep your hips level, neither sagging nor piking, and breathe steadily for one minute.
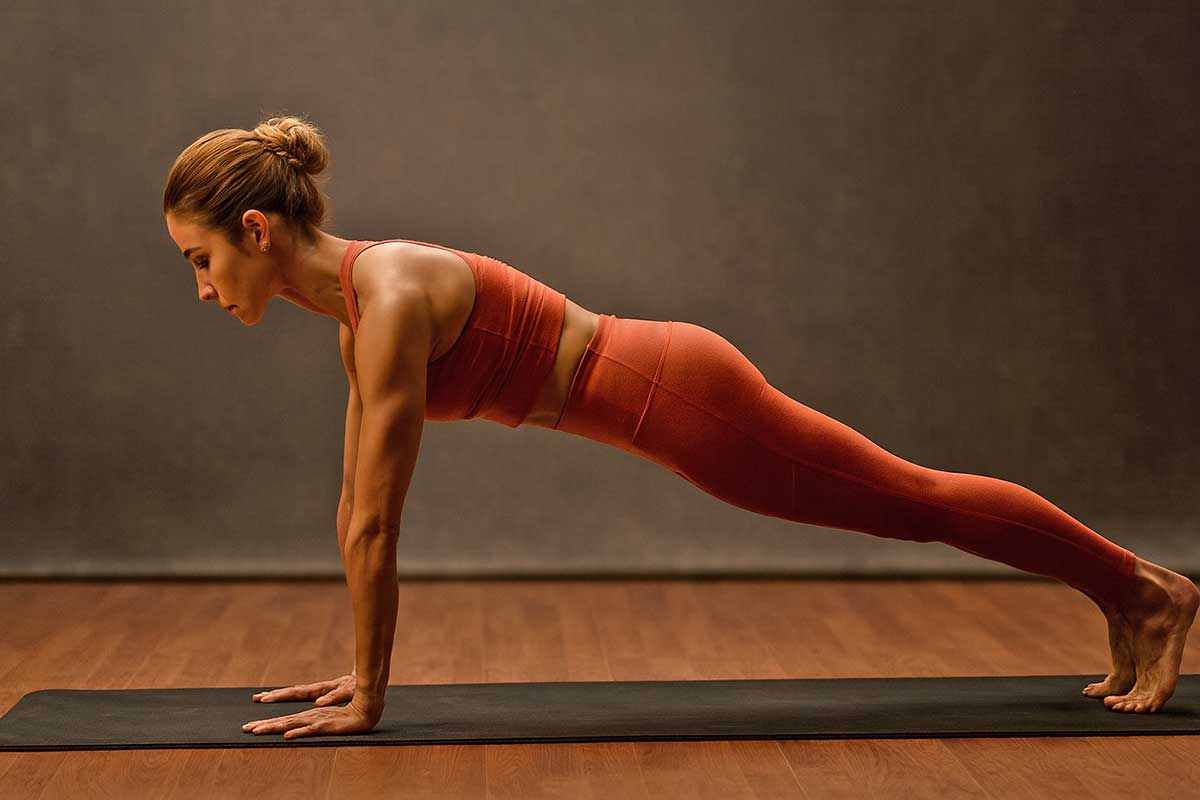
Modification: Drop to your knees to build the same strength without straining your lower back, keeping everything else identical.
Break the minute into two 30-second holds if you need to, resting in child’s pose between them. Why do the shoulders shake here before almost anywhere else in the routine?
A Pose We Left Out (And Why): Chaturanga Dandasana, the low push-up hold that shows up constantly in flow-style yoga classes, is arguably the single best strength-builder in the vinyasa tradition. It’s also one of the easiest poses to strain a shoulder in, especially during your first few weeks of practice, since it demands precise elbow tracking under real load.
This routine leaves it out on purpose. Get comfortable with Plank first, and Chaturanga becomes a natural next step once your shoulders know what stable actually feels like.
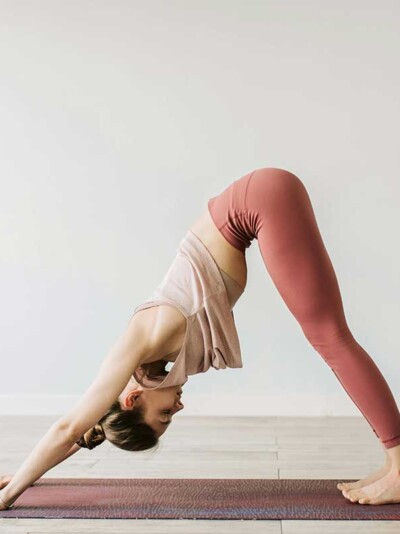
Pose 4: Downward-Facing Dog (Adho Mukha Svanasana) – Upper Body and Hamstrings (2 minutes)
Focus: Shoulder, arm, and back strength, plus hamstring flexibility
- From Plank, lift your hips up and back to form an inverted V with your body.
- Spread your fingers wide and press your palms firmly into the mat.
- Rotate your upper arms outward to broaden your shoulders, bending your knees generously if your hamstrings are tight.
- Let your head hang naturally between your arms and breathe deeply for two minutes.
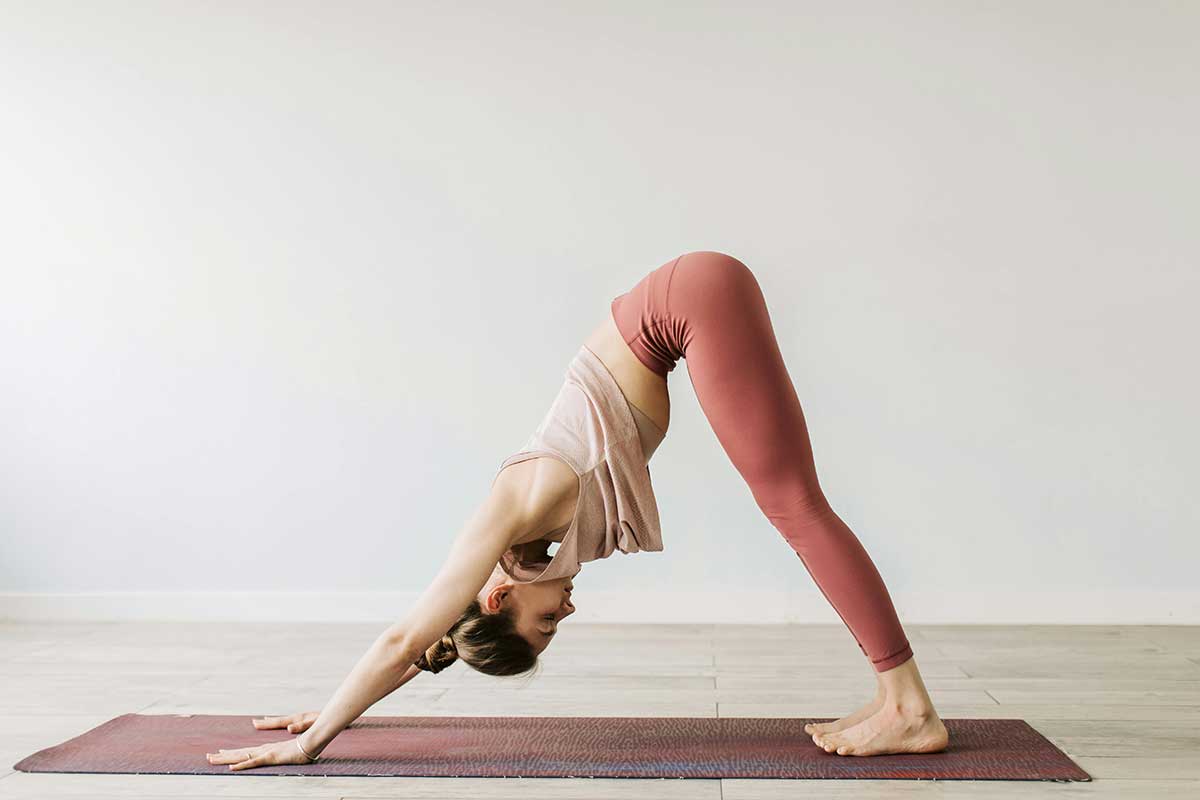
Modification: If your wrists ache here, drop to your forearms in a dolphin-pose variation instead, keeping the same inverted-V shape through your torso.
Pose 5: Warrior II (Virabhadrasana II) – Power and Endurance (2 minutes total, 1 minute per side)
Focus: Leg strength, outer hips, core, and shoulders
- Step your feet wide apart, about three to four feet, and turn your right foot out 90 degrees.
- Turn your left foot in slightly and bend your right knee to a 90-degree angle, keeping the knee stacked over your ankle.
- Extend your arms out to the sides at shoulder height with palms facing down, keeping your torso centered between your legs.
- Gaze over your right fingertips and hold for one minute, then switch sides.
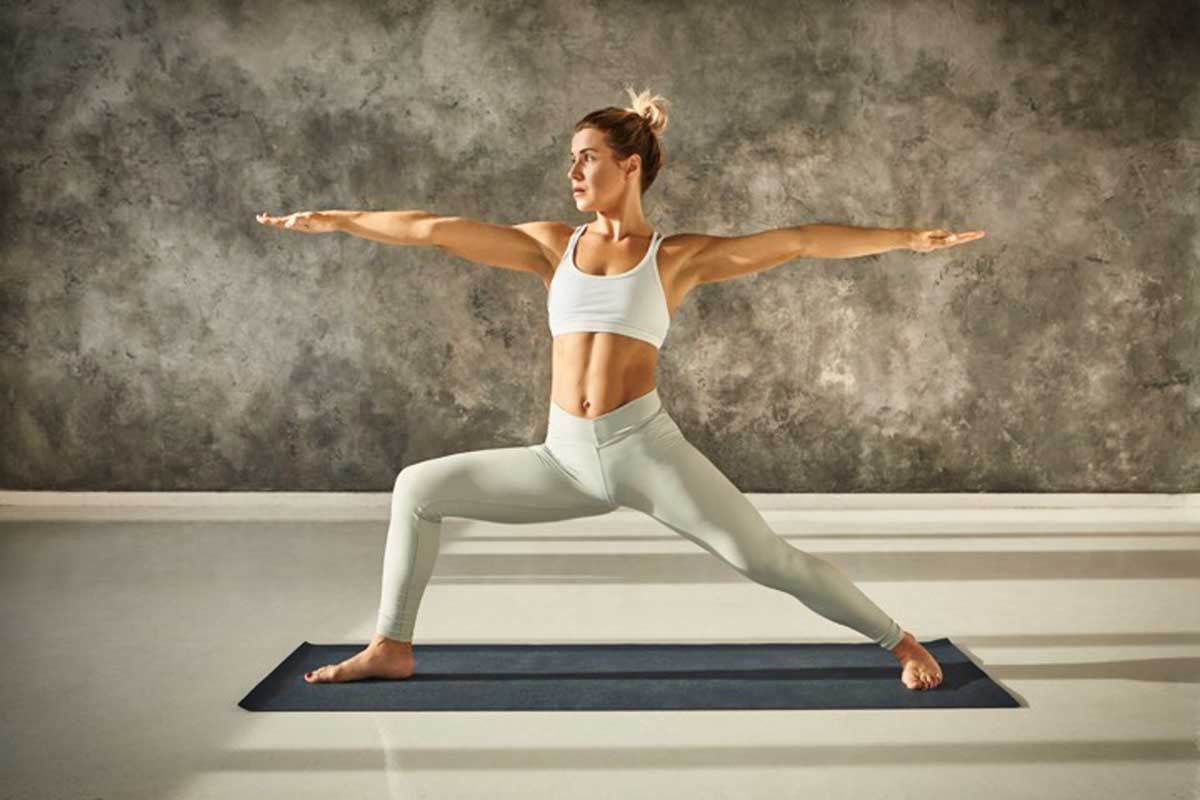
Strength Benefit: This pose builds the kind of leg endurance you’d need for a long hike or a hard run, while your shoulders and core stay switched on to hold your arms level the entire time.
That finding took a while to sink in. A static hold that never changes shape can still fatigue muscle as thoroughly as repeated movement does. Your front thigh will feel exactly that by the second half of the minute.
Pose 6: Bridge Pose (Setu Bandhasana) – The Posterior Chain Strengthener (1 minute)
- Lie on your back with your knees bent and feet flat on the mat, hip-width apart.
- Press your arms and palms into the floor alongside your body.
- Press into your feet and lift your hips toward the ceiling, keeping your knees aligned over your ankles.
- Lift your chest toward your chin and hold for one minute, breathing steadily.
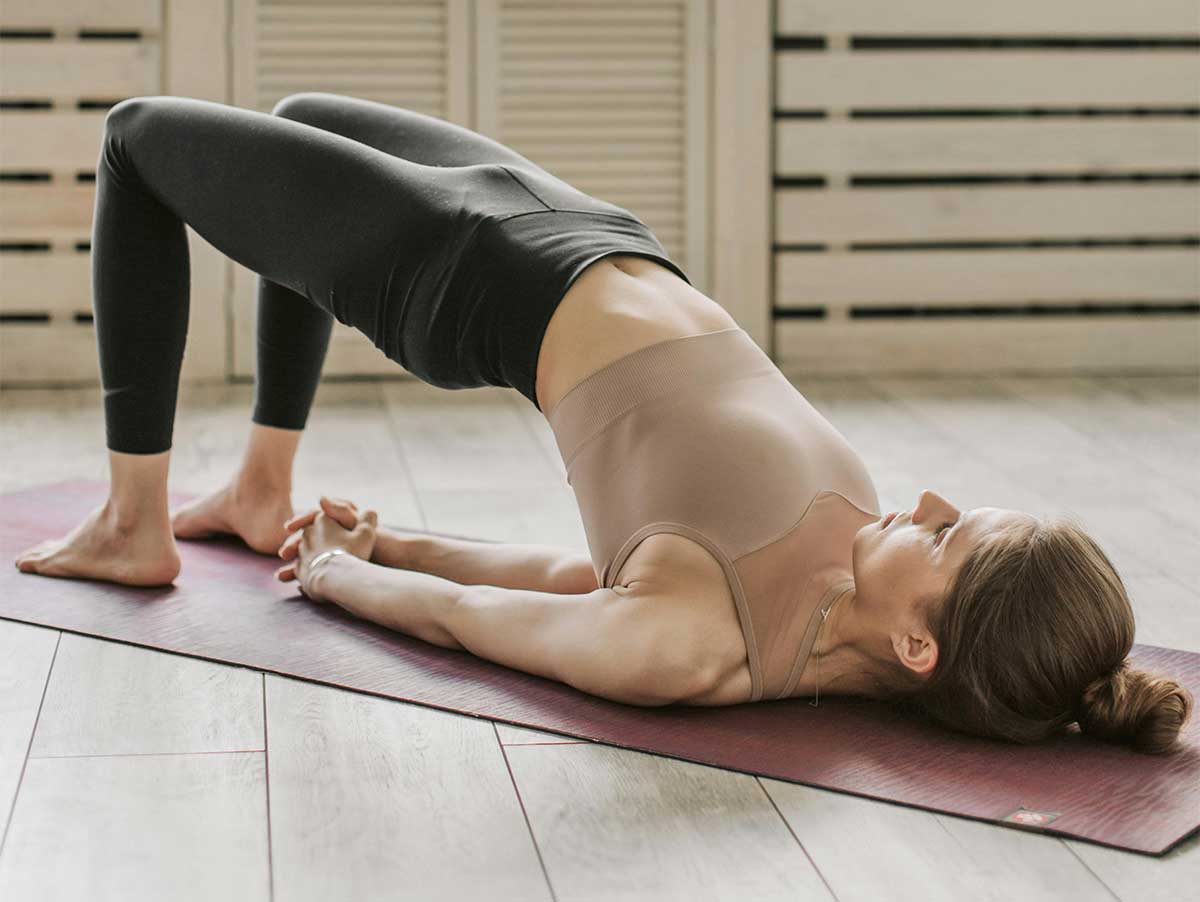
Strength Benefit: Bridge Pose activates your glutes, hamstrings, and lower back all at once, a detail that matters more than it sounds for anyone who sits most of the day. Squeeze your glutes hardest right at the top of the lift, where the real work happens.
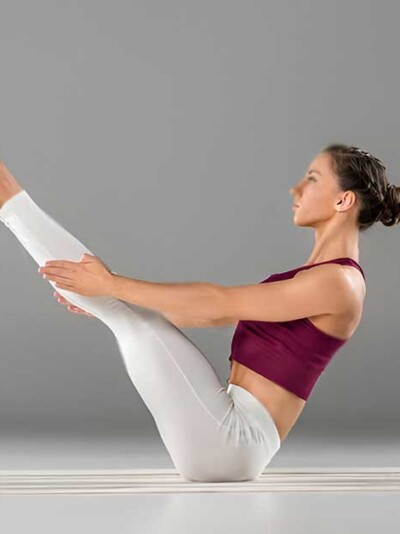
Pose 7: Boat Pose (Navasana) – Deep Core Finisher (1 minute)
Focus: Deep abdominal muscles
- Sit on the mat with your knees bent and feet flat on the floor.
- Lean back slightly and lift your feet off the floor, keeping your shins parallel to the ground.
- Reach your arms forward alongside your legs with palms facing each other.
- Balance on your sit bones with your chest lifted and hold for one minute.
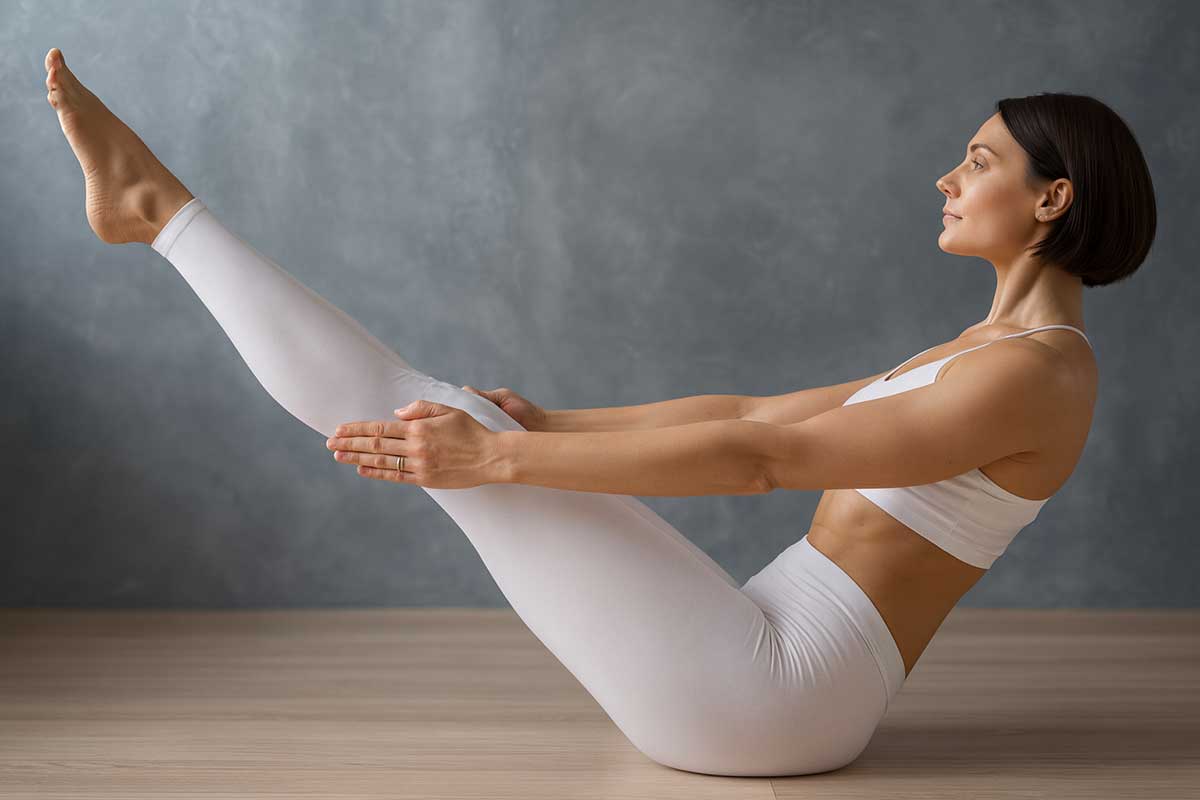
Modification: Hold the backs of your thighs for support if your lower back rounds, or keep your knees bent throughout. Either version still works the core hard.
Your abs will shake. That’s fatigue and adaptation, not failure.
Pose 8: Savasana (Corpse Pose) – Cool-Down (1 minute)
Focus: Recovery and integration
- Lie flat on your back and let your legs fall open naturally.
- Rest your arms alongside your body with palms facing up.
- Close your eyes and let your breathing return to its natural rhythm.
- Stay for one full minute before getting up.
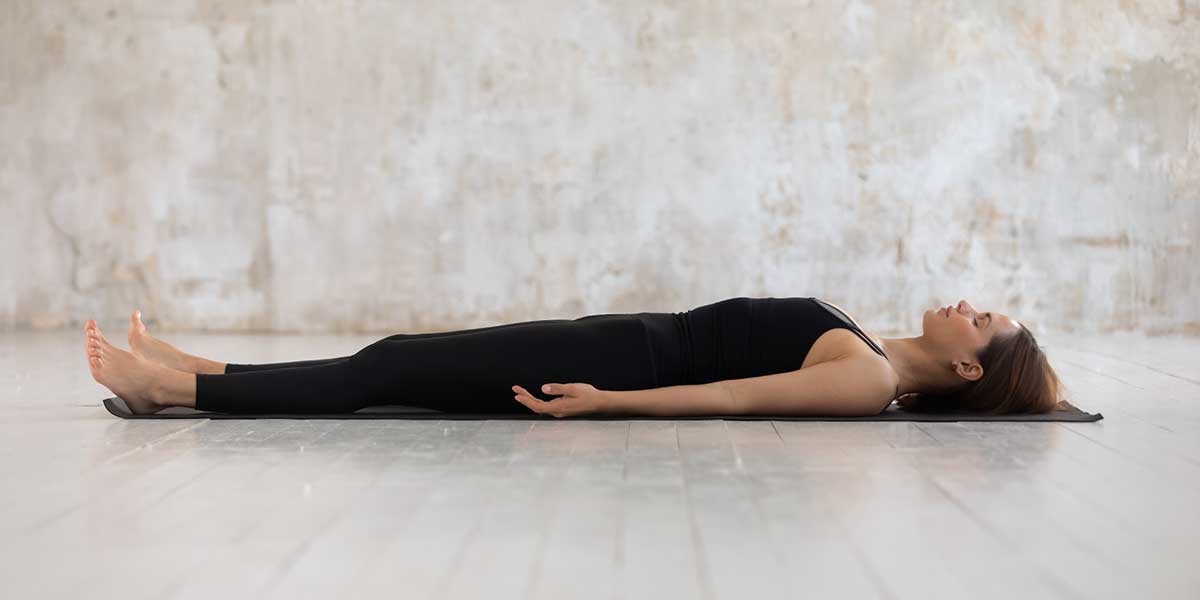
This final minute is where your nervous system shifts from effort back to rest, and your muscles start integrating the work you asked of them. Don’t skip it to save time. It’s doing something the other seven poses can’t.
10-Minute Yoga Strength Routine
Follow along, no gym required
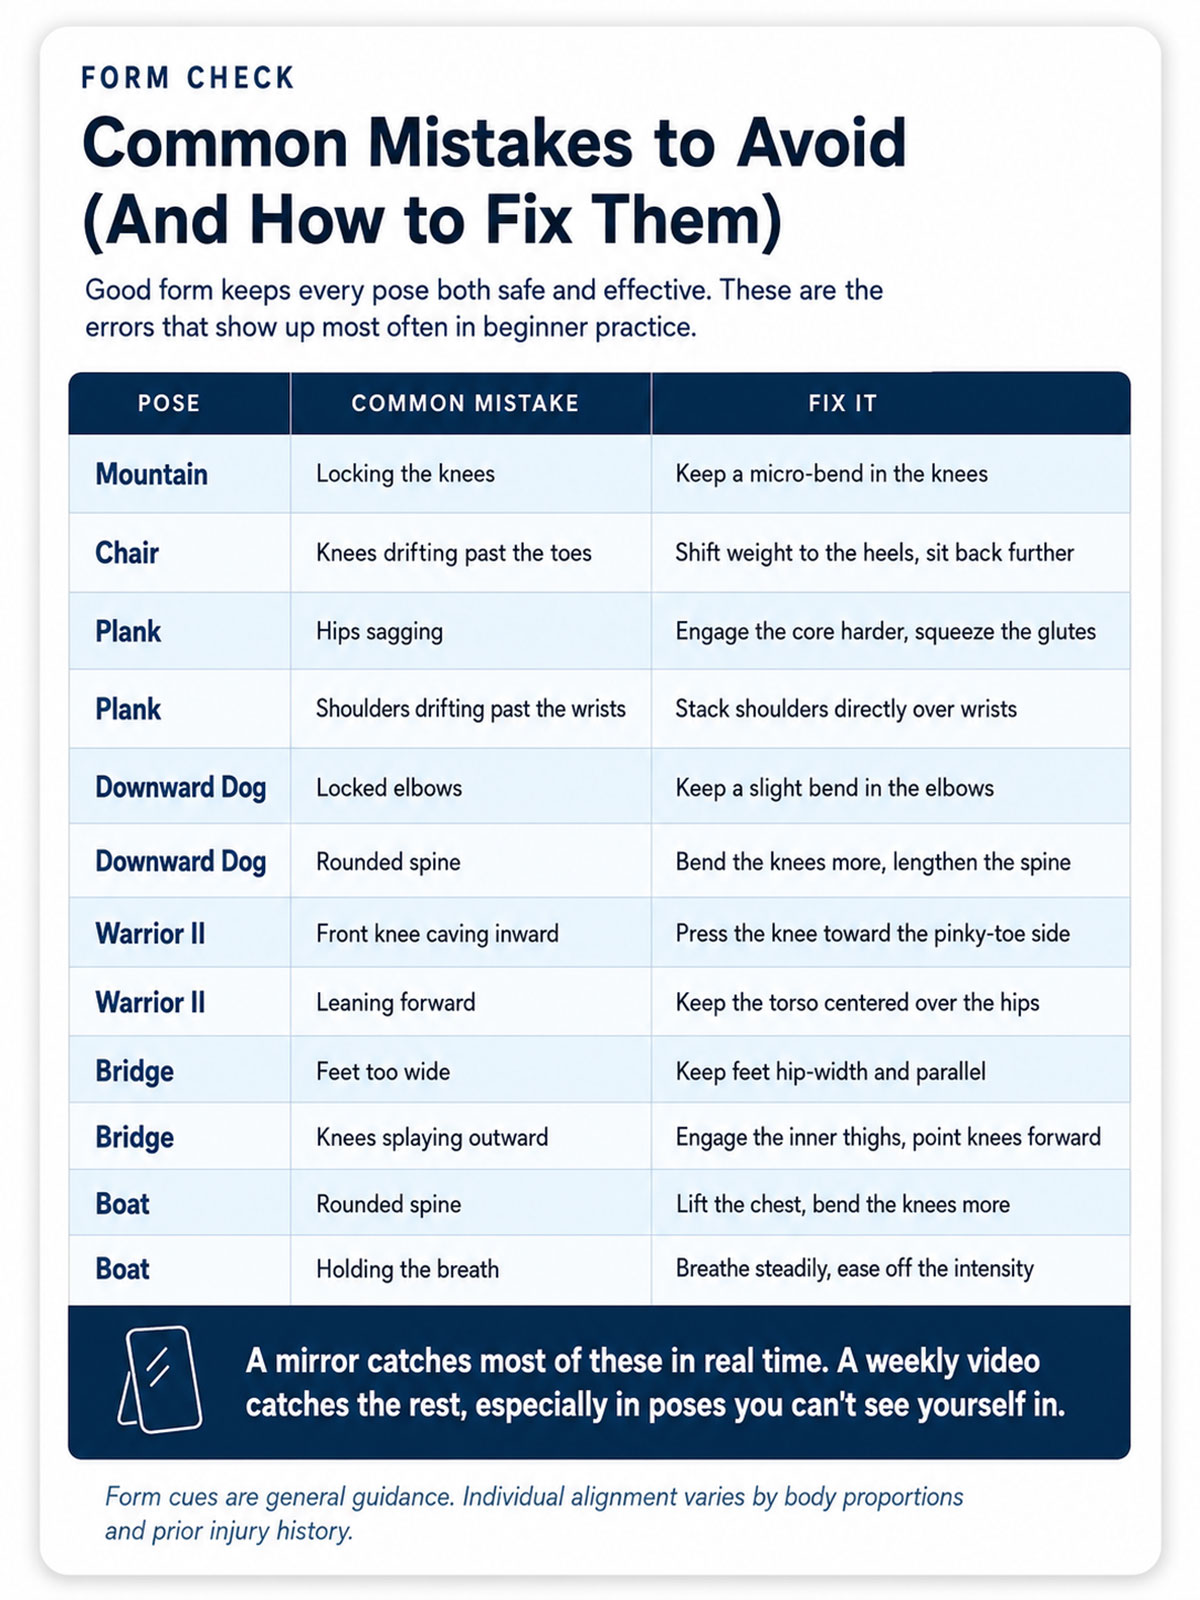
Common Mistakes to Avoid
Good form keeps a pose both safe and effective. Watch for these patterns as you build the routine into a habit.
A mirror helps catch most of these in real time. Filming yourself once a week catches the rest, especially in poses like Downward Dog, where you can’t see your own spine.
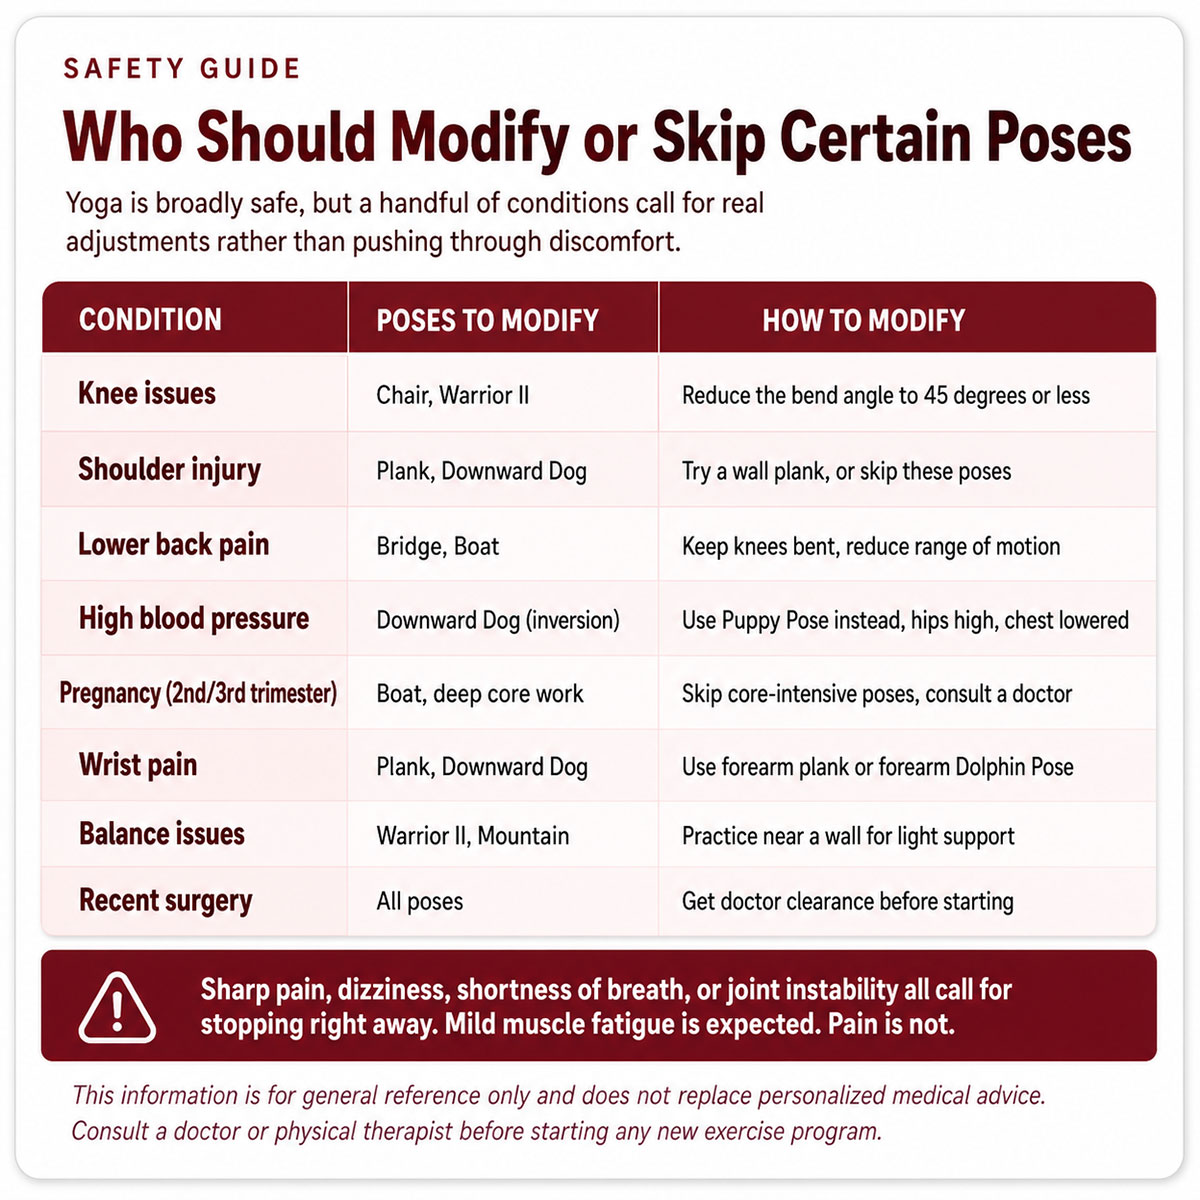
Safety First: Who Should Modify or Skip
Yoga is generally safe, but a handful of conditions call for real adjustments rather than pushing through.
Sharp pain, dizziness, shortness of breath, or joint instability all call for stopping immediately. Mild muscle fatigue is expected. Pain is a different signal entirely, and it’s the one worth listening to.
Track Your Progress
Strength builds gradually enough that it’s easy to miss your own progress without something tracking it for you.
Signs it’s working: holding poses longer without shaking as much, needing fewer modifications, steadier balance in standing poses, and transitions between poses starting to feel smooth instead of abrupt.
Making It a Habit: Consistency and Progression
Ten minutes daily beats one long session a week, and it isn’t close. Consistency builds strength faster than occasional hard efforts do, because the nervous system adaptations described earlier need repetition more than they need intensity.
Pick a time that actually fits your day. Morning practice sets a tone, evening practice unwinds one.
The right time is whichever one you’ll actually do.
A few things make the habit stick: practicing at the same time each day, rolling out the mat the night before so it’s already there, and not judging a day when you only manage five minutes instead of ten.
Rest matters as much as effort. Muscles get stronger during recovery, not during the workout itself, so take at least one full day off each week.
Work within your limits, and never push through sharp pain. Discomfort during effort, the muscle burn, the shaking, the general sense of being challenged, is normal and expected.
Pain is different: sharp, joint-centered, the kind that makes you wince or hold your breath. Choose discomfort over pain every time.
Progress here isn’t a straight line, and it doesn’t need to be. In the first two weeks, focus stays on learning the poses and using every modification you need.
By weeks three and four, most people can hold the full times and start dropping modifications. From week five onward, add roughly 15 seconds per pose and try fuller expressions of poses you’ve been modifying.
Somewhere past week eight, a lot of people find they’re ready to add a second daily session, or start exploring poses this routine didn’t include. Chaturanga is a natural place to start.
Troubleshooting Common Problems
Most snags in this routine have a quick fix.
A routine that’s started to feel too easy after a month isn’t a problem. It’s the neuromuscular adaptation described earlier, doing exactly what it’s supposed to do. Add time before you add complexity.
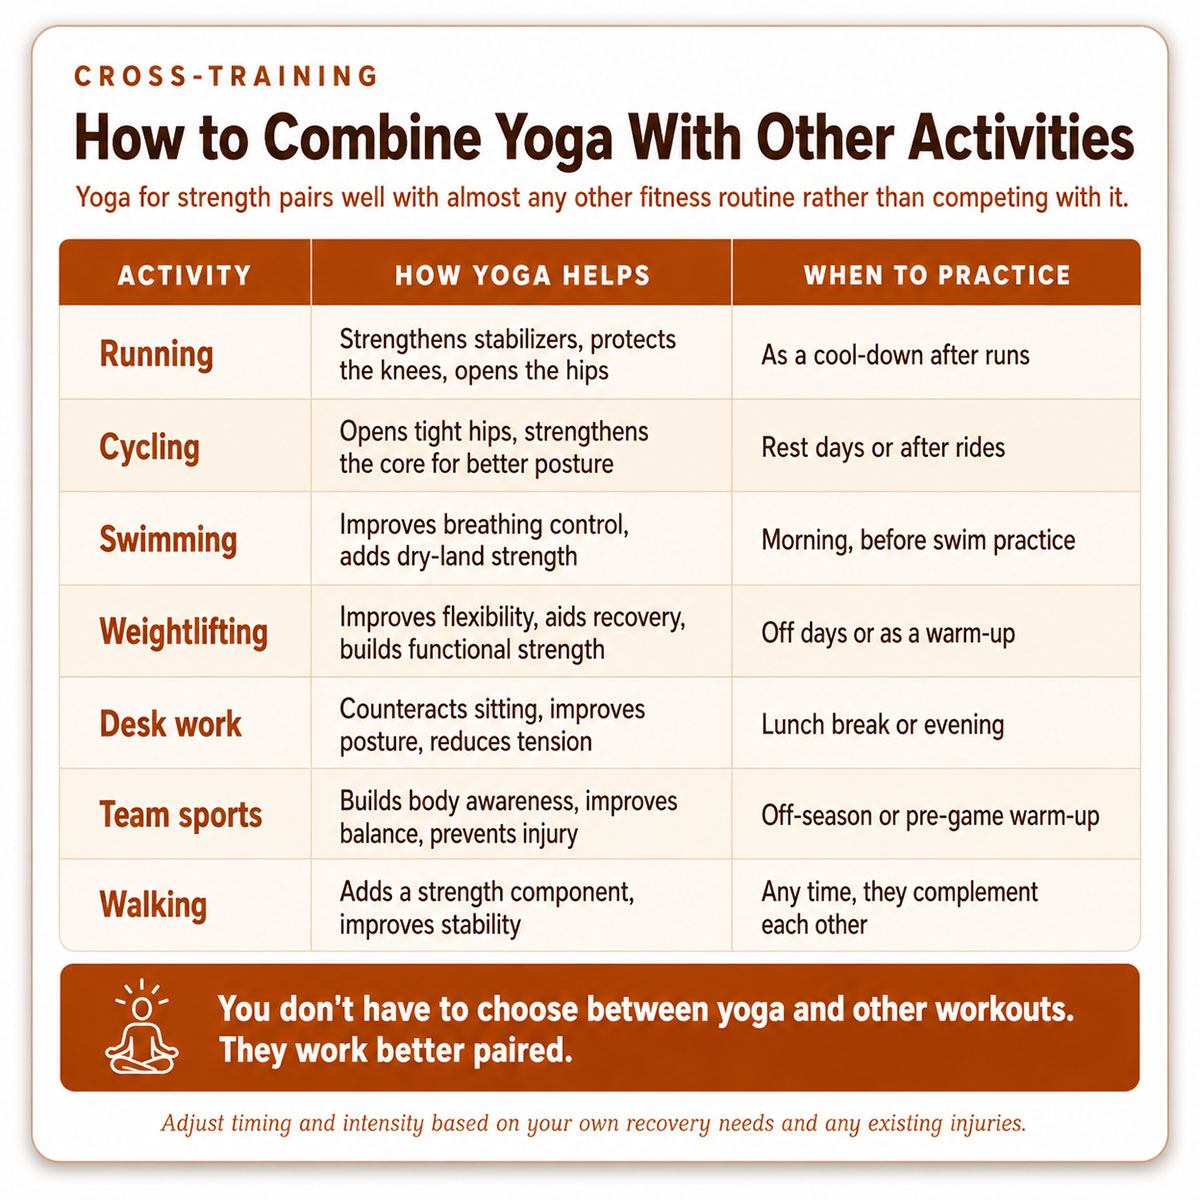
Combine Yoga With Other Activities
Yoga pairs well with almost any other fitness routine rather than competing with it.
None of this requires choosing yoga over anything else. It requires ten spare minutes and a decision about when they happen.
Where This Leaves You
The evidence doesn’t say yoga replaces a barbell, and it was never trying to. What it says is narrower and, in a way, more useful: a practice built entirely around stillness can produce real, measurable strength, using nothing but the weight you already carry around all day. That’s a lower bar to clear than most people assume starting out.
Seven poses, ten minutes, no equipment beyond a towel. The research took years to run. Starting takes considerably less.
FAQs
Can yoga really build muscle like weightlifting?
Yoga builds lean muscle and functional strength rather than the kind of size a dedicated weightlifting program produces. The Hong Kong trial described earlier found significantly better push-up scores in the yoga group than in people who changed nothing about their routine, which is real evidence of strength gains without a single weight in the room.
Should I do this routine before or after cardio?
Either works. Before cardio, it warms up the muscles you’re about to use, and after cardio, it supports recovery while those same muscles are still warm.
Try both and notice which one your body responds to better.
Can I do this routine every day?
Yes, with 24 hours of recovery between sessions, most people handle daily practice fine, though it’s worth skipping a day if you’re sick, injured, or a specific muscle feels overly strained rather than fatigued.
I can’t hold poses for the full time. What should I do?
Hold whatever you can, even 15 seconds, rest for a few breaths, then try again. Add five to ten seconds most weeks, and you’ll hit the full times within a month.
Progress isn’t linear. Some days go better than others, and that’s not a sign anything’s wrong.
Do I need to be flexible to start?
No. Strength often arrives before flexibility does, and plenty of people start this routine with genuinely tight hamstrings. The two develop together over time, so don’t let a tight muscle keep you off the mat.
What if I have an injury?
Check with a doctor or physical therapist before starting anything new. Most injuries have a workable modification, and the ones covered in the Safety First section above address the most common issues, but when in doubt, ask a professional rather than guessing.
Will this help me lose weight?
This routine burns calories and builds muscle, which supports metabolism, but weight loss depends mostly on nutrition. Think of it as a strength practice that supports weight management as part of a broader approach, not a standalone solution.