Research suggests lasting posture changes don’t come from simply sitting straighter. Learn why yoga takes a different approach, and which 7 poses to start with.
The standard advice for rounded shoulders has always been to sit up straight, as though posture were a habit you could practice more diligently. Rehabilitation research has reframed this approach. Posture is the physical outcome of whatever muscle balance your body has settled into after years of daily use, not the quality of your self-reminders.
When you’ve been sitting at a desk for years, specific muscles on the front of your body shorten. Your pectoralis major and minor, along with your anterior deltoids, become progressively tighter. Meanwhile, the rhomboids and middle trapezius, the muscles responsible for pulling your shoulders into proper position, stretch out and lose their ability to generate force.
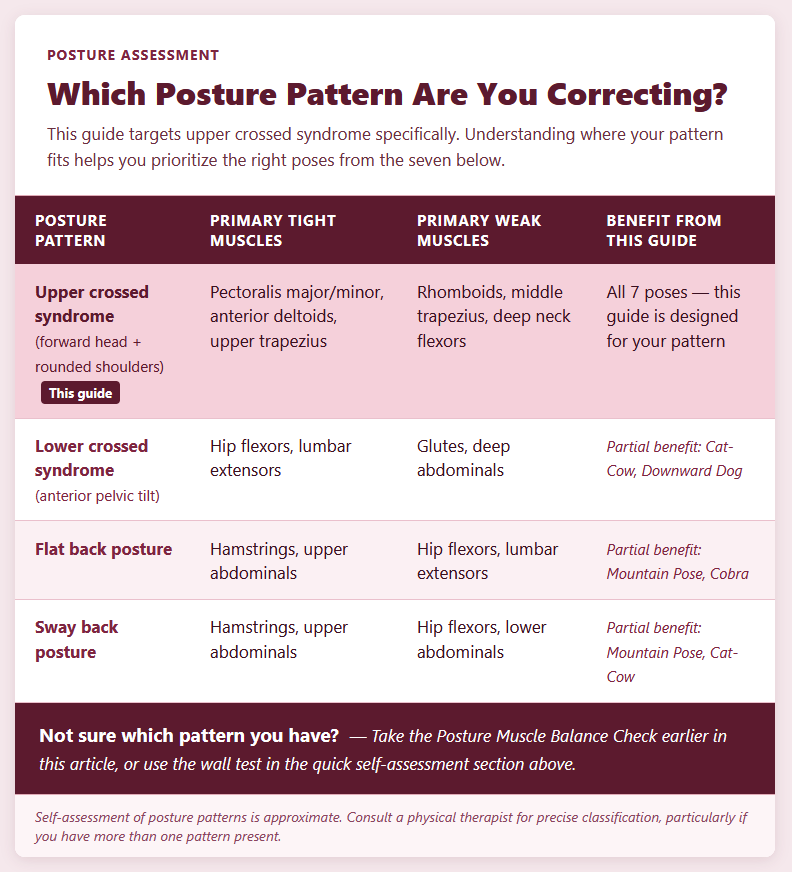
This pattern has a name in clinical circles: upper crossed syndrome. It describes the combination of forward head posture and rounded shoulders that develops when anterior muscles become dominant over a weakened posterior chain. Most self-correction attempts wear off within minutes, because they address the tightness without rebuilding what’s weak. This is the problem that yoga for posture correction is designed to solve.
Quick self-assessment: do you have slouching shoulders?
Stand against a wall with your back flat. Let your arms hang naturally at your sides. If your knuckles face forward rather than toward your thighs, your shoulders are rotated inward. That rotation is the muscle imbalance, not a posture choice.
Other signs worth noting:
- Your head sits forward of your shoulders when someone photographs you from the side
- You feel tightness across the chest when you try to pull your shoulders back
- Your upper back rounds visibly when you sit or stand without consciously thinking about it
- You can pinch more than an inch of skin between your shoulder blades without discomfort
If three or more of those apply, you have forward shoulder posture in some form. The posture muscle balance check below will help identify which specific muscles need the most attention before you begin the routine.
Posture Muscle Balance Check
5 questions to identify which muscle imbalance pattern you have — and which poses from this guide to prioritize first.
The hidden costs of poor posture
Forward head posture and rounded shoulders do more than affect appearance. When the thorax is compressed, and the ribcage is prevented from expanding fully, breathing becomes shallower. Research on posture and respiratory mechanics shows that sustained slouching restricts diaphragm movement and reduces the volume available for each breath, which over time can contribute to fatigue and reduced oxygen delivery to working muscles.
The relationship between posture and headaches is also well documented. A study published in the journal Headache found that the degree of forward head posture correlated positively with headache frequency and duration in people with chronic tension-type headaches.
The proposed mechanism involves sustained muscle tension in the suboccipital region at the base of the skull. The finding does not mean poor posture causes every tension headache, but the correlation is significant enough that correcting the posture is worth doing regardless of whether headaches are a current complaint.
The science behind your slouch
The muscle imbalance driving rounded shoulders follows a predictable pattern. On the front of the body, the pectoralis major and minor, the anterior deltoids, the upper trapezius, and the levator scapulae all become shortened and overactive. On the back, the rhomboids, middle and lower trapezius, and deep neck flexors weaken and lengthen. The result is a literal pulling contest that the front of the body wins by default.
This table maps the imbalance in more detail:
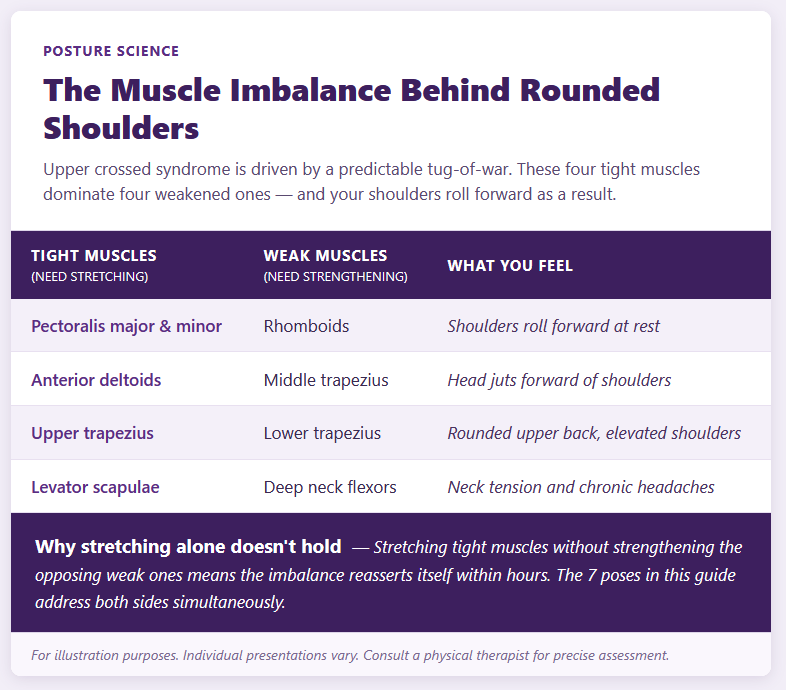
Understanding which muscles fall into which category matters because it changes what you prioritize. The poses in this guide are not a generic yoga sequence. Each one was chosen to address a specific entry in that table, either by stretching an overactive muscle or by loading a weakened one.

Why yoga for posture correction works differently from stretching alone
Stretching the chest is the most common home remedy for rounded shoulders. It works, briefly, and then the same muscles tighten again within hours. This happens because of a mechanism called reciprocal inhibition: when only the tight muscle is addressed, the opposing weak muscle cannot generate enough force to maintain the corrected position once the stretch ends.
Yoga for posture correction works differently because certain poses simultaneously stretch one muscle group and load the one opposing it. Cobra pose stretches the pectoralis major while activating the rhomboids. Wall Angels stretch the anterior shoulder while building strength in the external rotators. That dual action is what makes the correction last beyond the end of the session.
Most general yoga classes prioritize full-body flexibility and mobility, which is valuable for different reasons. The seven poses below are selected specifically for the upper crossed syndrome pattern. The seven poses below may not be the most advanced or well-known in yoga, but they are the most targeted ones for correcting this specific imbalance pattern.
7 yoga poses for posture correction and rounded shoulders
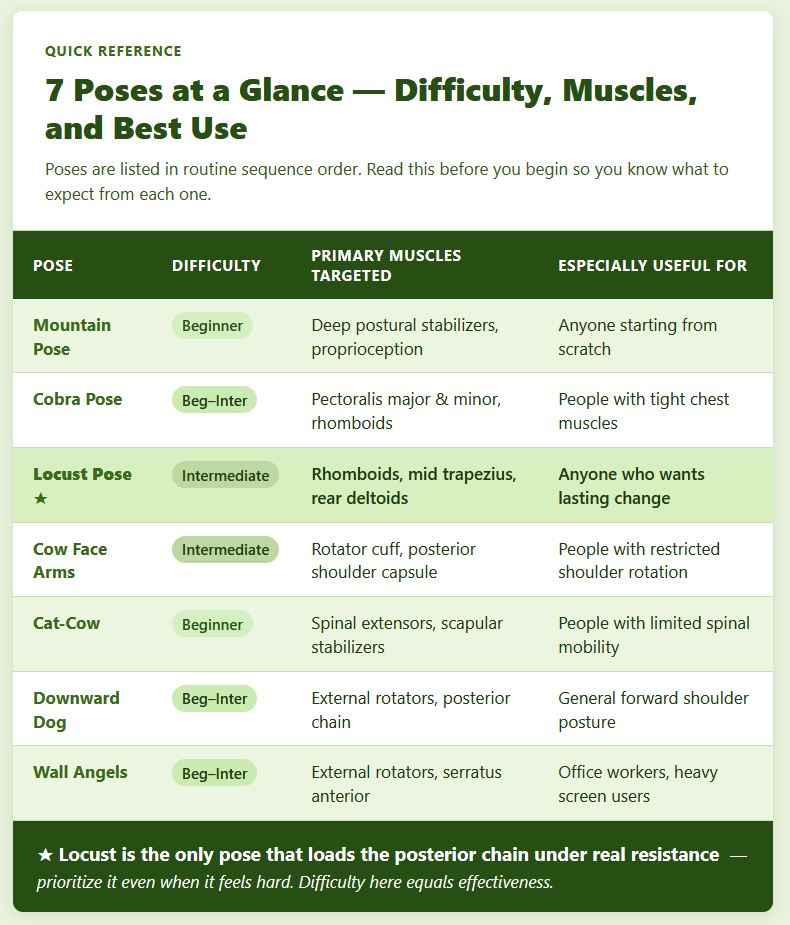
These seven poses address the full muscle imbalance pattern behind forward shoulders, in a sequence that moves from postural awareness through strengthening and into active mobility work. The quick reference below shows difficulty, primary muscle focus, and who each pose is particularly useful for before you begin:
1. Mountain pose (Tadasana): the postural reset
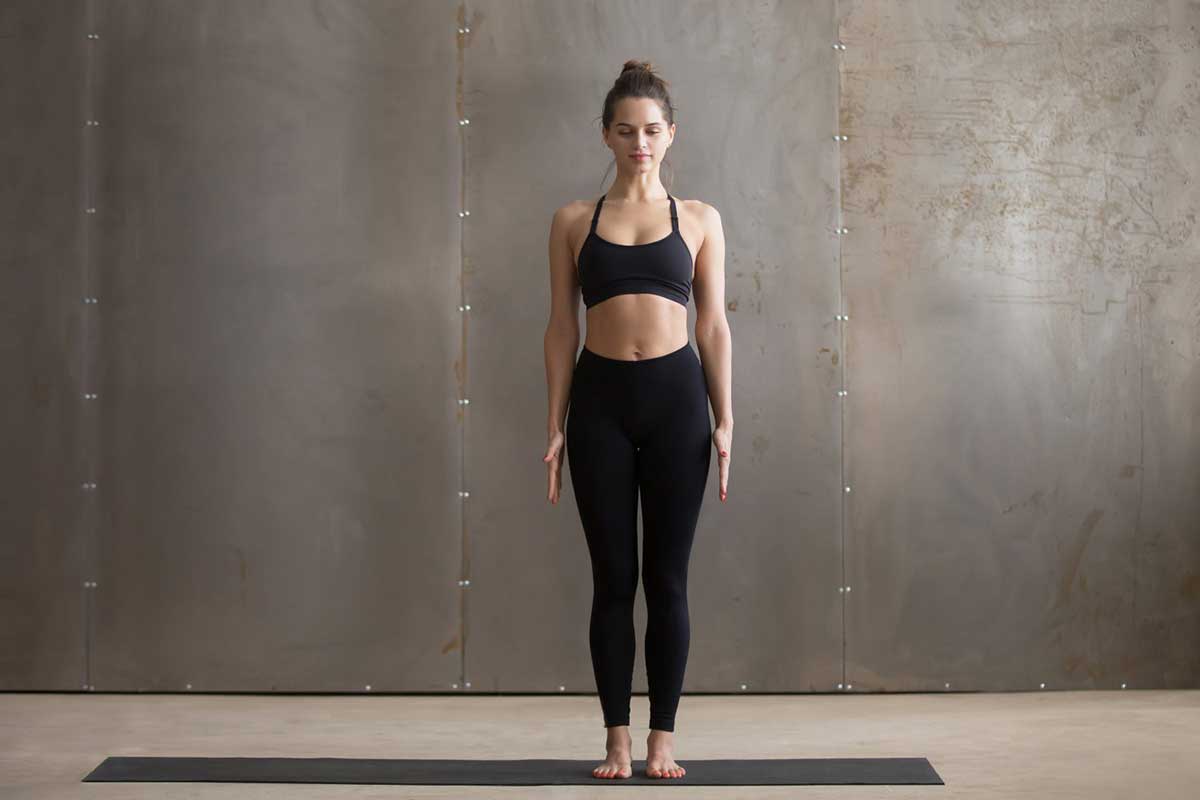
This pose gets dismissed because it looks like standing. That’s the point, and also why most people do it wrong. Mountain pose looks like standing but works as an active calibration of every joint in the postural chain simultaneously. For most people with forward shoulder posture, doing it correctly for 30 seconds reveals how far their resting position has drifted.
Step-by-step instructions:
- Stand with feet hip-width apart and distribute your weight evenly across the full foot, not just the heels.
- Engage your leg muscles lightly without locking your knees.
- Roll your shoulders up, then back, then down, letting your shoulder blades slide gently toward your back pockets.
- Broaden your collarbones without puffing your chest upward or arching your lower back.
- Let your chin drop slightly so your ears stack directly above your shoulders, not in front of them.
- Hold for 30–60 seconds, breathing into the space between your shoulder blades.
Why it works:
Mountain pose teaches your nervous system what neutral alignment feels like. After years of forward shoulder posture, your brain’s internal reference point for “normal” has shifted. The position that feels natural is the rounded one, and attempts to correct it feel strained and unnatural, which is exactly why they don’t hold.
Holding Mountain pose long enough to breathe into it begins recalibrating that internal reference. The posterior shoulder muscles are lightly loaded throughout the hold, not stretched passively. Your nervous system registers the relationship between back muscles engaged and shoulders in the correct position, which is the foundation everything else in this sequence builds on.
Trainer’s tip:
Avoid pushing your chest outward. That common response creates hyperextension in the lower back and doesn’t actually correct shoulder position. The movement to focus on is the shoulder blades sliding down, not the sternum lifting up.
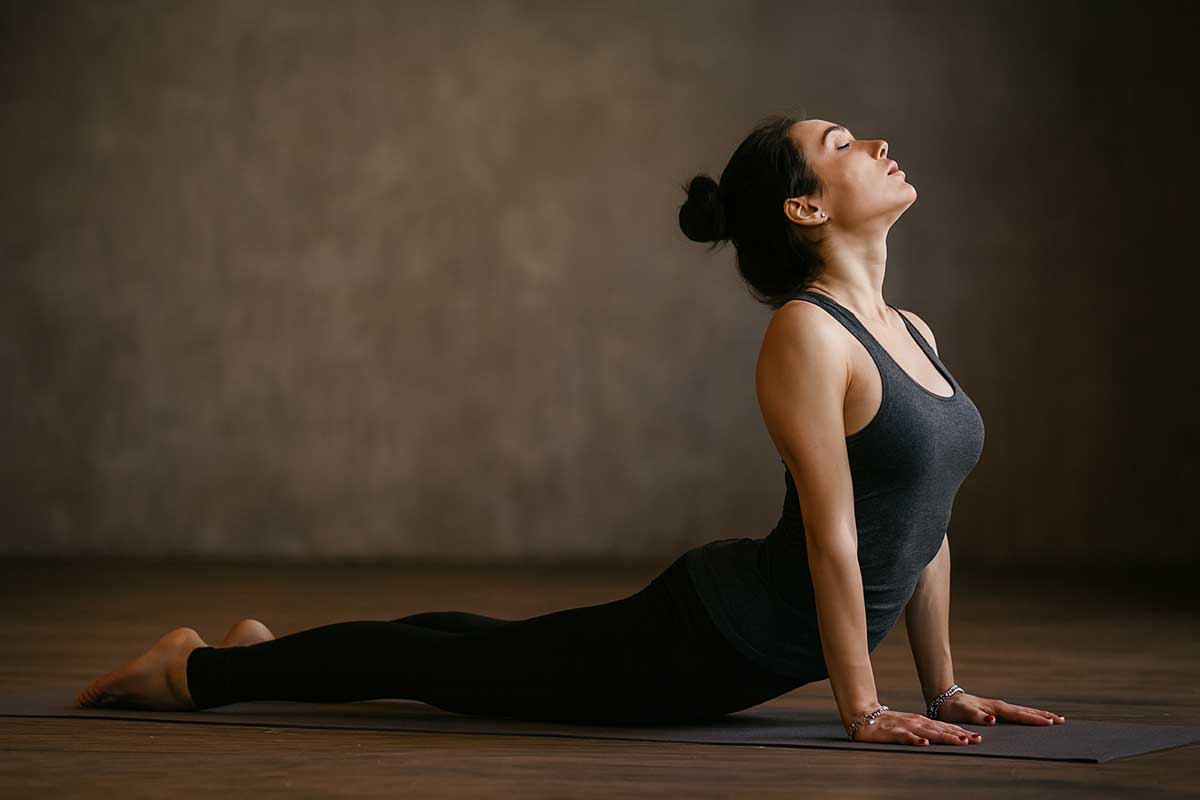
2. Cobra pose (Bhujangasana): the chest opener
Why it works:
Cobra directly targets the pectoralis major and minor, the two muscles that do the most pulling in the upper crossed syndrome pattern. The backbend position places these muscles in a sustained stretch while the act of lifting your chest against gravity activates the rhomboids and middle trapezius. This dual action is what separates Cobra from a passive chest stretch, where the back muscles are doing nothing.
The upper back activation is the part most people miss. If you feel Cobra only in your chest, that’s a valid stretch, but you’re leaving half the pose’s benefit on the floor. Engage the muscles between your shoulder blades as you lift, and you’re loading the weak side of the imbalance rather than just addressing the tight side.
Step-by-step instructions:
- Lie face down with your hands placed directly under your shoulders, elbows tucked close to your ribs.
- Press the tops of your feet into the mat to engage your legs and stabilize your lower back.
- Inhale, then lift your head and chest by pressing the floor away, keeping your lower ribs in contact with the mat.
- Draw your shoulder blades together and down, away from your ears, as you hold.
- Hold for 15–20 seconds, then lower with control. Repeat three times.
Trainer’s tip:
The height of the lift matters less than most people assume. If you push up high by straightening your arms fully, you shift the load into your lower back and reduce the contribution of the upper back muscles. A lower lift with active shoulder blade engagement is more effective for posture correction than the full Cobra seen in flow classes.
Modification for beginners:
Keep your forearms on the ground rather than pressing up onto your hands. The angle is reduced, but the chest stretch and back activation are still present and the position is easier to sustain for the full hold time.
Advanced variation:
Upward-facing dog, where the thighs lift off the mat entirely, increases the load on the posterior chain further. Attempt this only after Cobra feels controlled and comfortable across all three sets.
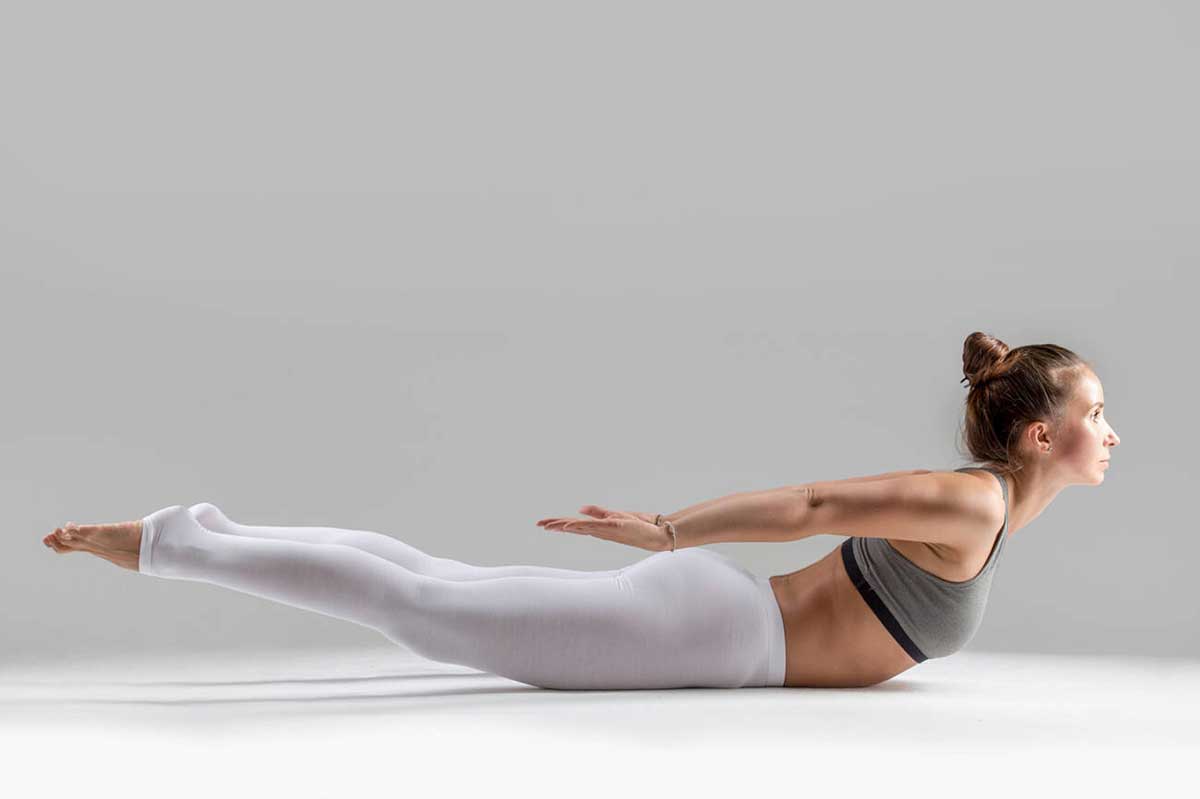
3. Locust pose (Salabhasana): the back strengthener you’re probably skipping
Most people who try this sequence for a week will quietly drop Locust. It’s harder than it looks, there’s no comfortable midpoint to rest in, and unlike Cobra, there is no way to scale it down to something passive. Either you’re lifting everything, or you’re not doing the pose.
That difficulty is the point. Locust is the only pose in this sequence that places the rhomboids, middle trapezius, and rear deltoids under genuine resistance rather than simply bringing them into a lengthened or slightly loaded position. Every other pose in this guide works by improving the conditions for those muscles. Locust makes them actually work.
If you take one thing from this entire routine seriously, make it this one.
Step-by-step instructions:
- Lie face down with your arms alongside your body, palms facing upward.
- Inhale, then simultaneously lift your head, chest, arms, and legs off the floor.
- Reach back through your fingertips and extend through your toes, keeping your neck long rather than craning it upward.
- Focus on length through the entire body, not maximum height.
- Hold for 15 seconds, lower with control, and rest for one breath before repeating. Complete two to three reps total.
Trainer’s tip:
Keep your legs straight throughout. The moment the knees bend, the glutes compensate and the posterior shoulder contribution drops significantly. The temptation to bend is strong when the hold gets difficult. Resist it.
Why it works:
Locust loads the full posterior chain, from the glutes and hamstrings through the spinal extensors to the upper back. For the posture-specific muscles, the position requires the rhomboids and middle trapezius to hold your arms in retraction against the weight of the limbs, which is a closer approximation to the demand those muscles face during normal sitting and standing than anything else in this routine.
Cobra stretches the front and activates the back. Locust loads the back under real resistance. You need both.
Modification for beginners:
Lift only your chest and arms, keeping your legs flat on the mat. This reduces the total load while preserving the posterior shoulder work. Build toward the full pose over two to three weeks before adding the leg lift.
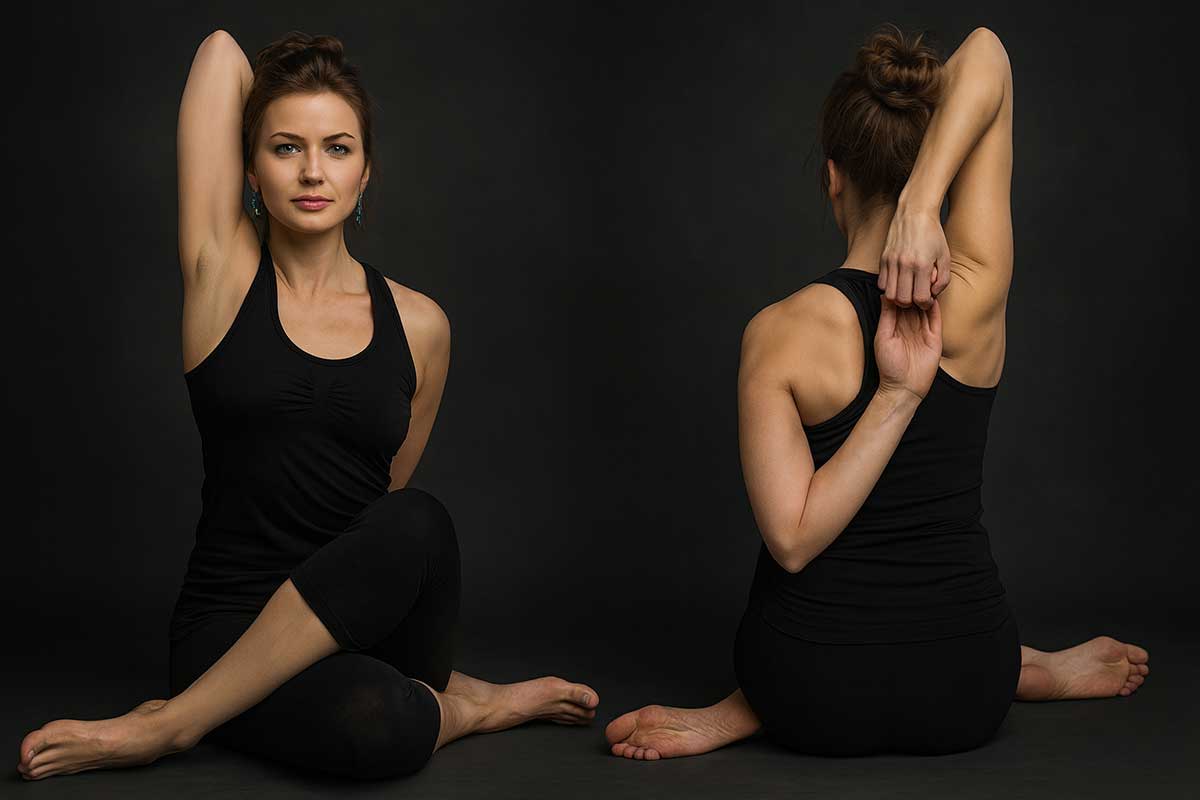
4. Cow face pose arms (Gomukhasana arms): the shoulder mobilizer
Rounded shoulders pull your shoulder joint into internal rotation and hold it there. The small muscles of the rotator cuff and the posterior shoulder capsule become restricted in ways that chest stretches and upper back strengthening don’t reach. Cow Face Arms is the one pose in this sequence that addresses those structures directly.
Step-by-step instructions:
- Sit tall in a comfortable position with your spine upright.
- Reach your right arm up toward the ceiling, then bend your elbow and allow your right hand to fall between your shoulder blades.
- Reach your left arm out to the side, then sweep it behind your back with the elbow bent, working your left hand up toward your right hand.
- If your hands don’t meet, hold a yoga strap, folded towel, or belt between them. The stretch is fully effective without contact.
- Hold for 30 seconds, breathing steadily, then switch sides. The two sides will often feel noticeably different.
Why it works:
This pose reaches the posterior shoulder capsule and the rotator cuff muscles, the infraspinatus and teres minor, which become restricted with internal rotation. It also stretches the triceps of the top arm. The simultaneous external rotation demand in both shoulders is genuinely difficult to replicate in any other common exercise or stretch.
Modification for beginners:
Use a strap, belt, or folded towel every session until you can clasp without straining. Working toward contact is a secondary goal. The stretch happens regardless of whether the hands are touching.
Trainer’s tip:
Keep your head aligned above your spine throughout. The instinct when reaching behind your back is to crane the head forward, which defeats part of the purpose. Maintain the chin position you established in Mountain pose.
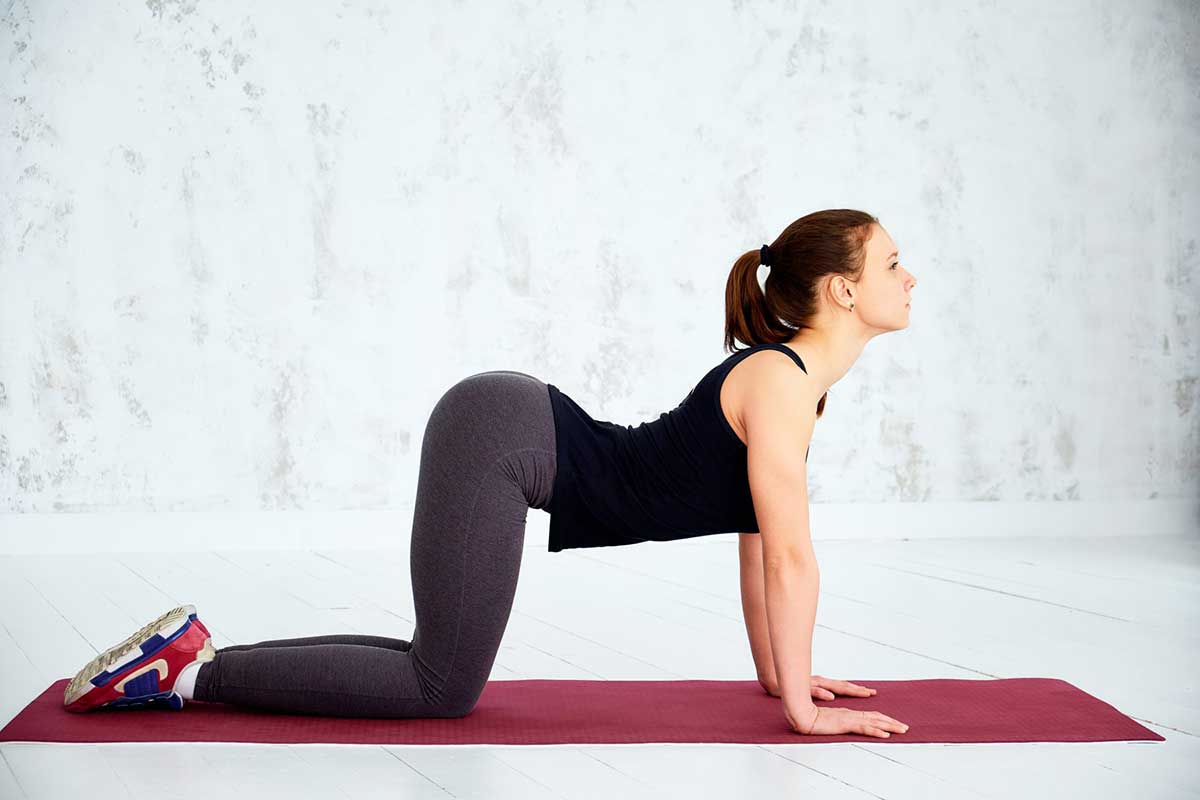
5. Cat-cow stretch (Marjaryasana-Bitilasana): the spinal reset
Cat-cow teaches you to move your shoulder blades actively rather than letting them be dragged wherever your chest muscles pull them. Once you’ve held the strengthening poses above, this movement restores range and helps the brain map the newly activated muscles to actual spinal movement patterns.
Step-by-step instructions:
- Start on hands and knees with hands directly below your shoulders and knees below your hips.
- On the inhale: drop your belly toward the floor, lift your chest and tailbone, draw your shoulder blades gently together and down (Cow position).
- On the exhale: press the floor away, round your spine upward, tuck your chin toward your chest, and spread your shoulder blades wide (Cat position).
- Feel the stretch between your shoulder blades in the Cat phase. That’s the rhomboids and middle trapezius being lengthened after their work in Locust.
- Flow between the two positions for 5–8 complete breath cycles.
Why it works:
The Cow phase actively replicates the shoulder blade position you’re trying to build into your resting posture: retracted, depressed, and coordinated with an open chest. The Cat phase provides a decompression stretch for the intervertebral discs and gives the upper back muscles an active recovery between contractions.
Trainer’s tip:
Start the movement from your tailbone and let your spine respond in sequence from the base upward. Most people initiate from their neck, which reverses the muscular sequencing and reduces the benefits at the thoracic level, where forward shoulder posture is primarily driven.
If you have sensitive knees, place a folded blanket under them. The floor contact here matters for the movement, so avoid skipping this pose if it’s uncomfortable. Work around it with padding rather than substituting a standing version, which changes the mechanics considerably.
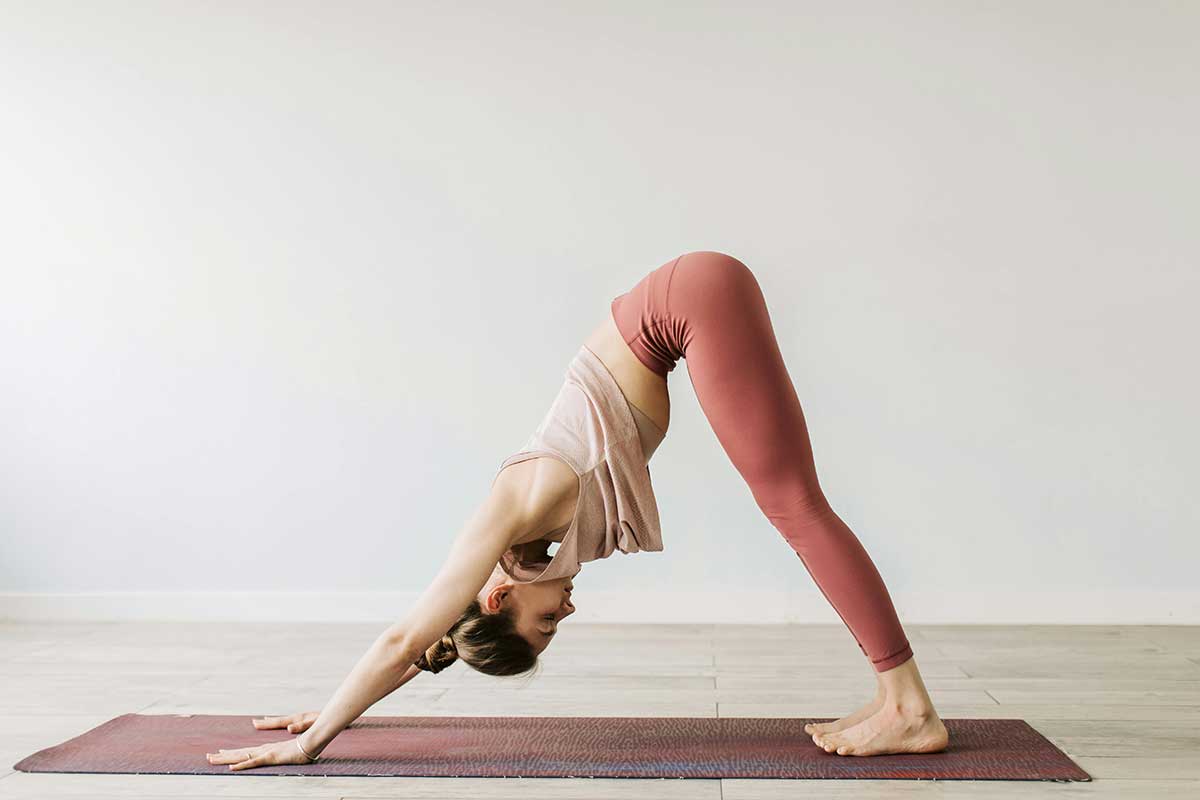
6. Downward-facing dog (Adho Mukha Svanasana): the full-chain lengthener
Downward dog gets included in almost every yoga sequence, for good reason. For the posture correction application specifically, its value comes from two things: the decompression of the thoracic spine after the backbend work above, and the demand it places on shoulder external rotation, which is the same movement pattern that corrects forward shoulder posture.
Step-by-step instructions:
- From hands and knees, tuck your toes and press your hips upward and back until your body forms an inverted V shape.
- Bend your knees generously. A long, neutral spine matters more than straight legs for the posture benefits of this pose.
- Press firmly into all four corners of your hands and rotate your upper arms outward, as if you were trying to widen the space between your hands without actually moving them.
- Let your head hang without tension, ears level with your upper arms.
- Hold for 30–45 seconds. Step or hop forward to stand when you’re done.
Why it works:
The external rotation of the upper arms in this position directly trains the same motor pattern you need for shoulder retraction in Mountain pose, Cobra, and daily life. The inverted position also decompresses the intervertebral discs, which is useful after the sustained active holds in Locust and Cobra.
Trainer’s tip:
The heels do not need to reach the floor. The common cue to lengthen toward the floor usually produces a rounded upper back as people strain for the stretch, which is counterproductive here. Bent knees with a long spine will always outperform straight legs with a curved thoracic region for this purpose.
Modification for beginners:
Place your hands on yoga blocks, or walk your feet closer to your hands until you can maintain a neutral spine. You can also practice against a wall, with hands at hip height and the body at roughly 90 degrees, which significantly reduces the demand while preserving the shoulder mechanics.
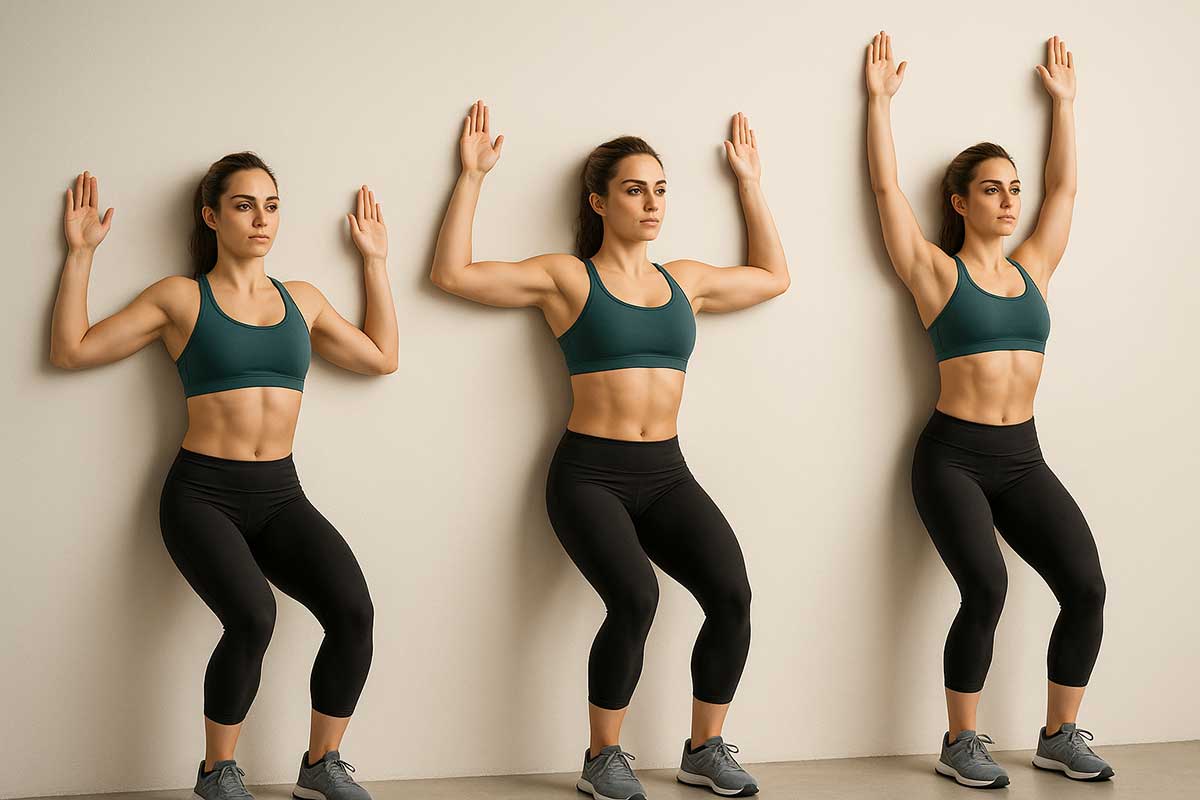
7. Wall angels (Devaduta Bahu Vinyasa Bhittih Close Up): the active postural trainer
Why it works:
Wall angels are a physical therapy staple for a reason: the wall removes your ability to compensate. In every other pose in this sequence, it’s possible to achieve the shape without fully activating the target muscles. Here, the wall provides immediate feedback. If your lower back arches away from the wall, your core isn’t engaged. If your elbows lose contact, your external rotators aren’t strong enough yet. The wall tells you exactly where you are.
It’s a strengthening exercise disguised as a stretch. The posterior shoulder muscles work throughout every inch of the movement, and the serratus anterior, a muscle along the side of the ribcage that’s often ignored in posture correction, is loaded throughout the slide.
Step-by-step instructions:
- Stand with your back against a wall, feet about four to six inches away from the baseboard.
- Press your tailbone, upper back, and the back of your head against the wall. Your lower back will have a slight natural curve, not flat contact.
- Bend your elbows to 90 degrees and press both elbows and the backs of your hands into the wall.
- Slowly slide your arms upward along the wall, maintaining contact with elbows and hands throughout.
- Slide back down to the start position. Complete 8–10 repetitions at a pace where maintaining contact is genuinely challenging.
Trainer’s tip:
Only slide as high as you can while keeping elbows and hands against the wall. Losing contact at the top is not a slightly modified version of the exercise but a sign that the external rotators have given out and a different muscle group is compensating. Go only as high as correct form allows, and the range will expand over two to three weeks.
Modification for beginners:
Stand farther from the wall so the range of motion required at the top of the slide is reduced. Focus exclusively on maintaining contact rather than reaching any particular height. If maintaining wall contact at all is genuinely difficult, begin with the arm position only, held for 20 seconds before adding the sliding movement.
Your 10-minute daily posture reset routine
These seven poses sequence from postural calibration through backbend work, mobility, and active strengthening. Running them in this order produces a cumulative effect: the earlier poses prepare the muscles and nervous system for the work of the later ones. Below is the full sequence with hold times and the cue to focus on for each pose:
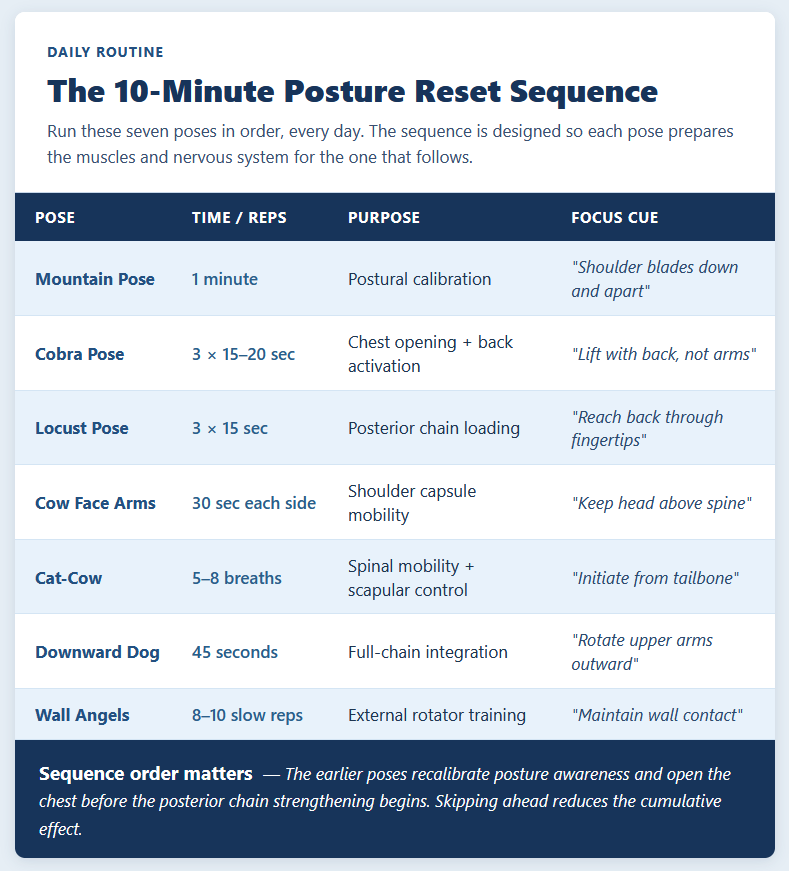
Ten minutes daily produces better results than a longer session three times per week. The nervous system learns posture through repetition, not through intensity. Daily practice creates a daily recalibration, while spaced sessions allow the old patterns to reassert themselves in between.
What to realistically expect
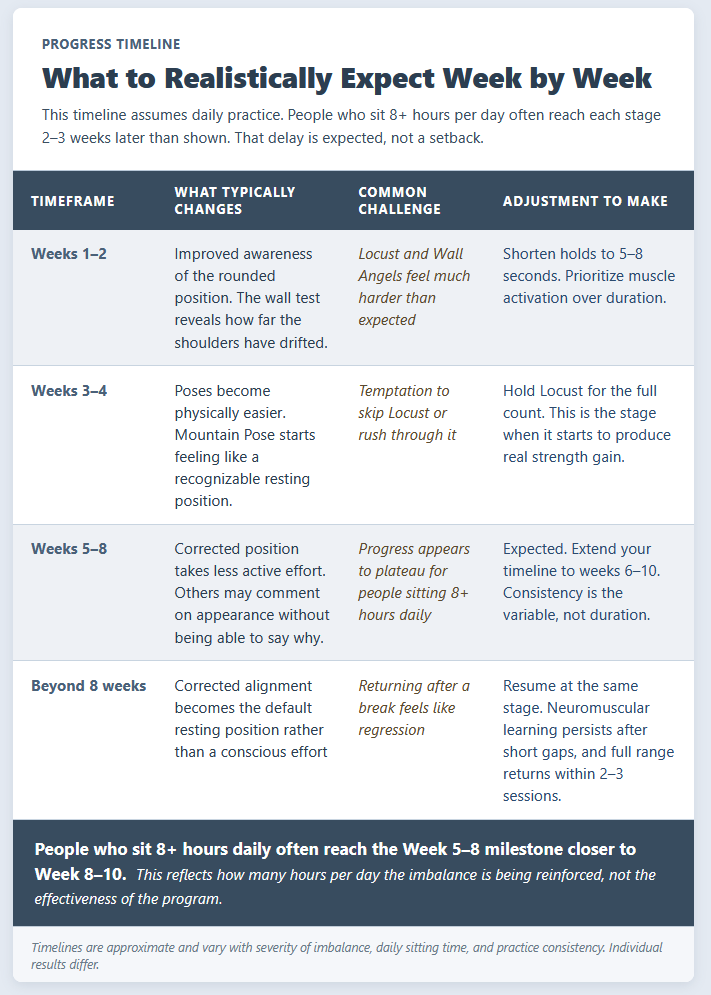
The research-based timeline for postural change from a Petersen Physical Therapy review places the range at two to six weeks for initial changes in body awareness, and two to six months for structural, long-term change. That range is wide for a reason. How quickly you progress depends on how many hours you sit each day, how pronounced your current imbalance is, and whether you practice daily or with gaps.
For most people, the first noticeable change is proprioceptive rather than structural. Within the first one to two weeks of daily practice, you’ll begin catching yourself in the rounded position before you’ve been there for an hour, rather than only noticing it when your neck hurts. That awareness is the beginning of genuine change rather than cosmetic correction.
By weeks three to four, the poses become physically easier. Mountain pose starts to feel less like effort and more like a recognizable resting position. Wall angels, which are often genuinely difficult in week one, become manageable throughout the full range. Some people at this stage notice that others comment on their appearance without being able to say exactly what changed.
Weeks five through eight are when the results become self-reinforcing. The corrected position takes less active effort to maintain because the muscle balance has shifted enough that the back muscles can participate in the work of holding your shoulders.
People who sit more than eight hours per day, or who are starting from a more pronounced forward head posture, often find this stage runs closer to weeks six through ten rather than five through eight. That delay is a function of how many hours per day those muscles are being pulled back in the other direction, not a sign that the program isn’t working.
After two months, most people who have practiced daily report that good posture has become their default rather than their effort. The weekly-expectation table below breaks this down phase by phase:
What the research actually shows
The most specific evidence for yoga’s effect on forward head posture and rounded shoulders comes from studies on Iyengar yoga, a style that emphasizes precise anatomical alignment over flow or flexibility.
A team of researchers at the College of Physiotherapy in Miraj, India, wanted to test whether a structured Iyengar yoga program could produce measurable changes in the two angles used clinically to assess upper crossed syndrome: the craniovertebral angle, which measures forward head position, and the shoulder angle, which measures how far the shoulders are rotated inward.
Their randomized controlled trial assigned 74 students with upper crossed syndrome to either an 8-week Iyengar yoga program three times per week, or a control group that maintained normal activity. Both angles improved significantly in the yoga group (p=0.001 for both), while the control group showed no meaningful change.
The craniovertebral and shoulder angle measurements used in that study are the same ones a physical therapist would use to document improvement. The finding matters because it connects yoga practice to clinically meaningful change in the actual postural angles, not just to subjective reports of feeling better.
An earlier study published in the Journal of Modern Rehabilitation found that 8 weeks of Iyengar yoga improved cervical angle by 11 degrees and shoulder angle by 15 degrees in middle-aged women with upper crossed syndrome. To put 11 degrees of cervical angle improvement in terms you can feel: that’s roughly the difference between a visibly forward head position and a neutral one.
For the neck pain component, a randomized controlled trial published in the International Journal of Exercise Science compared yoga against stretching exercises in 80 office workers with neck and shoulder pain over four weeks.
Both interventions reduced pain, but the yoga group showed significant improvements in pressure pain threshold, which measures how sensitive the tissue is to pressure, alongside self-reported pain scores. Pressure pain threshold is an objective physiological measure rather than a self-report, which makes the improvement harder to attribute to expectation alone.
The combined sample across these three studies is modest, fewer than 200 participants in total, which means the effect sizes are promising rather than definitive. What gives rehabilitation clinicians confidence in recommending this approach is the directional consistency across different populations and study designs rather than the volume of the evidence.
Troubleshooting common challenges
“I can’t hold the poses long enough.” Begin with five to eight seconds on Locust and Cobra and add time weekly. Duration is not what produces the benefit in the first two weeks. The muscular activation pattern is what matters, and that happens in the first few seconds of each hold.
“My wrists hurt in Downward Dog.” Place your hands on yoga blocks to reduce the angle at the wrist, or substitute the wall version described in the modification above. Wrist discomfort in Downward Dog usually indicates tight wrist extensors or insufficient weight distribution across the palm, not an inherent incompatibility with the pose.
“I don’t feel anything in Mountain Pose.” That means your body awareness at baseline is low, which is common and is exactly what the pose is addressing. Focus on finding the micro-movement of shoulder blades sliding down and apart. Try it while standing sideways to a mirror.
“Wall Angels feel impossible.” That’s useful information. Begin with the starting position only, held for 20 seconds, elbows and hands pressed into the wall, without attempting the slide. Hold, release, and repeat five times. The movement will come once the isometric hold is manageable.
“I can’t clasp in Cow Face Arms.” Use a strap every time. The stretch is happening whether or not the hands meet. Forcing contact produces compensation elsewhere in the shoulder and reduces the effectiveness of the pose.
Workplace integration
The ten-minute routine handles the active correction. These desk-compatible practices handle the hours between sessions.
Chair-based posture cues
- Practice the Mountain Pose shoulder position while seated: roll your shoulders up, back, and down, breathing into the space between your shoulder blades. Hold for five breaths.
- Perform shoulder blade squeezes by pulling your shoulder blades toward each other as if gripping a pencil between your shoulder blades. Hold for five seconds and release. Repeat five to ten times per hour.
- Use doorframes for a passive chest stretch when passing through: arms at 90 degrees against the frame, step through and pause for ten seconds.
Desk setup adjustments that reduce the load
- Position your monitor so the top of the screen is at or slightly below eye level. Screens placed below eye level drive forward head posture even in people actively working to correct it.
- Set your keyboard and mouse at a height that keeps your elbows at 90 degrees without shrugging.
- If you take calls, stand up. Standing telephone conversations are the easiest way to get regular mid-day posture breaks without any planning.
Lifestyle habits that help
The yoga routine corrects the imbalance actively. These habits reduce how quickly the imbalance reasserts itself between sessions.
Set a timer on your phone to go off every 45 to 60 minutes while sitting. Use the alert as a cue to do a ten-second Mountain Pose shoulder reset rather than a reminder to sit straight. “Sit straight” is a vague instruction that produces tension rather than correction. Running through the shoulder-roll sequence is a specific motor pattern your muscles have been practicing daily and will recognize.
Carry bags on alternating shoulders rather than always on the same side. Consistent unilateral loading creates asymmetrical shoulder elevation over time, which compounds the forward shoulder pattern. Distributing the load across both shoulders with a wider strap is preferable to a single-shoulder carry at the same weight.
Sleep position has limited impact on daytime posture compared to the eight or more hours spent sitting, but if you sleep on your side, a pillow between your knees and a slightly thicker one between your ear and shoulder will reduce strain on the cervical muscles overnight.
When to see a professional
Yoga for posture correction produces meaningful change for most people with mild to moderate forward shoulder posture and no structural complications. Some presentations fall outside what a yoga routine can address. Consider consulting a physical therapist or physician if any of the following apply:
- Pain that extends into one or both arms, or that is accompanied by numbness or tingling in the hands or fingers
- Persistent neck pain that does not improve after four weeks of consistent daily practice
- Severe headaches that worsen with movement or with sustained head positions
- A visible lateral curve in the spine when standing (scoliosis requires assessment before a posture correction program)
- Any recent neck or shoulder injury that has not been cleared by a clinician
The poses in this guide are appropriate for most healthy adults but are not a substitute for clinical evaluation when symptoms suggest a structural issue rather than a postural one.
Consistency beats intensity
Ten minutes of daily practice produces more durable change than a 45-minute session twice a week. The nervous system learns posture through repetition and frequency, not through effort and duration.
Missing a day occasionally does not erase progress. Missing a week allows the old muscle patterns to reassert themselves enough that you’ll spend the first few sessions back feeling like you’ve regressed.
The practical advice is to attach the routine to something that already happens daily. Before your morning coffee. At the end of your lunch break. Immediately after finishing your workday. The cue matters less than the consistency.
Ten minutes a day is a reminder, not a workout. Your nervous system responds to reminders better than it responds to effort, because posture is a nervous system habit at least as much as a muscular one.
FAQs
How quickly will I see results?
Most people notice improved body awareness, specifically catching themselves in the rounded position before it becomes painful, within one to two weeks of daily practice. Visible postural changes that others notice typically appear between four and eight weeks.
People who sit more than eight hours per day or who have more pronounced forward head posture are often at the longer end of that range.
What type of yoga is best for posture?
Iyengar yoga is the most studied style for postural correction because it emphasizes precise anatomical alignment and uses props to achieve correct joint positions before adding movement.
Hatha yoga also tends to work well because it holds poses long enough for postural muscles to be trained under a sustained load, rather than moving through them.
Fast-paced flow classes can be valuable for other goals, but the brevity of each hold limits their effectiveness for the muscle imbalance work that posture correction requires.
Can I correct years of bad posture?
Yes. The muscle imbalances behind forward shoulder posture are reversible regardless of how long they have been present, because they are functional rather than structural changes. Tendons and muscles adapt to the demands placed on them throughout adult life.
The timeline lengthens with the severity of the imbalance and the number of hours per day spent reinforcing it, but no study has established an age or duration past which correction is no longer possible. More pronounced imbalances often take three to six months of daily work rather than six to eight weeks, but the direction of change is the same.
Can I do these poses if I have arthritis?
Gentle yoga can be appropriate for many forms of arthritis and may reduce joint stiffness when done consistently within a pain-free range. Consult your physician or physical therapist before beginning, particularly if you have cervical spinal arthritis or rheumatoid arthritis affecting the shoulder joints.
For the poses in this guide, the most common modification for arthritic joints is reducing the hold time, using blocks or props to reduce the range required, and skipping any pose that produces joint pain rather than muscle stretch.
What if I miss a few days?
Resume the routine without modifying the progression. Progress from a seven-day break does not reset to the beginning. You may notice the harder poses feel slightly more effortful after a gap, but the neuromuscular learning from prior sessions persists. The main cost of a gap is the time spent reclaiming the full range and endurance, which usually takes one to three sessions.
Are these poses safe during pregnancy?
Mountain Pose, Cat-Cow, Downward Dog, and Wall Angels are generally considered safe throughout pregnancy, though consult your obstetrician or midwife before beginning any new exercise practice.
Cobra and Locust, which require lying face down, are typically modified or avoided after the first trimester. Cow Face Arms can generally continue throughout pregnancy with no modification required.
Can kids do these poses?
All seven poses are appropriate for children. Forward head posture from smartphone and tablet use is increasingly common in school-age children, and the correction process works the same way it does in adults. Use shorter hold times, five to eight seconds rather than fifteen to thirty, and prioritize movement exploration over form precision.
What’s the best time of day to practice?
Morning practice sets a postural baseline that carries into the workday, which is valuable if you spend most of your time at a desk. Evening practice undoes the accumulated forward loading of the day and can be more immediately satisfying because the contrast with the end-of-day position is more pronounced.
Research on the optimal timing of postural correction practice is sparse. Consistency at any time outperforms optimal timing with gaps.