The average person spends 12 hours per day sitting—during work, commuting, and leisure time. Research shows that after just two hours of static postures, muscle tension increases by 34%. After four hours, it doubles.
Hours of sitting, staring at screens, and typing create what experts call “tech neck”—forward head posture that typically measures 15 to 45 degrees ahead of where your head should be. For every inch your head moves forward from neutral alignment, it adds 10 pounds of pressure on your neck muscles. If you’re looking down at your phone or laptop, your head may be 3 to 4 inches forward. That’s 30 to 40 extra pounds of strain.
Your muscles get stuck in shortened positions. Blood flow slows. Tension builds layer by layer until moving your head feels like turning a rusty hinge.
But here’s the good news: you can reverse this damage with just 12 minutes a day.
This simple yoga routine targets the exact muscles that get tight from desk work. No yoga mat required. No fancy equipment. Just seven gentle moves that release tension, improve flexibility, and help you feel human again.
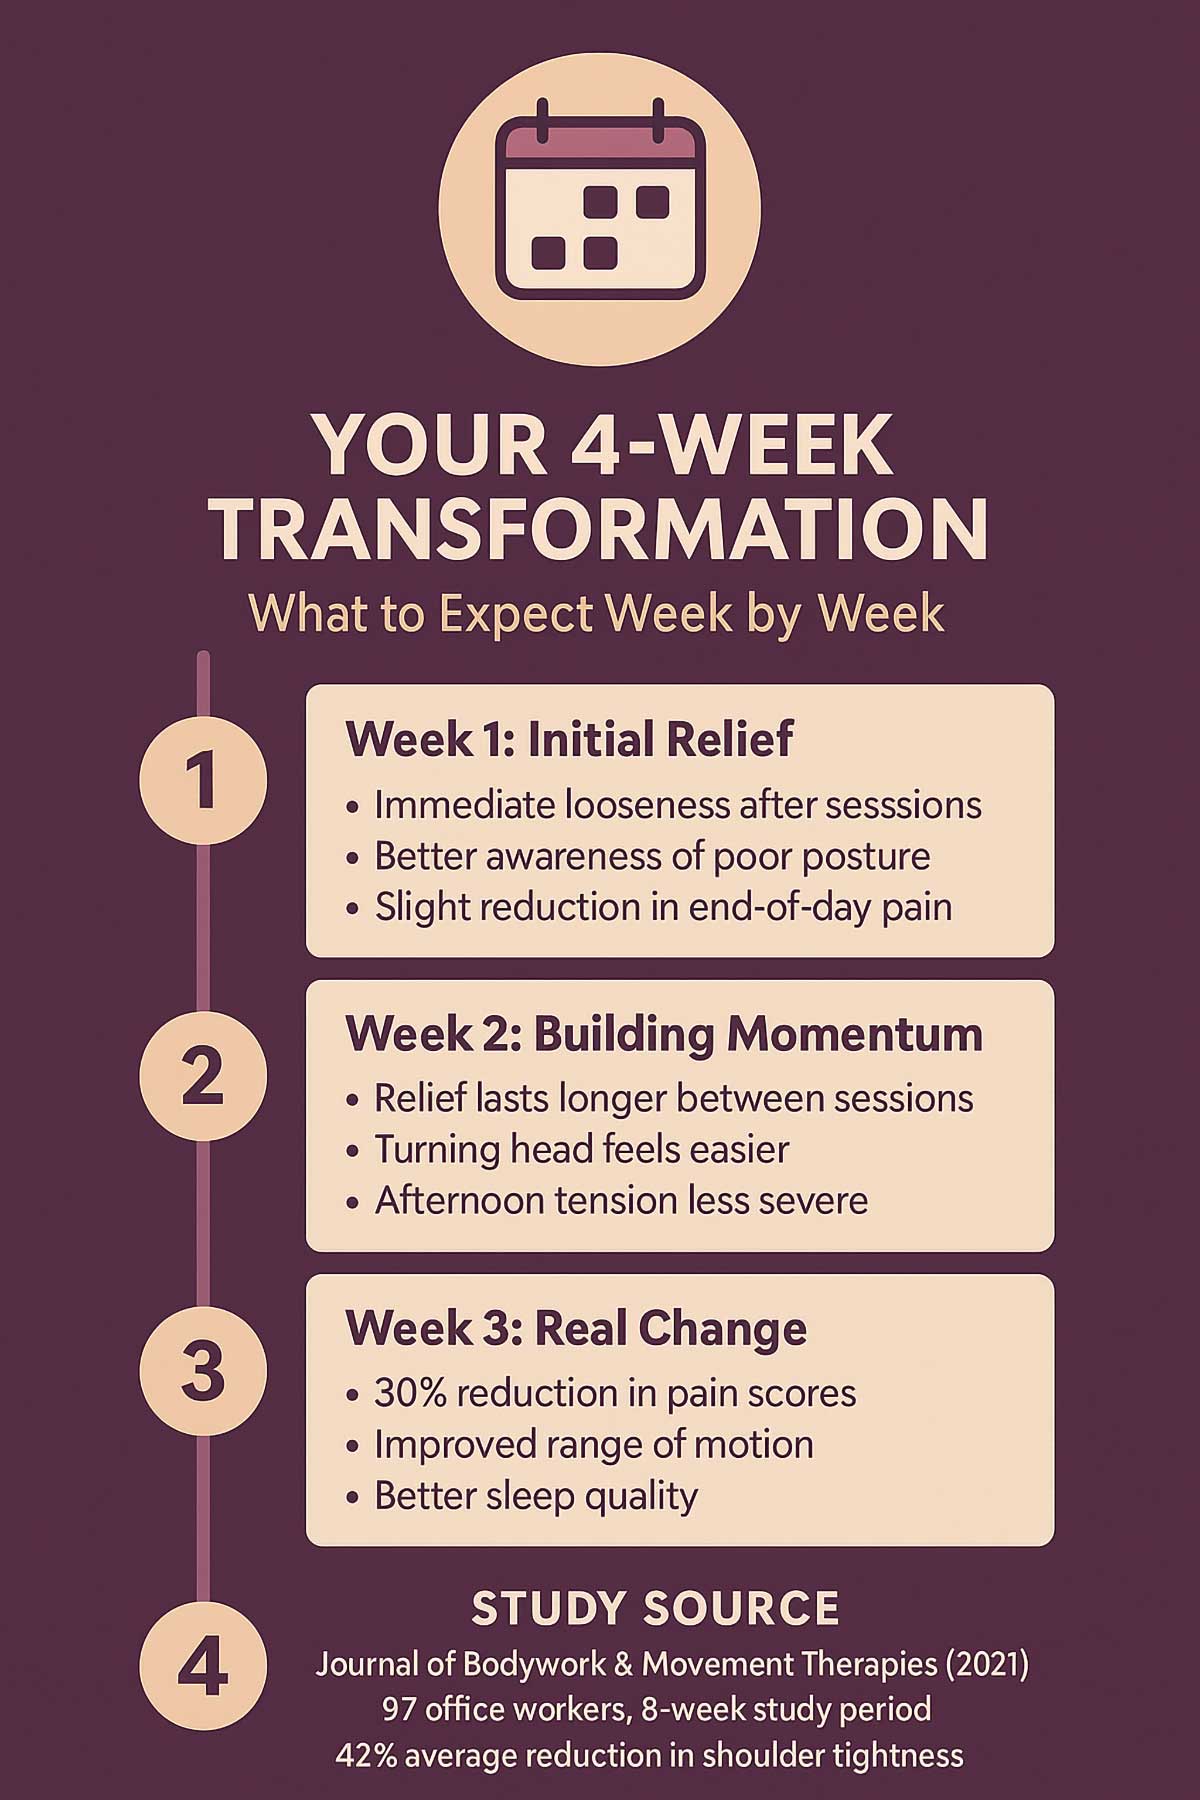
A 2021 study published in the Journal of Bodywork & Movement Therapies tracked 87 office workers who practiced yoga three times weekly. After eight weeks, participants reported a 42% reduction in shoulder tightness and significant improvements in posture awareness. The researchers noted that even brief sessions created measurable changes in muscle tension patterns.
Understanding your neck and shoulder anatomy
Before you start the routine, it helps to know what you’re working with. Your neck and shoulders contain several key muscles that bear the burden of poor posture.
| Muscle | Location | What it does | Why sitting hurts it |
|---|---|---|---|
| Trapezius | Upper back & neck | Supports head, moves shoulders | Stays contracted when shoulders hunch forward |
| Levator Scapulae | Side of neck | Lifts shoulder blades | Overworks when you crane neck toward screen |
| Rhomboids | Between shoulder blades | Pulls shoulders back | Stretches and weakens with poor posture |
| Sternocleidomastoid | Front and side of neck | Rotates and tilts head | Shortens from forward head position |
When you sit for hours, these muscles develop what physical therapists call “upper crossed syndrome.” Your chest muscles tighten while your upper back muscles weaken. Your head drifts forward while your shoulders round. The muscles that should be resting are working overtime just to hold your head up.
This pattern doesn’t develop overnight. Tension builds gradually throughout your day. By mid-morning, your trapezius muscles start to fatigue. By afternoon, that fatigue turns into tightness. By evening, you’re dealing with full-blown pain that radiates into your head or down your arms.
The yoga routine below breaks this cycle by stretching tight muscles, strengthening weak ones, and retraining your nervous system to recognize better alignment.
The sitting epidemic: what’s really happening to your body
Prolonged sitting doesn’t just make you uncomfortable. It fundamentally changes how your body functions.
When you hold static postures for extended periods, several things happen:
- Blood flow decreases. Your muscles need fresh oxygen and nutrients to stay supple. Sitting reduces circulation to your upper body by up to 50%. Without adequate blood flow, waste products accumulate in muscle tissue. This creates the achy, heavy feeling in your shoulders.
- Fascia becomes dehydrated. Fascia is the thin connective tissue that wraps around every muscle fiber. When you move regularly, fascia stays hydrated and slides smoothly. When you sit still, it loses water content and develops adhesions—sticky spots where layers glue together. This restricts movement and creates that stiff sensation when you try to turn your head.
- Your nervous system adapts. Your brain receives constant feedback about body position. After hours of sitting, your nervous system starts to think this slouched posture is normal. It stops sending correction signals. You lose awareness of how far forward your head has drifted.
- Muscles develop trigger points. These are small, hyper-contracted knots within muscle fibers. They form when muscles stay partially contracted for too long. Trigger points in your upper trapezius can cause headaches. Trigger points in your levator scapulae create that sharp pain when you turn your head.
A study in Pain Medicine (2020) examined office workers with chronic neck tension. Researchers found that participants had lost an average of 22 degrees of cervical rotation—the ability to turn their heads side to side. After a 12-week yoga-based neck exercise program, participants restored an average of 18 degrees of rotation. That’s enough to check blind spots while driving without discomfort.
Self-assessment: understanding your pain patterns
Before you begin the routine, take a moment to assess your current state. This helps you track progress and identify which poses will benefit you most.
Desk Posture Self-Assessment
Discover your ergonomic risk level in 60 seconds
Take this quick check right now. Don't adjust anything yet—just notice where your body is positioned at this moment.
Check each box that applies to your current setup:
Your Action Plan
Assessment History
Pain pattern identification
Where do you feel the most discomfort? This table helps you understand which muscles are affected and which poses will help most.
| Where you feel pain | Likely muscle | Best poses for relief |
|---|---|---|
| Base of skull | Suboccipital muscles | Neck tilts, corpse pose with support |
| Top of shoulders | Upper trapezius | Shoulder shrugs, thread the needle |
| Between shoulder blades | Rhomboids | Eagle arms, thread the needle |
| Side of neck | Levator scapulae | Neck tilts on opposite side |
| Front of shoulders | Pectorals | Cow face arms |
Rate your pain level right now on a scale of 1 to 10. Write it down. You’ll check again after one week of practice.
The 12-minute tension-release routine
Set a timer for 12 minutes. Move slowly. Breathe deeply. Your body will thank you.
Each pose includes modifications so you can adjust for your flexibility level. Never push into sharp pain. A stretch should feel intense but not unbearable.
12-Minute Yoga Timer
Follow along with audio cues for each pose
Sequence
1. Seated cat-cow (2 minutes)
Why it works
This move wakes up your entire spine. It pumps fresh blood into tight muscles. The gentle rocking motion loosens stiff vertebrae and releases trapped tension in your upper back. Studies show that spinal flexion and extension exercises increase intervertebral disc hydration by up to 20%, which improves shock absorption and reduces pain.
Anatomical focus
You’re targeting the erector spinae muscles along your spine, the multifidus muscles between vertebrae, and the thoracic extensors in your mid-back. The movement also gently stretches your abdominals and chest muscles.
How to do it
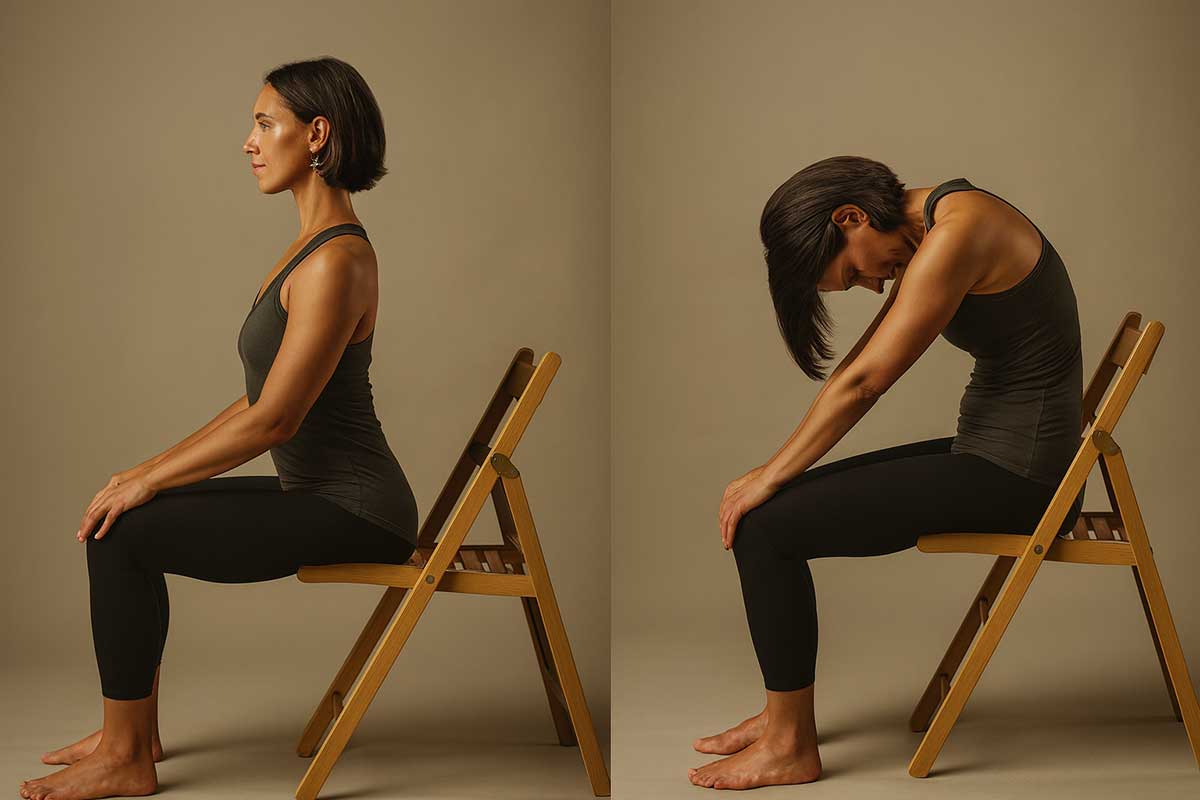
- Sit at the edge of your chair. Place both feet flat on the floor about hip-width apart. Rest your hands on your knees.
- Breathe in. Arch your back. Lift your chest toward the ceiling. Pull your shoulders back and down. Let your gaze lift slightly, but don’t crank your neck back.
- Breathe out. Round your spine. Draw your belly button toward your spine. Let your shoulders curve forward. Drop your chin toward your chest.
- Repeat this flow 10 to 15 times. Move with your breath. Make it smooth and slow. Each inhale creates the arch. Each exhale creates the rounding.
Breath pattern
Inhale for 3 to 4 counts during the arch. Exhale for 3 to 4 counts during the rounding. Keep the breath steady and controlled.
Common mistakes
- Moving too quickly without breath coordination
- Arching only in the lower back instead of the whole spine
- Cranking the neck too far back during the extension
Safety note
If your lower back feels tender, make smaller movements. Focus on moving your upper spine and shoulders. If you have severe lower back pain or herniated discs, consult your doctor before doing this pose.
Pro tip
If your lower back feels tender, make smaller movements. Focus on moving your upper spine and shoulders. Place a small pillow behind your lower back for extra support.
2. Neck rolls & tilts (2 minutes)
Why it works
Your neck carries about 10 to 12 pounds of weight all day long. When your head drifts forward, that load increases exponentially. These simple moves release the small muscles that hold all that tension. They improve range of motion and reduce stiffness. Cervical range of motion matters more than you might think. Research in Pain Medicine (2020) found that restricted neck movement strongly correlates with chronic pain.
Anatomical focus
You’re stretching the sternocleidomastoid muscles on the front and sides of your neck, the scalene muscles that help you breathe, and the upper trapezius fibers that connect your neck to your shoulders. You’re also mobilizing the seven cervical vertebrae in your neck.
How to do it
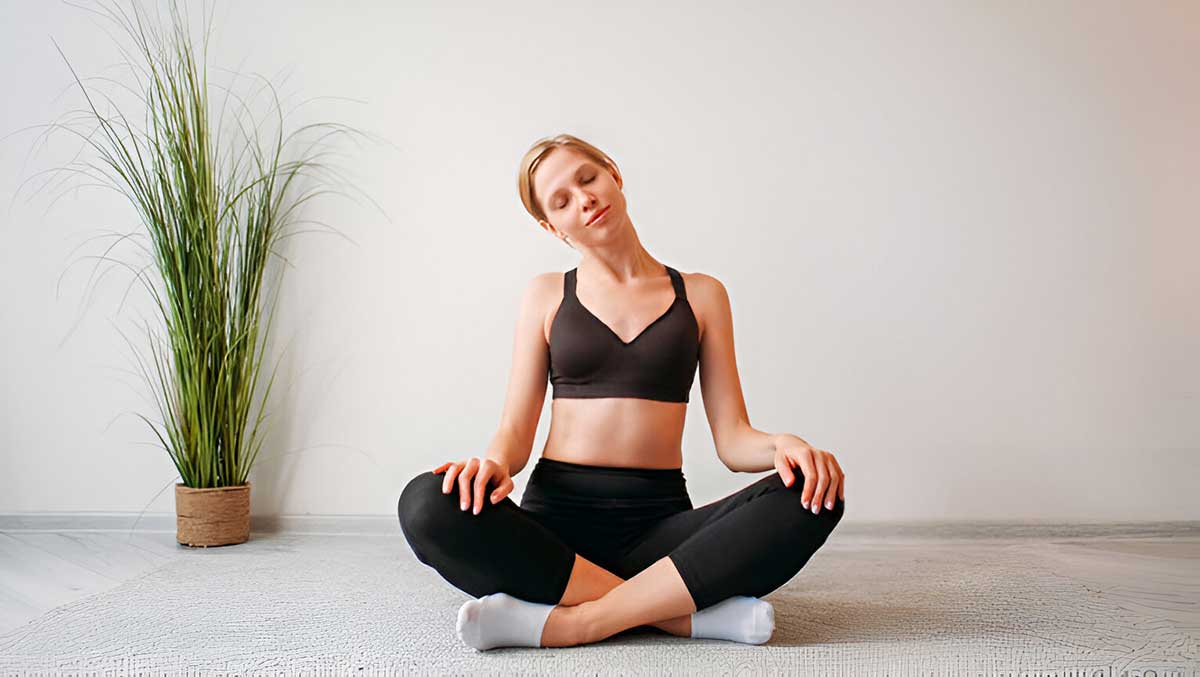
- Sit up tall. Relax your shoulders down away from your ears.
- Drop your right ear toward your right shoulder. Don’t lift your shoulder to meet your ear. Let gravity do the work. Hold for three to five breaths. Feel the stretch along the left side of your neck.
- Come back to center slowly. Repeat on the left side. Hold for three to five breaths.
- Next, turn your head to look over your right shoulder. Keep your chin level—don’t let it drop or lift. Hold for three to five breaths. You should feel a stretch along the left side of your neck, possibly into the front of your shoulder.
- Return to center. Turn left. Hold for three to five breaths.
- Do three rounds on each side, alternating right and left.
Breath pattern
Breathe naturally throughout. Don’t hold your breath. Take slow, deep breaths through your nose if possible.
Common mistakes
- Rolling the head in full circles (this can strain your neck)
- Forcing the stretch by pulling with your hand
- Holding your breath during the stretch
- Lifting the opposite shoulder when tilting
Safety note
Never roll your head in full circles. This can compress the delicate structures in your cervical spine. Stick with side-to-side tilts and turns. If you have cervical stenosis or severe arthritis in your neck, make these movements very gentle or skip them.
Pro tip
Never roll your head in full circles. This can strain your neck. Stick with side-to-side tilts and turns. If you feel dizzy during neck movements, slow down and make the range smaller.
3. Shoulder shrugs and circles (1 minute)
Why it works
Your trapezius muscles—those big, diamond-shaped muscles across your shoulders and upper back—hold tons of stress. When you’re anxious or focused, these muscles contract unconsciously. Shrugs and circles shake out that tension fast. The active contraction followed by relaxation helps reset the muscle tone.
Anatomical focus
You’re working the upper, middle, and lower fibers of the trapezius, the levator scapulae that lifts your shoulder blades, and the muscles of the rotator cuff that stabilize your shoulder joint.
How to do it
- Sit or stand with your arms relaxed at your sides.
- Breathe in deeply. Lift both shoulders straight up toward your ears. Really exaggerate the lift. Hold for 1 to 2 seconds.
- Breathe out forcefully. Drop your shoulders down with intention. Let gravity help. Feel the release.
- Repeat 10 times.
- Then make slow circles with your shoulders. Lift them up, pull them back, press them down, and bring them forward. This creates a smooth rolling motion. Roll them backward five times.
- Reverse direction. Roll your shoulders forward five times. Lift them up, bring them forward, press them down, and pull them back.
Breath pattern
Inhale as shoulders lift. Exhale as they drop. Breathe naturally during the circles.
Common mistakes
- Making the circles too small to create real movement
- Moving too fast without control
- Forgetting to breathe
- Not fully releasing the shoulders after the shrug
Safety note
If you have a shoulder impingement or rotator cuff injury, make these movements smaller and gentler. Stop if you feel pinching or sharp pain.
Pro tip
Really exaggerate the upward lift. Then let your shoulders drop completely with a slight bounce. This contrast releases deep tension. You might hear or feel some cracking sounds—this is usually just gas bubbles releasing from joints and is harmless.
4. Thread the needle pose (2 minutes)
Why it works
This gentle twist reaches the muscles between your shoulder blades—an area that gets incredibly tight from desk work. It also stretches the outside of your shoulder and opens your chest. The twist helps release fascia adhesions that form when you stay in one position too long.
Anatomical focus
You’re targeting the rhomboids between your shoulder blades, the middle trapezius, the posterior deltoids at the back of your shoulders, and the muscles along your thoracic spine. The twist also gently massages your internal organs.
How to do it
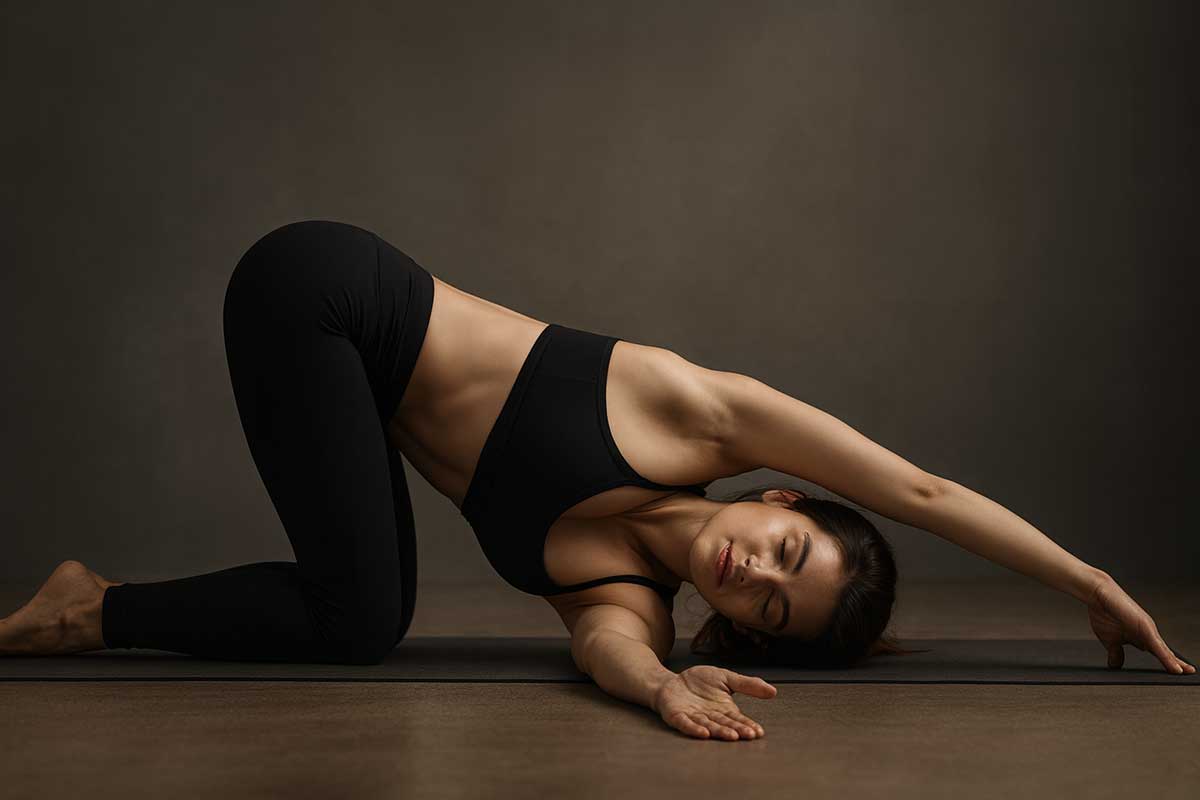
- Start on your hands and knees on the floor. Wrists under shoulders, knees under hips. If kneeling is uncomfortable, place a folded blanket under your knees.
- Lift your right hand off the floor. Slide it under your left arm, palm facing up. Thread your arm through the space until your right shoulder and ear rest on the floor. Your right arm should be extended to the left.
- Your left hand can stay where it is, or you can walk it forward slightly for a deeper stretch. Keep your hips level—don’t let your right hip collapse toward the floor.
- Hold for five to eight breaths. Feel the twist through your upper back. You might feel a stretch along the outside of your right shoulder.
- Press into your left hand to unwind. Come back to hands and knees. Pause for a breath.
- Repeat on the other side. Thread your left arm under your right.
Breath pattern
Breathe deeply into your ribs. Each inhale can help you lengthen your spine. Each exhale lets you settle a bit deeper.
Common mistakes
- Collapsing the weight onto the threaded shoulder
- Twisting from the lower back instead of the upper back
- Holding the breath
- Letting the hips shift to one side
Safety note
Skip this pose if kneeling causes knee pain. If you have a rotator cuff injury, keep the twist minimal. People with glaucoma should avoid sustained positions where the head is below the heart.
Pro tip
Place a folded blanket or yoga block under your shoulder if the floor feels too hard. You can also do a modified version sitting in a chair: sit sideways on the chair and twist toward the backrest.
5. Cow face pose arms (2 minutes)
Why it works
This pose opens your chest and shoulders in opposite directions. It’s perfect for undoing the forward slouch from typing and texting. One arm stretches the back of your shoulder while the other opens the front. Together, they address both aspects of rounded shoulder posture.
Anatomical focus
Your top arm stretches the triceps muscle on the back of your upper arm and the latissimus dorsi—that large back muscle. Your bottom arm opens the pectoralis major in your chest and the front deltoid. You’re also mobilizing the shoulder capsule and rotator cuff.
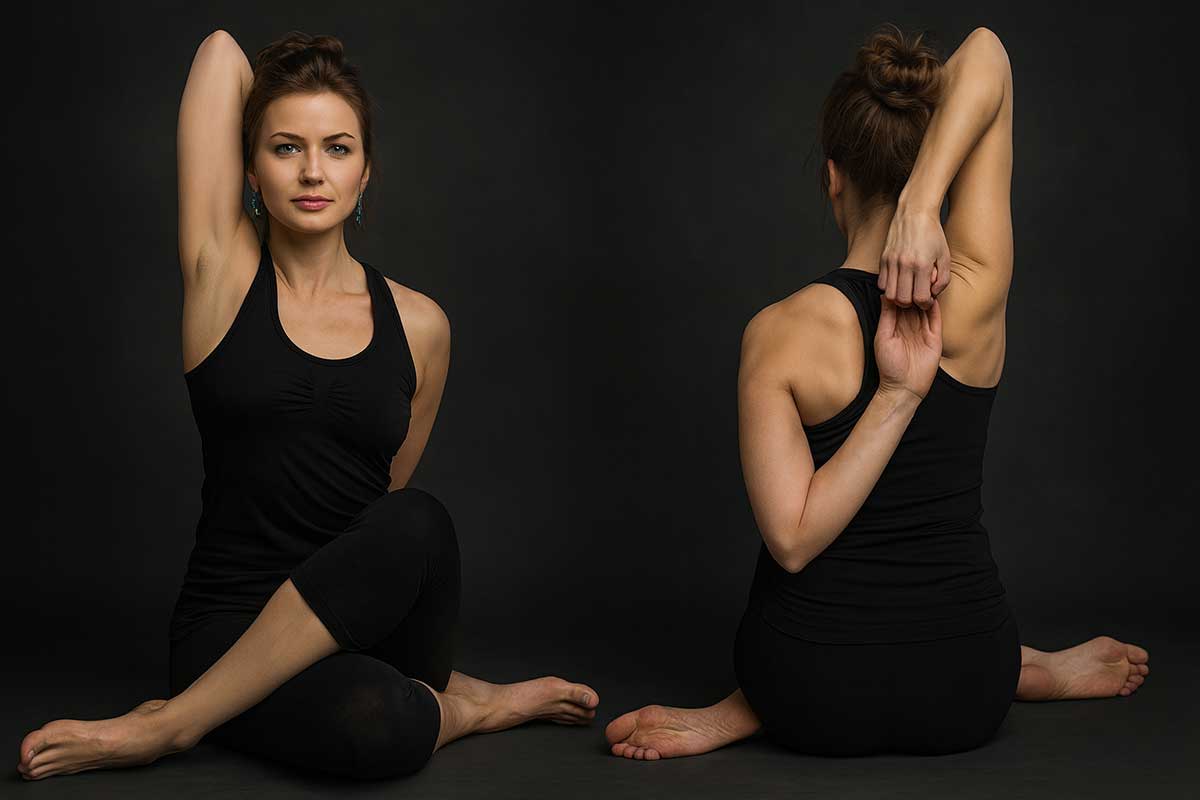
How to do it
- Sit cross-legged on the floor or in a chair. Make sure you’re sitting on the front edge of your sit bones so your pelvis can tilt slightly forward.
- Reach your right arm straight up toward the ceiling. Bend your elbow. Let your right hand drop down between your shoulder blades. Your right elbow points toward the ceiling.
- Bring your left arm behind your back. Bend your elbow. Reach your left hand up your back, trying to walk your fingertips toward your right hand.
- If your hands meet, clasp your fingers together. If they don’t meet—and they might not—use a yoga strap, belt, or towel between your hands. Hold each end.
- Keep your spine tall. Don’t lean to one side. Draw your ribs in slightly so they don’t flare forward.
- Hold for five to eight breaths.
- Release slowly. Shake out your arms. Repeat on the other side. Left arm up, right arm down.
Breath pattern
Inhale to lengthen your spine. Exhale to maintain the length while settling into the stretch. Keep breathing steadily.
Common mistakes
- Leaning to one side to force the hands together
- Letting the ribs flare forward
- Arching the lower back excessively
- Holding the breath
Safety note
Skip this pose if you have a rotator cuff injury or recent shoulder surgery. If you have frozen shoulder, use a strap and keep the range small. Pregnant individuals should use props generously and not force the stretch.
Pro tip
Using a strap isn’t cheating—it’s smart yoga. Many people have tight shoulders from years of desk work. The strap allows you to get the benefits without forcing your body. Over time, your hands will move closer together.
6. Eagle pose arms (1 minute)
Why it works
This move creates space between your shoulder blades. It stretches the rhomboids and rear deltoids—muscles that get crushed when you hunch forward at your desk. The wrap of the arms creates a deep stretch across your entire upper back.
Anatomical focus
You’re targeting the rhomboid major and minor between your shoulder blades, the middle trapezius, the infraspinatus and teres minor of your rotator cuff, and the posterior deltoids. This pose also gently stretches the triceps.
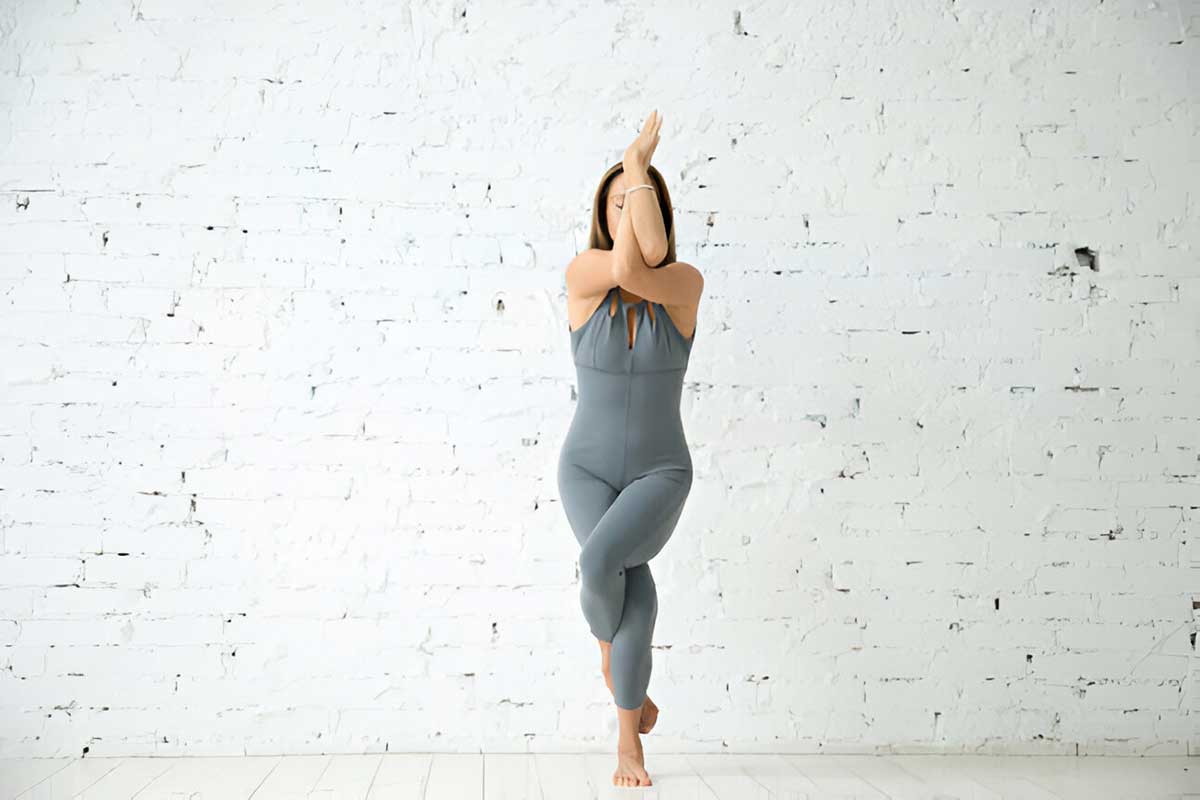
How to do it
- Sit or stand tall. Extend both arms straight forward at shoulder height, palms facing each other.
- Cross your right arm over your left arm at the elbows. Your right elbow rests on top of your left elbow.
- Bend both elbows. Your forearms should now be vertical. Bring the backs of your hands together. If you can, wrap your right hand around to press your palms together. If this is too much, just press the backs of your hands together.
- Lift your elbows slightly while pressing your forearms together. You should feel a stretch across your upper back, between your shoulder blades.
- Draw your shoulders down away from your ears. Don’t let them creep up.
- Hold for five to eight breaths.
- Unwind slowly. Extend your arms out to the sides. Repeat on the other side. Left arm over right.
Breath pattern
Breathe into your back body. Imagine your breath expanding the space between your shoulder blades.
Common mistakes
- Letting shoulders lift toward ears
- Not crossing the arms deeply enough to create a stretch
- Collapsing through the chest
- Holding breath
Safety note
If you have a shoulder injury, keep the wrap loose. Stop if you feel pinching in the front of your shoulder.
Pro tip
Really reach your fingertips toward the ceiling while pressing your forearms together. This deepens the stretch across your upper back. You can also try gently pulling your elbows away from your face while keeping the forearms pressed together.
7. Corpse pose with neck support (2 minutes)
Why it works
Your nervous system needs time to absorb the benefits of movement. This final rest allows your muscles to relax completely. It shifts you from stress mode to healing mode. When you rest after stretching, your body integrates the new range of motion. Your nervous system recalibrates to recognize the more open, relaxed state as normal.
Anatomical focus
This is about releasing all muscular effort. You’re allowing gravity to do the work. The neck support maintains the natural curve of your cervical spine, preventing strain even during rest.
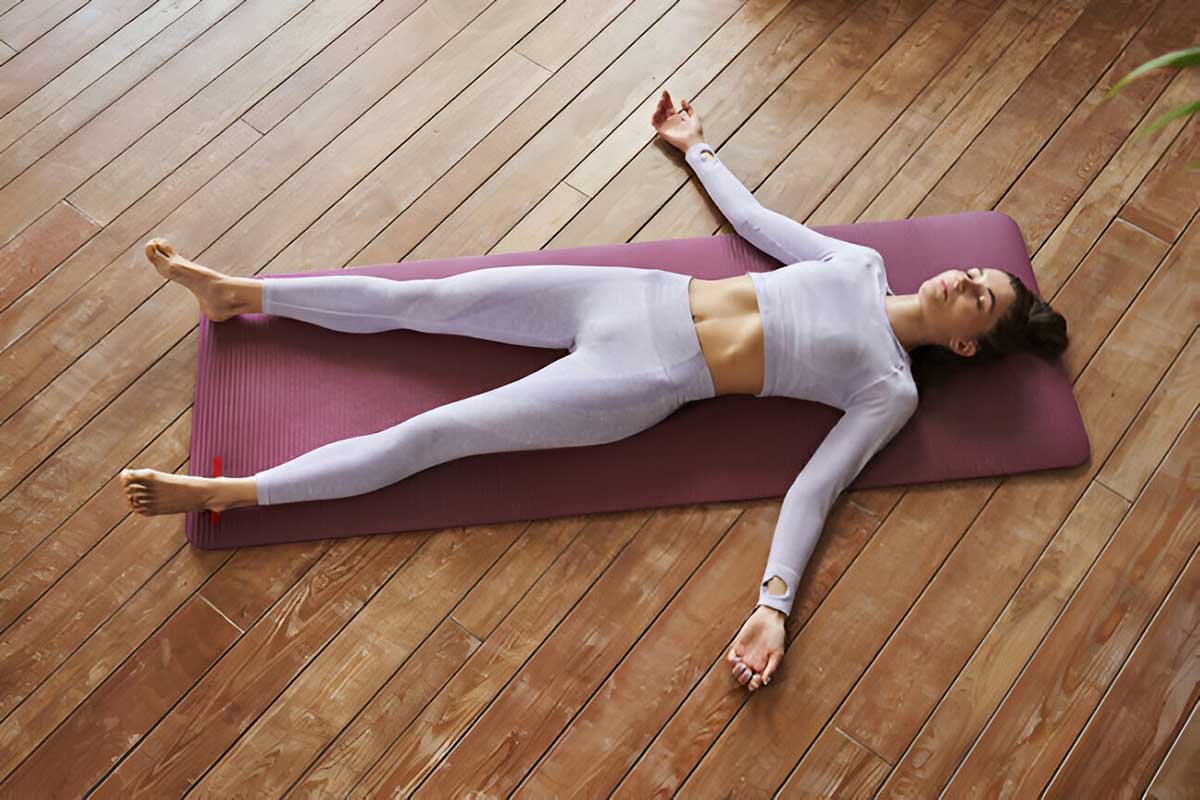
How to do it
- Lie on your back on the floor, your bed, or a yoga mat.
- Place a rolled towel, small pillow, or yoga bolster under your neck for support. The support should fit in the curve of your neck, not under your head. Your head should feel cradled and neutral, not propped up high.
- Let your legs extend naturally. Your feet will probably roll out to the sides. That’s fine.
- Let your arms rest by your sides, a few inches away from your body. Turn your palms to face up. This opens your chest slightly.
- Close your eyes. Let your jaw relax. Your tongue can rest gently on the roof of your mouth or float in your mouth.
- Breathe naturally. You don’t need to control your breath anymore. Just let it flow.
- Stay here for at least two minutes. Five minutes is even better if you have the time.
Breath pattern
Natural breathing. Let your body breathe itself.
Common mistakes
- Propping the head up too high with a thick pillow
- Tensing the body instead of releasing
- Thinking about your to-do list instead of resting
Safety note
If lying flat bothers your lower back, bend your knees and place your feet flat on the floor. Or place a bolster or pillows under your knees. Pregnant individuals should lie on their left side instead of their back after the first trimester.
Pro tip
Set a gentle alarm so you don’t worry about the time. Just rest. Some people fall asleep during this pose—that’s okay. Your body obviously needs the rest. If you’re at work and can’t lie down, rest your head on your desk on folded arms for two minutes.
Understanding why yoga works
You’ve learned the poses. Now let’s talk about why they’re so effective.
Yoga doesn’t just stretch tight muscles. It creates changes at multiple levels of your body:
Myofascial release
Fascia is the thin connective tissue that wraps around every muscle fiber, muscle group, and organ in your body. Think of it like plastic wrap around your muscles. When you move regularly, fascia stays hydrated and slides smoothly. Different layers glide past each other without restriction.
When you sit still for hours, fascia loses water content. The layers start to stick together. These adhesions create that stiff, restricted feeling when you try to move.
Slow, sustained stretching—the kind you do in yoga—rehydrates fascia. A study by Schleip and colleagues in the Journal of Bodywork (2012) found that slow stretching increases fascial water content by 23%. More water means better glide. Better glide means easier movement.
Neuromuscular re-education
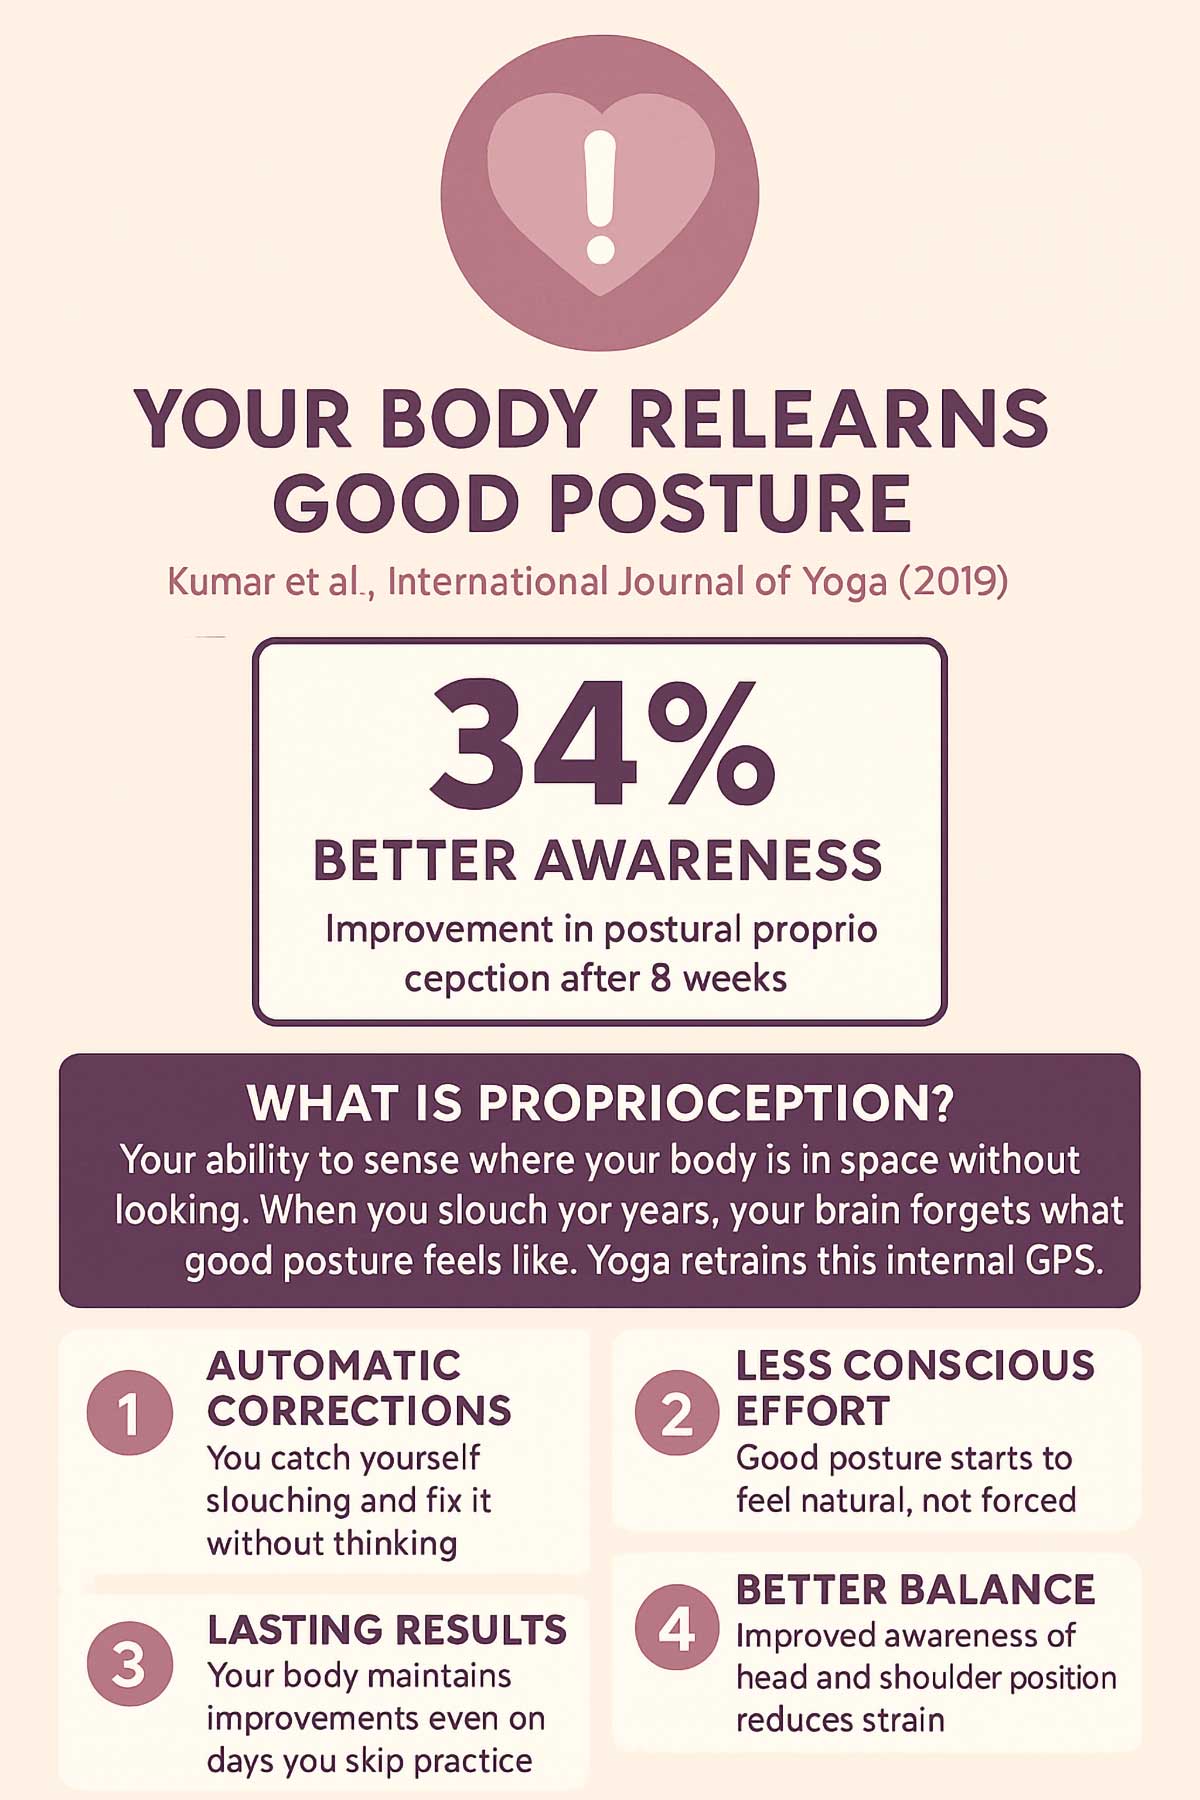
Your brain constantly monitors body position through sensors in your muscles, joints, and skin. This awareness is called proprioception. When you hold poor posture for months or years, your proprioceptors adapt. Your brain starts to think that slouched position is normal. It stops sending correction signals.
Yoga retrains proprioception. When you practice daily, you give your nervous system new information. You teach it what good alignment feels like. Over time, your body starts to prefer this aligned position. You naturally sit up straighter without thinking about it.
A study by Kumar and colleagues in the International Journal of Yoga (2019) found that eight weeks of yoga improved postural awareness by 34% compared to a control group. Participants could sense when they were slouching and correct it automatically.
Stress reduction and muscle tension
There’s a direct link between your stress levels and muscle tension. When you’re anxious or overwhelmed, your body releases cortisol and adrenaline. These stress hormones tell your muscles to contract. It’s an old survival mechanism—tense muscles protected you from injury during fights or falls.
But chronic stress means chronic muscle contraction. Your trapezius muscles never fully relax. They develop a baseline level of tension that feels normal to you but is actually exhausting your muscles.
Yoga activates your parasympathetic nervous system—your rest-and-digest mode. Deep breathing, gentle movement, and focused awareness signal your brain that you’re safe. Cortisol levels drop. Muscles receive the signal that they can finally release.
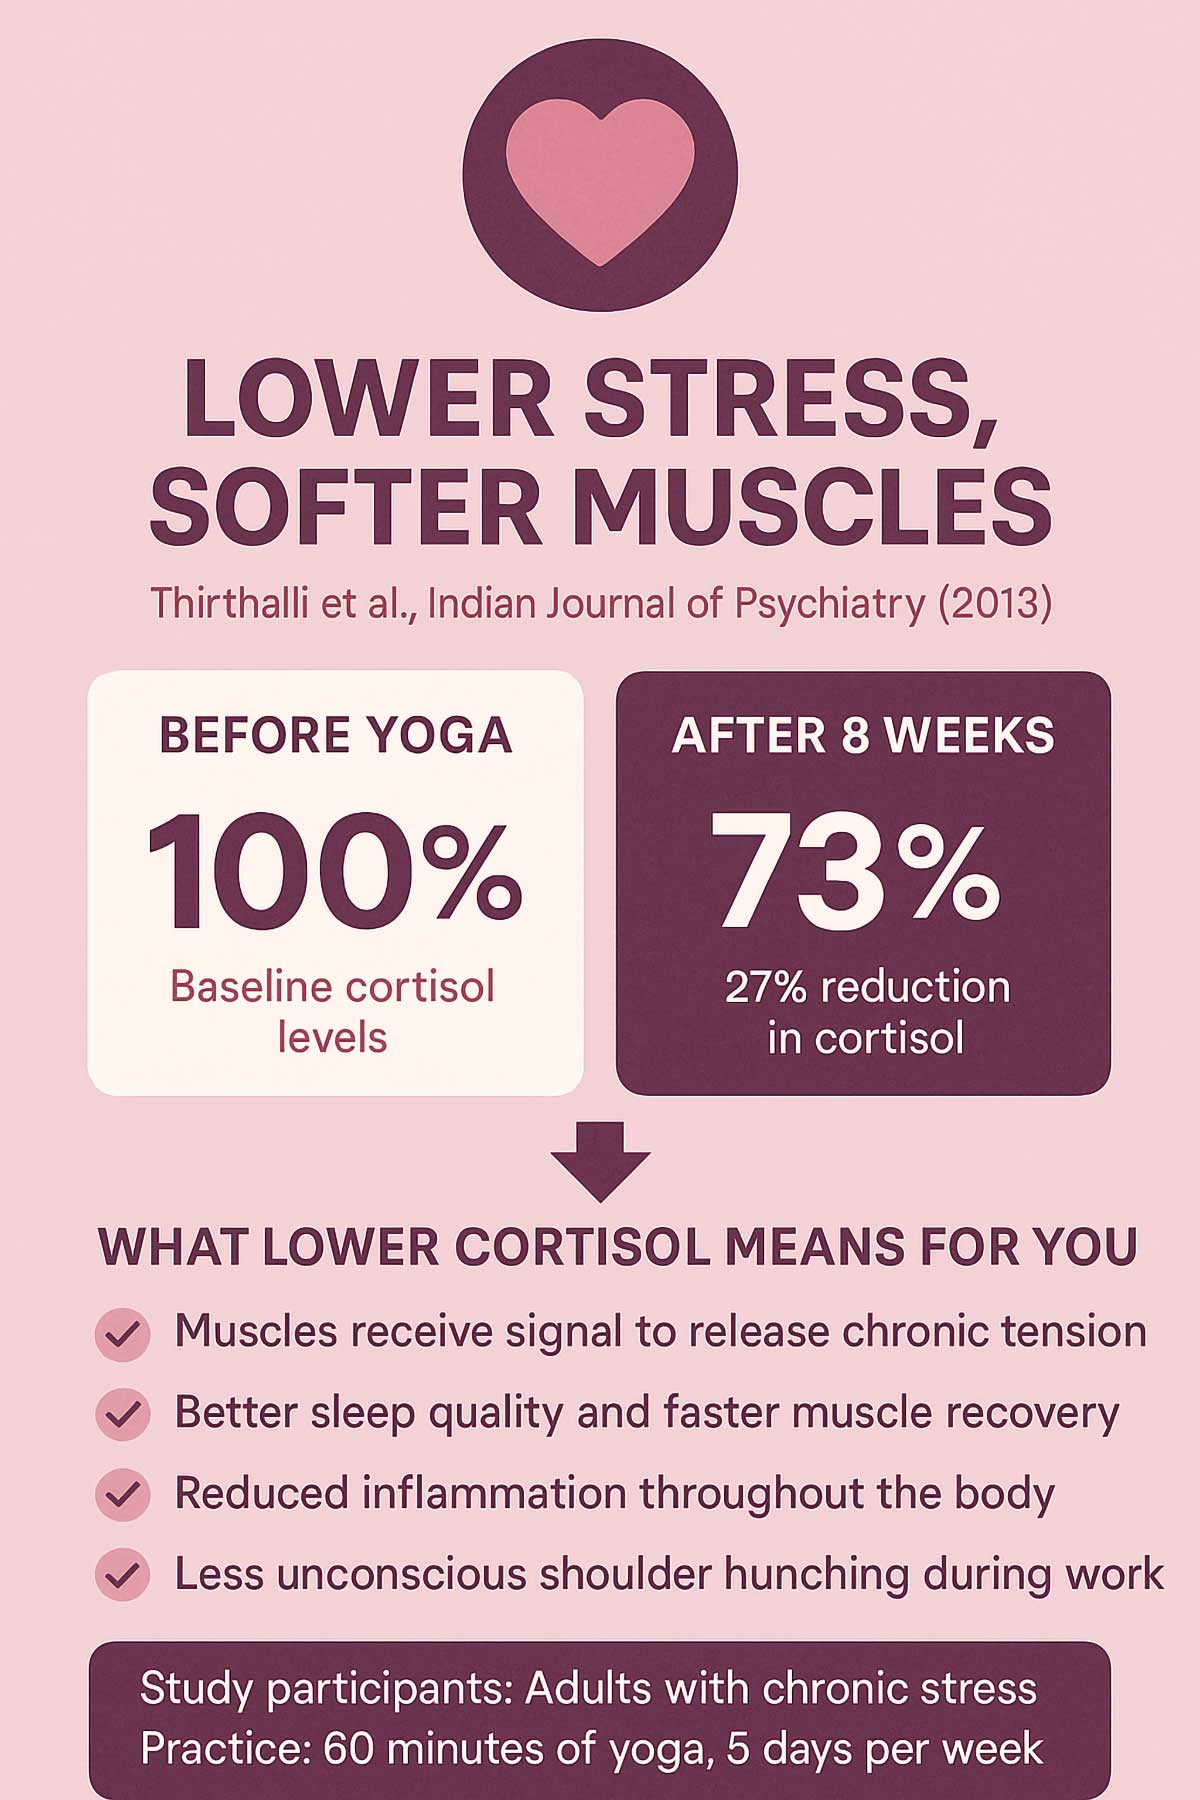
Thirthalli and colleagues published a study in the Indian Journal of Psychiatry (2013) showing that yoga reduced cortisol levels by 27% compared to controls. Lower cortisol means less chronic muscle guarding.
| Mechanism | Study | Key finding |
|---|---|---|
| Fascia hydration | Schleip et al., Journal of Bodywork (2012) | Slow stretching increases fascial water content by 23% |
| Proprioception | Kumar et al., International Journal of Yoga (2019) | 8 weeks of yoga improved postural awareness by 34% |
| Cortisol reduction | Thirthalli et al., Indian Journal of Psychiatry (2013) | Yoga reduced cortisol levels by 27% compared to controls |
The science behind these poses is compelling. A 2022 meta-analysis in PLOS ONE combined data from 14 randomized controlled trials involving 1,226 participants. The researchers found that yoga interventions produced significant reductions in both pain intensity—measured on standardized scales—and functional disability compared to control groups who received no treatment or standard care.
Variations for your schedule and needs
Not everyone has the same amount of time or the same pain level. Here are three versions of this routine to match your needs.
Quick desk reset (5 minutes)
If you’re at work and need fast relief, do these three poses right at your desk:
| Pose | Duration | Why this one |
|---|---|---|
| Seated Cat-Cow | 2 min | Wakes up entire spine without leaving chair |
| Neck Rolls & Tilts | 2 min | Targets acute neck tension directly |
| Shoulder Shrugs | 1 min | Releases upper trap tension quickly |
This short sequence can be done multiple times throughout your day. Try it mid-morning, after lunch, and mid-afternoon.
Full tension release (12 minutes)
This is the main routine described above. Do all seven poses in order. This is your daily practice.
Deep relief session (20 minutes)
When you have more time—on weekends or evenings—extend the routine:
- Do the full 12-minute routine
- Hold each pose for 8 to 10 breaths instead of 5
- Add 3 minutes of breathing exercises before you start
- Extend corpse pose to 5 minutes at the end
Choosing based on pain level
| Your pain level | Recommended approach |
|---|---|
| Mild tension (1-3 out of 10) | Quick desk reset 2-3 times daily |
| Moderate discomfort (4-6 out of 10) | Full 12-minute routine once daily |
| Significant pain (7-8 out of 10) | Deep 20-minute session plus professional evaluation |
| Severe pain (9-10 out of 10) | See a healthcare provider before starting yoga |
The 3-minute breath break that doubles your results
Breathing and muscle tension are intimately connected. Shallow chest breathing—the kind you do when stressed—keeps your nervous system in alert mode. Your muscles stay partially contracted.
Deep belly breathing activates your relaxation response. It signals your body that everything is okay. Muscles receive permission to release.
Try this simple technique before your yoga routine or any time you notice tension building:
Diaphragmatic breathing technique
- Sit tall in your chair or on the floor.
- Place one hand on your chest, one hand on your belly.
- Breathe in through your nose for 4 counts. Your belly should rise while your chest stays relatively still.
- Hold for 2 counts at the top.
- Breathe out through your mouth for 6 counts. Your belly falls.
- Repeat 10 times.
| Benefit | Why it matters |
|---|---|
| Reduces cortisol | Lower stress hormones mean less muscle tension |
| Improves oxygen flow | Tight muscles get fresh blood and nutrients |
| Activates relaxation response | Signals body to release chronic holding patterns |
| Slows heart rate | Calmer nervous system means softer muscles |
You can do this breathing exercise at your desk, in your car, or before bed. It takes three minutes and creates immediate changes in your muscle tone.
Self-massage techniques for between sessions
Yoga is powerful, but you can support your practice with simple self-massage. These techniques release trigger points and improve blood flow.
Tennis ball for upper back
Place a tennis ball between your upper back and a wall. Lean against it gently. Move your body slowly so the ball rolls around. When you find a tender spot, stay there for 30 to 60 seconds. Breathe deeply. The pressure helps release the tight band of muscle.
Do this for 2 to 3 minutes on each side of your spine, between your shoulder blades.
Finger pressure for base of skull
Tight suboccipital muscles at the base of your skull can cause headaches. Place your fingertips at the base of your skull where it meets your neck. Press gently upward and hold for 30 seconds. You might feel the tension start to melt.
Move your fingers half an inch to the side and repeat. Work your way across the base of your skull.
Hand massage for trapezius
Reach your right hand over your left shoulder. Grasp the thick muscle between your neck and shoulder—your upper trapezius. Squeeze gently and hold for a few seconds. Release. Move your hand slightly and repeat. Work your way from your neck toward your shoulder.
Repeat on the other side.
When to use heat vs. ice
Use heat when:
- Muscles feel tight and stiff
- Pain is dull and achy
- You want to relax before yoga
Heat increases blood flow and relaxes muscles. Apply a heating pad for 15 to 20 minutes.
Use ice when:
- You have acute inflammation
- Pain started recently (within 48 hours)
- The area feels hot or swollen
Ice reduces inflammation and numbs pain. Apply an ice pack wrapped in a towel for 10 to 15 minutes.
For chronic tension, heat usually works better. Many people find that alternating heat and cold—3 minutes heat, 1 minute cold, repeated three times—provides the most relief.
Building better desk ergonomics
Yoga releases tension. Ergonomics prevents it from building in the first place. Take five minutes to optimize your workspace.
| Setup element | Ideal position | Common mistake | Quick fix |
|---|---|---|---|
| Monitor | Top of screen at eye level, 20 to 26 inches away | Too low, causing neck flexion | Stack books under monitor or use a monitor stand |
| Keyboard | Elbows at 90 to 100 degrees, wrists neutral | Too high, causing shoulder elevation | Lower keyboard tray or adjust desk height |
| Chair | Lower back supported, thighs parallel to floor | No lumbar support | Add small pillow or rolled towel behind lower back |
| Mouse | Same height as keyboard, close to body | Too far away, causing shoulder strain | Move mouse pad closer to keyboard |
| Feet | Flat on floor or footrest | Dangling or tucked under chair | Use footrest or large book under feet |
| Phone | At ear level when talking | Cradled between ear and shoulder | Use speakerphone or headset |
The 20-20-20 rule
Even with perfect ergonomics, static postures cause problems. Your body needs regular movement.
Follow the 20-20-20 rule: Every 20 minutes, look at something 20 feet away for 20 seconds.
While you’re looking away, add micro-movements:
- Roll your shoulders back three times
- Tilt your head side to side
- Stand up and sit back down
- Squeeze your shoulder blades together five times
These tiny breaks prevent tension from accumulating. They’re more effective than trying to fix hours of built-up tightness at the end of the day.
Daily schedule for maximum relief
Timing matters. Certain practices work better at specific times of day. Here’s an ideal schedule for desk workers dealing with neck and shoulder pain:
| Time | Activity | Duration | Benefit |
|---|---|---|---|
| 8:00 AM | Morning yoga routine | 12 min | Starts day with mobility, prevents tension buildup |
| 10:00 AM | Desk posture check | 30 sec | Catches slouching before it causes pain |
| 12:00 PM | Walking break | 10 min | Increases blood flow, breaks sitting cycle |
| 2:30 PM | Quick desk stretches (poses 1, 2, 3) | 5 min | Addresses afternoon tension peak |
| 5:00 PM | Evening yoga routine (optional) | 12 min | Releases accumulated daily tension |
| Before bed | Corpse pose with neck support | 5 min | Promotes better sleep quality |
You don’t have to do all of these every day. Start with the morning routine. Add other elements as they fit your schedule.
The key is consistency. Twelve minutes every morning beats occasional hour-long sessions. Your body adapts to regular input.
Foods that support muscle health
Yoga releases physical tension. Nutrition supports muscle recovery and reduces inflammation. You don’t need a complete diet overhaul—just add more of these foods to your regular meals.
| Food category | Examples | Why it helps |
|---|---|---|
| Omega-3 rich foods | Salmon, sardines, walnuts, flax seeds, chia seeds | Reduces muscle inflammation and promotes tissue repair |
| Magnesium sources | Almonds, dark chocolate, pumpkin seeds, black beans | Relaxes muscle fibers and reduces cramping |
| Hydration | Water, herbal tea, coconut water | Keeps muscle tissue supple and aids nutrient transport |
| Antioxidants | Berries, green tea, turmeric, ginger, dark leafy greens | Combats oxidative stress from chronic tension |
| Protein | Eggs, Greek yogurt, chicken, tofu, lentils | Provides building blocks for muscle repair |
| Vitamin D sources | Fatty fish, egg yolks, fortified milk, sunlight | Essential for muscle function and pain reduction |
Foods to limit:
- Excess caffeine increases muscle tension and can worsen anxiety
- High-sodium processed foods promote inflammation and water retention
- Alcohol dehydrates tissues and disrupts sleep quality
- Excess sugar triggers inflammatory responses in the body
Hydration matters more than you think. Dehydrated muscles are more prone to tension and injury. Aim for half your body weight in ounces of water daily. If you weigh 150 pounds, drink 75 ounces of water. Add more if you exercise or live in a hot climate.
A simple test: Check your urine color. Pale yellow means you’re well hydrated. Dark yellow means you need more water.
Props and modifications
You don’t need expensive equipment for this routine. But a few simple props can make poses more accessible and comfortable.
| Prop | Cost | When to use | How it helps |
|---|---|---|---|
| Yoga strap or belt | $8-15 | Cow face pose, any pose with tight shoulders | Bridges gap when hands don’t meet |
| Block or thick book | $10 or free | Thread the needle | Supports head, reduces neck strain |
| Rolled towel | Free | Corpse pose, any pose needing neck support | Maintains natural cervical curve |
| Tennis ball | $3 | Self-massage between sessions | Releases trigger points in upper back |
| Resistance band | $10-20 | Strengthening phase after flexibility improves | Adds challenge to build supporting strength |
| Folded blanket | Free to $20 | Kneeling poses, sitting poses | Cushions knees and hips |
Don’t let lack of props stop you from practicing. You can do this entire routine with nothing but your body and a chair.
Troubleshooting common issues
Not everyone responds to yoga the same way. If you’re not getting the relief you expected, this troubleshooting guide can help.
| Issue | Possible cause | Solution |
|---|---|---|
| Poses feel too easy | Good flexibility or mild tension only | Try intermediate variations or add strength exercises |
| Sharp pain during poses | Injury, inflammation, or pushing too hard | Stop immediately, reduce range of motion, see healthcare provider if pain persists |
| No improvement after 2 weeks | Poor form, inconsistent practice, or underlying condition | Film yourself doing poses, compare to instructions, ensure daily practice |
| Pain worse after practice | Pushing too hard or incorrect alignment | Reduce range of motion, focus on gentle movements, check form |
| Headaches during practice | Holding breath, clenching jaw, or tension in face | Focus on steady breathing, relax facial muscles, soften your gaze |
| Can’t hold poses for full time | Normal for beginners or severe tightness | Start with shorter holds (3 breaths), build up gradually |
| Dizziness during neck movements | Moving too quickly or blood pressure changes | Slow down movements, make range smaller, keep eyes open |
If problems persist after trying these solutions, consult a healthcare provider. Some conditions require professional treatment.
Level up your practice
After you’ve mastered the basic routine, you can deepen your practice with these progressions.
Week 1-2: master the basics
Focus on learning proper form. Don’t worry about how deep you go. Just get familiar with each pose. Practice daily for 12 minutes.
Week 3-4: increase hold times
Extend each breath. Hold poses for 8 breaths instead of 5. This gives your fascia more time to release. Your total routine will take about 15 minutes now.
Week 5-6: add intermediate variations
Instead of Thread the Needle: Try Extended Puppy Pose. Start on hands and knees. Walk your hands forward while keeping your hips over your knees. Let your chest drop toward the floor. Your forehead rests on the ground. This creates a deeper stretch through your shoulders and upper back.
Instead of Cow Face Arms: Try Reverse Prayer. Bring both hands behind your back. Press your palms together with fingers pointing up. This requires significant shoulder mobility. If you can’t get palms together, just bring the backs of your hands together.
After Eagle Arms: Add Supported Fish Pose. Lie on your back with a rolled blanket or yoga block under your shoulder blades. Let your arms rest on the floor, palms up. Your chest opens while your head falls back gently. This deeply stretches the front of your shoulders and chest. Hold for 2 to 3 minutes.
Month 2 and beyond
Once you have consistent flexibility, add strength training. Flexible muscles without strength can’t maintain good posture. You need both.
Complement your yoga practice with these strengthening exercises:
| Exercise | Frequency | Purpose | How it complements yoga |
|---|---|---|---|
| Chin tucks | 10 reps, 3 times daily | Strengthen deep neck flexors | Builds strength to maintain good head position |
| Wall angels | 10 reps, 2 times daily | Strengthen postural muscles | Creates active strength to support flexibility |
| Scapular squeezes | 15 reps, 2 times daily | Strengthen rhomboids | Pulls shoulders back with muscle power, not just stretch |
| Resistance band rows | 15 reps, 3 times weekly | Build upper back strength | Prevents muscle imbalances as flexibility improves |
The combination of yoga flexibility and targeted strength training provides the best long-term results.
Medical considerations and when to seek help
Yoga is safe for most people. But certain conditions require modifications or professional guidance.
Important medical considerations
| Condition | Can do routine? | Modifications needed |
|---|---|---|
| Herniated cervical disc | Consult doctor first | Avoid deep forward bends, keep neck neutral, may need physical therapy first |
| Rheumatoid arthritis | Yes, during non-flare periods | Gentler movements, avoid end-range positions, listen to your body |
| Recent whiplash injury | Wait 6 to 8 weeks | Focus on breathing and minimal movement initially, get medical clearance |
| Cervical stenosis | Consult doctor first | Avoid extreme neck extension, keep movements small and controlled |
| Osteoporosis | Yes, with caution | No forceful movements, keep spine neutral, avoid deep twists |
| Pregnancy | Yes | Modify cow face arms, use props generously, avoid lying on back after first trimester |
| Glaucoma | Yes, with modifications | Avoid sustained head-down positions like thread the needle |
| High blood pressure | Yes | Avoid holding breath, keep movements gentle, no inversions |
Red, yellow, and green flags
Red Flags – See a doctor immediately:
- Pain radiating down arms with numbness or tingling
- Sudden onset of severe pain after an injury
- Pain accompanied by fever, chills, or unexplained weight loss
- Weakness in arms, hands, or difficulty gripping objects
- Loss of bladder or bowel control
- Severe headache with neck stiffness
- Pain that wakes you from sleep consistently
Yellow Flags – See a doctor within a week:
- No improvement after 4 weeks of consistent daily practice
- Pain that interferes with sleep most nights
- Pain that’s gradually increasing over time despite practice
- Clicking, grinding, or popping sensations with pain
- Numbness that comes and goes
- Pain that spreads to new areas
Green Flags – Continue self-care:
- Mild to moderate tension that doesn’t limit daily activities
- Pain that improves with movement and stretching
- No numbness, tingling, or weakness
- Gradual improvement over days or weeks
- Pain related to specific activities like computer work
If you see red flags, stop the yoga routine and seek immediate medical attention. Red flags can indicate serious conditions that need professional treatment.
If you have yellow flags, continue gentle yoga but schedule a doctor’s appointment. You may benefit from physical therapy, imaging studies, or other interventions.
Green flags mean you’re on the right track. Keep practicing consistently.
Consistency: the real secret to success
You now have everything you need: the poses, the science, the modifications, the troubleshooting tips. But none of it matters without one thing: consistency.
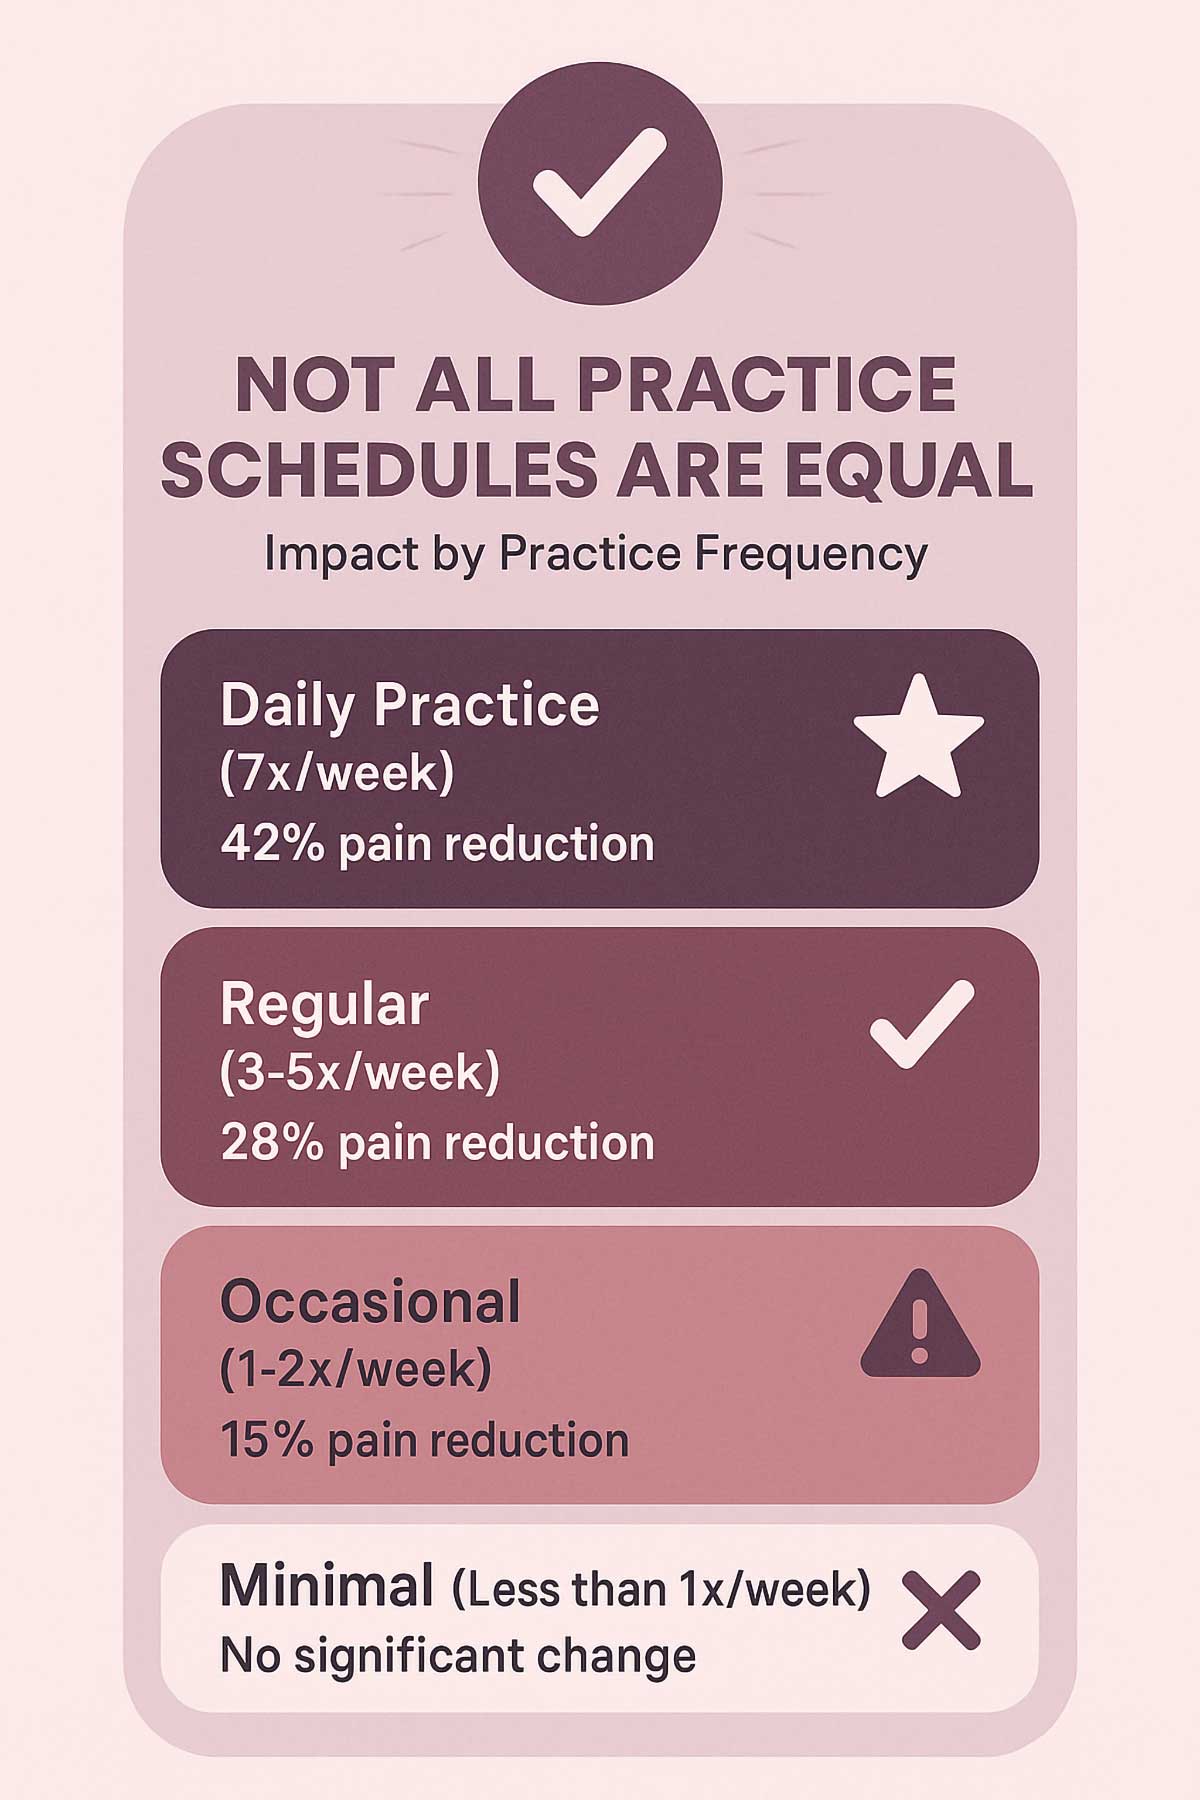
Twelve minutes every day beats one 90-minute class per week. Your body adapts to regular, repeated input. When you practice daily, you’re constantly reminding your nervous system what good alignment feels like. You’re regularly hydrating your fascia. You’re consistently lowering your stress hormones.
When you practice occasionally, your body never fully adapts. You might feel good right after a session, but the relief doesn’t last. You’re always starting over instead of building on previous progress.
Think of it like compound interest. Each daily practice builds on the one before. Small, consistent efforts accumulate into significant change.
Here’s how to make consistency easier:
- Tie it to an existing habit. Do your yoga routine right after you brush your teeth in the morning. Or right before you make your coffee. Or immediately after you close your laptop at the end of the workday. Connecting the new habit to an established one makes it stick.
- Make it visible. Put a sticky note on your bathroom mirror: “12-minute yoga.” Set a recurring phone reminder. Lay out a towel or yoga mat the night before. Visual cues trigger action.
- Start smaller if needed. Can’t commit to 12 minutes? Start with 5. Just do the first three poses. Once that becomes automatic, add the rest. Building a small habit consistently is better than starting big and quitting.
- Track your practice. Check off each day you complete the routine. Seeing a chain of successful days motivates you to keep going. You won’t want to break the streak.
- Be flexible with time, not with consistency. Some days you’ll do the full 12 minutes. Other days you might only manage 5. That’s fine. Five minutes is still practice. What matters is that you do something every single day.
- Focus on how you feel. Pay attention to the relief you get from practice. Notice when your shoulders feel lighter. Celebrate when you can turn your head farther. These positive feelings reinforce the habit.
The routine works. But only if you work the routine.
Conclusion
Twelve minutes. Seven poses. One simple routine that can change how you feel every single day.
Your tight muscles didn’t develop overnight. They won’t fully release in one session. But if you stick with this routine for one week, you’ll notice a difference. Less pain. More range of motion. A sense that your body is finally cooperating with you again.
By week two, the changes become more obvious. You’ll catch yourself sitting up straighter without thinking about it. Turning to check your blind spot while driving won’t cause that familiar catch. The afternoon headaches might disappear.
By week four, this practice will feel like part of your daily routine, like brushing your teeth or making your morning coffee. You’ll notice when you skip it because your body will remind you.
Research confirms what yoga practitioners have known for centuries: regular practice works. That 2022 meta-analysis in PLOS ONE reviewed 14 studies with over 1,200 participants. Yoga significantly reduced neck pain and disability compared to doing nothing. The participants who practiced regularly got better. The ones who didn’t stayed the same or got worse.
You have the tools now. You have the time—we all have 12 minutes. All that’s left is to start.
Try this routine tomorrow morning. Notice how you feel. Then do it again the next day. And the next.
FAQs
How long does it take for yoga to relieve neck pain?
Most people notice some relief after their first session. You might feel looser, lighter, or less restricted. But this initial relief is temporary. Significant, lasting improvements typically occur within 2 to 4 weeks of daily practice.
A study in Complementary Therapies in Medicine (2023) found measurable reductions in neck and shoulder stiffness after just 6 weeks of 15-minute yoga sessions. Participants reported a 38% decrease in self-reported stiffness.
The timeline depends on several factors:
- How severe your tension is when you start
- How consistent you are with daily practice
- Whether you address ergonomics and other contributing factors
- Your overall stress levels and sleep quality
Be patient. Your tension developed over months or years. It won’t disappear overnight. But with consistent practice, you’ll notice steady improvement.
Can I do yoga for neck pain every day?
Yes. These gentle poses are safe for daily practice. In fact, your body adapts better to frequent, shorter sessions than occasional long ones.
Think of it like brushing your teeth. You don’t brush once a week for an hour. You brush for a few minutes every day. The same principle applies to releasing muscle tension.
Daily practice teaches your nervous system that this more open, relaxed state is the new normal. Your muscles start to maintain this lower baseline tension even when you’re not actively stretching.
If you feel unusually sore after practice, take a rest day. But general muscle soreness—the kind that feels like you worked the muscles—is normal and usually means you’re making progress.
Is yoga or physical therapy better for neck pain?
Both can be effective. The best choice depends on your specific situation.
Yoga works well for:
- General tension from poor posture and desk work
- Stress-related muscle tightness
- Mild to moderate pain without injury
- Prevention and maintenance
- People who prefer self-directed practice
Physical therapy is better for:
- Specific injuries like herniated discs or whiplash
- Severe or chronic pain that doesn’t improve with self-care
- Conditions that need professional diagnosis
- Situations requiring manual therapy or specialized treatments
- When you need guidance for your specific condition
Many people benefit from combining both approaches. You might see a physical therapist to address a specific injury, then maintain your progress with daily yoga practice at home.
If you’re unsure which approach you need, start with your doctor. They can help you determine whether self-care is appropriate or if you need professional intervention.
What if I can’t do floor poses at work?
The first three poses—seated cat-cow, neck rolls, and shoulder shrugs—can all be done at your desk in a regular chair. These three alone provide significant relief and take only 5 minutes.
You can also modify the other poses:
- Eagle arms works perfectly while sitting
- Cow face arms can be done seated
- Thread the needle can be modified: sit sideways in your chair and twist toward the backrest, threading one arm behind the backrest
- Corpse pose can become a seated meditation: close your eyes and rest your head on your folded arms on your desk for 2 minutes
The floor poses are ideal, but they’re not required. Do what you can with the space and time available. Some yoga is always better than no yoga.
Can yoga make neck pain worse?
Only if you push too hard or use poor form. Gentle, controlled movements should feel releasing, not painful.
Follow these guidelines to stay safe:
- Move slowly and mindfully
- Never force a stretch
- Stop if you feel sharp pain
- Breathe steadily throughout
- Start with smaller ranges of motion and gradually increase
- Listen to your body’s signals
A stretch should feel intense but not unbearable. You should be able to breathe normally during the pose. If you’re holding your breath or grimacing, you’re pushing too hard.
Some muscle soreness the next day is normal, especially when you first start. This is different from sharp pain during the pose or pain that gets worse over time.
If your pain consistently worsens after yoga, you’re either using poor form or you may have an underlying condition that needs professional evaluation.
How do I know if I’m doing the poses correctly?
Here are signs you’re doing them right:
- You feel a stretch in the target muscles described
- You can breathe normally throughout the pose
- The intensity is manageable
- You feel relief or increased mobility after the session
Here are signs you might need to adjust:
- You feel pain in joints rather than muscles
- You’re holding your breath
- You feel strain in areas not mentioned in the instructions
- You feel worse after practice
If you’re unsure about your form, film yourself doing the poses. Compare your video to the written instructions. Look for common mistakes listed with each pose.
You can also practice in front of a mirror initially. This gives you real-time feedback about your alignment.
Many people find that booking one session with a yoga teacher or physical therapist helps. They can check your form and give you personalized cues. Then you can practice confidently on your own.
Scientific references
The recommendations in this article are supported by peer-reviewed research:
PLOS ONE (2022): A meta-analysis of 14 randomized controlled trials found that yoga significantly reduced neck pain and disability compared with control groups. The analysis included 1,226 participants and found consistent benefits across different yoga styles and practice durations.
Pain Medicine (2020): A 12-week yoga-based neck exercise program improved cervical range of motion and decreased chronic tension in participants. The study showed an average improvement of 18 degrees of cervical rotation, along with significant reductions in pain scores and functional disability.
Journal of Bodywork & Movement Therapies (2021): Office workers practicing yoga three times per week reported less shoulder tightness and better posture awareness. After eight weeks, participants showed a 42% reduction in shoulder tightness and measurable improvements in proprioceptive awareness.
Complementary Therapies in Medicine (2023): Fifteen-minute micro-yoga sessions during work hours reduced self-reported neck and shoulder stiffness by 38% after six weeks. The study demonstrated that even brief, workplace-based interventions can produce clinically meaningful improvements.


