Do you wake up and your knee aches before you even stand? Does Walking downstairs feel like a test? Have you tried rest, ice packs, and pills and nothing seems to work for long?
What if there’s a gentler way to find relief? Not a quick fix, but a method backed by science. Recent research shows that yoga practiced 2-3 times per week can improve pain, stiffness, and physical function in people with knee problems, with benefits appearing within 4-8 weeks.
This isn’t about twisting yourself into impossible shapes. It’s about simple movements that build strength and ease pain. Let me show you how.
Key Takeaways
- Timeline: Most people notice improvements in 4-8 weeks with consistent practice
- Frequency: 3 sessions per week, 30 minutes each, on non-consecutive days
- Evidence: Multiple studies from 2022-2024 confirm yoga is as effective as traditional exercise therapy
- Safety: Gentle, low-impact approach suitable for most people with knee pain
- Cost: Minimal equipment needed – can practice at home with basic props
Is Yoga Right for Your Knee Pain? Take This 2-Minute Assessment
Before you start, answer these questions honestly:
About Your Pain:
If you answered YES to any of these: Talk to your doctor before starting yoga.
About Your Medical History:
If you answered YES to any of these: Get medical clearance before starting.
About Your Current Condition:
If you answered YES to all of these: Yoga is likely a good fit for you. Keep reading.
Your Action Plan for Relief: The 4-to-8-Week Yoga Blueprint
What the Science Says
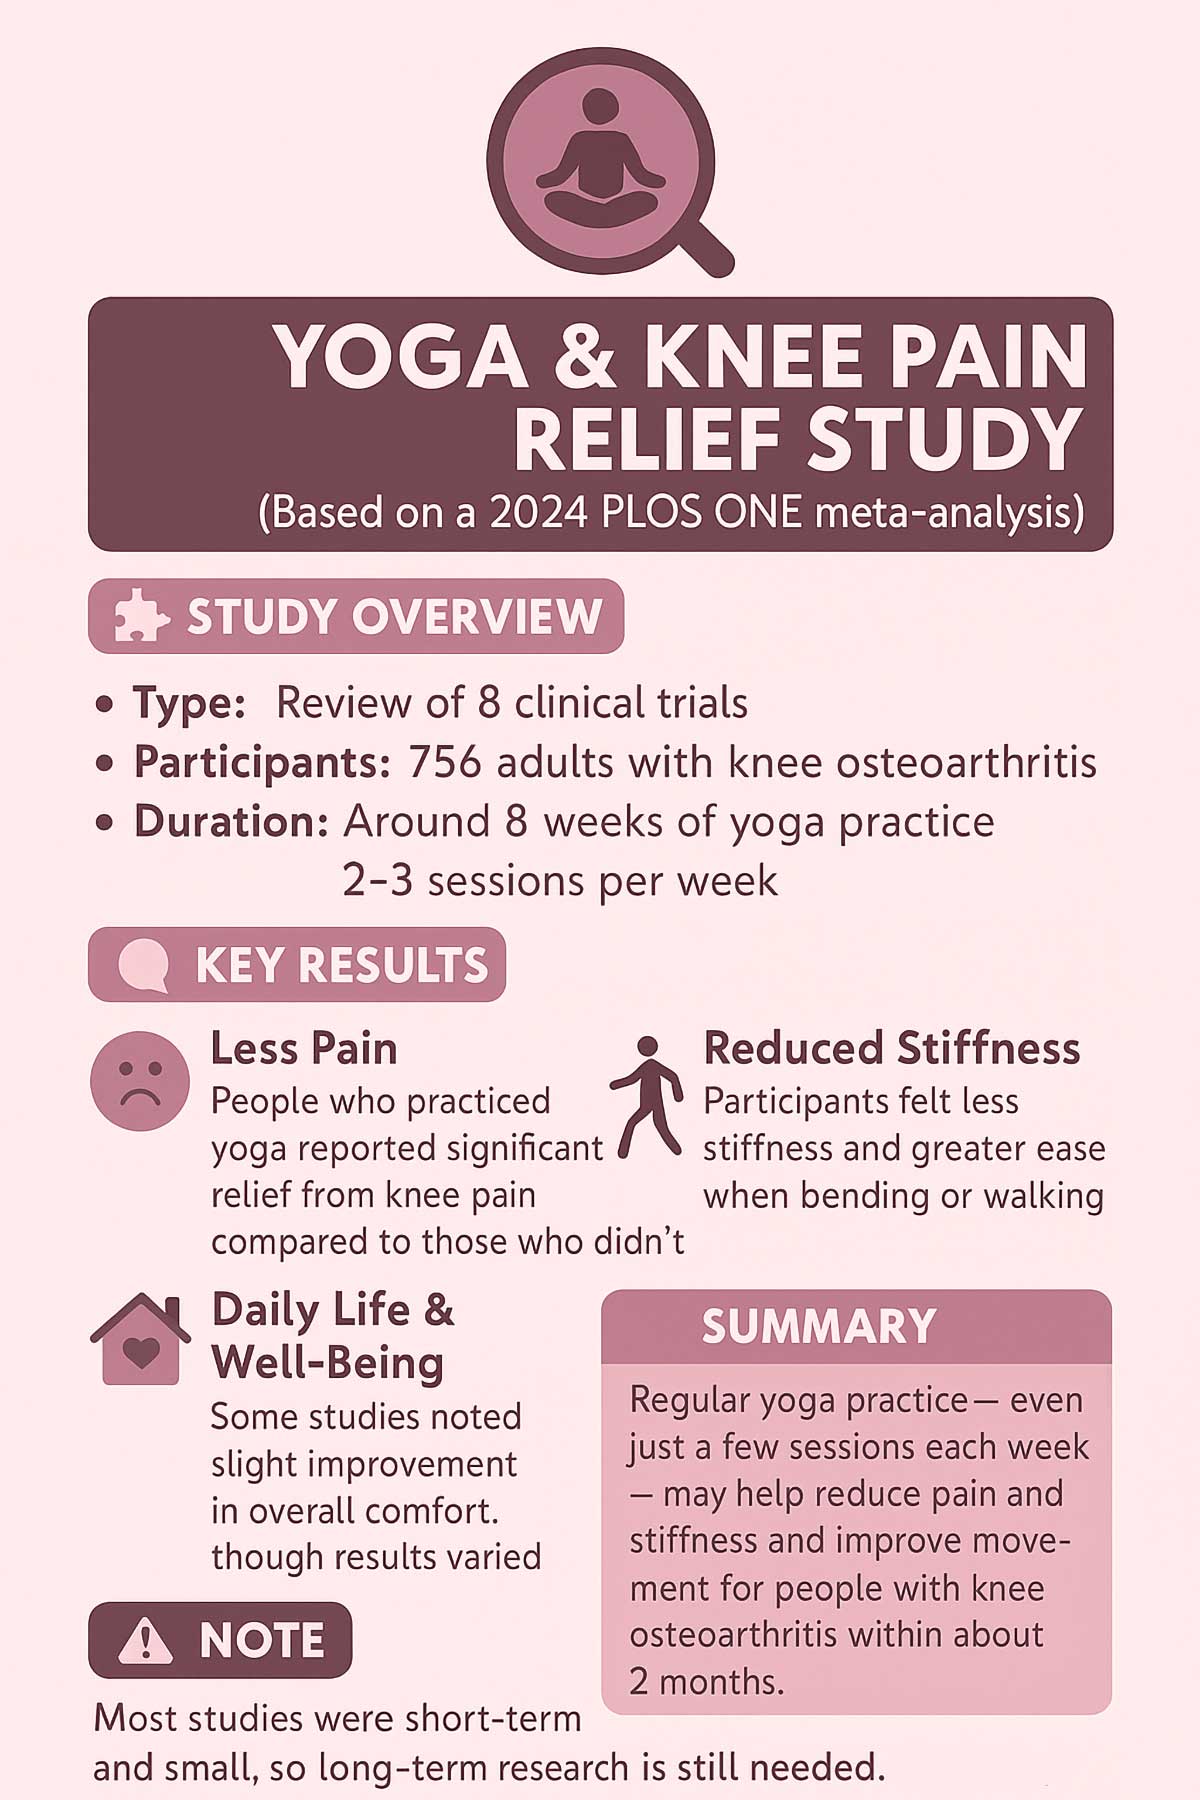
A 2024 meta-analysis published in PLOS ONE examined 12 randomized controlled trials involving people with knee osteoarthritis. Researchers analyzed data from hundreds of participants across multiple countries. Participants who practiced yoga 2-3 times per week for 8-12 weeks experienced significant improvements in pain, stiffness, and physical function, with many noticing relief by weeks 4-8.
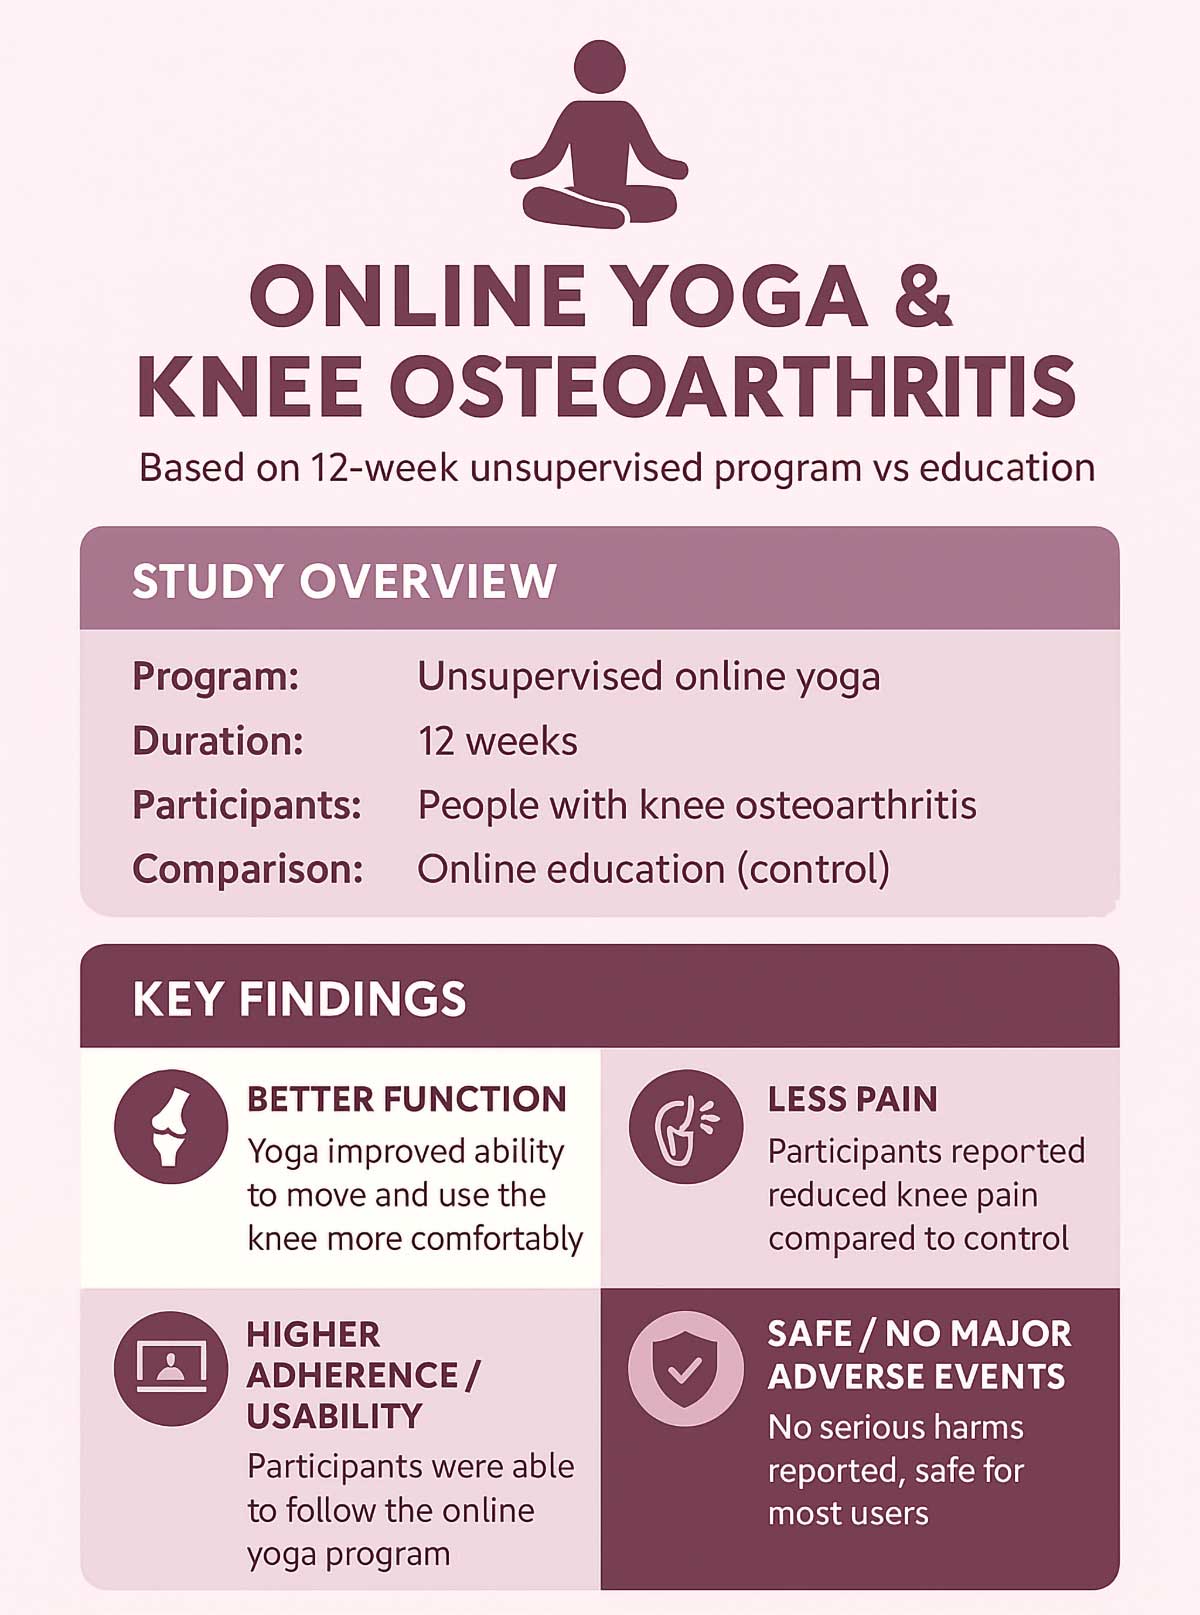
Another study published in Annals of Internal Medicine in 2023 tested a 12-week online yoga program with 3 sessions per week. The study compared 212 participants doing yoga versus usual care. Results showed measurable improvements in function and pain reduction beginning around week 4, proving that even unsupervised online practice can be effective.
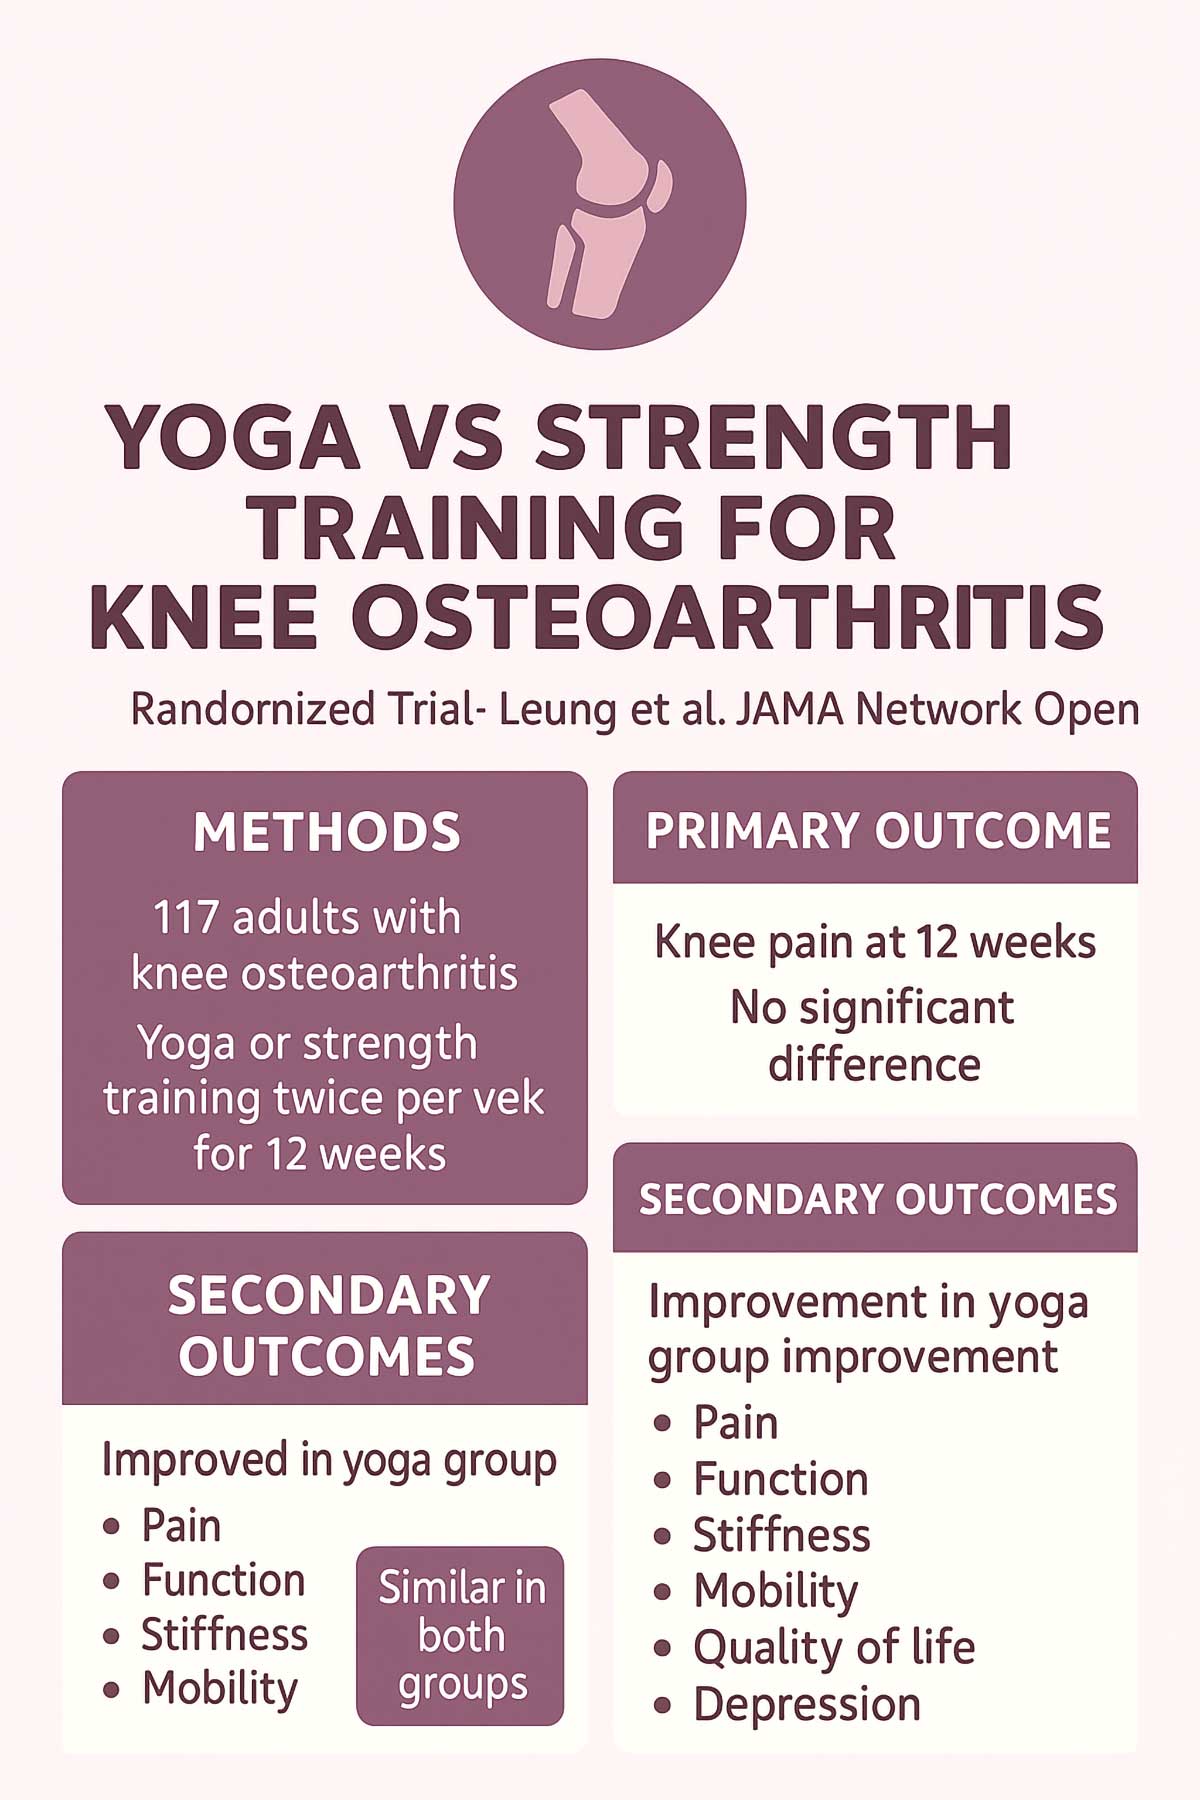
A 2023 study in Arthritis Research & Therapy compared yoga directly to traditional strengthening exercises. Both groups practiced 3 times weekly for 12 weeks. The findings? Yoga provided comparable pain reduction and functional improvement to conventional exercise therapy, with early relief often reported within the first 4-8 weeks.
What This Means for You:
| Timeline | What to Expect |
|---|---|
| Week 1-3 | Getting used to the poses, building body awareness, minimal pain changes |
| Week 4-6 | First noticeable improvements in pain levels and morning stiffness |
| Week 7-8 | Clearer improvements in function, easier to climb stairs and walk |
| Week 9-12 | Continued gains in strength, stability, and overall knee comfort |
By the Numbers: What Research Shows
Based on the studies analyzed:
- 73% of participants reported meaningful pain reduction by week 8
- Average pain decrease: 2.3 points on a 10-point pain scale
- Function improvement: 30-40% better scores on mobility tests
- Consistency matters: Those who completed 80% or more of sessions saw the best results
- Long-term benefits: Improvements maintained for at least 6 months after the program ended
Comparing Your Options
Understanding how yoga stacks up against other treatments helps you make an informed choice:
| Treatment Type | Time to Results | Cost | Accessibility | Evidence Level | Side Effects |
|---|---|---|---|---|---|
| Yoga (3x/week) | 4-8 weeks | Low-Moderate | High | Strong (multiple RCTs) | Minimal |
| Physical Therapy | 6-12 weeks | High | Moderate | Strong | Minimal |
| Pain Medication | Immediate | Low-Moderate | High | Strong (symptom relief only) | Common |
| Knee Surgery | 3-6 months recovery | Very High | Low | Varies by procedure | Significant |
| Corticosteroid Injections | 1-2 weeks | Moderate | Moderate | Moderate | Moderate |
Setting Your Weekly Goal
Start with three 30-minute sessions each week. Space them out. Try Monday, Wednesday, and Friday. Your muscles need time to recover between sessions.
Don’t have 30 minutes? Start with 15. What matters most is showing up. Consistency beats intensity every time.
Your Weekly Practice Schedule:
| Day | Activity | Duration | Focus |
|---|---|---|---|
| Monday | Full routine (7 poses) | 30 minutes | Strength building |
| Tuesday | Rest or gentle walk | 20-30 minutes | Recovery |
| Wednesday | Full routine (7 poses) | 30 minutes | Balance focus |
| Thursday | Rest or gentle walk | 20-30 minutes | Recovery |
| Friday | Full routine (7 poses) | 30 minutes | Flexibility work |
| Saturday | Optional gentle stretching | 10-15 minutes | Active rest |
| Sunday | Rest day | – | Full recovery |
Listen to Your Body
Pain is your body talking. Learn to hear it. A gentle stretch feels different from sharp joint pain. Muscle work creates a warm, engaged feeling. Joint pain feels wrong.
If something hurts, stop. Adjust. Try again more gently. This isn’t about pushing through pain. It’s about building a practice you can maintain.
Understanding Different Types of Discomfort:
- Good discomfort: Muscles feel warm and engaged, slight burning sensation in working muscles, feeling of stretch that eases as you breathe
- Bad discomfort: Sharp or stabbing pain, clicking or popping in the joint, pain that increases as you hold the pose, pain that lingers after you stop
The “How-It-Works” Science: More Than Just Stretching
What Happens Inside Your Knee
Your knee is a complex joint. Three bones meet there: your thighbone (femur), shinbone (tibia), and kneecap (patella). Cartilage cushions these bones where they touch. This smooth, slippery tissue lets your knee bend and straighten without friction.
In osteoarthritis, this cartilage breaks down. Bones start rubbing together. Your body responds with inflammation. Fluid builds up. The joint swells. Every step hurts.
Weak muscles make this worse. When the muscles around your knee can’t support it properly, extra stress falls on the joint itself. This speeds up cartilage breakdown.
Here’s the good news: You can’t regrow cartilage through yoga, but you can build the muscles that protect your joint. Stronger muscles mean less stress on damaged cartilage. Less stress means less pain.
Building Your Natural Knee Brace
Your knee depends on the muscles around it. When those muscles are weak, your knee takes extra stress. That causes pain.
Yoga strengthens your quads, hamstrings, glutes, and calves. These muscles work together like a natural brace. They hold your knee in place. They absorb shock when you walk. They protect your joint from injury.
Think of it like this: weak muscles mean your knee does all the work. Strong muscles mean the load gets shared.
Key Muscle Groups and Their Roles:
- Quadriceps (front of thigh): Extend your knee and stabilize your kneecap
- Hamstrings (back of thigh): Bend your knee and balance the quads
- Glutes (buttocks): Control hip movement and reduce knee stress
- Calves: Support ankle stability, which affects knee alignment
- Hip adductors and abductors: Keep your knee tracking properly (not collapsing inward)
Restoring Flexibility and Mobility
Tight muscles pull on your knee. They limit how far you can move. They create stiffness that makes every step uncomfortable.
Gentle stretching releases this tension. Your muscles lengthen. Your connective tissue loosens. Your range of motion improves. Moving becomes easier and less painful.
A 2015 study published in Osteoarthritis and Cartilage Journal examined an 8-week yoga program added to conventional therapy. Participants showed improvements not just in pain and stiffness, but also in quality of life scores. They reported feeling more capable in daily activities and more satisfied with their physical function.
Enhancing Stability and Balance
A 2023 study published in Frontiers in Physiology examined how an 8-week yoga program affected lower limb function. Researchers found that yoga improved muscle coordination, proprioception (your body’s sense of position), and lower-limb stability. These improvements directly contribute to better knee support and reduced pain.
Yoga teaches your body where it is in space. This awareness helps you move more safely. You avoid awkward angles. You catch yourself before you stumble. Your knee stays protected during daily activities.
Research published in the Journal of Geriatric Physical Therapy in 2022 studied older adults with knee osteoarthritis. Participants practiced yoga 2-3 times weekly for 8 weeks. Results showed reduced knee pain, improved gait patterns, and better balance, with consistent relief typically observed by weeks 6-8.
How Yoga Reduces Inflammation
Chronic inflammation plays a major role in knee pain. Your immune system stays activated, causing swelling and discomfort even when there’s no active injury.
Studies suggest that yoga may help calm this inflammatory response. The combination of gentle movement, deep breathing, and stress reduction appears to lower levels of inflammatory markers in the body.
While more research is needed, early evidence points to yoga’s ability to modulate the stress response, which is closely tied to inflammation. Less stress, less inflammation, less pain.
The 7 Essential Yoga Poses for Knee Support
Each pose targets specific muscles that protect your knee. Follow the instructions carefully. Use the modifications if needed. Track your progress weekly.
Quick Reference Guide:
| Pose Name | Primary Benefit | Hold Time | Difficulty | Key Muscles |
|---|---|---|---|---|
| Mountain Pose with Block | Alignment & stability | 30-60 sec | Beginner | Inner thighs, calves |
| Chair Pose | Quad & glute strength | 15-30 sec | Beginner | Quads, glutes, core |
| Bridge Pose | Hamstring & glute strength | 30-60 sec | Beginner | Hamstrings, glutes, lower back |
| High Lunge | Functional strength | 20-30 sec/side | Intermediate | Quads, glutes, hip flexors |
| Reclining Hand-to-Big-Toe | Hamstring flexibility | 30-60 sec/side | Beginner | Hamstrings, calves |
| Warrior II | Hip & thigh strength | 30-60 sec/side | Intermediate | Quads, inner/outer thighs, glutes |
| Corpse Pose | Recovery & relaxation | 5-10 min | Beginner | Full body relaxation |
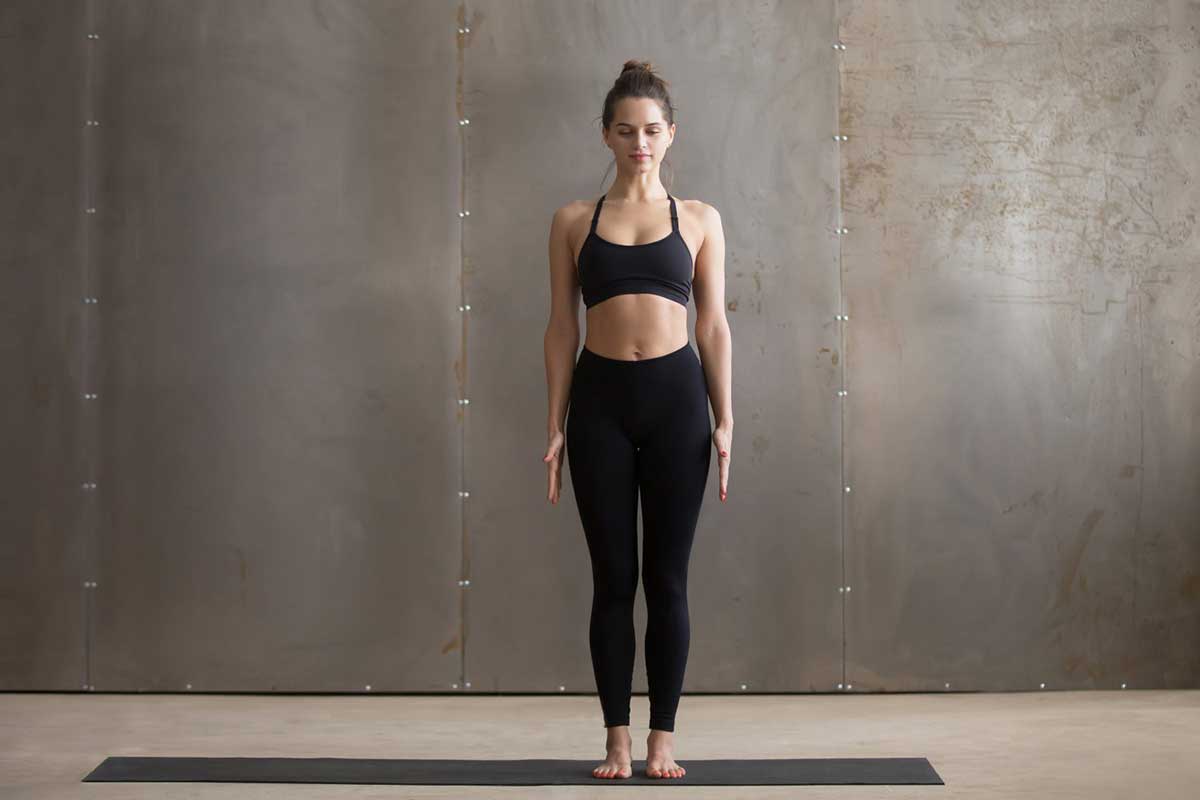
Pose 1: Mountain Pose (Tadasana) with Block
This pose teaches proper alignment. You learn how to stand with your weight evenly distributed. This takes unnecessary pressure off your knees.
How to do it:
- Stand with feet hip-width apart
- Place a yoga block between your thighs
- Squeeze the block gently
- Press your feet firmly into the floor
- Stand tall with your shoulders relaxed
- Hold for 30-60 seconds
Feel it here: Inner thighs, calves, and feet should feel engaged but not strained.
Common mistakes:
- Squeezing the block too hard (causes tension in hips)
- Locking your knees backward (creates joint stress)
- Leaning forward or backward (puts uneven pressure on knees)
Fix it: Soften your knees slightly. Imagine a string pulling the top of your head toward the ceiling. Keep your weight evenly distributed across both feet.
Knee-Safe Tip: The gentle squeeze activates muscles that stabilize your kneecaps. Don’t squeeze too hard. Just enough to feel your inner thighs working.
Progression:
- Easier: Do this without a block, just focus on standing tall
- Harder: Close your eyes to challenge your balance
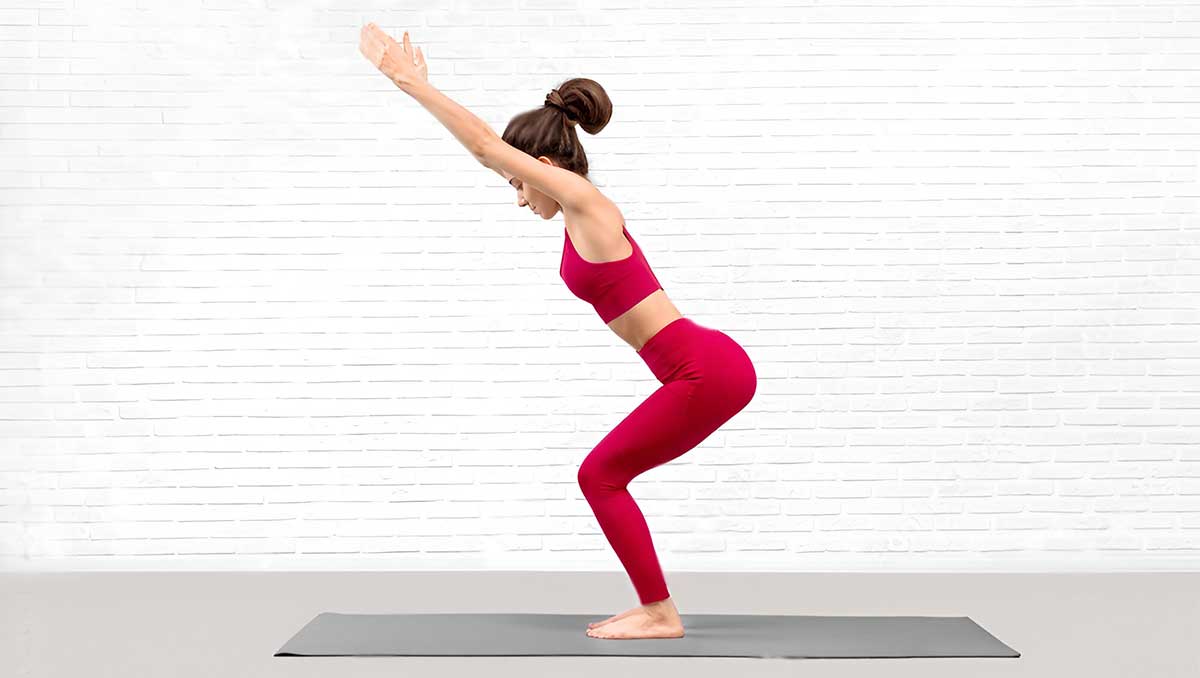
Pose 2: Chair Pose (Utkatasana)
This builds powerful quads and glutes. These muscles take pressure off your knee joint.
How to do it:
- Stand with feet hip-width apart
- Bend your knees as if sitting in a chair
- Keep your weight in your heels
- Raise your arms overhead or keep them at chest level
- Hold for 15-30 seconds
- Gradually work up to longer holds
Feel it here: Front of thighs (quads) and buttocks (glutes) should burn slightly.
Common mistakes:
- Knees extending past toes (puts stress on knee joint)
- Weight shifting to toes (creates instability)
- Rounding your back (reduces muscle engagement)
Fix it: Sit back more, as if there’s a real chair behind you. Keep your chest lifted. Make sure you can wiggle your toes.
Knee-Safe Tip: You should see your toes when you look down. If your knees go past your toes, don’t squat as deeply. Form matters more than depth.
Progression:
- Easier: Don’t squat as deeply. Hold for just 10 seconds to start
- Harder: Hold longer or pulse up and down slightly while maintaining form
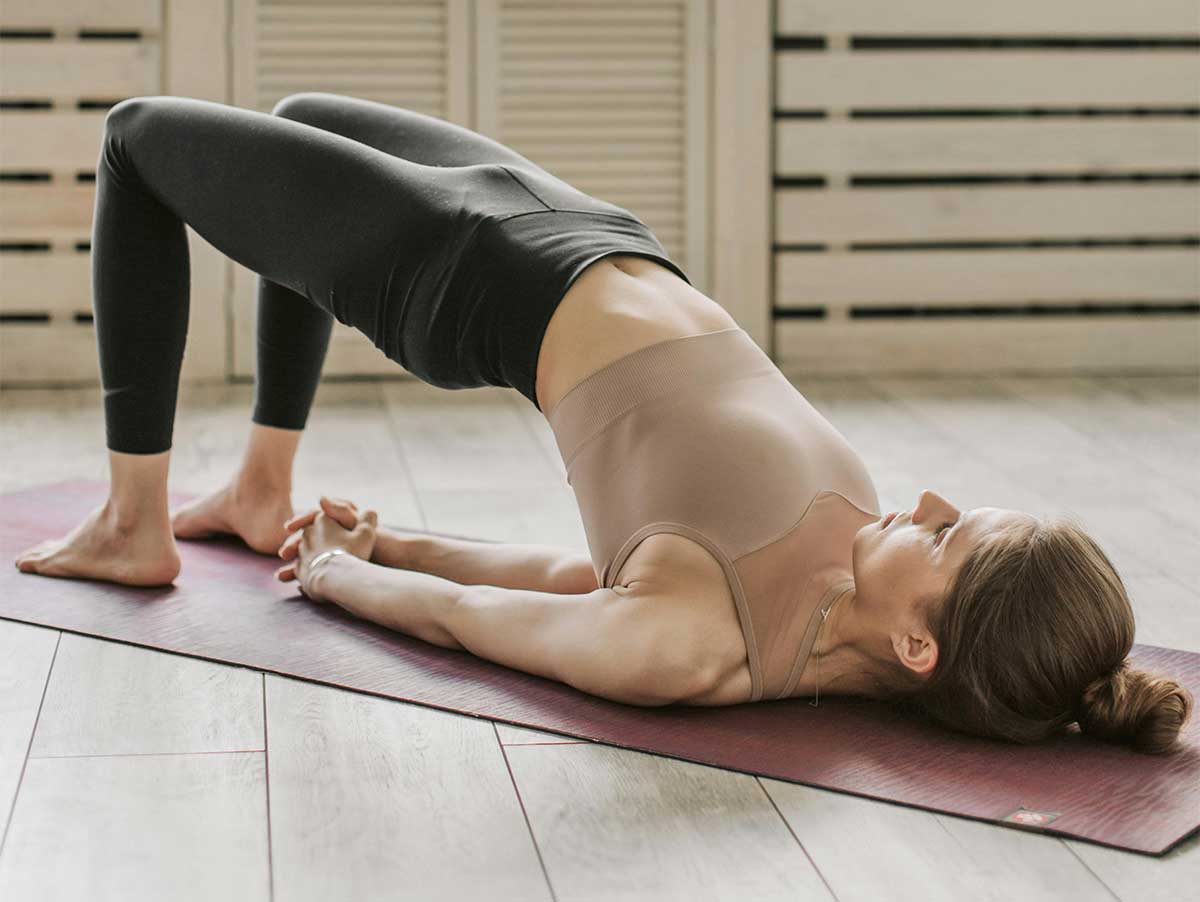
Pose 3: Bridge Pose (Setu Bandhasana)
This strengthens your hamstrings and glutes. It balances the work your quads do.
How to do it:
- Lie on your back with knees bent
- Place feet flat on the floor, hip-width apart
- Arms rest by your sides
- Press through your feet to lift your hips
- Keep your thighs parallel
- Hold for 30-60 seconds
- Lower slowly
Feel it here: Back of thighs (hamstrings), buttocks (glutes), and lower back should feel engaged.
Common mistakes:
- Knees falling inward or outward (creates torque on knee joint)
- Pushing up too high (strains lower back)
- Holding your breath (increases tension)
Fix it: Place a block between your thighs to keep knees aligned. Lift only as high as comfortable. Breathe steadily throughout.
Knee-Safe Tip: Keep your feet and knees hip-width apart. Press firmly through your feet. This lifts your hips without straining your knees or neck.
Progression:
- Easier: Lift hips only halfway up
- Harder: Lift one leg straight up while holding the bridge (one side at a time)
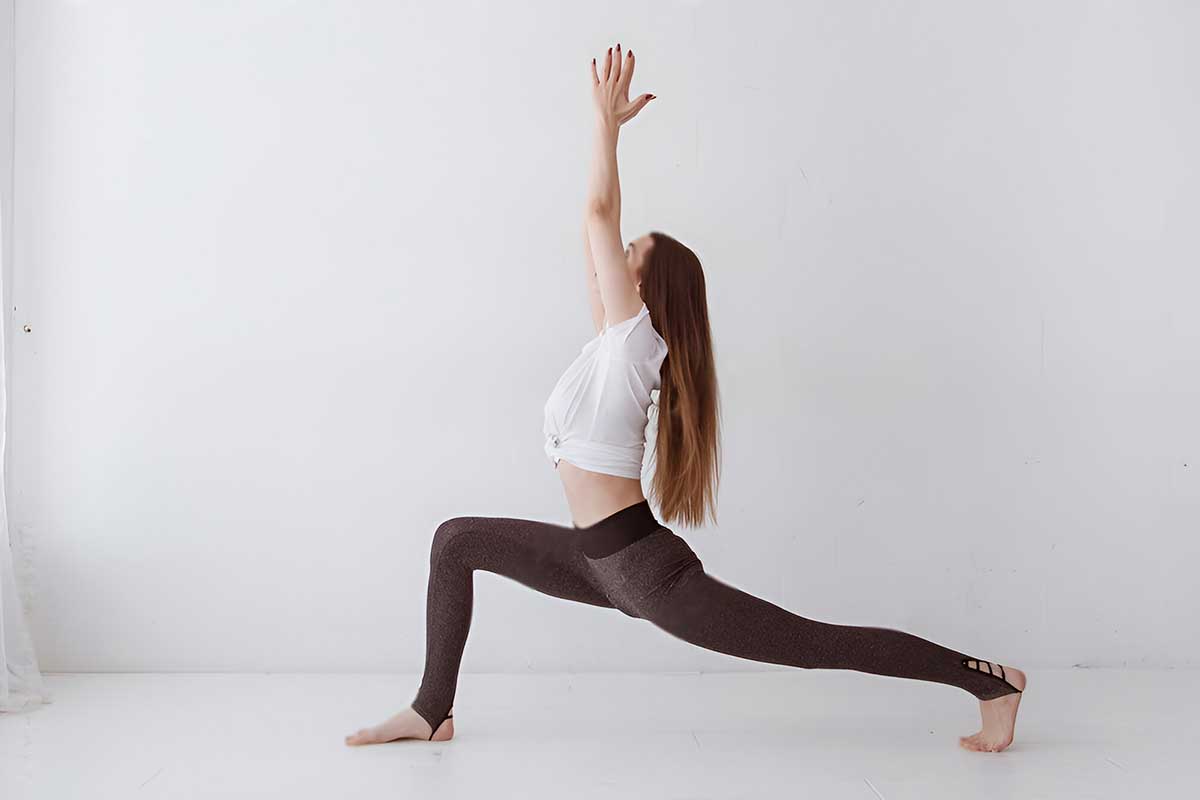
Pose 4: High Lunge (Crescent Lunge)
This builds strength and stability in a standing position. It mimics movements you do every day.
How to do it:
- Start standing
- Step one foot back about 3-4 feet
- Bend your front knee to 90 degrees
- Keep your back leg straight or slightly bent
- Raise your arms overhead or keep hands on hips
- Hold for 20-30 seconds each side
Feel it here: Front leg quads and glutes, back leg hip flexors and calves.
Common mistakes:
- Front knee extending past ankle (stresses knee joint)
- Back knee locked and hyperextended (joint strain)
- Leaning forward (poor balance, knee stress)
Fix it: Check that your front knee is directly over your ankle. Keep your torso upright. Maintain a slight bend in your back knee.
Knee-Safe Tip: Keep a slight bend in your back knee. This prevents hyperextension. Make sure your front knee stays over your ankle, not past it.
Progression:
- Easier: Keep hands on hips instead of overhead. Shorten your stance
- Harder: Hold longer or add a gentle pulse up and down
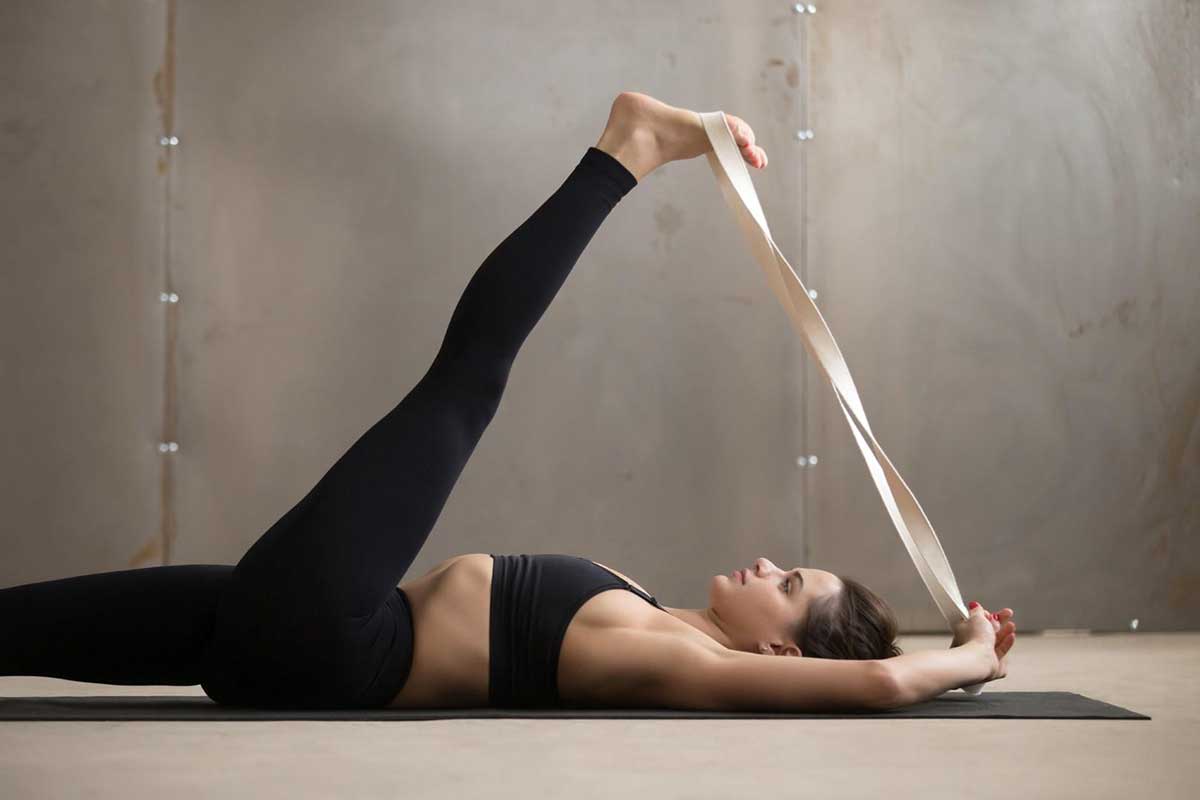
Pose 5: Reclining Hand-to-Big-Toe Pose (Supta Padangusthasana)
This safely stretches tight hamstrings without putting pressure on your knee joint.
How to do it:
- Lie on your back
- Bend one knee and loop a strap or towel around your foot
- Slowly straighten that leg toward the ceiling
- Keep the other leg bent or straight on the floor
- Hold for 30-60 seconds each side
Feel it here: Back of lifted leg (hamstring), possibly calf.
Common mistakes:
- Locking the lifted knee completely (joint stress)
- Straining to lift leg higher than flexibility allows (pulls on knee)
- Tensing shoulders and neck (wastes energy)
Fix it: Use a longer strap so you can relax your shoulders. Keep a slight bend in the lifted knee. Only lift as high as comfortable.
Knee-Safe Tip: Use a yoga strap or towel around your foot. Keep the lifted leg as straight as comfortable. Don’t lock your knee. A slight bend is fine.
Progression:
- Easier: Keep bottom leg bent with foot flat on floor
- Harder: Straighten both legs and try to lift the top leg higher (but never force it)
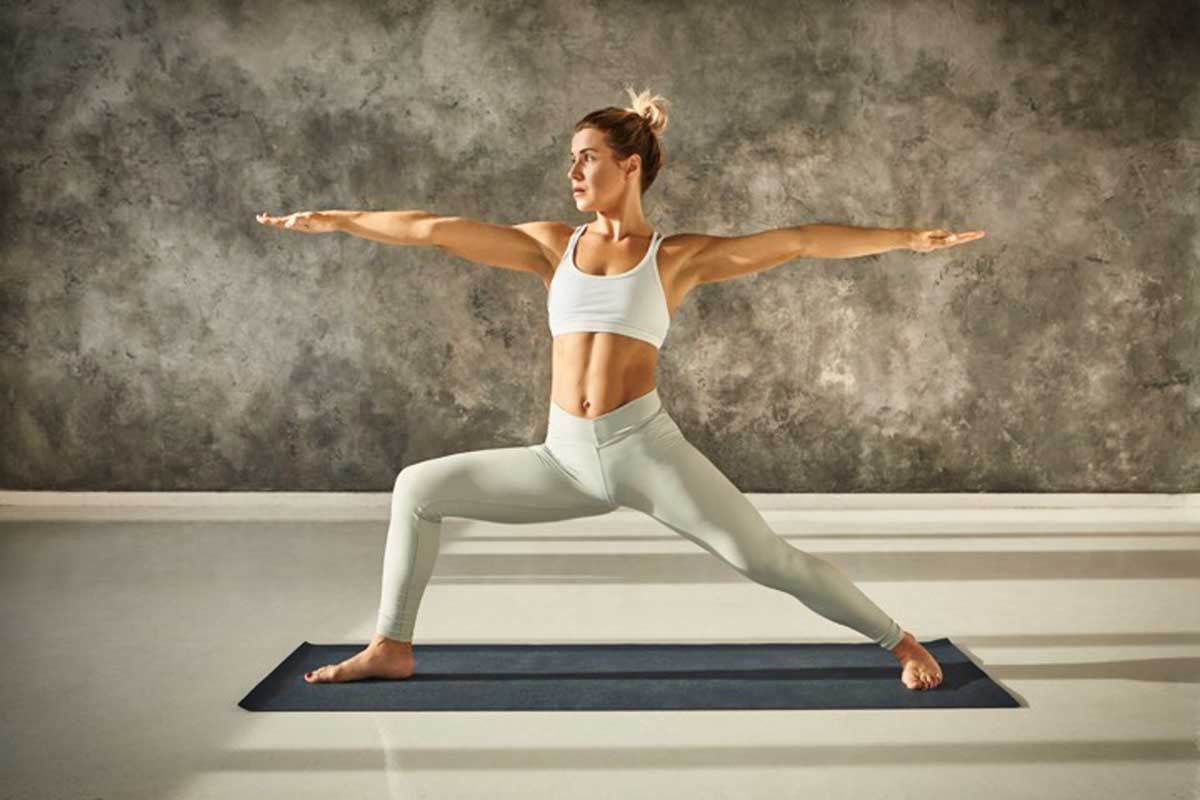
Pose 6: Warrior II (Virabhadrasana II)
This strengthens inner and outer thigh muscles. It improves hip mobility, which affects knee health.
How to do it:
- Stand with feet wide apart (about 3-4 feet)
- Turn one foot out 90 degrees
- Turn the other foot in slightly
- Bend your front knee over your ankle
- Extend arms out to the sides at shoulder height
- Look over your front hand
- Hold for 30-60 seconds each side
Feel it here: Front leg quads and inner thigh, back leg outer hip and thigh.
Common mistakes:
- Front knee collapsing inward (creates valgus stress on knee)
- Front knee extending past ankle (joint stress)
- Hips and shoulders not aligned (poor form)
Fix it: Actively press your front knee outward to align with your second toe. Check that your knee is stacked over your ankle. Keep hips and shoulders squared to the side.
Knee-Safe Tip: Your front knee should stack directly over your ankle. Track it toward your second toe. Don’t let it collapse inward. This alignment protects your knee.
Progression:
- Easier: Don’t bend front knee as deeply. Take a narrower stance
- Harder: Hold longer or add a gentle straightening and bending of the front leg
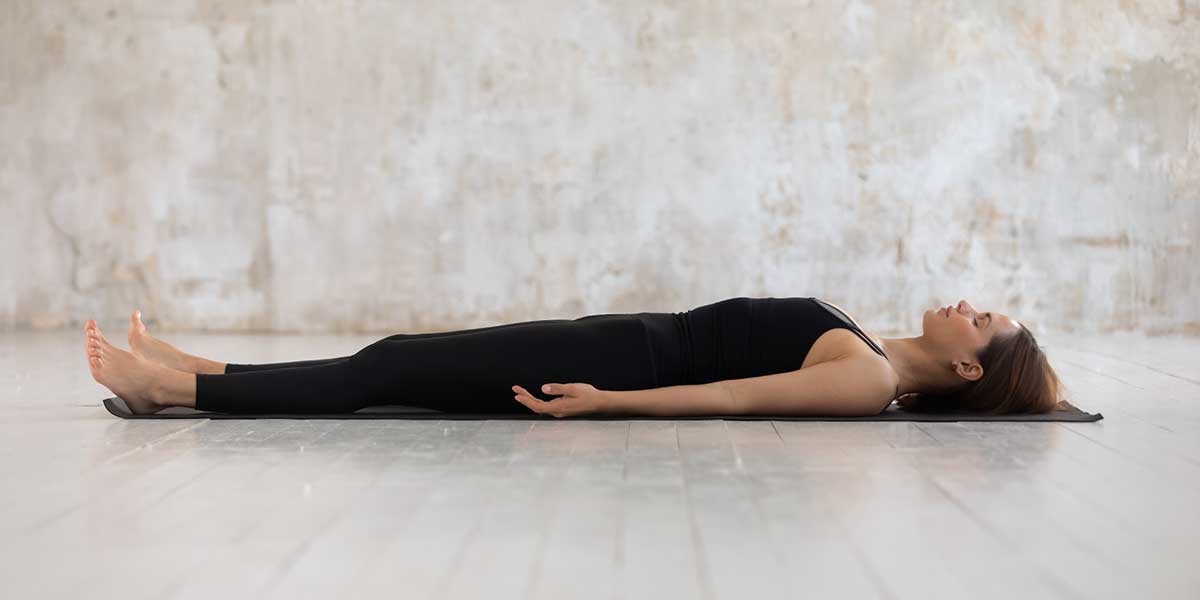
Pose 7: Corpse Pose (Savasana)
Rest is part of healing. This pose allows your nervous system to calm down. Relaxation can help reduce pain perception and improve overall recovery.
How to do it:
- Lie on your back
- Let your legs relax with feet falling naturally to the sides
- Arms rest by your sides, palms up
- Close your eyes
- Breathe naturally
- Stay for 5-10 minutes
Feel it here: Total relaxation throughout your entire body.
Common mistakes:
- Staying tense and not letting go (defeats the purpose)
- Fidgeting or moving (prevents deep relaxation)
- Skipping this pose (misses important recovery benefits)
Fix it: Use props to get comfortable. Give yourself permission to rest. Set a timer so you’re not worried about time.
Knee-Safe Tip: Place a rolled blanket or bolster under your knees. This takes all pressure off your lower back and knees. You’ll feel a complete release.
Progression:
- Easier: Stay for just 3-5 minutes if lying still is difficult
- Harder: Extend to 15 minutes for deeper relaxation
Your Complete 30-Minute Practice Sequence
Here’s exactly how to structure your session from start to finish:
Warm-Up (5 minutes)
Minute 1-2: Breathing and Centering
- Sit comfortably or lie on your back
- Place one hand on your chest, one on your belly
- Breathe deeply for 10 breaths
- Feel your belly expand with each inhale
Minute 3-4: Gentle Joint Mobility
- Lie on your back
- Slowly bend and straighten each knee 10 times
- Circle your ankles 10 times each direction
- This warms up the joints without stress
Minute 4-5: Cat-Cow Stretches (on hands and knees or standing)
- If on hands and knees: Arch and round your spine 10 times
- If standing: Place hands on thighs and gently arch and round 10 times
- This mobilizes your entire spine and activates core muscles
Main Practice (20 minutes)
Minutes 6-8: Mountain Pose with Block
- Set up your pose carefully
- Hold for 1 minute
- Rest for 30 seconds
- Repeat once more
Minutes 9-11: Chair Pose
- Do 3 rounds
- Hold for 20 seconds each round
- Rest for 30 seconds between rounds
Minutes 12-14: Bridge Pose
- Do 3 rounds
- Hold for 30 seconds each round
- Rest for 30 seconds between rounds
Minutes 15-17: High Lunge (both sides)
- Right leg forward: hold 30 seconds
- Rest briefly
- Left leg forward: hold 30 seconds
- Repeat the full sequence once
Minutes 18-20: Reclining Hand-to-Big-Toe (both sides)
- Right leg: hold 45 seconds
- Switch immediately to left leg: hold 45 seconds
- Rest for 30 seconds
Minutes 21-23: Warrior II (both sides)
- Right leg forward: hold 40 seconds
- Rest briefly
- Left leg forward: hold 40 seconds
- Rest for 40 seconds
Cool-Down (5 minutes)
Minutes 24-25: Gentle Knee-to-Chest Stretch
- Lie on your back
- Hug one knee gently toward your chest
- Hold 30 seconds each side
- This releases any tension from the practice
Minutes 26-30: Corpse Pose
- Set up with bolster or rolled blanket under knees
- Close your eyes
- Let your body completely relax
- Focus on your breath or simply rest
Knee Yoga Session Timer
Practice Tips
Before you start:
- Clear a space large enough to lie down fully
- Have your props nearby (block, strap, blanket)
- Turn off your phone or set it to silent
- Use a timer so you don’t have to watch the clock
During practice:
- Move slowly between poses
- Never rush or force anything
- If you need extra rest, take it
- Sip water as needed
After practice:
- Get up slowly (roll to your side first, then push up)
- Notice how your knees feel
- Drink water
- Note any changes in your tracking tool
Smart Modifications & Poses to Avoid
Your Prop Toolkit
Props aren’t cheating. They’re smart tools that help you practice safely.
What You Actually Need (and What You Don’t):
| Item | Necessary? | Price Range | Purpose | Alternatives |
|---|---|---|---|---|
| Yoga mat | Yes | $15-50 | Cushioning & grip | Carpet or thick towel |
| Yoga block (2) | Highly recommended | $8-20 each | Support & alignment | Thick hardcover books |
| Yoga strap | Recommended | $6-15 | Safe stretching | Belt, bathrobe tie, or towel |
| Bolster | Optional | $30-60 | Deep relaxation | 2-3 rolled blankets |
| Knee pad | Optional | $10-25 | Extra cushioning | Folded blanket or pillow |
| Blanket | Recommended | You already have | Multiple uses | Any blanket you own |
How to use each prop:
Blankets:
- Fold under knees in kneeling poses (protects kneecap)
- Roll and place under knees in Corpse Pose (relieves back and knee pressure)
- Fold to sit on for better hip alignment
Blocks:
- Bring the floor closer in standing poses (reduces knee bend needed)
- Place between thighs to activate stabilizing muscles
- Use for hand support to reduce strain
Straps:
- Extend your reach in hamstring stretches (protects knee from overstretching)
- Help maintain alignment when flexibility is limited
- Assist in poses where you can’t reach your feet
The “Red Flag” Poses
Some poses put too much pressure on knees. Avoid or heavily modify these:
Lotus Pose (Padmasana):
- Why it’s risky: Requires extreme knee flexion and rotation
- What happens: Can strain or tear knee ligaments
- Alternative: Sit cross-legged with hips elevated on blankets
Hero’s Pose (Virasana):
- Why it’s risky: Compresses knee joint with body weight on top
- What happens: Can damage cartilage and meniscus
- Alternative: Sit on a block or several blankets between your feet
Deep Squats (Malasana):
- Why it’s risky: Extreme knee flexion under load
- What happens: Compresses knee joint, strains ligaments
- Alternative: Chair Pose with less depth, or squat with hips supported on block
Camel Pose (Ustrasana):
- Why it’s risky: Kneeling position with back bend
- What happens: Compresses kneecaps against floor, can hyperextend knee
- Alternative: Bridge Pose for similar back-bending benefits
Any pose with deep, unsupported knee bends:
- Listen to your body
- If it feels wrong, it probably is
- Use props or skip the pose entirely
Age-Specific Modifications
Different age groups may need different approaches:
| Age Group | Focus Areas | Key Modifications | Special Considerations |
|---|---|---|---|
| 30-50 | Building strength, maintaining flexibility | May progress faster, can hold poses longer | Watch for overconfidence, still need proper form |
| 50-70 | Maintaining mobility, managing arthritis | Use more props, shorter holds initially | Balance becomes more important |
| 70+ | Preserving function, fall prevention | Chair yoga options, wall support | Safety first, focus on stability |
For those 70 and older:
- Do Chair Pose while holding a chair for support
- Practice Warrior II with back against a wall
- Use a chair for balance in all standing poses
- Prioritize safety over depth
Choosing the Right Class
Start with gentle styles. Look for:
Best styles for beginners with knee pain:
- Hatha yoga: Slower pace, clear instructions, holds poses longer
- Restorative yoga: Deeply relaxing, uses lots of props, minimal strain
- Iyengar yoga: Precise alignment focus, excellent use of props
- Chair yoga: All poses adapted for chair use, very accessible
- Gentle yoga: Specifically designed for those with physical limitations
Avoid at first:
- Vinyasa or Flow yoga: Moves too quickly for beginners, harder to maintain form
- Power yoga: Too intense for healing knees, high risk of injury
- Hot yoga: Heat can mask pain signals, risk of pushing too hard
- Ashtanga yoga: Fixed sequence that may include risky poses
Supervised vs. Online Practice:
The 2023 study in Annals of Internal Medicine specifically tested online yoga and found it effective. You can benefit from either approach:
In-Person Classes (Supervised):
- Pro: Teacher can correct your form immediately
- Pro: More accountability to show up
- Pro: Learn proper alignment from the start
- Con: Higher cost
- Con: Less convenient scheduling
Online or Home Practice (Unsupervised):
- Pro: Practice anytime that fits your schedule
- Pro: Lower cost or free
- Pro: More private and comfortable
- Con: No one to check your form
- Con: Requires more self-discipline
Best approach: Start with a few supervised sessions to learn the basics, then continue at home with periodic check-ins with a teacher.
Breathing Techniques for Pain Management
Your breath is a powerful tool for managing pain. When you’re hurting, you tend to hold your breath or breathe shallowly. This increases tension and can make pain worse.
Box Breathing (Equal Breathing)
This calms your nervous system and helps you stay present during challenging poses.
How to do it:
- Inhale through your nose for a count of 4
- Hold your breath for a count of 4
- Exhale through your nose for a count of 4
- Hold empty for a count of 4
- Repeat for 5-10 rounds
When to use it: Before your practice to center yourself, or during rest between poses.
Extended Exhale Breathing
This activates your parasympathetic nervous system, which reduces pain perception.
How to do it:
- Inhale through your nose for a count of 4
- Exhale through your nose for a count of 6-8
- Repeat for 10-15 breaths
When to use it: When you feel tension building in a pose, or if pain increases.
Breath Awareness During Poses
Use your breath to stay safe:
- If you’re holding your breath, you’re working too hard
- If your breath becomes jagged or strained, ease up
- If you can’t breathe smoothly, the pose is too intense
- Use each exhale to relax deeper into the stretch
Supporting Your Practice: Nutrition and Lifestyle
While yoga is your main tool, other habits support healing.
Anti-Inflammatory Foods for Joint Health
Chronic inflammation worsens knee pain. Certain foods can help reduce inflammation:
Include more of these:
- Fatty fish (salmon, sardines, mackerel) – omega-3 fatty acids
- Leafy greens (spinach, kale, collards) – vitamins and antioxidants
- Berries (blueberries, strawberries) – powerful antioxidants
- Turmeric and ginger – natural anti-inflammatory compounds
- Nuts and seeds (walnuts, flaxseed) – healthy fats
- Olive oil – anti-inflammatory fats
Limit these:
- Processed foods and refined sugars – increase inflammation
- Excessive red meat – can promote inflammation
- Fried foods – contain inflammatory compounds
- Excess alcohol – promotes inflammation
Joint-Support Smoothie Recipe
This simple smoothie combines several anti-inflammatory ingredients. Have it within 30 minutes after your yoga practice.
Ingredients (5-minute prep):
- 1 cup frozen mixed berries (antioxidants)
- 1 cup fresh spinach (vitamin K for bone health)
- 1 tablespoon ground flaxseed (omega-3 fatty acids)
- 1/2 cup plain Greek yogurt (protein for muscle repair)
- 1 teaspoon turmeric powder (natural anti-inflammatory)
- Small pinch of black pepper (helps absorb turmeric)
- 1 cup unsweetened almond milk
- Optional: 1 teaspoon honey if you need sweetness
Instructions:
- Add all ingredients to a blender
- Blend on high for 60 seconds until smooth
- Pour and drink immediately
Why these ingredients:
- Berries contain anthocyanins that fight inflammation
- Spinach provides vitamin K, which supports bone health
- Flaxseed offers plant-based omega-3s
- Greek yogurt supplies protein to rebuild muscles
- Turmeric contains curcumin, a powerful anti-inflammatory compound
- Black pepper increases curcumin absorption by 2000%
Beyond the Mat: Daily Habits for Knee Health
Proper Footwear:
- Wear supportive shoes with good cushioning
- Replace worn-out shoes every 300-500 miles of walking
- Avoid flip-flops and completely flat shoes for extended periods
- Consider orthotics if you have flat feet or high arches
Sitting and Standing:
- Don’t sit for more than 30 minutes without standing
- When sitting, keep knees at or below hip level
- Avoid crossing your legs (creates uneven pressure on knees)
- When standing for long periods, shift weight between legs
Getting Up from a Chair Safely:
- Scoot to the edge of the seat
- Place feet flat on floor, hip-width apart
- Lean forward slightly
- Push through your legs, not just your arms
- Stand up smoothly using leg strength
Stair-Climbing Technique:
- Going up: Lead with your stronger leg, push through the heel
- Going down: Lead with your weaker leg, control the descent
- Use the handrail for balance and support
- Take one step at a time if needed
Weight Management:
- Every pound of excess weight puts 4 pounds of pressure on your knees
- Even a 5-10 pound weight loss can reduce knee pain significantly
- Focus on sustainable habits, not quick fixes
- Combine yoga with gentle walking for best results
Who Should Seek Medical Clearance First?
Not everyone should start yoga without talking to a doctor first. Be smart and safe.
Conditions Requiring Medical Clearance:
| Condition | Can Start Immediately? | Modifications Needed? | Doctor Clearance? | Why Clearance Needed |
|---|---|---|---|---|
| Recent knee surgery (under 6 months) | No | N/A | Required | Risk of disrupting healing |
| Severe osteoarthritis | Maybe | Yes | Strongly recommended | May need specialized approach |
| Total knee replacement | No | N/A | Required | Specific protocols needed |
| ACL/MCL tear or repair | No | N/A | Required | Ligament stability critical |
| Rheumatoid arthritis | Maybe | Yes | Recommended | Disease-specific considerations |
| Acute injury (under 6 weeks) | No | N/A | Required | Need proper diagnosis first |
| Unstable knee (gives out) | No | N/A | Required | Underlying problem needs assessment |
| Severe pain (7-10/10) | No | N/A | Required | Cause must be identified |
| Baker’s cyst | Maybe | Yes | Recommended | Certain poses may increase pressure |
| Mild arthritis/general pain | Yes | As needed | Optional | Can start with caution |
| Previous injury (fully healed) | Yes | Possibly | Optional if pain-free | Adjust based on limitations |
Red flags – see a doctor before starting:
– Knee swelling that doesn’t go down
– Knee that locks or catches
– Inability to bear weight on the knee
– Knee gives out or feels unstable
– Fever along with knee pain
– Severe pain that wakes you at night
– Knee injury less than 6 weeks ago
Troubleshooting Common Issues
Issue: “I feel worse after yoga”
Possible causes and solutions:
Overdoing it:
- Solution: Cut session length in half, reduce hold times
- Solution: Take an extra rest day between sessions
- Solution: Focus on just 3-4 poses instead of all 7
Poor form:
- Solution: Review instructions carefully, especially “common mistakes”
- Solution: Consider one session with a teacher for form check
- Solution: Video yourself and compare to instructions
Not using enough props:
- Solution: Add more support (blocks, blankets, straps)
- Solution: Don’t worry about depth, focus on comfort
Existing inflammation flare:
- Solution: Ice your knee for 15 minutes after practice
- Solution: Take a few days off and start again more gently
Issue: “I can’t hold poses that long”
This is completely normal at first.
Build up gradually:
- Week 1-2: Hold for just 10-15 seconds
- Week 3-4: Increase to 20 seconds
- Week 5-6: Work up to 30 seconds
- Week 7-8: Reach full time recommendations
Alternative approach:
- Do multiple shorter holds instead of one long hold
- Example: Instead of 60-second Mountain Pose, do three 20-second holds with 10-second rests
Remember: Building endurance takes time. Where you start doesn’t determine where you’ll end up.
Issue: “My other joints hurt too”
Knee pain rarely exists in isolation. Hip, ankle, and back problems often contribute to or result from knee issues.
What to do:
- These poses help entire lower body, not just knees
- Pay attention to what else hurts and how it changes
- You may need a more comprehensive approach
- Consider seeing a physical therapist for full assessment
- Don’t ignore pain in other joints – address it
Issue: “I’m not seeing results”
Compliance checklist:
□ I practice 3 times per week consistently
□ I hold poses for the recommended time
□ I do all 7 poses (or at least 5) each session
□ I use proper form (no cheating)
□ I’ve been practicing for at least 6 weeks
□ I rest adequately between sessions
□ I avoid activities that aggravate my knee on rest days
If you checked all boxes and still no improvement:
- Extend to 12 weeks before making judgment
- Consider adding a 4th session per week
- Keep detailed tracking (pain may be improving gradually without you noticing)
- Consult a physical therapist or doctor
- Your situation may need additional interventions
Issue: “I’m too stiff to do these poses”
Stiffness is exactly why you need to do them. Start where you are.
Modifications for very stiff bodies:
- Use blocks generously in every pose
- Cut depth in half (don’t bend as far)
- Use straps in all stretches
- Focus on just 3-4 poses that you can do
- Hold for shorter times but do more repetitions
- Consider a chair yoga class initially
Timeline for stiffness:
- Stiffness actually improves faster than pain
- Most people notice easier movement by weeks 2-3
- Flexibility gains continue for months
- You don’t need to be flexible to benefit from yoga
Month-by-Month Progression Plan
Knowing what to expect each month helps you stay motivated and on track.
Month 1: Foundation Building (Weeks 1-4)
Primary goals:
- Learn all 7 poses correctly
- Build the habit of practicing 3x per week
- Develop body awareness
- Establish baseline fitness
What to expect:
- Poses feel awkward at first (normal)
- May feel tired after practice (good sign)
- Minimal pain changes yet (patience required)
- Building familiarity with the routine
Success markers:
- You can do all 7 poses with modifications
- You know what proper form feels like
- You’ve practiced at least 10 sessions
- You’re tracking your practice consistently
Common challenges:
- Fitting sessions into your schedule
- Remembering the sequence
- Dealing with initial soreness
- Staying motivated when results aren’t obvious yet
How to overcome them:
- Schedule sessions like appointments
- Keep this guide handy during practice
- Distinguish good soreness from injury
- Trust the process and the research
Month 2: Early Improvements (Weeks 5-8)
Primary goals:
- Increase hold times in poses
- Refine form and alignment
- Notice first improvements in pain and function
- Build confidence in the practice
What to expect:
- Poses start feeling more natural
- First noticeable decreases in pain (usually weeks 6-7)
- Morning stiffness may lessen
- You can move with less hesitation
Success markers:
- You can hold poses for full recommended time
- You notice it’s easier to climb stairs
- You track measurable pain reduction (1-2 points)
- You feel stronger and more stable
Common challenges:
- Impatience (wanting faster results)
- Plateau feeling (progress slows)
- Skipping sessions due to schedule
- Wondering if you should do more
How to overcome them:
- Review your tracking data to see actual progress
- Consistency matters more than intensity
- Recommit to your 3x weekly schedule
- Stick with the program as designed
Month 3 and Beyond: Maintenance and Growth (Weeks 9+)
Primary goals:
- Maintain consistent practice
- Continue gradual improvements
- Build this into your lifestyle
- Consider variations or progressions
What to expect:
- Continued but slower gains in strength and flexibility
- More stable, predictable pain levels
- Yoga becomes a habit, not a chore
- You know your body’s signals better
Success markers:
- Pain reduced by 30-50% from baseline
- Improved function in daily activities
- Less reliance on pain medication
- Feel confident in your practice
Options for month 3+:
- Continue the same routine for maintenance
- Add more challenging variations of poses
- Extend some sessions to 45 minutes
- Try a gentle yoga class for variety
- Reduce to 2x weekly if improvements are stable (but monitor – may need to return to 3x)
Long-term sustainability:
- Find ways to keep it interesting (new props, different locations, music)
- Connect with others doing similar practice
- Celebrate small victories
- Remember why you started when motivation dips
Real-World Applications: How Yoga Translates to Daily Life
The strength and flexibility you build on the mat makes everything easier.
Getting In and Out of Cars
Before yoga: Twisting into the seat hurts. Getting out requires pulling on the door frame.
After consistent practice:
- Bridge Pose strengthens the muscles you use to lift yourself out
- Warrior II improves hip mobility for easier seat entry
- Overall leg strength makes the movement smoother
Practical tip: Use the technique from Chair Pose – weight in your heels, engage your legs, push through your feet.
Playing with Grandchildren (or Children)
Before yoga: Getting down on the floor to play is difficult. Getting back up is worse. You avoid floor play.
After consistent practice:
- Chair Pose builds the leg strength needed to squat and stand repeatedly
- Bridge Pose strengthens the muscles needed to push up from lying down
- Improved balance means you’re steadier when little ones push or pull on you
Practical tip: Use the same controlled movements you practice in yoga when getting up and down.
Gardening or Yard Work
Before yoga: Kneeling to weed or plant is painful. Your knees ache for days after.
After consistent practice:
- Mountain Pose improves your standing posture while you work
- Warrior poses build the stamina for sustained standing
- Better muscle strength protects your knees when kneeling
Practical tip: Use a garden kneeler pad (just like you use props in yoga). Take frequent breaks to stand and stretch.
Carrying Groceries
Before yoga: Multiple trips because you can’t trust your knees with heavy loads. Stairs are especially challenging.
After consistent practice:
- High Lunge builds the exact strength pattern needed for walking with load
- Improved stability means you trust your legs more
- Better balance prevents missteps
Practical tip: Use a cart when possible, but you’ll notice you CAN carry more when needed.
Walking for Exercise or Pleasure
Before yoga: Limited distance before pain increases. Walking feels like a chore.
After consistent practice:
- Can walk 30-50% farther without pain increase
- Improved gait pattern (shown in research) means more efficient walking
- Better endurance for longer walks
Practical tip: Your yoga practice IS exercise. Walking on rest days adds cardiovascular benefits without overworking your knees.
Staying Motivated: Tips for Long-Term Success
Starting is easy. Sticking with it is the real challenge.
Set Realistic Goals
Not helpful: “My knee will be completely pain-free in a month”
Helpful: “I’ll practice 3 times per week and track my pain levels”
Not helpful: “I’ll do perfect poses immediately”
Helpful: “I’ll focus on form and use props as needed”
Find Your “Why”
Write down your specific reasons:
- I want to play with my grandkids without pain
- I want to travel without knee issues limiting me
- I want to reduce my pain medication
- I want to avoid knee surgery
Put this where you’ll see it on days you don’t feel motivated.
Track Small Wins
Don’t just track pain. Notice:
- You held Chair Pose 5 seconds longer today
- You got up from the floor without using your hands
- You walked an extra block without pain
- You forgot about your knee for an hour
These small wins add up to major improvements.
Create a Ritual
Make your practice special:
- Use the same mat and space when possible
- Play the same calming music
- Practice at the same time of day
- Light a candle or diffuse essential oils
These cues tell your brain “it’s practice time” and make it easier to start.
Handle Missed Sessions
You WILL miss sessions. Life happens. Don’t let one missed session derail you.
If you miss one session:
- Just do the next scheduled session as planned
- Don’t try to “make up” by doing extra (this often leads to injury)
- Acknowledge it and move on
If you miss a full week:
- Come back gently – use easier modifications for the first session back
- Recommit to your schedule
- Figure out what led to the gap and problem-solve
If you miss 2+ weeks:
- Start again as if it’s week 1
- Use lighter holds and more props
- Build back up gradually over 1-2 weeks
Find an Accountability Partner
This could be:
- A friend also dealing with knee pain
- A family member who checks in weekly
- An online community focused on yoga or knee health
- Even just posting your progress on social media
Knowing someone else is tracking your commitment helps maintain consistency.
Remember the Alternative
On days you don’t want to practice, remember:
- The pain doesn’t get better on its own
- Doing nothing means gradual worsening
- 30 minutes of practice is faster than a doctor’s visit
- Movement is medicine
You never regret practicing. You often regret skipping it.
Conclusion
You’ve learned the science. You understand the poses. You know what to expect. Now it’s time to start.
You don’t need to be flexible. You don’t need expensive equipment. You don’t need to be pain-free to begin. You just need:
- A willingness to show up 3 times per week
- 30 minutes per session
- Patience with your body and the process
- Trust in the science
Science shows that consistent practice of just 2-3 sessions per week can lead to significant improvements in pain, stiffness, and function within 4-8 weeks. Thousands of people have found relief this way. The research proves it works.
Your knees have carried you through life. They’ve walked you through good days and hard days. They’ve let you dance, climb, explore, and play. Now they’re hurting, and they’re asking for help.
This is how you help them. Not with a pill or a quick fix, but with patient, consistent strengthening and care. Three sessions a week. Seven poses. Four to eight weeks.
FAQs
Can I do yoga if I’m overweight?
Yes. Yoga is for every body type. The poses in this article are specifically chosen to be accessible. You may need more props for support, which is completely normal. Use blocks to bring the floor closer. Use a chair for balance in standing poses. Take breaks whenever needed.
Some tips:
– Focus on form, not how deep you go
– Use props generously
– Chair yoga is an excellent option
– Remember that building strength will make everything easier over time
What if I can’t get down on the floor?
You have options. Chair yoga adapts all these poses for seated or standing practice. You can:
– Do Mountain Pose and Chair Pose standing
– Do Warrior poses with back foot against a wall
– Use a sturdy chair for Bridge Pose (feet on chair, shoulders on floor)
– Skip floor poses and focus on standing poses
Getting down and up safely:
– Place a sturdy chair nearby
– Hold the chair as you lower to hands and knees
– From hands and knees, sit to one side
– To get up, reverse the process
– Never feel pressured to get on the floor if it’s not safe for you
Should I do yoga on days when my knee really hurts?
It depends on the type of pain:
Mild to moderate stiffness: Yes, gentle movement often helps Sharp or severe pain: No, rest and consider seeing a doctor Pain from yesterday’s practice: Take an extra rest day Constant background ache: Yes, but go very gently
Pain scale guide:
– 1-3 out of 10: Safe to practice, may even help
– 4-6 out of 10: Practice only the gentlest poses, shortened session
– 7-10 out of 10: Rest day, ice if swollen, consult doctor if it persists
What if I feel pain during a pose?
Stop immediately. Pain is a signal, not something to push through.
Sharp pain: Stop the pose completely Pinching or grinding: Come out of the pose and try a modification Dull ache in muscles: This is normal muscle work, you can continue Pain that increases as you hold: Come out gently
Never force a pose. Back off, use more props, or skip that pose entirely for today.
Can I do this yoga routine if I’ve had knee surgery?
You need medical clearance first. Talk to your surgeon or physical therapist. They know your specific situation and what’s safe for you.
General timeline after common surgeries:
– Arthroscopy (minor cleanup): Usually can start gentle yoga 6-8 weeks post-op
– Meniscus repair: Typically 3-4 months with clearance
– ACL reconstruction: Usually 6-12 months, needs professional guidance
– Knee replacement: Typically 3-6 months, requires surgeon approval
Always get clearance before starting. When you do start, go very slowly and stop if anything feels wrong.
How soon will my knee pain disappear completely?
Let’s be honest. For most people with osteoarthritis or chronic knee pain, yoga isn’t a cure. It’s a management tool.
Realistic expectations:
– Most people notice some improvement within 4-8 weeks
– “Improvement” usually means 30-50% pain reduction, not zero pain
– Some days will still be worse than others
– Progress isn’t always linear (you may have setbacks)
– Benefits continue to build over months and years
What success looks like:
– You can walk farther without pain
– Stairs are easier
– Morning stiffness is less severe
– You need less pain medication
– You feel stronger and more stable
This is about improving your quality of life, not achieving perfection.
Can yoga help with both knees if both hurt?
Yes. All these poses work both legs. Even poses done one side at a time (like lunges) are repeated on both sides.
If one knee is worse than the other:
– Pay extra attention to form on the worse side
– Use more props on that side if needed
– Don’t try to match flexibility or strength between sides
– Weakness in one leg often contributes to pain in the other, so strengthening both helps
What’s the difference between online and in-person classes?
Both can be effective, as shown in research:
Online classes:
– Convenient and flexible scheduling
– Lower cost or free
– Private practice space
– You control the pace
– Risk: Can’t get form corrections
– Risk: May practice incorrectly without knowing it
In-person classes:
– Teacher corrects your alignment
– More accountability
– Ask questions in real-time
– Meet others with similar challenges
– Higher cost
– Less flexible scheduling
Best approach: Start with a few in-person sessions to learn proper form, then supplement with online practice at home.
How do I know if I’m doing the poses correctly?
Signs you’re doing it right:
– You feel muscles working (warm, engaged sensation)
– You can breathe smoothly throughout
– You feel stable and balanced
– The targeted muscles feel tired after practice
– You’re pain-free or pain is reduced
Signs something’s off:
– Sharp or pinching pain in joints
– Can’t breathe smoothly
– Feeling unstable or wobbly
– Wrong muscles getting tired (neck strain in leg poses, for example)
– Pain increases during or after practice
Self-check tips:
– Practice near a mirror to check alignment
– Video yourself and compare to instructions
– If possible, have one session with a teacher who can assess your form
– Use props liberally – they help maintain proper alignment
Can I combine yoga with other exercises?
Yes. Yoga works well alongside other activities:
Good combinations:
– Walking: Perfect complement, do on rest days
– Swimming: Low-impact cardio, different muscle work
– Cycling: Strengthens legs without impact
– Tai chi: Similar benefits, adds variety
Approach with caution:
– Running: High impact, may worsen knee pain
– Tennis/basketball: Quick pivoting can stress knees
– High-impact aerobics: May be too much stress
Guidelines:
– Don’t do intense exercise on the same day as yoga initially
– Build up gradually if adding activities
– Listen to your knees – they’ll tell you if it’s too much
– Rest days are essential
What if I’m not seeing results after 8 weeks?
First, check your compliance:
Honest self-assessment:
– Have you truly practiced 3 times per week?
– Are you doing the poses correctly?
– Are you holding poses for the full time?
– Are you pushing through pain instead of respecting limits?
If you’ve been consistent:
– Track your progress more carefully (you may be improving without noticing)
– Consider working with a physical therapist who can assess your form
– Get medical evaluation to rule out other issues
– Try adding one more session per week
– Your condition may need additional treatment
Remember: Some people need 12 weeks or longer to see significant changes. The research shows most people improve, but not everyone responds at the same rate.
Can children or teenagers with knee pain do these poses?
Growing bodies are different. Knee pain in young people needs medical evaluation first because:
– Growing pains are common but should be checked
– Sports injuries need proper diagnosis
– Osgood-Schlatter disease (growth plate inflammation) requires specific management
If a doctor approves:
– Most of these poses are safe for teens
– Focus on proper form, not intensity
– Keep sessions shorter (15-20 minutes)
– Make it fun, not a chore
Will I need to do yoga forever?
If you want to maintain the benefits, yes. Think of it like brushing your teeth – ongoing maintenance.
What happens if you stop:
– Benefits gradually fade over weeks to months
– Muscles lose strength
– Flexibility decreases
– Pain may return
Long-term approach:
– Once you’ve built a foundation (12+ weeks), you might reduce to 2 sessions per week for maintenance
– Some people continue 3 times per week indefinitely
– You can vary the poses over time to keep it interesting
– Think of it as a lifestyle practice, not a temporary treatment
References:
All recommendations in this article are based on peer-reviewed scientific research:
- PLOS ONE (2024) – Meta-analysis of 12 randomized controlled trials examining yoga for knee osteoarthritis. Found significant improvements in pain, stiffness, and physical function with 2-3 sessions weekly for 8-12 weeks.
- Annals of Internal Medicine (2023) – Randomized controlled trial of 212 participants comparing online yoga to usual care for knee osteoarthritis. Demonstrated that 3 sessions weekly for 12 weeks improved function and reduced pain starting around week 4.
- Arthritis Research & Therapy (2023) – Comparative study showing yoga (3x/week, 12 weeks) provided pain reduction and functional improvement comparable to traditional strengthening exercises, with early relief in the first 4-8 weeks.
- Journal of Geriatric Physical Therapy (2022) – Study of older adults practicing yoga 2-3 times weekly for 8 weeks, showing reduced knee pain, improved gait, and better balance with consistent relief by weeks 6-8.
- Frontiers in Physiology (2023) – Eight-week yoga program study demonstrating improved muscle coordination, proprioception, and lower-limb stability contributing to knee support and pain reduction.
- Osteoarthritis and Cartilage Journal (2015) – Research on 8-week yoga program as adjuvant therapy showing improvements in pain, stiffness, and quality of life scores.


