If you can finally sit down and still can’t switch off, your nervous system may be stuck in a pattern that most stress advice never addresses.
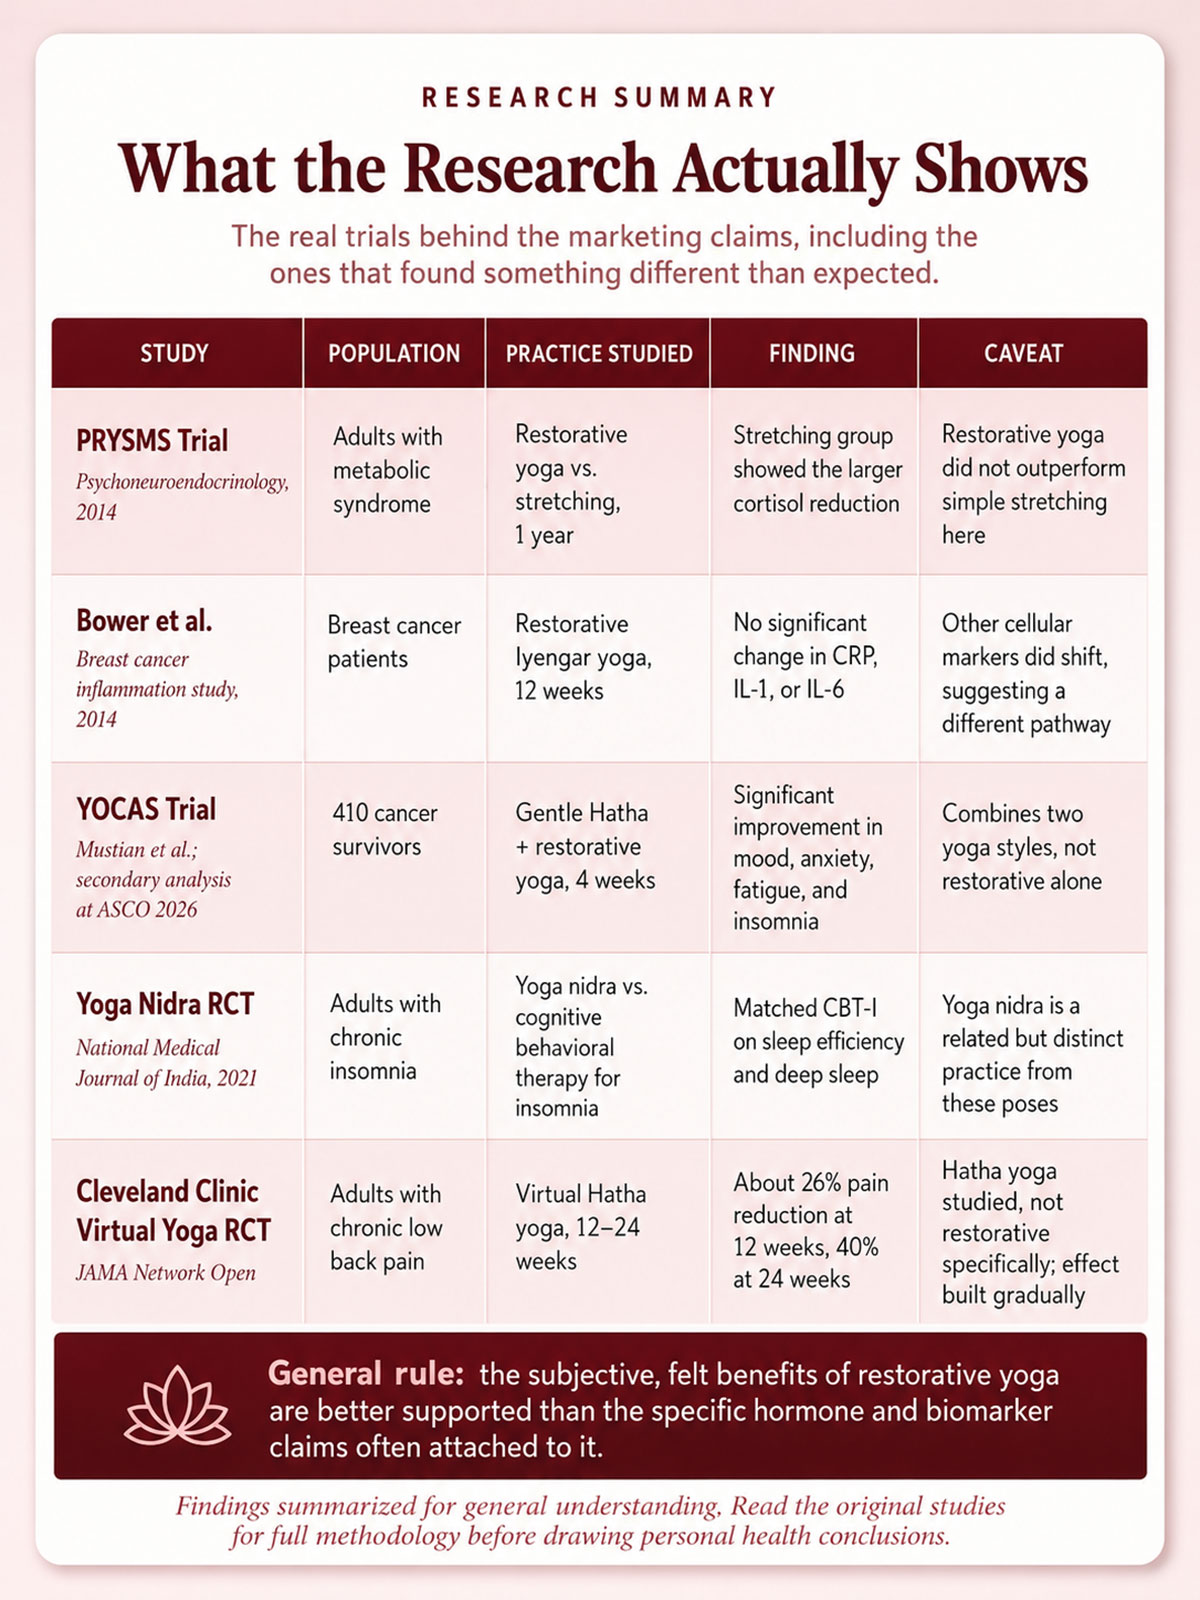
In 2014, a research team put restorative yoga up against something almost insultingly simple: a basic stretching class. For a full year, they tracked salivary cortisol in adults with metabolic syndrome across both groups. The stretchers came out ahead.
That finding took a while to sink in. It cuts against nearly everything wellness marketing has told you about why this practice works. It doesn’t mean restorative yoga does nothing. It means the story you’ve heard about the mechanism is wrong.
What restorative yoga is actually built for is slower and less flashy than a hormone reset: teaching an overstimulated nervous system what it feels like to stop bracing. Eight poses, held far longer than any other yoga style would ask, do that job well. The biochemistry headlines were just never the right way to sell it.
What is restorative yoga? (and what it’s not)
Restorative yoga is the art of passive support. Props like bolsters, blankets, and blocks do the work of holding your body in place while you focus on simply being present.
Unlike other yoga styles that challenge your strength or flexibility, restorative yoga asks nothing of your muscles. Your body surrenders its weight entirely, and your nervous system gets the chance to shift into repair mode.
Restorative yoga vs. other styles: quick comparison
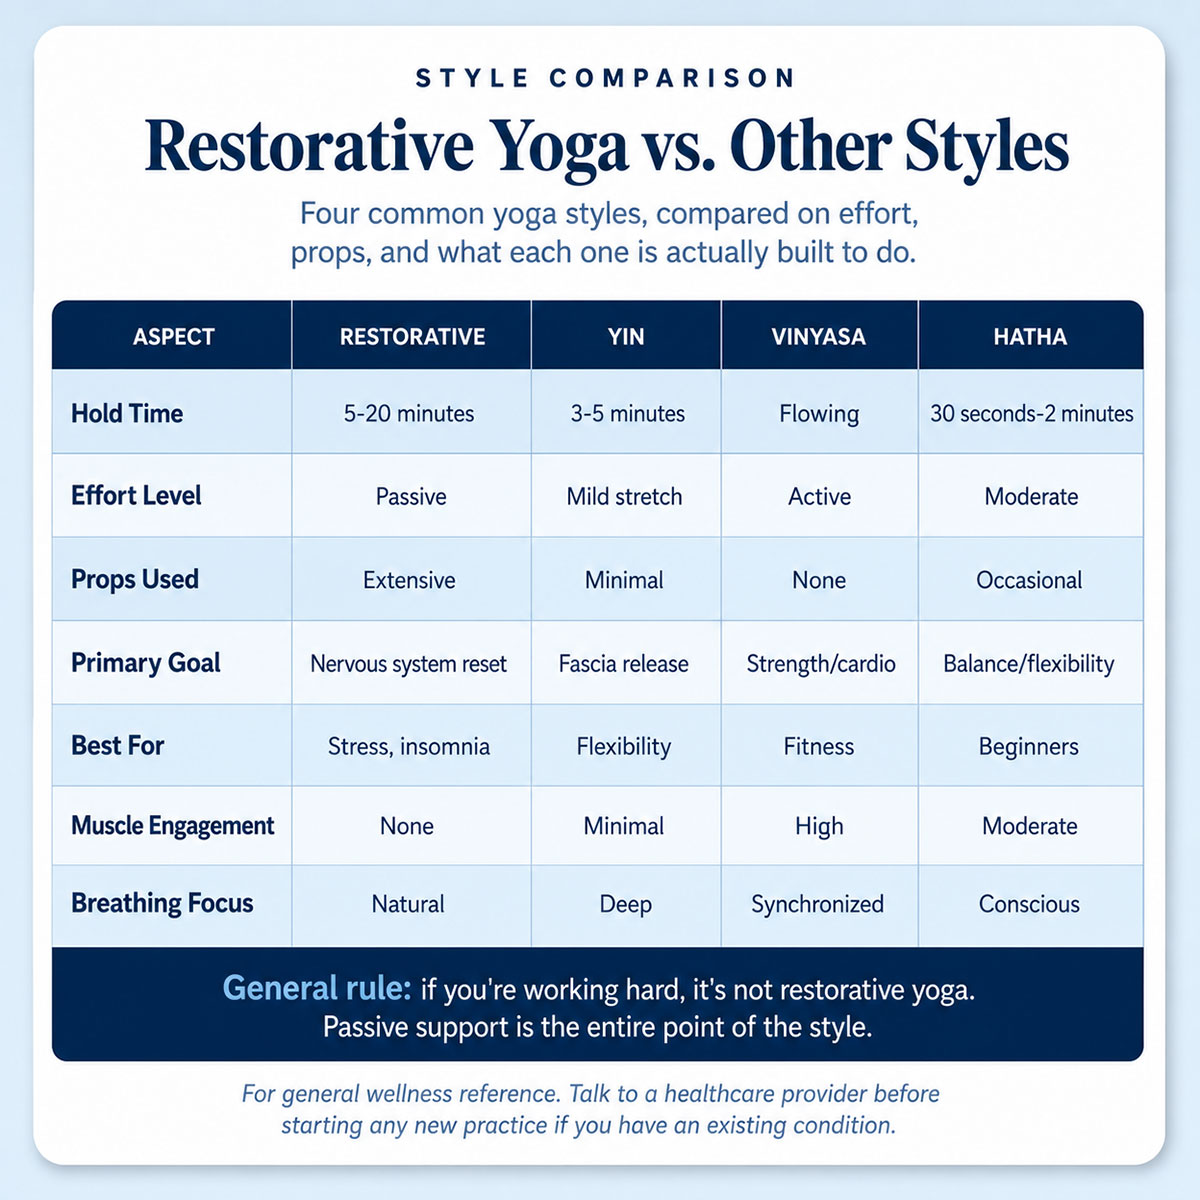
Key distinctions that matter
Restorative vs. yin yoga: Both practices move slowly and lean on props, but yin yoga stretches your deep connective tissue through gentle, sustained stress. Restorative yoga skips the stretch entirely and aims purely at nervous system settling.
Restorative vs. active yoga: Vinyasa and power yoga are about doing: building strength, working up a sweat, increasing flexibility. Restorative yoga is about being. Your job is to let your body rest, not to accomplish anything with it.
The science of deep rest
Here’s what happens in your body during a supported hold: your parasympathetic nervous system takes over. Your heart rate slows. Your breathing deepens. Muscles release tension they’ve been holding for hours, days, sometimes years.
How your nervous system responds
Long holds do something specific to the vagus nerve, the long wandering nerve that connects your brain to your heart, lungs, and gut. Extended stillness stimulates it, and that stimulation nudges the body toward a “rest and digest” state.
What that stimulation does to measurable stress hormones is less settled than most wellness coverage suggests. The PRYSMS trial, a yearlong study published in Psychoneuroendocrinology comparing restorative yoga to basic stretching in adults with metabolic syndrome, tracked salivary cortisol across both groups.
The stretching group showed the largest drop. Researchers still don’t fully agree on why a passive, prop-supported practice would underperform simple stretching on this specific marker, though the group dynamics of the stretching classes may have played a role.
Inflammation tells a similarly mixed story. Julienne Bower’s team at UCLA studied restorative Iyengar yoga in breast cancer patients and found no significant change in common inflammatory markers like CRP or IL-6, even after twelve weeks of regular practice. It did turn up shifts in less commonly discussed markers, changes in immune-cell gene activity that hint at a real effect happening somewhere the bigger studies haven’t mapped yet.
A different but related practice, yoga nidra, has more consistent backing on sleep. A 2021 trial in the National Medical Journal of India compared it directly to cognitive behavioral therapy, the current gold-standard insomnia treatment.
Yoga nidra held its own: participants reached deeper sleep stages, spent less time awake after initially falling asleep, and reported better sleep quality. That’s not quite the same practice as the poses in this guide, though the two share a slow, still, prop-optional quality that likely explains the overlap in benefit.
The proven benefits of restorative yoga
Regular practice offers benefits that extend well past your time on the mat.
- The nervous system gets permission to exit constant high alert, which is where most of the stress relief comes from.
- Sleep quality improves as the body relearns what genuine relaxation feels like before bedtime.
- Passive stretching gently extends range of motion without straining muscles that are already fatigued.
- Chronic pain often eases as muscle tension drops and circulation improves.
- Mindfulness deepens simply because there’s nothing else to do but notice your own body and breath.
- Blood pressure tends to settle with consistent practice, largely through the same relaxation response.
- Digestion benefits from the parasympathetic shift, since “rest and digest” describes a real physiological shift, not a figure of speech.
- Mood often lifts, and some people notice real reductions in anxiety and low mood over time.
What the research actually shows
Rather than repeat marketing-friendly percentages that don’t hold up under scrutiny, here’s what the existing trials found, including where they disagree with each other.
Karen Mustian’s team at the University of Rochester ran the largest test of this so far: 410 cancer survivors, split between usual care and a four-week program of gentle Hatha and restorative yoga. The yoga group came out ahead on mood, anxiety, fatigue, and the insomnia that those three tend to feed. A follow-up analysis presented at the 2026 ASCO meeting upheld the same pattern years later.
Essential props for your practice (and DIY alternatives)
Don’t let unfamiliar equipment keep you off the mat. These tools enhance a practice, but you can build an effective session with items already in your house.
Professional props and their functions
- A bolster provides firm, unmoving support for your torso, legs, or arms. No bolster at home? Stack two firm pillows and wrap them in a blanket for stability, or use a tightly rolled sleeping bag.
- Blankets offer warmth and a gentle, grounding weight. Any soft blanket, large towel, or even a bathrobe works just as well.
- Blocks support your body at different heights and angles. Thick books wrapped in towels, firm cushions, or sturdy storage boxes covered in blankets all do the job.
- A strap helps you reach a pose without straining toward it. A belt, scarf, necktie, or a towel tied in a loop are all fine substitutes.
- An eye pillow blocks light and adds gentle pressure for deeper relaxation. A folded towel over your eyes, or a sleep mask, works the same way.
- A weighted blanket adds therapeutic pressure that some people find calming for anxiety. Layering several regular blankets or using a heavy comforter achieves a similar effect.
Bolsters aren’t one-size-fits-all, and the shape matters more than most beginners expect. A round bolster distributes pressure more broadly and suits poses like Supported Fish, where your spine needs a gentle, even curve.
A rectangular bolster gives a flatter, firmer surface that works better under the knees in Bridge Pose or lengthwise between the thighs in Child’s Pose. Firmness matters too: a softer bolster that compresses under weight is more forgiving for sensitive backs, while a denser one holds its shape through a 20-minute hold without flattening out.
You don’t need any of this to start. A firm mattress edge, a couch cushion, and a rolled towel can substitute for a full prop kit in almost every pose here. Legs Up the Wall works against a headboard. Supported Child’s Pose works with a stack of couch pillows on the floor. If you’re traveling or don’t own props yet, the Travel Adaptations section further down covers no-prop versions of several poses in more detail.
Enhanced prop alternatives
- A few drops of lavender or chamomile essential oil on a tissue near your head can add an aromatherapy element.
- A gentle chime app makes a better meditation timer than your phone’s default alarm, since it ends a pose peacefully rather than jarringly.
- Soft instrumental music or nature sounds, kept at low volume, can deepen relaxation without becoming a distraction.
The underlying principle stays the same across every prop: if you’re holding any muscular effort to stay in a pose, add more support until you’re not.
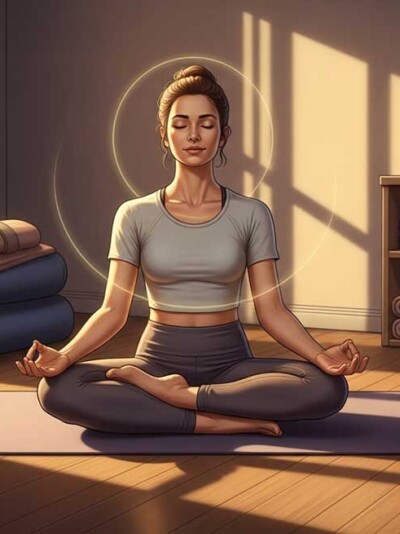
8 foundational restorative yoga poses for deep relaxation
A typical restorative class sticks to five or six poses. This guide gives you eight: enough to build a full at-home toolkit you can pull from depending on what your body needs on a given day, not a script you have to run start to finish every time.
Restorative Pose Finder
Tell it what you need and how long you have. It'll tell you what to do.
What do you need right now?
How much time do you have?
1. Supported Child’s Pose (Balasana)
Best for: Grounding yourself, releasing lower back tension, calming anxiety
Props needed: Bolster or two stacked pillows, blanket, optional blocks
- Kneel on your mat with your knees wide apart.
- Place the bolster lengthwise between your knees.
- Fold forward, resting your torso completely on the bolster.
- Turn your head to one side, switching sides halfway through.
- Drape a blanket over your back for warmth.
- Let your arms rest naturally by your sides.
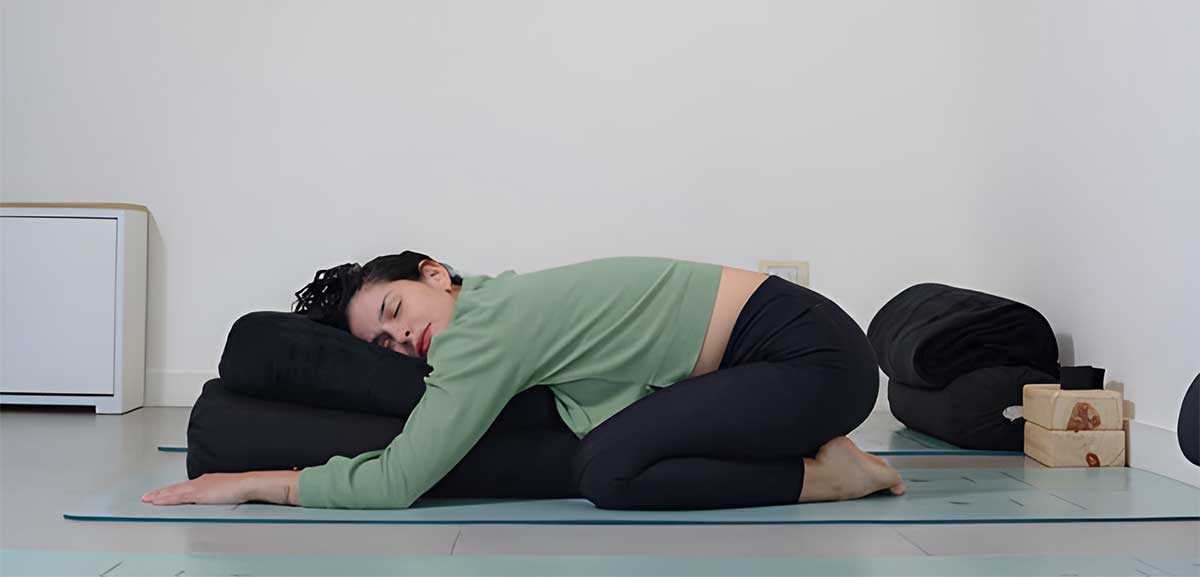
Hold time: 8-15 minutes
Mindfulness cue: Feel your breath naturally slow as your belly presses gently into the bolster with each inhale.
Modifications: If your hips don’t reach your heels comfortably, place a folded blanket between your calves and thighs. For knee sensitivity, roll a towel behind your knees before folding. If lifting your head makes you dizzy, come up slowly.
2. Supported Bridge Pose (Setu Bandha Sarvangasana)
Best for: Opening the chest, relieving tired legs, easing mild backache
Props needed: Block or firm pillow, blanket, optional bolster
- Lie on your back with knees bent, feet flat on the floor.
- Lift your hips and slide the block under your sacrum, the flat bone at the base of your spine.
- Let your arms rest by your sides, palms up.
- Allow your legs to relax completely.
- Cover yourself with a blanket for warmth.
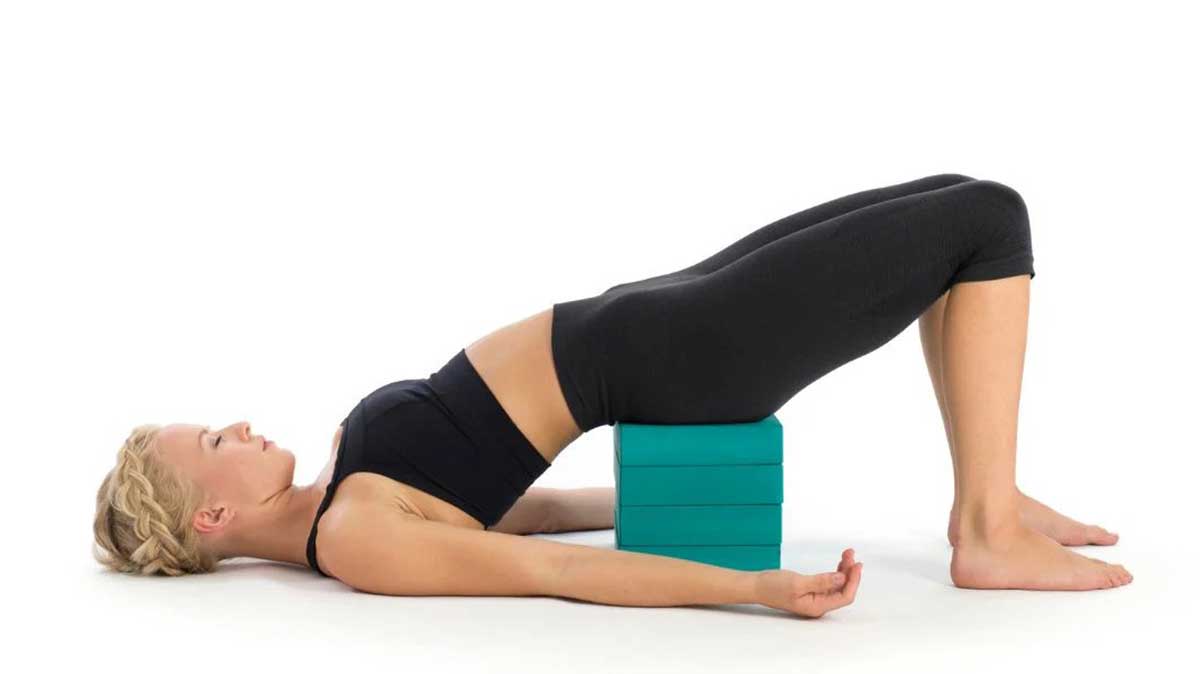
Hold time: 10-20 minutes
Mindfulness cue: Notice how your chest opens without any effort from you.
Modifications: If the block feels too high, drop to a lower setting or use a folded blanket instead. For sensitive lower backs, add a bolster under your knees. If your neck strains at all, slide a small towel under your head.
3. Legs Up the Wall (Viparita Karani)
Best for: Improving circulation, reducing leg swelling, calming the nervous system
Props needed: Wall space, blanket, optional bolster or pillow
- Sit sideways next to a wall.
- Swing your legs up the wall as you lie back.
- Scoot your sitting bones as close to the wall as feels comfortable.
- Let your arms rest by your sides, palms up.
- Place a folded blanket under your lower back if you want it.
- Cover your torso with a blanket.
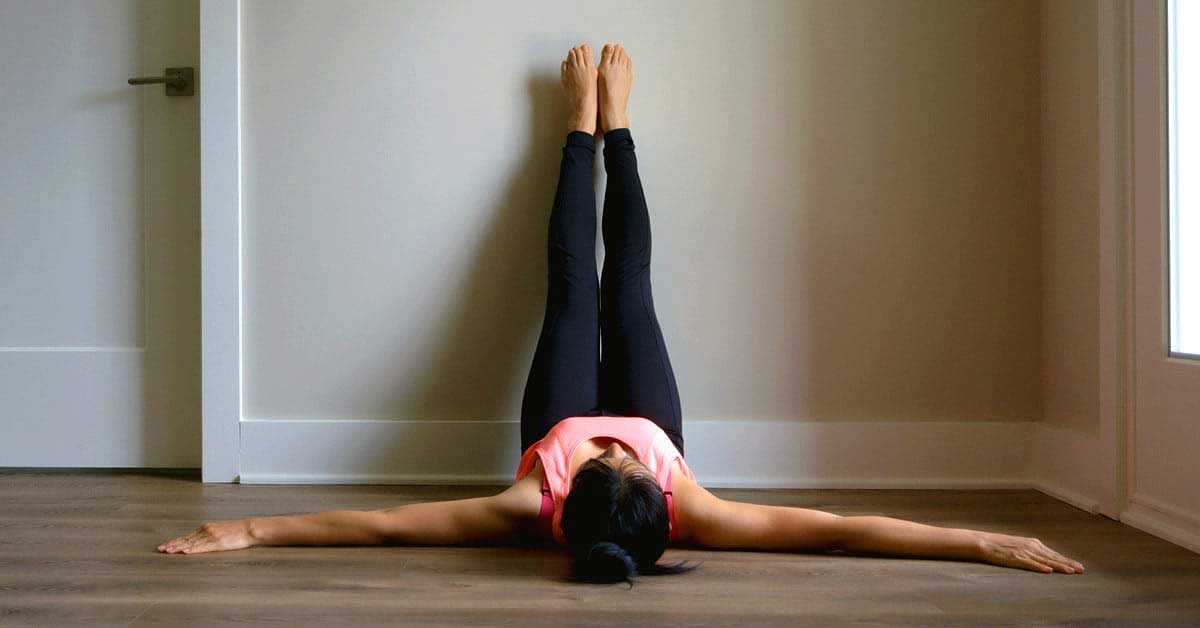
Hold time: 15-20 minutes
Mindfulness cue: Imagine any tension in your legs draining down toward your heart with each exhale.
Modifications: If your hamstrings are tight, move further from the wall or bend your knees slightly. For extra comfort, add a bolster under your lower back. If your legs start tingling, come down slowly and rest before trying again.
Of the eight poses here, this is the one that shows up in nearly every restorative yoga list on the internet, and for a practical reason: it needs almost nothing to work. A wall and a few spare minutes are enough, which makes it the pose most people actually keep doing after the novelty of a new practice wears off.
4. Reclining Bound Angle Pose (Supta Baddha Konasana)
Best for: Opening tight hips and inner thighs, releasing pelvic tension, easing menstrual discomfort
Props needed: Bolster or stacked pillows, two blocks or cushions, blanket
- Sit with the soles of your feet together, knees falling out to the sides.
- Place the bolster behind you, then lie back onto it.
- Support each knee with a block or cushion.
- Let your arms fall naturally to your sides.
- Cover yourself with a blanket.
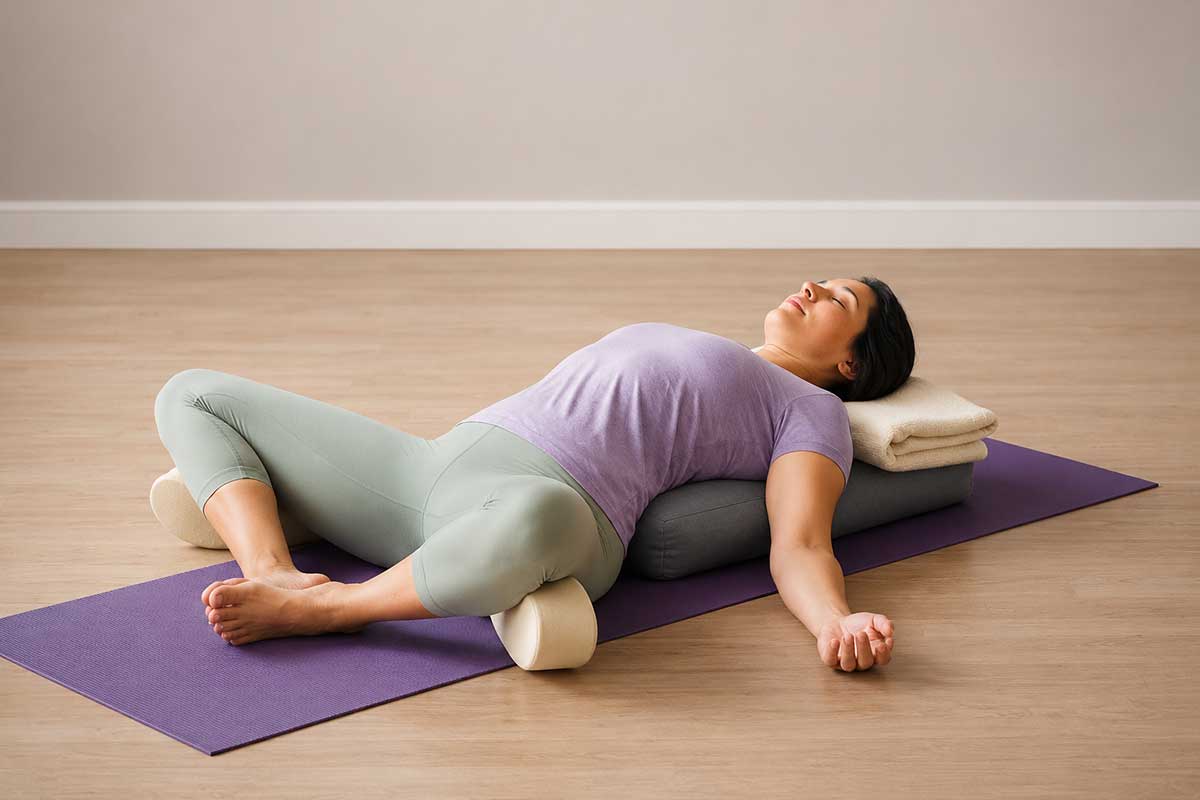
Hold time: 10-20 minutes
Mindfulness cue: Breathe into the gentle opening across your inner thighs and pelvis.
Modifications: If your inner thighs strain at all, add more support under your knees. During pregnancy, prop your torso up further rather than lying flat. If your head doesn’t reach the bolster, slip a small pillow underneath it.
5. Supported Supine Spinal Twist (Supta Matsyendrasana)
Best for: Gentle spinal mobility, digestive support, releasing hip tension
Props needed: Bolster or large pillow, blanket
- Lie on your back with your knees bent.
- Drop both knees to one side.
- Place the bolster between your legs, hugging it with your top leg.
- Extend your arms into a T-shape.
- Turn your head away from your knees.
- Switch sides halfway through your practice.
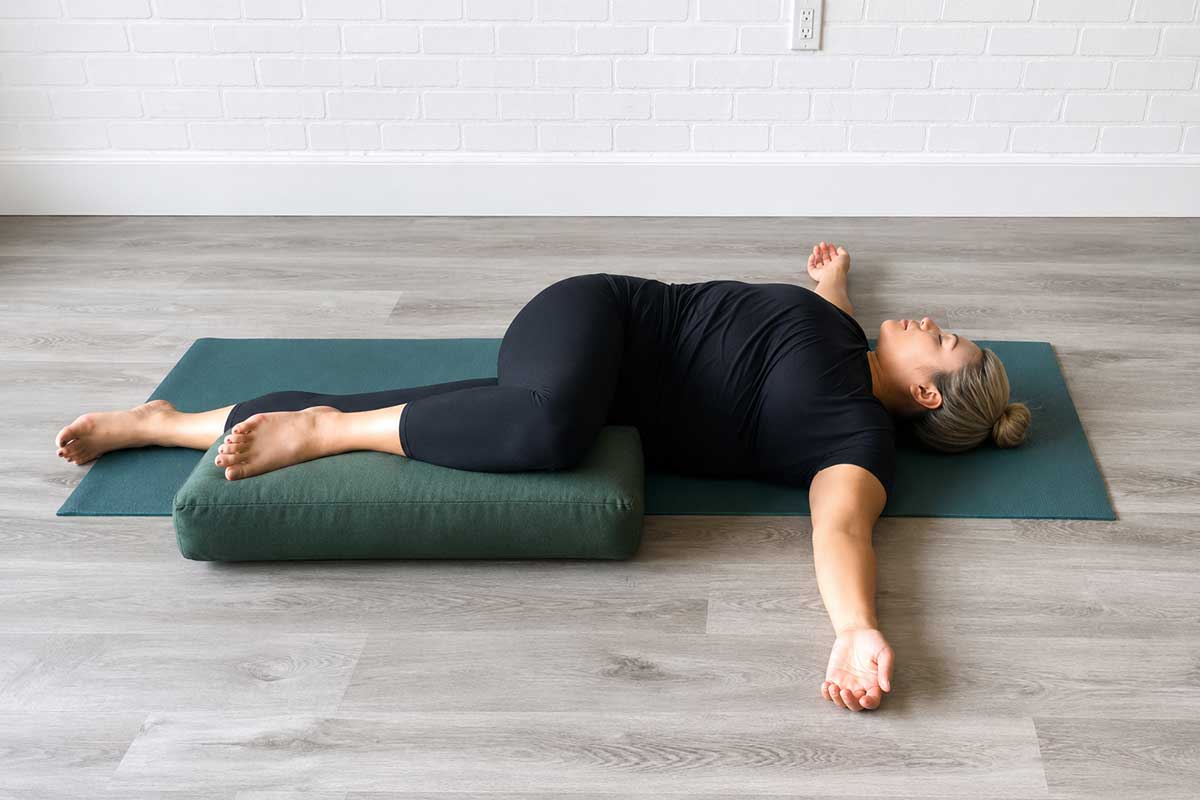
Hold time: 8-12 minutes each side
Mindfulness cue: Feel the gentle spiral through your spine as you breathe calmly.
Modifications: If your top shoulder lifts off the ground, tuck a folded blanket under your knees for more support. For sensitive backs, reduce the twist by not letting your knees drop as far. If turning your head is uncomfortable, keep it centered.
6. Supported Fish Pose (Matsyasana)
Best for: Opening the chest and shoulders, countering forward head posture, easing breathing
Props needed: Bolster or firm pillow, blanket, optional eye pillow
- Sit with legs extended, bolster placed behind you.
- Lie back so the bolster supports your shoulder blades.
- Let your arms fall to your sides, palms up.
- Rest your head comfortably on the floor.
- Cover your legs with a blanket.
- Place an eye pillow over your eyes if you’d like.
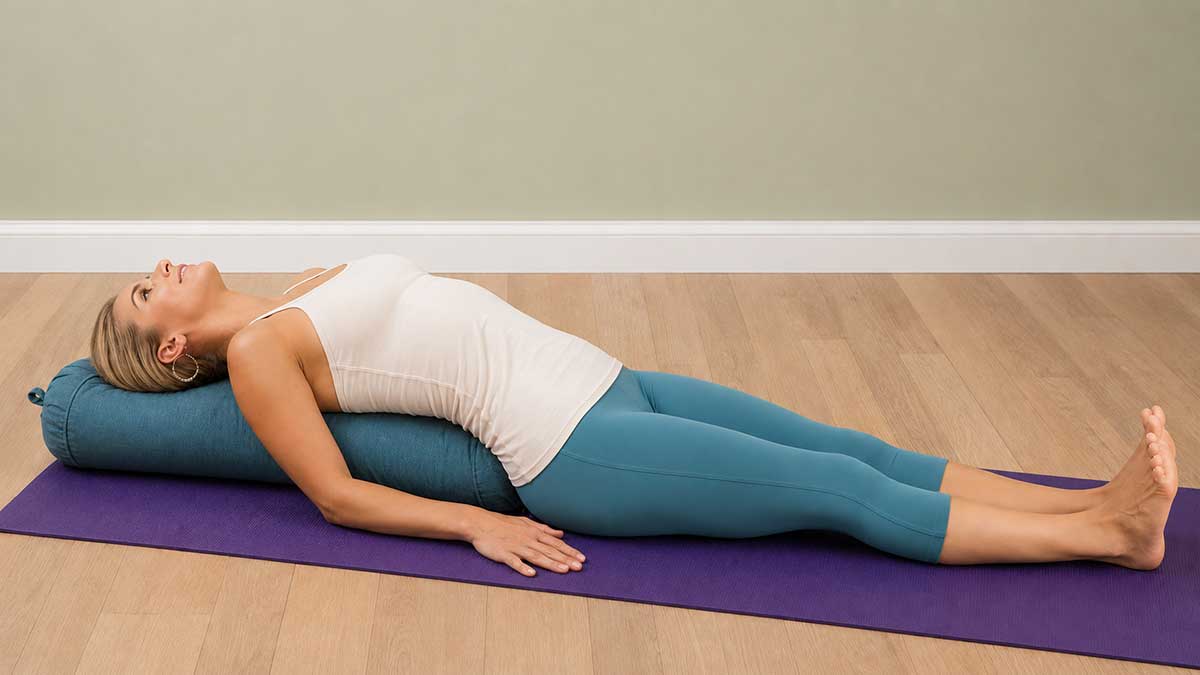
Hold time: 10-15 minutes
Mindfulness cue: Feel your chest opening like a flower blooming toward the ceiling.
Modifications: If your head doesn’t reach the floor, add a small cushion or folded blanket underneath it. For sensitive lower backs, bend your knees with feet flat. If your neck strains, lower the height of the bolster.
This is also the pose most people quietly skip. Fully opening the chest while your arms fall open to the sides can feel exposed in a way the other seven poses don’t, and that discomfort is worth noticing rather than avoiding. It usually eases within a minute or two once the breath settles.
7. Supported Forward Fold (Paschimottanasana)
Best for: Gentle hamstring release, turning attention inward, calming the mind
Props needed: Bolster or stacked pillows, blanket, optional blocks
- Sit with legs extended in front of you.
- Place the bolster across your thighs.
- Fold forward, resting your torso on the bolster.
- Let your arms drape naturally around the bolster.
- Turn your head to one side, switching sides halfway through.
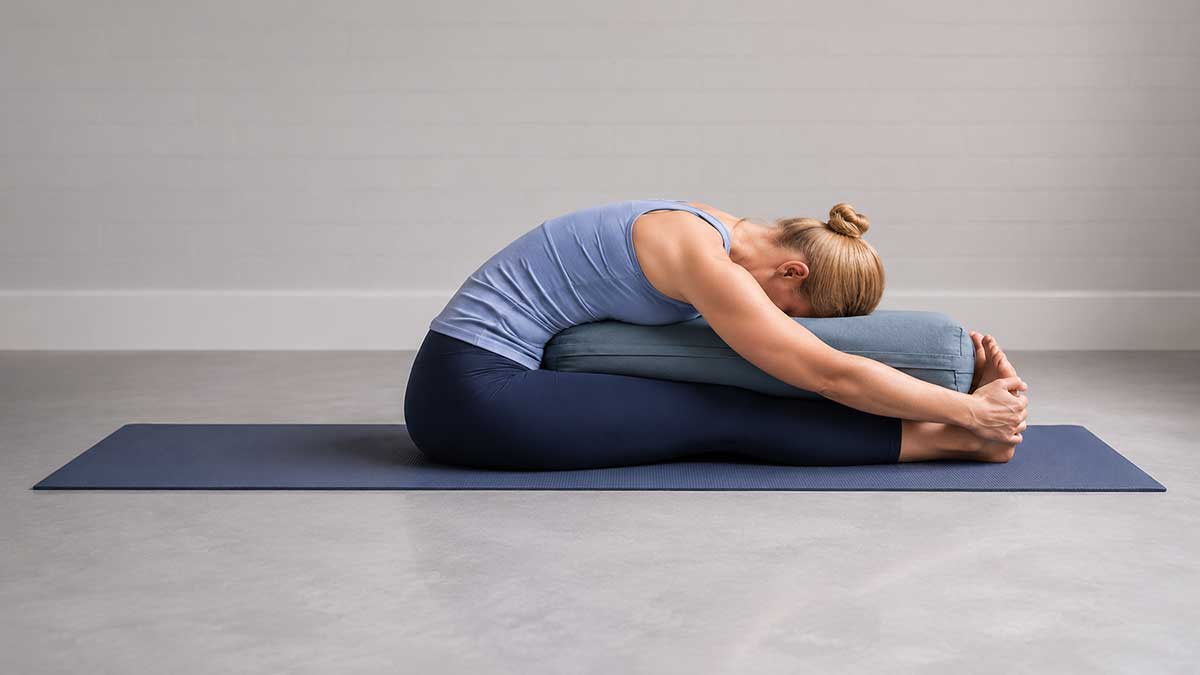
Hold time: 8-12 minutes
Mindfulness cue: With each exhale, imagine melting a little deeper into the support of the props.
Modifications: If sitting upright is uncomfortable, sit on a folded blanket to raise your hips. For very tight hamstrings, raise the bolster on blocks. If your back strains, don’t fold as deeply.
8. Supported Corpse Pose (Savasana)
Best for: Complete conscious rest, integration, deep meditation
Props needed: Blanket, optional bolster for under the knees, eye pillow
- Lie on your back with legs extended.
- Place a bolster or pillow under your knees if you’d like.
- Let your arms rest by your sides, palms up.
- Cover yourself with a blanket.
- Place an eye pillow over your eyes.
- Close your eyes and follow your natural breath.
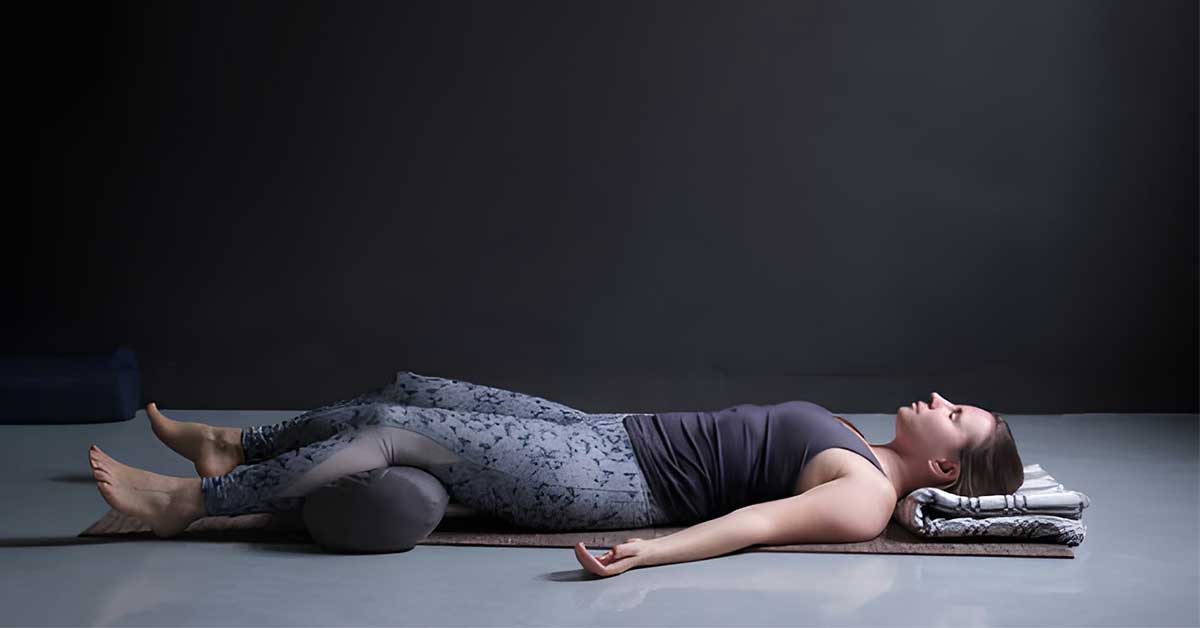
Hold time: 10-20 minutes
Mindfulness cue: Let each exhale release a little more tension, sinking deeper into rest.
Modifications: If lying flat is uncomfortable, prop your head and chest up on a bolster. During pregnancy, lie on your side with a bolster between your legs. If your mind won’t settle, count breaths down from ten, then start again.
One more worth trying: Sphinx Pose
If the eight above start to feel familiar, Sphinx Pose is worth adding to the rotation. It’s a gentle backbend, forearms flat on the mat, chest lifted enough to feel a mild stretch through the lower back, and it’s currently the subject of an active multicenter trial comparing it against mindfulness-based stress reduction for chronic low back pain. Nobody has published results yet, but the fact that researchers picked this specific pose to test says something about how it’s regarded in physical therapy circles already.
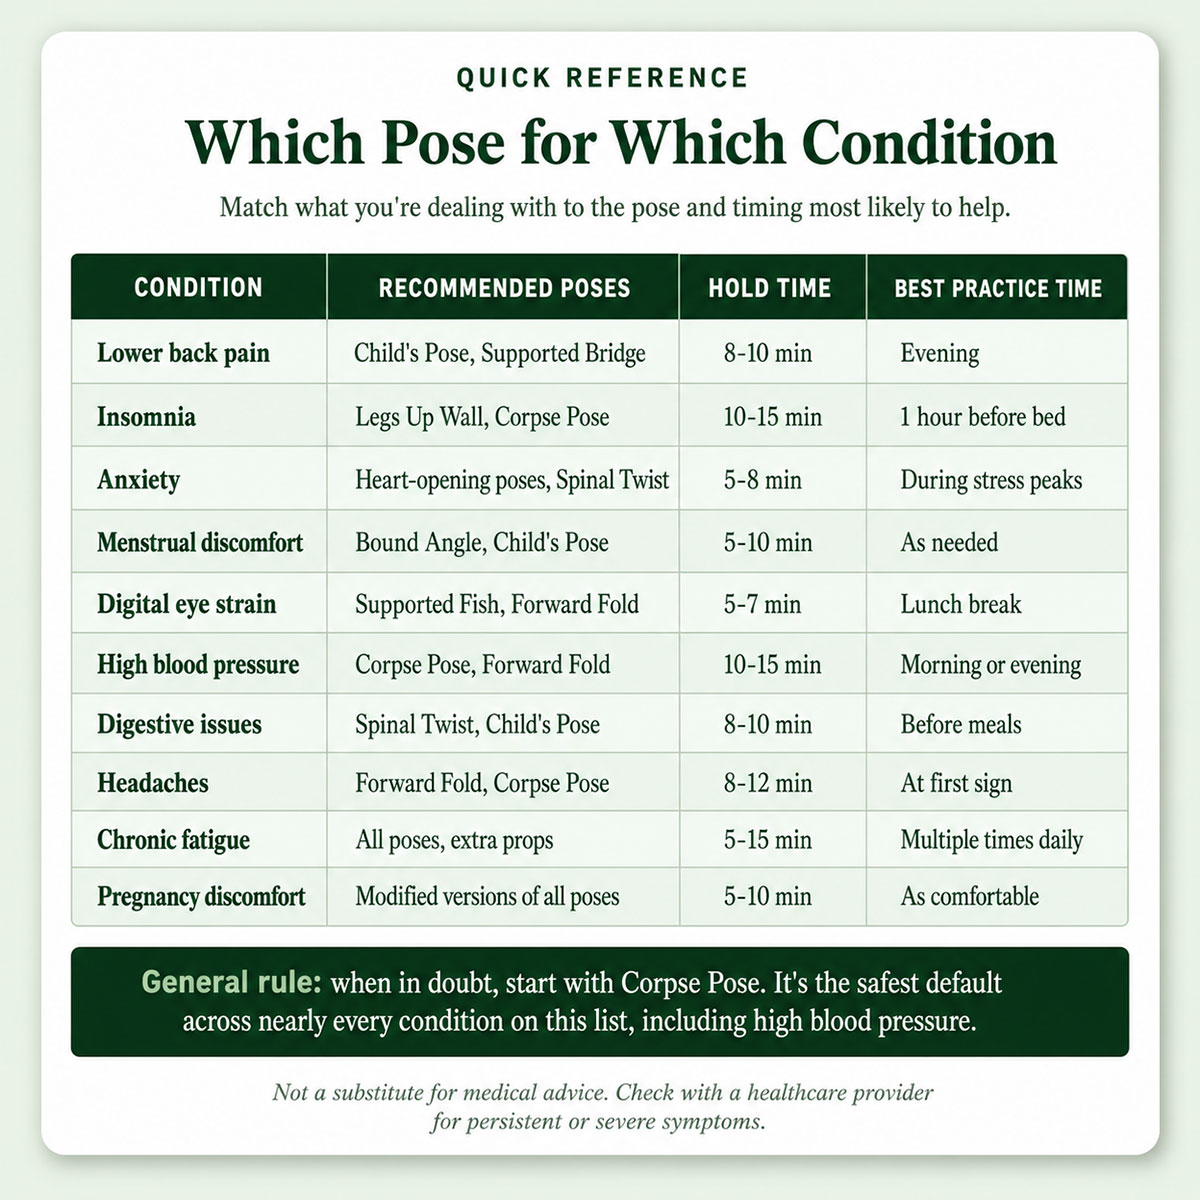
Quick reference: pose-to-condition guide
Progressive practice framework
Building a sustainable restorative yoga practice takes time. Here’s a structured approach to developing it.
Week 1-2: Foundation building
Goal: get comfortable with basic poses and prop setup.
- Start with three poses: Child’s Pose, Legs Up the Wall, Corpse Pose.
- Hold each pose for 5 minutes.
- Focus on comfortable breathing and basic prop arrangement.
- Practice 3-4 times per week for 15-20 minutes total.
Your mind may feel restless during this stretch, which is normal. Don’t judge yourself for having thoughts. Notice them and return to your breath.
Week 3-4: Expanding practice
Goal: add variety and get comfortable with longer holds.
- Add Bridge Pose and Bound Angle Pose to your routine.
- Increase hold times to 7-8 minutes per pose.
- Start noticing which poses feel most beneficial to you specifically.
- Practice 4-5 times per week for 25-35 minutes total.
Improved sleep and reduced daytime stress often show up around this point.
Month 2: Deepening understanding
Goal: introduce sequencing and personalization.
- Learn all eight foundation poses.
- Begin building your own themed sequences (see the section below).
- Hold poses for 8-12 minutes.
- Practice 5-6 times per week for 30-45 minutes total.
Month 3+: Personalized practice
Goal: develop an intuitive practice based on daily needs.
- Build custom sequences based on how you feel each day.
- Hold poses for 10-20 minutes.
- Fold in breathing techniques and meditation.
- Practice daily, even if it’s only 10 minutes.
How to create your own restorative yoga sequence
Knowing eight poses in isolation is only half the practice. The real skill, and the part most guides skip past, is combining them into something that answers what your body needs on a given day rather than running through a fixed list. Here are ready-to-use sequences to start from, plus the principles behind building your own.
Sample sequences for different needs
15-minute pre-bedtime routine for deeper sleep
- Supported Child’s Pose, 3 minutes.
- Legs Up the Wall, 5 minutes.
- Reclining Bound Angle Pose, 4 minutes.
- Supported Corpse Pose, 3 minutes.
This sequence calms your nervous system and prepares your body for rest.
20-minute “desk decompress” for neck, shoulder, and back relief
- Supported Fish Pose, 5 minutes.
- Supported Supine Spinal Twist, 5 minutes each side.
- Supported Forward Fold, 5 minutes.
This sequence counteracts the forward head posture and rounded shoulders common in desk workers.
30-minute weekend reset for full-body unwind
- Supported Child’s Pose, 5 minutes.
- Supported Bridge Pose, 5 minutes.
- Reclining Bound Angle Pose, 5 minutes.
- Supported Supine Spinal Twist, 5 minutes each side.
- Supported Corpse Pose, 5 minutes.
This fuller sequence addresses every major area of tension.
10-minute emergency stress relief
- Legs Up the Wall, 5 minutes.
- Supported Corpse Pose, 5 minutes.
When you’re pressed for time, these two poses deliver the most relaxation for the least effort.
25-minute anxiety relief sequence
- Supported Child’s Pose, 5 minutes.
- Reclining Bound Angle Pose, 8 minutes.
- Legs Up the Wall, 7 minutes.
- Supported Corpse Pose, 5 minutes.
Heart-opening and grounding poses work together here to settle anxiety through the parasympathetic response.
Sequencing principles
- Start with grounding poses that help you settle in, typically forward folds or poses where your forehead touches something.
- Move through gentle openings that address tension in both the front body (chest, hip flexors) and back body (spine, hamstrings).
- End in complete stillness. Corpse Pose lets your nervous system fully absorb the practice.
- Consider the time of day. Morning sequences can lean on gentle backbends for energy, while evening ones favor forward folds and inversions for calm.
- Listen to your body. If something feels good, stay longer. If a pose doesn’t serve you that day, skip or modify it.
Seasonal practice adaptations
Winter sequences (December-February)
Most people don’t think to adjust a restorative practice for winter, but this is the season it earns its keep most. The days are shorter, cortisol tends to run higher through the darker months, and heart-opening poses held a few minutes longer than usual do more work here than they will in July. Layer on an extra blanket and lean into Supported Bridge and Supported Fish for a few minutes beyond their usual hold time. Winter slouching actually responds better to backbends than to forward folds, which is the opposite of what most people reach for when they’re already feeling low.
Spring, summer, and fall
The other three seasons ask for smaller adjustments. Spring favors twisting poses and hip openers, useful for digestive reset and emotional release after a long winter. Summer wants less: forward folds, Legs Up the Wall, and as few props as the heat allows. Fall leans back toward forward folds and twists, with longer holds that suit the inward turn toward the darker months ahead. None of these three needs the seasonal emphasis winter does, which mostly comes down to how much daylight and cortisol levels change across the rest of the year.
When to practice: integrating restorative yoga into your life
Restorative yoga isn’t only a Sunday-evening ritual. Here’s when this practice tends to serve people best.
Daily integration opportunities
A morning session between 6 and 8 AM sets a calm tone before the day’s demands begin. Ten minutes focused on gentle heart-opening, including Supported Fish Pose, can improve posture for the hours ahead.
A midday reset during your lunch break works well too. Five to ten minutes in Legs Up the Wall relieves lower-body tension from sitting and often restores mental clarity for the afternoon.
After work, between 5 and 7 PM, a 15-minute sequence helps shift you from “doing” mode into “being” mode before you settle in with family for the evening.
In the evening, from 8 to 10 PM, a 20 to 30-minute calming sequence built around forward folds and gentle inversions creates a real boundary between day and night.
Specific life situations
- After a workout, 10-15 minutes of restorative poses supports muscle recovery and helps prevent stiffness, focused on the areas you just trained.
- During illness, gentle restorative poses can support your immune system without taxing your limited energy.
- On travel days, airport delays and long flights build tension that a seated forward fold or gentle twist can ease almost anywhere.
- Before high-pressure events, a short sequence built around supported heart-opening and breath awareness can calm pre-performance nerves.
- During your menstrual cycle, poses like Supported Child’s Pose and Reclining Bound Angle can ease cramping and fatigue.
- During high-stress periods, even 5 minutes of restorative practice can reset an overloaded nervous system.
- Around seasonal transitions like the equinoxes and solstices, longer sequences support your body through natural energy shifts.
Adapting practice for special conditions
Pregnancy modifications
Restorative yoga can be genuinely beneficial during pregnancy, but a few modifications matter for safety. Avoid lying flat on your back after the first trimester, use more props as your body changes, and skip deep twists and backbends. Above all, listen to your body and modify as needed.
For Child’s Pose, widen your knees to make room for your belly. For Bridge Pose, use a lower prop or skip it entirely. Replace Legs Up the Wall with side-lying after the first trimester. Prop your torso up significantly in Bound Angle Pose. Keep any twists very gentle and open. Let your knees bend as needed in forward folds. In Corpse Pose, lie on your side with a bolster between your legs.
Senior practitioners (65+)
Restorative yoga suits older adults especially well, with a few adaptations worth building in. Use chairs for poses if getting to the floor is difficult, take extra time transitioning between poses, and lean on more props for support. Favor poses that improve circulation and emphasize seated and supported positions over floor-based ones.
The most beneficial focus areas at this stage tend to be joint mobility without strain, balance improvement through supported poses, better circulation, and the kind of stress reduction that supports better sleep. Group classes add a social dimension worth seeking out too.
Chronic pain conditions
Fibromyalgia deserves more caution than the other two conditions here, because the pattern practitioners describe is genuinely stranger than a simple pain-relief story. People with fibromyalgia often report emotional releases during longer supported holds: sudden tearfulness, unexpected memories, a wave of grief that seems to come from nowhere.
Nobody has a clear explanation for why this shows up more here than with other chronic pain conditions, and the research hasn’t caught up to the anecdote yet. What practitioners do agree on is practical: start with short holds of 3 to 5 minutes, use extra-soft props, and practice during your best energy window of the day. Then let those emotional releases happen rather than trying to head them off.
Arthritis and chronic fatigue call for less improvisation. For arthritis, keep weight off affected joints, lean on blocks and bolsters for support, and warm up slowly before any hold. For chronic fatigue, practice lying down whenever possible, use maximum prop support, and cap early sessions at 5 to 10 minutes rather than pushing for a full routine.
Mental health applications
For depression, heart-opening poses can counter the physical inward collapse that often accompanies low mood, and well-lit spaces with short early sessions help build confidence gradually. For anxiety, longer exhales, a weighted blanket for grounding, and forward folds over anything more exposed matter more than which specific pose you choose.
PTSD changes the calculus in a way the other two conditions don’t. A closed-eye pose that feels perfectly safe to most people can feel like the opposite for someone whose nervous system has learned to treat stillness and vulnerability as a warning sign.
That’s not a reason to skip restorative yoga. It’s a reason to keep your eyes open through every pose if that feels safer, skip anything that feels triggering without needing to justify it, and work with a trauma-informed instructor who already understands why those adjustments matter, rather than one who has to be talked into them.
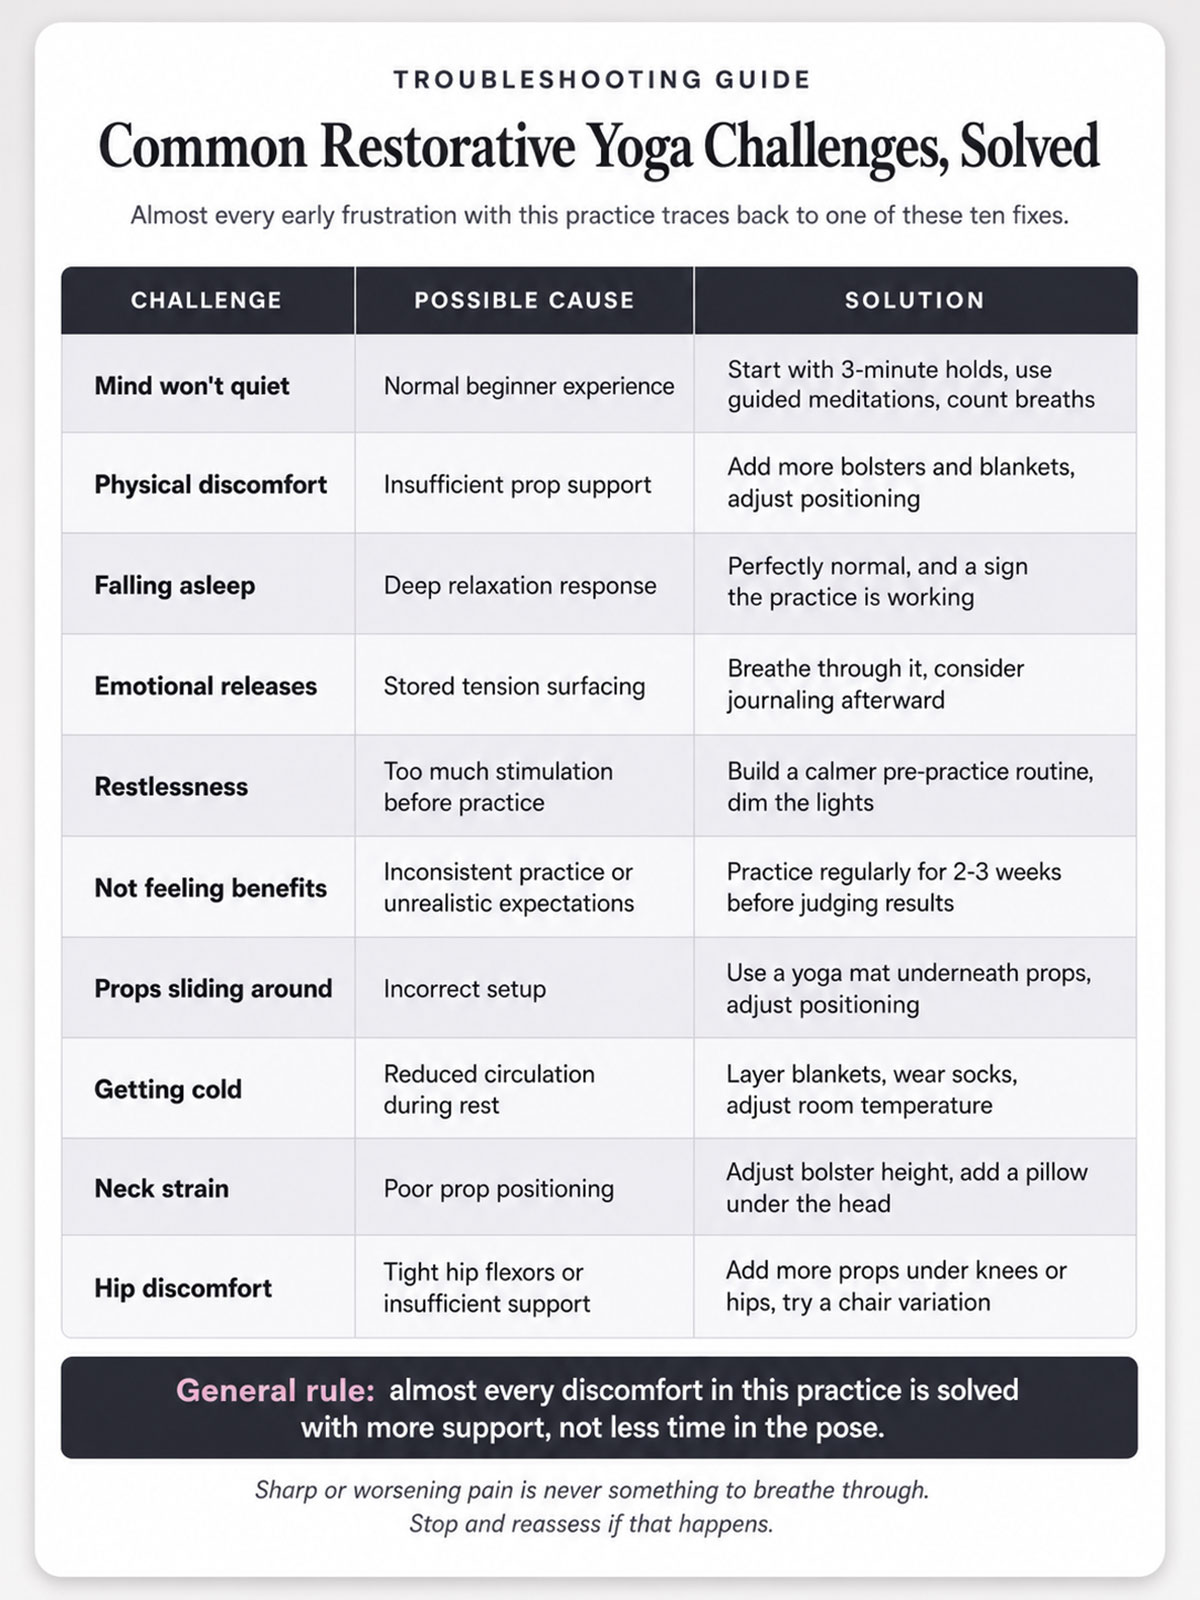
Troubleshooting common challenges
Safety guidelines and contraindications
Restorative yoga is generally safe for most people, but certain conditions call for extra attention.
When to avoid or modify practice
Recent surgery calls for the most patience on this list, since feeling fine and actually being healed underneath the surface aren’t the same thing. Wait for medical clearance before returning to any practice, avoid poses that put stress anywhere near the surgical site, even if that area feels fine, and lean on more props than you think you need while tissue finishes healing.
Uncontrolled high blood pressure carries a real risk worth taking seriously rather than glossing over. Inversions can spike blood pressure further at exactly the moment your body needs it to come down, so skip them entirely until it’s under control, keep your head level or slightly raised in every pose, and monitor how you feel throughout the session rather than pushing through discomfort.
A few other conditions call for smaller, more mechanical adjustments. With low blood pressure, come up slowly from any lying pose and stay hydrated. With osteoporosis, avoid forward folds that round the spine and use props to keep it aligned instead.
With a herniated disc, skip forward folds and twists that increase pain and favor supported backbends with extra spinal support. During pregnancy, follow the modifications covered earlier in this guide, avoid lying flat after the first trimester, and check with a healthcare provider if anything feels uncertain.
Emergency situations
Come out of any pose immediately if you notice sharp or worsening pain, difficulty breathing, dizziness or nausea, chest pain, or severe emotional distress.
Measuring your progress
Progress in restorative yoga isn’t about reaching more complex poses. Track these changes instead.
Weekly self-assessment
Rate each area from 1 to 10 weekly: how easily you fall asleep and whether you sleep through the night, how you handle daily stressors and whether you feel more resilient, whether chronic pain or physical tension has eased, whether your focus and mood have improved, and whether your energy feels steadier throughout the day.
Monthly practice review
Once a month, ask yourself which poses feel most beneficial, which sequences you gravitate toward, how your relationship with rest has changed, and which modifications you’ve discovered that work specifically for your body.
Building your home practice space
You don’t need a dedicated yoga room, but a peaceful corner improves the practice. Choose a quiet spot away from high-traffic areas, keep it clean and clutter-free, and aim for a slightly cool room temperature, since your body temperature drops during deep relaxation. Soft lighting from a dim lamp or candles beats overhead fluorescents, and keeping props stored in an accessible basket removes friction before you even start.
A few nice-to-haves round things out: living plants for air quality and a natural feel, an essential oil diffuser with lavender or sandalwood, and soft instrumental music or a sound machine to mask household noise.
Busting common myths
“It’s too easy to be beneficial.” The challenge here is mental, not physical. Learning to be still in a busy life takes real skill.
“You need expensive props.” Household items work perfectly well. Willingness to rest matters far more than gear.
“It’s only for flexible people.” Restorative yoga requires zero flexibility. Props support your body exactly where it is today.
“Falling asleep means you’re doing it wrong.” This is the myth most worth correcting properly. Falling asleep mid-pose is a sign your nervous system feels safe enough to fully let go, which ties directly back to the vagus nerve activity described earlier in this guide. A nervous system that’s still bracing for threat doesn’t drift off this easily. If you fall asleep in Legs Up the Wall, your body told you something useful about how overdue that rest was.
“It’s boring.” It can be at first. That boredom is worth sitting with rather than fixing. It’s usually a sign of how unfamiliar genuine stillness has become, and it tends to fade within a few sessions.
Office-Friendly 5-Minute Sequences
You can bring elements of restorative yoga into a workday.
- Seated Forward Fold, 2 minutes: sit at the edge of your chair, fold forward over your legs, and let your arms hang. Rest your head on the desk if that’s comfortable.
- Seated Twist, 1 minute each side: sit sideways in your chair, hold the back of it, and twist gently while breathing deeply.
- Legs raised, 2 minutes: rest your feet on a box or trash can under your desk, lean back, and close your eyes if you can.
Travel Adaptations
Travel doesn’t have to interrupt your practice.
Hotel room sequences using only bed pillows
- Legs up against the headboard.
- Supported Fish Pose with pillows under your shoulder blades.
- Side-lying relaxation with a pillow between your legs.
No props needed
- Corpse Pose directly on the bed.
- Child’s Pose, using the bed itself as support.
- Gentle twists lying on the bed.
Airplane and car modifications
- Seated Forward Fold, only when safe to unbuckle.
- Neck rolls and shoulder shrugs.
- Ankle circles and foot flexes.
- Deep breathing exercises.
- A gentle seated twist.
Breathing Techniques to Enhance Practice
Simple breath work deepens the effect of any restorative pose.
4-7-8 breathing: inhale for 4 counts, hold for 7, exhale for 8. Repeat 4 times. This pattern calms anxiety and promotes sleep.
Natural breath awareness: simply observe your breathing pattern without changing it. Notice the pause between inhale and exhale.
Extended exhale: make your exhale slightly longer than your inhale. This activates the parasympathetic nervous system directly.
Belly breathing: place one hand on your belly and feel it rise with each inhale and fall with each exhale.
FAQs
How many poses does a restorative yoga sequence actually need?
A single session usually needs only five or six poses held for five to ten minutes each. The eight poses in this guide aren’t a required minimum. They’re a toolkit to draw from depending on what your body needs that day.
How long should I hold each pose?
Aim for 3 to 10 minutes per pose. Start with shorter holds and extend them as you get more comfortable with stillness.
Is it okay if I fall asleep?
Yes. Falling asleep during restorative yoga signals that your body trusts the environment enough to let go completely. It’s a sign the practice is working, not a failure.
Can I practice restorative yoga if I’m not flexible?
Yes. The props do all the work of supporting your body exactly where it is today. Flexibility has nothing to do with it.
Is it normal to feel emotional during or after practice?
Very normal. Slowing down and tuning in often surfaces emotions that were pushed down elsewhere. That’s part of the process, not a problem with it.
Can I do these poses in bed?
Some work well in bed, especially on a firm mattress. Legs Up the Wall against your headboard, or Supported Corpse Pose, both make solid bedtime options.
The stretching class that outperformed restorative yoga on cortisol in that 2014 trial wasn’t secretly the better practice. It measured something restorative yoga was never really built to fix. What eight long, supported holds are actually good for is quieter and harder to put a percentage on: teaching a body that’s forgotten how to stop bracing what stopping actually feels like. That’s not a finding you can put in a headline. It might be the more useful one.