Stop doing endless sit-ups. They won’t give you the strong core you want. The truth is that sit-ups aren’t the magic fix for a flat stomach. They can strain your spine and barely touch your lower abs. The “lower abs” are tricky because they’re part of one big muscle called the rectus abdominis. Most standard exercises miss the deep core muscles that really matter.
I’ve got something better for you. This 10-minute routine uses five targeted exercises that work smarter, not harder. No equipment needed. You can do it in your living room right now.
These aren’t random moves. They’re based on research that shows how to effectively hit your lower rectus abdominis and transverse abdominis. This is your deep core – the muscles that support your spine and improve your posture.
This routine builds functional strength. Your back will thank you. Your posture will improve. And you’ll feel more stable in everything you do.
The Science Behind Lower Ab Training
Research backs up what we know about effective core training. EMG studies show that reverse crunches and hanging knee-ups produce the highest muscle activity in the lower portion of the rectus abdominis compared to traditional crunches.
While anatomically the rectus abdominis is one continuous muscle, electromyography studies prove that different exercises can emphasize different regions. The key is choosing movements that create maximum activation in the target area.
Here’s what science tells us about core training:
- Exercise Selection Matters: Bottom-up movements (lifting legs rather than torso) activate lower abdominal fibers more effectively
- Frequency vs Duration: Studies show 3-4 sessions per week of 10-15 minutes beats daily hour-long sessions
- Progressive Overload: Your core adapts in 6-8 weeks, requiring progression to continue improving
- Functional Benefits: Strong core muscles reduce lower back pain by 30-50% according to physical therapy research
One crucial point: abdominal exercises alone don’t reduce belly fat. That requires a caloric deficit through diet and overall activity. But these exercises will strengthen the muscles underneath, improving posture and function regardless of body fat percentage.
Your 10-Minute Lower Ab Workout
Here’s how this works:
Total Time: 10 minutes
Format: Circuit style
Work: 45 seconds per exercise
Rest: 15 seconds between exercises
Rounds: Complete the circuit twice
Focus on slow, controlled movements. Feel your abs working with each rep. This isn’t about speed – it’s about quality.
Your mind-muscle connection matters here. Really think about your core doing the work. If you can’t feel your abs, slow down or modify the exercise.
The 5-Exercise Core Routine
Exercise 1: Reverse Crunch
Muscles Worked: Lower rectus abdominis, transverse abdominis Difficulty: Beginner to Intermediate
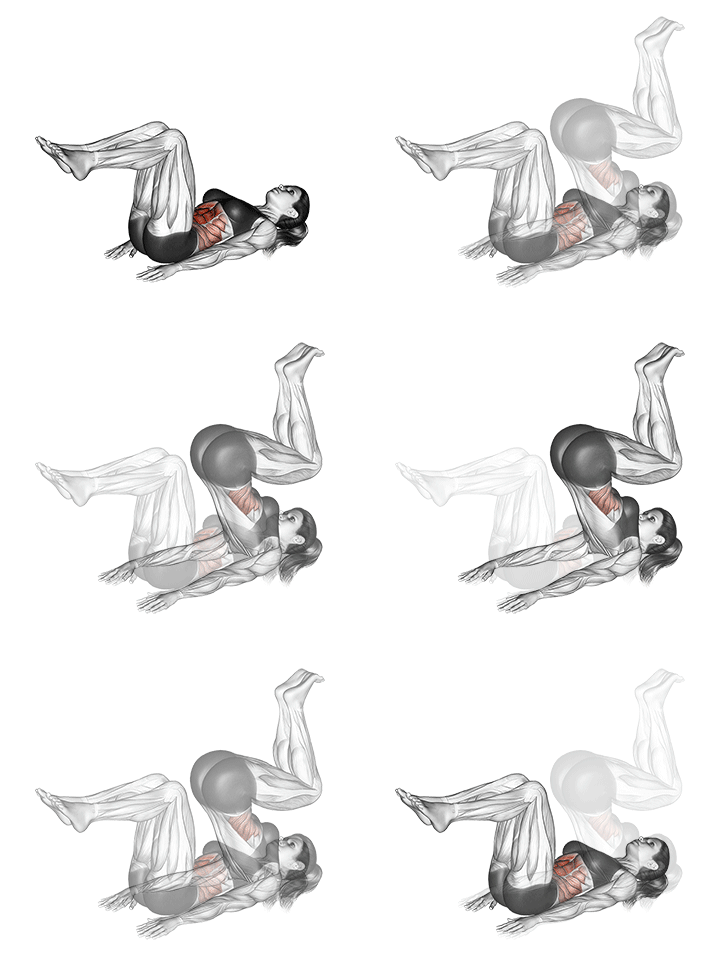
Lie on your back with knees bent at 90 degrees. Your shins should be parallel to the floor. Place your arms at your sides for stability.
Exhale and contract your abs to lift your hips off the floor. Your knees move toward your chest, but your upper back stays down. Inhale as you slowly lower your hips back to the starting position.
Breathing Pattern: Exhale on the lift, inhale on the lower Pro Tip: Don’t swing your legs. The movement comes from your abs contracting, not momentum. If you’re using your hip flexors more than your abs, you’re doing it wrong.
Common Mistakes:
- Using momentum instead of muscle control
- Lifting shoulders off the ground
- Holding your breath during the movement
Progression Options:
- Easier: Keep feet on floor, just lift knees toward chest
- Harder: Extend legs straight up during the movement
Form Checklist:
✓ Lower back pressed to floor
✓ Knees at 90 degrees
✓ Controlled movement
✓ Breathing coordinated with movement
✗ Using momentum
✗ Neck strain
✗ Shoulders lifting off floor
Exercise 2: Leg Raises
Muscles Worked: Lower rectus abdominis, hip flexors, deep core Difficulty: Intermediate
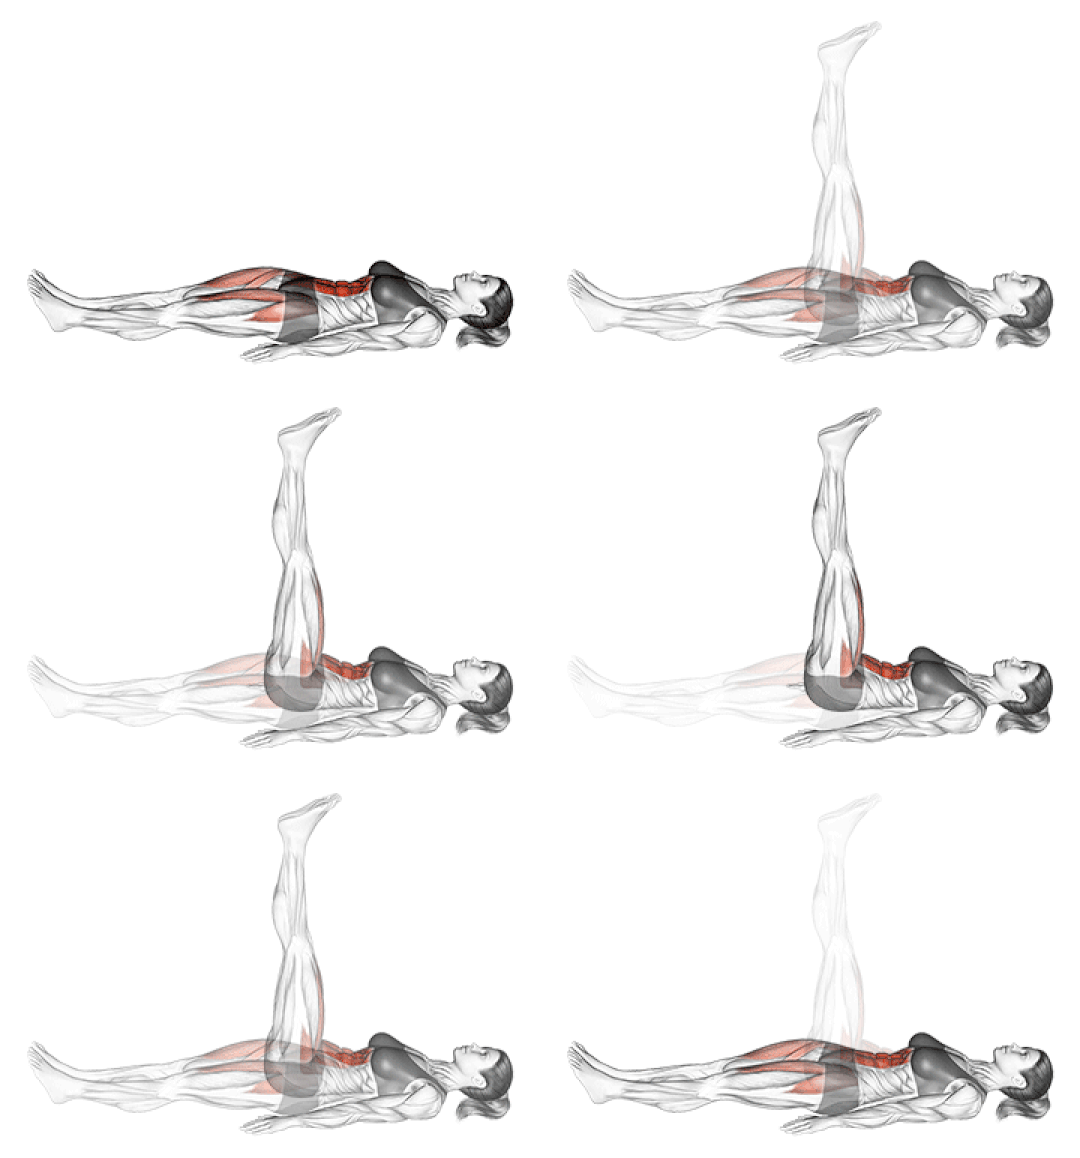
Lie flat on your back with legs straight. Put your hands under your lower back for support if needed. Keep your arms pressed into the floor.
Slowly raise your legs to about 90 degrees. Your feet should point toward the ceiling. Lower them back down with control, stopping just before your heels touch the floor.
Breathing Pattern: Exhale as legs rise, inhale as they lower Pro Tip: Your lower back must stay pressed into the floor. If it starts to arch, don’t lower your legs as far. It’s better to do a smaller range of motion correctly than a full range incorrectly.
Common Mistakes:
- Allowing lower back to arch off the floor
- Dropping legs too quickly
- Lifting head and neck during movement
Progression Options:
- Easier: Bend knees slightly or raise legs only to 45 degrees
- Harder: Add ankle weights or hold legs at bottom for 2 seconds
Form Checklist:
✓ Lower back flat against floor
✓ Slow, controlled movement
✓ Full range of motion (when possible)
✓ Steady breathing
✗ Back arching
✗ Using momentum
✗ Neck tension
Exercise 3: Mountain Climbers (Controlled)
Muscles Worked: Entire core, shoulders, hip flexors Difficulty: Intermediate
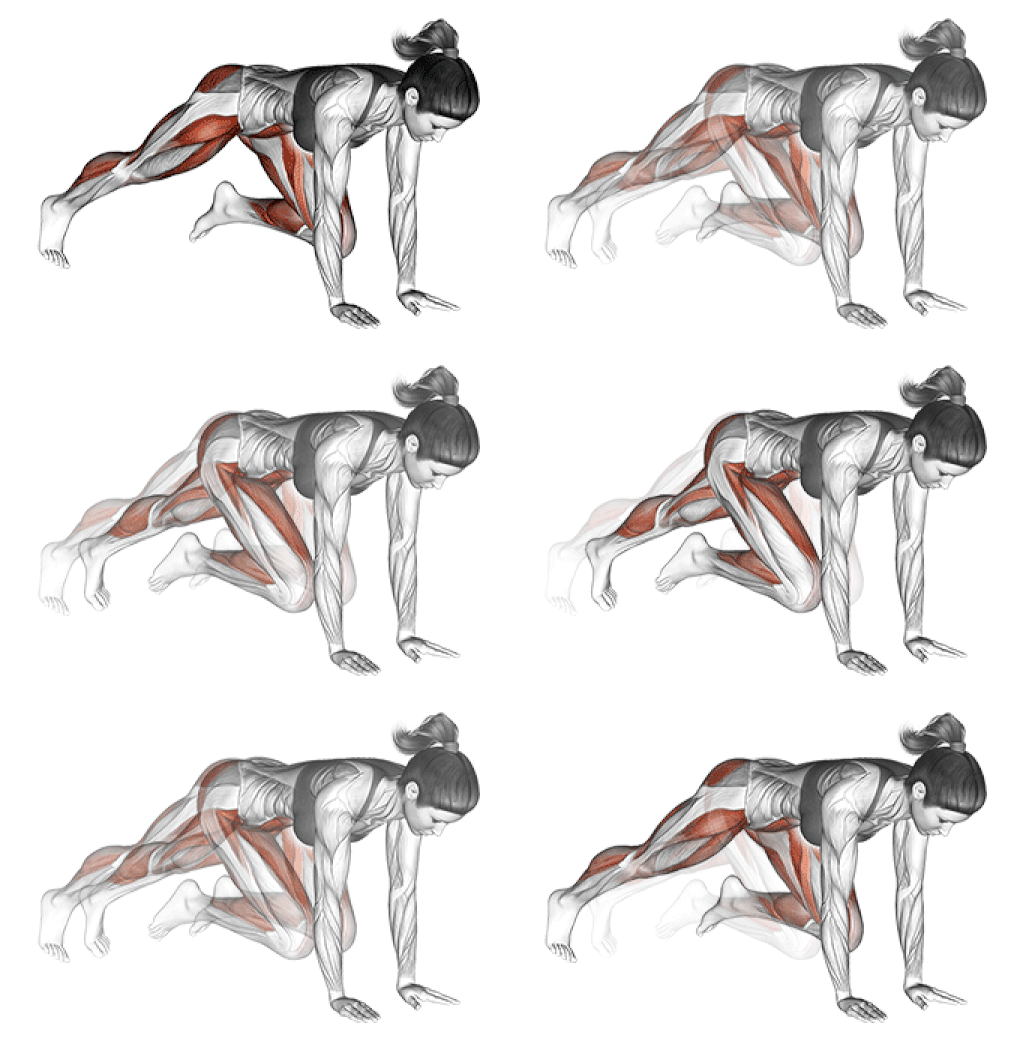
Start in a high plank position. Your hands should be directly under your shoulders. Keep your body in a straight line from head to heels.
Slowly bring your right knee toward your chest. Return it to the starting position. Now bring your left knee toward your chest. This isn’t cardio – move deliberately.
Breathing Pattern: Natural breathing, don’t hold your breath Pro Tip: Keep your hips level. Don’t let them rise up or sag down. The slower you go, the harder your abs have to work to maintain stability.
Common Mistakes:
- Moving too fast and losing control
- Allowing hips to rise or sag
- Putting too much weight on arms
Progression Options:
- Easier: Place hands on elevated surface like a couch
- Harder: Add a push-up between each knee drive
Form Checklist:
✓ Straight line from head to heels
✓ Controlled knee movement
✓ Hips level throughout
✓ Core engaged constantly
✗ Sagging hips
✗ Raised butt
✗ Moving too fast
Exercise 4: Scissor Kicks
Muscles Worked: Lower rectus abdominis, hip flexors, inner thighs Difficulty: Intermediate
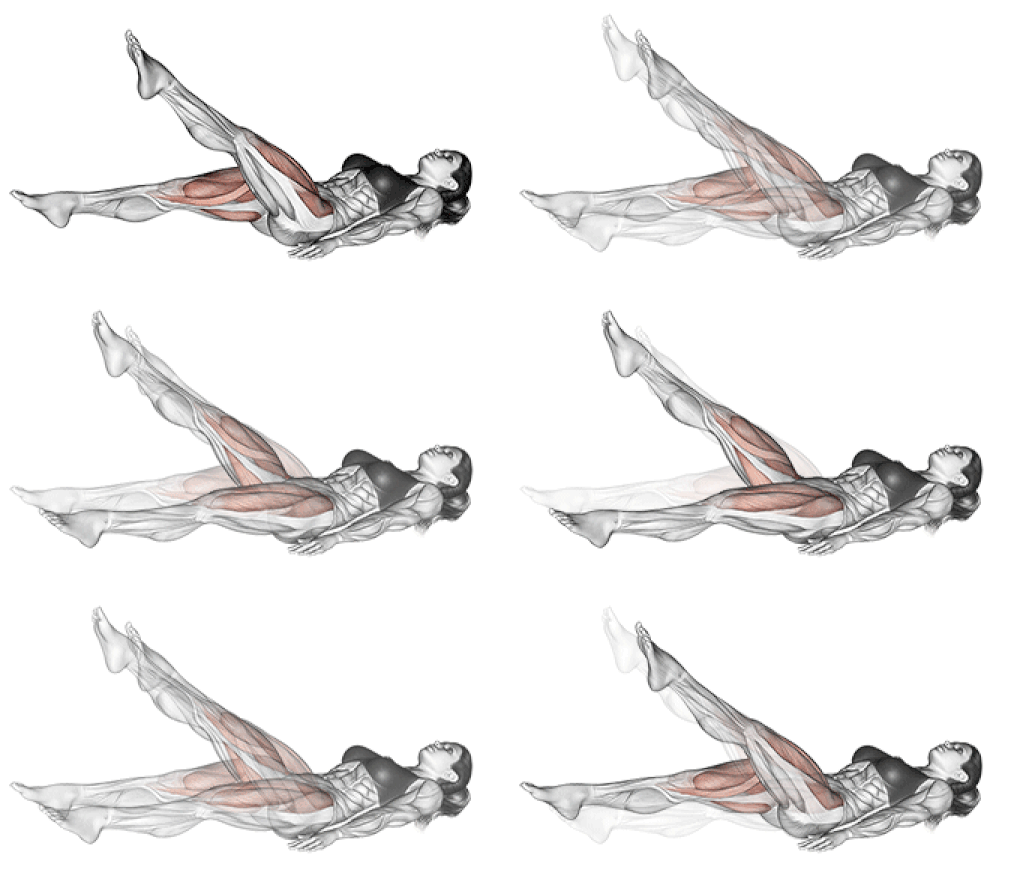
Lie on your back with legs extended. Lift your legs a few inches off the floor. Your hands can be at your sides or under your lower back for support.
Make small, alternating scissor motions with your legs. One leg goes slightly higher while the other goes slightly lower. Keep switching.
Breathing Pattern: Steady, natural breathing throughout Pro Tip: The lower your legs are to the floor, the harder this gets. Find a height where you can keep good form. Your back shouldn’t arch at all.
Common Mistakes:
- Making movements too large
- Allowing lower back to arch
- Moving legs too fast
Progression Options:
- Easier: Keep legs higher off the floor
- Harder: Lower legs closer to floor or add ankle weights
Form Checklist:
✓ Small, controlled movements
✓ Lower back pressed to floor
✓ Steady leg height
✓ Continuous motion
✗ Large leg movements
✗ Back arching
✗ Jerky motions
Exercise 5: Dead Bug
Muscles Worked: Transverse abdominis, multifidus, pelvic floor Difficulty: Beginner to Intermediate
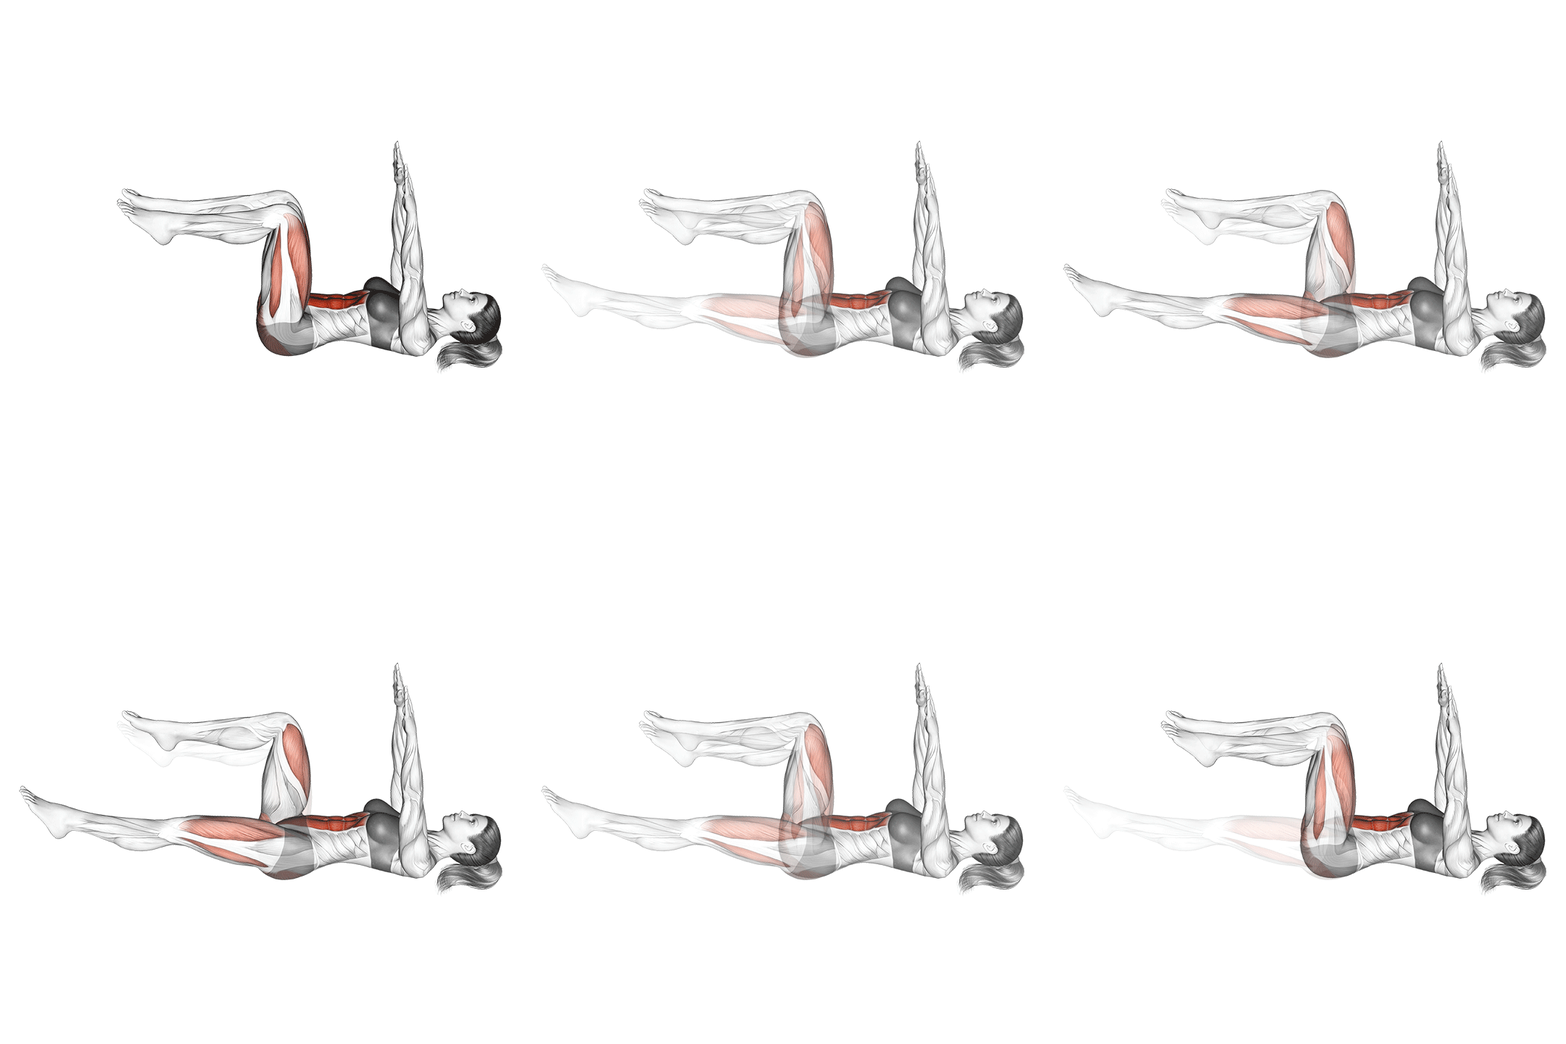
Lie on your back with arms reaching toward the ceiling. Bend your knees to 90 degrees so your shins are parallel to the floor.
Slowly lower your right arm toward the floor behind your head while extending your left leg toward the floor. Return to center. Now switch sides – left arm back, right leg out.
Breathing Pattern: Exhale as you extend, inhale as you return Pro Tip: Your torso shouldn’t move at all. Imagine balancing a cup of water on your stomach. This exercise targets your transverse abdominis – the deep muscle that acts like a natural weight belt.
Common Mistakes:
- Allowing torso to twist or move
- Moving too quickly
- Not maintaining opposite arm/leg pattern
Progression Options:
- Easier: Move only arms or only legs, not both
- Harder: Hold the extended position for 3-5 seconds
Form Checklist:
✓ Torso completely still
✓ Opposite arm and leg moving
✓ Slow, controlled movement
✓ Lower back flat
✗ Torso twisting
✗ Both sides moving together
✗ Rushing the movement
10-Minute Core Workout Timer
Today's Complete Workout:
🎉 Workout Complete!
Outstanding work! You've completed your 10-minute core routine.
Your abs and deep core muscles are stronger already. Keep this up 3-4 times per week for best results.
Lower Ab Exercises vs Upper Ab Exercises: What’s the Difference?
Many people ask if there’s really a difference between upper and lower ab exercises. Here’s what research shows:
| Exercise Type | Primary Focus | Best Exercises | EMG Activity Level |
|---|---|---|---|
| Lower Ab Focus | Lower rectus abdominis | Reverse crunches, leg raises | 90-100% activation |
| Upper Ab Focus | Upper rectus abdominis | Traditional crunches, sit-ups | 70-85% activation |
| Full Core | Entire core system | Planks, dead bugs | 80-95% activation |
The key difference isn’t anatomy – it’s biomechanics. When you lift your legs (bottom-up), you emphasize the lower fibers more. When you lift your torso (top-down), you emphasize the upper fibers more.
But here’s what matters most: your core works as a system. The best programs include exercises that target all areas plus the deep stabilizing muscles.
Equipment-Free Alternatives
Want more variety? Here are alternatives that work the same muscles:
| Our Exercise | Alternative Option | Difficulty | Focus Area | Why It Works |
|---|---|---|---|---|
| Reverse Crunch | Bicycle Crunch | Same | Lower abs + obliques | Adds rotation component |
| Leg Raises | Flutter Kicks | Easier | Lower abs | Smaller range of motion |
| Mountain Climbers | High Plank Hold | Easier | Core stability | Isometric challenge |
| Scissor Kicks | Single Leg Lower | Harder | Lower abs + hip flexors | Unilateral challenge |
| Dead Bug | Bird Dog | Same | Core stability | Quadruped variation |
Expected Results Timeline
Here’s what research and experience tell us about core training progress:
| Timeframe | What to Expect | Measurable Changes | Key Markers |
|---|---|---|---|
| Week 1-2 | Learning form, mild soreness | Can complete full routine | Less shaking during exercises |
| Week 3-4 | Increased endurance | Hold positions longer | Can maintain form for full 45 seconds |
| Week 5-6 | Strength gains | Ready for progressions | Exercises feel easier |
| Week 7-8 | Functional improvements | Better posture, less back pain | Daily activities feel easier |
| Week 9-12 | Advanced strength | Need harder variations | Can progress to advanced moves |
Remember: visible abs depend on body fat percentage, not just muscle strength. This timeline reflects functional improvements and muscle development.
Fueling Your Core: Nutritional Support
Your muscles need proper fuel to grow stronger. Here’s how nutrition supports your core training:
Pre-Workout (30-60 minutes before)
- Light carbs for energy: banana, apple, or handful of dates
- Hydration is crucial: 8-16 oz water
- Avoid large meals that can cause cramping
Post-Workout (within 30 minutes)
- Protein for muscle repair: 15-20g from Greek yogurt, protein smoothie, or eggs
- Carbs to replenish energy: fruit, oatmeal, or whole grain toast
- Continue hydrating: replace fluids lost during exercise
Daily Nutrition for Core Health
| Nutrient | Why It Matters | Best Sources |
|---|---|---|
| Protein | Muscle repair and growth | Lean meats, fish, eggs, legumes |
| Magnesium | Muscle function and recovery | Spinach, nuts, seeds, dark chocolate |
| Vitamin D | Muscle strength and function | Fatty fish, fortified foods, sunlight |
| Omega-3s | Reduces inflammation | Salmon, walnuts, chia seeds |
| Water | Muscle function and recovery | Plain water, herbal teas |
Sample Core-Supporting Meals
Breakfast: Scrambled eggs with spinach and avocado on whole grain toast Lunch: Grilled salmon salad with mixed greens and pumpkin seeds
Dinner: Lean chicken with quinoa and roasted vegetables Snacks: Greek yogurt with berries, handful of almonds, or apple with almond butter
Injury Prevention and Safety
Core training should make you feel stronger, not hurt. Here’s how to stay safe:
Red Flags – Stop Immediately If You Feel:
- Sharp pain in your lower back
- Neck pain or strain
- Dizziness or nausea
- Pain that gets worse during the exercise
Common Issues and Solutions
Lower Back Pain During Exercises:
- Cause: Usually from arching your back
- Fix: Keep lower back pressed to floor, modify range of motion
- Alternative: Try exercises with knees bent
Neck Strain:
- Cause: Pulling on neck or lifting head unnecessarily
- Fix: Keep head neutral, look at ceiling
- Alternative: Place small pillow under head
Hip Flexor Dominance:
- Cause: Hip muscles taking over from weak abs
- Fix: Focus on initiating movement from core, not legs
- Alternative: Start with bent-knee versions
Modifications for Common Conditions
If You Have Lower Back Issues:
- Keep knees bent during leg exercises
- Place small pillow under lower back
- Reduce range of motion
- Focus on dead bug and modified reverse crunch
If You’re a Beginner:
- Start with 30 seconds instead of 45
- Take longer rest periods (30 seconds)
- Do only one round initially
- Master form before increasing difficulty
If You’re Pregnant:
- Consult your doctor first
- Avoid exercises lying on your back after first trimester
- Focus on standing core exercises
- Listen to your body and modify as needed
Beyond the 10 Minutes: Getting Maximum Results
Consistency Beats Intensity
Research consistently shows that regular, moderate exercise beats sporadic intense sessions. Your goal is 3-4 sessions per week, not daily marathon workouts.
The Role of Overall Activity
This 10-minute routine is most effective when combined with:
- Regular walking: Aim for 150 minutes per week
- Strength training: 2-3 sessions per week for other muscle groups
- Flexibility work: Daily stretching or yoga
- Adequate sleep: 7-9 hours per night for recovery
Diet and Visible Abs
If your goal is visible abs, understand that exercise alone won’t get you there. Body fat percentage determines ab visibility:
- Men: Usually need 10-15% body fat to see abs
- Women: Usually need 16-20% body fat to see abs
This requires a sustained caloric deficit through diet and increased overall activity.
When to Progress
You’re ready for harder variations when:
- You can complete the full routine with perfect form
- The exercises feel significantly easier
- You’re no longer sore the next day
- You can hold each position for the full 45 seconds
Listen to Your Body
Good soreness (mild muscle fatigue) is normal. Bad pain (sharp, shooting, or worsening) means stop. Your body tells you what it needs – learn to listen.
10-Minute Workout Benefits: Why This Works
Short, focused workouts offer unique advantages backed by exercise science:
Time Efficiency
- Higher compliance rates: People stick with shorter workouts
- Less intimidating: 10 minutes feels achievable for everyone
- Easy to fit in: Can be done during TV commercial breaks
Physiological Benefits
- Improved core endurance: Ability to maintain good posture longer
- Better spinal stability: Reduced risk of back injury
- Enhanced functional movement: Daily activities become easier
- Postural improvements: Especially important for desk workers
Mental Health Benefits
- Increased confidence: Completing the routine builds self-efficacy
- Stress reduction: Exercise releases mood-boosting endorphins
- Better focus: Physical activity improves cognitive function
- Sense of accomplishment: Daily achievement boosts motivation
Long-term Health Impact
Strong core muscles contribute to:
- Reduced lower back pain (30-50% improvement in studies)
- Better balance and fall prevention
- Improved athletic performance in other activities
- Enhanced quality of life as you age
Home Core Workout Equipment: What You DON’T Need
One of the best parts about effective core training? You don’t need expensive equipment. Here’s what marketers try to sell you versus what actually works:
Equipment You DON’T Need:
- Ab wheels: Can cause back strain for beginners
- Sit-up benches: Encourage poor form and neck strain
- Ab belts: Don’t actually strengthen muscles
- Fancy machines: Expensive and take up space
- Weighted gear: Your body weight provides enough resistance
What You DO Need:
- Floor space: 6 feet by 3 feet is plenty
- Comfortable surface: Yoga mat or carpet
- Timer: Your phone works perfectly
- Motivation: The most important piece of equipment
Optional Comfort Items:
- Yoga mat: For cushioning and grip
- Small pillow: For head support if needed
- Water bottle: Stay hydrated during workouts
The beauty of bodyweight exercises is their simplicity and effectiveness. Master these movements, and you’ll have a stronger core than people spending hundreds on equipment.
Lower Ab Exercises for Beginners
New to core training? Start here with these beginner-friendly modifications:
Week 1-2: Foundation Building
- Work time: 30 seconds instead of 45
- Rest time: 30 seconds instead of 15
- Rounds: Complete only one circuit
- Focus: Perfect form over speed or intensity
Beginner Exercise Modifications:
Reverse Crunch (Beginner):
- Keep feet flat on floor
- Just bring knees toward chest
- Focus on the squeeze at the top
Leg Raises (Beginner):
- Bend knees to 90 degrees
- Raise and lower bent legs
- Use hands under lower back for support
Mountain Climbers (Beginner):
- Place hands on couch or sturdy surface
- Move very slowly and deliberately
- Focus on keeping hips level
Scissor Kicks (Beginner):
- Keep legs higher off the ground
- Make smaller movements
- Take breaks when needed
Dead Bug (Beginner):
- Start with arms only
- Add legs once you master arm movement
- Keep movements very small initially
Building Confidence
Remember, everyone starts somewhere. Focus on what your body can do today, not what you think it should be able to do. Every rep, no matter how modified, is building strength.
Conclusion
You don’t need hours at the gym for a strong core. You don’t need fancy equipment or endless sit-ups that hurt your neck.
This 10-minute routine targets the muscles that matter most. The ones that support your spine, improve your posture, and make you feel stronger in everything you do.
Start where you are. Use the modifications when you need them. Track your progress. Be consistent.
In 8 weeks, you’ll have a stronger, more stable core. Your back will feel better. You’ll stand taller. And you’ll prove to yourself that smart training beats long training every time.
FAQs
How long until I see results?
Most people notice improved core stability within 2-3 weeks. Visible changes depend on your starting point and body fat percentage. Functional improvements (better posture, less back pain) typically appear in 4-6 weeks.
Can I do this workout every day?
No. Your muscles need recovery time to get stronger. Stick to 3-4 times per week with at least one day of rest between sessions. You can do light walking or stretching on rest days.
What if I have lower back pain?
Stop any exercise that causes pain. Lower back discomfort during ab exercises usually means your form needs work. Focus on keeping your lower back pressed to the floor and consider easier modifications.
How do I know if I’m doing the exercises correctly?
You should feel the work in your abs, not your neck, back, or hip flexors. If an exercise feels wrong, slow down and check your form against our guidelines. When in doubt, choose the easier modification.
Is this workout enough for overall fitness?
This routine specifically targets core strength. For complete fitness, you’ll also need cardiovascular exercise (walking, swimming, cycling) and strength training for other muscle groups.
What if the exercises become too easy?
That’s great progress! Try these progressions:
- Increase work time to 60 seconds
- Decrease rest time to 10 seconds
- Add a third round
- Try the harder variations we’ve listed
Can I do these exercises if I’m pregnant?
Always consult your healthcare provider first. Generally, women who exercised before pregnancy can continue modified core work, but avoid exercises lying on your back after the first trimester.
Why am I not seeing visible abs?
Visible abs are primarily about body fat percentage, not muscle strength. You can have very strong abs that aren’t visible due to the fat layer above them. This workout will strengthen your core regardless of visibility.


