If you experience a sharp, stabbing pain just below your kneecap halfway through your morning run, you’re likely dealing with patellar tendonitis, also known as “jumper’s knee.” This overuse injury affects the patellar tendon, the thick band of tissue that connects your kneecap to your shinbone. While it’s common in basketball players and volleyball athletes, it doesn’t discriminate – runners, hikers, and weekend warriors all know this pain well.
With the right approach, you can reduce your pain, rebuild strength, and get back to the activities you love. This guide will give you a clear, actionable plan with 7 specific exercises designed to tackle patellar tendonitis head-on.
Quick self-assessment: is this really patellar tendonitis?
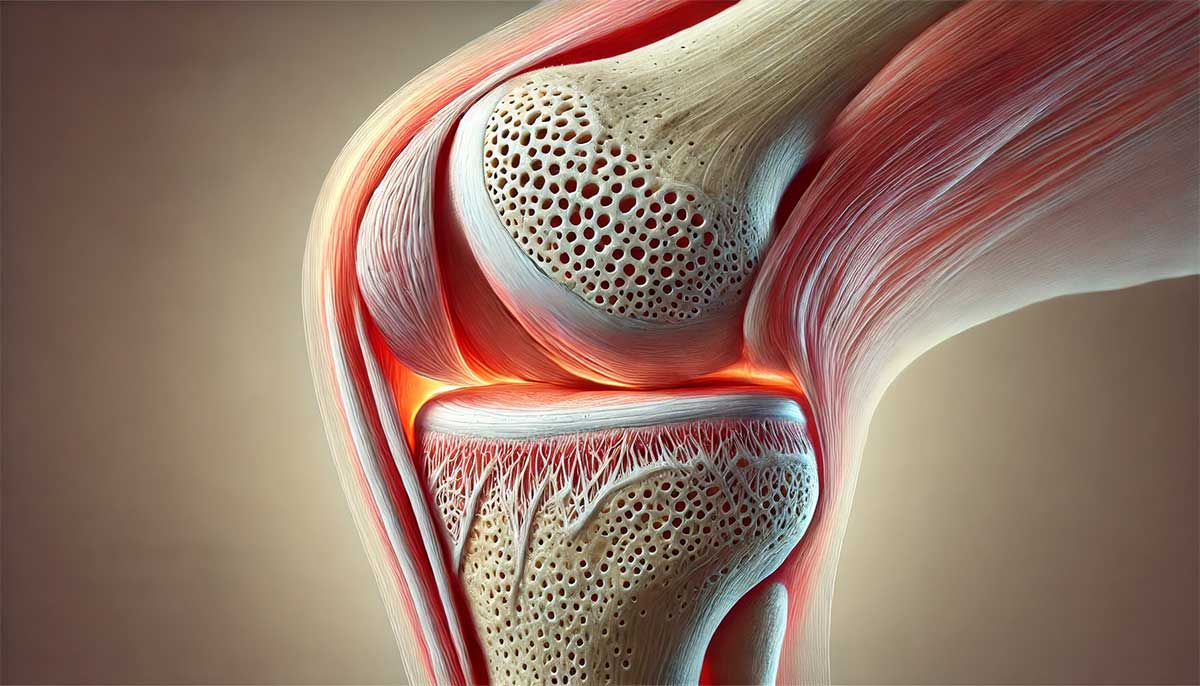
Before we list the exercises, let’s make sure we’re treating the right problem. Patellar tendonitis has specific characteristics that set it apart from other knee issues.
Pain location check
Where does it hurt?
- Pain directly below your kneecap (not above or to the sides)
- Tender spot you can pinpoint with one finger
- Pain that gets worse when you press on the area
Activity pattern test
When does it hurt most?
- Starting activities after sitting for a while
- Going up or down stairs
- Jumping or running
- Squatting down
- Morning stiffness that improves with gentle movement
Pain scale assessment
Rate your pain on a scale of 1-10:
- 1-3: Mild discomfort, doesn’t limit activities
- 4-6: Moderate pain, some activity limitation
- 7-8: Significant pain, major activity limitations
- 9-10: Severe pain, seek immediate medical attention
Red flags – see a doctor immediately if you have:
- Severe swelling or warmth around the knee
- Can’t bear weight on your leg
- Knee gives out or feels unstable
- Numbness or tingling
- Pain that wakes you up at night
Understanding your injury: what actually happens in patellar tendonitis
Your patellar tendon is like a strong rope that connects your kneecap to your shinbone. When you jump, run, or climb stairs, this tendon works overtime to control the movement of your leg.
The anatomy made simple
Think of your knee as a pulley system:
- Your quadriceps (front thigh muscles) are the motor
- Your kneecap is the pulley
- Your patellar tendon is the rope that does the heavy lifting
Common causes and risk factors
Training errors:
- Sudden increases in activity level
- Too much jumping or running on hard surfaces
- Poor warm-up routines
Muscle imbalances:
- Weak glute muscles
- Tight quadriceps or hamstrings
- Poor hip flexibility
Biomechanical issues:
- Flat feet or high arches
- Knee tracking problems
- Hip weakness affecting knee alignment
The healing process
Tendon healing happens in three phases:
- Inflammatory Phase (0-72 hours): Your body’s initial response
- Proliferation Phase (3 days – 6 weeks): New tissue formation
- Remodeling Phase (6 weeks – 6 months): Tissue strengthening and maturation
Exercise progression guide
The key to successful recovery is following a structured progression. This isn’t a race – it’s a methodical rebuilding process.
| Week | Primary Focus | Exercises to Include | Sets x Reps/Time | Frequency | Pain Level Goal |
|---|---|---|---|---|---|
| 1-2 | Pain Reduction | Isometric Quad Hold | 3-5 x 30-45 sec | 2-3x daily | 0-3/10 |
| 3-4 | Early Strengthening | + Glute Bridge, Wall Sit | 2-3 x 10-15 | Daily | 0-4/10 |
| 5-6 | Progressive Loading | + Eccentric Squats | 3 x 10-15 | 5x weekly | 0-5/10 |
| 7-8 | Advanced Strengthening | All exercises + variations | Varied progression | 4-5x weekly | 0-3/10 |
| 9+ | Maintenance/Prevention | Full routine + sport-specific | Maintenance level | 3-4x weekly | 0-2/10 |
| Pain Level (1-10) | Exercise Response | Action Required | Notes |
|---|---|---|---|
| 0-3 | Continue as planned | Progress as tolerated | Ideal range for exercise |
| 4-6 | Reduce intensity by 25% | Monitor closely next session | Still safe to exercise |
| 7-8 | Stop current exercise | Rest 24-48 hours, then retry | May need to regress |
| 9-10 | Stop all exercises | Seek medical evaluation | Possible re-injury |
Phase 1: pain relief exercises – first, let’s calm the pain
Before we jump into heavy lifting or intense stretching, we need to address your pain. The smartest approach starts with isometric exercises. These involve muscle contractions without any joint movement, which means you can strengthen your muscles while giving your irritated tendon a break.
Think of isometric exercises as a peace treaty between your muscles and your angry tendon. You’re building strength without the friction that comes with movement-based exercises.
Exercise 1: the isometric quad hold
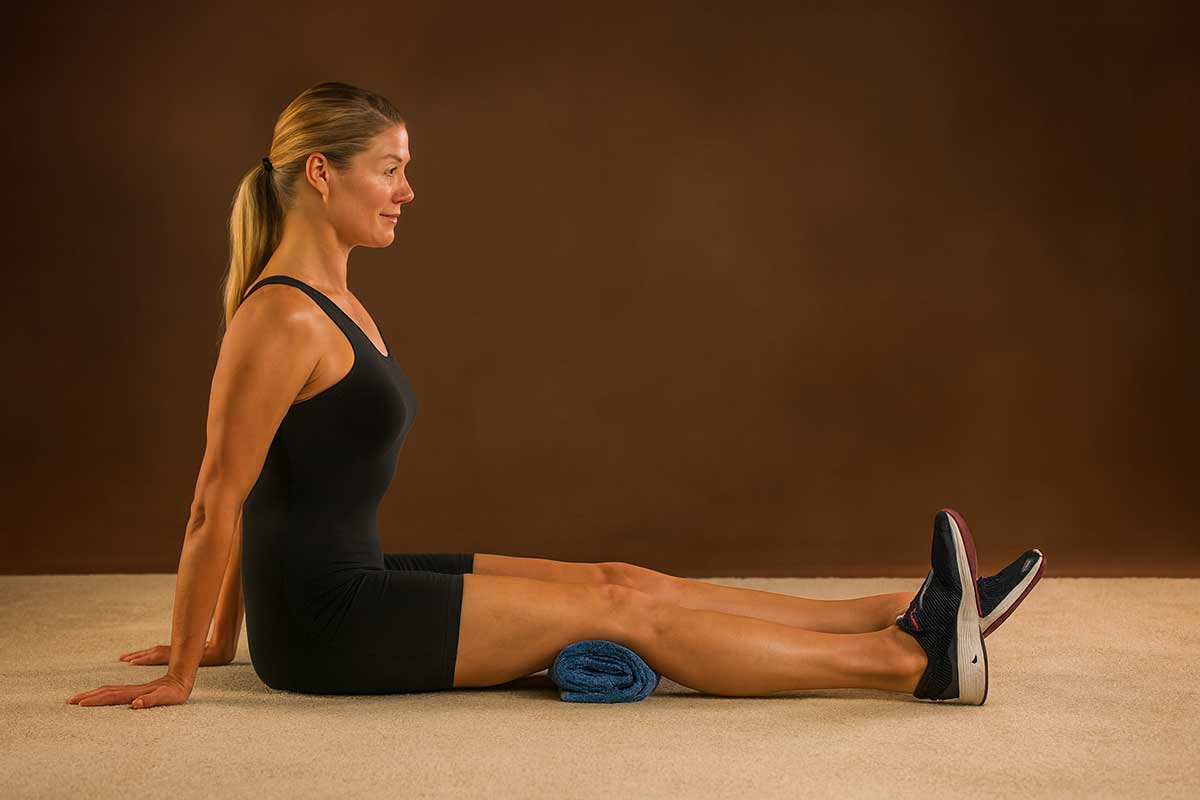
This exercise is your new best friend. Research shows that isometric contractions can actually reduce pain levels during and after the exercise – it’s like a natural pain medication that comes from your own muscles.
How to do it:
- Sit on the floor with your affected leg straight out in front of you
- Place a rolled towel under your knee for support
- Tighten your thigh muscle and push your knee down into the towel
- Hold this contraction for 30-45 seconds
- You should feel your quad muscle working, but your pain should decrease, not increase
- Rest for 15 seconds between holds
- Repeat 3-5 times
Progression options:
- Beginner: Hold for 20-30 seconds, 3 repetitions
- Intermediate: Hold for 45 seconds, 4 repetitions
- Advanced: Hold for 60 seconds, 5 repetitions
Common mistakes to avoid:
- Holding your breath (breathe normally throughout)
- Lifting your heel off the ground
- Pushing through increasing pain
Wall Variation: Stand with your back against a wall, affected leg straight. Press your knee back into the wall while tightening your quad muscle.
Pro-Tip: This exercise works like magic, but only if you do it right. The intensity should reduce your pain, not make it worse. If your pain increases, back off the pressure. You can do this multiple times throughout the day – it’s that gentle and effective.
Phase 2: strengthening exercises – build a strong foundation
Now that we’ve started calming the pain, it’s time to build the strong foundation your knee needs for long-term recovery. A stronger support system around your knee is your ticket to getting back to normal activities without fear.
Exercise 2: the eccentric decline squat
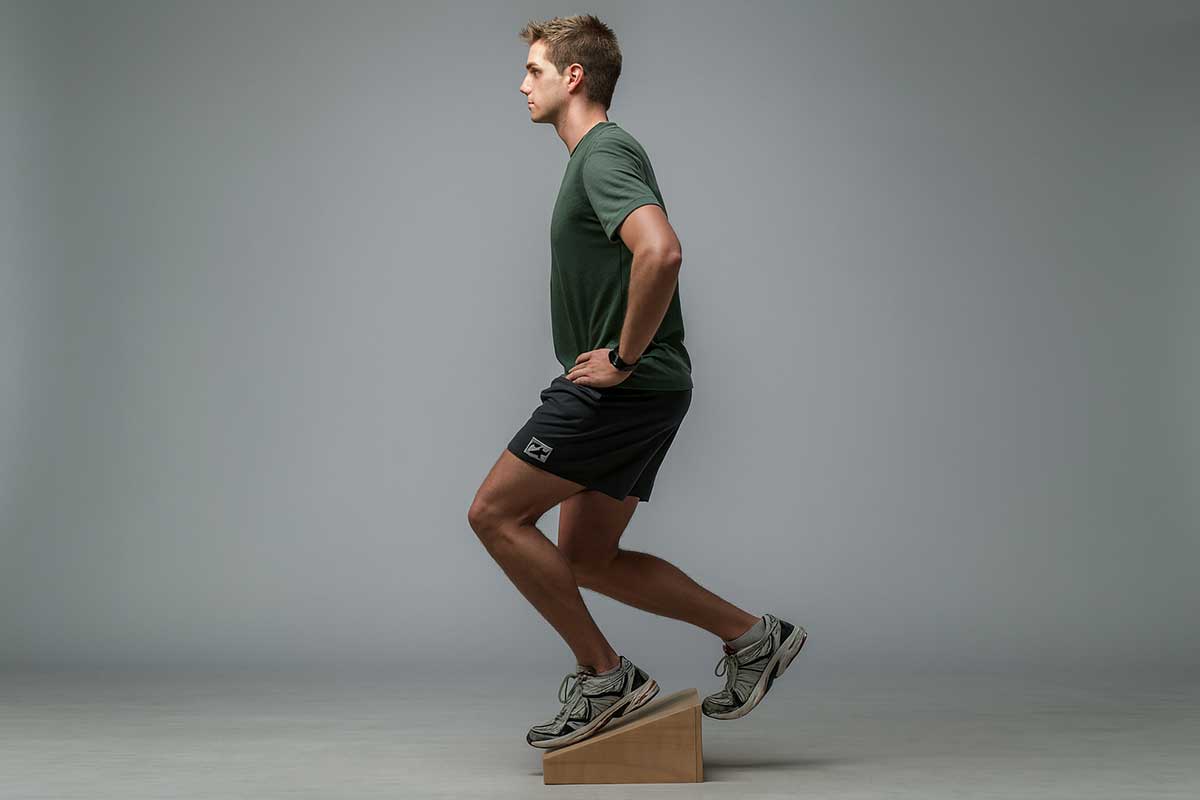
This exercise is the heavyweight champion of patellar tendonitis rehabilitation. Multiple research studies show that eccentric loading – slowly lengthening a muscle under tension – actually helps remodel and strengthen the tendon tissue itself.
Why it works: During the eccentric (lowering) phase, your tendon experiences controlled stress that stimulates healing and strengthening. This creates microscopic changes in the tendon that make it stronger and more resilient.
Equipment needed: Slant board, wedge, or thick books
How to do it:
- Stand on a slant board or small decline with your affected leg
- Keep your unaffected leg slightly behind for support
- Slowly lower yourself into a shallow squat over 3-4 seconds
- Focus on the slow, controlled descent – this is where the healing happens
- Use your unaffected leg to help push back up to starting position
- Start with 3 sets of 10 repetitions
Progression schedule:
- Week 1-2: Body weight only, 2 sets of 8-10
- Week 3-4: Body weight, 3 sets of 10-12
- Week 5-6: Add 5-10 lb weight, 3 sets of 10
- Week 7+: Progress weight as tolerated
Equipment alternatives:
| Recommended | Budget Alternative | DIY Option |
|---|---|---|
| Slant board ($20-40) | Thick books stacked | Wooden board + books underneath |
| Decline wedge | Small step/platform | Sturdy box |
| Dumbbells for weight | Water bottles | Backpack with books |
Pro-Tip: A slant board makes this exercise significantly more effective because it increases the stretch on your patellar tendon. If you don’t have one, you can use a thick book or small step, but consider investing in a slant board for best results.
Exercise 3: the glute bridge
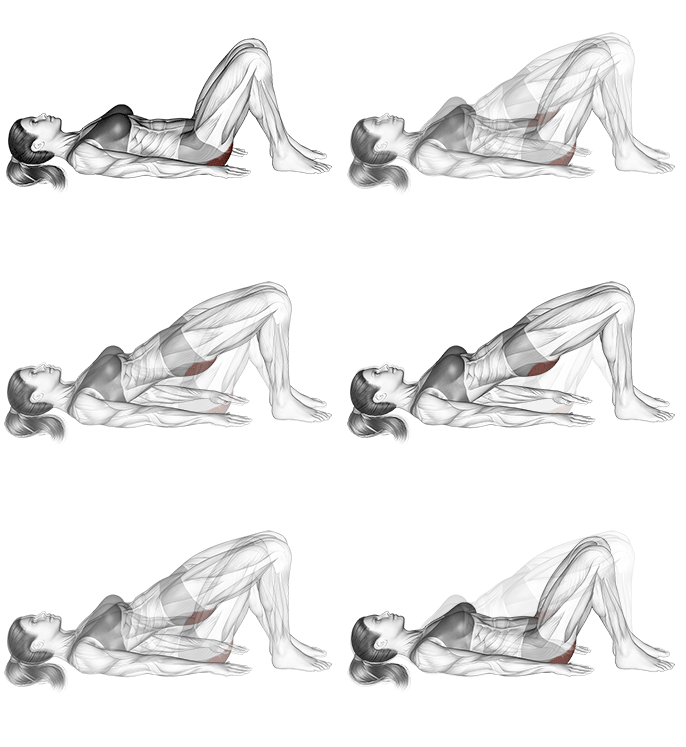
Your glutes are like the CEO of your lower body – when they’re not doing their job properly, everyone else has to work overtime. Weak glutes force your knees to handle more stress than they should, contributing to patellar tendon problems.
Why it works: Strong glutes provide stability and reduce the load on your knees during walking, running, and jumping activities. They also help maintain proper leg alignment.
How to do it:
- Lie on your back with knees bent, feet flat on the floor hip-width apart
- Squeeze your glutes and lift your hips up, creating a straight line from knees to shoulders
- Hold for 2-3 seconds at the top
- Lower slowly and repeat
- Start with 2 sets of 15 repetitions
Progression options:
- Beginner: Double-leg, 2 sets of 10-12
- Intermediate: Double-leg with 3-second holds, 2 sets of 15
- Advanced: Single-leg bridges, 2 sets of 8-10 each leg
Single-leg progression: Once the double-leg version becomes easy, try lifting one leg off the ground and performing the bridge on one leg.
Pro-Tip: Really focus on squeezing your glutes at the top of the movement. You should feel this in your backside, not your lower back. If you feel it in your back, focus more on the glute squeeze and consider reducing the range of motion.
Exercise 4: the wall sit
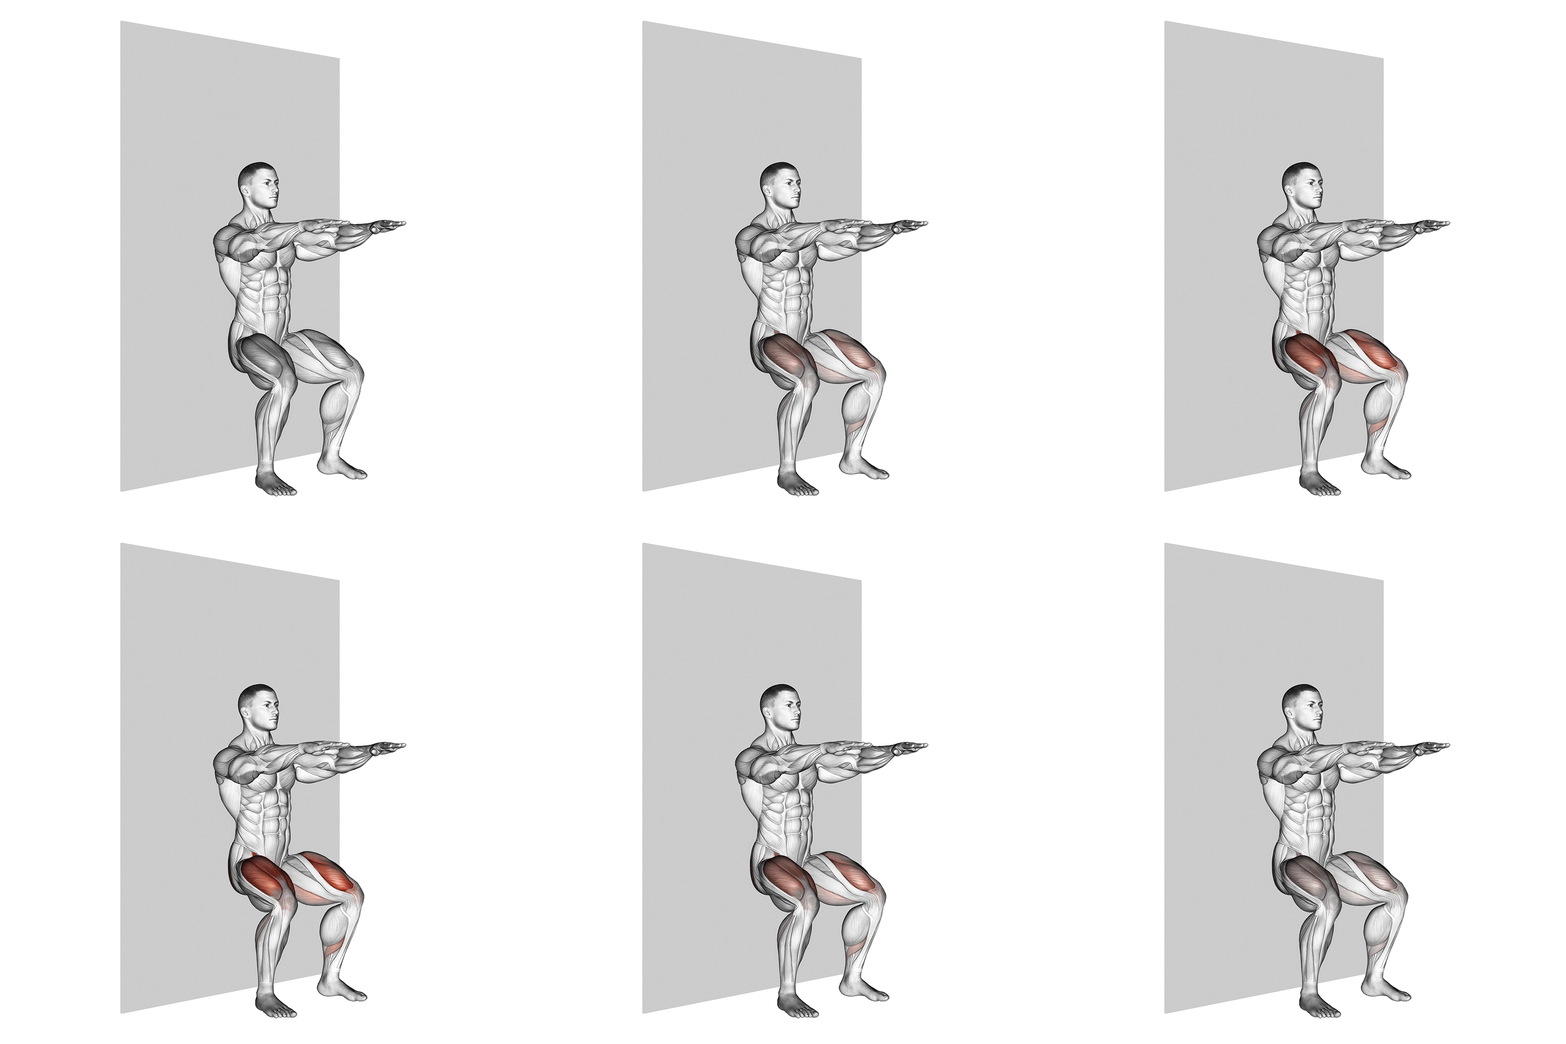
The wall sit is like a trust fall with a wall – it’s got your back while your quads do the work. This exercise builds the endurance your quadriceps need to support your knee during daily activities.
Why it works: It strengthens your quads in a controlled, low-impact way while teaching them to work efficiently for extended periods.
How to do it:
- Stand with your back against a wall
- Walk your feet out about 2 feet from the wall
- Slide down until your knees are at roughly a 90-degree angle (or higher if needed to manage pain)
- Keep your back flat against the wall
- Hold this position for 20-60 seconds
- Start with 2-3 holds
Progression timeline:
- Week 1: 20-30 seconds, 2 holds
- Week 2: 30-45 seconds, 2-3 holds
- Week 3: 45-60 seconds, 3 holds
- Week 4+: 60+ seconds or add single-leg variations
Pro-Tip: Don’t let your ego push you into a position that increases your pain. Start higher (less knee bend) and work your way down as your strength improves. Focus on form over duration.
Phase 3: flexibility and mobility – don’t forget to stretch
Tight muscles are like that friend who never shares – they hoard all the tension and pass the stress onto your joints. When your quads, hamstrings, and hip flexors are tight, they pull on your knee in ways that can aggravate your patellar tendon.
Exercise 5: the standing quad stretch
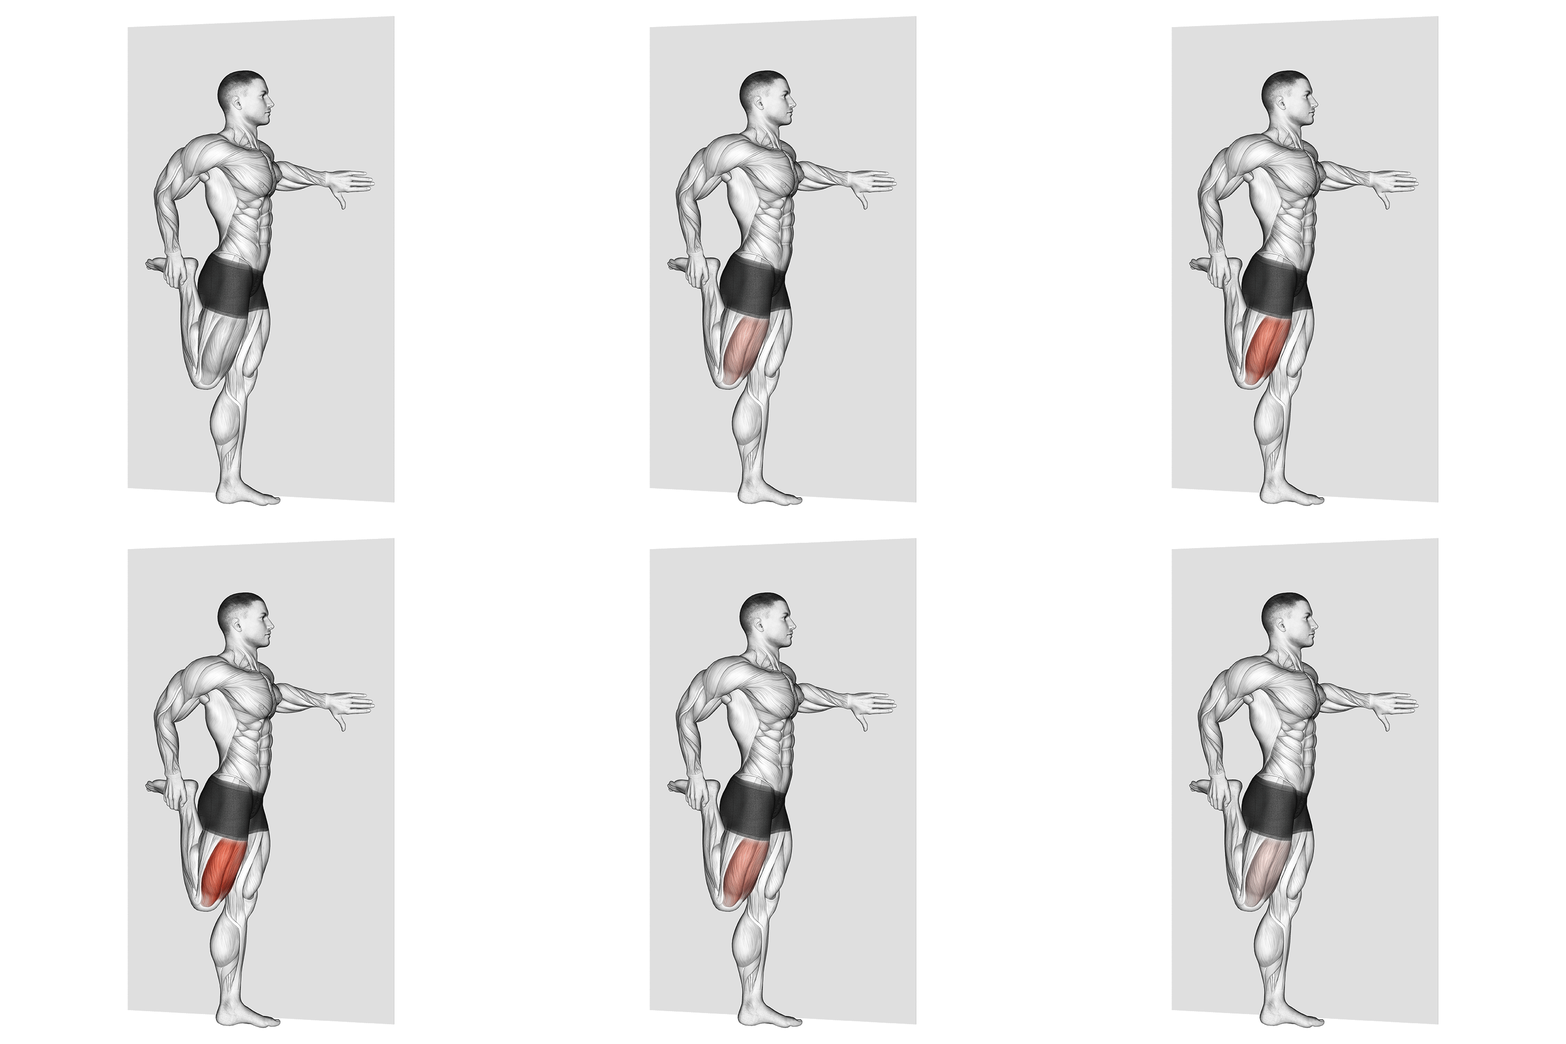
This classic stretch targets the very muscles you’ve been strengthening, helping them stay flexible and functional.
How to do it:
- Stand near a wall for balance support
- Bend your affected knee and grab your ankle behind you
- Gently pull your heel toward your glutes
- Keep your knees close together
- Hold for 30-45 seconds
- Repeat 2-3 times
Modifications:
- If you can’t reach your ankle: Use a towel or strap around your foot
- For balance issues: Hold onto a wall or chair
- For knee pain: Don’t pull as hard, focus on gentle tension
Pro-Tip: Don’t force this stretch. You should feel a gentle pull in the front of your thigh, not pain in your knee. The stretch should feel good, not painful.
Exercise 6: the seated hamstring stretch
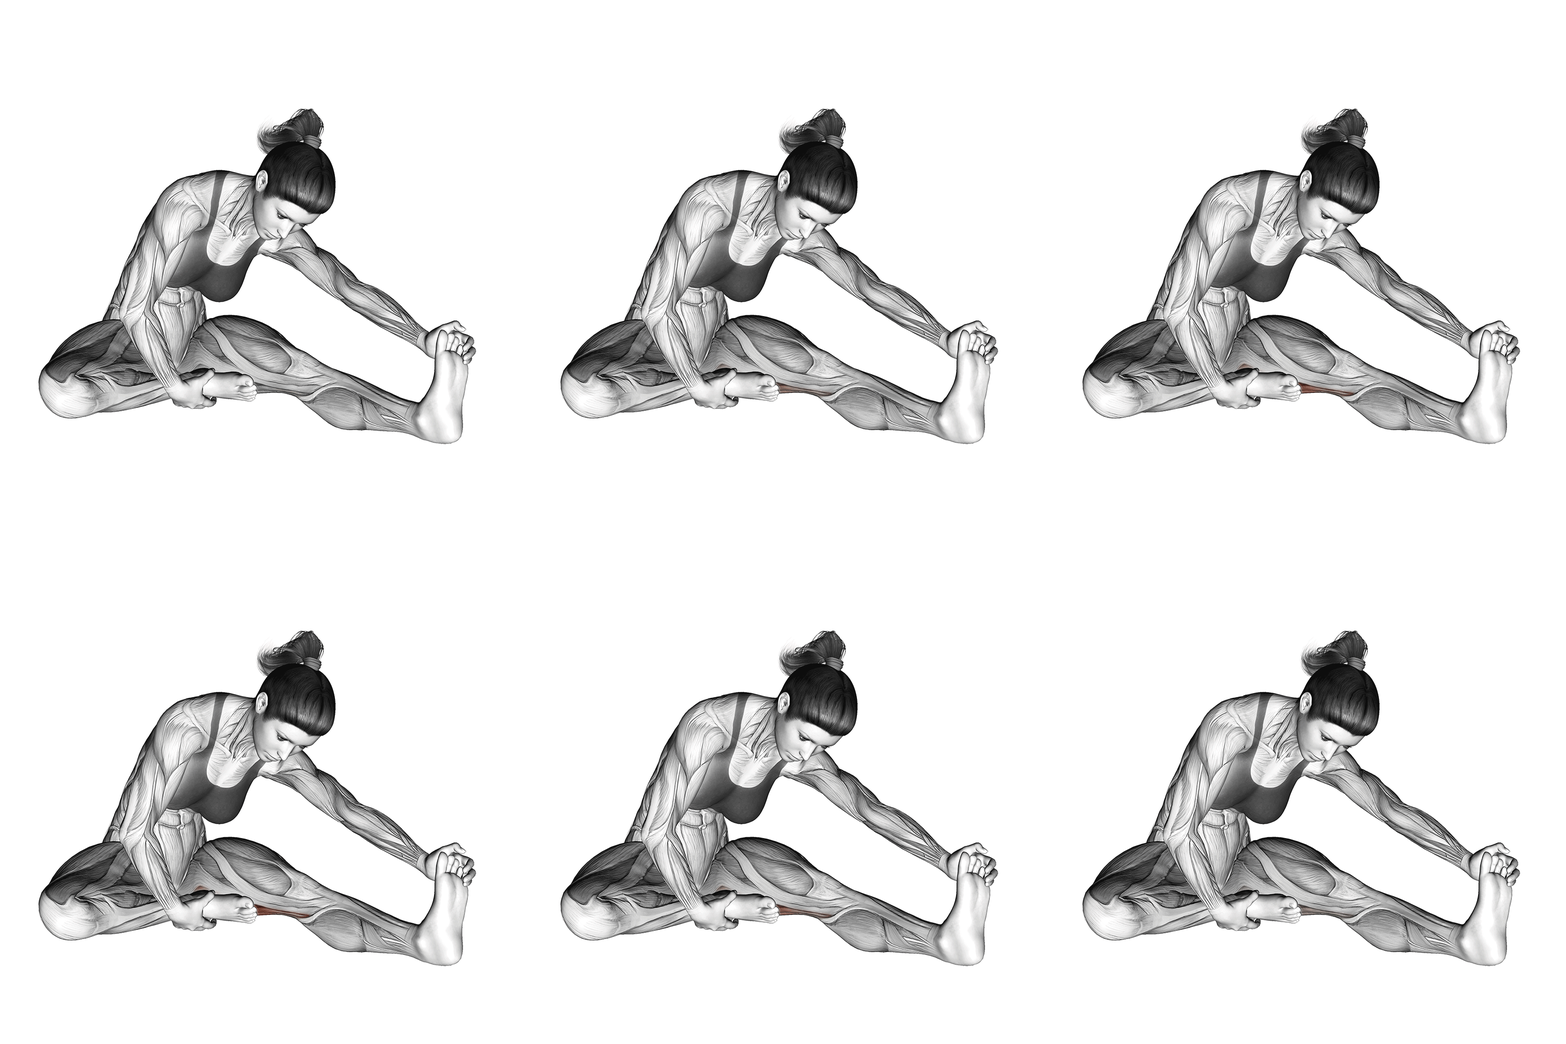
Tight hamstrings are sneaky contributors to knee problems. When they’re tight, they can alter your movement patterns and put extra stress on your patellar tendon.
How to do it:
- Sit on the floor with your affected leg straight out
- Keep your other leg bent with foot flat on the floor
- Sit up tall and slowly lean forward from your hips (not your back)
- Reach toward your toes without rounding your back
- Hold for 30-45 seconds
- Repeat 2-3 times
What you should feel:
- Gentle stretch behind your thigh
- No pain in your knee or lower back
- Ability to breathe comfortably
Pro-Tip: Keep your back straight throughout this stretch. It’s better to lean forward less with good form than to round your back trying to touch your toes.
Exercise 7: the kneeling hip flexor stretch

Hip flexors get tight from sitting too much, and tight hip flexors can contribute to poor movement patterns that stress your knees.
How to do it:
- Start in a lunge position with your affected leg behind you
- Lower your back knee to the ground
- Keep your torso upright
- Gently push your hips forward
- You should feel a stretch in the front of your hip on the kneeling side
- Hold for 30-45 seconds
- Repeat 2-3 times
Comfort modifications:
- Place a pillow under your back knee
- Hold onto a chair for balance
- Start with smaller movements and work up to deeper stretches
Pro-Tip: Don’t arch your back to increase the stretch. Keep your core engaged and let the stretch come from moving your hips forward.
Treatment protocols: recipe-style recovery plans
Morning pain relief protocol (5 minutes)
Best for: Morning stiffness and pain
You’ll need:
- Quiet space
- Towel
- 5 minutes
Instructions:
- Warm-up (1 minute): Gentle leg swings or marching in place
- Isometric Quad Hold (2 minutes): 3 x 30-45 seconds with 15-second rest
- Gentle Quad Stretch (2 minutes): Hold 45 seconds each leg
Serves: Anyone with morning knee stiffness
Best served: Upon waking, before daily activities
Storage tip: Repeat daily for best results
Post-workout recovery routine (15 minutes)
Best for: After running, sports, or gym sessions
You’ll need:
- Ice pack or frozen peas
- Comfortable floor space
- Pillow for support
Instructions:
- Cool down walk (5 minutes): Slow, easy pace
- Complete stretch sequence (8 minutes):
- Quad stretch: 90 seconds
- Hamstring stretch: 90 seconds
- Hip flexor stretch: 90 seconds
- Gentle movement between stretches
- Ice and elevation (10-15 minutes): Ice on knee, leg elevated
Best served: Immediately after exercise
Storage: Repeat after each workout session
Acute pain management protocol (20 minutes)
Best for: Pain flare-ups or bad days
You’ll need:
- Ice pack
- Comfortable seating
- Timer
Instructions:
- Rest and assess (5 minutes): Rate pain level, identify triggers
- Isometric holds only (10 minutes): Light intensity, multiple sets
- Ice application (15 minutes): On for 15, off for 15, repeat as needed
- Gentle movement (5 minutes): Easy walking or leg swings
Serves: Anyone experiencing a pain flare-up
Frequency: As needed during acute phases
Recovery timeline: what to expect
Understanding the typical recovery process helps set realistic expectations and prevents frustration.
Phase 1: acute pain management (weeks 1-2)
What’s happening: Initial inflammation is settling down
What you’ll feel:
- Pain may fluctuate day to day
- Morning stiffness common
- Some activities still cause pain
Exercise focus: Isometric holds and gentle stretching
Goals: Reduce pain from 7-8/10 to 4-5/10
Phase 2: early recovery (weeks 3-6)
What’s happening: Tissue healing and early strengthening
What you’ll feel:
- More consistent pain levels
- Improved tolerance for daily activities
- Less morning stiffness
Exercise focus: Add strengthening exercises
Goals: Pain consistently below 5/10, improved function
Phase 3: progressive loading (weeks 6-12)
What’s happening: Tendon remodeling and strengthening
What you’ll feel:
- Significant improvement in daily activities
- Occasional mild pain with challenging activities
- Increased confidence in knee stability
Exercise focus: Full exercise program with progressions
Goals: Return to most activities, pain below 3/10
Phase 4: return to full activity (3-6 months)
What’s happening: Full tissue healing and strengthening
What you’ll feel:
- Minimal to no pain with most activities
- Confidence returning to sports/running
- Occasional minor soreness with intense activities
Exercise focus: Sport-specific training, maintenance program
Goals: Full return to desired activities
Signs you’re improving
- Week 1-2: Can perform daily activities with less pain
- Week 3-4: Stairs become easier, less morning stiffness
- Week 5-6: Can perform exercises without increasing pain
- Week 7-8: Improved strength in wall sits and bridges
- Month 3+: Can jog short distances or play recreational sports
Warning signs of setbacks
- Pain consistently increases over several days
- New areas of pain develop
- Unable to perform exercises you could do previously
- Significant swelling or warmth returns
Activity modification guidelines
Not all activities are created equal when you’re recovering from patellar tendonitis. Here’s your guide to what’s safe when.
| Activity | Acute Phase (Weeks 1-2) | Recovery Phase (Weeks 3-6) | Return Phase (6+ Weeks) |
|---|---|---|---|
| Walking | Short distances, flat surfaces | Normal distances, gentle hills | No restrictions |
| Running | Avoid completely | Water running, treadmill walk | Short distances, soft surfaces |
| Stairs | Use handrail, step up with good leg first | Normal pace, still use rail | No restrictions |
| Jumping | Completely avoid | Static jump holds only | Progressive small jumps |
| Deep squats | Avoid | Partial range (45 degrees) | Full range as tolerated |
| Sports | Avoid all | Walking-based sports only | Non-jumping sports first |
| Cycling | Stationary bike, low resistance | Road cycling, avoid hills | Normal cycling |
| Swimming | Gentle pool walking | All strokes except aggressive kicking | No restrictions |
Return-to-running guidelines
Running is often the activity people want to get back to most. Here’s a safe progression:
Prerequisites before starting:
- Can walk 30 minutes without pain increase
- Can perform single-leg eccentric squats pain-free
- Pain consistently below 3/10
Week 1-2: walk-run program
- 5-minute warm-up walk
- Alternate 1 minute running, 2 minutes walking
- Repeat 5-8 times
- 5-minute cool-down walk
Week 3-4: increase running intervals
- 5-minute warm-up walk
- Alternate 2 minutes running, 1 minute walking
- Repeat 6-8 times
- 5-minute cool-down walk
Week 5+: continuous running
- Start with 15-20 minutes continuous
- Increase by 10% each week
- Monitor pain levels closely
What NOT to do: activities and mistakes to avoid
Sometimes knowing what not to do is just as important as knowing what to do. These activities and mistakes can set back your recovery and potentially make your pain worse.
Activities to avoid during recovery
Completely avoid during acute phase (weeks 1-2):
- Deep squats and lunges that increase knee pain
- Jumping exercises and plyometrics
- Running through sharp pain
- Aggressive stretching that causes pain
- Activities that make pain worse the next day
Use caution with these activities:
- Kneeling directly on the affected knee
- Prolonged sitting without movement
- Sudden increases in activity level
- High-impact sports before full recovery
Common recovery mistakes
Mistake #1: Doing too much too soon
- Starting with advanced exercises when still in pain
- Returning to full activity before adequate healing
- Ignoring pain signals during exercise
Mistake #2: Inconsistent exercise routine
- Doing exercises only when pain is bad
- Skipping the boring exercises (stretches, holds)
- Not following the progressive schedule
Mistake #3: Focusing only on the knee
- Ignoring hip and glute strengthening
- Not addressing muscle imbalances
- Forgetting about flexibility components
Mistake #4: Poor pain monitoring
- Pushing through significant pain increases
- Not tracking pain levels and patterns
- Ignoring pain that’s getting worse
Listen to your body guidelines
Green light (safe to continue):
- Mild discomfort that doesn’t increase during exercise
- Pain that returns to baseline within 2 hours
- Gradual improvement over days/weeks
Yellow light (proceed with caution):
- Pain that increases during exercise but returns to baseline
- Stiffness that improves with gentle movement
- Some good days, some bad days
Red light (stop and reassess):
- Sharp, severe pain during any activity
- Pain that’s consistently getting worse
- Swelling, warmth, or significant changes in symptoms
Complementary Treatments and Support
While exercises are the foundation of patellar tendonitis treatment, several additional strategies can support your recovery.
Heat and cold therapy guidelines
Ice application protocol:
- Use after activities that aggravate symptoms
- Apply for 15-20 minutes at a time
- Never apply ice directly to skin (use a thin towel)
- Most helpful during the first 2-3 weeks
Heat application protocol:
- Use before exercises to warm tissues
- Apply for 10-15 minutes before activity
- Avoid if there’s significant swelling
- Helpful throughout recovery process
Over-the-counter pain management
NSAIDs (ibuprofen, naproxen):
- Can help reduce pain and inflammation
- Use lowest effective dose for shortest time needed
- Take with food to protect stomach
- Consult healthcare provider if using regularly
Topical pain relievers:
- Can provide localized relief
- Generally safer than oral medications
- Good option for people who can’t take oral NSAIDs
Supportive equipment and aids
| Equipment | Purpose | When to Use | Effectiveness |
|---|---|---|---|
| Patellar strap/band | Reduces tendon stress | During activities | Moderate – good for some people |
| Knee sleeve | Provides warmth, mild support | During exercise or daily activities | Low-moderate |
| Kinesiology tape | May reduce pain, improve awareness | During activities | Variable |
| Heel lift | Reduces tendon stretch | In shoes during acute phase | Low-moderate |
Lifestyle modifications for recovery
Sleep and recovery:
- Aim for 7-9 hours of quality sleep
- Sleep position: avoid pressure on affected knee
- Consider using a pillow between knees if side sleeping
Nutrition for tendon health:
- Adequate protein intake (0.8-1g per kg body weight)
- Anti-inflammatory foods: fatty fish, berries, leafy greens
- Stay well hydrated
- Consider vitamin C and collagen supplements (consult healthcare provider)
Stress management:
- High stress can impair healing
- Consider relaxation techniques, meditation, or counseling
- Maintain social activities that don’t aggravate symptoms
Advanced exercise progressions
Once you’ve mastered the basic exercises and your pain is consistently low, you can progress to more challenging variations.
Advanced eccentric squat variations
Single-leg eccentric with weight:
- Hold dumbbells or wear a weighted vest
- Progress weight gradually (5-10 lbs at a time)
- Maintain slow, controlled descent
Pistol squat progression:
- Single-leg squat to a box or bench
- Gradually lower the height of the target
- Advanced athletes only
Plyometric progression (8+ weeks, pain-free)
Phase 1: Static jumps
- Small jumps in place, landing softly
- Focus on landing mechanics
- 2 sets of 10-15 jumps
Phase 2: Directional jumps
- Forward/backward small jumps
- Side-to-side jumps
- 2 sets of 8-10 each direction
Phase 3: Sport-specific
- Sport-specific jumping patterns
- Gradual return to full intensity
- Monitor symptoms closely
When to seek professional help
While many cases of patellar tendonitis can be managed with conservative treatment, sometimes professional help is necessary.
See a healthcare provider if:
- Pain persists for more than 2-3 weeks despite consistent exercise
- You can’t bear weight on your leg
- Your pain is severe (8-10/10) or getting worse
- You experience swelling, warmth, or redness around your knee
- You have numbness, tingling, or weakness
- Your knee gives out or feels unstable
- You’re not seeing improvement after 6 weeks of consistent exercise
Types of healthcare providers
Primary care physician:
- Good first step for diagnosis and basic treatment
- Can prescribe medications if needed
- May refer to specialists
Physical therapist:
- Specializes in movement and exercise therapy
- Can provide hands-on treatment and personalized exercise programs
- Often the most cost-effective option
Sports medicine doctor:
- Specializes in athletic injuries
- Can provide advanced treatments like injections
- Good for athletes wanting to return to high-level activities
Orthopedic surgeon:
- Specializes in surgical treatment
- Usually only needed for severe cases that don’t respond to conservative treatment
- Can rule out other structural problems
Advanced treatment options
Platelet-rich plasma (PRP) injections:
- Uses your own blood components to promote healing
- Mixed research results, but may help chronic cases
- Typically requires multiple sessions
Extracorporeal shock wave therapy:
- Uses sound waves to stimulate healing
- May be helpful for chronic cases
- Usually requires multiple treatments
Dry needling:
- Similar to acupuncture, targets trigger points in muscles
- Can help with associated muscle tightness
- Often combined with exercise therapy
Surgery:
- Rarely needed for patellar tendonitis
- Usually only considered after 6+ months of failed conservative treatment
- May involve removing damaged tissue or releasing tight structures
Conclusion
Patellar tendonitis responds well to the right exercises done consistently over time. These 7 exercises give you a complete toolkit for recovery, but remember – healing takes time. Stay consistent, listen to your body, and don’t be afraid to seek professional help if you need it. Your knees will thank you for the investment in their long-term health.
FAQs
How long does patellar tendonitis take to heal?
Most people see significant improvement in 6-12 weeks with consistent exercise. Complete healing can take 3-6 months, depending on how long you’ve had symptoms and how consistently you follow your exercise program. Chronic cases that have been present for months or years may take longer.
Can I run with patellar tendonitis?
In the acute phase (first 2-3 weeks), running usually makes symptoms worse and should be avoided. As pain decreases, you can gradually return to running using a walk-run program. The key is not running through pain – if running consistently increases your pain during or after, you’re not ready yet.
What’s the difference between patellar tendonitis and runner’s knee?
Patellar tendonitis specifically affects the tendon below your kneecap, while “runner’s knee” usually refers to patellofemoral pain syndrome, which affects the cartilage under your kneecap. The pain locations are different – patellar tendonitis hurts below the kneecap, while patellofemoral pain is typically behind or around the kneecap.
Should I use heat or ice for patellar tendonitis?
Ice is best for acute pain and after activities that aggravate symptoms. Use for 15-20 minutes at a time. Heat can be helpful before exercises to warm up the tissues, but avoid heat if there’s significant swelling or acute inflammation.
Can patellar tendonitis become permanent?
With proper treatment, most cases of patellar tendonitis heal completely. However, if left untreated or if you repeatedly return to aggravating activities too soon, it can become a chronic condition. The key is early intervention and consistent rehabilitation.
What shoes are best for patellar tendonitis?
Look for shoes with good shock absorption and proper arch support. Avoid completely flat shoes or high heels. Many people benefit from shoes with a slight heel drop (difference between heel and toe height). Consider seeing a podiatrist for custom orthotics if you have flat feet or other structural issues.
Why do my symptoms get worse in the morning?
Morning stiffness is common with tendon injuries. During sleep, tendons become less flexible and blood flow decreases. The morning pain typically improves within 15-30 minutes of gentle movement. This is why the morning routine protocol can be so helpful.
Can I do these exercises if I have knee arthritis too?
Many of these exercises are actually beneficial for mild knee arthritis, particularly the strengthening exercises. However, you should consult with your healthcare provider first, as some modifications may be needed based on the severity and location of your arthritis.
How do I know if I’m progressing too fast?
Signs you’re progressing too quickly include: pain that’s consistently higher than your baseline, inability to complete exercises you could do previously, increased morning stiffness, or pain that doesn’t settle within a few hours after exercise.
What if these exercises don’t help after 6 weeks?
If you’ve been consistent with the exercises for 6 weeks and haven’t seen improvement, it’s time to see a healthcare provider. You may need additional treatments like physical therapy, imaging studies, or other interventions.


