After age 30, we lose about 3-8% of our muscle mass each decade. This loss accelerates after 40, reaching 1-2% annually by age 50. Scientists call this sarcopenia – the medical term for age-related muscle loss.
But here’s what most people don’t know: muscle loss isn’t just about appearance. It affects your metabolism, bone density, balance, and ability to live independently. Research shows that adults who lose significant muscle mass are three times more likely to fall and twice as likely to develop chronic diseases.
Muscle loss self-assessment: are you at risk?
If you checked 2 or more items, you’re likely experiencing early muscle loss. If you checked 4 or more, it’s time to take action immediately.
The Science Behind Why Resistance Bands Work
Your muscles respond to one thing: progressive resistance. When you challenge them consistently, they adapt by getting stronger. It’s called the principle of progressive overload, and it works at any age.
A 12-week study with older women showed that elastic band training significantly increased both lean muscle mass and functional capacity compared to controls. The participants didn’t just get stronger – they improved their daily activities and quality of life.
But why bands specifically? Three compelling reasons:
Variable Resistance: Unlike weights, bands provide increasing tension as you stretch them. This matches your muscle’s strength curve perfectly. Your muscles are strongest at the end of a movement, and bands provide maximum resistance exactly where you need it most.
Joint-Friendly: Resistance training shows noticeable effects on grip strength in elderly patients after 12 weeks The gradual tension buildup protects aging joints while still providing enough stimulus for muscle growth.
Proven Results: Studies on elastic band resistance training show improvements in muscle mass and physical function in older women Multiple research studies confirm that resistance band training produces measurable increases in muscle mass and strength.
Choosing Your Resistance Bands: A Buyer’s Guide
Not all bands are created equal. Here’s what you need:
| Band Type | Best For | Resistance Levels | Price Range |
|---|---|---|---|
| Loop Bands | Lower body, glutes | Light, Medium, Heavy | $10-20 |
| Tube Bands with Handles | Full body workouts | 10-50 lbs resistance | $15-30 |
| Flat Bands | Physical therapy, stretching | Light to medium | $8-15 |
| Heavy Duty Loops | Advanced users | Extra heavy | $20-40 |
What to buy first: Start with a set of tube bands with handles offering 10-40 lbs of resistance. Look for bands with comfortable grips and door anchors included.
Quality indicators: Thick latex construction, reinforced connection points, and no visible nicks or tears. Cheap bands break quickly and can cause injury.
The 15-Minute Daily Strength Preservation Routine
Instructions: Perform each move for 45 seconds, followed by 15 seconds of rest. Complete two full circuits for a total workout of just under 15 minutes.
Focus on proper form over speed. Control beats intensity every time.
15-Minute Resistance Band Timer
Get Ready!
Prepare for your resistance band strength workout
Today's Resistance Band Exercises:
- Banded Goblet Squat
- Seated Band Row
- Standing Chest Press
- Banded Glute Bridge
- Overhead Press
- Bicep Curl
- Pallof Press
1. Resistance Band Squat
Target Muscles: Glutes, Quadriceps, Core
Why It Matters: Squats strengthen the largest muscle groups in your body. Strong legs mean better mobility, balance, and a faster metabolism.
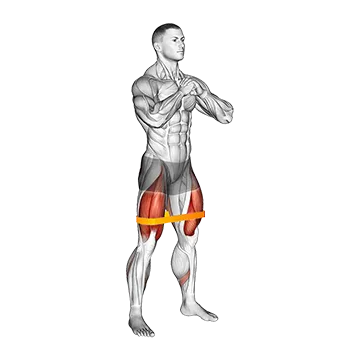
Setup:
- Stand with feet shoulder-width apart and the resistance band placed just above the knees around the thighs
- Hold hands at chest level like you’re holding a heavy cup
- Keep your chest up and core engaged
Movement:
- Sit back like you’re sitting in an invisible chair
- Lower until your thighs are parallel to the floor
- Keep your knees behind your toes
- Press through your heels to stand back up
- Squeeze your glutes at the top
Common Mistakes: Knees caving inward, leaning too far forward, not going low enough.
2. Seated Band Row
Target Muscles: Latissimus dorsi, Rhomboids, Biceps
Why It Matters: Rows fight “desk posture” and build a stronger back to support your spine. Better posture reduces back pain and makes you look more confident.
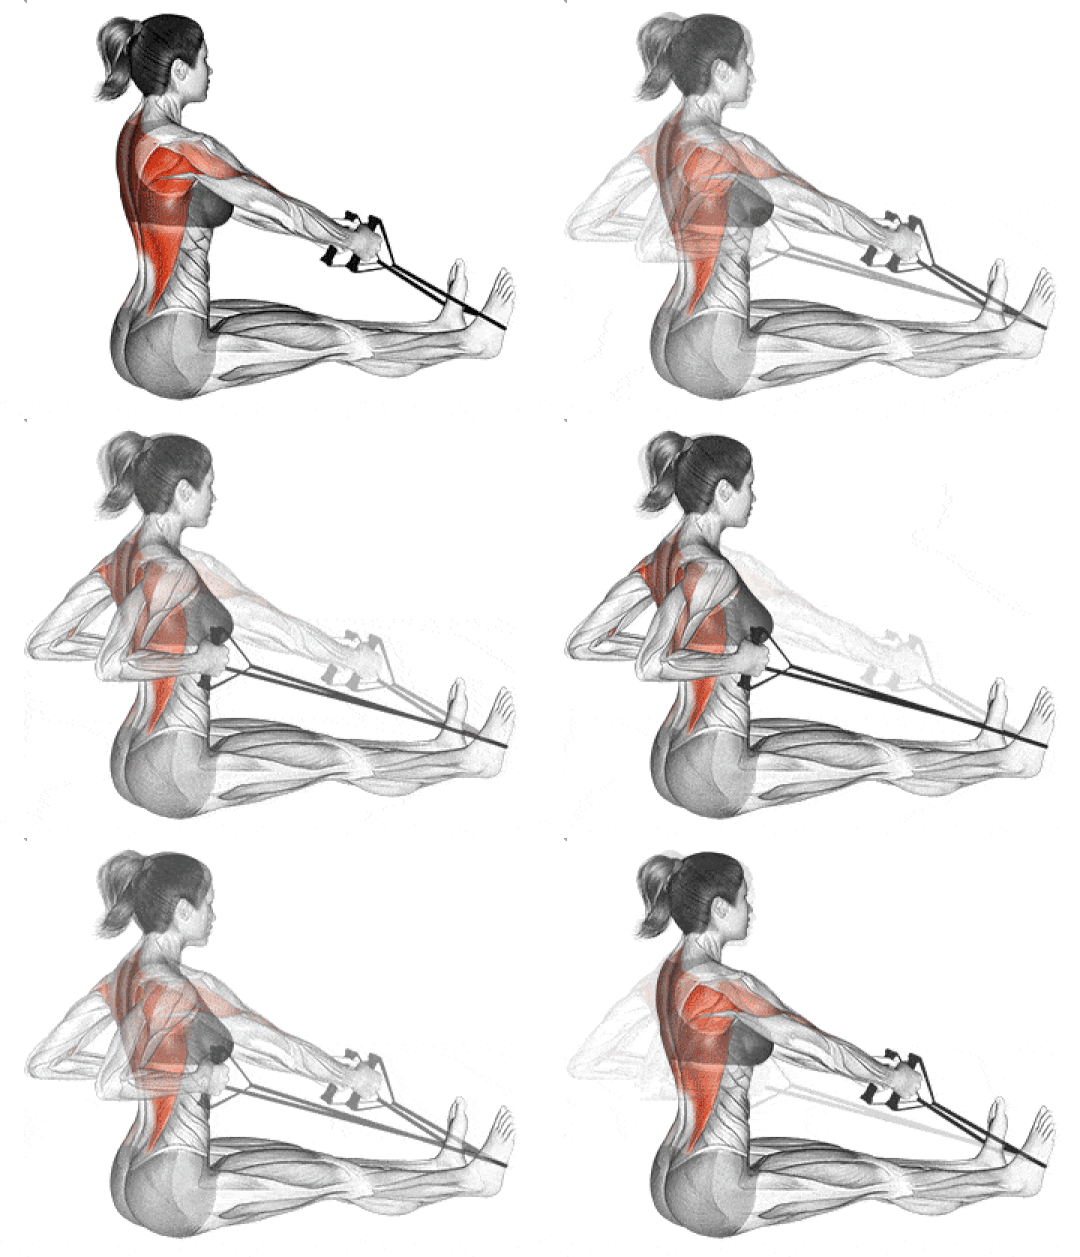
Setup:
- Sit on the floor with legs extended straight
- Loop the band around the soles of both feet
- Hold one handle in each hand with arms extended
Movement:
- Pull your elbows straight back, squeezing your shoulder blades together
- Lead with your elbows, not your hands
- Hold for 1 second at the back position
- Slowly return to the starting position
- Keep your chest up throughout the movement
Focus Point: Imagine you’re trying to crack a walnut between your shoulder blades.
3. Banded Standing Chest Press
Target Muscles: Pectorals, Anterior deltoids, Triceps
Why It Matters: Essential for pushing movements – from getting up off the floor to pushing open heavy doors or moving furniture.
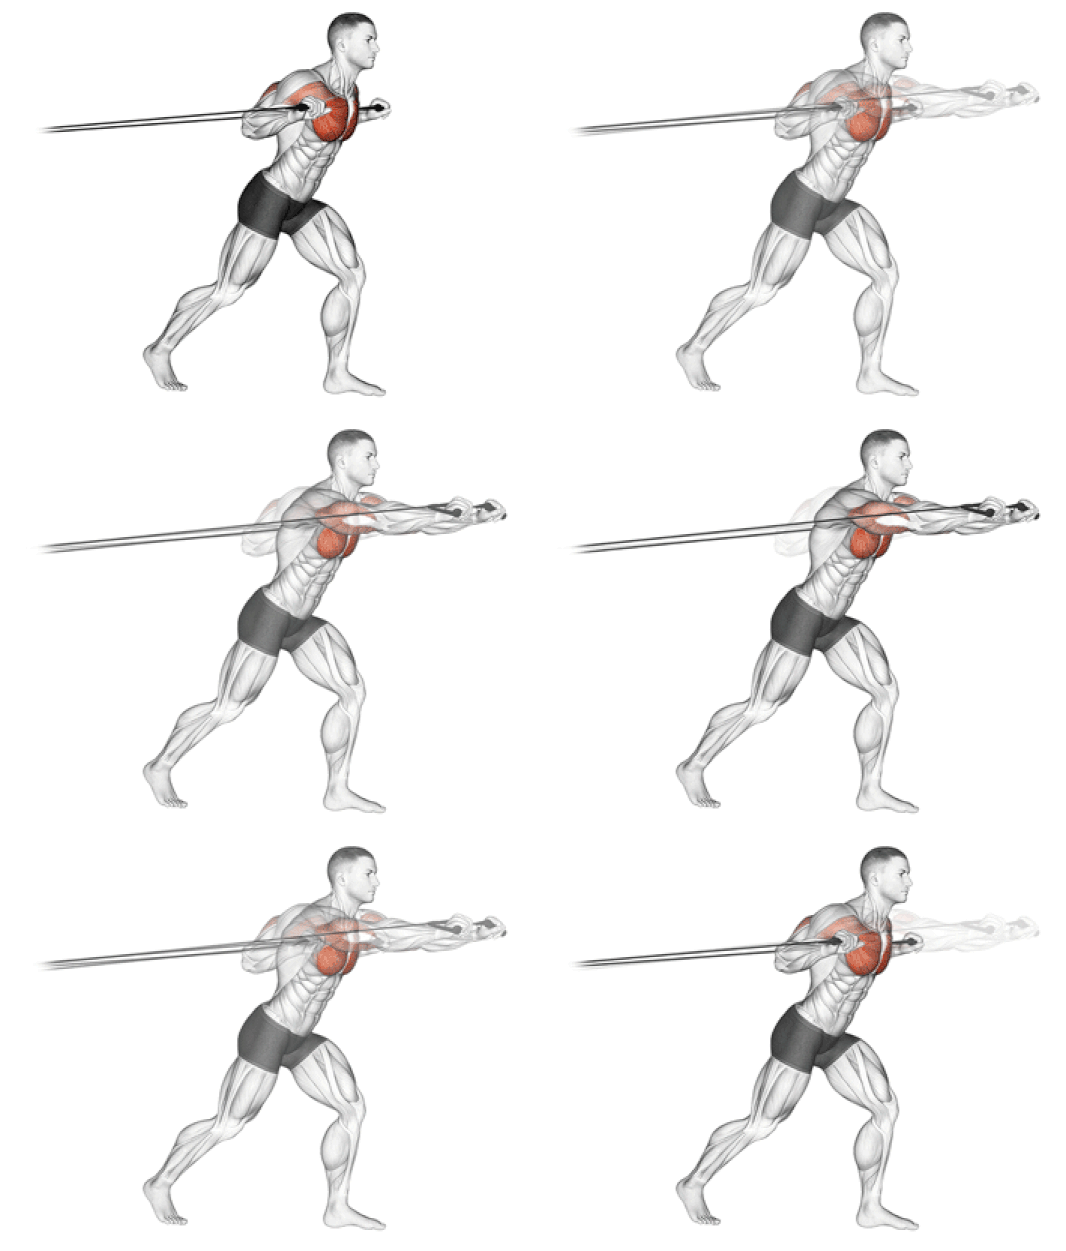
Setup:
- Anchor the band behind you at chest height (use a door anchor or sturdy object)
- Step forward until you feel moderate tension
- Hold handles with arms bent at 90 degrees
Movement:
- Press forward until your arms are fully straight
- Keep your wrists straight and strong
- Control the return to starting position
- Don’t let the band snap back
- Keep your core tight to maintain balance
Progression Tip: Step further away from the anchor point to increase resistance.
4. Banded Glute Bridge
Target Muscles: Gluteus maximus, Hamstrings, Core
Why It Matters: Your glutes are the largest, most powerful muscles in your body. Strong glutes protect your lower back, improve posture, and boost athletic performance.
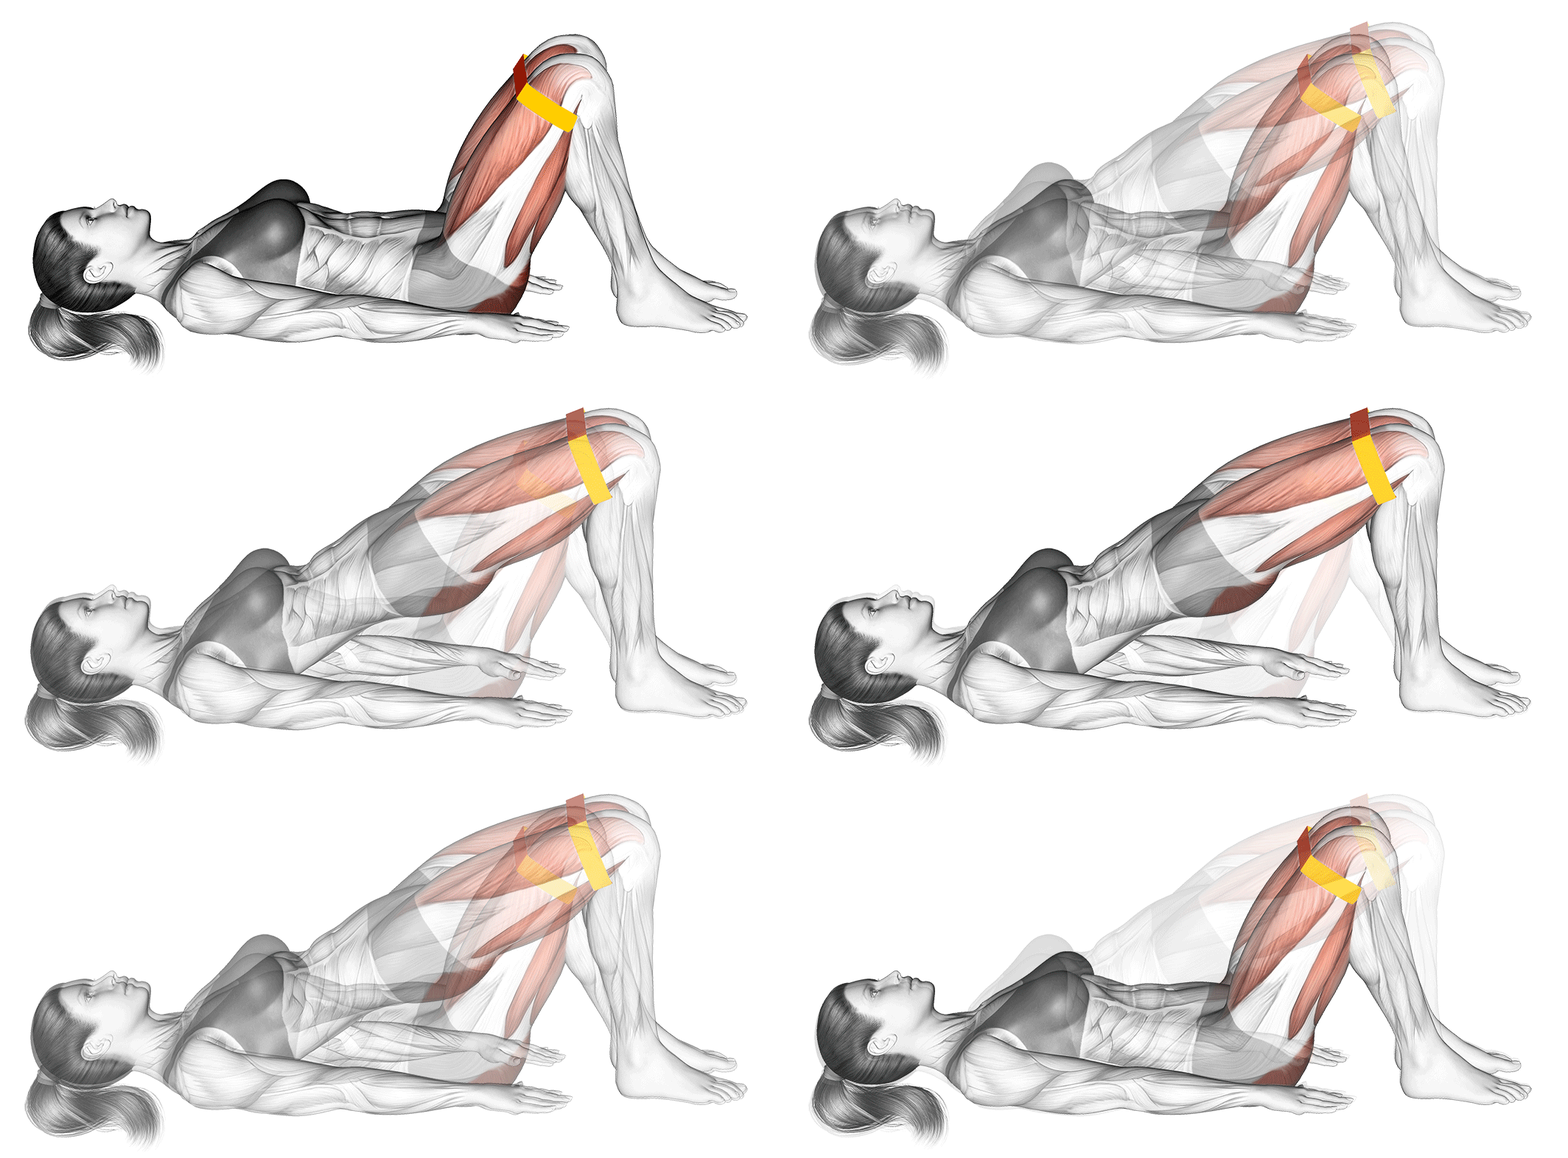
Setup:
- Lie on your back with the band looped around your thighs, just above your knees
- Place your feet flat on the floor, hip-width apart
- Arms at your sides for stability
Movement:
- Press your heels into the floor and lift your hips up
- Push your knees out against the band resistance
- Squeeze your glutes hard at the top position
- Hold for 2 seconds
- Lower slowly and with control
Key Cue: Think “hips to the sky” and squeeze like you’re trying to crack a nut with your glutes.
5. Banded Overhead Press
Target Muscles: Deltoids, Triceps, Core
Why It Matters: Builds strength for lifting objects overhead – from putting away dishes to loading luggage into overhead bins.
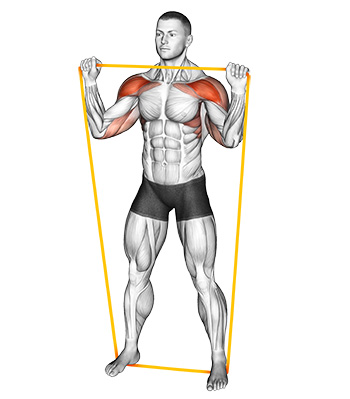
Setup:
- Stand on the center of the band with feet hip-width apart
- Hold handles at shoulder height with palms facing forward
- Engage your core muscles
Movement:
- Press straight up until your arms are fully extended overhead
- Keep your head neutral – don’t crane your neck forward
- Lower with control back to shoulder height
- Don’t arch your back as you press
- Keep the movement smooth and controlled
Safety Note: If you have shoulder issues, only press to a comfortable range. Pain is never the goal.
6. Banded Bicep Curl
Target Muscles: Biceps, Forearms
Why It Matters: Essential for all pulling and carrying activities. Strong biceps help with grocery bags, luggage, gardening, and playing with grandchildren.
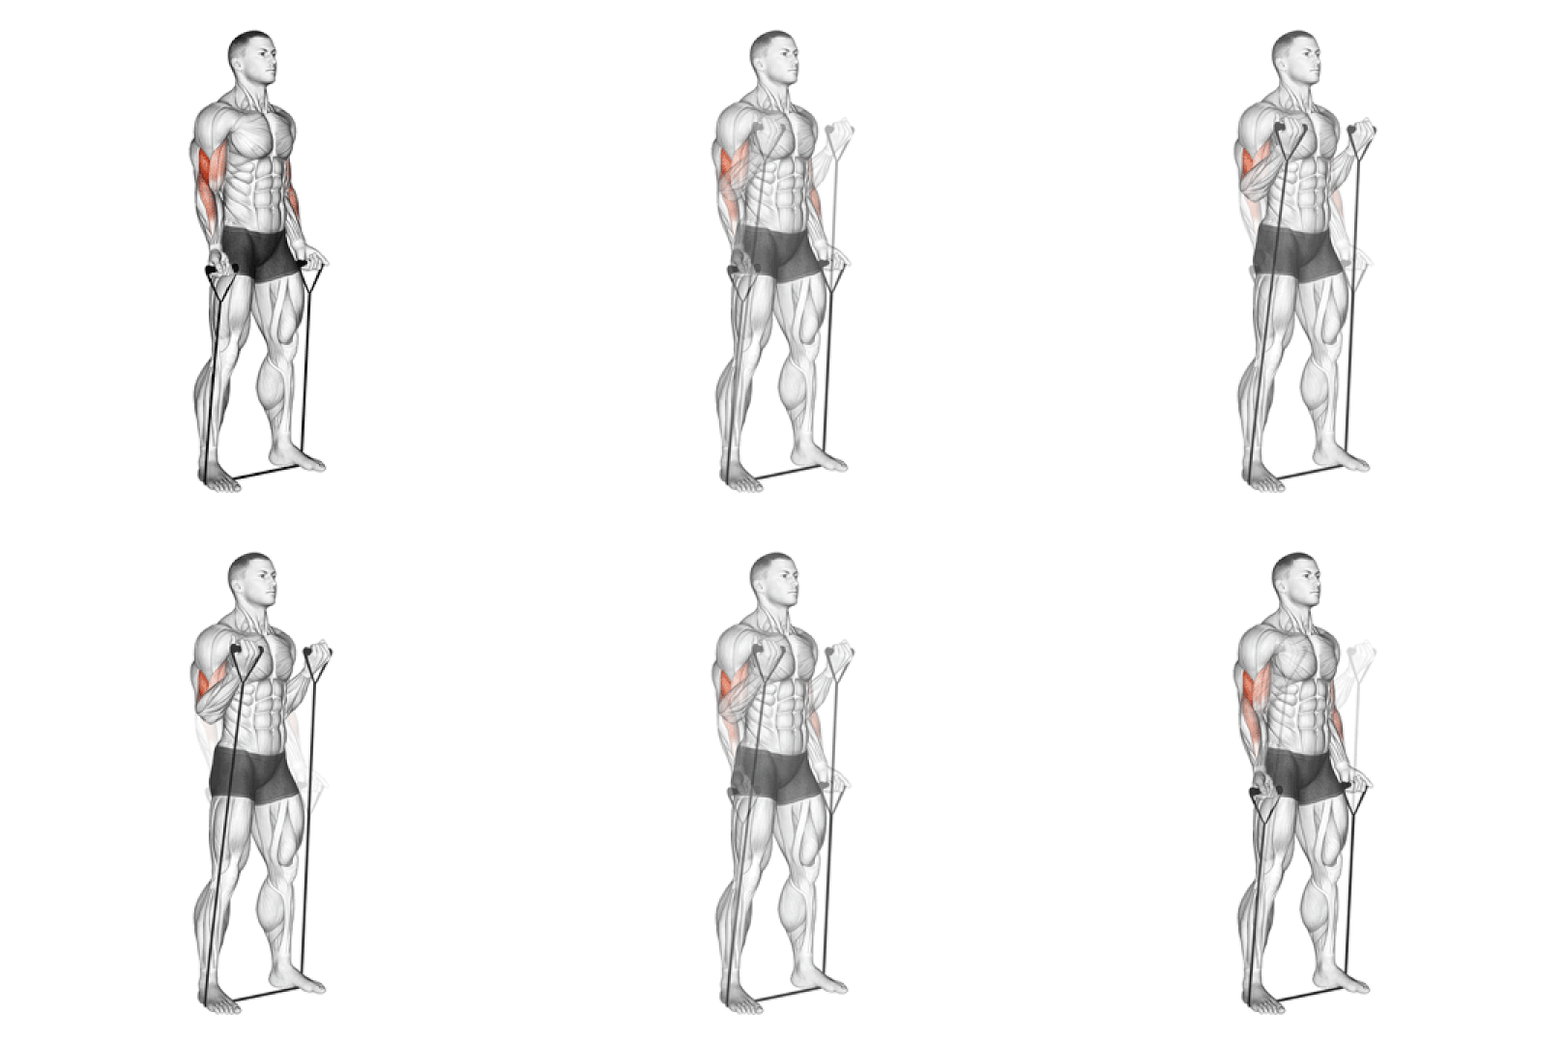
Setup:
- Stand on the band with feet hip-width apart
- Hold handles with arms at your sides, palms facing forward
- Keep your elbows close to your torso
Movement:
- Curl up by bending only at the elbows
- Keep your upper arms stationary
- Squeeze at the top for 1 second
- Lower slowly – this part builds strength too
- Don’t swing or use momentum
Pro Tip: The lowering phase is just as important as the lifting phase for muscle building.
7. Pallof Press
Target Muscles: Transverse abdominis, Obliques, Deep core muscles
Why It Matters: Builds anti-rotation strength and true core stability. This prevents injury during daily activities and improves your performance in every other exercise.
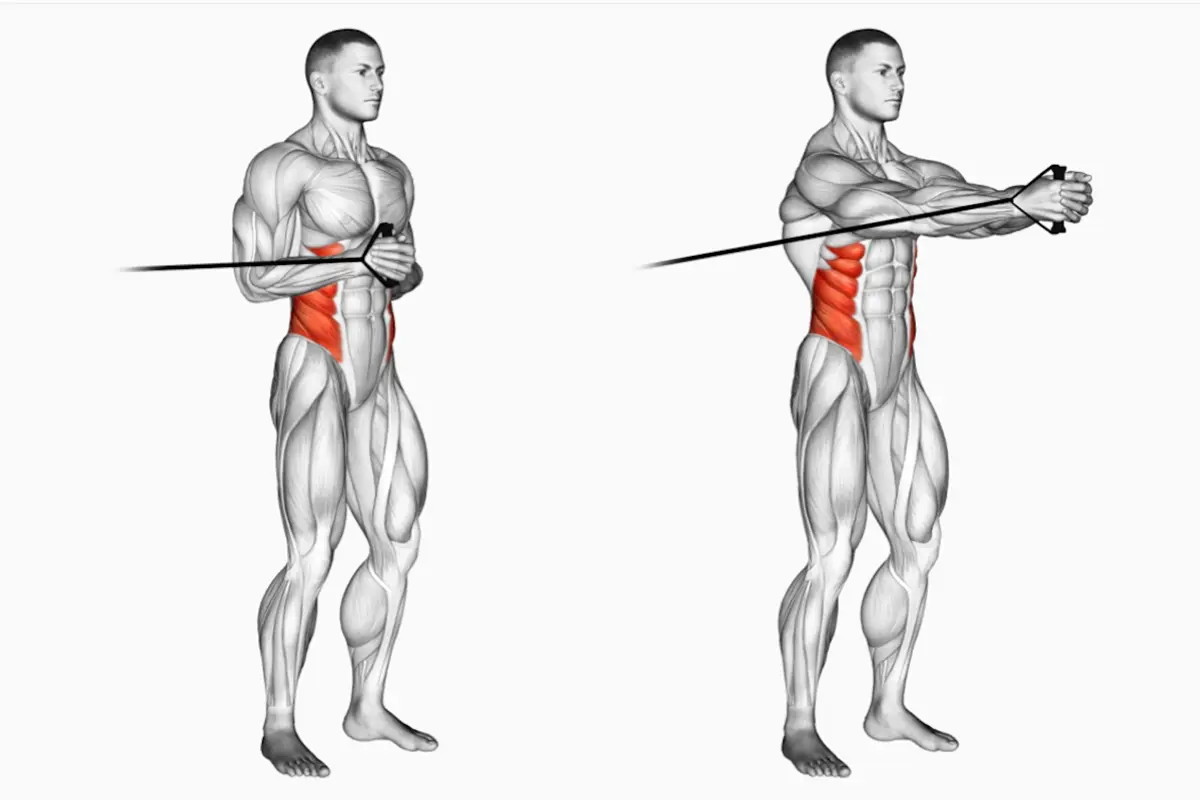
Setup:
- Anchor the band at chest height to your right side
- Hold the handle with both hands at the center of your chest
- Step away from the anchor until you feel tension
- Stand with feet shoulder-width apart
Movement:
- Press the handle straight out from your chest
- Fight the band’s pull to rotate you toward the anchor
- Hold for 2-3 seconds with arms extended
- Pull back to your chest with control
- Complete all reps on one side, then switch sides
Mental Cue: Imagine someone is trying to pull you sideways, and you’re resisting with your core.
Progressive Workout Schedule: Your 12-Week Plan
| Week | Sets/Circuits | Resistance Level | Rest Time | Focus |
|---|---|---|---|---|
| 1-2 | 1 circuit | Light tension | 20 seconds | Learn proper form |
| 3-4 | 1.5 circuits | Light-medium | 15 seconds | Build endurance |
| 5-8 | 2 circuits | Medium | 15 seconds | Current routine |
| 9-12 | 2 circuits | Medium-heavy | 10 seconds | Increase intensity |
How to progress: When you can complete all exercises with perfect form and feel like you could do 5-10 more seconds, it’s time to increase resistance or decrease rest time.
Exercise Modifications for Every Fitness Level
Beginner Modifications
If you’re new to exercise or have mobility limitations:
| Exercise | Beginner Version | Key Changes |
|---|---|---|
| Goblet Squat | Chair-assisted squat | Use chair for support, quarter-depth |
| Band Row | Seated in chair | Use sturdy chair, shorter range |
| Chest Press | Wall push-up with band | Face wall, lighter resistance |
| Glute Bridge | No band bridge | Remove band, focus on form |
| Overhead Press | Half-range press | Stop at ear level |
| Bicep Curl | Seated version | Sit for stability |
| Pallof Press | Kneeling version | Better core engagement |
Advanced Progressions
When the routine becomes too easy:
- Increase time: Work for 60 seconds, rest for 10 seconds
- Add pulses: 3 small pulses at the hardest part of each movement
- Combine movements: Squat to overhead press, lunge with bicep curl
- Increase resistance: Use thicker bands or double up bands
- Add instability: Perform exercises on one leg where safe
Nutrition Guide for Muscle Building After 40
Protein isn’t just helpful for muscle building – it’s essential. Research suggests older adults may benefit from consuming 1 to 1.6 grams of protein per kilogram of body weight daily to help increase muscle strength
Daily Protein Requirements by Body Weight
| Body Weight (lbs) | Daily Protein Need (g) | Per Meal Target (g) | Example Foods |
|---|---|---|---|
| 120 | 55-87 | 18-29 | 3 oz chicken breast, 1 cup Greek yogurt |
| 140 | 64-102 | 21-34 | 4 oz salmon, 2 eggs + 1 cup milk |
| 160 | 73-116 | 24-39 | 5 oz lean beef, 1 cup cottage cheese |
| 180 | 82-130 | 27-43 | 6 oz tuna, 1 scoop protein powder + banana |
| 200 | 91-145 | 30-48 | 7 oz turkey breast, 1 cup black beans |
Complete vs. Incomplete Proteins: What You Need to Know
Complete proteins contain all nine essential amino acids your body can’t make. These include:
- Animal sources: meat, fish, eggs, dairy
- Plant sources: quinoa, soy products, hemp seeds
Incomplete proteins lack one or more essential amino acids but can be combined:
- Rice + beans = complete protein
- Peanut butter + whole grain bread = complete protein
- Hummus + pita = complete protein
High-Protein Meal Ideas for Busy Adults
Breakfast Options (20-30g protein):
- Greek yogurt parfait with berries and granola
- Scrambled eggs with cottage cheese
- Protein smoothie with banana and spinach
- Overnight oats with protein powder
Post-Workout Snacks (15-25g protein):
- Hard-boiled eggs with string cheese
- Protein bar with 20g+ protein
- Chocolate milk (surprisingly effective!)
- Tuna packet with whole grain crackers
Sleep: Your Secret Muscle-Building Weapon
Sleep isn’t just rest – it’s when the magic happens. During deep sleep stages, your body releases growth hormone and repairs muscle tissue damaged during exercise.
Sleep Quality Checklist:
- 7-9 hours nightly for adults over 40
- Room temperature between 65-68°F
- Complete darkness (blackout curtains or eye mask)
- No screens for 1 hour before bed
- Consistent bedtime and wake time
Sleep and Muscle Connection: Studies show that people who get less than 6 hours of sleep lose 30% more muscle mass during weight loss compared to those who sleep 8+ hours.
Warning Signs You’re Losing Muscle
Physical Signs:
- Decreased grip strength (can’t open jars easily)
- Clothes fitting looser in arms and shoulders
- Feeling tired after minimal physical activity
- Reduced balance and coordination
- Slower walking speed
- Difficulty rising from low chairs without using arms
Functional Signs:
- Avoiding physical activities you used to enjoy
- Asking for help with tasks you could do before
- Feeling less confident in your physical abilities
- Increased recovery time after activity
Metabolic Signs:
- Unexplained weight gain despite same eating habits
- Feeling cold more often (muscle generates heat)
- Blood sugar fluctuations (muscle helps regulate glucose)
3 Science-Based Muscle Health Strategies
Strategy 1: Optimize Your Protein Timing
When you eat protein matters as much as how much you eat. Your muscles can only use about 25-30 grams of protein at once for muscle building.
The 3-Hour Rule: Space protein intake every 3-4 hours throughout the day. This keeps your muscles in a constant state of repair and growth.
Post-Workout Window: Eat 20-25 grams of protein within 2 hours of your workout. This isn’t as critical as once thought, but it still helps optimize recovery.
Strategy 2: Master Your Sleep for Maximum Recovery
Quality sleep amplifies your exercise results. Here’s how to optimize it:
Sleep Hygiene Protocol:
- Set a consistent bedtime – even on weekends
- Create a 30-minute wind-down routine
- Keep your bedroom cool, dark, and quiet
- Avoid caffeine after 2 PM
- Use blue light blocking glasses if you must use screens
Track Your Recovery: Notice how you feel the day after a good night’s sleep versus a poor one. Your workout performance and muscle soreness will reflect sleep quality.
Strategy 3: Stay Consistent with the 80% Rule
Perfect isn’t the enemy of good – it’s the enemy of done. Follow the 80% rule: if you can stick to your routine 80% of the time, you’ll see significant results.
Weekly Minimum: 3 sessions per week maintains muscle mass. 4-5 sessions builds muscle mass. 6+ sessions optimizes results but isn’t necessary for most people.
Make It Non-Negotiable: Treat your 15 minutes like a medical prescription. You wouldn’t skip blood pressure medication – don’t skip muscle maintenance.
Troubleshooting Common Problems
Problem: “I don’t feel my muscles working”
Solutions:
- Slow down your movements – take 3 seconds up, 3 seconds down
- Focus on the muscle you’re trying to work
- Increase resistance by stepping further from anchor points
- Add a 2-second pause at the hardest part of each movement
Problem: “My joints hurt during exercises”
Solutions:
- Reduce range of motion to pain-free zones
- Use lighter resistance to start
- Warm up with 5 minutes of light movement first
- Consider the beginner modifications listed above
- Consult a healthcare provider if pain persists
Problem: “I’m not seeing results after 4 weeks”
Check these factors:
- Are you eating enough protein? (Use the table above)
- Are you getting 7+ hours of sleep?
- Are you challenging yourself enough? (Can you do 10 more seconds?)
- Are you consistent? (Missing more than 2 sessions per week slows progress)
Myth-Busting: Common Muscle Loss Misconceptions
Myth 1: “Cardio exercise prevents muscle loss”
Truth: Cardio improves heart health but doesn’t provide enough resistance to maintain muscle mass. You need resistance training specifically.
Myth 2: “You can’t build muscle after 50”
Truth: Research proves adults can build significant muscle mass well into their 70s and 80s with proper resistance training.
Myth 3: “Heavier weights are always better”
Truth: Muscle responds to effort and time under tension, not just weight. Bands can provide excellent muscle-building stimulus when used properly.
Myth 4: “Women shouldn’t lift heavy – they’ll get bulky”
Truth: Women have 15-20 times less testosterone than men. Resistance training helps women build lean, strong muscle without bulk.
Safety Guidelines and When to See a Doctor
Pre-Exercise Medical Screening
Consult your doctor before starting if you have:
- Heart disease or high blood pressure
- Recent surgery or injury
- Diabetes with complications
- Severe arthritis or joint replacement
- Balance problems or frequent falls
- Chest pain during physical activity
Exercise Safety Rules
- Start slowly: Use light resistance for the first 2 weeks
- Stop if you feel pain: Muscle fatigue is normal, joint pain is not
- Stay hydrated: Drink water before, during, and after exercise
- Listen to your body: Some days you’ll feel stronger than others
- Get medical clearance: If you haven’t exercised in years, check with your doctor first
What to Expect: Your 12-Week Transformation Timeline
Weeks 1-3: Foundation Phase
- Physical: Learning proper form, initial strength gains
- Mental: Building confidence and establishing routine
- Energy: May feel tired initially as body adapts
- Measurements: Minimal visible changes
Weeks 4-6: Adaptation Phase
- Physical: Noticeable strength improvements in daily tasks
- Mental: Exercise becomes a habit, not a chore
- Energy: Increased energy levels throughout the day
- Measurements: Slight muscle tone improvements
Weeks 7-9: Growth Phase
- Physical: Visible muscle definition, improved posture
- Mental: Increased confidence in physical abilities
- Energy: Sustained energy, better sleep quality
- Measurements: Measurable strength gains, clothes fit differently
Weeks 10-12: Mastery Phase
- Physical: Significant functional improvements
- Mental: Strong sense of physical capability
- Energy: Consistent high energy levels
- Measurements: Friends and family notice the changes
Resistance Band Maintenance and Safety
How to Care for Your Bands
Daily Care:
- Wipe down with mild soap and water after use
- Check for nicks, cuts, or thin spots before each workout
- Store in a cool, dry place away from direct sunlight
Monthly Maintenance:
- Inspect all connection points thoroughly
- Replace bands showing any signs of wear
- Rotate between multiple sets if you have them
Safety Signs to Replace Immediately:
- Visible cuts or nicks in the latex
- Thinning or discoloration
- Loose or damaged handles
- Bands that feel less stretchy than when new
Emergency Replacement Protocol
Always have a backup band available. Band failure during exercise can cause injury. If your primary band breaks:
- Stop the exercise immediately
- Check for any injuries
- Switch to your backup band
- Replace the broken band before your next workout
Building Your Support System
Track Your Progress
Weekly Measurements to Take:
- How many complete circuits you can finish
- Resistance level you’re using for each exercise
- Energy level (1-10 scale) before and after workouts
- Sleep quality the night after workouts
- Functional improvements (can you open that stubborn jar now?)
Monthly Assessments:
- Take body measurements (arms, thighs, waist)
- Test your grip strength (smartphone apps available)
- Assess balance (how long can you stand on one leg?)
- Evaluate daily activities (stairs easier? Lifting easier?)
Making It Social
Family Involvement: Invite family members to join your routine. Kids love resistance bands, and partners can provide motivation and accountability.
Community Building: Share your progress with friends who have similar health goals. Social support increases long-term success rates by 40%.
Conclusion
Age-related muscle loss affects everyone, but accepting it as inevitable is a choice – and it’s the wrong choice. You have the power to maintain and build strength well into your later years.
This 15-minute resistance band routine isn’t just exercise – it’s an investment in your future independence, health, and quality of life. Every rep you complete today makes tomorrow’s tasks a little easier.
Start with week one of the progressive plan. Focus on learning proper form before worrying about intensity. Your muscles will respond to consistent challenge, regardless of your starting point.
Remember: The best workout is the one you’ll actually do. Fifteen minutes is manageable. Resistance bands are convenient. The exercises work.
Your strongest years don’t have to be behind you. They can be ahead of you – starting today.
Note: This article is for educational purposes only and is not intended as medical advice. Consult with a healthcare provider before beginning any new exercise program, especially if you have pre-existing health conditions.
FAQs
How quickly will I see results?
Week 1-2: You’ll feel stronger and more confident with the movements
Week 3-4: You’ll notice improved energy and less fatigue during daily activities
Week 5-8: Visible muscle tone improvements and increased functional strength
Week 9-12: Significant improvements in daily tasks and overall strength
Are resistance bands as effective as weights?
Research recommends two full-body exercise sessions per week performed with relatively high effort Studies show similar muscle-building results between bands and weights when effort levels are matched. The key is progressive overload, not the tool you use.
Can I do this with arthritis or joint problems?
Resistance bands are often recommended for people with joint issues because they provide variable resistance. Start with very light tension and focus on pain-free ranges of motion. Always consult your doctor first.
What if I miss a few days?
Missing 1-2 days won’t hurt your progress. Missing a full week means you’ll lose some of the strength gains you’ve made. Get back to it as soon as possible – your muscles forgive quickly.
Do I need different bands for different exercises?
One set of tube bands with handles works for all these exercises. As you get stronger, you can add heavier resistance bands or use multiple bands together.


