The problem may not be that you’re stretching too little, it may be that you’re stretching the wrong way. Here’s why this eight-pose routine takes a different approach.
It’s not that your hips are tight the way a knotted muscle is tight, ready to release with enough foam rolling. For people who sit for long hours, the hip flexors have changed physically, shortening at the structural level by reducing muscle fiber units and allowing the connective tissue wrapping them to densify into something less like elastic and more like cord. A few stretches won’t reverse that. Weeks of consistent practice will.
Yoga works here for a specific reason. The combination of breath-guided holds and longer stretching durations triggers neurological changes that static stretching largely doesn’t: your nervous system learns to stop guarding against the stretch, rather than being pulled past it. That distinction sounds small. In practice, it’s why yoga produces lasting gains where a nightly stretching routine does not.
This routine is built around eight poses targeting the hip flexors, hamstrings, and deep hip rotators most affected by sitting. Fifteen minutes a day, done consistently, is enough. The research on hold duration specifically suggests that brief holds produce only a fraction of the adaptation that full-duration holds do.
What the Research Shows About Yoga and Flexibility
Study Results That Changed How Researchers Thought About Stretching
A 2023 randomized controlled trial published in PLOS ONE found that 16 weeks of yoga improved sit-and-reach flexibility by 3.5 centimeters and groin and hip flexibility by 6 centimeters in participants who trained consistently.
That’s enough improvement to shift someone from straining toward their knees to reaching comfortably past their toes. The researchers also found balance improvements that persisted beyond the flexibility gains. That pattern points to whole-body rather than purely muscular adaptation.
Six weeks of a single weekly session proved sufficient for measurable change. Researchers recruited 16 low-to-moderately active women with an average age of 52, put them through a six-week Iyengar yoga program, one 90-minute class a week, and found significant improvements in lumbar and hamstring flexibility, tracked via sit-and-reach testing.
The full study details are in the 2013 Journal of Bodywork and Movement Therapies paper. What made the result worth noting: these were not athletes or regulars, and the gains came from a frequency that most people with busy schedules can realistically maintain.
For collegiate athletes, the picture was similar. A research group wanted to know whether yoga could improve functional movement quality, not just passive flexibility, and had athletes complete two 90-minute yoga sessions per week for 12 weeks.
Their 2022 paper in the International Journal of Environmental Research and Public Health found that Functional Movement Screen scores (a standardized assessment of basic movement quality) improved significantly compared to a no-intervention control group. Deep squat, shoulder mobility, and trunk stability scores all shifted into functional ranges.
The Hold Duration Finding That Actually Matters
One of the more counterintuitive results in flexibility research concerns older adults and how long each stretch should be held. Researchers divided subjects aged 65 and older into groups holding hamstring stretches for 15, 30, or 60 seconds, five days a week for six weeks.
The 2001 Physical Therapy study found the 60-second group gained range of motion at four times the rate of the 15-second group, and their gains persisted longer after the program ended.
That finding took a while to accept in mainstream flexibility coaching. The implication for this routine: duration matters more than repetitions. Short holds feel like effort and produce limited adaptation. The structural change happens in the sustained position, once the nervous system has had enough time to stop guarding.
Flexibility vs. Mobility: Not the Same Problem
These terms get used interchangeably, but they describe different things. Flexibility is your muscle’s capacity to lengthen passively, the kind measured when someone gently presses your back into a forward fold. Mobility is your joint’s active range of motion, how far you can move a limb under your own control without assistance.
Tight hips are usually a flexibility problem layered on a mobility deficit. The muscles are short, and the joint hasn’t been moved through its full range often enough to stay accessible. This routine addresses both: passive holds lengthen the muscles, while transition movements between poses keep the joint in motion and remind the body what its full range feels like.
Why Your Hips and Hamstrings Stay Tight
Your hip flexors connect your spine to your upper leg and are designed to alternate between contraction and full extension, the hip hinge of a walking stride. Sustained sitting locks them in a shortened position. Within a few weeks, that position becomes the new default: the muscle adapts by reducing its sarcomere count (the structural units of muscle fiber), and the surrounding fascia thickens to match.
Here is what that actually feels like. You get out of the car after a long drive and there is a specific stiffness in the front of the hip, not pain exactly, just restriction, like the joint needs to be convinced to open.
You try to sit cross-legged on the floor, and one knee stays stubbornly elevated. Running reveals it another way: a pulling sensation in the low back that no amount of back stretching touches, because the source isn’t in the back at all. Those are the signs of hip flexors that have adapted to a shortened position.
The hamstrings compound this. They work in opposition to the hip flexors and often remain shortened during sitting, particularly when a chair doesn’t allow full hip flexion. A shortened posterior chain pulls the pelvis into a posterior tilt, which is one of the most common structural contributors to low back discomfort. The pelvis can’t move freely because the hamstrings won’t permit the hip hinge to go far enough.
Assess Your Starting Point
Before beginning the routine, record a few baseline measurements. They don’t need to be precise, but they give you something real to compare against in four and eight weeks. The sit-and-reach and a basic hip flexor test (lying on a bed edge and letting one leg hang while the other knee is drawn to the chest) cover the most relevant tissue.
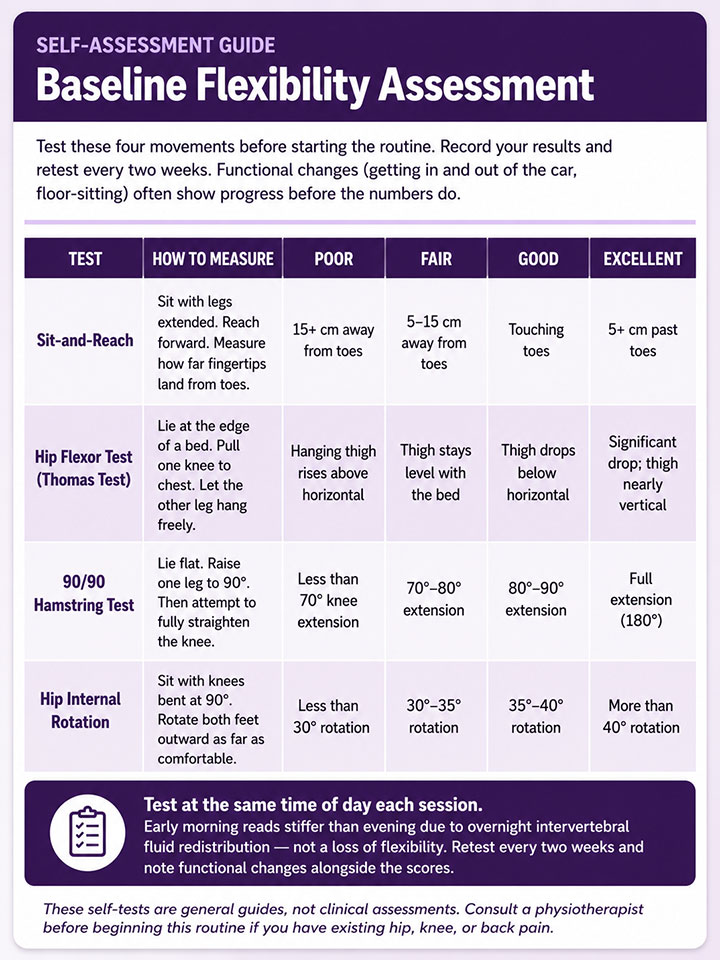
Test at the same time of day each session. Early morning typically reads stiffer than evening because intervertebral fluid has redistributed overnight, not because you’ve lost flexibility. Retest every two weeks and note functional changes alongside the measurements.
Your 15-Minute Hip and Hamstring Routine
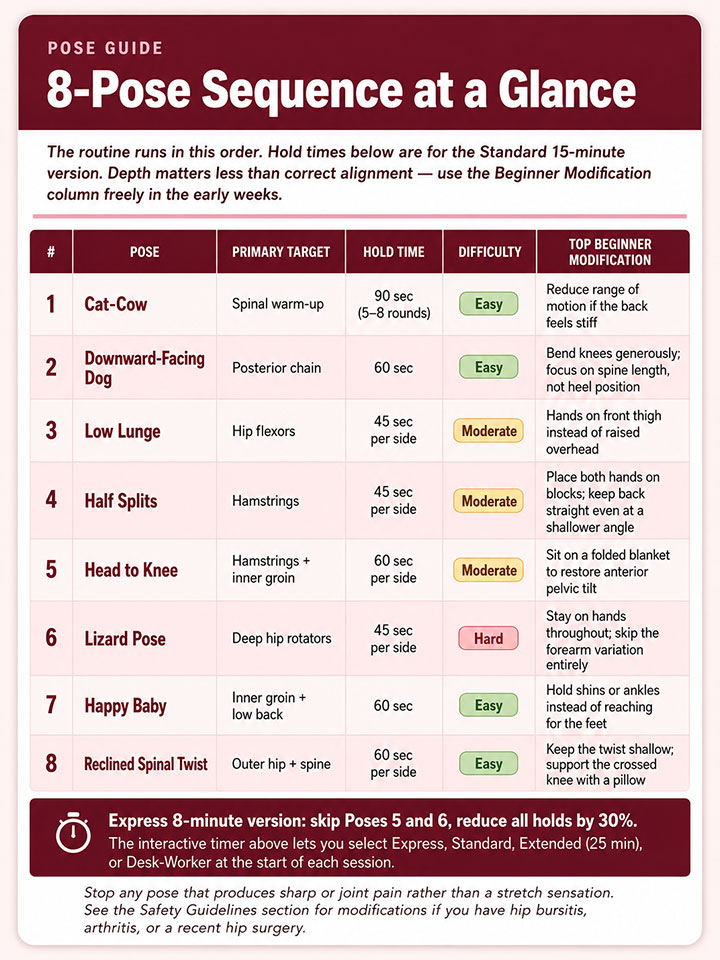
Complete the eight poses in the order below. Hold each for the indicated duration, focus on breath quality over depth, and let each exhale carry you slightly further into the position rather than pushing muscularly into the stretch.
Pose 1: Cat-Cow (Marjaryasana/Bitilasana)
Target: Spinal warm-up and core mobility | Duration: 90 seconds (5 to 8 rounds)
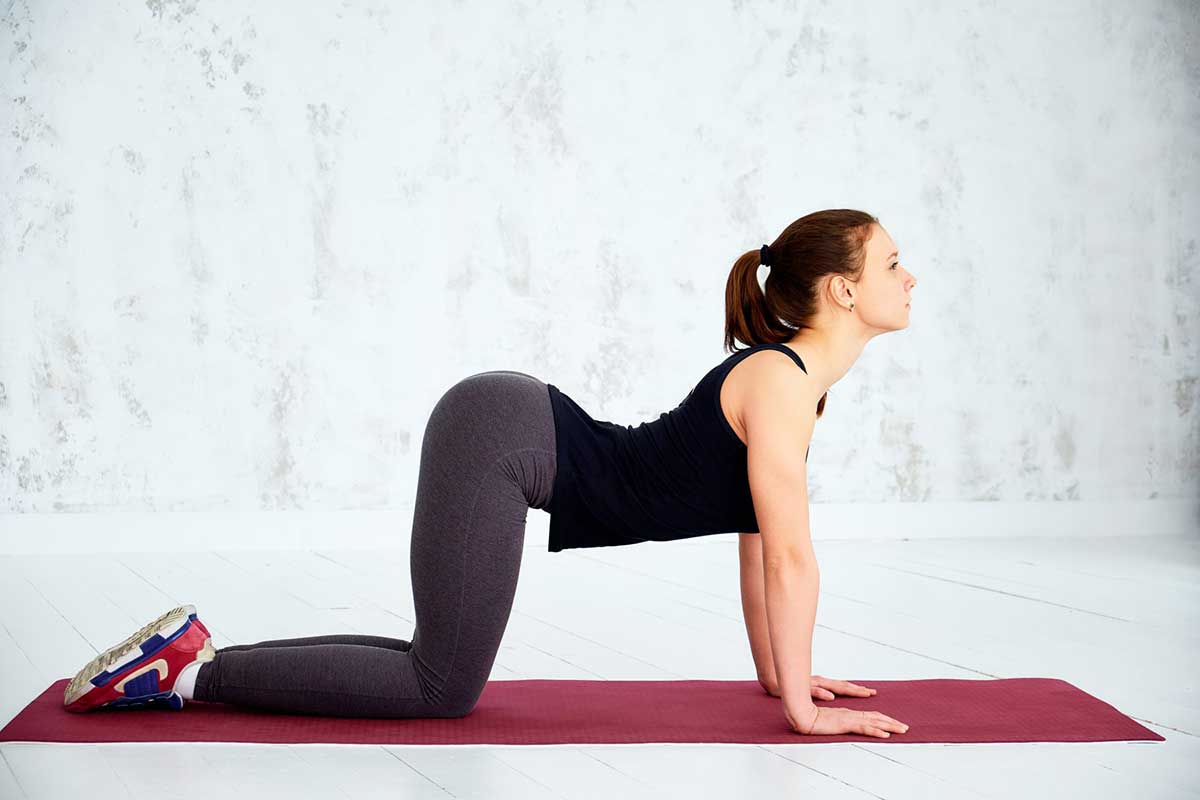
- Start on hands and knees with wrists stacked under shoulders and knees under hips.
- Inhale: drop the belly toward the mat, lift the chest and tailbone (Cow position).
- Exhale: round the spine toward the ceiling, tuck the chin and tailbone (Cat position).
- Move continuously between the two positions, letting the breath set the pace.
Cat-Cow is a warm-up, not a stretch. Its job is to pump fluid through the spinal joints and establish the breathing pattern needed for the harder poses ahead. Keep it loose and unhurried. Save any effort for what follows.
Pose 2: Downward-Facing Dog (Adho Mukha Svanasana)
Target: Full posterior chain lengthening | Duration: 60 seconds
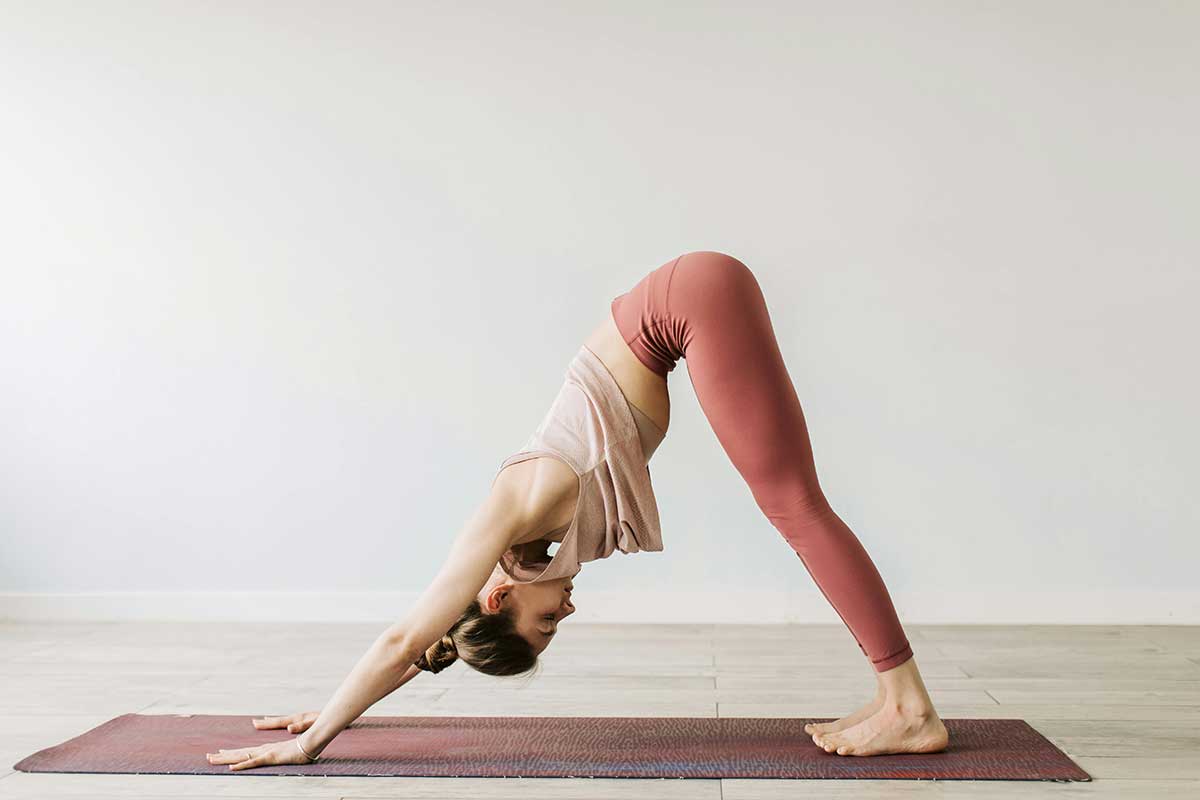
- From hands and knees, tuck the toes and lift the hips up and back, forming an inverted V shape.
- Press firmly through the hands, arms straight, heels reaching toward the mat.
- Pedal the feet for the first 20 seconds, alternating a bent and a straight knee.
- Then settle into stillness and press the chest gently toward the thighs.
What makes this pose distinctive is the dual load: the posterior chain (calves, hamstrings, glutes, and spine) lengthens under mild gravitational traction at the same time the arms hold the position actively. Unlike most stretches, this one requires active effort from the arms, which is why it reaches tissue that a supine hamstring stretch misses entirely.
For beginners: bend the knees generously and focus on length through the spine rather than pressing the heels down. That comes with time.
Pose 3: Low Lunge (Anjaneyasana)
Target: Hip flexor release | Duration: 45 seconds per side (90 seconds total)
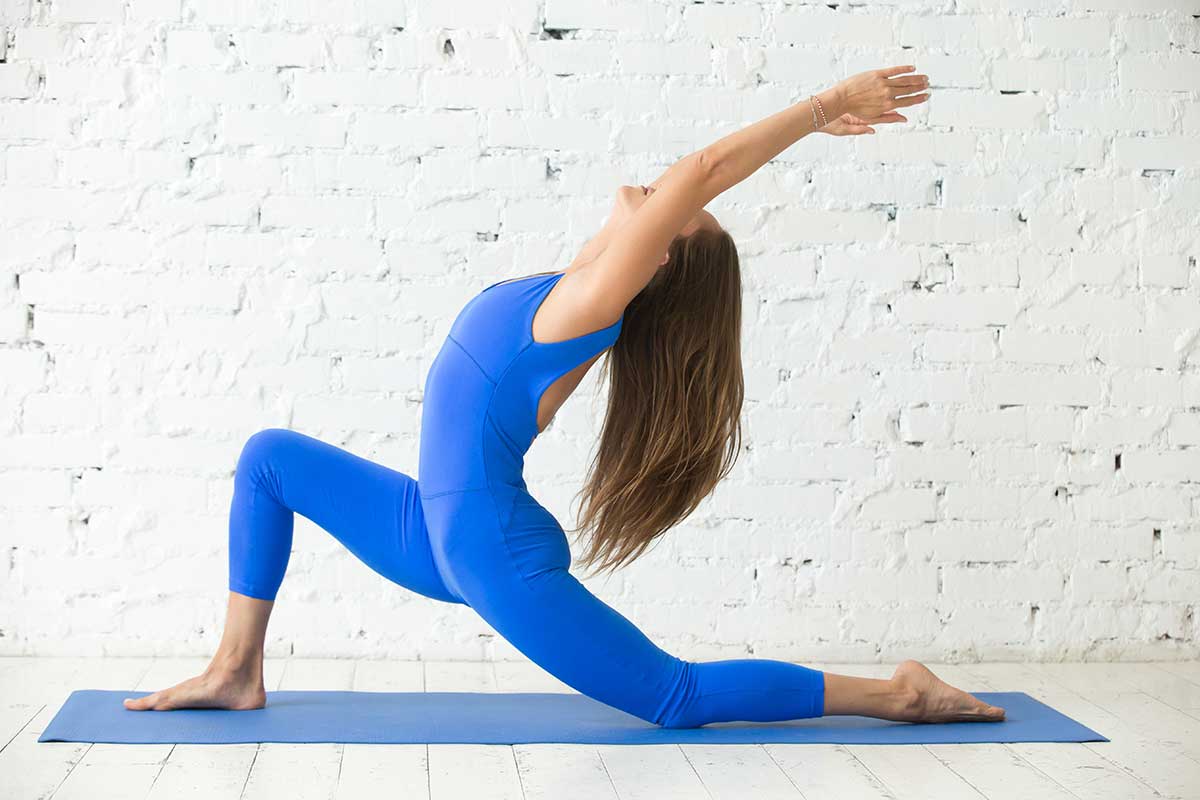
- From Downward Dog, step the right foot forward between the hands.
- Lower the left knee to the mat. Back toes can remain tucked or lie flat, whichever is comfortable.
- Stack the right knee directly over the ankle, not past the toes.
- Place hands on the front thigh or raise both arms overhead.
- Press the hips gently forward, keeping the pelvis squared toward the front.
- Hold the full duration, then switch sides.
Keep the back hip squared and facing forward. The temptation is to let it rotate open to the side, but that immediately redirects the stretch away from the hip flexor and into the outer hip. A different tissue entirely, and not the target here.
After long periods of sitting, this pose can feel acute on the first session. The hip flexor hasn’t been in full extension for hours at a time, and the intensity is appropriate. Pushing through it by muscular force is not.
Pose 4: Half Splits (Ardha Hanumanasana)
Target: Hamstring lengthening | Duration: 45 seconds per side (90 seconds total)
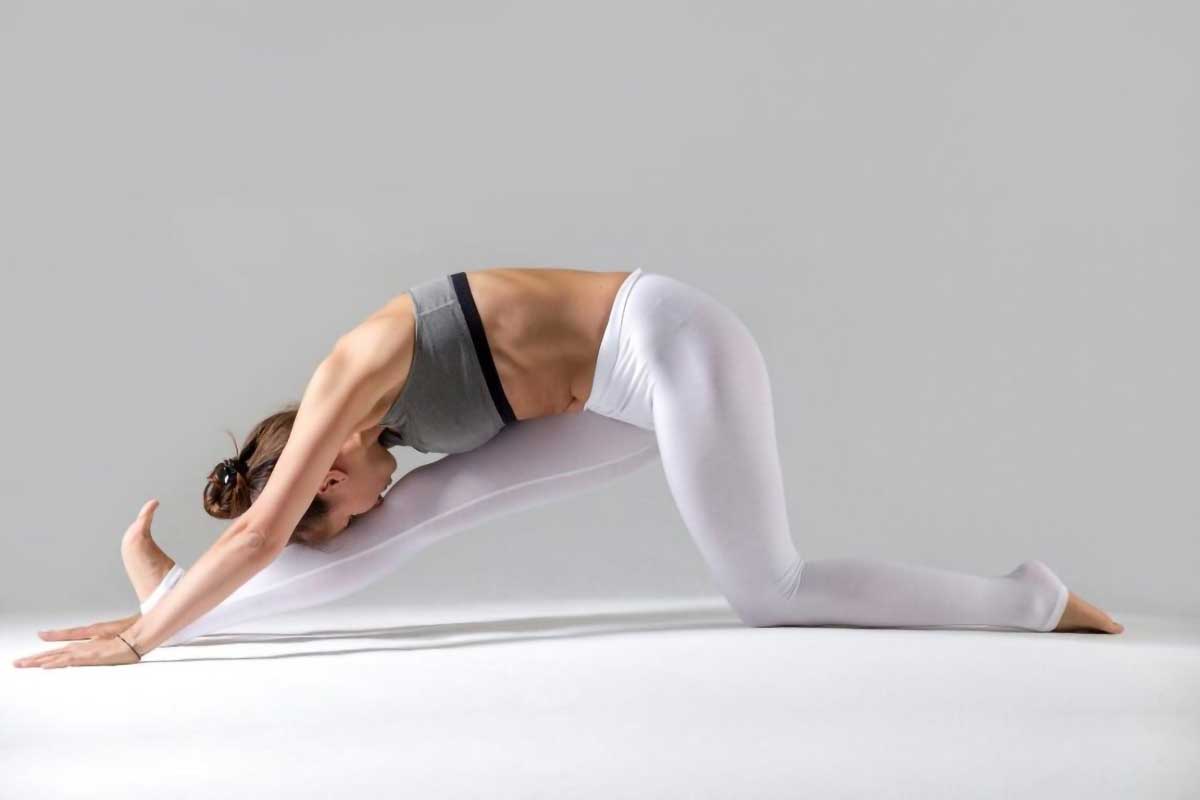
- From Low Lunge, shift the hips back over the back knee.
- Straighten the front leg and flex the front foot, heel pressing into the mat.
- Place hands on the mat on either side of the front leg, or onto blocks for height.
- Hinge forward from the hips toward the front foot, keeping the chest open and the back straight.
- Hold the full duration, then switch sides.
Half Splits isolates the hamstring of the straight leg in a way most people haven’t experienced outside a clinical setting. The supported position removes the balance demand, so the nervous system doesn’t need to guard the stretch and can allow the tissue to lengthen without triggering the reflex contraction that cuts most hamstring stretches short.
What beginners get wrong here is almost universal: they round the spine to chase depth. A rounded lumbar spine takes tension off the hamstring and transfers it into the vertebrae, which is both less effective and genuinely hard on the lower back. The spine is straight, or the pose isn’t working. Keep the back long, place hands on blocks if needed, and accept a shallower position that actually reaches the right tissue.
In four to six weeks of daily practice, most people find the blocks come down without forcing. That’s the structural adaptation beginning at the muscle fiber level, not just the nervous system relaxing. The two feel different. A nervous system release happens in one session. Sarcomere-level adaptation shows up gradually and stays.
Pose 5: Head to Knee (Janu Sirsasana)
Target: Hamstrings, inner groin, and spinal lengthening | Duration: 60 seconds per side (120 seconds total)
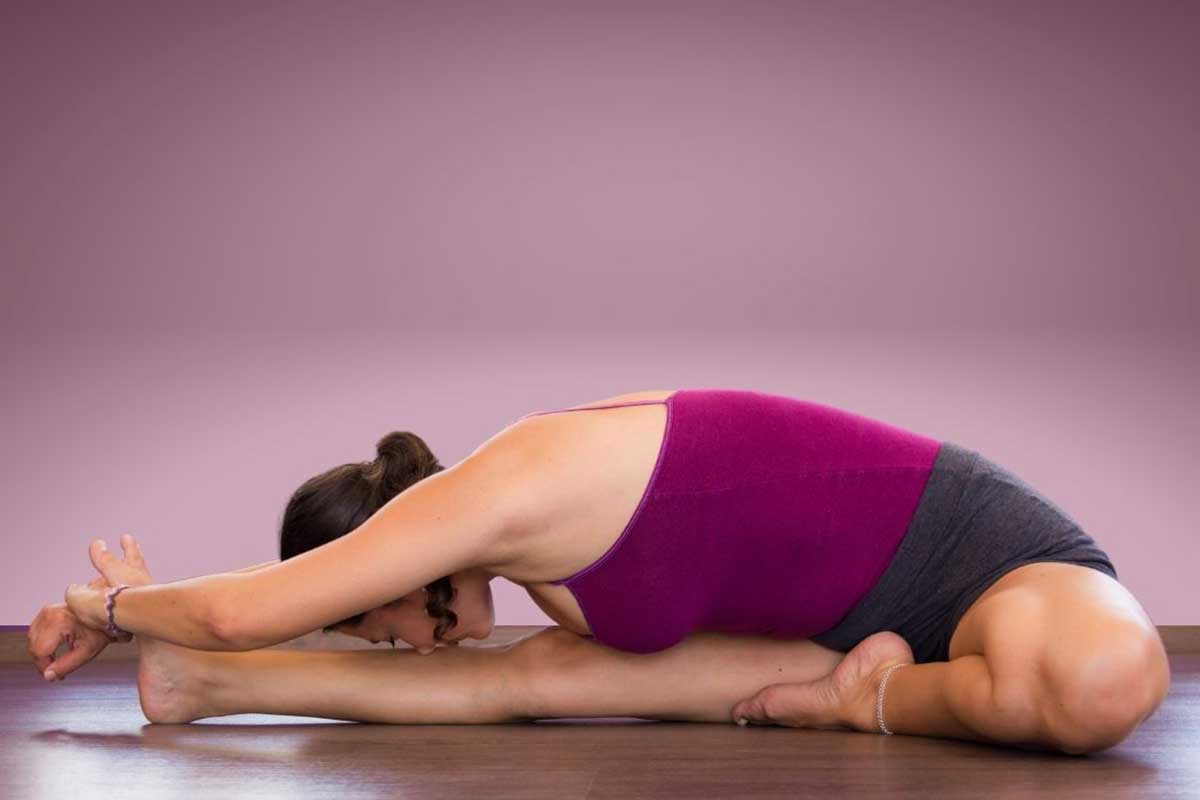
- Sit with both legs extended in front of you.
- Bend the right knee and place the sole of the right foot against the inner left thigh.
- Keeping the left leg straight, hinge forward from the hips toward the extended leg.
- Reach hands to the left foot, shin, or knee, whichever allows the back to remain straight.
- Lead with the chest, not the forehead. Hold. Switch sides.
The bent-leg position does something the previous poses haven’t: it opens the inner thigh and groin on that side while the other leg stays in full extension. Working one side at a time also surfaces asymmetries. Most people are noticeably tighter on one side than the other, and individual work gives the tighter side more time than a bilateral forward fold allows.
If the lower back rounds severely in the full forward fold, sit on a folded blanket. Elevating the pelvis restores the anterior tilt that makes a genuine hip hinge possible.
Pose 6: Lizard Pose (Utthan Pristhasana)
Target: Deep hip rotators and inner groin | Duration: 45 seconds per side (90 seconds total)
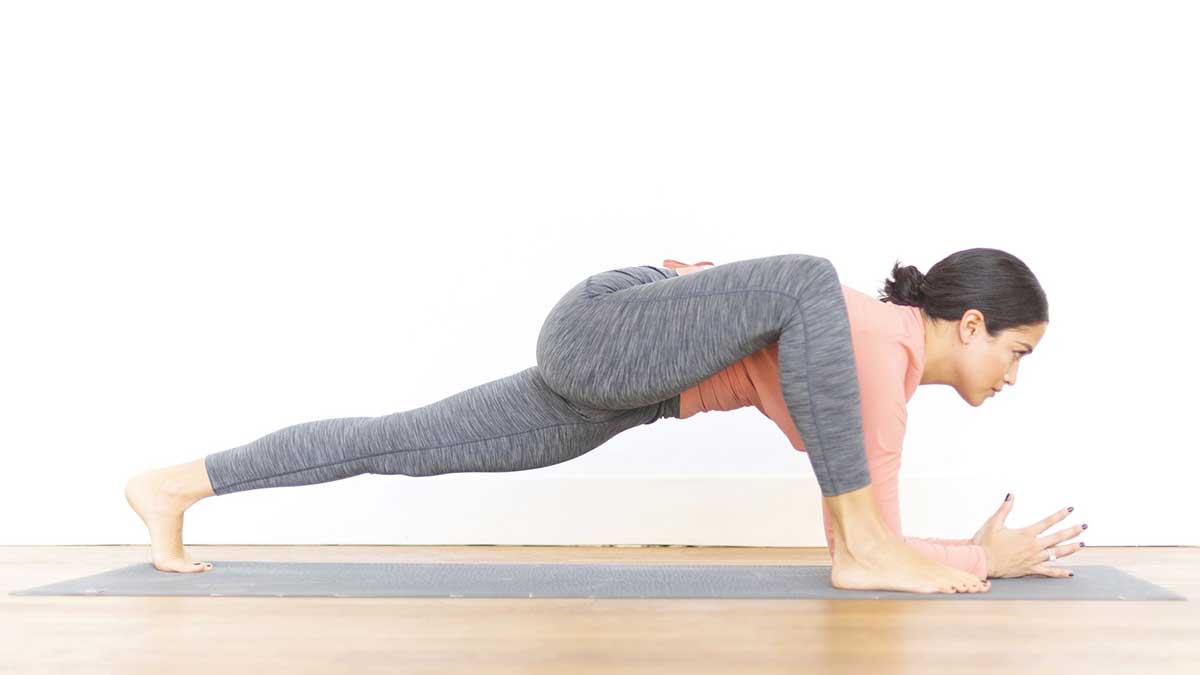
- From a Low Lunge with the right foot forward, place both hands inside the right foot.
- Walk the right foot outward past the right hand, widening the stance.
- Option A: remain on hands, with arms straight, pressing gently outward against the inner thigh.
- Option B: lower the forearms to the mat for a deeper position.
- Press actively through the back heel and keep the back leg straight.
- Hold. Switch sides.
Lizard reaches the deep hip rotators, the muscles that stabilize the joint from underneath rather than just the hip flexors at the front. These are rarely targeted by conventional stretching or foam rolling. If you have finished a long run or a long drive and felt a specific tightness on the outer hip that no rolling or forward fold touches, that’s these muscles. Lizard is built for that sensation.
This is the technically demanding pose in this sequence. Don’t force the forearm variation if the hands version already produces a strong sensation in the target area. What matters is staying in the right place (the inner groin and outer hip of the front leg) without compensating by letting the back hip sag or the front knee collapse inward. A clean, moderate position produces more adaptation than pushing to the deepest available variation in the first few sessions.
In the weeks when this pose feels most intense, it is usually working. The deep rotators respond slowly because they are not used to being targeted at all. Expect a longer runway before this one stops feeling difficult.
Pose 7: Happy Baby (Ananda Balasana)
Target: Inner groin release and lumbar decompression | Duration: 60 seconds
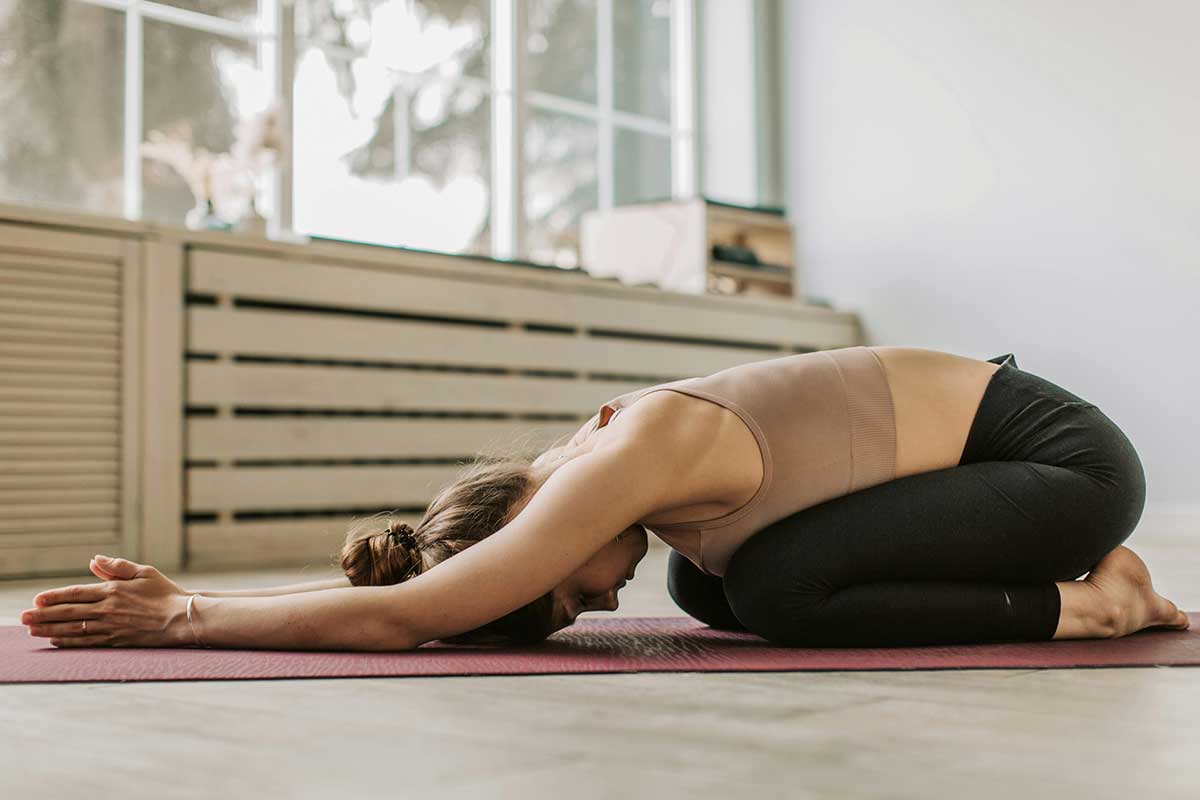
- Lie on your back and draw both knees toward the chest.
- Grab the outer edges of the feet, the ankles, or the shins.
- Draw the knees gently down toward the mat, just outside the ribcage.
- Keep the lower back pressed into the floor. Rock slowly side to side if that feels good.
Happy Baby is recovery. After five demanding poses, the supine position lets gravity do the work without any muscular effort, which allows the nervous system to release its guarding response more fully than any active position can. Slow the breath down here. Don’t chase depth.
Pose 8: Reclined Spinal Twist (Supta Matsyendrasana)
Target: Spinal rotation and outer hip release | Duration: 60 seconds per side (120 seconds total)
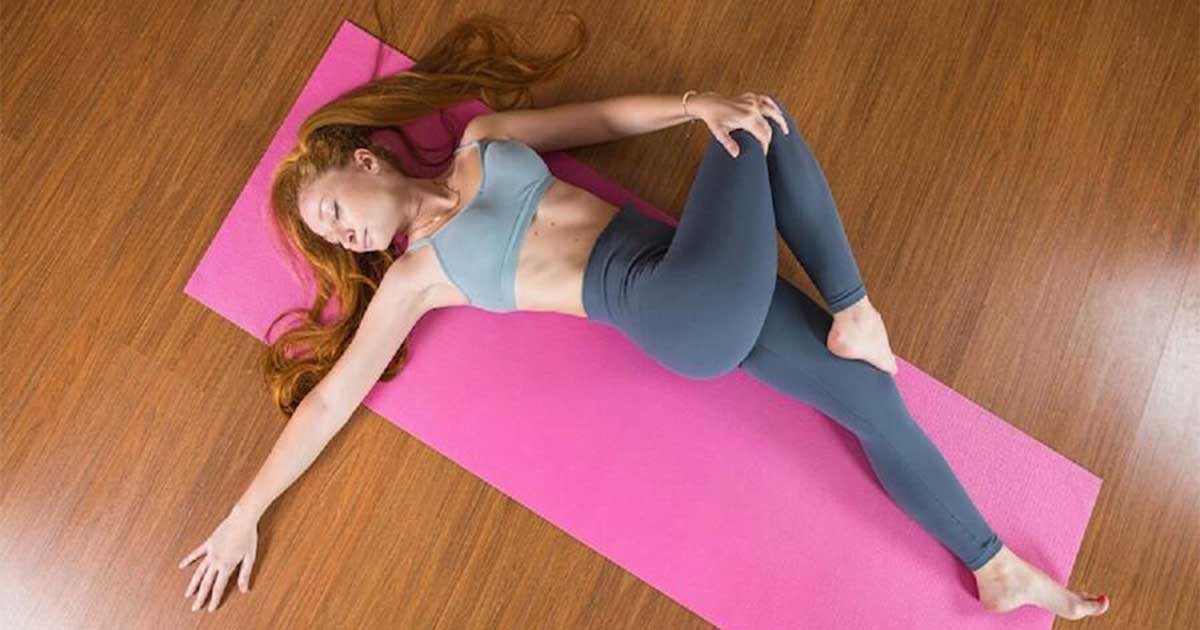
- Lie on your back and extend both arms out to the sides in a T shape.
- Draw the right knee to the chest, then cross it over to the left side and let it rest on the mat.
- Keep both shoulders pressing into the mat and turn the head to the right, away from the crossed knee.
- Hold for 60 seconds. Switch sides.
Every forward fold and hip-opening pose in this sequence pulls the spine in one direction. The reclined twist brings it back. It also releases the outer hip and glute of the crossed leg, tissue that the earlier poses didn’t directly address. End here, stay in the hold, and don’t rush out of the final side.
The Standard routine runs all eight poses at the recommended hold times. Select Express when time is short, Extended for deeper work, or Desk-Worker for sitting-specific hip tightness.
Find a quiet spot and gather any props you need. Blocks for Half Splits and Head to Knee. A folded blanket for Low Lunge. Take three slow breaths before the first pose begins.
Your hip flexors and hamstrings have received the sustained attention that produces real adaptation. The structural change happens in the sustained position — you held the full duration.
Common Mistakes That Keep People Tight
Most people who start a hip yoga routine and don’t see results after several weeks are making one of these errors, not a consistency problem.
Chasing depth over breath is the most common. When a pose feels intense, the instinct is to push through it muscularly. The productive response is neither pushing nor backing off, but breathing into the sensation and letting the exhale soften the tissue. Forcing past resistance trains the nervous system to guard harder, which is the opposite of what’s needed.
Letting the back hip rotate open in Low Lunge and Half Splits happens automatically because it immediately relieves the sensation, but it does so by redirecting the stretch away from the hip flexor. The target is lost, and the pose becomes much less effective. Keep the hips squared forward, even at a shallower depth.
Rounding the lumbar spine to reach further in forward folds is particularly common in Half Splits and Head to Knee. The stretch in a forward fold comes from the hip hinge, not from spinal flexion. When the lower back rounds to get the hands closer to the foot, all tension leaves the hamstrings and transfers to the lumbar vertebrae. Sit on a folded blanket, bend the front knee slightly, and prioritize a straight back.
Nobody skips Cat-Cow on purpose. It seems too easy to matter: 90 seconds of gentle spinal movement before the harder poses. What’s actually happening in those 90 seconds is preparation of the joint environment: synovial fluid circulating, the nervous system shifting from guarding mode to movement mode. Skip it and the first real hold in Low Lunge starts at a higher baseline of resistance than it needs to.
Holding the breath during challenging positions is something most people do without noticing. Muscle tension increases sharply when you hold the breath in a difficult pose. Each exhale is an opportunity for the tissue to release slightly. Keeping a slow, consistent breath pattern throughout is the mechanism, not a coaching cliché.
Routine Variations for Different Schedules
The 15-minute sequence is the standard. When time is limited, the express version below preserves the structural logic. When time allows, the extended version adds depth to the two poses that most benefit from it.
8-minute express version: Cat-Cow (60 seconds), Downward Dog (45 seconds), Low Lunge both sides (60 seconds total), Half Splits both sides (90 seconds total), Happy Baby (45 seconds), Reclined Twist both sides (90 seconds total).
25-minute extended version: Run the full sequence with all holds extended by 50%. Spend extra time in Half Splits and Lizard. These are the two poses that produce the most adaptation per minute for most people in the first eight weeks.
Desk-worker variation: Double the time in Low Lunge (90 seconds per side), add a seated figure-four stretch after Head to Knee, and finish with legs up the wall for three minutes rather than Reclined Twist. This addresses the hip tightness pattern specific to sustained sitting at a desk.
Building the Habit
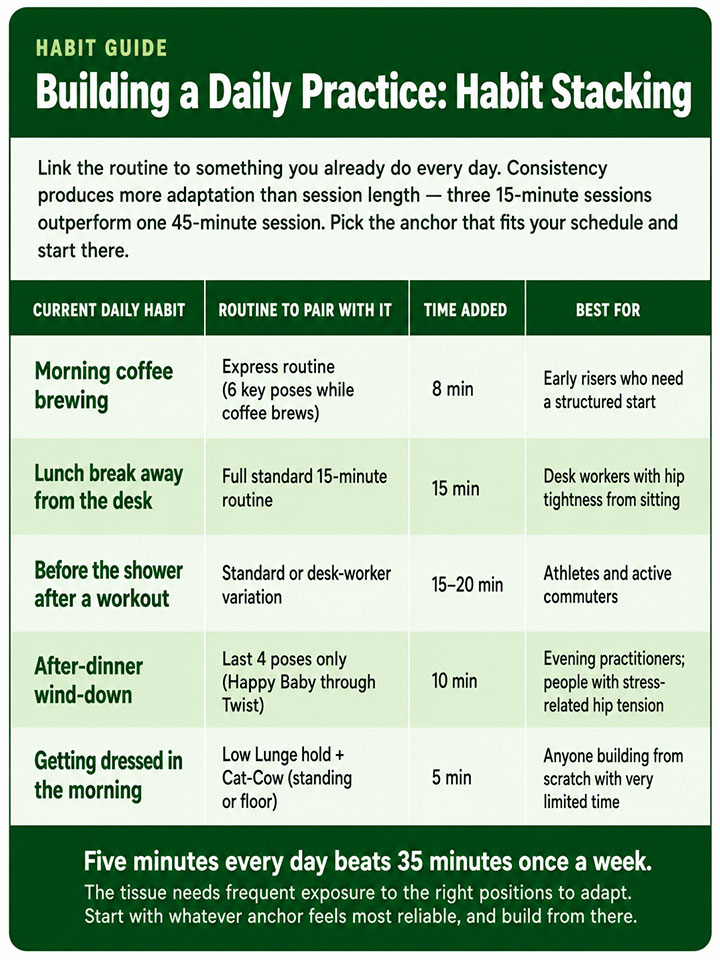
The research on flexibility consistently points to frequency over session length. Three 15-minute sessions per week produce more adaptation than one 45-minute session. The goal is never to do this perfectly. It’s to do it often enough that the tissue doesn’t have time to revert between sessions.
Tracking Your Progress
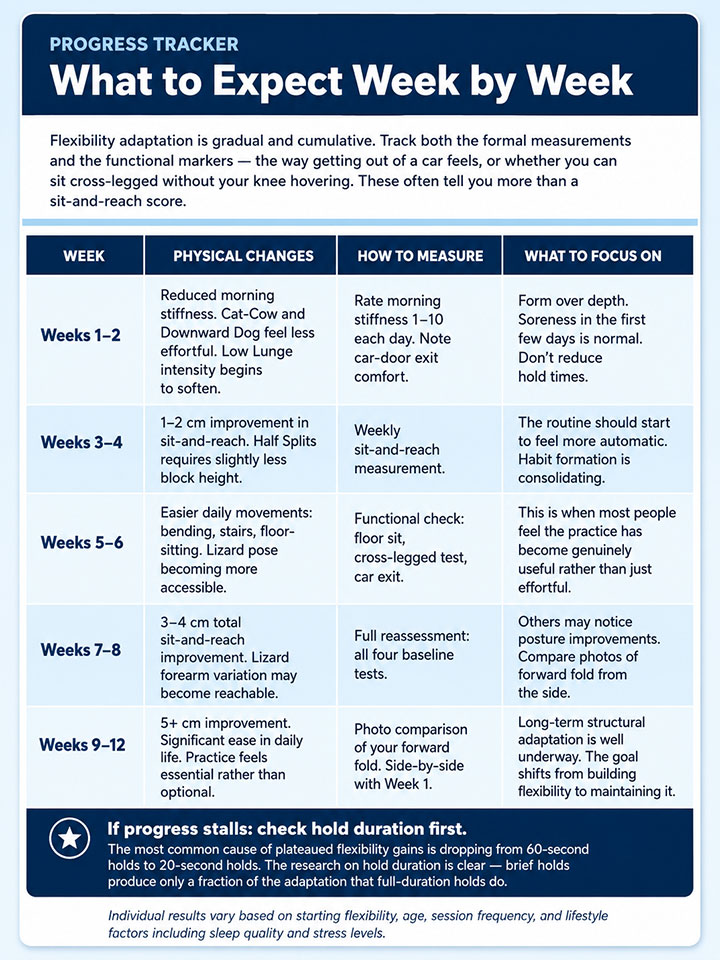
Flexibility improvement is gradual enough that it’s easy to miss without measurement. The most useful tracking is functional rather than formal: how the stiffness getting out of the car changes, whether sitting cross-legged is becoming easier, whether forward folds feel different than they did four weeks ago. These are more meaningful than a weekly sit-and-reach number.
Equipment Guide
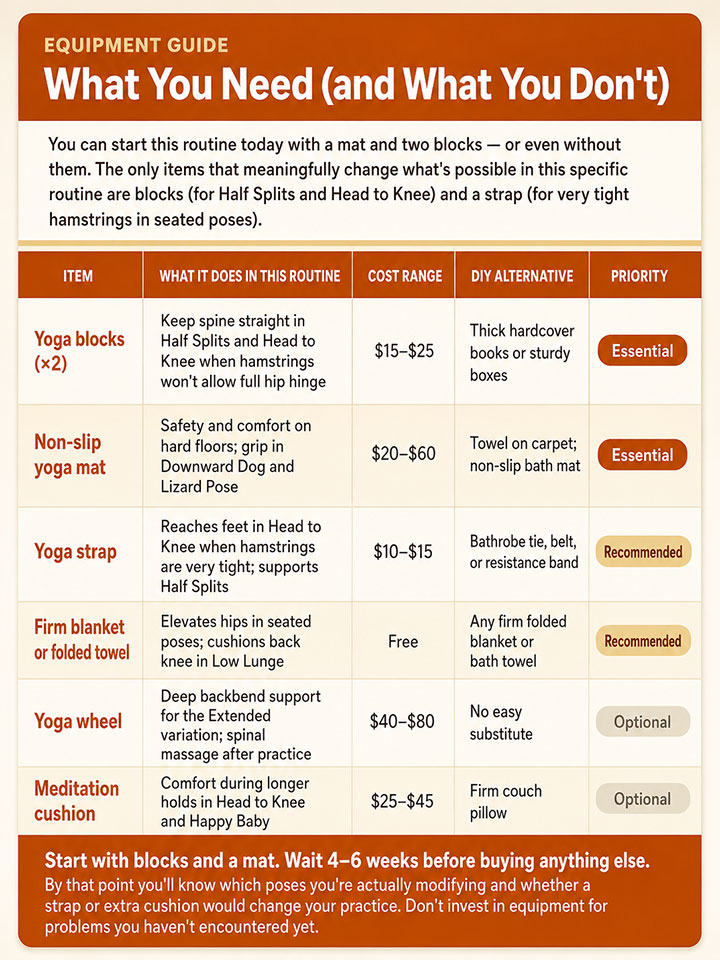
Two yoga blocks and a mat are the only items that meaningfully change what’s possible in this routine. Blocks allow the spine to stay long in Half Splits and Head to Knee when tight hamstrings would otherwise cause the spine to round. A strap can substitute for blocks in some holds. Everything else is optional.
Safety Guidelines
Modifications for Hip Pain, Bursitis, and Arthritis
Hip bursitis, hip arthritis, and post-surgical hips all require modifications to this routine. The governing principle across all three is counterintuitive: reduce the range of motion, not the frequency. Staying active within a comfortable range is generally more beneficial than avoiding movement, and the instinct to rest a painful hip until it improves is usually what makes it stay painful.
For hip bursitis, skip Lizard or use a very shallow version with hands elevated on blocks. Avoid any position requiring the hip to abduct noticeably past neutral, as this compresses the bursa. Low Lunge is usually tolerated well with a folded blanket under the back knee. Happy Baby can be done one leg at a time if bilateral hip abduction is painful.
For hip arthritis, avoid deep flexion past 90 degrees if it produces sharp joint pain. Half Splits is typically better tolerated than poses requiring extreme internal or external rotation. The Reclined Twist should be held at a shallow angle rather than forcing the knee all the way to the mat.
After hip replacement surgery, consult your surgeon or physiotherapist before starting this routine. Standard post-surgical precautions (no hip flexion past 90 degrees, no crossing the midline) apply for the first three months and eliminate or significantly modify most poses here.
When to Stop and Seek Help
Distinguish between stretch sensation and pain. A stretch sensation is diffuse, tolerable, and responds to breath. Pain is sharp, located at a joint rather than a muscle belly, and doesn’t reduce with minor position adjustment or a few breaths. Stop the pose and, if it recurs, see a physiotherapist before continuing.
Stop immediately if you experience numbness or tingling down the leg during any pose. This signals nerve involvement and requires medical assessment, not a stretching modification.
Age-Specific Notes
Practitioners over 50 should allow a longer warm-up, at least eight to ten minutes of light movement before the first deeper hold. The 60-second hold times in this routine are particularly relevant at this stage of life: the Physical Therapy research on hold duration specifically showed that shorter holds produce measurably less adaptation in older subjects. Hold the full time.
Teens and younger adults can often shorten hold times to 30 to 45 seconds and progress to the next variation more quickly. Focus on form over depth regardless of age.
Conclusion
The structural adaptation that sitting creates in the hips doesn’t undo itself with effort. It undoes itself with time and repetition at the right positions. Fifteen minutes a day is not a shortcut. It is genuinely sufficient.
Progress in flexibility doesn’t announce itself. It shows up quietly: one day you reach for something on the floor and notice it was easier than it used to be. The stiffness getting out of the car is a little less. That’s what the adaptation looks like from the inside.
Frequently Asked Questions
How long before I see results?
Most people notice reduced morning stiffness and easier daily movements within two to three weeks. Measurable flexibility improvements, the kind you can track with a sit-and-reach test, typically show up around week four. The six-week mark is when most people find the routine starting to feel genuinely easy rather than effortful.
Should I feel pain during stretches?
No.
Can I do this if I have low back problems?
Yes, for most people with low back trouble. Tight hip flexors and hamstrings are a common structural contributor to low back discomfort, and addressing them directly often helps the condition rather than aggravates it. Bend the knees in all forward folds, avoid positions that reproduce sharp or shooting sensations, and consult a physiotherapist if you have a confirmed disc problem before starting.
Can I do this routine every day?
Yes. This routine is designed for daily practice. If muscles are noticeably sore after the first week, reduce hold times rather than skipping days entirely. Tissue recovers faster from movement within a manageable range than from rest.
Will I lose the gains if I stop?
Flexibility begins to decline after two to three weeks without practice. Twice a week maintains most of the adaptation. Once you’ve built meaningful flexibility, it also returns faster after a break than it took to build initially.
Does this routine strengthen my hips as well as stretch them?
Partly. Downward Dog, Lizard with an active back leg, and Low Lunge all require muscular work. But this routine is designed primarily for flexibility rather than hip stability or strength. If strength is the co-equal goal, add single-leg glute bridges and clamshells as a separate block.
What if Downward Dog makes me dizzy?
Hold the pose for shorter periods initially, 20 to 30 seconds, and come to hands and knees before sitting back or standing. The dizziness is usually a blood pressure response to the mild inversion and typically resolves over two to three weeks of practice. If it doesn’t, a supported forward fold from standing is a direct substitute.
What’s the best time of day?
Body temperature peaks in the late afternoon, making most people measurably more flexible between 4 and 7 PM. Consistency matters far more than timing, though. The best time is whichever slot you’ll actually use.
Can children do this routine?
Yes, with shorter hold times. Fifteen to 20 seconds is appropriate for children under 12. Make it playful.