The standard critique of yoga as a strength modality is reasonable: no external load, no progression, no real gains. A 2015 controlled trial at the Chinese University of Hong Kong tested it anyway. What the researchers found disrupted a lot of assumptions, including some of their own.
Caren Lau and her colleagues at the Department of Medicine and Therapeutics recruited 173 adults, split them into a yoga group and a waitlist control, and ran a 12-week Hatha program, one 60-minute session per week.
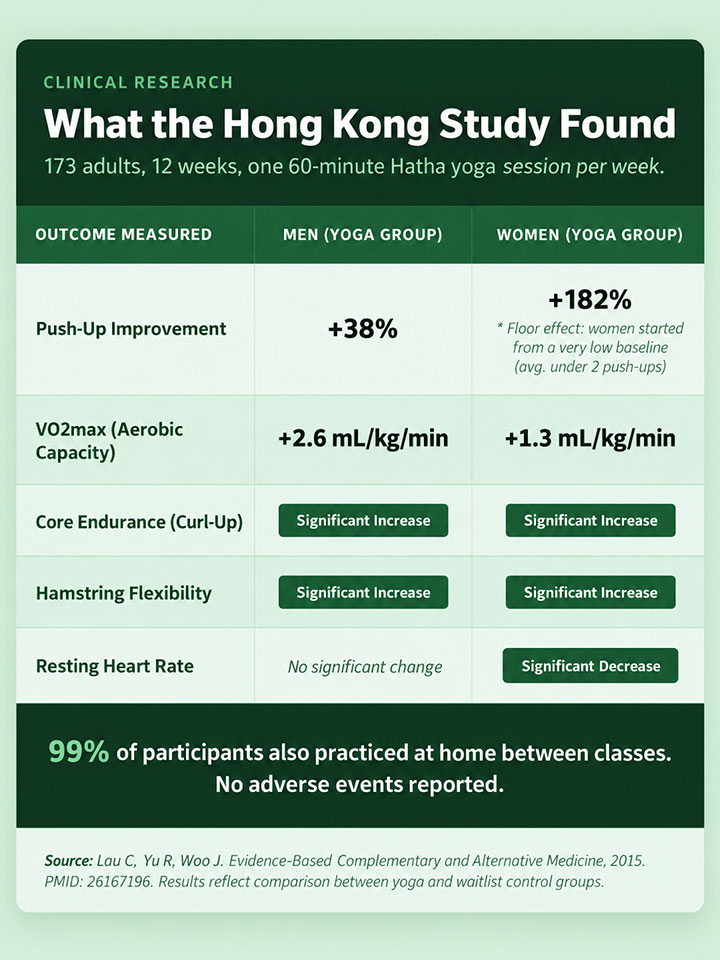
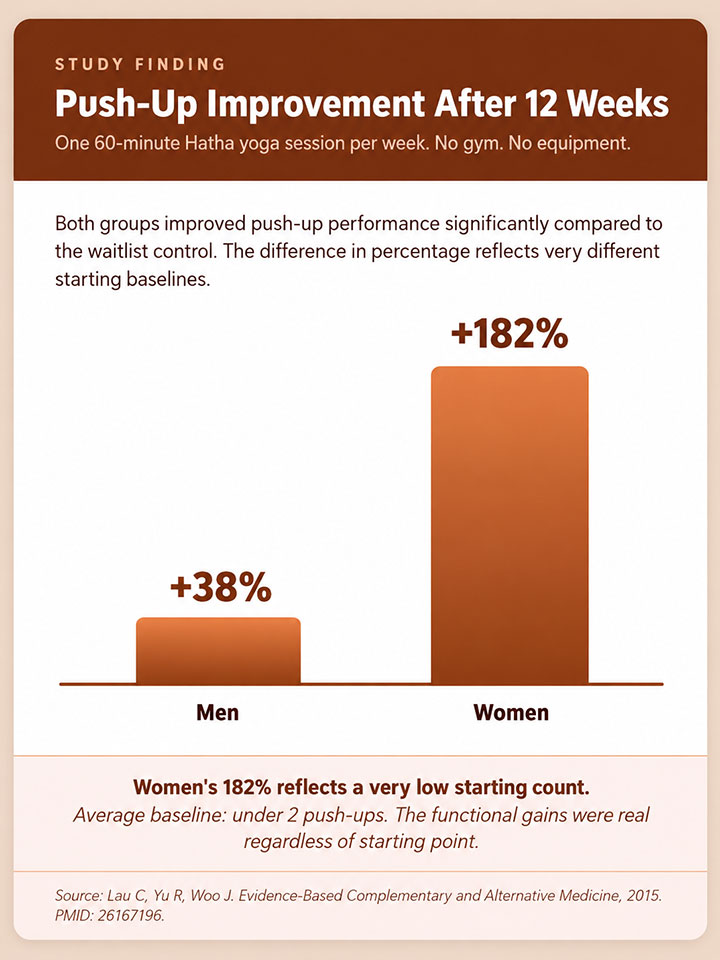
At the end of those 12 weeks, the yoga group had improved push-up performance by roughly 38% in men and 182% in women. Core endurance, measured by curl-up counts, increased significantly in both men and women. Cardiorespiratory fitness improved too.
One session a week. That is the number worth sitting with before anything else.
The Science Behind Yoga and Strength
Why the “Yoga Is Just Stretching” Myth Persists
The confusion is understandable. Yoga looks soft compared to barbell work. No chalk-dusted hands, no loaded bar, none of the visual cues people associate with strength training. The effort is quiet.
But what Hatha yoga does is place muscles under sustained tension. That is the mechanism the “just stretching” critique misses. When you hold a Plank for 45 seconds or lower slowly from one position to another, your muscles are working hard. The load is your own bodyweight. The challenge is time.
Time Under Tension: How Yoga Actually Builds Muscle
In weight training, a bicep curl might last two seconds per rep. Ten reps give you roughly 20 seconds of muscle work. In yoga, a single held pose can keep muscles firing for 30 to 60 seconds straight. That is called time under tension, and it is one of the key drivers of muscle adaptation.
Traditional resistance training uses isotonic movement: muscles shorten and lengthen under load. Yoga uses more isometric work, where muscles fire without changing length. Both approaches build strength.
They do it differently, and the 2015 study published in Evidence-Based Complementary and Alternative Medicine showed that the isometric route produces measurable results within 12 weeks with a surprisingly low time commitment.
The 60-Minute Weekly Protocol
One Session. Real Results.
Lau’s team prescribed one 60-minute Hatha yoga class per week for 12 weeks. No gym. No equipment. No second session required in the written protocol.
A single weekly session, repeated consistently, produced statistically significant gains in upper-body strength and core endurance for both men and women. The participants’ mean age was 52, and the age range ran from 31 to 71.
The findings held across that full spread, with push-up and flexibility improvements reaching significance in both the younger and older subgroups. This was not a narrow result for one population.
Why Hatha Yoga Specifically?
Hatha is the foundation of most yoga styles practiced today. It focuses on two things: postural alignment and sustained holds. That combination is what makes it effective for strength. Alignment ensures the right muscles are doing the work. Sustained holds create the time under tension needed for adaptation.
Faster-paced styles like Vinyasa can also build strength, but Hatha’s slower pace makes it easier to learn mechanics, particularly if you are new to bodyweight training.
Progressive Overload Without Weights
Traditional strength training adds load by increasing weight. Yoga adds load by increasing time. A 20-second Plank becomes a 40-second hold. A slow descent becomes a three-count pause before lowering. The muscle challenge grows without a single piece of equipment.
This is the progressive overload principle applied to bodyweight training. The 12-week roadmap below follows it exactly, phase by phase.
The Upper-Body Strength Circuit
These three poses target the muscles the Hong Kong study measured in its push-up test: the triceps, the serratus anterior, and the chest. Run Plank, Chaturanga, and Upward Dog as a linked sequence before moving to the core circuit.
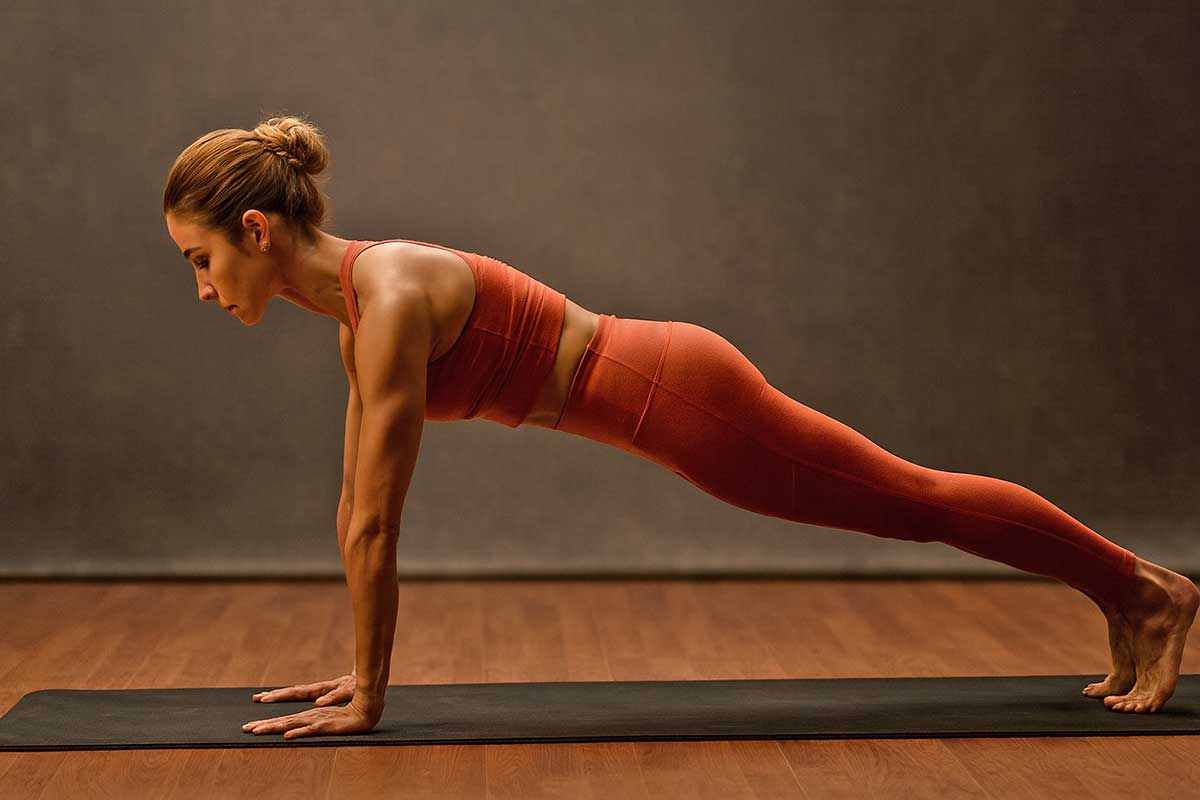
Pose 1: Plank (Phalakasana)
Plank is the starting point for upper-body work. It looks simple. It is not.
- Begin in a push-up position with hands directly below the shoulders, fingers spread wide.
- Press actively through the base of the index finger and the heel of the palm. This distributes load across the whole hand rather than concentrating it at the wrist joint. Yoga teachers call this Hasta Bandha.
- Draw the shoulder blades slightly apart (scapular protraction) and pull the belly button toward the spine.
- Keep hips level: not sagging toward the floor, not raised toward the ceiling.
- Hold. Start with 20 to 30 seconds and work toward 60 seconds over the 12 weeks.
Wrist ache after Plank is almost always a technique problem. Press harder through the fingertips and check that your weight is not collapsing into the heel of the hand. That shift alone usually fixes it.
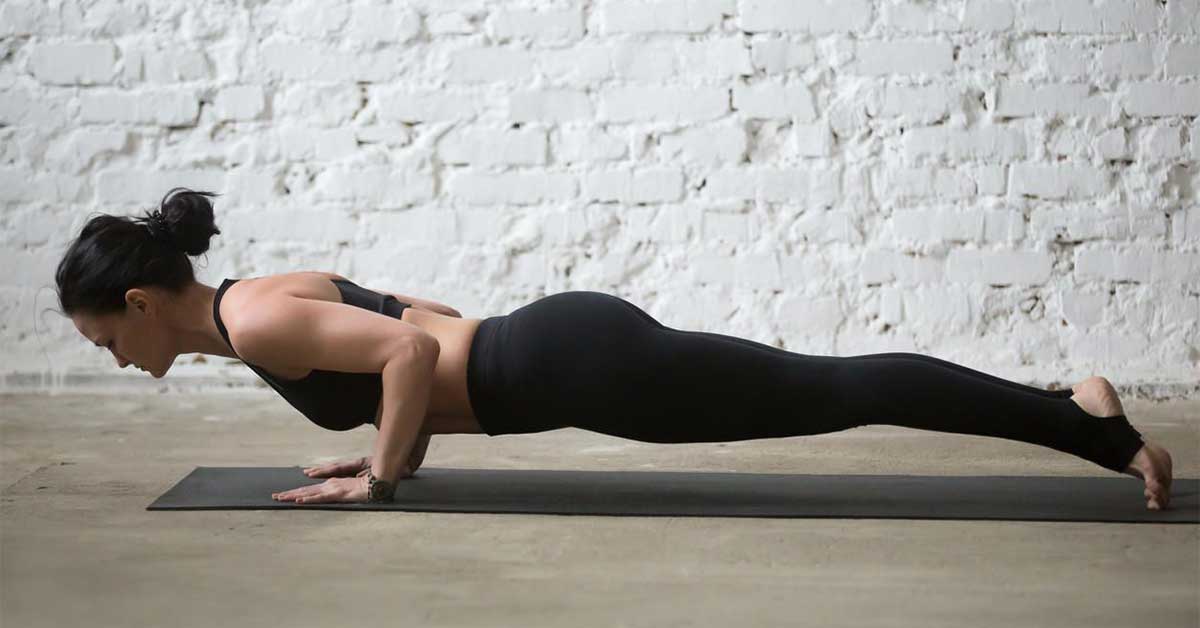
Pose 2: Four-Limbed Staff Pose (Chaturanga Dandasana)
This is the yoga push-up. It is technically the most demanding pose in the circuit and the one most people shortcut. That shortcut is also where most of the benefit gets lost.
Chaturanga loads the triceps and the serratus anterior (the muscle running along the side of the rib cage) in exactly the way a push-up test does. The mechanism is the controlled descent under load: the same muscles that drive push-up performance have to fire isometrically to prevent a collapse.
This loading pattern is a likely reason why consistent Hatha practice produces the push-up gains the Hong Kong study measured across its 57-pose protocol.
- From Plank, shift your weight forward onto the balls of the feet.
- Begin to lower your body as one straight unit, keeping the elbows hugged close to the ribs. They should not flare out to the sides.
- Stop when the elbows reach 90 degrees. The upper arms should be parallel to the floor.
- Hold this position for one full breath before lowering completely, or control the descent in a 3- to 5-count.
If full Chaturanga is too much at first, drop the knees to the floor. The knees-down version trains exactly the same muscles at a lower load. It is a genuine modification, not a shortcut, and it is the right starting point for most beginners. Quality of movement matters more than ego.
Start with 3 to 5 slow repetitions. Work toward a 5-count descent over the program.
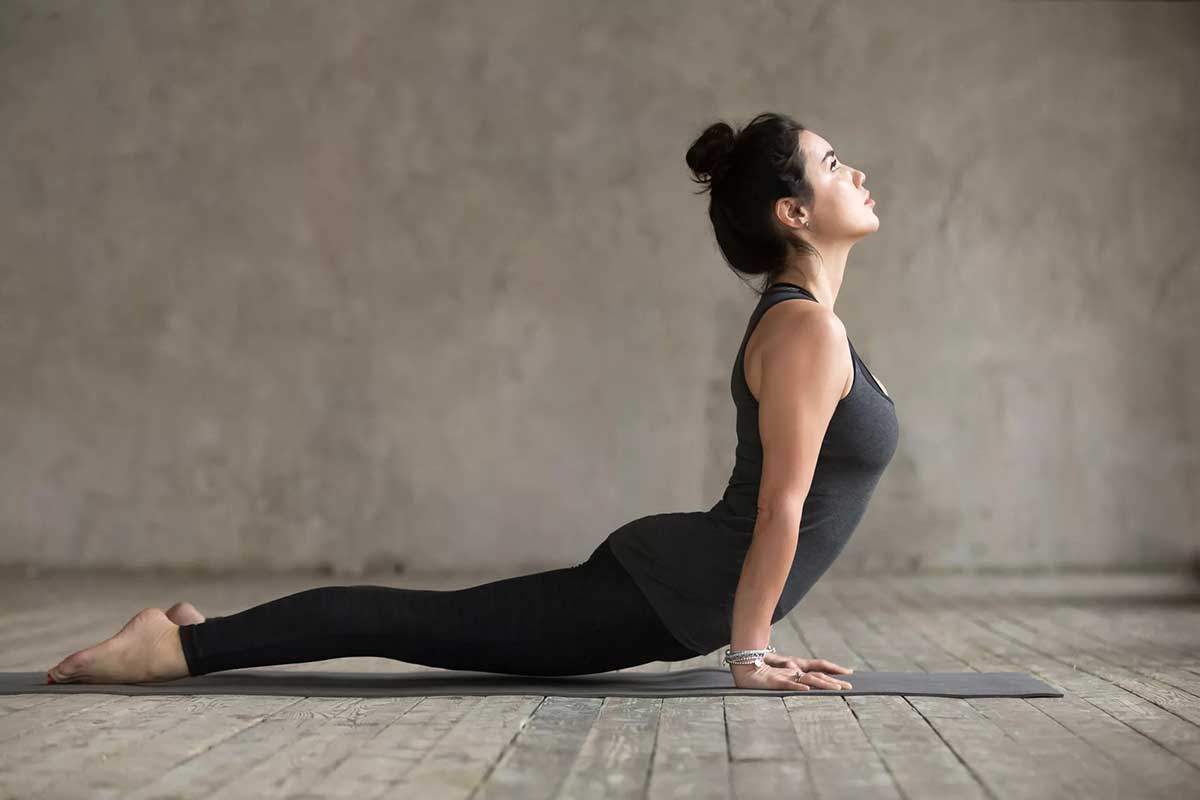
Pose 3: Upward-Facing Dog (Urdhva Mukha Svanasana)
This is the return phase of the movement.
- From the bottom of Chaturanga, press through the hands and roll over the toes.
- Lift the chest and draw it forward until the arms straighten fully and the thighs rise off the mat.
- Press the tops of the feet firmly into the floor. This engages the quadriceps and keeps the thighs lifted.
- Hold for one to two full breaths, then either press back to Plank or lower through to the floor.
Upward Dog creates active tension through the arms and chest while stretching the hip flexors and abdominals at the same time. Most people experience it as relief after the intensity of Chaturanga. The muscles are still working, just in a different direction, which is exactly why this three-pose sequence hits differently than a set of push-ups.
The Core Endurance Circuit
The Hong Kong study measured core strength using curl-up tests, and the yoga group improved significantly in both men and women. These three poses drive that result.
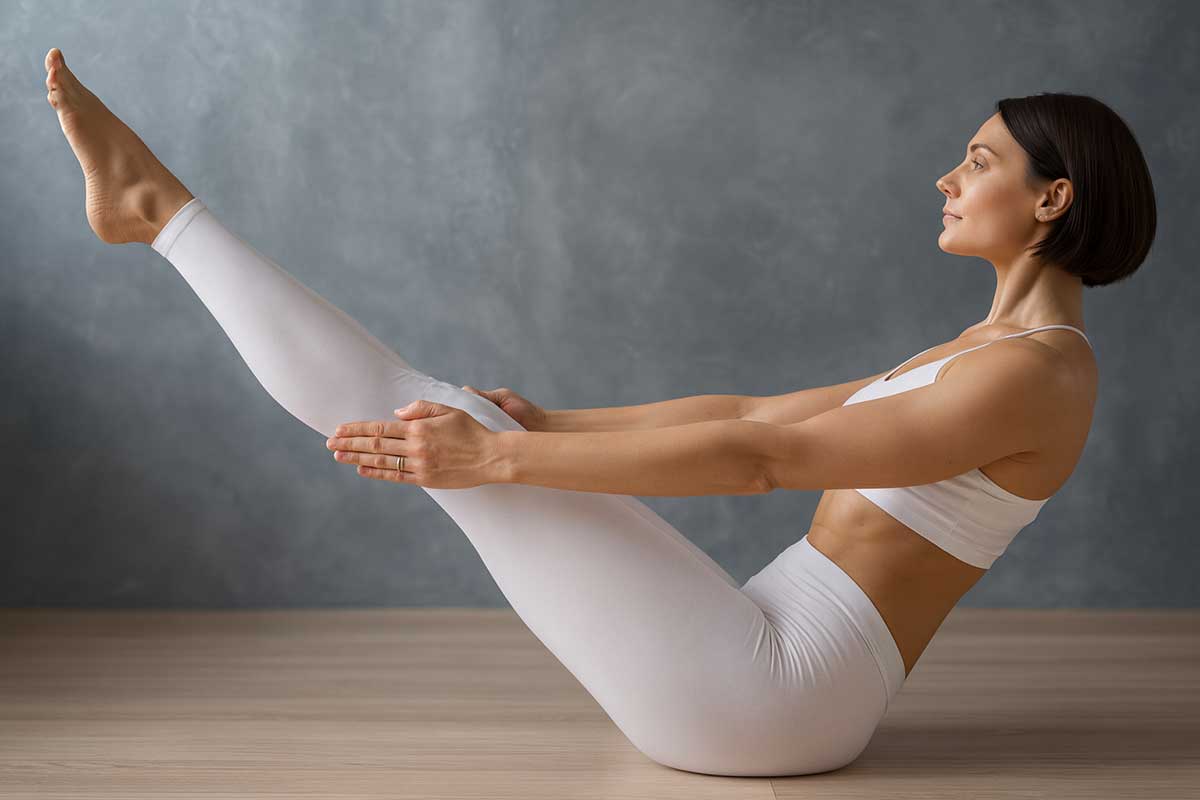
Pose 4: Boat Pose (Navasana)
- Sit on the floor and lean back until you feel the hip flexors engage rather than just the lower back absorbing the load.
- Lift your feet until the shins are parallel to the floor.
- Extend your arms forward alongside the legs, palms facing inward.
- Keep the spine long. If it rounds into a C-shape, you have gone too far back. Pull the chest slightly forward until it lifts.
- Hold for 20 to 30 seconds. Rest briefly, then repeat twice.
Boat Pose trains the rectus abdominis and hip flexors under sustained load. The self-diagnostic is your spine: long means the deep core is doing the work. Rounded means the hip flexors have taken over and the core has disengaged. Most people hit that point around the 20-second mark. The hold after it is where the actual work happens.
Pose 5: Warrior III (Virabhadrasana III)
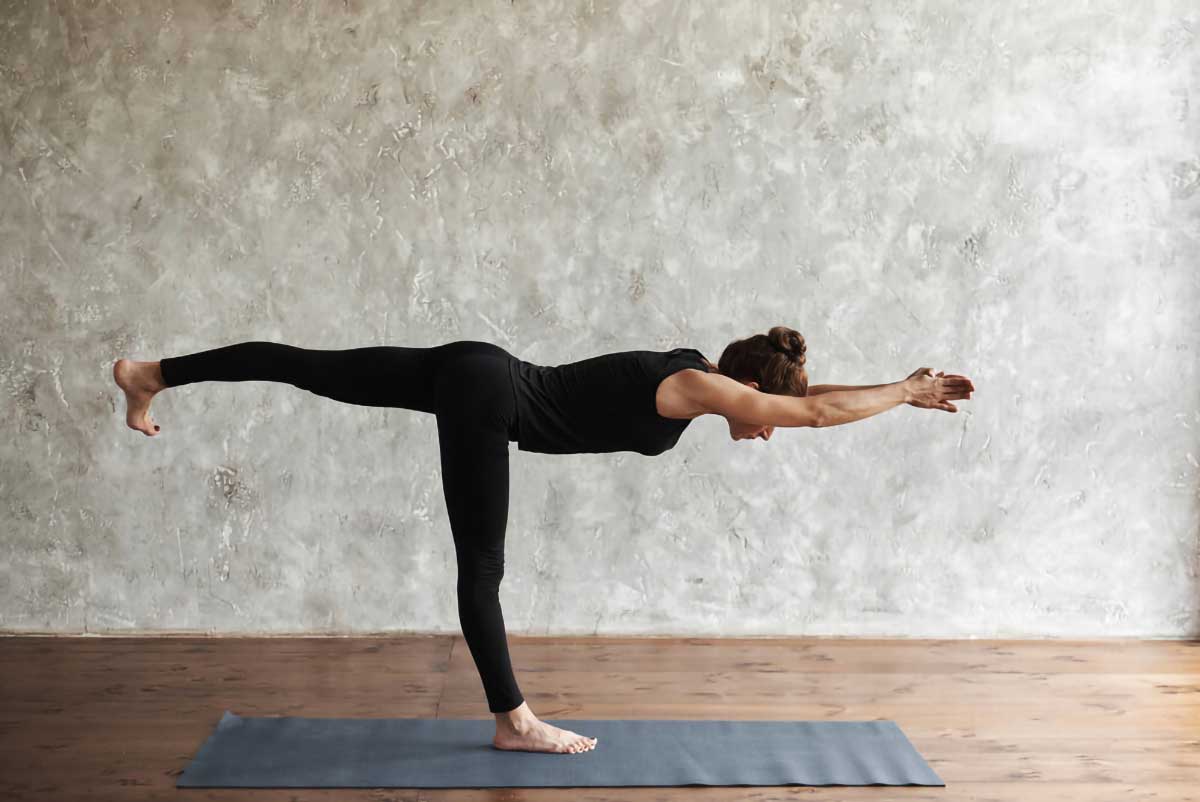
Balance poses are deceptive. Warrior III does not look like core training. It is.
- Begin standing. Shift your weight onto one foot and hinge forward at the hips.
- Lift the non-weight-bearing leg behind you until your body forms a straight T-shape from the extended foot to the crown of the head.
- Arms can extend forward, rest on the hips, or brace against a wall for support.
- Fix your gaze on a stationary point at floor level. Hold for 20 to 30 seconds per side.
To hold this position, the transverse abdominis (the deep core stabilizer wrapped around the spine) has to work constantly, not just during the initial lift.
That sustained demand on a muscle most people never consciously train is what makes Warrior III more useful for functional core strength than it appears.
Training balance in this way also builds proprioception, your body’s sense of where it is in space, which transfers directly into better movement quality off the mat.
Pose 6: Side Plank (Vasisthasana)
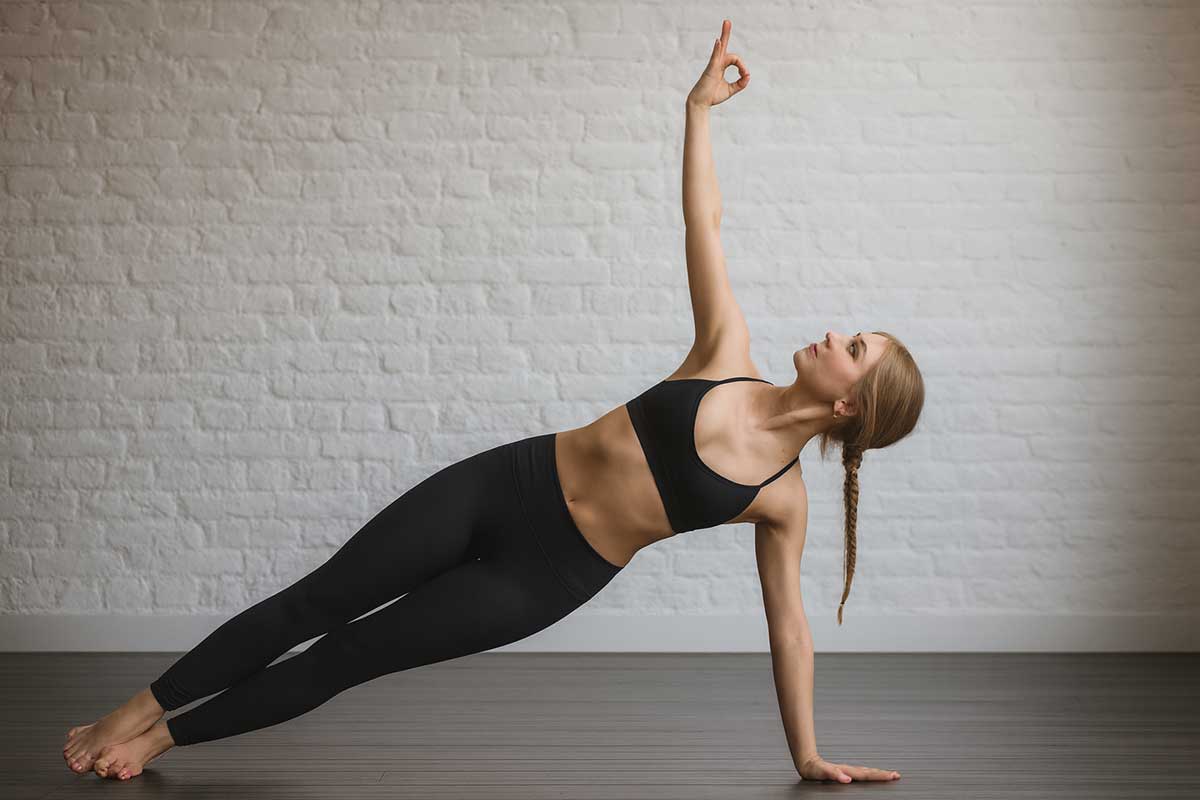
- From a standard Plank, rotate onto the outer edge of one foot and stack your feet.
- Shift your weight onto one hand and lift the top arm toward the ceiling.
- Keep the hips lifted. If they drop toward the floor, the obliques stop working.
- Hold for 20 seconds per side to start. Work toward 45 to 60 seconds over the program.
Side Plank targets the obliques and the quadratus lumborum, a deep back stabilizer that controls lateral trunk stability and rotational movement. Strong obliques mean a more stable core, better posture, and reduced strain on the lower back during daily activity.
The improvements in postural control the Hong Kong study found most likely owe something to consistent lateral core loading of this kind.
The 12-Week Implementation Roadmap
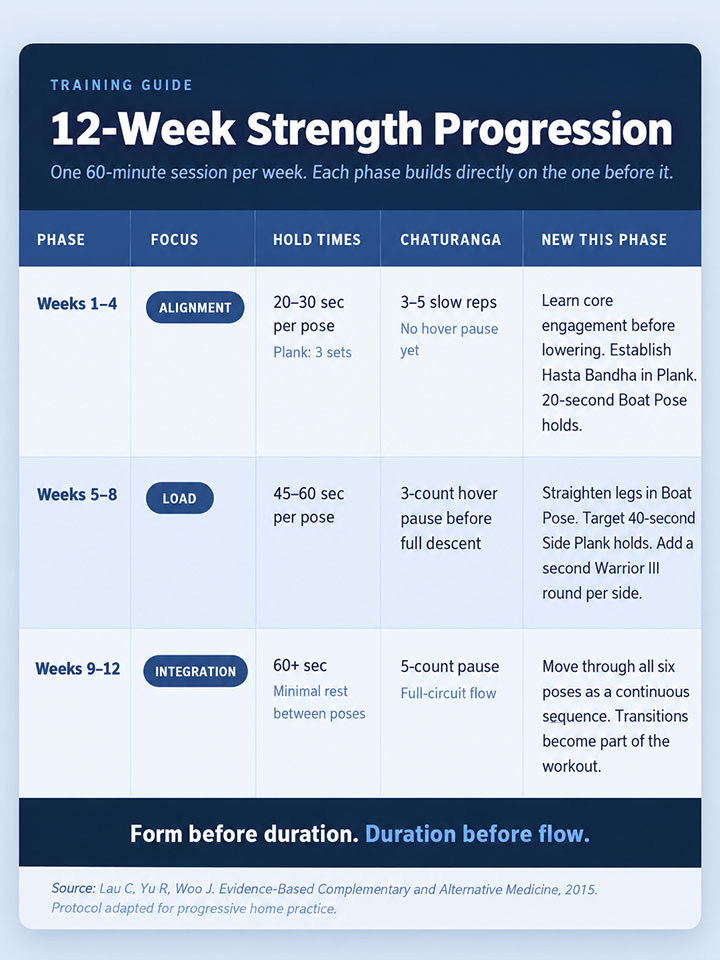
This roadmap mirrors the Hong Kong study’s structure. Each phase has a specific job: alignment first, then load, then integration.
Weeks 1 to 4: The Foundation Phase
The first month is about alignment, not intensity. Move slowly through each pose. Learn where your weight should sit in Plank. Learn how to engage the core before lowering into any descent. Get comfortable with Boat Pose at 20-second holds before pushing the duration.
Hold times: 20 to 30 seconds per pose. Plank: 3 sets. Chaturanga: 3 to 5 slow repetitions. Let the joints adapt. Let the technique settle before adding time.
Weeks 5 to 8: The Build Phase
Now extend the holds to 45 to 60 seconds. Add a hover in Chaturanga: pause two to three inches above the floor before lowering all the way. That pause is where the real strength work happens, and it is harder than it sounds the first time you try it.
In Boat Pose, try extending the legs to a straighter angle. In Side Plank, target 40-second holds per side. Warrior III: add a second round per side each session. The transitions between poses start to feel less effortful, and that is the signal that the Foundation phase did its job. Keep the hold times climbing.
Weeks 9 to 12: The Peak Phase
By week nine, the full sequence should flow with more ease and more challenge at the same time. Plank feels steadier. Chaturanga feels more controlled. Boat Pose, which felt precarious in week two, now feels familiar enough that the difficulty has to come from hold time.
Aim to move through the full circuit (Plank, Chaturanga, Upward Dog, Boat, Warrior III, Side Plank) with minimal rest between poses. Hold times: 60 seconds or longer. Chaturanga descent: a full 5-count pause near the bottom before lowering.
Functional Gains Beyond the Muscle
Strength and Flexibility Together
One of the more unexpected findings in the Hong Kong data was this: participants gained both strength and flexibility over the 12 weeks. Traditional resistance training rarely delivers both simultaneously, because repeated muscle shortening under load can create tightness over time.
Yoga’s combination of held positions and full-range movements keeps muscles both strong and long. That balance has real consequences for long-term joint health and the quality of everyday movement, and it is not something most gym programs account for.
Heart Health Along the Way
The study also measured cardiorespiratory endurance. Men in the yoga group gained roughly 2.6 mL/kg/min in VO2max over 12 weeks. Women gained approximately 1.3 mL/kg/min. For context, that is roughly comparable to what a moderate walking program produces over a similar period. It is not what a structured running plan delivers, and no one should mistake this for aerobic training. But for someone whose cardiovascular baseline is genuinely sedentary, it is a real return on one hour a week.
A 60-minute Hatha session keeps the heart working at a steady rate throughout: sustained poses, controlled transitions, breathing that does not stop. That sustained demand, repeated over 12 weeks, produces a measurable change in aerobic capacity without a single cardio machine.
Common Pitfalls That Kill Progress
Dumping Into Your Joints
The most common mistake in Plank and Chaturanga is collapsing into the wrists and shoulders rather than actively holding the position. You will know this is happening if your wrists ache after Plank or your shoulders creep up toward your ears mid-Chaturanga.
The fix: spread your fingers wide and press actively through the palm, particularly the base of the index finger. This “Spider-Man grip,” or Hasta Bandha, distributes load across the whole hand rather than concentrating it at the wrist joint. Pair it with shoulder blades drawn slightly apart and a core engaged before any movement, and the position becomes substantially safer.
Wrist and shoulder injuries in yoga are almost always a technique problem, not a yoga problem.
Holding Your Breath
This one is subtle but important. When poses get hard, most people hold their breath. The instinct makes sense: it feels like bracing. The effect is closer to the opposite.
Controlled breathing keeps the diaphragm moving rhythmically, which maintains intra-abdominal pressure. That pressure is what stabilizes the spine during challenging positions. Think of it like the air pressure inside a tire: the air is what gives the tire its structural strength. A held breath deflates the tire at exactly the moment it needs to hold the most load.
Aim for one natural exhale through the nose every three to four seconds during held poses. If you find yourself holding your breath, the pose is too intense. Modify first.
Is Yoga Enough?
The honest answer requires knowing what the study measured and who its participants were.
Lau’s team recruited adults across a wider age range than the study is usually described as covering: the participants’ mean age was 52, but the range ran from 31 to 71.
The push-up and curl-up baselines in the data reflect a genuinely sedentary starting point. Most participants were doing very little structured exercise before enrollment.
The 182% improvement in women’s push-up performance is real, and it partly reflects how low the starting count was (an average of under two push-ups at baseline). That floor effect is documented in the published data, and it is useful information about who benefits most from a program like this.
There is also something the study’s lead finding tends to obscure. The protocol prescribed one weekly 60-minute class.
That is the number cited. But the study’s own adherence records show that 99% of participants also practiced at home between classes, averaging about 165 additional minutes per week. The yoga group was not doing one hour a week.
They were doing one structured class and an additional two and a half hours of home practice on top of it. That distinction matters when deciding how much time to commit.
Whether yoga can replace a gym program depends entirely on what the goal is. For people who want to move better, stand taller, feel stronger, and maintain joint health as they age, a consistent Hatha practice delivers real, measurable results.
If the goal is muscle size or maximal strength output, resistance training will eventually be necessary. Yoga’s load is limited by bodyweight, and that ceiling becomes relevant for more advanced athletes.
Start with the Foundation phase. Learn the poses. The data supports the approach. What the data cannot tell you is how much of the result came from the class and how much came from the practice people did between classes. That variable is worth accounting for in your own planning.
This routine is based on research published in Evidence-Based Complementary and Alternative Medicine (Lau, Yu, and Woo, 2015; PMID: 26167196). As with any new exercise program, speak with a healthcare provider before starting, especially if you have existing joint, wrist, or shoulder concerns.