Five simple movements form the foundation of a progressive approach designed to rebuild hip strength. But knowing when to advance each exercise matters just as much.
For decades, the standard advice for hip pain was rest. Stop running. Stop climbing stairs. Wait for the inflammation to subside. Doctors meant well. They were also, in many cases, making things worse.
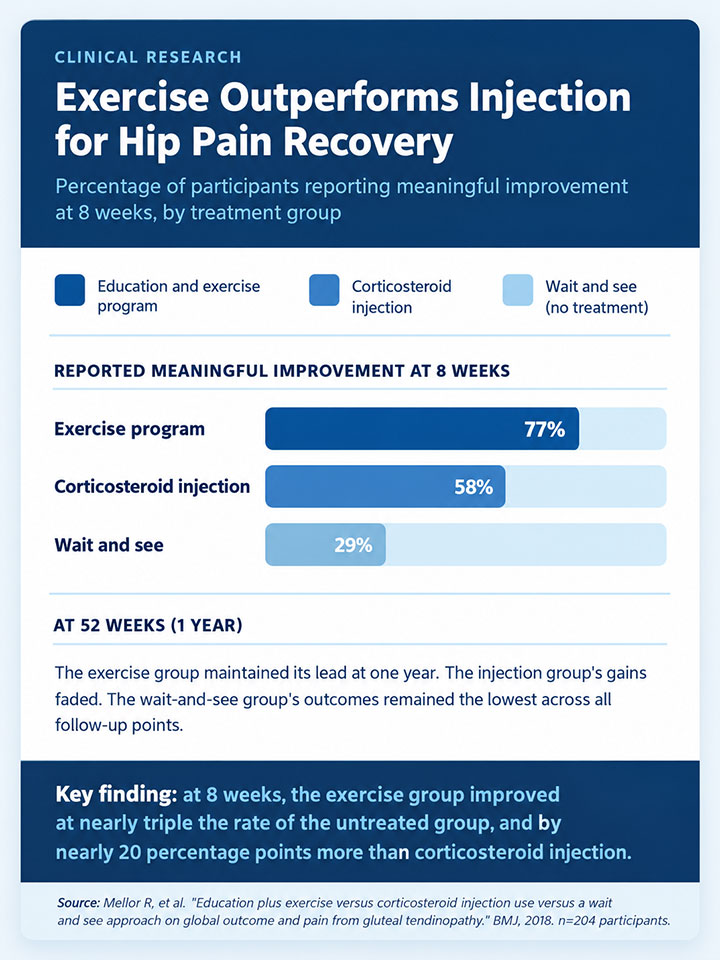
A landmark clinical trial published in the BMJ found that people who followed a structured education-and-exercise program recovered at roughly twice the rate of those who received a corticosteroid injection (the go-to treatment for hip bursitis in most clinics).
At eight weeks, 77% of the exercise group reported meaningful improvement. The injection group came in at 58%. The wait-and-see group, those who rested and avoided loading, managed 29%.
Rest, it turns out, is the least effective treatment available. The hip doesn’t want to be left alone. It wants to be loaded: carefully, progressively, and with a plan.
This guide gives you that plan. Six weeks of hip bursitis exercises, organized by phase, with clear guidance on what to avoid and what to expect as you progress.
Understanding Your Hip Pain: Is It Really Bursitis?
Hip bursitis sits on the outside of the hip, right at the bony bump you can feel on your upper thigh. It gets worse when you lie on that side at night. Getting up from a chair makes you grimace. Climbing stairs feels like climbing a mountain.
But the condition most people call “hip bursitis” is more complicated than the name suggests. Researchers Sarah Long, Deborah Surrey, and Levon Nazarian published findings in the American Journal of Roentgenology in 2013 showing that isolated bursa inflammation is actually uncommon in people diagnosed with this condition.
The more frequent finding on imaging is tendinopathy of the gluteus medius or minimus tendons (the muscles responsible for stabilizing your pelvis when you walk). The bursa often becomes inflamed secondarily, as collateral damage.
This is why some people rest for weeks without improvement. Tendinopathy doesn’t respond to rest the way acute inflammation does. It responds to graded loading.
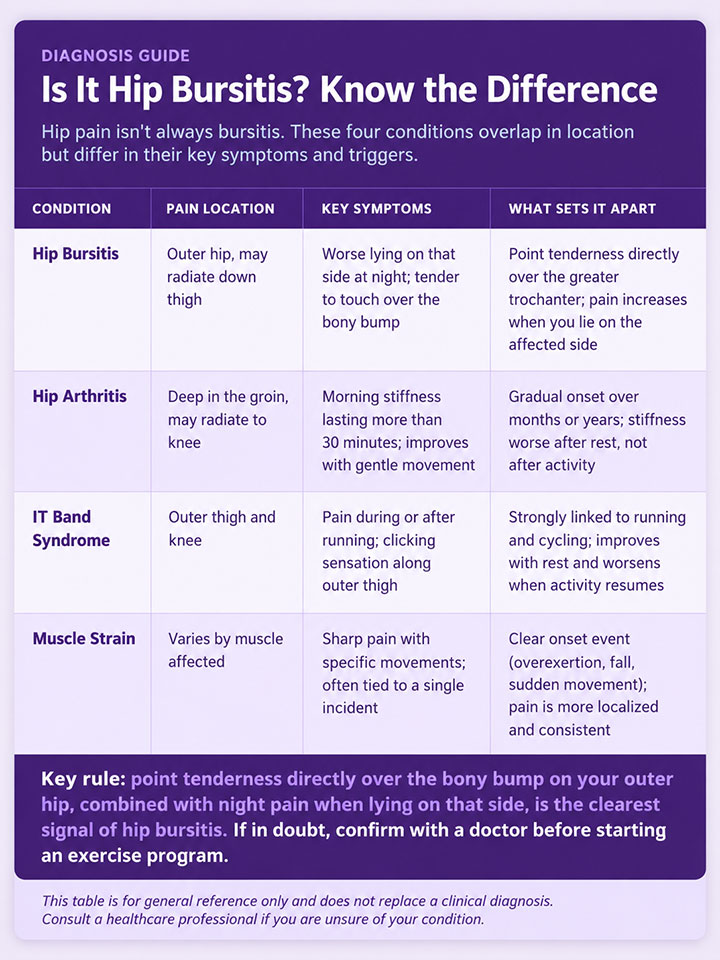
Before starting any exercise program, it’s worth confirming the diagnosis with a doctor or physical therapist. Hip pain isn’t always bursitis. The table below shows what distinguishes the most common conditions:
If any of the red flag symptoms below apply, stop and seek medical attention before starting exercises:
- Fever alongside hip pain (possible infection)
- Inability to bear weight on the affected leg
- Numbness or tingling running down the leg
- Severe pain that doesn’t respond at all to rest
- Visible warmth, redness, or swelling over the hip
The Research Case for Exercise (and Why Your Instincts Are Wrong)
Rebecca Mellor and her colleagues at the University of Queensland wanted to know which treatment for lateral hip pain actually worked best. The LEAP trial, published in the BMJ in 2018, enrolled 204 people with confirmed gluteal tendinopathy and randomly assigned them to one of three groups: a structured education-and-exercise program, a single corticosteroid injection, or a wait-and-see approach.
At eight weeks, 77% of the exercise group were “moderately better” to “very much better” on a standardized recovery scale. At 52 weeks, the exercise group maintained its lead. Corticosteroid injections worked faster in the first month. They’re good at reducing acute inflammation, but the gains faded. By the one-year mark, exercise had pulled ahead on every measure.
The implication is stranger than it sounds. The treatment that feels most passive (rest, injection) works fastest and fades soonest. The treatment that feels most demanding (progressive loading, structured exercise) takes longer to feel like anything is changing, and produces the most durable recovery. That’s the counterintuitive core of this plan.
The One Rule That Governs Every Exercise
Sharp, shooting pain is your body telling you to stop. Mild aching during a stretch, or a dull burn during the final repetitions of a strengthening set, is expected and acceptable. The line between the two matters.
Use this scale every time you exercise:
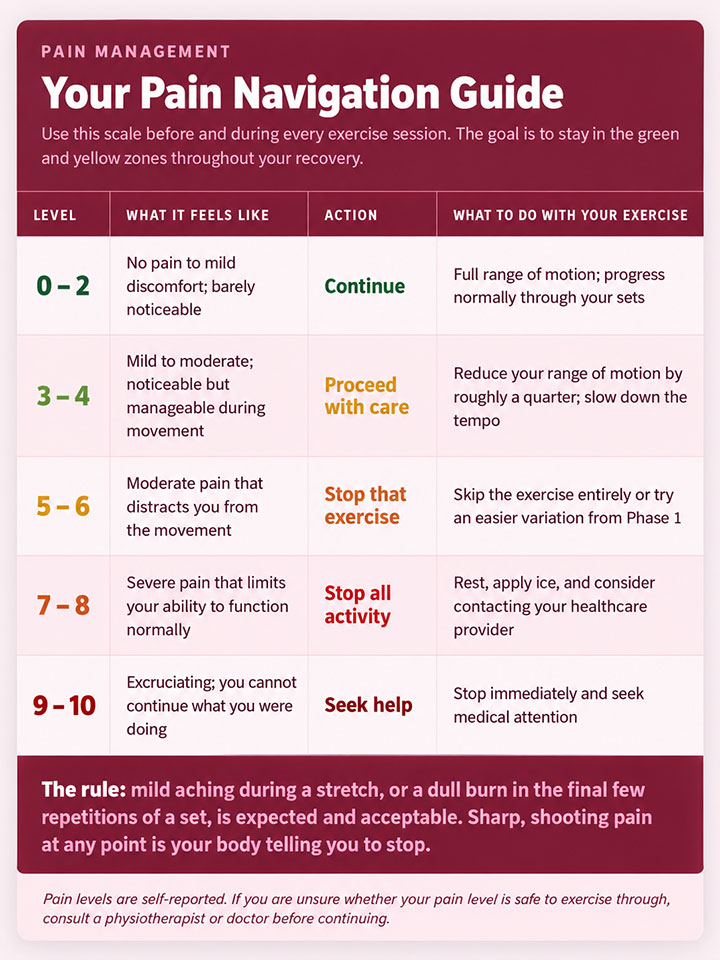
Think of your range of motion as a dimmer switch, not an on-off switch. Start small. Increase only as your body allows. Your inflamed tissue needs progressive coaxing, not aggressive pushing. Pushing through sharp pain during the early phases doesn’t accelerate recovery. It restarts the clock.
The 5 Best Exercises for Hip Bursitis
If you’re in acute pain and want to know where to start, these five exercises are the core of this entire plan. They appear in the phase-by-phase guide below with full instructions, but here’s the quick answer:
- Clamshells: activates the gluteus medius without loading the bursa directly
- Glute bridges: builds glute strength in a position that reduces compressive load
- Side-lying leg raises: targets the hip abductors with controlled range
- Bird-dog: trains the core-hip connection without hip flexion stress
- Standing hip abduction: a functional progression once the first three feel manageable
Everything else in this guide supports or builds on these five. If you can only do three exercises a day, do clamshells, glute bridges, and bird-dog.
Phase 1: Calming Things Down (Weeks 1 and 2)
Your hip is angry right now. Phase 1 isn’t about building strength. It’s about restoring enough mobility to move without flinching, and waking up the muscles that have gone quiet because of pain. Don’t try to push past this phase by adding Phase 2 exercises early. It won’t accelerate recovery.
Expected experience during these two weeks: sharp pain should reduce. Night pain may persist but typically begins to ease by week two. Walking tolerance increases slightly. Stiffness in the morning remains common.
Gentle Stretches
1. Piriformis Stretch (Seated)
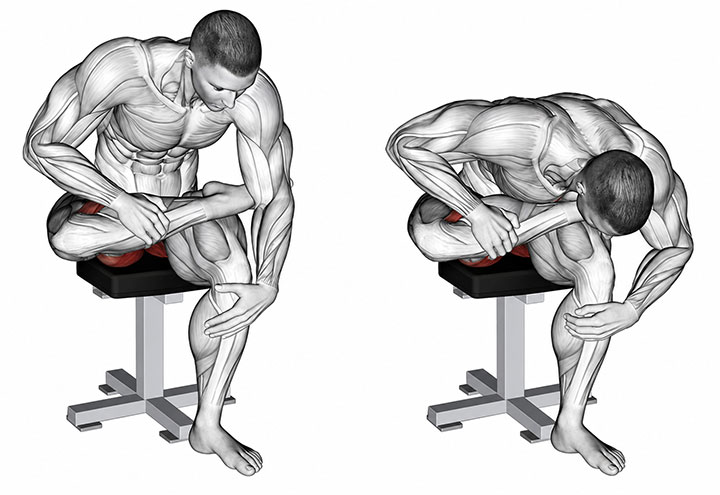
- Sit upright in a firm chair with both feet flat on the floor.
- Place your right ankle on your left knee.
- Gently lean forward from the hips until you feel a stretch deep in your right glute.
- Hold for 30 seconds, breathing slowly throughout. Repeat on the opposite side.
2. IT Band Stretch (Standing)
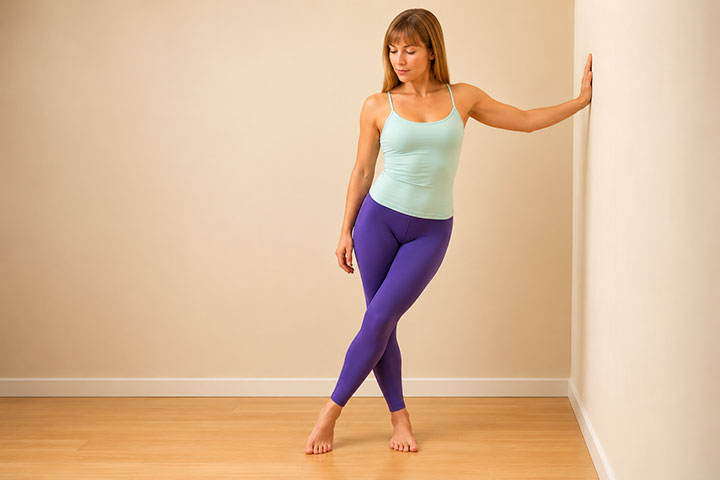
- Stand next to a wall and place one hand on it for support.
- Cross your right leg behind your left at the foot.
- Lean your right hip toward the wall, keeping your right leg straight and your torso upright.
- Hold for 30 seconds. You should feel this along the outside of your right hip and thigh. Switch sides.
The IT band stretch is deceptively mild for the first five seconds. Then it kicks in, usually somewhere unexpected, further back toward the glute than the outside of the thigh. That’s normal, and it’s where you want to feel it.
3. Figure-Four Glute Stretch
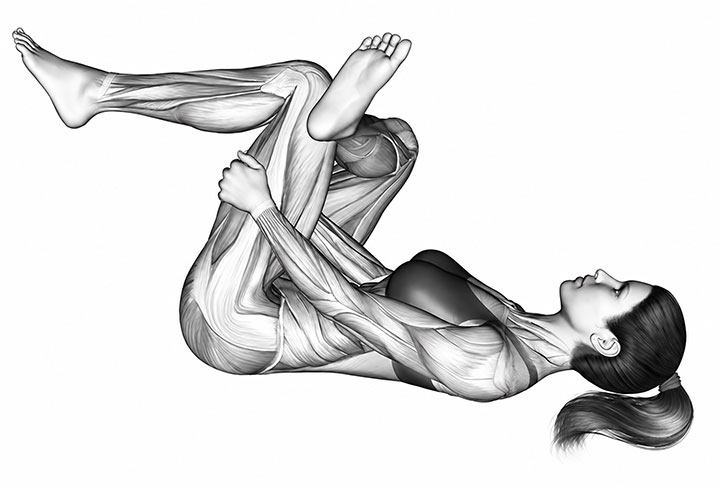
- Lie on your back with both knees bent.
- Place your right ankle on your left knee, forming a figure-four shape.
- Reach behind your left thigh and gently draw both legs toward your chest.
- Hold for 30 seconds. If the stretch is too strong, keep your left foot on the floor. Switch sides.
Activation Exercises
5. Glute Squeezes
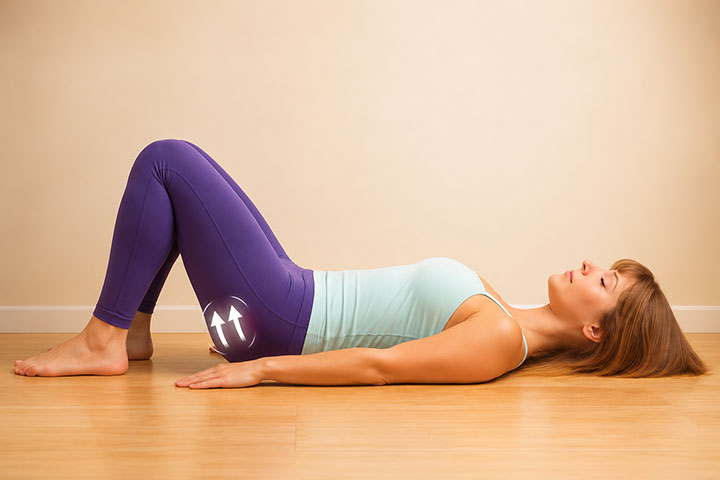
- Lie on your back with both knees bent.
- Squeeze both glute muscles firmly and hold for 5 seconds.
- Release completely and rest for 2 seconds.
- Complete 10 repetitions for 2 to 3 sets. This wakes up the glutes without placing any stress on the hip joint.
6. Heel Slides
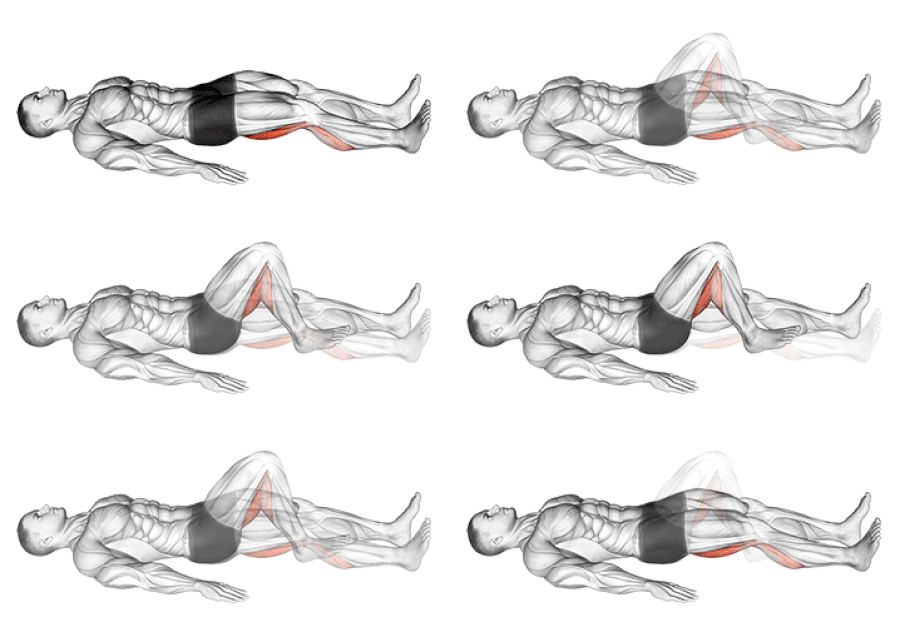
- Lie on your back with one leg straight and one knee bent.
- Slowly slide your straight leg’s heel toward your glute by bending the knee, keeping the foot in contact with the floor.
- Slide it back to straight.
- Complete 10 repetitions on each leg for 2 sets. This gently circulates fluid through the joint without placing load on it.
7. Quad Sets
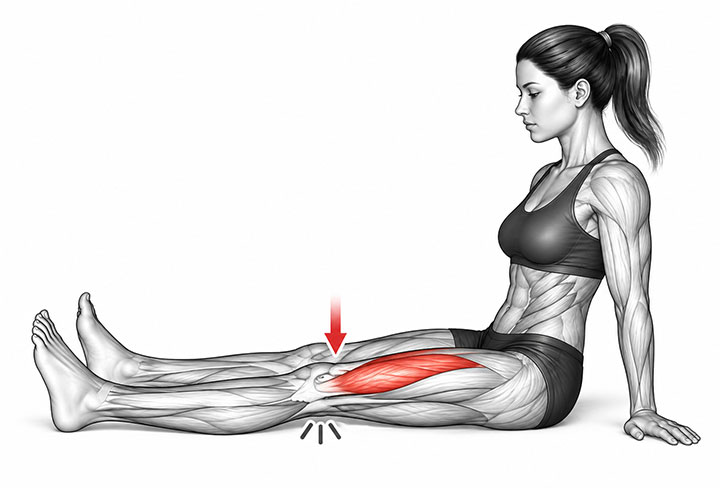
- Sit on the floor or a firm surface with both legs straight out in front of you.
- Tighten the muscle on the front of one thigh by pressing the back of your knee gently toward the floor.
- Hold for 5 seconds, then release.
- Complete 10 repetitions on each leg for 2 sets.
Phase 1 schedule: Do all stretches plus activation exercises on Monday, Thursday, and Saturday. Stretches only on Tuesday and Friday. Rest or very gentle movement on Wednesday and Sunday. Sessions run 20 to 25 minutes on full days, 15 minutes on stretch-only days.
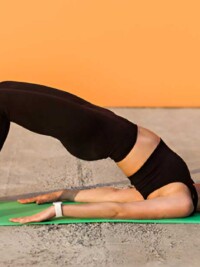
Phase 2: Building the Foundation (Weeks 3 to 6)
Weak hip muscles are a primary reason bursitis develops in the first place and the primary reason it returns. When your glutes and hip stabilizers can’t do their job, the bursa ends up carrying load it wasn’t designed for. Phase 2 addresses this, and it’s where most of the durable recovery happens.
What to expect: pain should be significantly reduced by now. You may have occasional sharp discomfort when starting a new exercise, which is normal and typically fades within the first week of doing it. If it doesn’t fade, step back to Phase 1 for a few more days.
Foundational Strengthening Exercises
Clamshells
Level 1:
- Lie on your side with your hips and knees bent to roughly 45 degrees. Support your head with your lower arm.
- Keeping your feet together, lift your top knee toward the ceiling as far as comfortable without rotating your pelvis backward.
- Hold briefly at the top, then lower with control.
- Complete 10 to 15 repetitions on each side. Move slowly. Momentum defeats the purpose.
Level 2: Add a light resistance band around your thighs just above the knees once Level 1 is easy with 15 repetitions. The band should add challenge without changing your form.
Glute Bridges
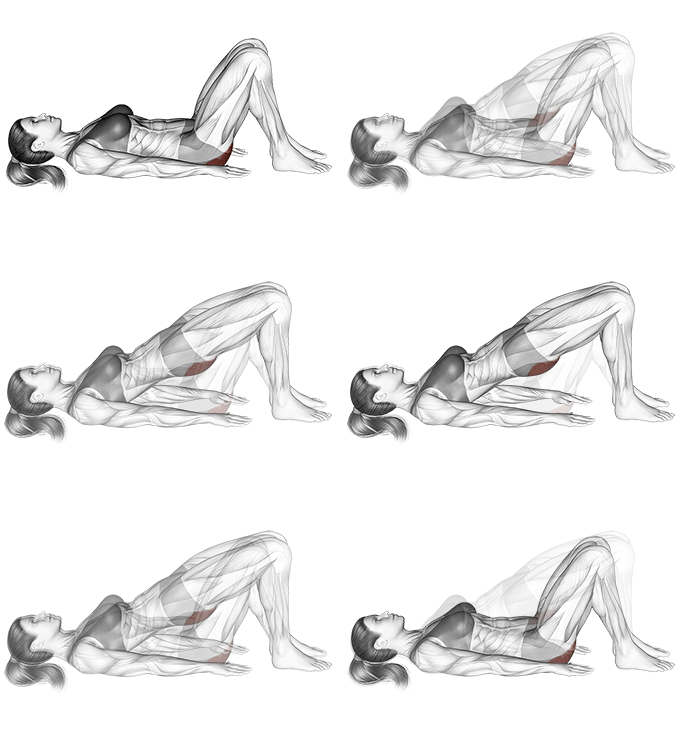
Level 1 (double-leg):
- Lie on your back with knees bent and feet flat on the floor, hip-width apart.
- Squeeze your glutes and press through your heels to lift your hips off the ground.
- Your body should form a straight line from knees to shoulders at the top. Hold for 2 seconds.
- Lower slowly. Complete 10 to 15 repetitions for 2 to 3 sets. Exhale as you lift, inhale as you lower.
Most people find the glute bridge deceptively challenging once they do it properly. The instinct is to lift by pushing the lower back upward. The right cue is to think about pressing the tailbone toward the ceiling while the lower back stays neutral. That small shift puts the work where it belongs: in the glutes, not the spine.
Level 2 (single-leg): From the same position, extend one leg straight out and perform the bridge on one leg only. Start with 5 repetitions per side and work toward 10 to 12. Return to double-leg if this causes hip pain.
Side-Lying Leg Raises
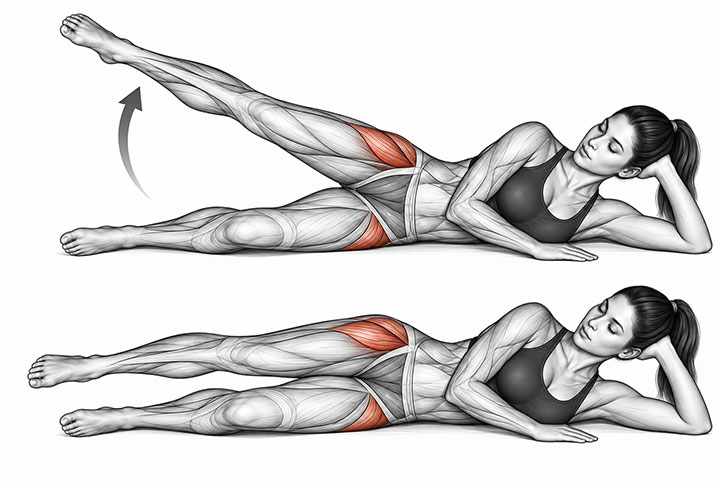
- Lie on your side with your bottom knee slightly bent for stability and your top leg straight.
- Lift your top leg toward the ceiling to roughly 45 degrees.
- Hold briefly, then lower with control. Don’t let your body rock forward or backward during the movement.
- Complete 10 to 15 repetitions on each side. Once this is easy, add a 1 to 2 pound ankle weight. Don’t exceed 5 pounds.
Standing Hip Abduction
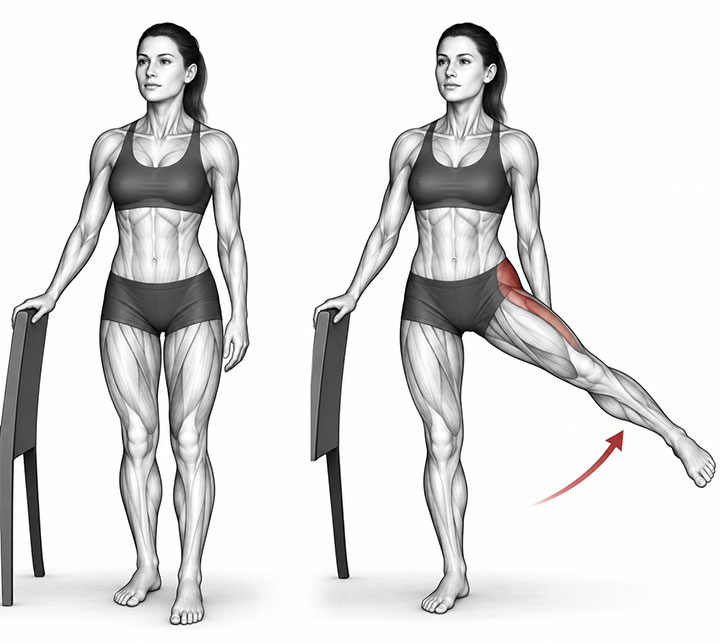
- Stand next to a wall or chair for support, with your hand resting on it lightly.
- Keeping your standing leg slightly bent and your torso upright, lift your outside leg directly to the side.
- Hold briefly at the top, then lower with control. Don’t lean away from the lifting leg.
- Complete 10 to 15 repetitions on each side. Progress to doing this without support once balance is solid.
Bodyweight Squats to a Chair
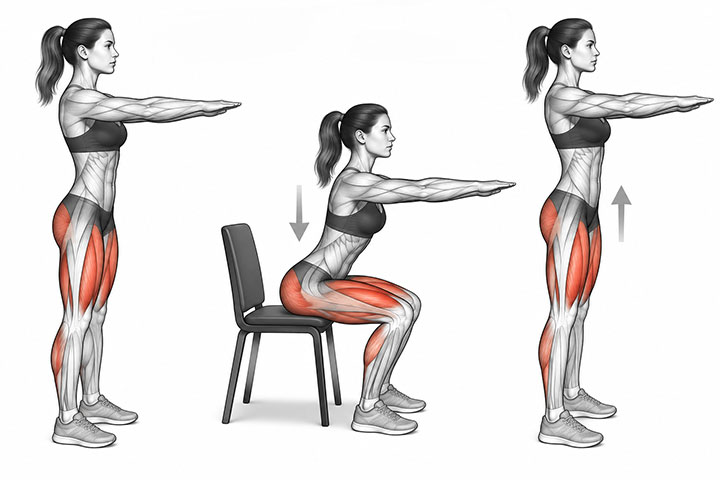
- Stand in front of a firm chair with feet shoulder-width apart.
- Hinge at the hips and slowly lower until your glutes just touch the seat, then drive through your heels to stand.
- The chair prevents you from going deeper than the range your hip can currently handle.
- Complete 8 to 12 repetitions for 2 to 3 sets. Keep your knees tracking over your toes throughout.
Clamshells are the most commonly prescribed hip bursitis exercise and also the most commonly performed incorrectly. The two errors that eliminate most of their benefit are rotating the pelvis backward as the knee lifts, and moving too quickly to let the glute do the work. Slow the movement down. If your top hip is rolling away from the floor, the range is too wide.
Phase 2 schedule: Three days per week of strengthening plus stretches (30 to 35 minutes). Two days of active recovery with stretches and gentle walking. Two rest or light movement days. Progression within exercises every 1 to 2 weeks as pain allows.
The Core-Hip Connection (Add from Week 3)
The hip stabilizers don’t work in isolation. They depend on a stable pelvis, and the pelvis depends on the core. When the core is weak, the pelvis tilts forward, hip flexors shorten, glutes become underactive, and the stress on the bursa increases during every step. Core work doesn’t replace the hip exercises. It makes them more effective.
Core Exercises Safe for Hip Bursitis
Bird-Dog
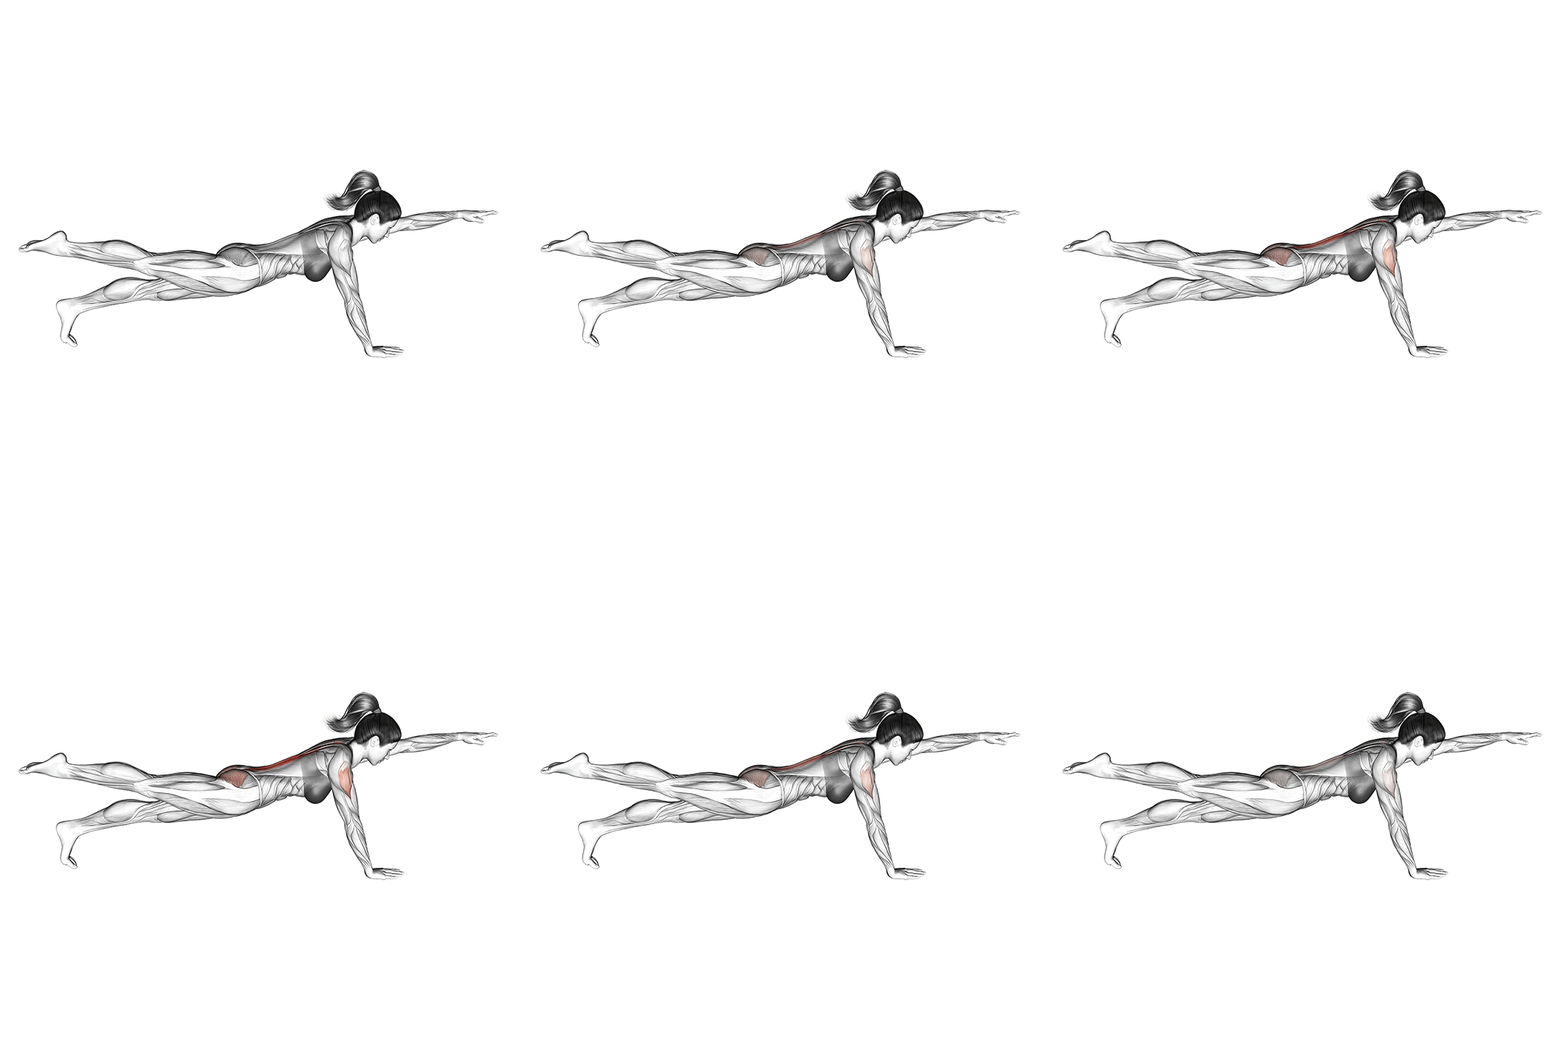
- Start on your hands and knees with your wrists directly below your shoulders and knees below your hips.
- Brace your core gently, then extend your right arm forward and your left leg back simultaneously until both are parallel to the floor.
- Hold for 5 to 10 seconds without letting your hips rotate or your lower back arch.
- Return to start and switch sides. Complete 8 to 10 repetitions on each side for 2 to 3 sets.
Dead Bug
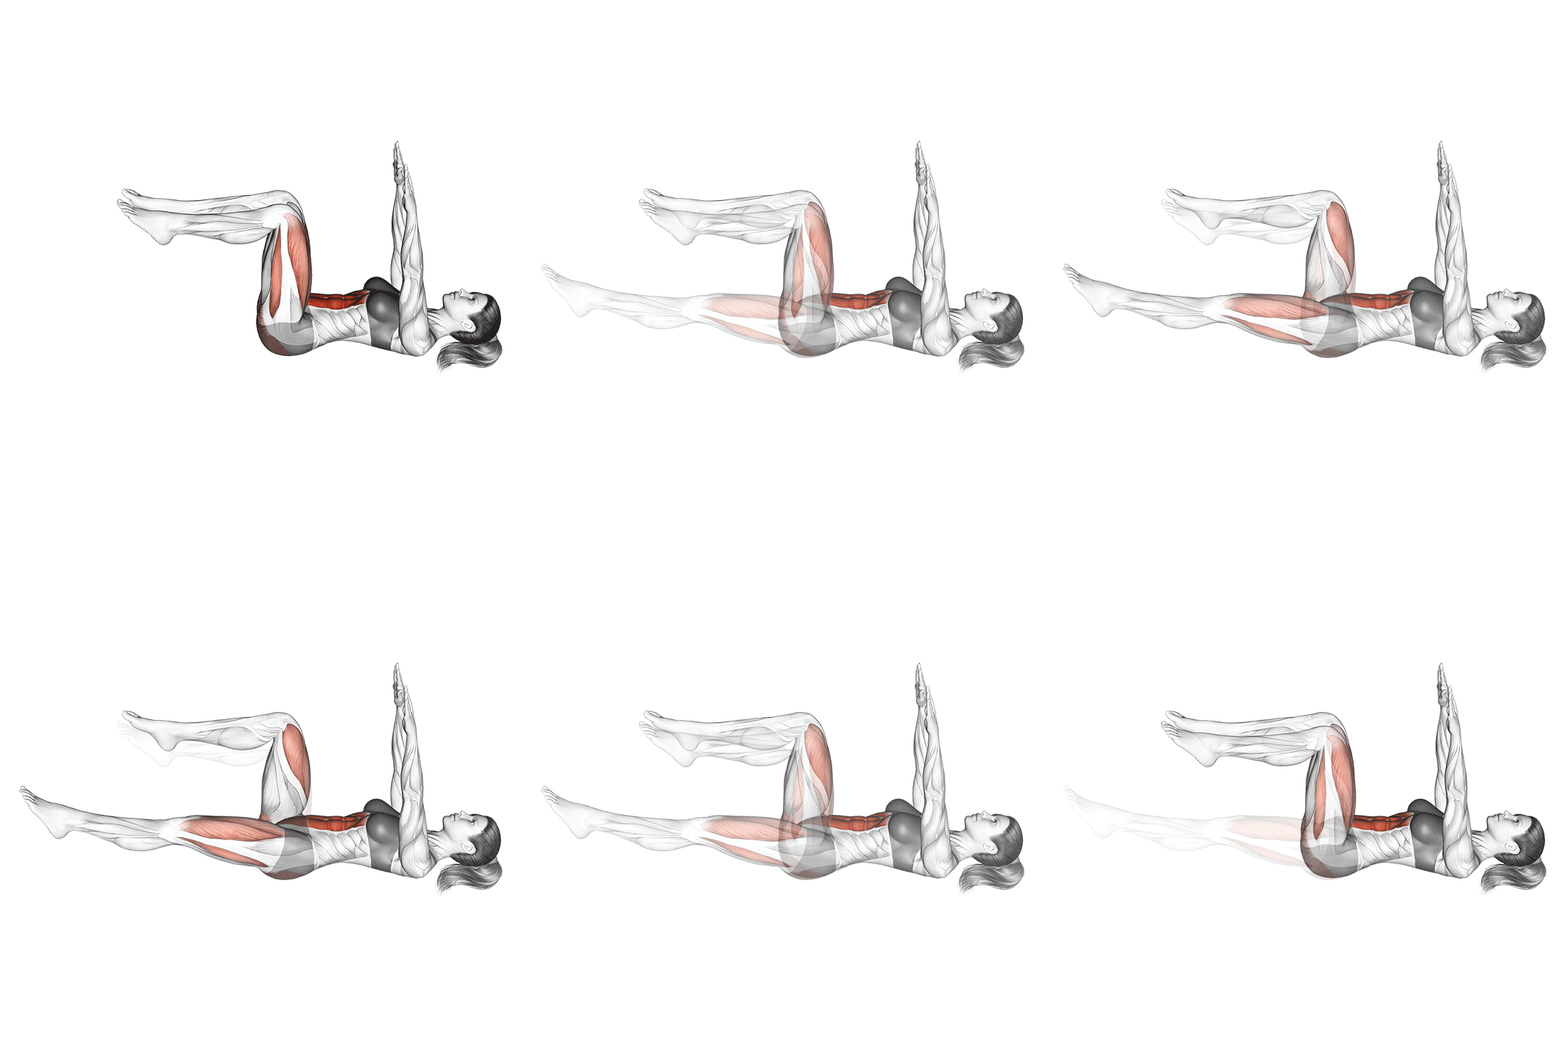
- Lie on your back with your arms extended toward the ceiling and your knees bent to 90 degrees, shins parallel to the floor.
- Press your lower back into the floor and keep it there throughout the movement.
- Slowly lower your right arm overhead while simultaneously extending your left leg toward the floor, both stopping just before they touch.
- Return to start, then switch sides. Complete 8 to 10 repetitions per side. If your back arches off the floor, reduce the range of the leg extension.
Modified Plank
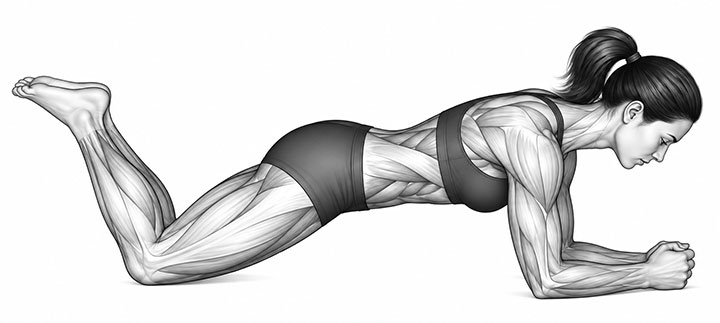
- Place your forearms on the floor with elbows below your shoulders.
- Drop to your knees, keeping your body in a straight line from head to knees.
- Hold for 15 to 30 seconds, building toward 60 seconds over 4 to 6 weeks.
- Once the knee version is easy for 60 seconds, progress to a full plank with feet on the floor.
Add bird-dog and dead bug three times per week from the start of Phase 2. The plank can follow 1 to 2 weeks later. These exercises don’t require a separate session. Fold them into your Phase 2 strengthening days.
Hip Bursitis Exercises to Avoid
Some movements reliably aggravate the bursa during the early stages of recovery. The list below covers the activities most likely to set you back:
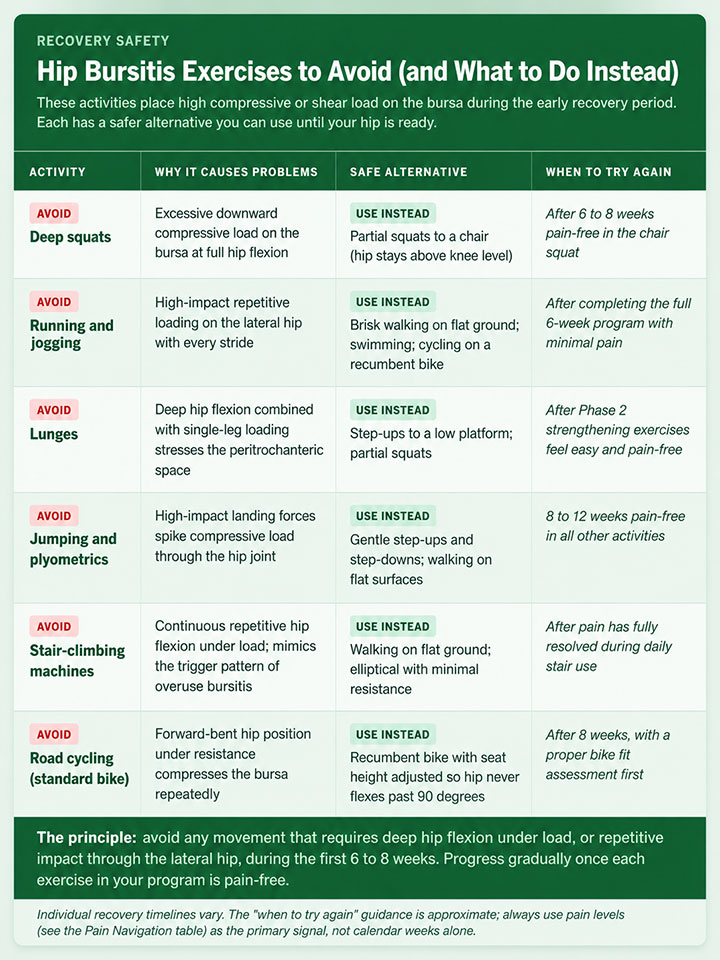
Two modifications that most people overlook:
Getting in and out of a car. Twisting to lower yourself into a seat while your hip is flexed puts direct shear stress on the bursa. Use the swivel technique instead: sit down first, then bring both legs into the car together. To exit, swing both legs out first, then stand. Avoid the one-leg-at-a-time rotation.
Sleeping position. Lying on the affected hip puts direct pressure on the inflamed bursa all night. Sleep on your back or your unaffected side. If you sleep on your side, place a pillow between your knees to prevent your top hip from dropping inward. That inward drop compresses the peritrochanteric space even when you’re lying on the opposite side.
What to Expect Week by Week
Recovery doesn’t feel like the timeline below suggests. Week three often feels worse than week two, not because you’ve regressed, but because you’ve started loading harder and your body is catching up to the demand. A bad day in week four doesn’t mean week two’s progress is gone.
Weeks 1 and 2: Pain decreases 20 to 30% from baseline. Sleep improves. Walking gets slightly easier.
Weeks 3 and 4: Pain down roughly 50% from baseline. Stairs get easier. You can usually sleep on the unaffected side without waking.
Weeks 5 and 6: Pain minimal during most daily activities. Walking tolerance significantly improved. Night pain should be largely resolved by now.
Weeks 7 to 12: Return to most normal activities. Occasional discomfort with longer or more demanding activities is expected. Maintenance program begins (see below).
Contact a healthcare provider if pain worsens rather than plateaus after two weeks of consistent exercise, if you develop new numbness or tingling down the leg, or if there’s no measurable improvement after 4 to 6 weeks.
The progressive recovery tracker below lets you log your weekly pain scores and see your trajectory over the full program.
Hip Bursitis Recovery Tracker
Log your pain and function scores each week to track your progress across the 12-week program.
| Week | Rest Pain | Walk Pain | Night Pain | Chair | Stairs | Avg |
|---|
Combining Exercise with Other Treatments
Exercise works best as part of a broader approach rather than the only intervention. A few evidence-based combinations worth knowing about:
Ice and heat. Ice reduces acute inflammation and works well after exercise sessions during the first two to three weeks (15 to 20 minutes, not directly against skin). Heat applied before exercise can loosen tight tissue. During acute flare-ups, default to ice.
Corticosteroid injections. The LEAP trial showed injections worked well at four weeks but lost their advantage by week 52. They’re not useless. If pain is severe enough to prevent you from doing the exercises at all, an injection can provide a window where loading becomes possible. The issue is treating the injection as the solution rather than the entry point.
Physical therapy. A physiotherapist can assess your specific movement patterns, identify biomechanical factors the exercises here won’t address on their own, and adjust the program based on what they observe. If you’re not making progress after four weeks of consistent effort, an assessment is worth seeking.
Anti-inflammatory diet. The relationship between diet and musculoskeletal recovery is still being worked out. The current direction of evidence supports fatty fish, leafy greens, and berries, while pointing away from ultra-processed foods and excess alcohol. None of this is a substitute for the exercise program, and given how preliminary the dietary evidence remains, treating it as one would be a mistake.
Long-Term: Keeping It From Coming Back
Once you complete the 12-week recovery arc, the exercises don’t stop. They just decrease in frequency. Most people who maintain two to three targeted sessions per week don’t experience recurrence. Most people who stop completely do.
A sustainable maintenance program takes about 30 minutes, three times weekly: 10 minutes of the Phase 1 stretches, 15 minutes of the Phase 2 strengthening exercises (focus on clamshells, glute bridges, and side-lying leg raises), and 5 minutes of core work. That’s it.
The prevention piece that matters most: don’t return aggressively to the activity that triggered the problem in the first place. Running, cycling, and high-volume stair climbing all require gradual reintroduction.
If the original trigger was prolonged sitting with no movement breaks, the solution is a standing-up-and-walking habit installed as a default, not a fixed schedule. The hip that recovered well and is well-maintained stays recovered.
Conclusion
The hardest part of hip bursitis recovery isn’t the exercises. The clamshells and glute bridges and pillow-between-the-knees at 2 am are not complicated. The hard part is trusting that the boring, incremental work is actually doing something during the weeks when it doesn’t feel like anything is changing.
It is. The hip that woke you up in pain this week is the same one that will carry you through a long walk three months from now. But only if you give it what the evidence says it actually needs. Not rest. Loading.
FAQs
How long does it take for hip bursitis exercises to work?
Most people notice meaningful pain reduction within 2 to 3 weeks of consistent exercise. Full recovery typically takes 6 to 12 weeks, depending on how long symptoms have been present and how closely the program is followed.
The LEAP trial data suggests that people who stick with the exercise program have better outcomes at one year than those who choose injection or rest, but the exercise group also took longer to feel the initial benefit. Patience in the first four weeks pays off later.
Can I use heat or ice for hip bursitis?
Ice is generally more useful during the acute phase: the first 48 to 72 hours of a flare, or immediately after exercise sessions that produce swelling. Apply for 15 to 20 minutes with a cloth between the ice and skin. Heat before exercise can help loosen tight tissue. After the acute phase settles, the choice between the two is largely a matter of what provides more comfort rather than a clinically important distinction.
Is walking good for hip bursitis?
Yes, with caveats. Short walks on flat ground at a comfortable pace are helpful from week one. They maintain joint mobility and promote blood flow without placing high compressive load on the joint.
Long walks, hills, and uneven terrain should wait until the Phase 2 exercises feel solid. The general principle: walking that leaves your hip feeling better afterward (or no different) is appropriate. Walking that leaves it consistently more painful than before isn’t.
What is the best sleeping position for hip bursitis?
On your back, or on the unaffected side with a pillow between your knees. The pillow between the knees matters: without it, the top hip drops into adduction overnight, compressing the peritrochanteric space. Sleeping directly on the affected hip places sustained pressure on the inflamed bursa for hours at a time. This is often the primary reason night pain is so persistent early in recovery.
Why won’t hip bursitis go away?
The most common reason is that what’s being treated as bursitis is primarily gluteal tendinopathy (irritation of the tendons that attach to the greater trochanter), and tendinopathy doesn’t respond well to rest or anti-inflammatories alone.
It responds to progressive loading. If symptoms have persisted for more than 6 to 8 weeks despite conservative management, imaging (ultrasound or MRI) can clarify whether tendinopathy is the primary driver and inform a more targeted program.
Why did I suddenly get hip bursitis?
Bursitis rarely appears without a contributing cause, even when it feels sudden. The most common triggers are a sudden increase in activity volume or intensity (running more, climbing more stairs), prolonged sitting with no movement breaks, a change in footwear or surface, and existing glute weakness that allows the hip abductor complex to be overloaded. People who experience a single acute onset often can identify one of these factors in the days or weeks before symptoms began.
How long is too long to have bursitis?
Symptoms lasting beyond 8 to 12 weeks without measurable improvement should prompt a reassessment. This might mean returning to a doctor or physiotherapist to confirm the diagnosis, reviewing whether the exercise program is being performed correctly, or investigating whether a contributing factor (leg length discrepancy, training error, footwear) is still present.
The LEAP trial data showed that without intervention, about half of people still haven’t recovered after a full year, which is a strong argument for getting a proper program in place rather than waiting it out.