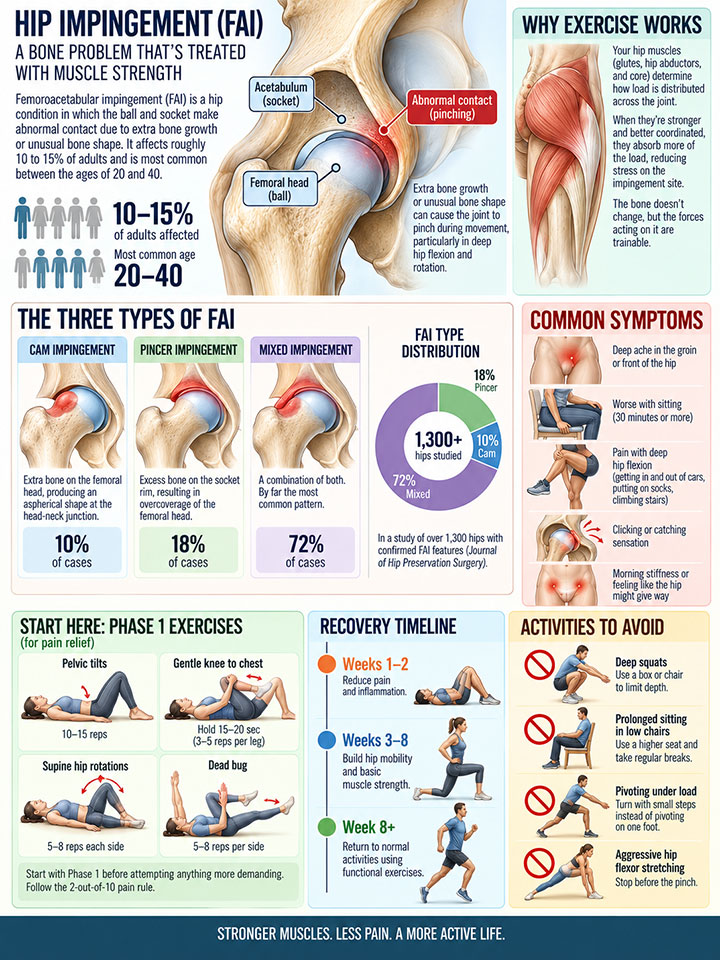
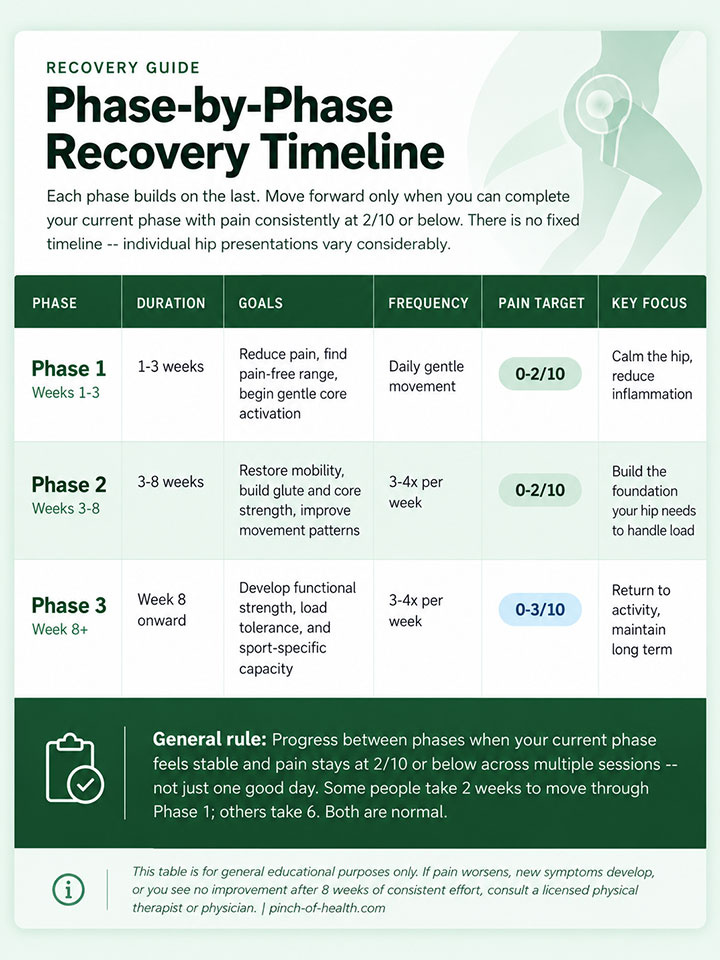
What you do in week one isn’t what you should do in week eight. This phased approach gradually moves from pain control to mobility, strength, and normal activity.
The diagnosis sounds structural. Your hip bones don’t quite fit the way they’re supposed to, and the result is a joint that pinches, catches, and aches when you move in specific ways.
Most people who get this news expect the treatment to be structural too. Surgery, perhaps, or at least something that addresses what the imaging shows.
What the research points to is stranger. The primary treatment for a bone problem is a muscle one.
Hip impingement, technically called femoroacetabular impingement or FAI, affects roughly 10 to 15 percent of adults and is most common between the ages of 20 and 40. The bone abnormality itself isn’t going anywhere. But in the large majority of cases, that structural fact turns out to be less predictive of your pain level and daily function than the strength of the muscles surrounding it.
Start here if you’re in pain right now
- Start with Phase 1 movements (pelvic tilts, gentle stretches, dead bugs) before attempting anything more demanding.
- Avoid deep squats, prolonged sitting, and aggressive stretching until Phase 2.
- Follow the 2-out-of-10 pain rule: stop any exercise the moment discomfort rises above a 2 on a scale of 10.
- See a doctor if you have severe pain, pain that wakes you at night, or difficulty bearing weight on the affected leg.
Timeline expectations:
- Week 1 to 2: Focus on reducing pain and inflammation.
- Week 3 to 8: Build hip mobility and basic muscle strength.
- Week 8 onward: Return to normal activities using functional exercises.
Understanding hip impingement
How the hip joint works and where it goes wrong
Your hip is a ball-and-socket joint. The ball is the femoral head, the rounded top of your thigh bone. The socket is the acetabulum, a cup-shaped cavity in your pelvis. In a typical hip, these two surfaces move together smoothly across a wide range of motion.
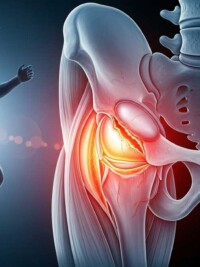
With FAI, extra bone growth on one or both surfaces creates abnormal contact points. Rather than gliding cleanly, the joint pinches at certain positions. Over time, this repeated pinching can damage the cartilage and the ring of fibrous tissue around the socket, called the labrum.
What triggers hip impingement?
FAI doesn’t develop overnight. The bone morphology that causes it often forms gradually, and several factors are known to raise the risk. Younger age and high-intensity sport participation during adolescence are among the most studied, particularly for cam-type deformity, which some research suggests can develop progressively in the growing skeleton under repeated loading.
Repetitive deep hip flexion, which occurs in sports like football, gymnastics, and ballet, also plays a role. Less understood but worth noting is that many people with FAI morphology on imaging have no symptoms at all, which means the bone shape alone doesn’t determine whether you’re in pain. How the hip is loaded, and how well the surrounding muscles manage that load, appears to matter considerably.
The three types of FAI
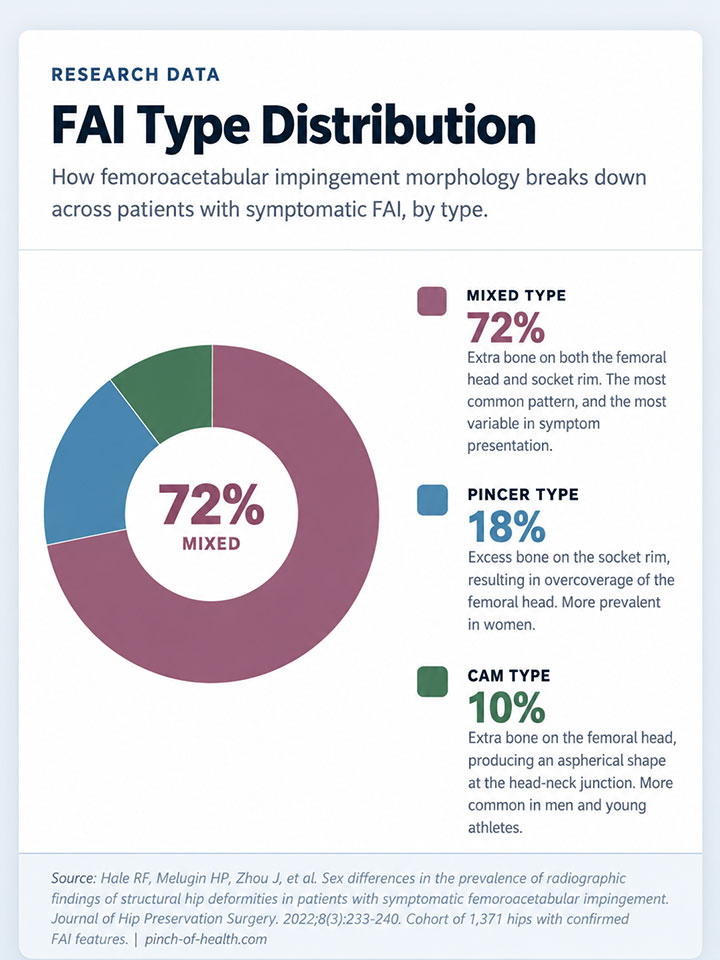
There are three structural patterns. Cam impingement involves extra bone on the femoral head, producing an aspherical shape at the head-neck junction. Pincer impingement involves excess bone on the socket rim, resulting in overcoverage of the femoral head. Mixed impingement is a combination of both, and it is by far the most common pattern.
In a cohort of over 1,300 hips with confirmed FAI features, research published in the Journal of Hip Preservation Surgery found that mixed-type morphology accounted for roughly 72 percent of cases, with cam at 10 percent and pincer at 18 percent. The sex distribution also differed: cam deformity was more prevalent in men, while pincer deformity was more common in women.
Common symptoms
Pain patterns in FAI are fairly characteristic. Most people describe a deep ache in the groin or front of the hip, with sharper pain during specific movements. Sitting for 30 minutes or more typically makes things worse, as does anything involving deep hip flexion: getting in and out of cars, putting on socks, climbing stairs.
Movement issues often accompany the pain. A clicking or catching sensation in the hip is common, as is morning stiffness and a general reluctance to squat or bend deeply. Some people describe the hip as feeling like it might give way.
A quick self-check
Here is a simple movement test you can do at home. Lie on your back. Slowly bring one knee toward your chest. If you feel a pinching sensation in your groin before the knee reaches a 90-degree angle, that’s a common impingement sign worth discussing with a clinician. It isn’t diagnostic on its own, but it’s a useful starting-point observation.
For a more structured self-assessment, the symptom checker below asks about the daily situations most consistently associated with FAI, and recommends where to start in the exercise program based on your answers.
Answer 10 questions to find the right starting phase for your exercise program.
Getting the right diagnosis
The standard diagnostic workup for FAI involves X-rays to assess bone shape and joint spacing, and an MRI if soft tissue damage to the labrum or cartilage is suspected. On physical examination, a positive FADIR test (flexion, adduction, internal rotation) is the most commonly used clinical sign.
Before starting any exercise program, it’s worth seeing a clinician if you have severe pain above a 7 out of 10, pain that wakes you at night, inability to bear weight, neurological symptoms such as numbness or tingling, or any hip pain that followed a fall or injury. These situations warrant evaluation before self-managed exercise.
For mild to moderate pain that came on gradually, improves with rest, and has no neurological symptoms, self-managed exercise is a reasonable starting point. A physical therapist can also design a program specifically matched to your presentation and the type of FAI involved.
Why exercise helps even when it can’t fix the bone
The assumption that a structural problem needs a structural solution is understandable. But the hip functions as a system, not an isolated joint. The muscles that surround it, including the glutes, hip abductors, and core stabilizers, determine how load is distributed across the joint during every step, sit-to-stand transition, and squat.
When those muscles are weak or poorly coordinated, more stress falls directly on the impingement site. When they’re stronger and better trained, they absorb more of that load before it reaches the bone-on-bone contact point.
The bone doesn’t change. But the forces acting on it are determined by the strength and coordination of what surrounds it, and that part is trainable. Phase 1 is where that training starts.
A 2020 systematic review and meta-analysis in the American Journal of Sports Medicine, led by Graeme Hoit and colleagues at the University of Toronto, pooled five randomized controlled trials and found that supervised physiotherapy programs focusing on active strengthening and core work produced significantly better functional outcomes than unsupervised care or passive modalities.
Core strengthening in particular showed the strongest effect (SMD 0.82), a finding that shapes the exercise selection in every phase below.
What the evidence actually says about treatment
Exercise, physical therapy, and the success rates
Conservative treatment, meaning exercise, activity modification, and physical therapy, is the appropriate first step for most people with FAI. Research supports this position, though the exact success figures are worth reading carefully rather than accepting at face value.
In a prospective study by Pennock and colleagues published in the American Journal of Sports Medicine in 2018, 82 percent of adolescent patients with FAI reported meaningful improvement in symptoms at two years following conservative management. That figure is meaningful, but it comes from an adolescent cohort in whom bone remodeling is still active, which may not translate directly to adults with established morphology.
The broader picture from physical therapy studies in adults is more nuanced. Recovery rates across conservative care cohorts tend to cluster in the 70 to 85 percent range, though the precise figure varies depending on how “improvement” is defined and how long patients are followed.
What the better-designed studies agree on is what that actually looks like: reduced pain and better function on validated outcome measures, not a return to a symptom-free baseline.
What the head-to-head data shows about surgery
This is the part of the treatment conversation that often gets smoothed over. Surgery is typically framed as a last resort for people who don’t respond to conservative care, and that framing is broadly reasonable. But the head-to-head data from randomized trials is worth knowing.
In the FASHIoN trial, a large multicentre randomized controlled trial published in the BMJ in 2019, patients were randomly assigned to arthroscopic hip surgery or a physiotherapy program. At eight months, the surgery group scored higher on the primary functional outcome measure (Hip Outcome Score, Activities of Daily Living subscale) than the physiotherapy group: 78.4 versus 69.2. That gap is meaningful, not trivial.
The honest reading of the evidence is this: conservative care is the right place to start, it works well for the majority, and it avoids the risks and recovery demands of surgery. But for people who don’t improve after six months of consistent effort, surgery has shown better functional outcomes in direct comparison.
The treatment hierarchy exists for a reason, and the goal of this program is to give conservative care its full chance.
Manual therapy and when it adds value
Exercise alone is the foundation. Manual therapy, including joint mobilizations, soft tissue work, and movement re-education from a physical therapist, can be a meaningful addition when progress stalls or when pain is high enough to prevent effective participation in exercise.
The physioFIRST pilot trial, one of the five studies included in the Hoit meta-analysis, was a 24-participant feasibility study designed to test whether a full-scale RCT was worth running, not to detect differences between treatment approaches. It was too small to draw conclusions about which protocol works better.
What the broader Hoit meta-analysis makes clear is that format matters more than the specific exercise list: supervised and active approaches beat unsupervised and passive ones, in every study that compared them.
Before you start: the rules that actually matter
The 2-out-of-10 pain rule
On a scale from zero to ten, with ten being the worst pain you can imagine, stay at or below a two during exercise. Mild discomfort from stretching is normal. Sharp or increasing pain during a movement means stop, not push through.
Pain levels between three and four signal a caution zone: reduce the range of motion, lower the resistance, or switch to an easier phase. A five or higher means stop the session entirely and rest before reassessing.
Progression is the point
The three phases below are not a checklist to rush through. Move from Phase 1 to Phase 2 when Phase 1 exercises feel comfortable, and pain stays below a two. Move from Phase 2 to Phase 3 when Phase 2 feels stable. Some people take two weeks to move through Phase 1. Others take six. Both are normal.
Starting with Phase 3 exercises when your hip is still irritated is one of the most common reasons people plateau or worsen. The phases exist because the hip needs to earn each level of loading.
Frequency and warm-up
Phase 1 movements can be done daily. Phase 2 and Phase 3 exercises work best at three to four sessions per week with rest days between, since muscle adaptation happens during recovery, not during the session itself.
Always start with five to ten minutes of gentle movement. Walking at a conversational pace or gentle marching in place is enough. End each session with light stretching. The hip joint responds poorly to being cold-loaded, and the warm-up is the cheapest injury prevention available.
Phase 1: Gentle mobilization and pain reduction
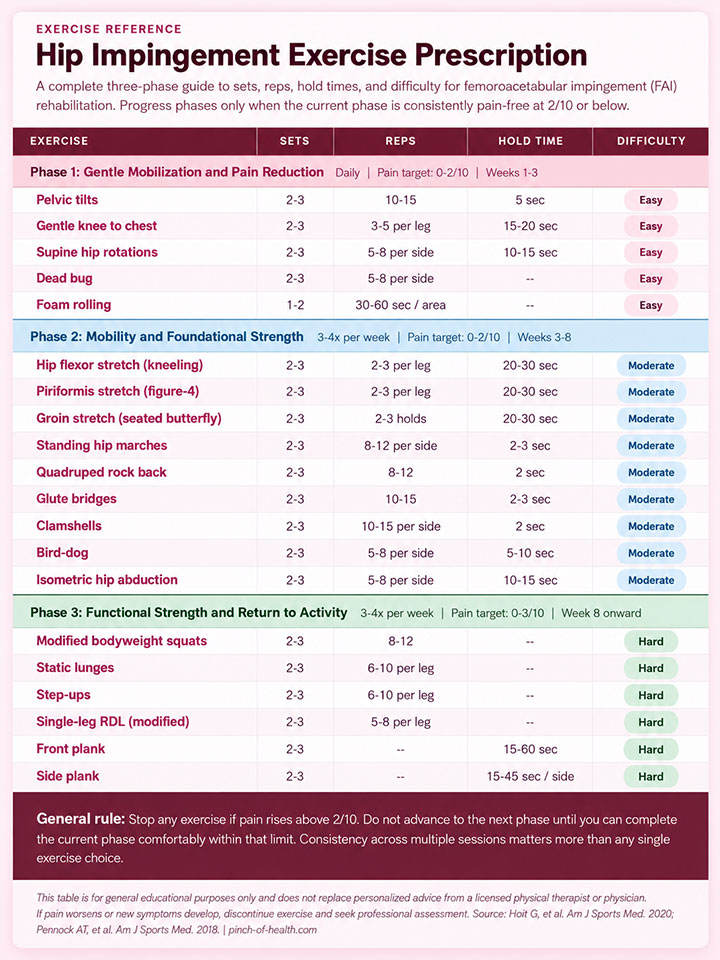
The goal in Phase 1 is simple: reduce inflammation, find your pain-free range, and begin activating the muscles that will carry more load in Phase 2. None of these exercises require equipment. All of them can be done daily.
Pelvic tilts
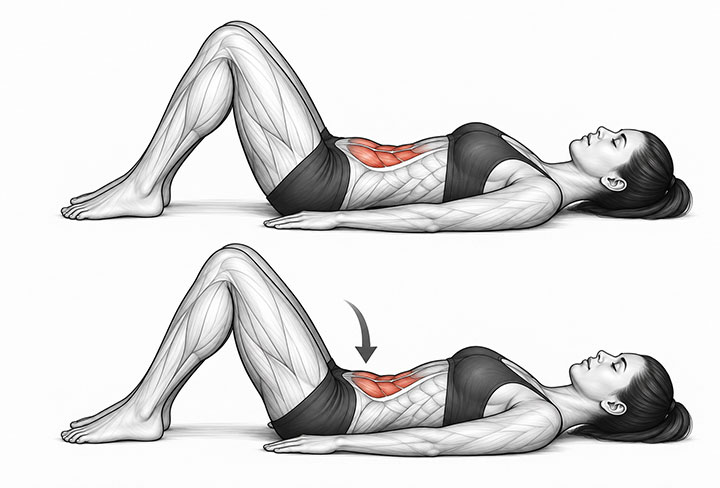
Lie on your back with knees bent and feet flat on the floor. Gently flatten your lower back against the floor by tilting your pelvis, hold for five seconds, then release. Do 10 to 15 repetitions.
Keep your shoulders relaxed and breathe normally throughout. The movement is small. What you’re after is a gentle activation of the lower abdominal muscles, not a dramatic flattening of the entire spine.
Gentle knee to chest
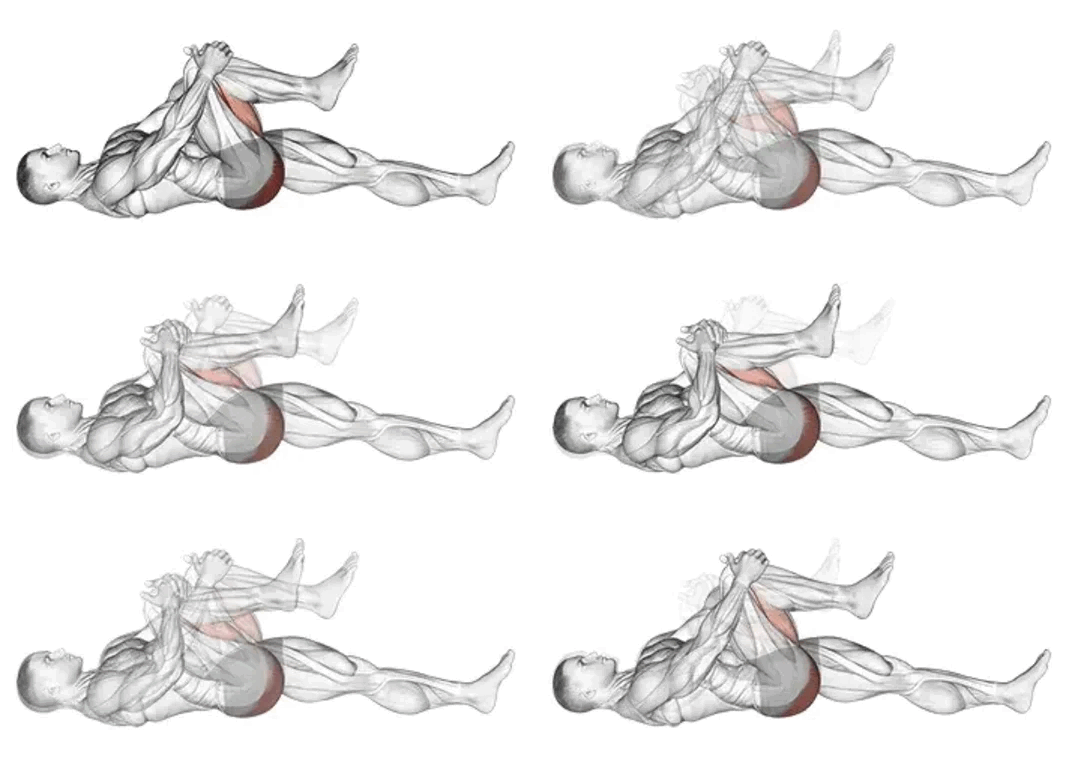
- Lie on your back with both knees bent, feet flat.
- Slowly bring one knee toward your chest, using your hands to guide it gently.
- Stop the moment you feel the first hint of pinching or pressure in the groin. This is your pain-free range, not a target to push past.
- Hold for 15 to 20 seconds, breathing steadily.
- Lower the leg slowly and repeat on the other side.
- Complete 3 to 5 repetitions per leg.
You should feel a gentle stretch in the hip flexor and buttock. Sharp groin pain means you’ve gone too far. The movement identifies your current safe range, which will expand gradually as the hip settles.
Supine hip rotations
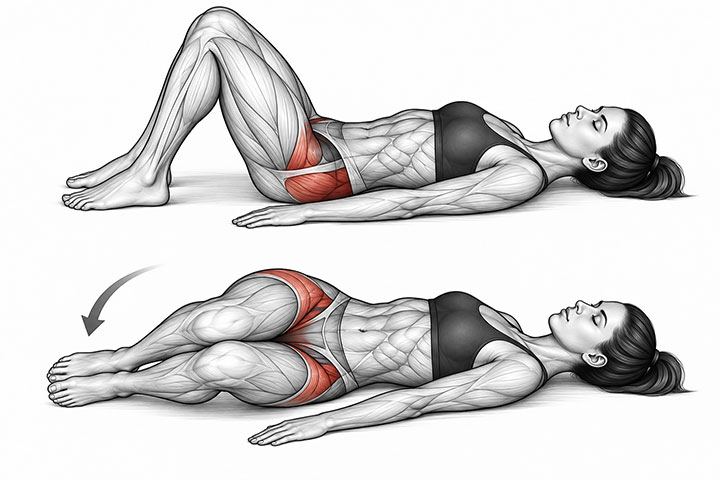
- Lie on your back with knees bent, feet flat.
- Let both knees drift slowly toward one side, only as far as comfortable.
- Hold for 10 to 15 seconds.
- Return to center, then repeat on the other side.
- Do 5 to 8 repetitions each direction.
Keep both shoulders flat against the floor throughout. Gentle rotation like this maintains hip mobility without putting any compressive load through the joint, which makes it one of the safest movements available when the hip is acutely irritated.
Dead bug
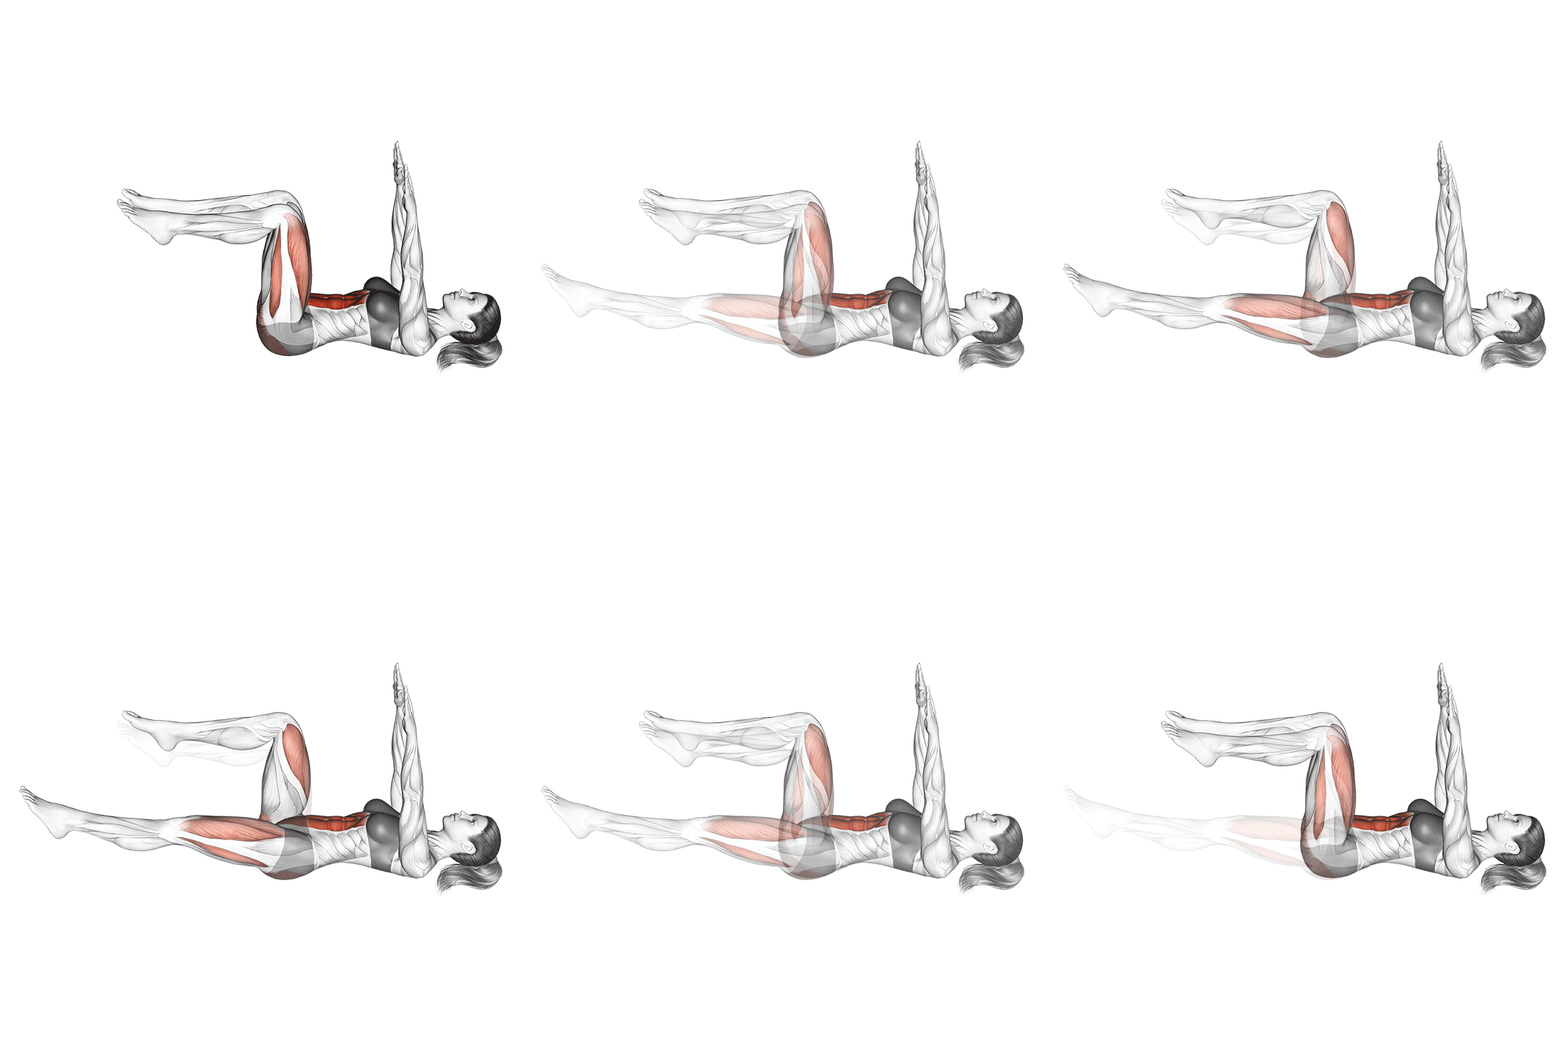
- Lie on your back with arms extended toward the ceiling, knees bent to 90 degrees and lifted so your shins are parallel to the floor.
- Slowly lower your right arm overhead and extend your left leg toward the floor at the same time, stopping before either touches down.
- Keep your lower back pressed flat against the floor throughout. If it lifts, reduce the range.
- Return both limbs to the starting position and repeat on the opposite side.
- Do 5 to 8 repetitions per side.
The dead bug looks deceptively simple but is one of the most direct ways to train the anti-rotation stability your hip needs before progressing to standing exercises. What you should feel is your core working hard to keep your back from arching.
What you should not feel is anything in the front of the hip. If the hip position causes impingement symptoms, keep the range very small until the joint becomes less reactive.
Foam rolling for surrounding muscles
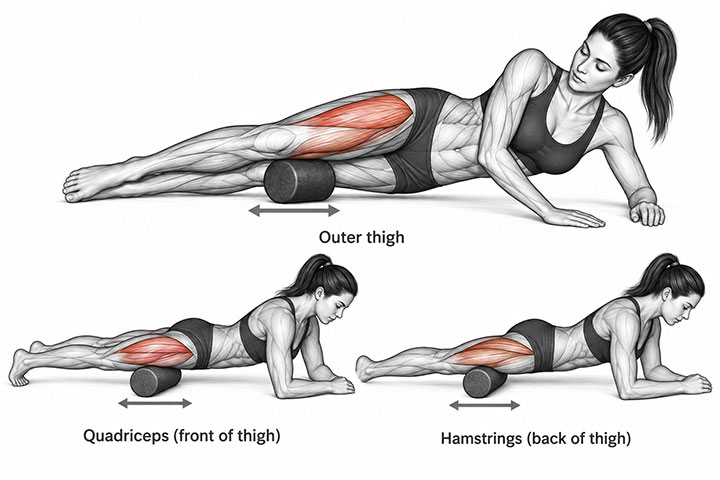
- Position the foam roller under your outer thigh and roll slowly from the hip to just above the knee.
- Move at roughly one inch per second, pausing on tight spots.
- Spend 30 to 60 seconds on the outer thigh, then repeat on the quadriceps (front of thigh) and hamstrings (back of thigh).
- Support yourself with your arms throughout and breathe normally.
Do not roll directly over the painful joint itself. The goal here is to reduce tension in the muscles that attach around the hip, since chronic tightness in the surrounding soft tissue changes how load is distributed across the joint. Mild discomfort from the pressure is expected. Increased hip symptoms are not.
Phase 2: Restoring mobility and foundational strength
Phase 2 is where the real work begins. The stretches address the muscle tightness that typically develops around an irritated hip, and the strengthening exercises start training the muscle groups that will take load off the joint once they’re strong enough to do so. Begin Phase 2 when Phase 1 exercises feel comfortable at a pain level of 2 or below.
Hip flexor stretch (kneeling)
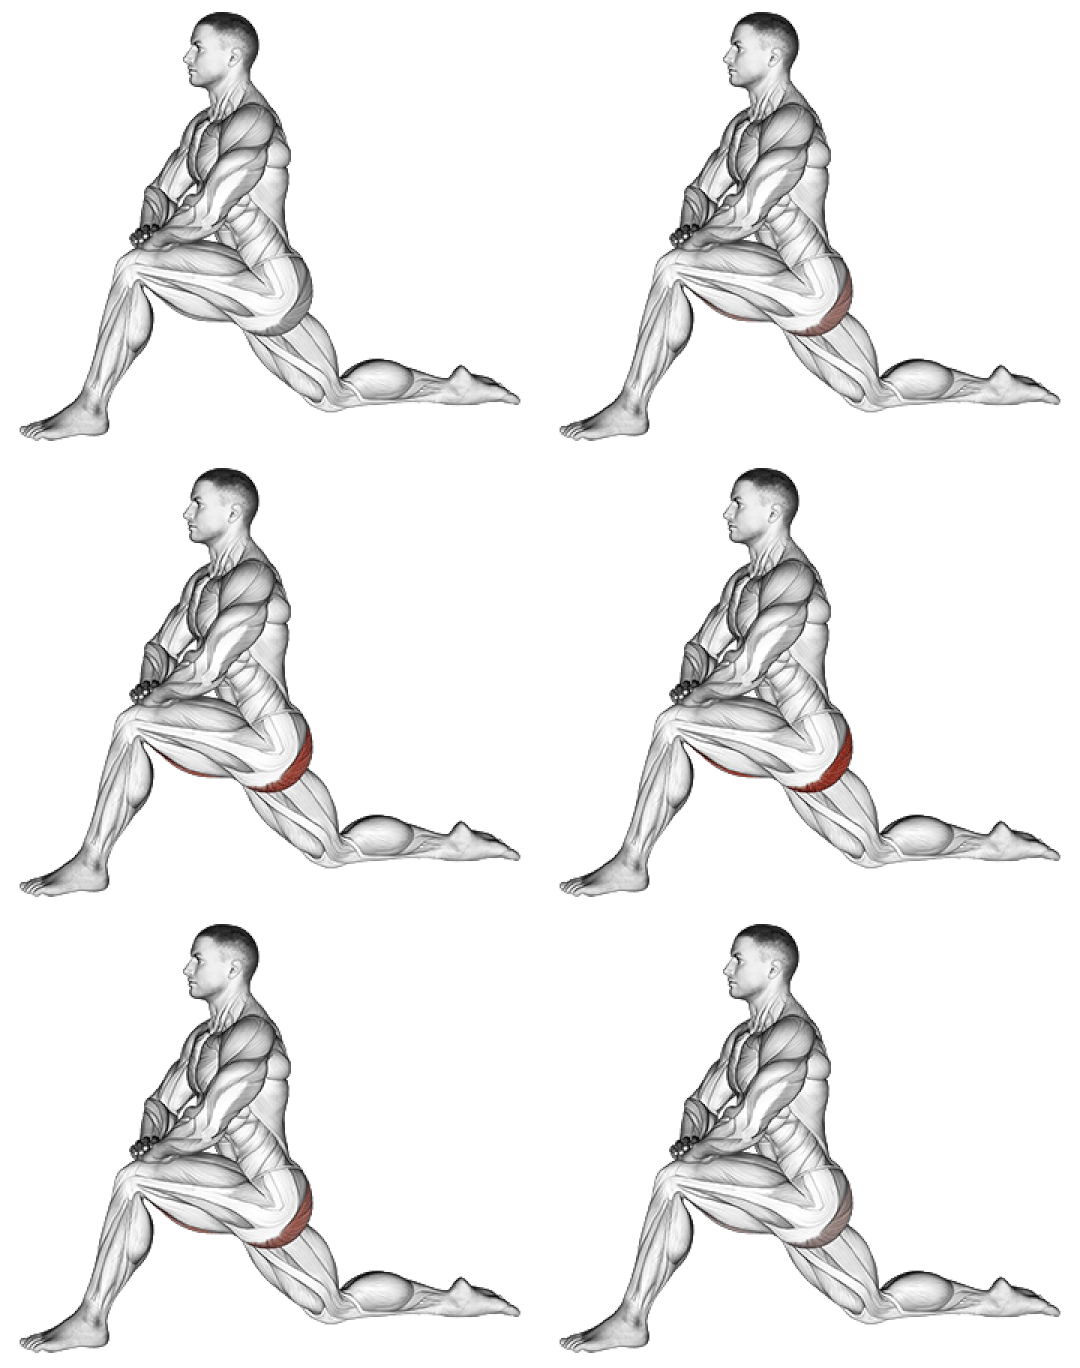
- Kneel on the affected leg with the other foot forward and flat on the floor.
- Keep your torso upright and tuck your tailbone slightly under. Avoid leaning forward.
- Gently press your hips forward until you feel a stretch along the front of the kneeling hip and thigh.
- Hold for 20 to 30 seconds. Repeat 2 to 3 times per side.
Hip flexors shorten with prolonged sitting, and shortened hip flexors change the mechanics of everything the hip does afterward. What you should feel is a stretch running down the front of the hip and thigh. Lower back pain or a sharp sensation at the front of the hip means the position needs adjusting, usually less pelvic tilt or a smaller forward drive.
Piriformis stretch (figure-4)
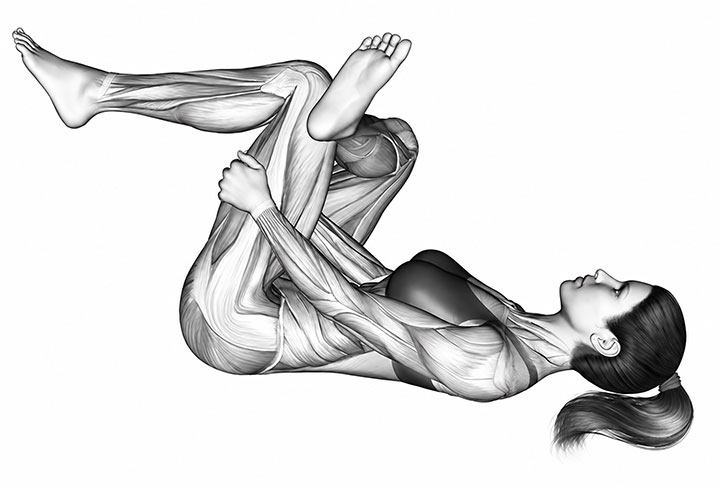
- Lie on your back and cross the ankle of your affected leg over the opposite knee, forming a figure-4 shape.
- Gently pull the uncrossed leg toward your chest using your hands.
- Keep your lower back flat against the floor throughout.
- Hold for 20 to 30 seconds, breathing slowly. Repeat 2 to 3 times.
You should feel a stretch deep in the buttock and possibly the outer hip. If you feel numbness or tingling, ease off. The piriformis sits close to the sciatic nerve, and excessive pressure in certain hip positions can aggravate it.
Groin stretch (seated butterfly)
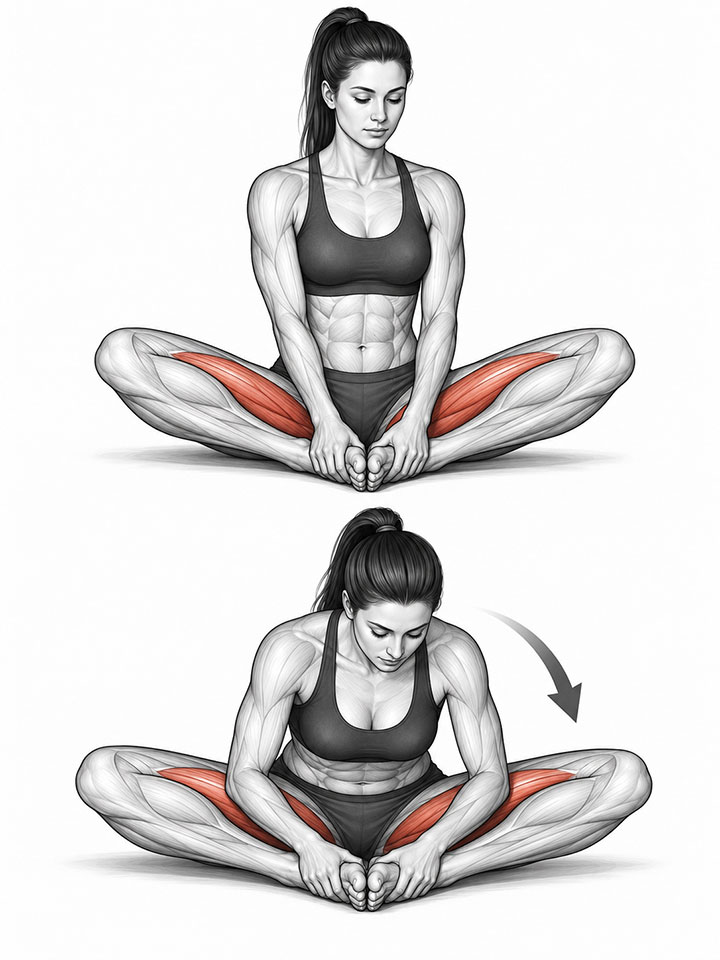
- Sit on the floor with the soles of your feet together and your back straight.
- Hold your ankles gently and let your knees drop toward the floor. Do not push them down.
- Lean forward slightly from the hips, not the lower back, until you feel a stretch along the inner thighs.
- Hold for 20 to 30 seconds. Repeat 2 to 3 times.
Let gravity do the work. Inner thigh tightness alters hip mechanics in the same direction as hip flexor tightness, pulling the femoral head forward in the socket. This stretch addresses that pattern without loading the joint.
Standing hip marches
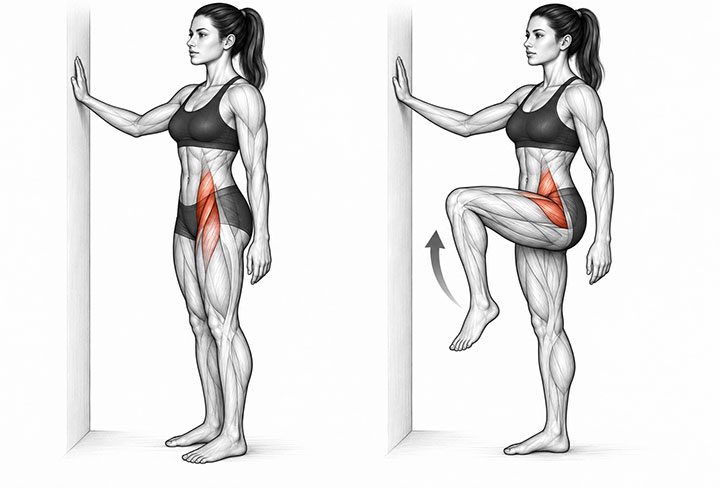
- Stand tall next to a wall or stable surface for balance if needed.
- Slowly lift one knee toward hip height, aiming for 90 degrees if that’s pain-free.
- Hold for two to three seconds at the top.
- Lower with control and repeat on the other side.
- Do 8 to 12 repetitions per side.
This exercise does two things that matter for FAI: it trains controlled hip flexion without the impingement-provoking compression of a squat position, and it challenges the hip flexors to work eccentrically (lengthening under load) as the leg lowers. Keep the movement slow and deliberate. Swinging the knee up quickly misses the point.
Quadruped rock back
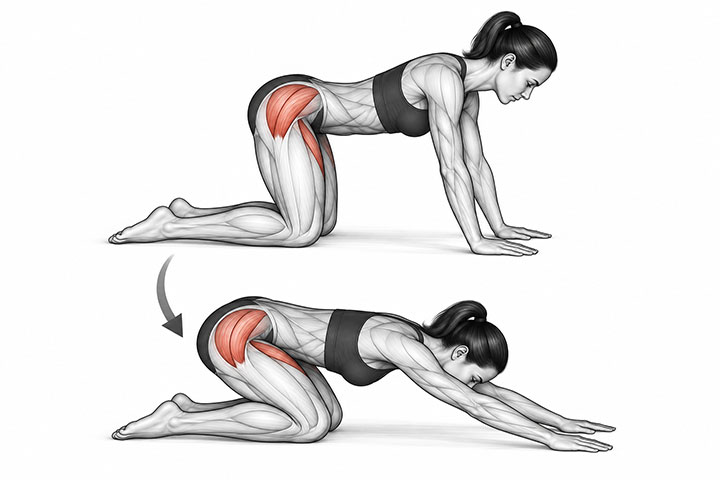
- Start on your hands and knees with hands under shoulders and knees slightly wider than hip-width.
- Slowly rock your hips back toward your heels in a controlled movement.
- Stop the moment you feel any pinching at the front of the hip. This stopping point is your current safe end-range.
- Hold for two seconds, then return to the starting position.
- Do 8 to 12 repetitions.
The quadruped rock back is essentially a joint exploration exercise, and the stopping-point instruction is not a suggestion. With FAI, the goal in Phase 2 is to find and work gently within the pain-free range, not to push through it. Over several weeks of consistent practice, most people find their stopping point gradually moves further back as the hip becomes less reactive.
Glute bridges
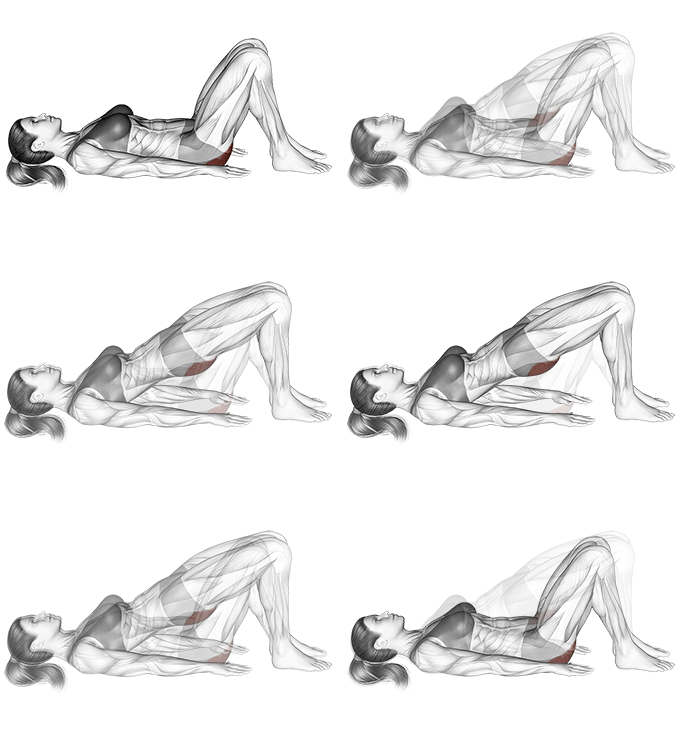
- Lie on your back with knees bent and feet flat, about hip-width apart.
- Squeeze your glutes and push through your heels to lift your hips off the floor.
- Raise until your body forms a straight line from knees to shoulders.
- Hold for two to three seconds at the top, then lower slowly.
- Do 10 to 15 repetitions.
The glute bridge is the exercise the Hoit meta-analysis indirectly endorses with its finding that core and glute-strengthening programs outperform passive stretching approaches in FAI. Push through your heels rather than your toes, which keeps the emphasis on the glutes rather than the hamstrings. As it gets easier, progress to single-leg bridges or add a resistance band above the knees to increase the load without changing the joint position.
Clamshells
Most people are surprised by how quickly clamshells reveal a weakness they didn’t know they had. The gluteus medius, the muscle running along the outer hip, is chronically underused in people who sit for most of the day. When it fires properly for the first time, the sensation can feel almost foreign.
Lie on your side with knees bent at 90 degrees and feet stacked. Keeping your heels together, rotate your top knee upward like a clamshell opening, moving slowly enough that the outer hip muscles are actually working. Lower with control. Do 10 to 15 repetitions, then switch sides. The most common error is rocking the pelvis backward to compensate for a weak medius. If you can see your hips moving in a mirror, the weight on the movement is going to the wrong place. Keep it small and controlled rather than lifting higher by cheating the position.
Bird-dog
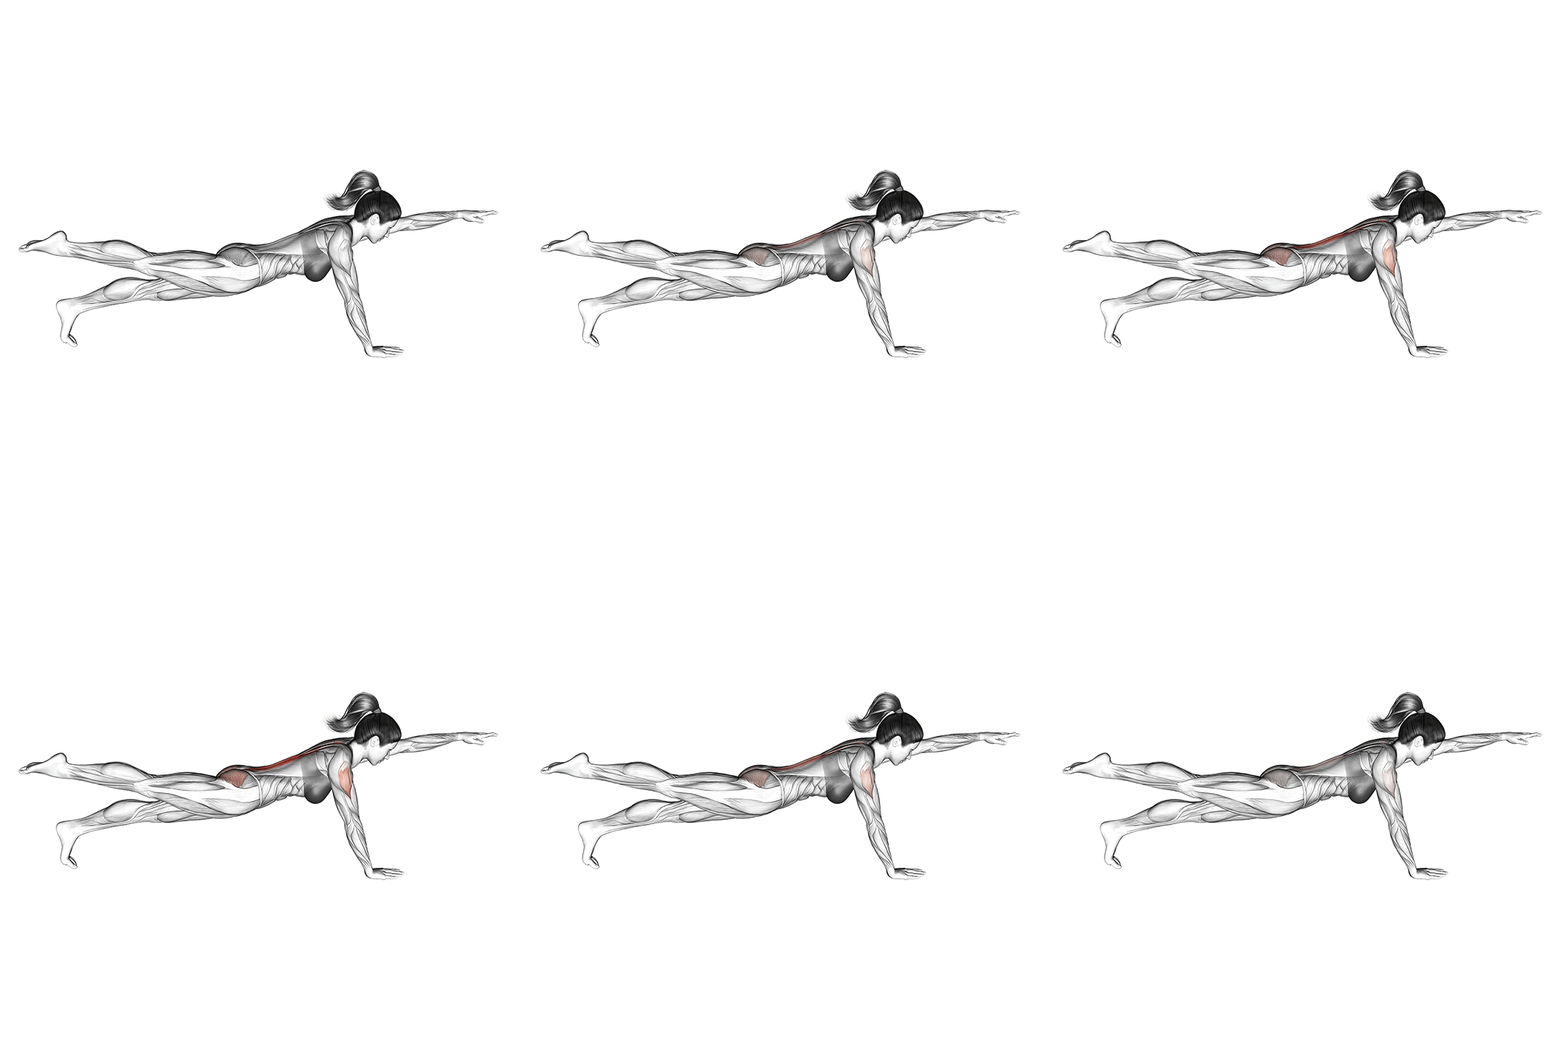
- Start on your hands and knees with a flat back.
- Extend your right arm forward and left leg back simultaneously, reaching long rather than reaching high.
- Hold for five to ten seconds while keeping your core tight and your hips level.
- Return to the starting position and repeat on the other side.
- Do 5 to 8 repetitions per side.
What you should feel is significant abdominal and glute engagement to prevent your back from sagging. What you should not feel is lower back pain or a shifting in your hip position as the leg rises. If balance is the limiting factor, start by extending just the leg or just the arm before combining them.
Isometric hip abduction
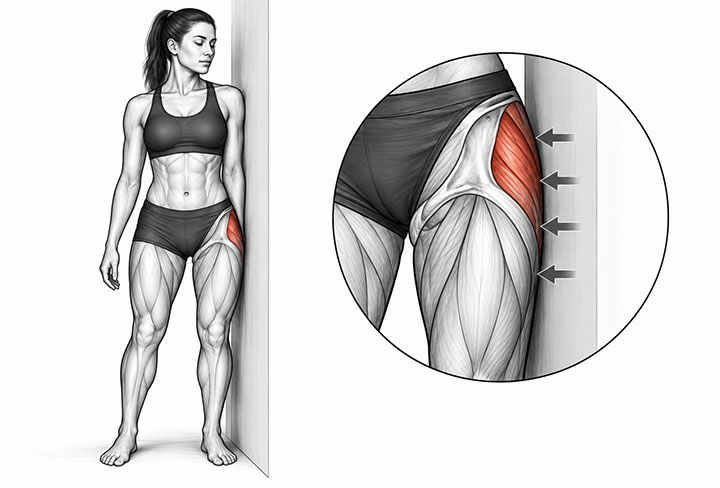
- Stand with your side against a wall.
- Press the outer aspect of your leg firmly into the wall, without actually moving.
- Hold the contraction for 10 to 15 seconds while keeping your body straight.
- Relax and repeat 5 to 8 times, then turn around and work the other side.
Isometric exercises generate muscle activation without joint movement, which makes this a reliable option during flare-ups when dynamic loading is too painful. The hip abductors are among the most important stabilizers for walking. Even a few weeks of focused isometric work tends to translate into measurable gains in gait comfort.
Phase 3: Building functional strength and control
Phase 3 exercises mirror the demands of daily life and sport. The hip now needs to handle load in positions closer to the ones that were previously painful. Start only when Phase 2 exercises are comfortable, and pain stays consistently at or below a two.
Modified bodyweight squats
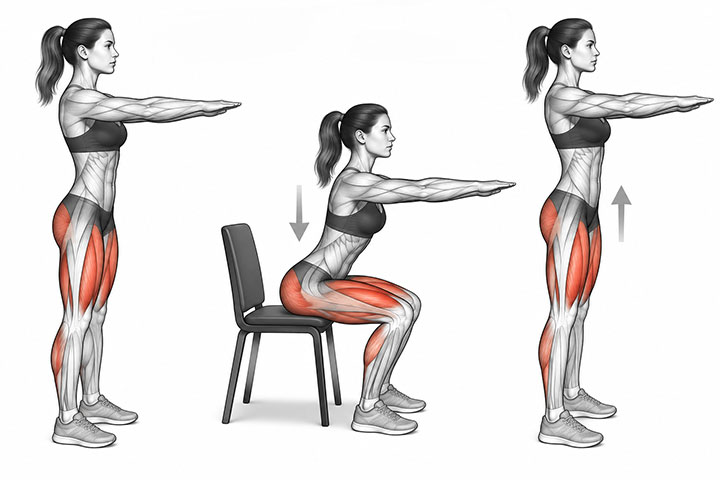
- Stand with feet slightly wider than shoulder-width, toes turned out 15 to 30 degrees.
- Sit back and down as if toward a chair, keeping your chest up and weight over your heels.
- Lower only as far as your pain-free range allows. Using a box to limit depth is a good starting point.
- Drive through your heels to stand, squeezing the glutes at the top.
- Do 8 to 12 repetitions.
Keep your knees tracking over your toes throughout and resist letting them collapse inward. The wider stance and slightly turned-out toe position open up the hip angle and reduce the impingement risk compared to a narrow-stance squat. Depth will increase gradually as the hip adapts. There’s no value in squatting deeper than your current pain-free range.
Static lunges
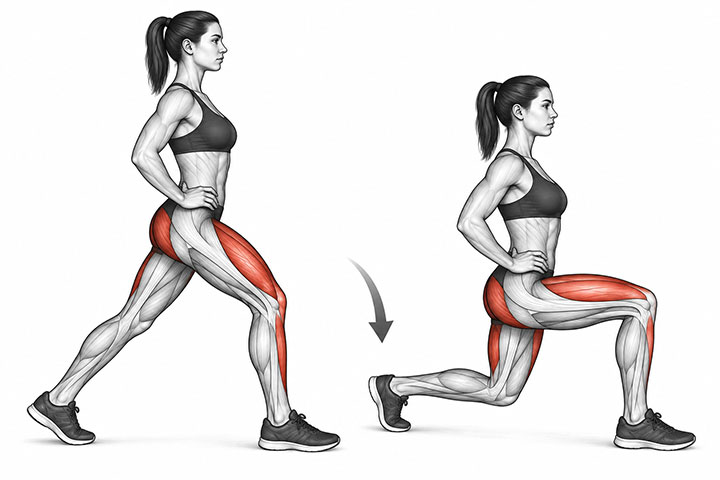
- Step one foot forward into a split stance with both feet roughly shoulder-width apart.
- Lower your back knee toward the floor without letting it touch down.
- Keep the front knee stacked over the ankle, not drifting past the toes.
- Push through the front heel to return to standing.
- Complete all repetitions on one side before switching. Start with 6 to 10 per side.
Lunges build the single-leg strength that FAI patients often lack on the affected side, since pain tends to produce subtle compensations in daily movement that create asymmetry over months. Keep your torso upright throughout. If the front-hip position creates impingement symptoms, try a shorter stride length rather than abandoning the exercise.
Step-ups
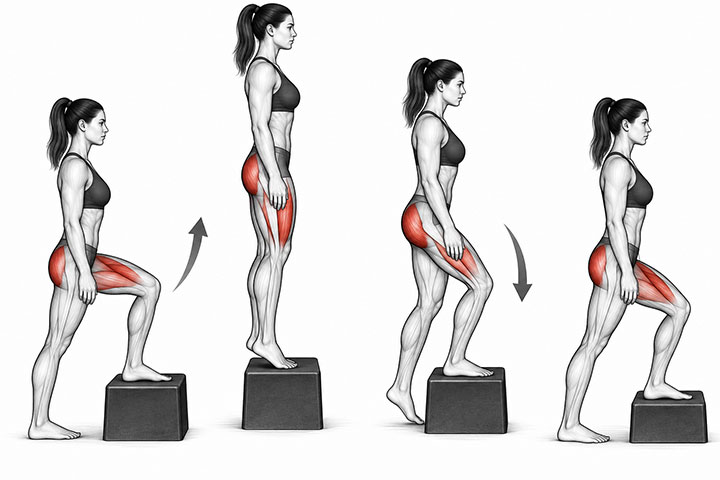
- Use a low step or sturdy box to start, increasing height as strength improves.
- Place one foot fully on the step and drive through that heel to stand up, bringing the other foot to meet it.
- Step back down with control, lowering the trailing leg first.
- The stepping leg does the work. Resist the urge to push off the floor leg.
- Do 6 to 10 repetitions per leg.
The controlled descent is where much of the benefit lives. Lowering slowly under load is one of the most effective ways to train eccentric glute strength, and it closely approximates the demands of descending stairs, one of the activities most commonly reported as difficult by people with FAI.
Single-leg Romanian deadlifts (modified)
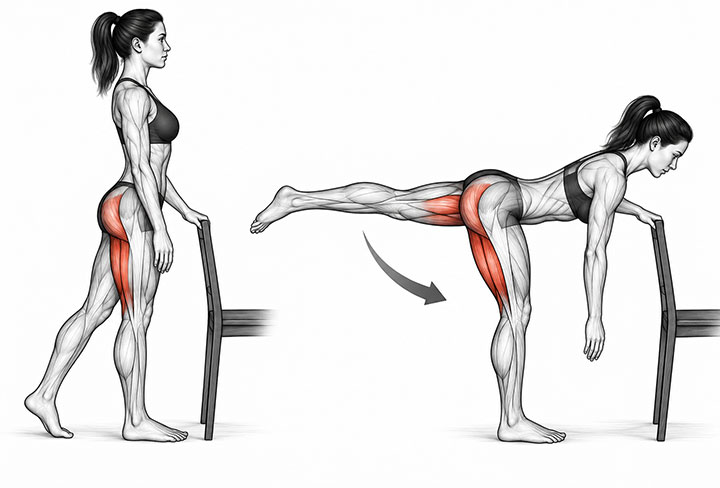
- Stand on one leg with a light hold on a wall or chair for balance if needed.
- Hinge forward at the hips, letting the free leg drift back as a counterbalance.
- Keep your back flat throughout. The movement comes from the hips, not the lower back.
- Lower until you feel a stretch in the hamstring of the standing leg, then squeeze the glute to return to standing.
- Start with 5 to 8 repetitions per leg.
The single-leg RDL is one of the most functional Phase 3 exercises for FAI because it trains the hip in a loaded hinge pattern without the impingement-provoking deep flexion of a squat. It also directly challenges balance and proprioception, two areas that tend to be subtly impaired on the affected side after months of pain-avoidance movement patterns.
Plank variations
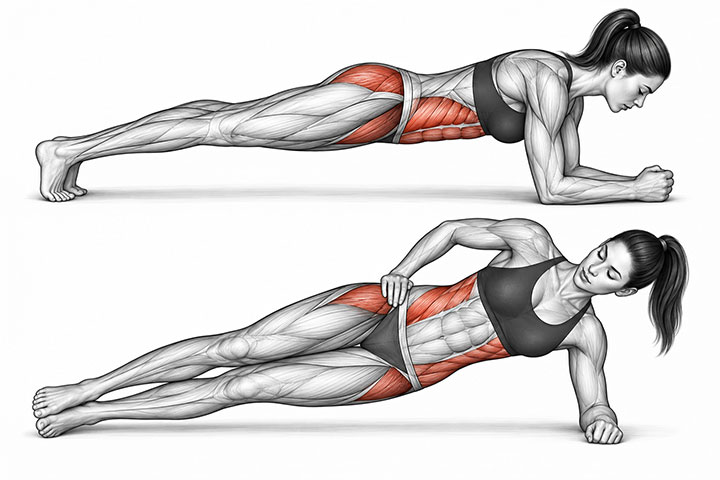
- Front plank: Hold a forearm plank position with your body forming a straight line from head to heels. Start with 15 to 30 seconds and build toward 60.
- Side plank: Lie on your side and push up onto your forearm, creating a straight line from head to feet. Start with 15 to 30 seconds per side.
- Breathe normally throughout. Avoid letting the hips sag toward the floor.
A strong core protects the hip during every other exercise in this program and in daily life. The side plank in particular loads the same gluteus medius that clamshells target, but now in a weight-bearing context that’s closer to actual functional demands.
Exercises and activities to avoid
Knowing what aggravates FAI is as practical as knowing what helps it. The activities below force the hip into the exact positions where impingement occurs.
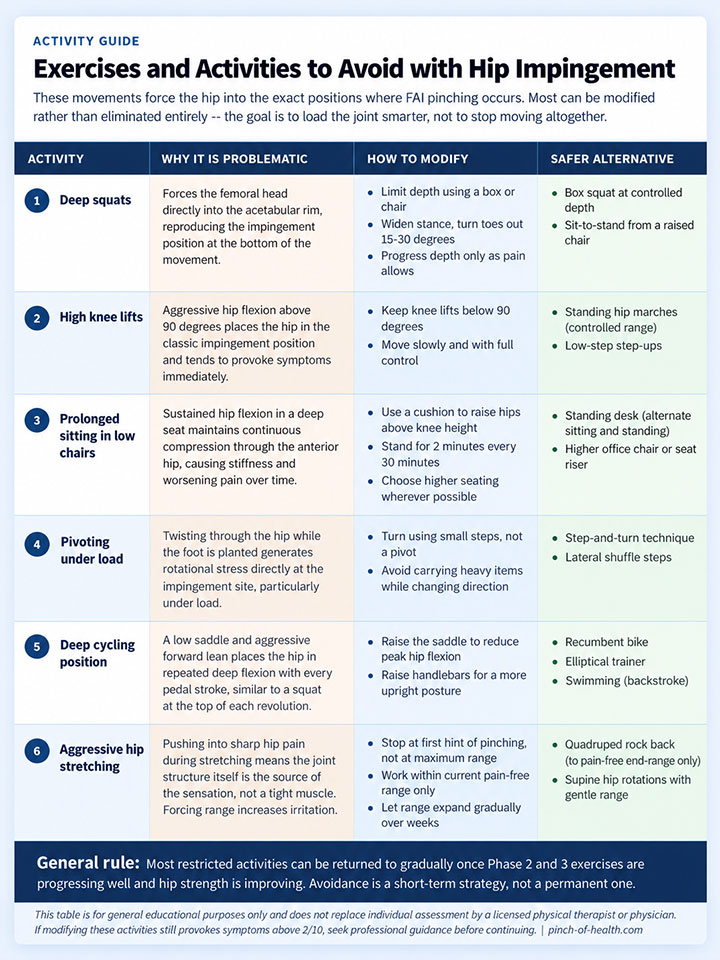
Deep squats
Squatting past the pain-free range forces the femoral head directly into the acetabular rim. Use a box or chair to limit depth, try a wider stance with turned-out toes, and progress depth only as the hip allows it, not as your ego allows it.
High knee lifts
Aggressive hip flexion above 90 degrees reproduces the impingement position and tends to provoke symptoms immediately. Replace with standing hip marches at a controlled pace and a more modest range.
Prolonged sitting in low chairs
Sustained hip flexion in a deep seat places continuous compression through the anterior hip. At a desk, use a cushion to bring the hips slightly above knee height. Take a two-to-three-minute standing break every 30 minutes. If you’re choosing between seat heights, the taller option is nearly always the better one.
Pivoting under load
Twisting through the hip while carrying weight, or while the foot is planted on the floor, generates rotational stress directly at the impingement site. Instead, turn by taking small steps rather than pivoting on one foot.
Aggressive hip flexor stretching
Pushing through sharp pain during any stretch is counterproductive in FAI because the pinching sensation is the joint structure itself complaining, not a muscle being reluctant. Stop before the pinch, work within that range, and let the range expand over weeks as the hip settles.
Managing hip impingement at work
Desk setup
Adjust your chair height so your hips sit at or slightly above knee level. This reduces the degree of hip flexion you’re sustaining for hours at a time. Monitor height should place the top of the screen at eye level. A footrest helps if your feet can’t reach the floor after raising the seat.
Break strategies that actually help
Every 30 minutes: stand, walk for two to three minutes, and do five to ten pelvic tilts standing or seated. Every hour: perform five standing hip marches (from Phase 2) and a standing hip flexor stretch against the nearest wall or door frame.
Standing desks are worth considering. They reduce the sustained hip flexion that makes FAI symptoms worse over the course of a workday. Alternate between sitting and standing rather than standing for the full day, and use an anti-fatigue mat. Standing for hours without movement is not significantly better than sitting for hours without movement.
Returning to sport
Running
Start with walk-jog intervals in week one to two: one minute of easy jogging, two minutes of walking, repeated for 20 minutes. Increase the jog intervals gradually over weeks three and four. Continuous running, if pain-free, can typically begin around week five. Land with your feet under your center of gravity rather than overstriding, which reduces hip flexion angle at initial contact and lessens impingement stress.
Cycling
Raise the seat higher than you normally would, which reduces the degree of hip flexion at the top of the pedal stroke. Move the seat forward slightly to further open the hip angle. Raising the handlebars creates a more upright torso position that also helps. Start with recumbent cycling or an elliptical machine if even these modifications produce symptoms.
Swimming
Backstroke involves the least hip flexion and is generally the most comfortable starting point. Modified freestyle with full body rotation is usually tolerable before breaststroke, which requires significant hip abduction and external rotation. Avoid aggressive flip turns early in the return process.
Team sports
Return in a sequence: straight-line jogging first, then lateral movement at reduced speed, then cutting and pivoting drills at increasing intensity, then contact situations last. Jumping and landing should be cleared by a clinician or physiotherapist before reintroduction, since the impact loads can be significant and land in a hip-flexed position.
Supporting your recovery
Anti-inflammatory eating
Diet won’t fix a structural hip problem, but it can reduce the inflammatory burden on a joint that’s already under mechanical stress. Fatty fish (salmon, mackerel, sardines), leafy greens, and berries appear most consistently in research on reducing systemic inflammation. Turmeric and ginger appear in the literature as well, though in amounts that typically require supplementation rather than culinary use to reach research doses.
On the other side, ultra-processed foods, foods high in refined carbohydrates, and excess alcohol all appear to contribute to inflammatory load. This is about tilting the balance, not achieving perfection.
Sleep and recovery
Soft tissue repair occurs primarily during sleep, and inadequate sleep increases pain sensitivity through well-established neuroimmune mechanisms. Side sleeping with a pillow between your knees keeps the hip in a more neutral position and reduces overnight discomfort for most people with FAI. Avoid sleeping directly on the affected side in the early phases.
Weight management
Biomechanical modeling consistently puts the load through the hip joint at roughly two to three times body weight during walking, a product of the joint’s lever mechanics. For people with FAI who are carrying excess weight, even modest reductions can produce meaningful decreases in symptom severity. Focus on nutritional changes over intensive exercise in the early phases, since high-impact activity before the hip is ready tends to produce setbacks rather than weight loss.
When exercise isn’t working
Lack of progress after four to six weeks of consistent effort usually has an identifiable cause. Poor exercise form is the most common. Progressing too quickly through the phases is the second. Continuing aggravating activities, including long periods in low chairs, deep squats in daily life, or high-impact sport before the hip is ready, frequently undermines the program’s effects entirely.
Medical factors can also stall progress. Concurrent labral tears, significant cartilage damage, or structural abnormalities that are too extensive for conservative management all require professional assessment. If you’ve completed eight weeks of Phase 1 and 2 exercises consistently, your pain is worsening rather than improving, or new symptoms are developing, that’s the signal to see a clinician before continuing.
Aquatic therapy, modified Pilates, and resistance band exercises in sitting positions are worth exploring if land-based exercises continue to provoke symptoms. The water reduces joint load while allowing strengthening to continue.
What to expect at each stage
Week one and two: Some reduction in resting pain is typical, along with improved tolerance for sitting. Progress feels slow in this phase because the hip is still reactive. That’s normal.
Month one to three: The functional markers tend to improve in a recognizable order. Getting in and out of a car becomes less effortful first. Morning stiffness shortens. Shoe-tying without significant discomfort usually follows. Exercise capacity increases week by week.
Month three and beyond: For people who remain in conservative management, this is the window where most durable gains occur. The research suggests that outcomes at the six-month mark, for those who have been consistent, are meaningfully better than at three months, which makes declaring progress complete too early a genuine risk. Keep the work going.
Long-term management
FAI doesn’t resolve in the way an acute injury resolves. The bone morphology remains. What changes is how well your body manages it. The people who maintain the best long-term function are typically those who kept some version of the Phase 2 and 3 exercises in their routine permanently, not as rehabilitation but as maintenance.
Periodic check-ins with a physiotherapist every three to six months help catch any drift in exercise form or any early warning signs before they become setbacks. Most people with well-managed FAI return to the activities they care about. Some modifications turn out to be permanent rather than temporary. That’s worth knowing early, rather than discovering after years of treating caution as a short-term phase.
Conclusion
The strange thing about hip impingement is that the bone that’s causing the problem is, in a sense, not the problem you solve. What you solve is the system around it. The muscles get stronger, the movement patterns get smarter, and the joint works better within a structure that hasn’t changed at all. That’s what the research describes when it says most people improve with conservative care. Not that the impingement goes away. That the body learns to work around it well enough that it stops running the show.
Whether that’s enough depends entirely on consistent, progressive effort with the right exercises. The phases above give you the sequence. What you do with it determines the rest.
Frequently asked questions
How long does it take for exercises to help hip impingement?
Most people notice some reduction in resting pain within two to four weeks of consistent exercise, though this varies considerably by baseline severity. Significant functional improvement, such as easier daily activities and reduced exercise pain, typically takes six to twelve weeks. Consistency matters more than any individual exercise choice.
Does walking aggravate hip impingement?
Walking is usually fine, and it’s one of the few activities most people don’t need to modify at all during Phase 1 and 2. The hip stays in a manageable flexion range at an easy pace. The exceptions are predictable: fast walking, inclines, and uneven terrain all require more hip flexion and rotation than level strolling. If a walk is leaving you worse than when you started, pace is the first variable to adjust, not distance.
Can I still run or play sports with hip impingement?
Many people return to sport with proper management. The sport-specific return guidelines above outline the sequence. Low-impact activities like swimming and cycling typically come back earliest, followed by running, followed by cutting and pivoting sports last. The return timeline depends on how consistently Phase 2 and 3 exercises are progressing and on how well symptoms respond to activity modification.
Will exercises fix the bone spurs?
No. The bone morphology stays. What changes is how well the surrounding muscles manage it, and for most people that turns out to be enough.
What age is most commonly affected by hip impingement?
FAI is most common between the ages of 20 and 40, though it can present outside this range. The condition is particularly prevalent in physically active individuals, with symptomatic rates in athletes reported at over 50 percent in some studies, compared to 10 to 15 percent in the general adult population.
Should I use heat or ice?
Ice is generally more useful for acute pain or after activities that flare symptoms, since it reduces local inflammation and can dull pain signals. Heat is helpful before exercise to warm the surrounding musculature. Many people find a straightforward approach works well: five to ten minutes of heat before a session, ice for 10 to 15 minutes afterward if the hip feels reactive.
What’s the difference between stretching and strengthening for FAI?
Stretching addresses muscle tightness that alters hip mechanics and increases impingement risk. Strengthening builds the muscular support that reduces how much load falls directly on the joint. Both are necessary, and neither works well without the other. The research on FAI outcomes consistently favors programs that combine active strengthening, particularly of the glutes and core, with mobility work.