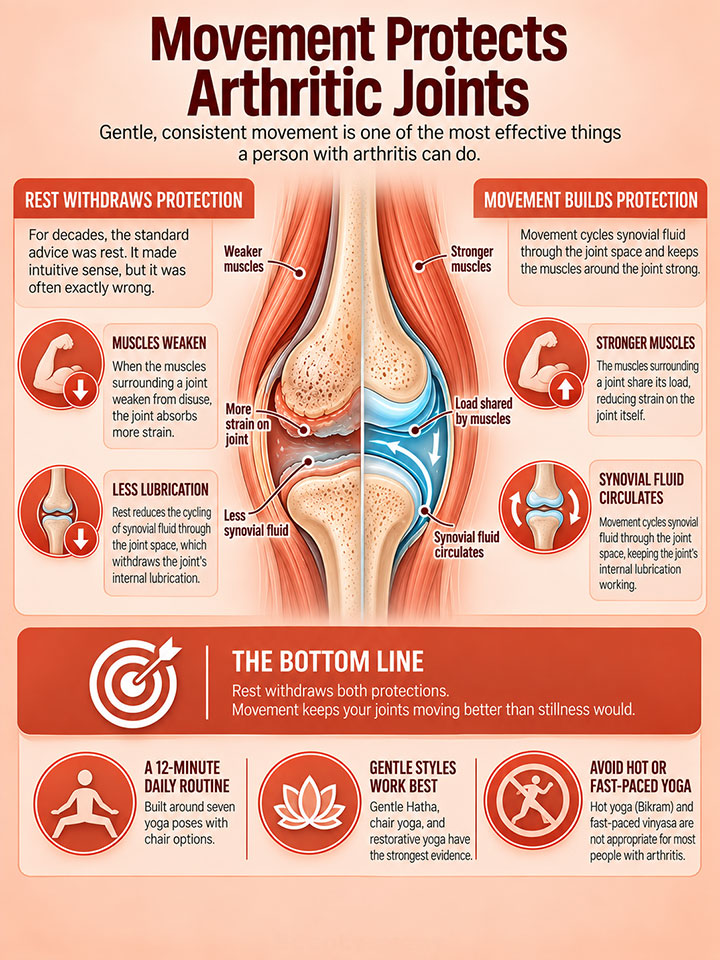
For decades, the standard advice for arthritic joints was rest. Stop moving them. Protect them from load. It made intuitive sense, and it was also, researchers now know, often exactly wrong.
Gentle, consistent movement is now understood to be one of the most effective things a person with arthritis can do. The muscles surrounding a joint share its load. When those muscles weaken from disuse, the joint absorbs more strain. Movement also cycles synovial fluid through the joint space, which keeps the joint’s internal lubrication working. Rest withdraws both of those protections.
This is a 12-minute daily routine built around seven yoga poses. No floor-splitting flexibility, no cross-legged sitting, no pretzel shapes. Most poses have a chair version for days when the floor is not an option. The goal is a daily conversation with your joints that keeps them moving better than stillness would.
Your 12-Minute Routine at a Glance
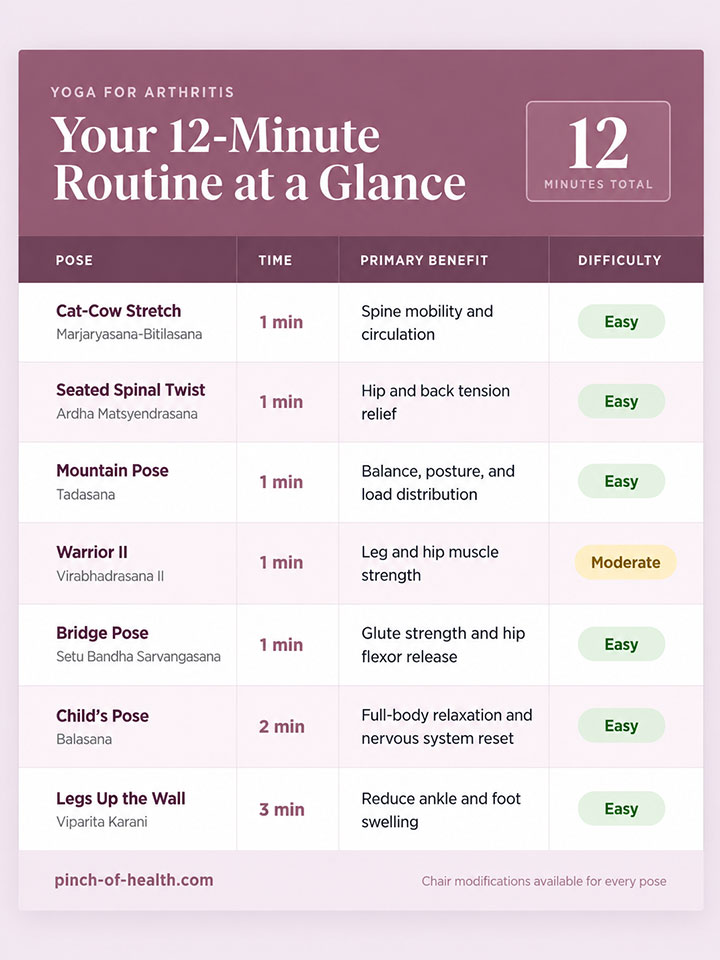
Glance at this before each session until the sequence becomes automatic. The total is 10 minutes of active movement, two minutes of rest, and a final three minutes of a position most people fall asleep in.
Which Type of Arthritis Do You Have?
Knowing your type clarifies why these specific poses work for your situation. All three respond to gentle yoga, but for different reasons.

The rheumatoid arthritis row carries an important qualifier that is worth holding onto as you read the research section below. Yoga changes what surrounds the damage but does not address the autoimmune process driving it.
What the Research Actually Shows
Yoga’s benefits for arthritis are not primarily about flexibility. The more meaningful mechanism is load redistribution: when the muscles around a joint become stronger, they absorb forces that would otherwise transfer directly to bone and cartilage.
Movement also cycles synovial fluid through the joint space, which keeps the surfaces lubricated. The evidence points in a consistent direction, though the precision of effect sizes is still developing.
The clearest data comes from knee osteoarthritis. Researchers pooled eight randomized controlled trials involving 756 patients in a 2024 systematic review and meta-analysis published in PLOS ONE. Yoga produced significant improvements in pain, stiffness, and physical function compared to control groups.
The stiffness finding in particular held up well across pooled trials, which matters because stiffness data is often noisy. The same review could not demonstrate significant improvement in daily activities or quality-of-life scores. Neither improved. That gap is worth knowing before you set your expectations.
The picture for rheumatoid arthritis is more specific. A 2020 meta-analysis in Frontiers in Medicine reviewed ten randomized trials with 840 RA patients. Physical function and disease activity scores both improved, as did grip strength, which RA systematically erodes.
Pain, joint swelling, and inflammatory blood markers did not change significantly. Not one of the included trials reported an adverse event. This is what yoga does in RA: it addresses the functional consequences of joint damage without affecting the underlying inflammatory process.
Anyone managing RA should understand yoga as a complement to their medical treatment, not a substitute for it.
On safety overall, the record is about as clean as clinical trials for arthritis get. When Johns Hopkins researcher Dr. Steffany Moonaz ran an 8-week randomized controlled trial in 75 sedentary adults with arthritis, published in the Journal of Rheumatology, the study reported no adverse events and found that yoga was safe and feasible even for participants who had been almost entirely sedentary before enrolling.
One honest limitation to name: a 2019 systematic review in Current Rheumatology Reports rated the quality of the available evidence as very low, citing small trial sizes and inconsistent methodology.
That assessment does not mean yoga does not work. It means the field has not yet run the large, rigorously designed trials that would make confidence in exact effect sizes warranted. The evidence points clearly in one direction, though exact effect sizes remain uncertain.
Across the studies reviewed here, participants reported a shift around weeks six to eight. Pain eased. Morning stiffness decreased. Daily tasks became more manageable.
What researchers cannot yet fully explain is which component does the most work: whether the gains come from the movement itself, the breathing, or the daily act of paying deliberate attention to the body. The three tend to arrive together. For now, the instruction is just: do it consistently.
When NOT to practice:
- During an active flare-up with significant swelling and heat in the joint. Rest is the right call. Return to the routine once the acute phase passes.
- When a pose produces sharp, stabbing, or shooting pain. That is a stop signal, not something to push through.
- If you feel dizzy or short of breath at any point during the session.
Consult your doctor before starting if you have:
- Had recent joint surgery or replacement (typically need 3 to 6 months clearance)
- Severe osteoporosis
- Acute joint inflammation with significant swelling
- Uncontrolled high blood pressure
- Recent fractures or significant balance problems
Pain vs. Discomfort: The Difference That Matters
Getting this distinction wrong in one direction means leaving benefit on the table. Getting it wrong in the other direction means injury. Learn to tell them apart.
A good stretch feels like:
- Mild pulling in the muscle (not inside the joint)
- Something that eases as you breathe and hold the position
- An opening sensation you can breathe through comfortably
Stop immediately if you feel:
- Sharp, stabbing, or shooting pain
- Pain that makes you hold your breath
- Burning inside the joint itself
- Pain that increases the longer you hold the position
Contact your doctor if, after practice, you notice:
- Pain that continues more than two hours after finishing
- Increased swelling in any joint
- A joint that is hot to the touch
- New popping or grinding accompanied by pain
What You’ll Need
Most of it is already in your home.
Required:
- A sturdy chair with no arms (a dining or kitchen chair works well)
- Comfortable clothing that allows movement
- A clear floor space roughly six feet by three feet
Helpful but optional:
- Yoga mat or thick folded towel for floor cushioning
- Two or three pillows or cushions for support
- Wall space for the final pose
- A yoga block or thick hardback book as a hand support
If any of this is missing, work around it. A folded blanket cushions a floor pose as effectively as a mat. A belt or scarf helps with stretches when reach is limited. The entire routine can be done in a chair on a carpeted floor.
Your 7-Pose, 12-Minute Routine
1. Cat-Cow Stretch (Marjaryasana-Bitilasana)
Time: 1 minute (8 to 10 repetitions)
Cat-Cow warms the spine from base to neck, moving through every joint between the vertebrae. The rhythmic movement increases circulation in areas that stiffen during the night. It is where every session in this routine begins because it is the body’s way of remembering it can move.
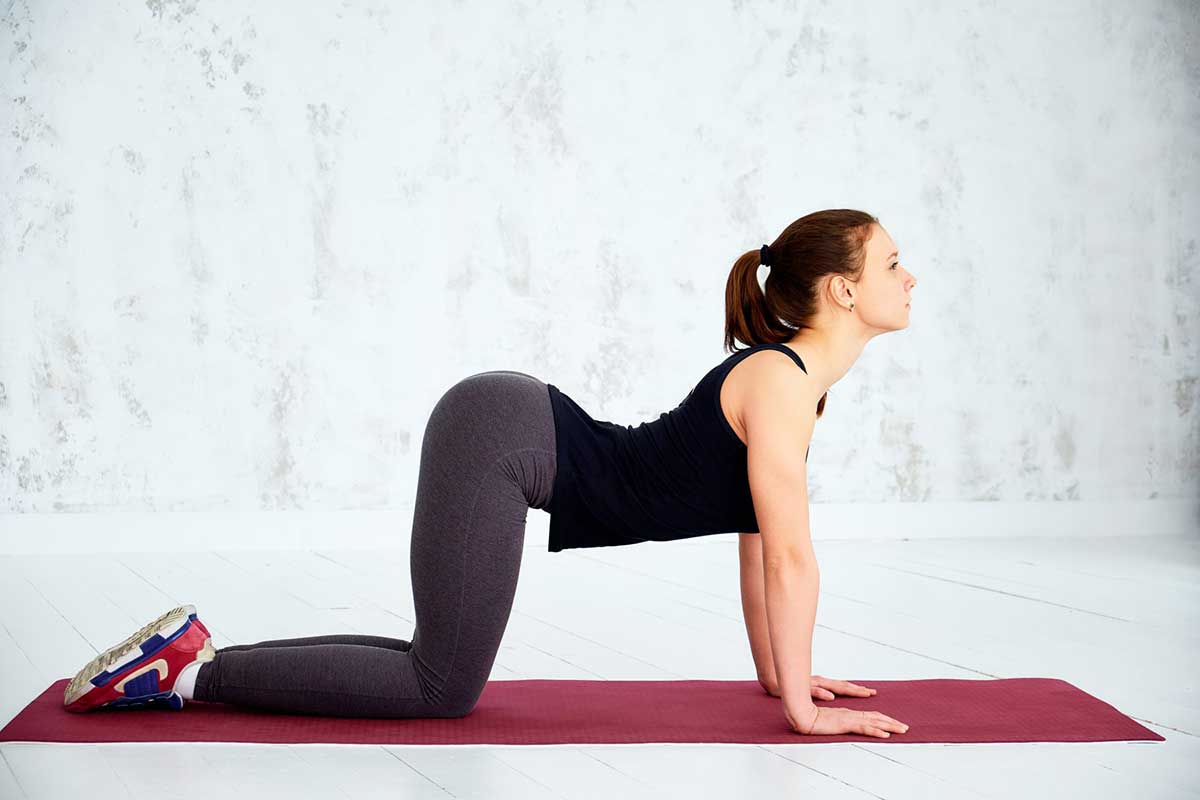
- Start on hands and knees, or sit in a sturdy chair with both feet flat on the floor.
- Breathe in for 4 counts while arching your back and lifting your chest and tailbone toward the ceiling (Cow).
- Breathe out for 4 counts while rounding your spine and tucking your chin toward your chest (Cat).
- Move slowly, letting the breath lead each transition. Do not rush. Continue for 1 minute.
If your wrists are tender, the chair version removes all pressure from them. Hands on knees, arch and round from your spine. The same movement, no floor required.
2. Seated Spinal Twist (Ardha Matsyendrasana)
Time: 1 minute (30 seconds each side)
The most common mistake in a spinal twist is leading with the neck. You turn your head, your shoulders follow, and the vertebrae that actually need the mobility work do not move. The correct sequence works in the opposite direction: lower belly first, then chest, then head. Done in that order, the twist reaches the spinal joints rather than just rotating the neck.
Spinal twists also release tension in the hip flexors that accumulates from extended sitting, and create a gentle massaging effect on the digestive organs.
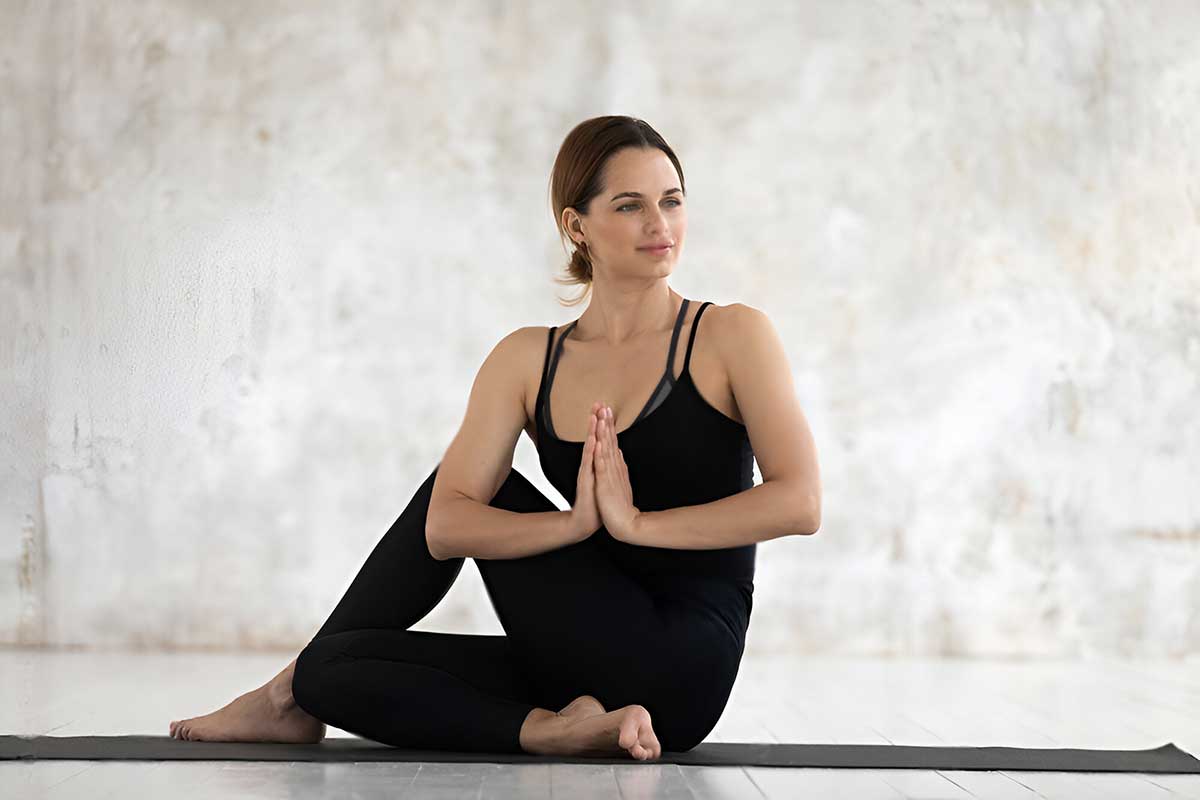
- Sit in a chair with feet flat on the floor, hip-width apart.
- Place your right hand on the back of the chair and your left hand on your right knee.
- Breathe in to sit tall and lengthen the spine.
- Breathe out and rotate to the right: belly first, then chest, then head.
- Hold for 30 seconds with steady breathing, then switch sides.
Keep both sit bones on the chair. If rotating your head causes neck discomfort, keep your gaze forward and twist only from the spine. A small rotation still delivers the benefit.
3. Mountain Pose (Tadasana)
Time: 1 minute
Mountain Pose is standing tall, done with attention. When weight distributes evenly through both feet and the spine sits in neutral alignment, no single joint takes a disproportionate share of the load. For people who have been compensating for pain by shifting weight to one side for months or years, one deliberate minute of symmetry starts to retrain the pattern.
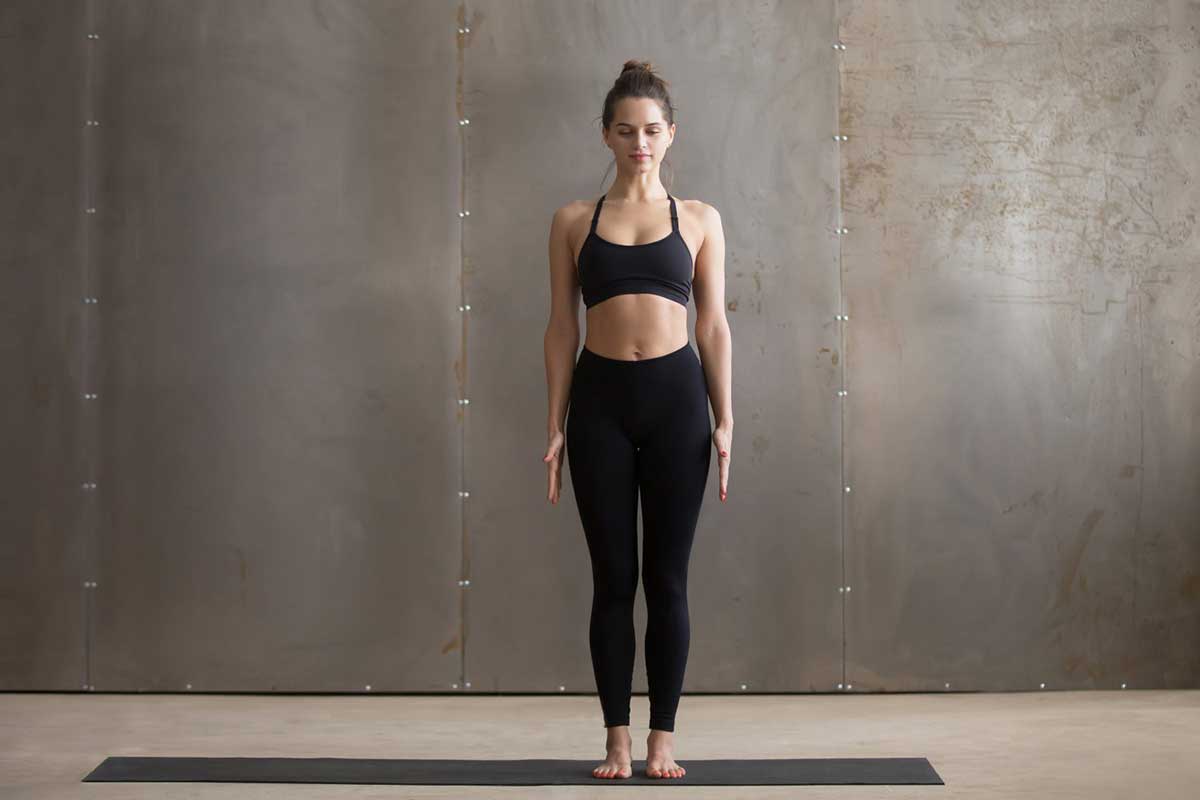
- Stand with feet hip-width apart, toes pointing forward.
- Press both feet evenly into the floor. Keep a slight softness in the knees. Do not lock them.
- Roll shoulders back and down so arms hang naturally at your sides.
- Lift through the crown of your head, lengthening the spine.
- Breathe deeply for 1 minute: inhale for 4 counts, exhale for 4 counts.
If balance is uncertain, stand behind the chair with your hands resting lightly on the back. You can also practice this seated, focusing entirely on spinal alignment and even distribution through your sit bones.
4. Warrior II (Virabhadrasana II)
Time: 1 minute (30 seconds each side)
This is the pose that surprises most people. A warrior pose in an arthritis routine seems wrong. The name implies demand, effort, exertion. Those qualities are exactly the point.
Arthritic joints are vulnerable partly because the muscles around them have weakened. In the knee, the quadriceps and glutes are responsible for keeping the femur and tibia tracking properly. When those muscles weaken, more of the mechanical load transfers to the joint itself, and damage accelerates. Warrior II, held at a modest depth with support available, builds precisely those muscles. Passive stretching cannot produce this effect. Only load-bearing movement does, and Warrior II is the closest thing in a gentle yoga routine to genuine load.
This pose is also the one most likely to reveal where the real weakness is. If 30 seconds in Warrior II is genuinely difficult, that is useful information about which muscles need the most work.
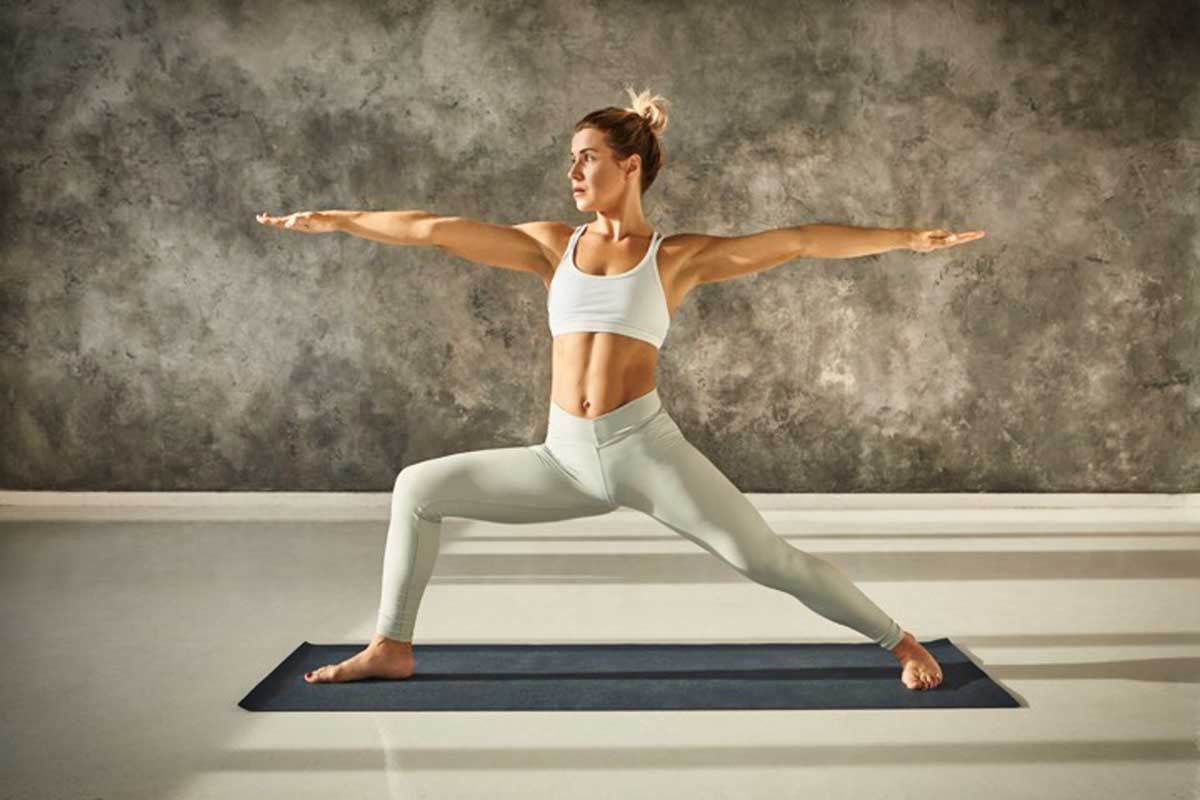
- Stand beside a chair with your hand available for balance if needed.
- Step your left foot back roughly 3 feet, turning it out at a 45-degree angle.
- Bend your right knee over your right ankle, keeping your left leg straight.
- Extend your arms out to the sides at shoulder height, or keep your hands on the chair.
- Hold for 30 seconds with steady breathing. Switch sides.
Watch the front knee: it tracks over the second toe, not inward. If your knee hurts, shorten your stance and bend less. A shorter, higher stance still builds the target muscles. Take what your joints offer today.
5. Bridge Pose (Setu Bandha Sarvangasana)
Time: 1 minute (2 to 3 repetitions of 15 to 20 seconds each)
Bridge Pose builds the glutes and lower back muscles that support the spine and hip joints. It also stretches the hip flexors, which shorten after long periods of sitting. When the hip flexors are tight, they tilt the pelvis forward and increase load on the lumbar spine. This one pose addresses both problems in the same movement.
The tell-tale sign you are doing it incorrectly: the effort is in your lower back rather than your glutes. If that happens, lower your hips a few inches. The lower position still builds the target muscles without putting strain on the spine.
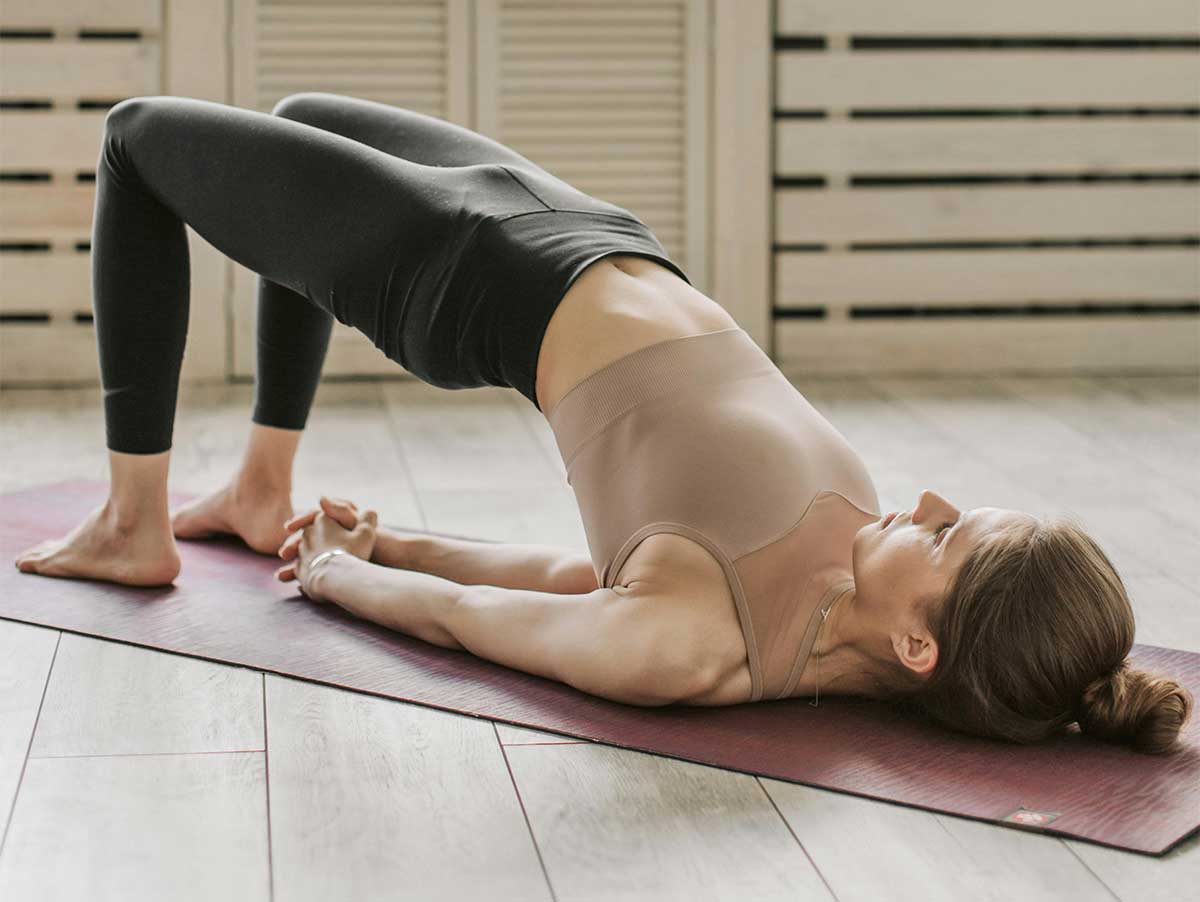
- Lie on your back with knees bent, feet flat on the floor hip-width apart, arms at your sides with palms down.
- Press both feet into the floor and lift your hips toward the ceiling.
- Squeeze your glutes. Keep your thighs parallel. Do not let the knees splay outward.
- Hold for 15 to 20 seconds while breathing normally.
- Lower slowly and rest for a few breaths. Repeat 2 to 3 times.
If getting to the floor is difficult, place a pillow or yoga block under your lower back and let the pose become restorative rather than active. You still get the hip flexor opening. You just are not actively lifting.
6. Child’s Pose (Balasana)
Time: 2 minutes
There is not much technique required here. Child’s Pose is a rest. It releases the lower back, hips, and shoulders, and gives the nervous system permission to down-regulate after the more demanding poses that came before. People with arthritis often carry chronically elevated baseline tension. Time spent in this position has its own value, separate from any stretch.
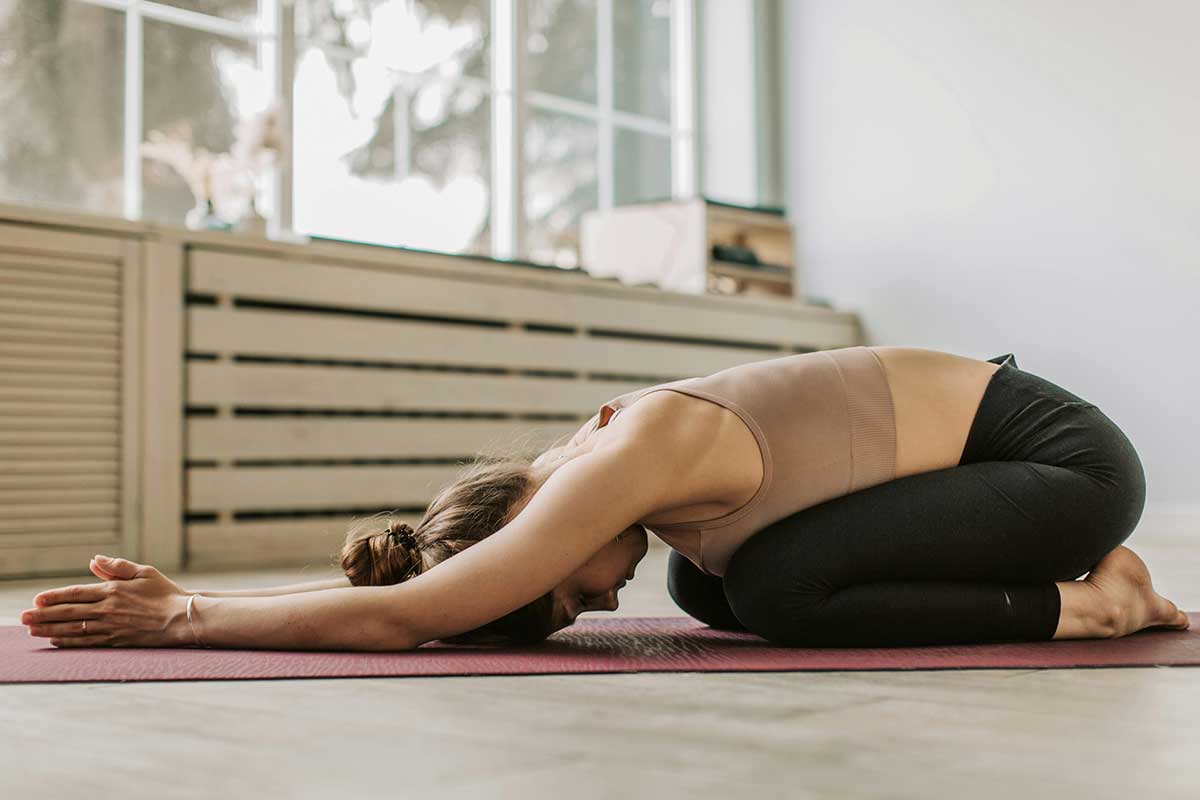
- Start on hands and knees.
- Sit your hips back toward your heels and stretch your arms forward on the floor.
- Rest your forehead on the floor or on a pillow.
- Close your eyes. Breathe slowly: in for 4 counts, out for 6 counts.
- Stay for 2 minutes without rushing toward the next pose.
If the position compresses your knees, widen them or place a pillow between your thighs and calves. If the floor is not accessible, a seated forward fold from a chair (chest dropping toward thighs, arms hanging loose) produces a comparable release.
7. Legs Up the Wall (Viparita Karani)
Time: 2 to 3 minutes
Legs Up the Wall is the most unconventional pose in this routine and, for many people with arthritis, the most immediately noticeable. When the legs are elevated above the heart, gravity pulls blood and interstitial fluid back toward the core and away from the feet and ankles, where arthritis-related swelling tends to accumulate throughout the day. The position also activates the parasympathetic nervous system, which lowers the body’s overall inflammatory signaling.
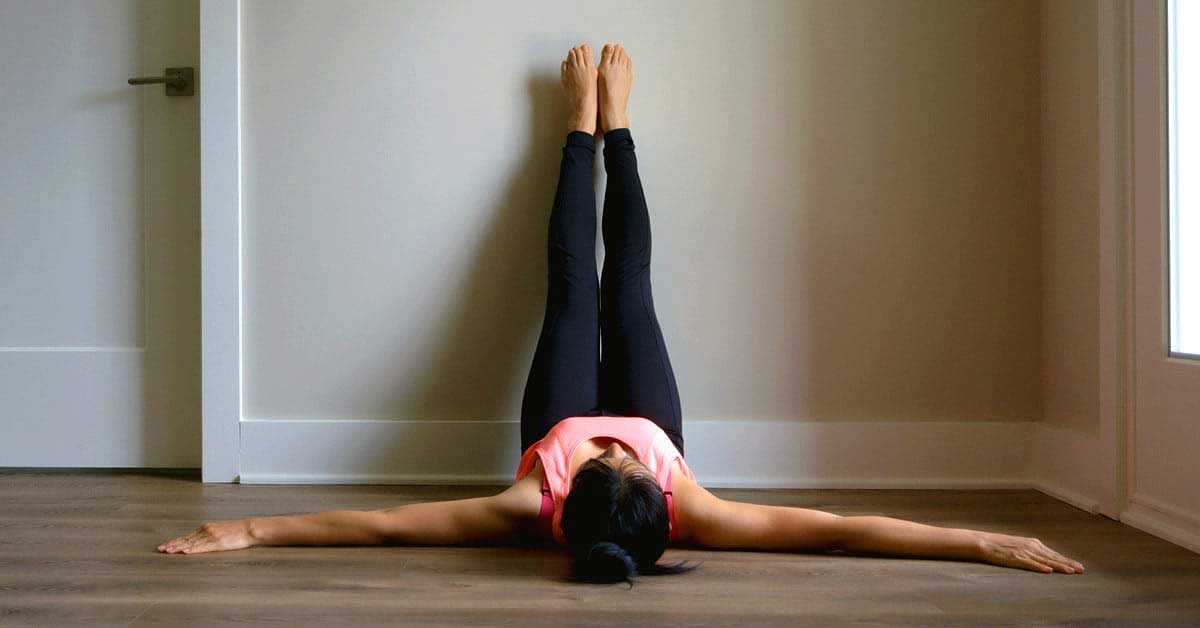
- Sit sideways next to a wall with your hip touching it.
- Swing your legs up the wall as you lie back on the floor.
- Scoot your hips toward the wall. A few inches away from the baseboard is fine.
- Rest your arms at your sides, palms facing up.
- Close your eyes and breathe naturally for 2 to 3 minutes.
A slight bend in the knees is fine if your hamstrings are tight. If your feet begin to tingle, that is normal. Come out of the pose when the tingling starts. If getting to the floor is difficult, lying on a bed with legs up the wall, or sitting in a chair with feet propped on a second chair at hip height, produces a similar circulatory effect.
12-Minute Yoga Sequence Timer
Choose Your Level: Modifications by Severity
Arthritis varies considerably from person to person and from day to day. The modifications below match your practice to where you actually are on a given morning, not where you hope to be.
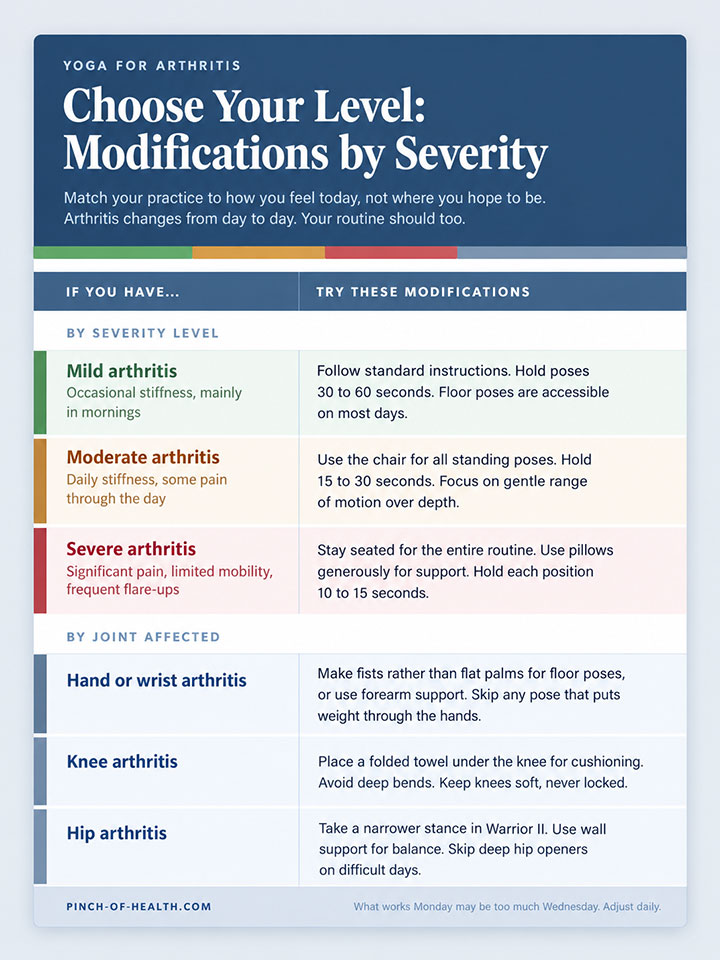
What works on Monday can be too much on Wednesday after a poor night. The modification column is a daily menu, not a fixed assignment.
Pain and Stiffness Daily Tracker
Your results will be saved in your browser for future sessions.
Pain & Stiffness Daily Tracker
Track your symptoms to see your progress over time
Your Progress Over Time (Last 14 Days)
Entry History
The Role of Breathing
Breathing during yoga is not incidental. Most people discover this by accident: they hold their breath through a difficult pose, the position gets harder, and when they finally exhale, the discomfort eases. That is the vagus nerve doing its job, shifting the body toward a parasympathetic state.
Several studies suggest this shift influences how the nervous system processes pain signals, though the evidence on whether it directly reduces inflammatory markers in arthritis is mixed. What is more consistently established is simpler: controlled breathing during poses makes movement feel more accessible than the same poses done while holding the breath.
Three Breathing Techniques
1. 4-7-8 Breath (for morning stiffness)
This pattern is particularly useful at the start of a session when joints are at their stiffest. Use it before you begin moving.
- Breathe in through your nose for 4 counts
- Hold for 7 counts
- Breathe out through your mouth for 8 counts
- Repeat 4 times
2. Belly Breathing (for rest poses)
Use this in Child’s Pose and Legs Up the Wall, where the goal is to let the body release rather than perform.
- Place one hand on your belly, one on your chest
- Breathe deeply so your belly rises first, while your chest stays relatively still
- Exhale slowly through pursed lips
- Continue for 2 to 3 minutes
3. Box Breathing (before you start)
A simple equal-count pattern that settles the mind before the routine begins.
- Breathe in for 4 counts
- Hold for 4 counts
- Breathe out for 4 counts
- Hold empty for 4 counts
- Repeat 5 to 10 times
Three Tips for Making This a Daily Habit
The research consistently shows that daily or near-daily practice produces the strongest results. The gap between knowing that and actually doing it is where most arthritis exercise programs fail. These three approaches close that gap.
Attach it to something you already do. The most reliable way to build a new habit is to anchor it to an existing one. Before your morning coffee. Right after brushing your teeth. During the ad breaks of a show you watch regularly. When the routine becomes a response to an existing cue rather than a standalone decision, it requires less willpower to execute.
The second tip is the one most people find hardest to follow: adapt rather than skip. On a difficult day, five minutes of chair versions is more valuable than nothing.
The participants who benefited most in every arthritis yoga study were not the ones who practiced perfectly but the ones who kept showing up on the hard days, even when showing up meant three minutes of Legs Up the Wall and calling it done.
Arthritis management does not follow a straight line. The question on difficult days is not whether to complete the full routine but whether there is anything gentle that makes sense.
Set up the space ahead of time. Chair in position. Mat or towel out. Pillows within reach. When setup costs 30 seconds rather than five minutes, the friction between waking up and beginning drops enough to change the outcome.
Four Habits That Support Your Practice
Stay hydrated. Articular cartilage is 65 to 80 percent water by weight. When the body is dehydrated, the cartilage’s ability to absorb shock and reduce friction decreases. Eight glasses of water daily is a reasonable baseline. A glass before practice and one after are an easy place to start.
Eat anti-inflammatory foods. Omega-3 fatty acids, polyphenols, and certain plant compounds directly influence how much inflammatory signaling circulates in joint tissue. The table below lists the specific foods with the strongest evidence and what each provides.

Warm up before practice. Cold, stiff joints move better once they have been pre-warmed. All of these work: a warm shower, a heating pad on the target joints for 10 minutes, or gentle arm circles and ankle rotations for five minutes. If mornings are when you practice, this step is particularly important.
Move regularly between sessions. The gaps between sessions matter as much as the sessions themselves, a principle that holds as true in arthritis management as in competitive athletic training. The 12-minute routine is the floor, not the ceiling. Sitting for extended periods stiffens joints by reducing synovial fluid circulation. A two-minute movement break every hour, even standing and stretching, maintains the joint environment the yoga practice works to improve.
Three Myths About Yoga and Arthritis
Myth: Yoga will make arthritis worse.
The clinical record does not support this. Across the studies reviewed above, adverse events in yoga groups were rare to nonexistent. The consistent finding is that appropriate yoga reduces arthritis symptoms. “Appropriate” is the key word: hot yoga, fast-paced vinyasa, and deep unsupported squats are not appropriate. The routine above is.
Myth: You need flexibility before you can start yoga.
Yoga is the process by which flexibility improves. You do not arrive at it already flexible. Every person in every arthritis yoga trial started exactly where they were. The modifications in this routine exist specifically for people working with limited range of motion. Stiffness is the condition yoga is designed for.
Myth: If it doesn’t hurt, it isn’t working.
This one is worth more time than the previous two myths. People who have lived with pain for years, often decades, have learned to read discomfort as the body objecting. That reading holds for most things but fails specifically for arthritic joints moving gently.
The clinical evidence here is unambiguous. The programs that produced the strongest functional improvements in the studies above were ones that participants could sustain without pain. Not despite working at low intensity.
Because of it. High-intensity effort in an already-damaged joint produces inflammation, not adaptation. The muscles surrounding the joint are not being asked to generate maximum force but to strengthen gradually, over weeks, until they can share the joint’s load reliably.
The mantra “no forcing, consistent practice” accurately describes how arthritic joints respond to load.
Stop and Call Your Doctor If:
Yoga is appropriate for most people with arthritis. The following signs indicate something that needs medical attention rather than a modified pose.
Conclusion
That is slow to internalize. It runs against what the pain is saying. The 12 minutes in this routine are daily practice at overriding an instinct, not merely an exercise dose. The people who benefit most, across every study reviewed here, are the ones who showed up consistently, not the ones who arrived already flexible.
FAQs
How soon will I feel results?
Most people notice reduced morning stiffness within 2 to 3 weeks of daily practice. Measurable pain improvements tend to appear closer to the 6 to 8 week mark, which is when progressive muscle strengthening around the joint starts to show up in how the joint functions day to day. Keeping a brief note on how your joints feel before and after each session makes these gradual changes easier to recognize.
Can I practice on days when my joints are swollen?
Not the full routine. During an active flare-up with significant swelling and heat in the joint, rest is appropriate. Gentle breathing exercises are accessible in that period, and Legs Up the Wall works well if lying down is possible. Return to the full routine once the acute phase passes.
Can I do yoga after joint replacement surgery?
Yes, but only after medical clearance. This is typically 3 to 6 months post-surgery, depending on the joint and procedure. Start with the chair version of every pose and progress slowly. Your surgeon or physical therapist will have specific guidelines. Follow them rather than any general timetable from an article.
What’s the best time of day to practice?
Morning works well for loosening joints that stiffened overnight, though it requires a longer warm-up period. Evening practice tends to support better sleep and releases the accumulated tension of the day. The honest answer is that consistency matters more than the time of day, so the better question is: which time are you most likely to actually do it?
Will yoga help with arthritis in my hands?
This routine targets the larger joints primarily. For the hands specifically, gentle exercises done alongside the routine can help. Making a slow fist and releasing, spreading all fingers wide and holding for a few seconds, and touching each fingertip to the thumb in sequence are all worth adding. Avoid gripping poses during flare-ups and skip floor-based hand positions when the hands are inflamed.
Can yoga replace my arthritis medication?
No. The research on rheumatoid arthritis in particular found that yoga improved physical function and disease activity without producing any measurable effect on inflammatory markers. The underlying inflammatory process needs medical management. Yoga addresses what surrounds it. Think of it as an addition to your treatment plan, not a substitution.
Do I need a yoga mat?
A mat provides cushioning and grip, and is helpful on hard floors. A thick folded towel on carpet works fine as an alternative, and several poses in this routine can be done entirely from a chair or a bed. A missing mat is not a reason to delay starting.
Medical Disclaimer: This article is for informational purposes only and is not a substitute for professional medical advice, diagnosis, or treatment. Always seek the advice of your physician or other qualified health provider with any questions you may have about a medical condition. Never disregard professional medical advice or delay seeking it because of something you have read in this article.